
- Wet Filament: Prevention, Symptoms & Drying - July 18, 2024
- Sovol SV08 – Best PrusaSlicer Settings & Profile - June 26, 2024
- Sovol SV08 – Best Orca Slicer Settings & Profile - June 26, 2024
Disclosure: Links marked with * are Affiliate Links. I earn from qualifying purchases if you decide to make a purchase through these links – at no additional cost for you!
In this article, you will find the most common 3D printing errors and their solutions. From problems with the first layer to difficulties printing fine details, this article serves as a comprehensive guide to improve your 3D printing experience.
TIP: Learn how to calibrate your 3D printer to get perfect results every time in my 3D printing course: FDM 3D Printing: The Comprehensive Course from A to Z
(The course teaches everything you need to know for FDM 3D printing in over 60 lessons. The course will get beginners up to my level in no time!)
Table of Contents:
- 1 FDM 3D Printing Errors
- 1.1 Poor Print Bed Adhesion
- 1.2 Nozzle too Close to the Print Bed
- 1.3 Warping and Deformation
- 1.4 Stringing and Oozing
- 1.5 Echoes of Certain Details on the Surface (Ringing and Ghosting)
- 1.6 Over-Extrusion
- 1.7 Under-Extrusion
- 1.8 Extrusion Stops During Printing
- 1.9 Layer Shift
- 1.10 First Layer too Wide (Elephant Foot)
- 1.11 Cracks
- 1.12 Spaghetti
- 1.13 Holes or Missing Parts of a Layer
- 1.14 Upper Layer has Holes or Bulges (Pillowing)
- 1.15 Infill Visible from the Outside
- 1.16 Supports are too Weak
- 1.17 Supports do not Stick to the Print Bed
- 1.18 Sagging Overhangs
- 1.19 Filament Used Up During Printing
- 1.20 Filament Broken During Printing
- 1.21 Filament Stripped (Extruder too Tight)
- 1.22 Blobs and Zits
- 1.23 Small Details are not Printed Well
- 1.24 Loud Noises (Print Head Moves too Far)
- 1.25 Object is Difficult to Remove from the Print Bed
- 1.26 Support Structures Cannot be Removed Smoothly
- 1.27 Nozzle is Clogged
- 1.28 Poor Dimensional Accuracy
- 1.29 Highly Visible Z-Seam
- 2 SLA 3D Printing Errors
FDM 3D Printing Errors
In 3D printing, FDM printers are known for their versatility and ease of use. Nevertheless, numerous errors can occur during printing that affect the final result.
These errors range from problems with adhesion to the print bed to complex difficulties such as layer shifts and overhangs.
In this chapter, we take a look at the most common errors in FDM 3D printing, examine their causes and offer practical solutions. The aim is to help you avoid these errors and improve the quality of your prints.
Poor Print Bed Adhesion
One of the most frustrating errors in FDM 3D printing is poor adhesion of the filament to the print bed. This problem often manifests itself in the printed object detaching from the print bed during the printing process or not adhering properly in the first place.
Poor adhesion can lead to distortion of the 3D model and often results in a completely unsuccessful 3D print. There are many reasons for this, ranging from an unclean print bed and incorrect settings to sub-optimal environmental conditions.
In this article and in this video I go into detail about this printing error, but here is the short version of the most important solutions:
- Clean the print bed: Always start with a clean print bed. Remove dust, grease residue and old filament residue. A scraper, lint-free cloths and cleaning agents such as isopropyl alcohol or acetone are suitable for this.
- Level the print bed: An even distance between the nozzle and the print bed is crucial. Use the paper method or, if available, automatic leveling systems.
- Z-Offset Adjustment: The distance between the nozzle and the print bed should be chosen so that the filament is lightly pressed onto the print bed. This improves adhesion without creating an elephant foot.
- Reduce print speed: A slower printing speed for the first layer allows the filament to remain liquid for longer and promotes adhesion. The liquid filament then has more time to penetrate the many small indentations in the print bed.
- Deactivate cooling: Avoid cooling during the first layers, especially with materials such as PLA.
- Increase print bed temperature: Increasing the print bed temperature by 5 to 10 °C can improve adhesion, but make sure this does not lead to warping or an elephant foot.
- Thicker first layer: A thicker first layer provides a larger contact area and adheres better.
- Use adhesives: Hairspray, glue sticks or special 3D printing adhesives such as Magigoo can significantly improve adhesion.
- Use a Brim or Raft: These extend the first layer to increase the bonding surface, but can affect the final appearance.
- Replace print bed: If problems persist, a change to a print bed with a different surface finish, such as PEI, may be advisable.
Nozzle too Close to the Print Bed
A common problem with 3D printing is that the nozzle of the 3D printer is positioned too close to the print bed. In this case, the molten filament does not have enough space to exit the nozzle and adhere to the print bed.
This often means that the first layers are not formed correctly, or the filament does not adhere at all. In the worst case, this can lead to a blockage in the hotend as the filament builds up.
Solutions for this 3D printing error:
- Adjust the Z-axis offset: A slight increase in the Z-axis offset can often remedy the situation. Most 3D printers allow this offset to be adjusted in the system settings. To remove the nozzle from the print bed, increase the offset into the positive range.
- Lowering the print bed: If possible, the print bed can be lowered to achieve the same effect. However, this requires recalibration and leveling of the bed to ensure consistent prints.
- Manual check and adjustment: Perform a manual check by moving a sheet of paper between the nozzle and the print bed. The paper should be able to be moved with slight resistance without tearing or wrinkling.
- Regular maintenance and cleaning of the nozzle: Make sure that the nozzle and the print bed are free of contamination. Dirt or debris can affect the distance between the nozzle and the print bed.
- Monitor the printing process: Observe the printing process, especially the first few layers. Signs of insufficient clearance are, for example, a scratching noise when the nozzle moves over the print bed or visible pressure of the filament into the print bed surface.
- Check automatic leveling systems: If your printer has automatic leveling systems, check their function and calibration, as these can also lead to insufficient clearance.
Warping and Deformation
Warping occurs when the corners and edges of a 3D print bend upwards during the printing process and detach from the printing plate. This problem is particularly common with materials such as ABS, as they shrink when they cool down. Warping often leads to distortions in the model, which significantly affects the quality and accuracy of the print.
You can find a detailed guide to this printing error here and all solutions at a glance here:
- Use a heated printing platform: A heated print platform keeps the material close to its glass transition temperature, which reduces shrinkage and improves adhesion.
- Apply adhesives to the print bed: Hairspray, glue sticks or special 3D printing adhesives can help the material to adhere better to the printing plate.
- Change print bed type: Changing to a print bed with better adhesion, such as PEI, can reduce warping.
- Calibrate the print platform: Make sure the print platform is level and the nozzle spacing is set correctly.
- Increase the contact surface: Using rafts or brims in the slicer software can increase the contact area of the model with the print bed and therefore reduce warping.
- Adjust temperature and fan settings: If necessary, gradually increase the temperature of the printing plate and adjust the fan settings to delay the cooling of the first layers.
- Print the first layer optimally: A thicker first layer and a reduced printing speed of the first layers can improve adhesion and reduce warping.
- Control environmental conditions: Avoid drafts and keep the room temperature constant to ensure even cooling of the material.
- Use printers with a closed build chamber: A closed build chamber helps to maintain a constant temperature during the printing process and prevent warping.
Stringing and Oozing
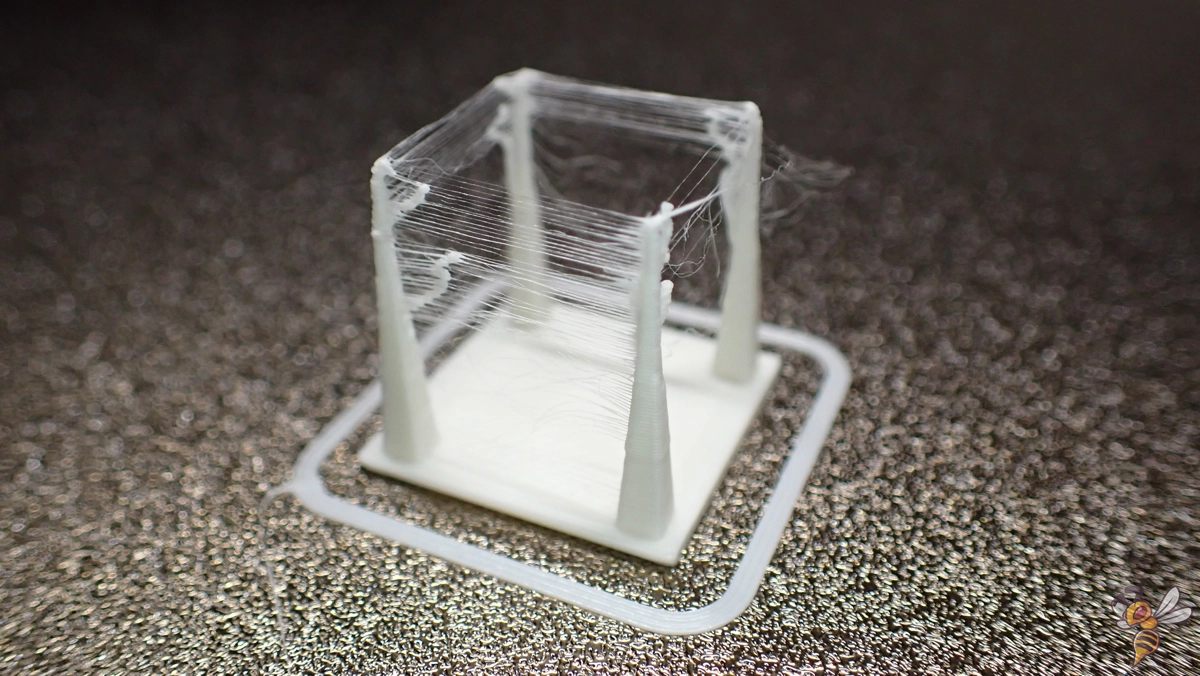
Stringing and oozing are common problems in 3D printing that are manifested by the formation of thin filaments or drops of molten filament between the parts of a 3D model.
These filaments are created when filament escapes from the nozzle via non-printing areas while the print head is moving. Materials such as PETG, which melt at relatively high temperatures, are particularly susceptible to this problem, but PLA and ABS can also be affected.
Detailed Stringing Guide: Best Methods & Settings to Prevent Stringing in 3D Printing
Solutions at a glance:
- Optimize Retraction Settings: Retraction (the process of pulling the filament back into the nozzle) is a common method to reduce stringing. Experiment with the retraction distance and speed to find the optimal setting for your printer and the filament used.
- Adjust the print temperature: A nozzle temperature that is too high can make the filament too liquid and thus promote stringing. Reduce the temperature gradually, but be careful not to go below the minimum temperature for the filament in question.
- Increase the travel speed: Increasing speed during non-printing movements can help reduce filament leakage by moving the print head faster over open areas.
- Clean the nozzle and print bed: A clean nozzle and print bed will help prevent unwanted material from sticking to the printed surface.
- Store filament correctly: Damp filament can lead to stringing. Store the filament dry and use a filament dryer if necessary.
- Adjust cooling: Proper cooling is important to solidify the filament quickly and minimize stringing. Experiment with the cooling settings to achieve optimum results.
- Adjust slicer settings: Use features like Combing and Coasting in your slicer software to optimize the path of the nozzle and minimize filament leakage.
- Activate wiping: This function cleans the nozzle after each print section and helps to remove excess filament.
- Material-dependent settings: Different filament types require different settings. Find out about the specific requirements of the material used.
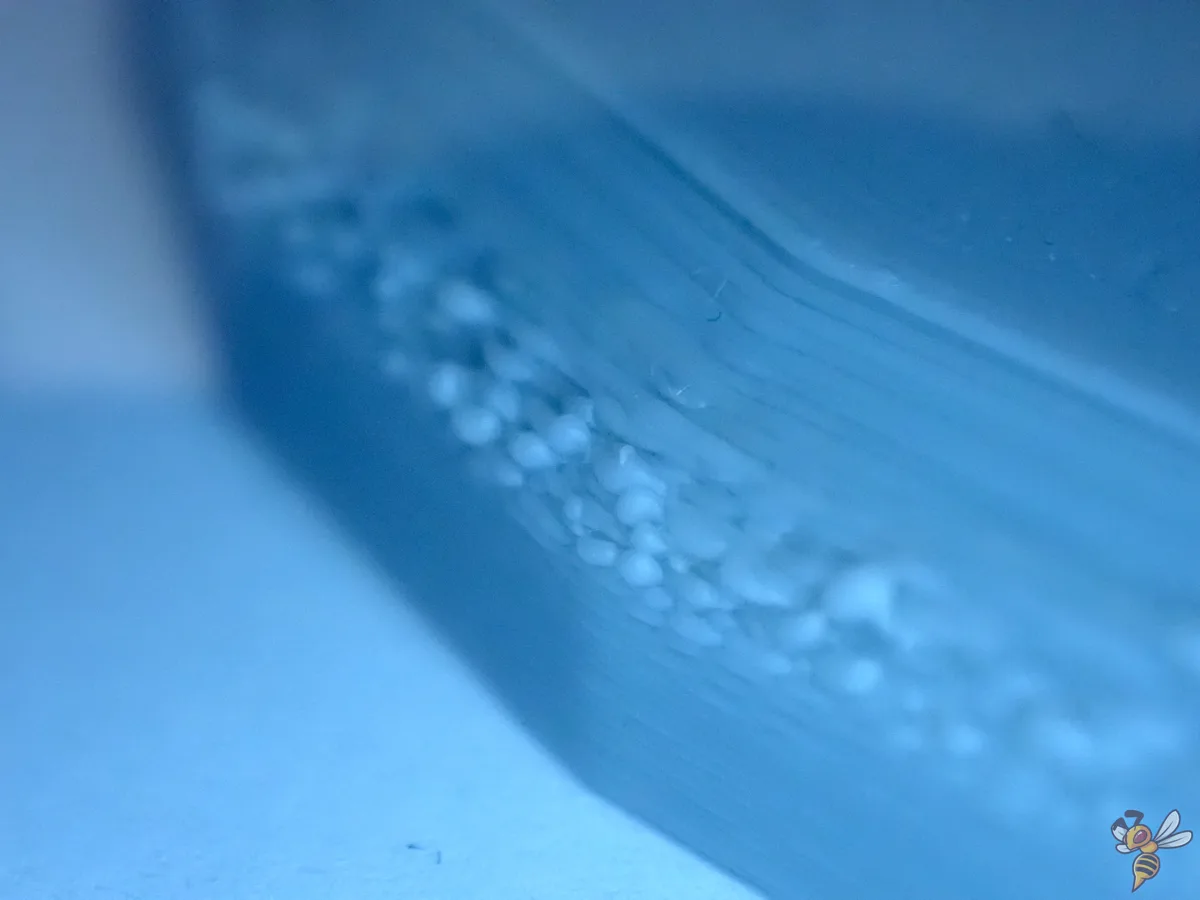
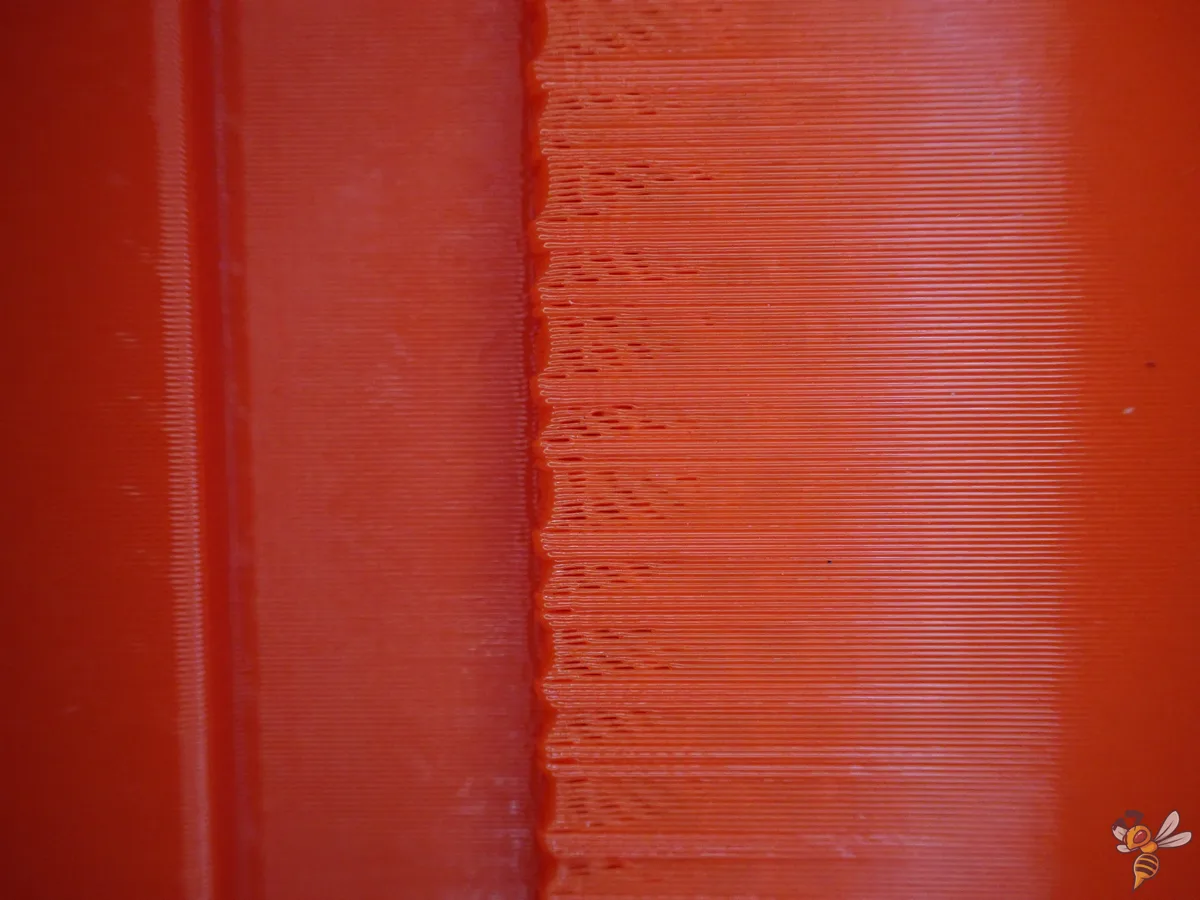
Echoes of Certain Details on the Surface (Ringing and Ghosting)
Ringing and ghosting are visual printing errors that appear as repeating patterns or ghost-like echoes on the surface of 3D prints. These errors occur when the print head makes rapid changes in direction, resulting in mechanical vibrations.
Ringing appears in the form of visible waves emanating from sharp corners or abrupt changes in print direction. Ghosting, on the other hand, appears as a faint, shadow-like duplicate of a design feature that deviates slightly from the original.
Detailed guide: How to Avoid Ringing & Ghosting in 3D Printing
Solutions for this 3D printing error:
- Adjust belt tension: Check and adjust the tension of the 3D printer’s belts. They should be tight enough to ensure precise movements, but not so tight that they stress the bearings.
- Reduce print speed: A slower print speed can reduce vibrations and therefore reduce ringing and ghosting. Experiment with different speeds to find the optimum result.
- Adjust acceleration and jerk settings: Reduce the acceleration and jerk settings in the slicer software. This will make the print head move more smoothly and generate less vibration.
- Tighten frame screws: Make sure all screws on the frame of the 3D printer are tightened to prevent additional vibrations.
- Improve vibration damping: Use vibration dampening pads or special dampening feet to minimize the transmission of vibrations to the print head.
- Reduce the weight of the print head: A lighter print head reduces inertia and therefore the risk of ringing and ghosting. Consider removing unnecessary parts or using lighter components.
- Improve the structural rigidity of the 3D printer: Strengthen the frame of the printer with additional struts or reinforcements to increase stability and precision.
- Check the damping of the stepper motors: Use high-quality dampers to reduce the vibrations of the stepper motors. This can make a big difference to print quality.
Over-Extrusion
Over-extrusion is a common problem in 3D printing, where the printer extrudes too much material. This 3D printing error can lead to a number of problems, including inaccurate dimensions, sagging layers, stringing, material leakage, lumpiness and even nozzle clogging.
Over-extrusion not only affects the aesthetics of the print, but can also weaken its structural integrity.
Detailed guide: How to Avoid Over-Extrusion on a 3D Printer: Settings & Tips
Solutions at a glance:
- Reduce extrusion multiplier / flow rate: This value in the slicer software determines the extrusion rate. It is set to 1 (or 100%) by default. Reducing it by 2.5% increments can help to avoid over-extrusion.
- Lower the printing temperature: A printing temperature that is too high can cause the filament to become too liquid and flow out of the nozzle in an uncontrolled manner. Lower the printing temperature in 5-degree increments to find the optimum temperature for your material.
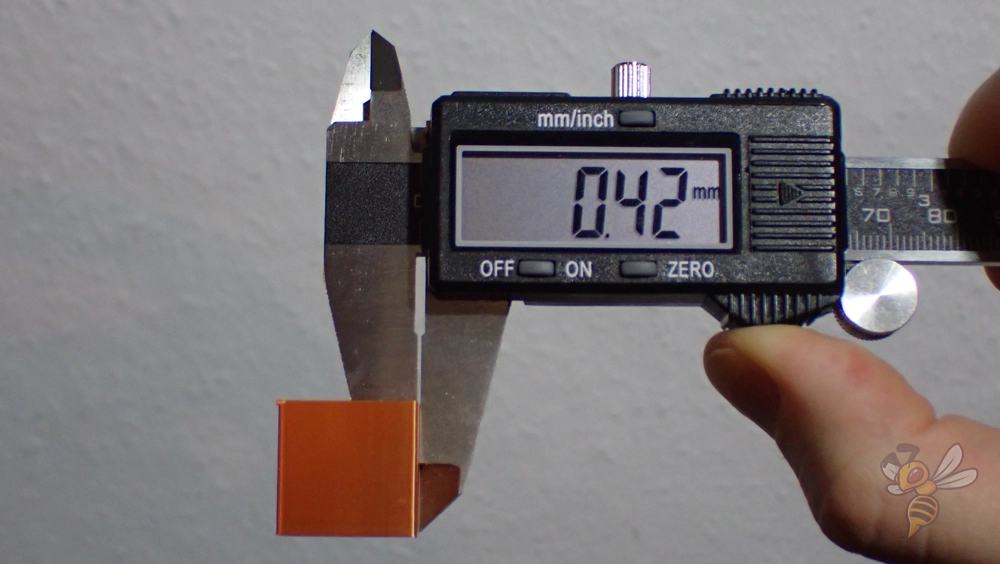
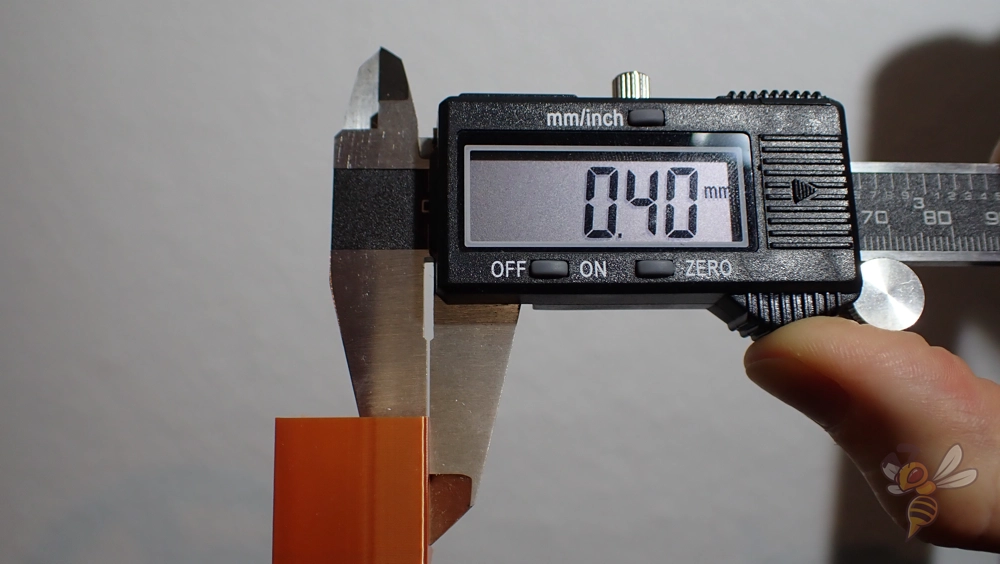
- Set the filament diameter correctly: Check whether the filament diameter set in the slicer software matches the actual diameter of the filament used. The most common filament diameters are 1.75 mm, 2.85 mm and 3 mm. Use a caliper gauge to check.
- Replace the nozzle: Nozzle wear can also lead to over-extrusion. Check your nozzle regularly for signs of wear and replace it if necessary. Various materials, such as hardened steel, offer greater wear resistance.
- Extruder calibration: Check the calibration of the extruder to ensure that the correct amount of filament is being fed. Perform tests where you extrude a certain length of filament and then measure it.
Under-Extrusion
Under-extrusion is a common problem in 3D printing that occurs when too little filament is extruded. This leads to gaps, missing layers, thin layers and sometimes small holes in the print. This affects the print quality and strength of the printed part.
Solutions for this 3D printing error:
- Check the filament diameter: make sure that the filament diameter set in the slicer matches the actual diameter of the filament used. Use a caliper gauge to measure the diameter accurately.
- Solving filament knots and hygroscopy: Prevent filament knots and ensure that the filament is stored dry. Moist filament can lead to under-extrusion.
- Cleaning and replacing the nozzle: Check the nozzle for blockages and clean it regularly. If necessary, you should replace the nozzle.
- Checking the Bowden tube or cold end: Make sure that the Bowden tube or cold end area (for direct extruders) is free of blockages and damage.
- Cleaning the extruder wheels: Clean the extruder wheels to ensure that they can properly grip the filament and guide it through the printer.
- Increase the printing temperature: If the printing temperature is too low, the filament cannot flow properly. Increase the print temperature in 5 degree increments until an improvement occurs.
- Adjust the retraction settings: Check the retraction settings and make sure they are set correctly to avoid under-extrusion near corners or seams.
- Increase the flow rate: If all hardware aspects are fine and you still have under-extruded prints, try increasing the flow rate (also called extrusion multiplier) in your slicer. Adjust this setting in 2.5% increments.
Extrusion Stops During Printing
A common problem with 3D printing is the sudden stop of extrusion during a printing process. There can be many causes for this, including problems with the filament supply, blockages in the hotend or nozzle problems.
Solutions for this 3D printing error:
- Checking the filament: make sure there is enough filament available. It can happen that the spool is empty without it being obvious.
- Check for damaged filament: Damaged filament can disrupt the extrusion process. Check the condition of the filament for damage or signs of wear.
- Clear nozzle blockage: A clogged nozzle can prevent the filament from flowing out. Clean the nozzle thoroughly to remove blockages.
- Check broken filament: Especially with Bowden extruders, broken filament can cause interruptions in the extrusion process. Check the filament for breaks and replace it if necessary.
- Overheated extruder motor driver: If the extruder motor driver overheats, this can lead to an extrusion stop. Switch off the printer to allow it to cool down and check whether additional cooling is required.
- Nozzle maintenance and replacement: Regular maintenance and replacing the nozzle when necessary can help prevent this problem.
- Adjust slicer settings: Check the slicer settings to make sure the extrusion parameters are correct. Sometimes minor adjustments to the settings can fix the problem.
- Check the extruder gearbox: Make sure the extruder gearbox is clean and can grip the filament correctly.
- Check the filament for cleanliness: Dusty or dirty filament can also cause clogging. Check the cleanliness of the filament.
Layer Shift
Layer shift is a common problem in 3D printing that affects both the accuracy and the optical quality of your print. It causes the layers to shift horizontally from their correct position.
This can lead to crooked prints that are not only visually distracting, but can also have functional defects. Layer shifts can occur as a single, large shift at a specific layer or as repeated shifts in the same direction.
Detailed guide: How to Fix Layer Shifting in 3D Printing | Step-by-Step
Solutions for this 3D printing error:
- Correct printer calibration: make sure your 3D printer is properly calibrated. This includes adjusting the slicer profile, checking the motor tension and tightening all relevant screws and bolts. You should also level the print bed and clean or replace the nozzle.
- Minimize shocks and vibrations: Place your 3D printer on a stable surface to minimize vibrations. Check that your printer’s motors are running smoothly and that there is no debris blocking the path of the print head or print bed. Vibration dampers can also help.
- Tighten belts and gears: Loose belts are a common cause of shifting layers. Check and tighten the belts to make sure they have enough tension.
- Reduce print speed: Too high a print speed can cause shifting. Try reducing the speed by 20-60% to see if this solves the problem.
- Secure print surface: Make sure the print plate is firmly attached to the base.
- Cool electronics: Overheated electronics, especially the stepper motor drivers, can cause shift displacement. Ensure sufficient cooling, for example by installing a fan directly above the mainboard.
- Avoid collisions: Activate the Z-hop function in your slicer software to avoid collisions between the print head and the print object.
- Check mechanical and electrical problems: Check the tension of the belts and make sure all set screws on the motor sprockets are tight. Also check the electrical connections and ensure that the motors are receiving sufficient current.
First Layer too Wide (Elephant Foot)
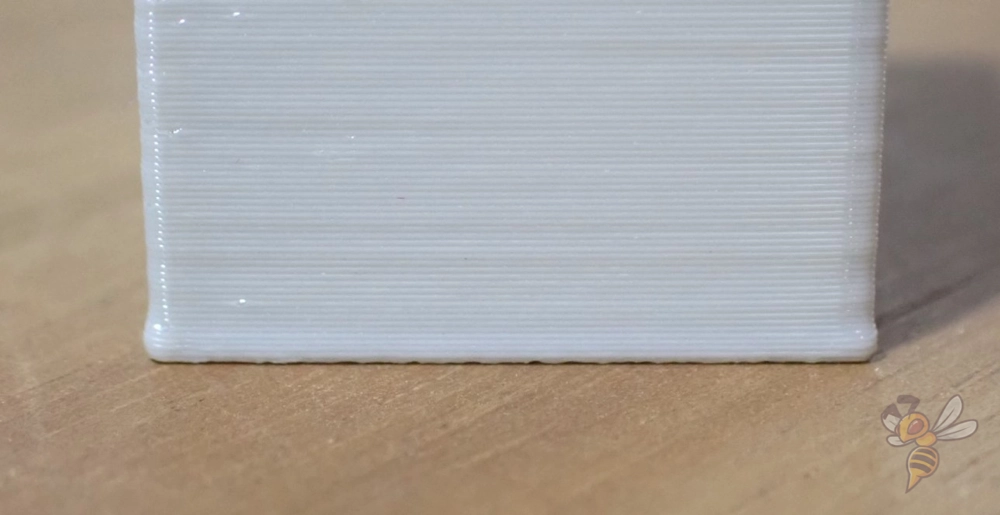
The so-called elephant foot in 3D printing occurs when the first layer or the first few layers of your 3D print are wider than the layers above.
This problem occurs especially with larger prints, as the weight of the object presses on the not yet fully cooled first layer and deforms it. The elephant foot not only affects the appearance of the printed object, but also its accuracy and functionality.
Detailed guide: 3D Printing Elephant’s Foot | Complete Prevention Guide
Solutions for this 3D printing error:
- Adjust the print bed and nozzle: Proper calibration of the print bed and setting the correct nozzle height are essential. An unleveled print bed or a nozzle height that is too low can lead to strong elephant feet.
- Reduce the print bed temperature: Too high a print bed temperature can result in the first layer remaining too warm and therefore malleable. Try lowering the temperature in 5°C increments without compromising adhesion.
- Print with a raft: A raft is an additional layer under your print model that holds the elephant’s foot and thus keeps it away from the actual 3D model.
- Add chamfers: For elephant feet that are difficult to detach, you can adjust the model file by adding a small chamfer (45°) at the bottom of the model.
- Check Z-axis: On 3D printers with a single Z-axis, an over-tightened eccentric nut can lead to an uneven elephant foot. An adjustment can help here.
- Set horizontal expansion: In your slicer software, you can adjust the horizontal expansion for the first layer. A negative setting can help to reduce the elephant foot.
- Optimize first layer settings: In your slicer software, you can adjust the settings for the first layer to prevent the filament from overflowing. This includes adjusting the layer height, line width and flow rate.
- Adjust the print speed of the first layer: A slower print speed for the first layer can also help reduce elephant foot.
Cracks
Cracks in 3D printing, especially with tall objects, are a common problem. They usually occur in the higher layers of the print, where the material cools faster.
The heat from the heated print bed does not reach these layers sufficiently, which leads to reduced adhesion and thus to cracking. This problem occurs particularly with larger prints and is often only noticed when the 3D print has already progressed.
Solutions for this 3D printing error:
- Increase the extruder temperature: A higher extruder temperature can help to bind the material better. An increase of 10 °C is a good start. Note the recommended temperature ranges of your filament.
- Check fan direction and speed: Make sure that the fans are switched on and correctly directed towards the 3D model. If necessary, you can reduce the speed of the fans to slow down cooling.
- Adjust the print speed: A slower print speed in the higher layers can also be helpful. This gives the material more time to adhere to the previous layer.
- Stabilize the printing environment: Try to create a stable printing environment to avoid temperature fluctuations. This can be achieved by closing doors and windows or by using a closed printer.
- Adjust layer height: A lower layer height in the affected areas can improve adhesion between layers.
- Check material quality: Check the quality of your filament. Cheap or old filament may be more likely to crack.
- Avoid moisture: Store your filament in a dry place to avoid moisture absorption, which can lead to cracks.
- Check heating bed temperature: An appropriate heated bed temperature can help keep the 3D model stable throughout the printing process.
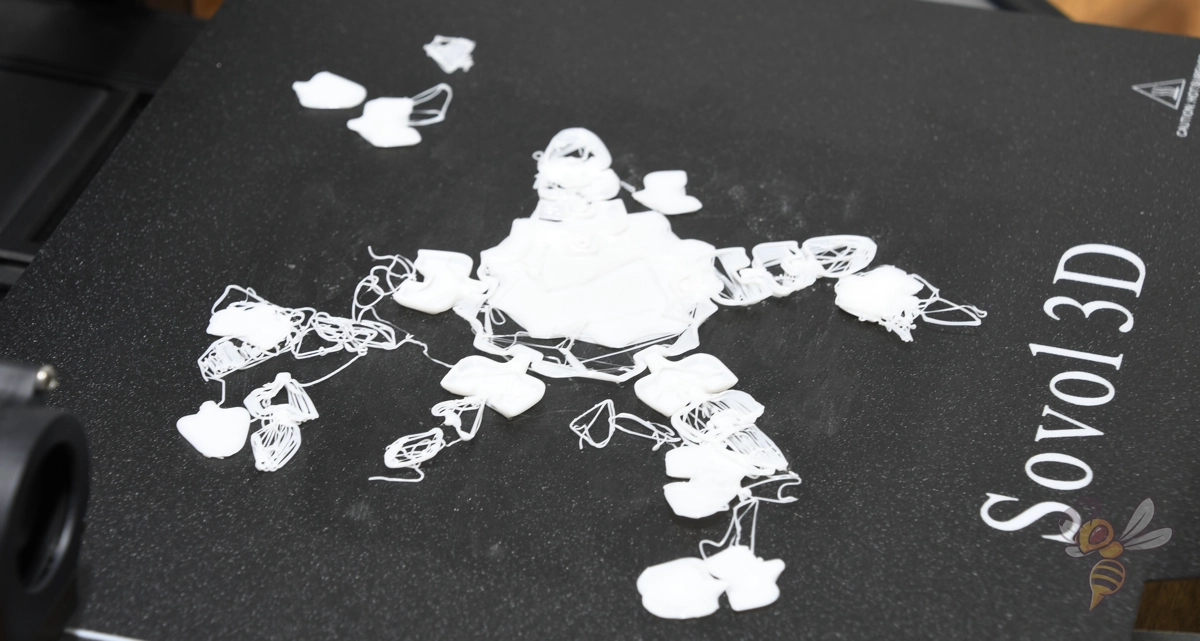
Spaghetti
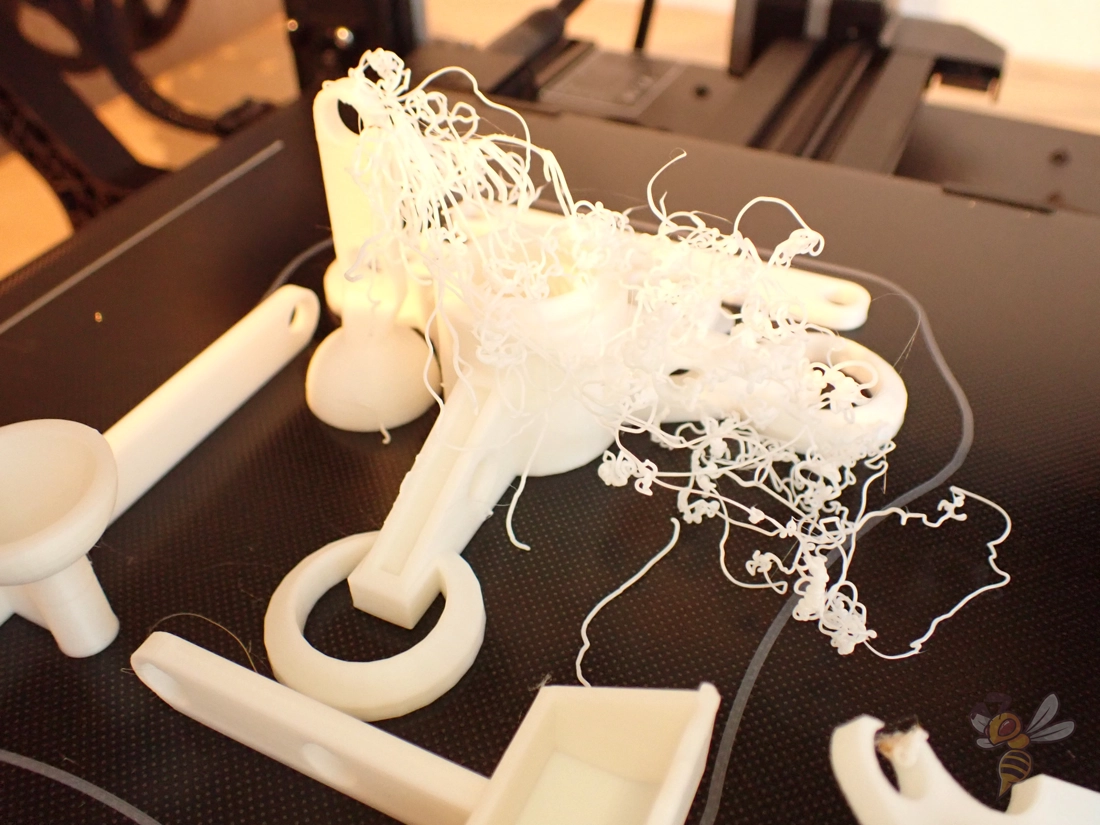
The so-called spaghetti error in 3D printing occurs when suddenly, after a few correct layers, the filament is extruded in the air instead of on the previous layer. This leads to a tangled mess of filament strands on the print bed, similar to a plate of spaghetti. Common causes are a lack of adhesion to the print bed or layer shifts.
Detailed guide: Avoiding Spaghetti in 3D Printing: A Step-by-Step Guide
Solutions for this 3D printing error:
- Improve print bed adhesion: Poor adhesion to the print bed often results in the printed object moving and the nozzle printing in the air. Measures to improve adhesion include:
- Cleaning the print bed of dust, grease or residue.
- Careful leveling of the print bed and adjustment of the Z-offset.
- Reducing the printing speed of the first layer.
- Use of adhesives or special bonding agents on the print bed.
- Checking and adjusting the print bed temperature.
- Avoid layer shifts: Layer shifts can lead to a spaghetti error if individual layers shift. You should check the following:
- Check the tension of the toothed belts and adjust if necessary.
- Reduce the printing speed to reduce the load on the motors.
- Ensure that there are no foreign objects in the axles and on the toothed belts.
- Avoid overheating the electronics, especially on hot days.
- Optimize support structures: With overhangs or complex geometries, inadequate supports can lead to spaghetti error. Check the placement and settings of your supports.
- Avoid warping: Warping can cause parts of the object to detach from the print bed and be caught by the nozzle, resulting in a spaghetti error. Measures to prevent warping are:
- Use of an enclosure.
- Setting an optimum temperature ratio between the print bed and the environment.
- Use of draft shields if required.
- Improve overhangs: Spaghetti errors can occur with overhangs if the settings are not optimal. Check and adjust the printing temperature, cooling and printing speed.
- Clean the nozzle: A clogged nozzle can lead to intermittent spaghetti errors. Regular cleaning and maintenance of the nozzle is therefore essential.
- Use a larger nozzle: For filaments with additives, a larger nozzle can help prevent clogging. For abrasive filaments, you will need a hardened nozzle.
- Check Bowden tube: A Bowden tube that is too tight can lead to irregular extrusion. If necessary, replace or adjust the tube.
Holes or Missing Parts of a Layer
In 3D printing, it can happen that layers are partially or completely skipped, which leads to gaps in the model. These gaps manifest themselves in the form of holes or missing sections in individual layers and can affect the structure and appearance of the printed object.
Solutions for this 3D printing error:
- Mechanical check: Regular checks of your 3D printer are important. Check the rods and bearings of the printer for correct fit and possible displacement.
- Check rod alignment: Make sure all rods are perfectly aligned. Move the print head manually to check if there is any resistance, which could indicate misalignment or bent rods.
- Bearing wear: Listen for unusual noises and feel for uneven movement of the print head. If bearings are worn, they should be replaced.
- Check lubrication: Regular lubrication of moving parts is important. Use suitable oil and make sure the rods are clean and free of debris.
- Correct under-extrusion: Under-extrusion can also lead to gaps. Check that the filament is being fed correctly and that the nozzle is not clogged. Also make sure that the filament is the correct thickness and is uniform.
- Fix z-axis problems: Check the z-axis for distortion, debris or lubrication issues. A faulty z-axis can lead to uneven layers.
- Adjust slicer settings: Sometimes incorrect slicer settings can also lead to this problem. Check the settings for layer height, infill and extrusion.
- Check filament feed and supply: Make sure the filament is feeding smoothly and the filament supply is sufficient. Also check the tension of the filament guide.
Upper Layer has Holes or Bulges (Pillowing)
Pillowing in 3D printing refers to the appearance of unsightly bulges or even holes on the top layer of the print model. This problem usually occurs at the end of the printing process and significantly impairs the surface quality of the finished object.
Solutions for this 3D printing error:
- Check the position and speed of the cooling fans: Insufficient cooling of the upper layers can cause pillowing. Make sure that the fans are working and blowing air effectively onto the model. Modifications may be necessary for better airflow.
- Set the fan speed in the G-Code: The fan speed should be maximized for the upper layers to ensure fast cooling and prevent the material from sagging. This can be done by making adjustments in the slicer.
- Increase the thickness of the top layer: A simple solution is to increase the thickness of the top layer in the slicer software. A minimum of 6 layers is recommended, with smaller nozzles and filaments possibly up to 8 layers.
- Optimize cooling of the upper layers: If pillowing continues to occur, improve the cooling. Check whether the cooling fans are active while printing the upper layers. If not, activate them in your slicer or adjust the G-code manually.
- Adjust print speed and temperature: Reducing the print temperature and printing at a slower speed can also help reduce pillowing. However, these adjustments should be made with caution as they can cause other printing problems.
- Increase infill percentage: Too low an infill percentage can lead to unstable top layers. If necessary, increase the infill percentage to create a more stable foundation for the upper layers.
Infill Visible from the Outside
During 3D printing, the infill pattern may show through the outer walls of the printed object. This problem mainly occurs when the outer walls are too thin and the infill penetrates into the path of the perimeter. It is particularly noticeable with thin walls and can significantly affect the visual quality of the print.
Solutions for this 3D printing error:
- Check wall thickness: The wall thickness should be a multiple of the nozzle size. For a 0.4 mm nozzle, wall thicknesses of 0.4 mm, 0.8 mm, 1.2 mm, etc. should therefore be selected.
- Increase wall thickness: A simple solution is to increase the wall thickness. Double the size to prevent the infill from overlapping.
- Print infill after outer walls: Many slicers allow the infill to be printed after the outer walls. This can be activated in the slicer software settings and helps to prevent the infill from showing through.
- Use print sequence: Depending on the model, the print sequence of inner walls and outer shells can be optimized. For high-quality surfaces where strength is less important, choose to print from the outside in. For structurally stronger prints, choose from the inside to the outside and increase the wall thickness.
- Adjust infill overlap: Too much infill overlap can lead to the infill showing through. Reduce the overlap percentage to maintain wall stability while reducing visibility.
- Consider nozzle diameter: The diameter of the hotend also affects how much the infill shows through. For smaller nozzles (0.4 mm or 0.6 mm), you should increase the number of circumferences and reduce the infill overlap.
Supports are too Weak
Sometimes the support structures do not hold properly during 3D printing. This is especially critical if your model has overhangs or bridges that cannot be printed correctly without this additional support. If the supports fail, they can break off, tip over or detach from the print bed, resulting in incomplete or faulty prints.
Solutions for this 3D printing error:
- Avoid isolated support towers: Isolated supports are more unstable. Try to adjust the design so that supports are connected or better integrated into the model.
- Adjust the print speed for supports: In your slicer software, you can reduce the print speed specifically for supports to increase their stability.
- Use a brim around the supports: A brim, i.e. an additional edge around the supports, increases adhesion to the print bed and stabilizes them.
- Change the support pattern: Different patterns offer different stability. Experiment with different support patterns in your slicer software.
- Adjust the overhang threshold: The overhang threshold defines the angle at which supports are needed. An adjustment can help to avoid unnecessary supports and strengthen the necessary ones.
- Adjust support density: Increase the density of the supports in the slicer settings to give them more stability.
- Check print bed and adhesion: A poorly calibrated print bed or lack of adhesion can also cause supports to fail. Clean the print bed thoroughly and use adhesion promoter if necessary.
- Bypass supports: Sometimes it is also possible to lay the 3D model on its side or position it elsewhere to avoid the need for supports altogether.
Supports do not Stick to the Print Bed
A common 3D printing error is that the support structures do not adhere properly to the print bed. This often leads to instability during printing as the supports cannot adequately support the model.
The problem can manifest itself in detachment of the supports from the print bed or in their deformation, which in turn affects the quality of the 3D print.
Solutions for this 3D printing error:
- Support Brim: A brim around the supports can increase the adhesive surface and thus ensure better stability.
- Print bed cleaning: Make sure the print bed is clean and free of dust, grease or residue. Thorough cleaning will significantly improve adhesion.
- Use adhesion promoter: Applying bonding agents such as hairspray, glue stick or special 3D printing adhesives to the print bed can improve the adhesion of the supports.
- Level the print bed: Proper leveling of the print bed is critical for uniform adhesion across the entire print surface.
- Adjust first layer: Optimize the first layer settings in your slicer software. A slower print speed and a higher initial print temperature can be helpful.
- Calibrate Z-offset: Adjust the Z-offset so that the first layer is pressed lightly onto the print bed to achieve better adhesion.
- Optimize print bed temperature: A higher print bed temperature can improve adhesion, especially with materials such as ABS.
- Avoid moisture in the filament: Store your filament dry to avoid moisture problems that could affect print quality.
Sagging Overhangs
In 3D printing, overhangs can sag, which is particularly noticeable in bridge structures. These areas often appear as uneven, thin or sagging filament strands.
Such problems occur when the filament is extruded between two points across a gap and does not cure fast enough to form a stable structure.
Solutions for this 3D printing error:
- Optimize cooling: Increase the speed of the cooling fan to cool the filament faster and prevent sagging.
- Reduce print speed: Reduce the print speed for overhangs to give the filament enough time to cure.
- Adjust print temperature: Lower the extruder temperature slightly to allow the filament to cure faster, but make sure not to go below the filament manufacturer’s recommended temperatures.
- Add supports: If the overhangs are too large, additional support structures can help.
- Check slicer settings: Use slicer software with special bridge modes that optimize settings for overhangs.
- Consider model realignment: Position the model on the print bed so that overhangs are minimized.
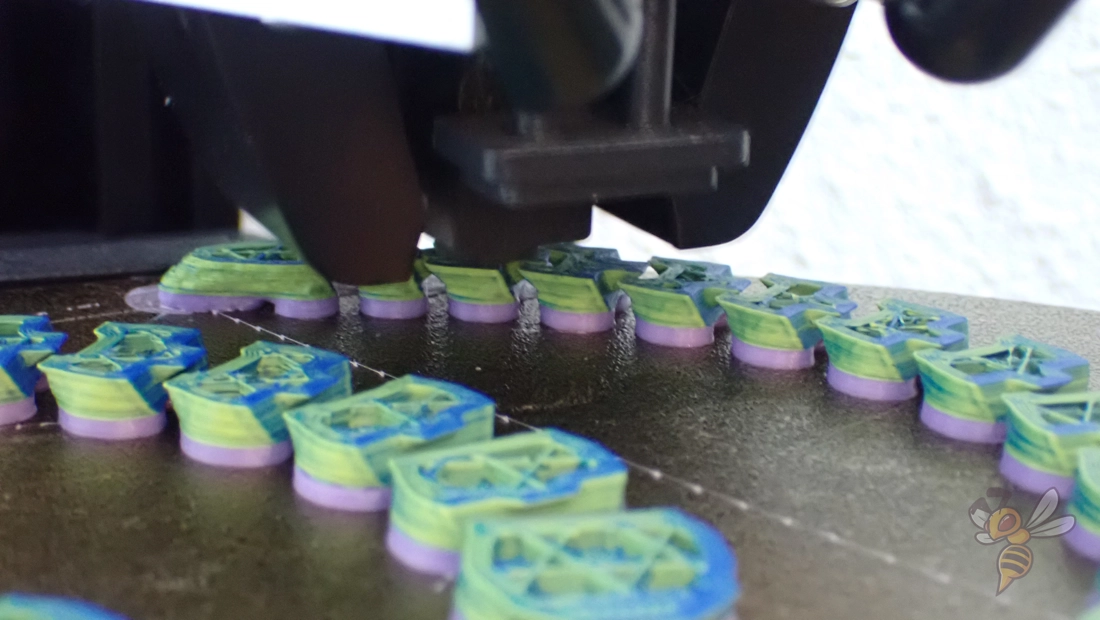
Filament Used Up During Printing
Sometimes the filament is used up during a 3D print. The print object is partially finished, but the printer continues to extrude without adding more material. This leads to incomplete prints.
Solutions for this 3D printing error:
- Check the filament spool: Check the filament spool regularly, especially for longer prints.
- Use a filament sensor: A filament sensor can automatically stop the printer when the filament runs out, preventing incomplete prints.
- Ensure a supply of filament: Make sure you have enough filament on hand before you start printing.
- Set up a print pause: Use printer settings that allow you to pause 3D printing and replace filament when it runs low.
- Estimate filament consumption: Use slicer software to estimate expected filament consumption and ensure enough material is available.
- Manual monitoring: For printers without a filament sensor, regular manual monitoring is recommended, especially for long prints.
Filament Broken During Printing
If the filament breaks during 3D printing, no more material is extruded even though the printer continues to run. This problem often occurs with older or brittle filament.
Solutions for this 3D printing error:
- Remove and replace filament: Remove the broken filament from the printer and load new filament.
- Check filament quality: Make sure the filament is not old or brittle. Use high-quality filament to avoid breakage. Store filament dry and protected from direct sunlight.
- Adjust extruder tension: Check the tension of the extruder on the filament. If it is too tight, loosen it slightly to reduce pressure on the filament.
- Check the nozzle: Make sure the nozzle is not clogged and clean it if necessary.
Filament Stripped (Extruder too Tight)
The filament appears stripped or worn, resulting in uneven filament feed. This happens when the extruder presses too hard on the filament.
Solutions for this 3D printing error:
- Adjust extruder tension: Reduce the tension of the extruder to reduce the pressure on the filament.
- Check and replace filament: Remove the damaged filament and replace it with new filament. Also check the quality of the filament to avoid future problems.
- Check extruder and nozzle: Make sure there are no blockages in the extruder or nozzle that could lead to increased pressure on the filament.
- Adjust print speed: Reduce the print speed to reduce the pressure on the filament to avoid seizing.
Blobs and Zits
Blobs and zits are small irregularities on the surface of the print. They appear as small bumps or spots and can affect the aesthetics and functionality of the printed object.
Detailed guide: How to Avoid Blobs & Zits in 3D Printing
Solutions for this 3D printing error:
- Calibrate extrusion: Check and calibrate the extrusion to ensure the printer is feeding the correct amount of filament.
- Adjust temperature and speed: Reduce the nozzle temperature and print speed to prevent too much material from being extruded.
- Optimize retraction settings: Adjust the retraction settings to prevent too much or too little filament from being retracted during printing.
- Increase cooling: Improve cooling to reduce the formation of blobs and zits.
- Use coasting: Activate the coasting function in the slicer to stop the end of the extrusion just before the movement is complete.
- Adjust layer settings: Change the outer shell settings in your slicer to hide or minimize zits and blobs.
Small Details are not Printed Well
If a 3D printer does not reproduce details correctly, fine edges and corners will not be sharp and precise, but will have a slight curve and softness. Complex details appear inaccurate and less defined.
Solutions for this 3D printing error:
- Increase resolution: A lower layer height and narrower extrusion width will result in smoother surfaces and better details.
- Adjust nozzle diameter: For fine details, a smaller nozzle (0.4 mm or smaller) should be used. Note that smaller nozzles require more precise print settings.
- Maintain printer: Check for loose screws and belts as these can affect print quality.
- Clean nozzle: Before starting a detailed print, the nozzle should be clean to avoid blockages.
- Reduce print speed: A slower print speed can improve the accuracy of detailed prints.
- Use high-quality filament: Choose good quality filament, as it will flow more smoothly and give better results.
- Level the print platform: A perfectly aligned print platform is crucial for accurate prints, especially at high resolutions.
Loud Noises (Print Head Moves too Far)
A common and unmistakable problem with 3D printing is loud noises that occur when the print head travels beyond the limits of the print bed. This problem occurs when the print head reaches the end of its X or Y axis and tries to move beyond it. This can result in loud noises from slipping belts, grinding gears or the print head hitting the edges of the printer.
Solutions for this 3D printing error:
- Perform homing again: Sometimes the 3D printer may forget its position if you unexpectedly turned it off. Before you continue printing after switching it on or start a new print, you should always reset the home position.
- Select the correct printer in the slicer: First check whether the correct printer setting has been selected in the slicer. Incorrect printer settings can lead to such problems.
- Update firmware: If the problem occurs with a new printer, make sure that the latest firmware version is installed. After the update, check all settings, especially the size of the print area.
- Check end stops: Observe the movement of the print head. If it tries to move beyond the limits of an axis, check whether an end stop is not connected or defective. If necessary, the end stops should be replaced.
- Check print area settings: Make sure the print area size is set correctly in the firmware or slicer software. An incorrectly configured print area can cause the printer to attempt to use a non-existent area.
- Check slicer software settings: Check whether settings have been changed by a software update or reset that could lead to this problem.
Object is Difficult to Remove from the Print Bed
A common 3D printing error is that objects adhere too firmly to the print bed and are difficult to remove. This can occur especially with materials such as PETG on glass print beds. The challenge is to remove the object without damaging the print bed or the printed part.
Solutions for this 3D printing error:
- Patience during cooling: Allow the print bed and object to cool completely. Often the object will release more easily when the material is fully cured. Most materials shrink a little after they have cooled down. They also do this differently than the print bed. This tension between the object and the print bed can usually release the object by itself.
- Use of a spatula: Use a palette knife or spatula to carefully get between the printed part and the print bed to release the object.
- Heating the print bed: Briefly increase the temperature of the print bed to slightly soften the material at the bottom of the object and loosen the adhesion (emergency solution).
- Using dental floss: Dental floss can be an effective tool to carefully separate the object from the print bed.
- Use of a solvent: A solvent such as isopropyl alcohol can help to weaken the bond between the object and the print bed, especially if an adhesive has been used.
Support Structures Cannot be Removed Smoothly
With some 3D prints, small residues or rough surfaces remain after the support structures have been removed. This residue can affect the quality and appearance of the finished object, and is particularly problematic with intricate or detailed models.
Solutions for this 3D printing error:
- Adjust the horizontal distance: Increase the horizontal distance (“air gap”) between the support structure and the object.
- Activate support interface: In most slicers, you can activate a so-called support interface that adds a flat top layer to the support. For many geometries, this makes it easier and smoother to remove the supports.
- Adjust the density of the support structure: Reduce the density of the support structures in your slicer software to make them easier to remove.
- Use a second extruder: With dual extruder printers, you can use soluble support materials like PVA that can be easily dissolved after printing.
Nozzle is Clogged
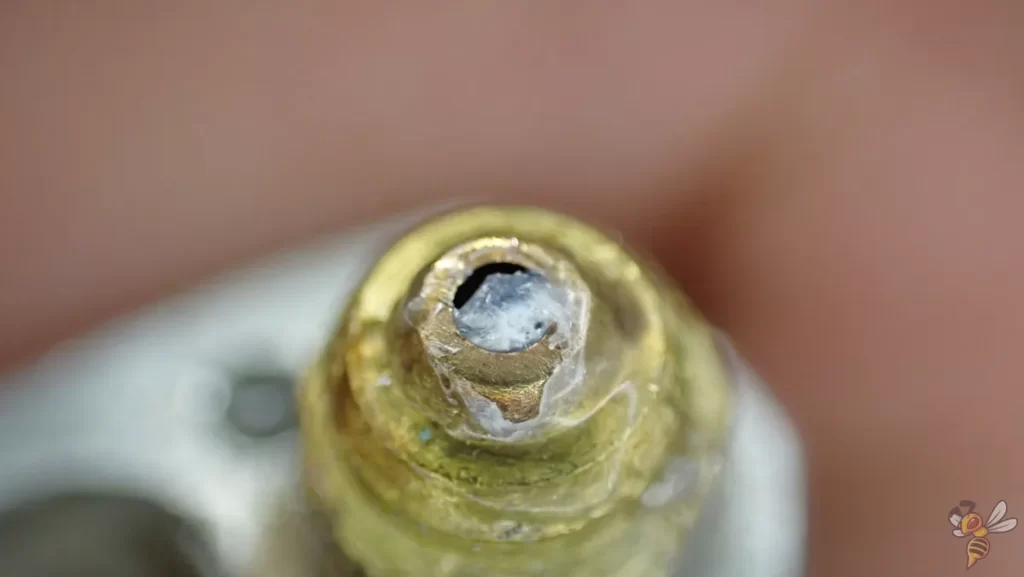
With 3D printing, it sometimes happens that nothing is extruded from the nozzle despite correct settings and loaded filament. This indicates a blockage in the nozzle, often caused by filament residue or impurities.
Detailed guide: How to Clean a Clogged 3D Printer Nozzle | All Methods
Solutions for this 3D printing error:
- Use needle for cleaning: Heat the nozzle to the melting temperature of the filament. Then use a fine needle to carefully clean the opening of the nozzle.
- Atomic Pull (Cold Pull) method: Use a nylon or ABS filament to clean the nozzle. Heat the nozzle, insert the cleaning filament and allow it to cool slightly. Then pull it out jerkily to remove deposits.
- Acetone bath for stubborn cases: Immerse the disassembled nozzle in acetone and wait a few hours until all filament residue inside the nozzle has dissolved.
- Replace the nozzle: In the event of severe blockages or damage, it may be advisable to replace the nozzle.
Preventive measures:
- Regular cleaning: Keep the nozzle clean by wiping it regularly with a paper towel.
- Use high-quality filament: Avoid cheap filament, which can lead to deposits.
- Storing the filament: Keep the filament dust-free and dry.
- Use a larger nozzle: A larger diameter nozzle can help prevent clogging.
- Care of the PTFE tube: Make sure that the PTFE tube is correctly seated in the hotend and that there are no gaps.
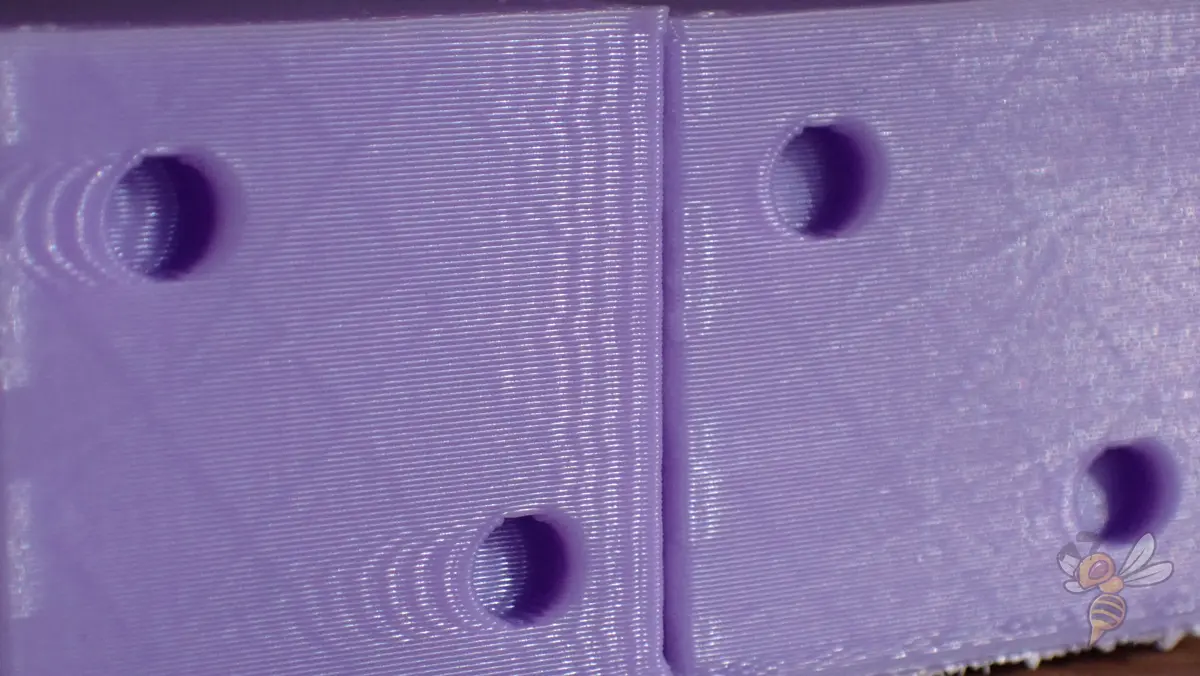
Poor Dimensional Accuracy
A common problem with 3D printing is the inaccurate reproduction of the dimensions defined in the CAD program. As a result, parts do not fit together, holes are the wrong size and dimensions generally do not meet expectations. Such dimensional deviations can be caused by both the configuration of the 3D model and the printer settings.
Solutions for this 3D printing error:
- Check units: Make sure that the units of measurement in your CAD program and your slicer software match (mm, cm or inches).
- Double check dimensions: Use digital calipers to check the dimensions of your design, especially when it comes to precise fits.
- Adjust hole sizes: Easily enlarge holes for screws or dowel pins to compensate for tolerances.
- Optimize polygon count: For models with round or complex shapes, choose an appropriate polygon count to avoid deformation.
- Test print accuracy: Print a calibration cube to check and adjust the accuracy in the X, Y and Z axes.
- Check the nozzle temperature: Too high a nozzle temperature can lead to unwanted extrusions that affect dimensional accuracy.
- Check belts and rails: Make sure all belts are tensioned and all rails are aligned to avoid inaccuracies in movement.
- Consider thermal contraction: Especially with ABS, thermal contraction can be a problem. Adjust the scaling of the model to compensate for this.
- Calibrate the printer: Check and adjust the calibration of your printer, especially the distance of the nozzle to the print bed and the layer height.
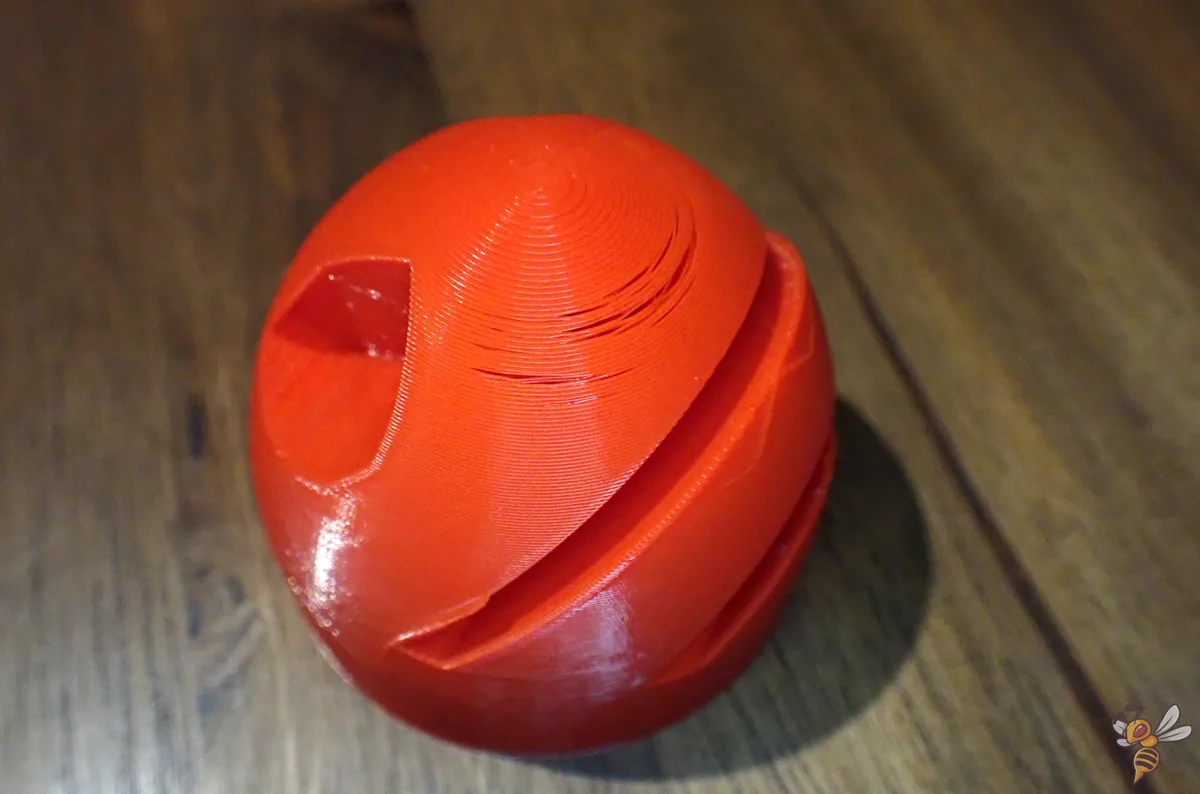
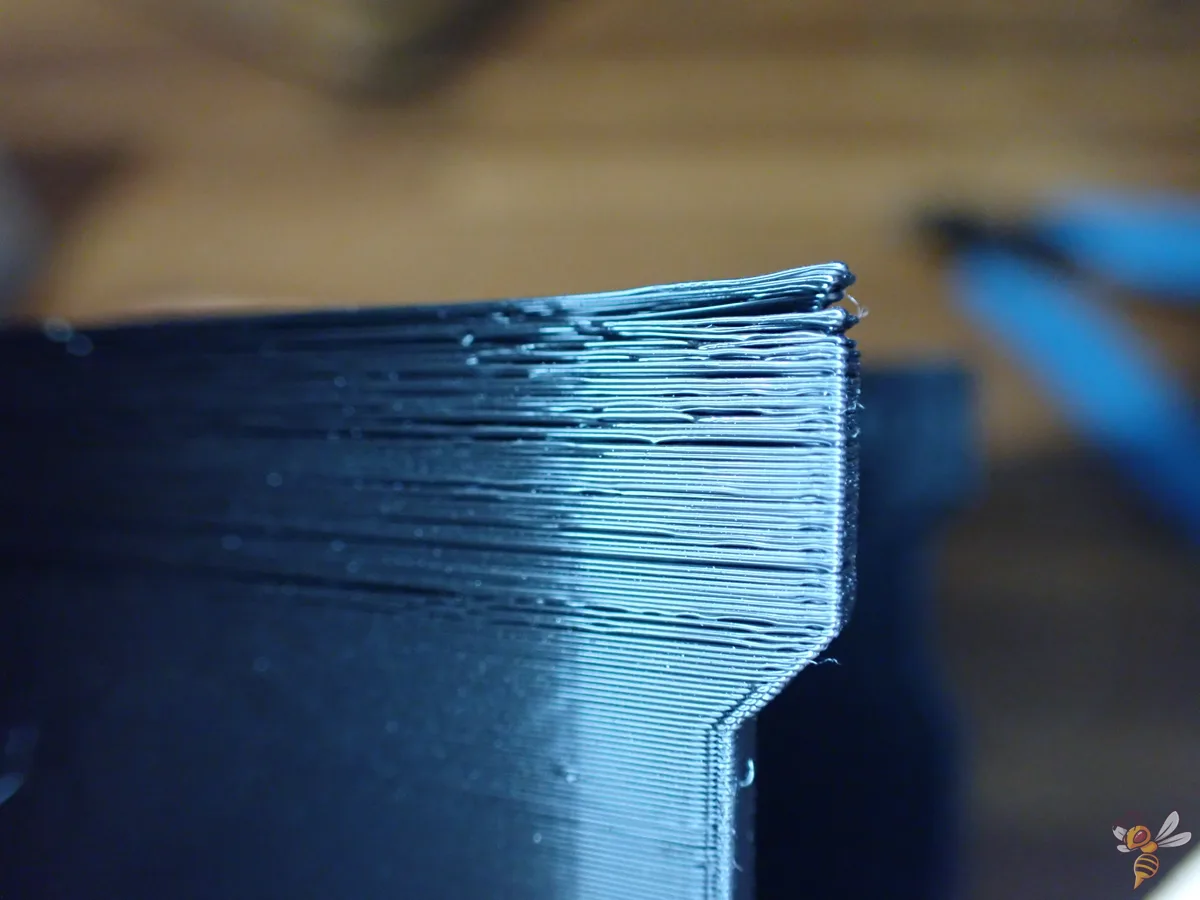
Highly Visible Z-Seam
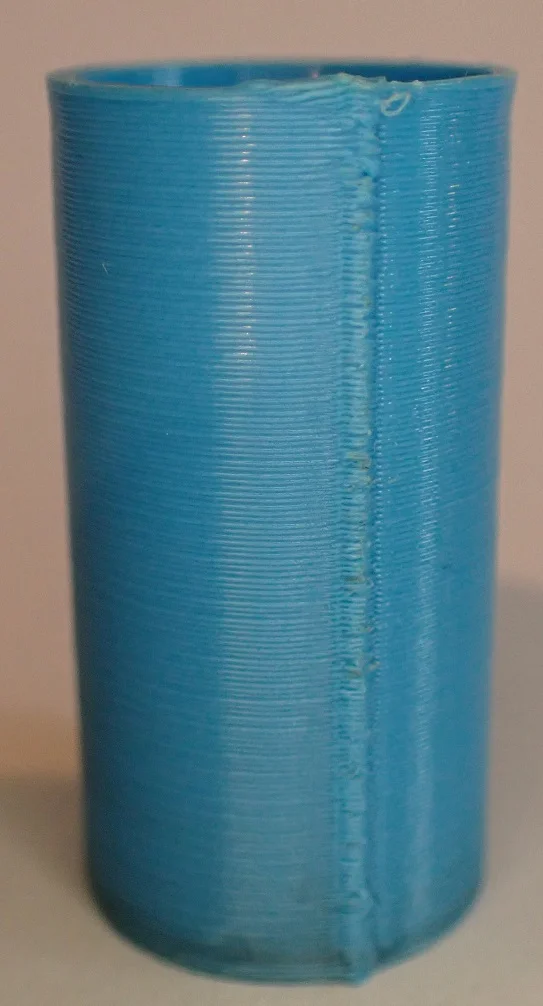
The Z-seam is a line along the Z-axis of a 3D print that is characterized by interruptions and sometimes by so-called “blobs” or spots. This is particularly noticeable on smooth, round objects.
It is caused by over- or under-extrusion at the transition between layers. In a perfect extrusion, the Z seam should hardly be visible.
Detailed guide: Z Seam | How to Hide & Avoid | Cura & PrusaSlicer
Solutions for this 3D printing error:
- Adjust the nozzle temperature: Too high a nozzle temperature often leads to over-extrusion and therefore more noticeable Z seams. Reducing the temperature can help.
- Optimize retraction: Properly configuring the retraction settings at the end of a print motion can prevent over-extrusion at layer transitions.
- Calibrate extruder & set flow rate: Make sure the extruder is feeding the correct amount of filament. The flow rate influences how much filament is output.
- Reduce print speed: A slower print speed gives the extruder more time to position the filament correctly and avoid over-extrusion.
- Use wiping and coasting: These slicer settings can help remove excess filament or stop extrusion just before the end of a layer to avoid over-extrusion.
- Hide Z-seam in Cura or PrusaSlicer: Use slicer settings to position the Z-seam in less visible areas of the model or paint it on the model to minimize visibility.
- Use vase mode for certain objects: Vase mode does not create Z-seams as the print head prints continuously in a spiral motion.
SLA 3D Printing Errors
Although SLA printers are known for precise and fine results, various factors such as material selection, print settings and device maintenance can lead to problems.
From difficulties with the first layer to inaccuracies in the printing process, SLA printers are prone to specific errors that can affect the print result.
In this chapter, we focus on the typical errors that occur with SLA printing. We explore their causes and offer you proven solutions. The aim is to give you a deeper understanding of SLA printing techniques and help you improve the quality of your print results.
First Layer Does Not Stick to the Print Bed
With SLA prints, it can happen that the first layer does not adhere to the print bed. This manifests itself in the support base being partially detached or even floating completely in the resin pool. This problem occurs when the adhesion between the first layer and the print bed is insufficient.
Solutions for this 3D printing error:
- Vat leveling: Check and adjust the leveling of your resin vat. Uneven leveling can cause parts of the print to not adhere properly to the print bed.
- Check resin temperature: Resin that is too cold can lead to poor adhesion. Heat the resin and the print area to create optimal conditions.
- Check vat foil: Check the foil for damage or wear. If necessary, you should replace this foil.
- Filter resin: Remove cured resin particles to ensure clear and undisturbed curing.
- Stir the resin: If the resin has been unused for a long time, the components may separate. Stir the resin thoroughly before printing.
- Sand the printing plate: A printing plate that is too smooth can impair adhesion. Sand the printing plate carefully and clean it thoroughly to enable better adhesion.
Support Structures Break During Printing
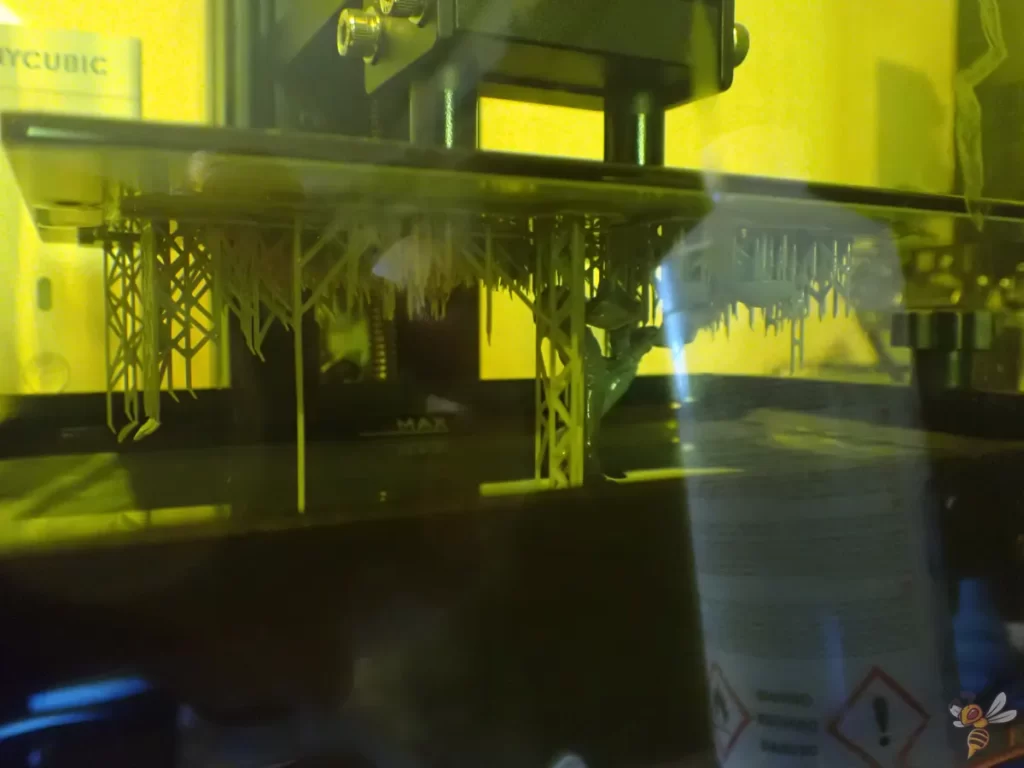
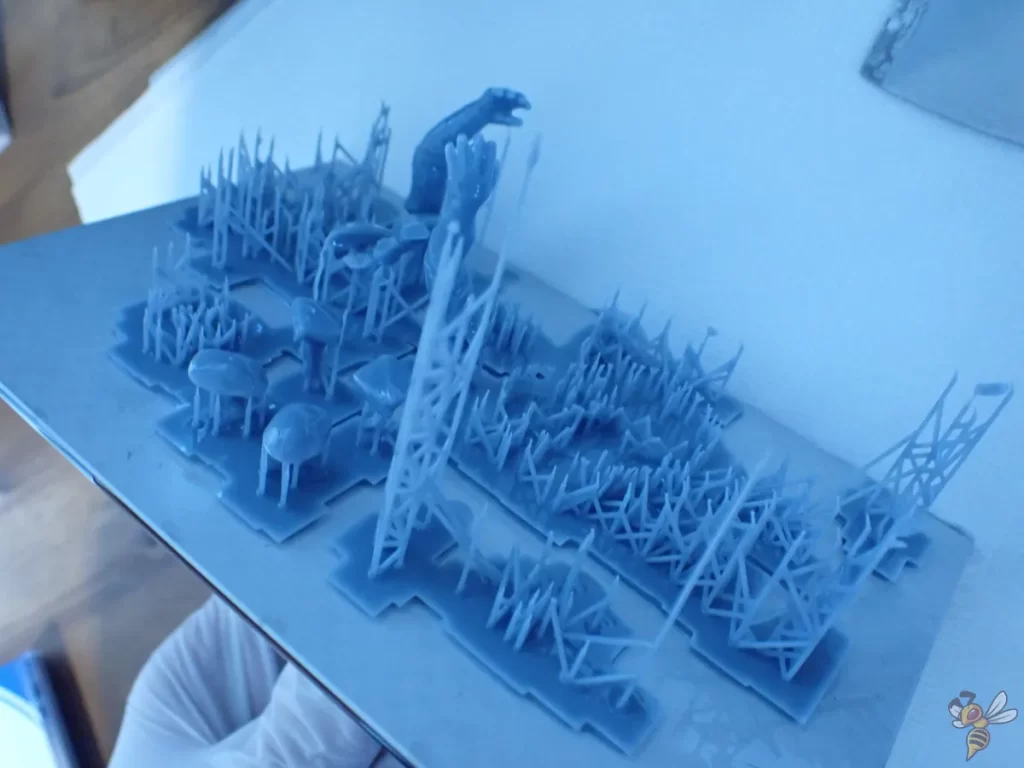
In SLA printing, support structures may break during the printing process. Supports that are too thin and cannot withstand the movements of the resin are often to blame. This often leads to incomplete or deformed prints, as the supports are crucial for the stability and accuracy of the model.
Solutions to this 3D printing error:
- Optimize support structure design: Check the design of the support structures. They should be strong enough to support the weight of the model and resist the resin flow, but also not too massive to save material and facilitate removal.
- Adjust the print speed: Reduce the speed at which the print plate is pulled up. This reduces the flow speeds and therefore the forces on the supports.
- Adjust the slicer settings: Experiment with the settings in your slicer software. Increase the thickness of the supports or add additional support elements to improve stability.
- Correct placement of support structures: Make sure that the support structures are placed at the critical points of the model to ensure sufficient support.
- Check resin quality: Use high-quality resin. Poor resin quality can lead to weak support structures that break easily during printing.
- Check ambient temperature: Make sure the ambient temperature is suitable for SLA printing.
- Clean and maintain the resin tank: Check the condition of the resin tank regularly. Dirt or damaged areas can negatively affect the print quality.
Support Structures Cannot be Removed Smoothly
When 3D printing with resin, it can happen that the support structures cannot be removed cleanly from the printed model. This problem occurs when the supports are firmly attached to the model and leave residue or damage on the model when they are removed.
Solutions for this 3D printing error:
- Isopropyl alcohol bath: Before removing the support structures, wash the object thoroughly with isopropyl alcohol. This removes liquid resin residue and prepares the model for the next step.
- Using hot water: Soak the model in hot water to soften the support structures. This step should be done before the model hardens to allow easier removal of the support structures. A bath in almost boiling water for a few seconds works perfectly with most types of resin.
- Careful removal: After softening in hot water, the support structures can be removed more carefully and precisely, reducing the risk of damage to the model.
- Optimized slicer settings: Check and adjust the slicer settings. A lower density and thickness of the support structures can make removal easier.
- Post-processing: Light post-processing helps with stubborn residues. Sanding or careful cutting can help to remove the last remnants without damaging the model.
- Correct placement of supports: Place support structures so that they are easily accessible. Also make sure that the columns of the supports do not have any lateral contact with the object.
Layer Separation and Delamination
With SLA 3D prints, layer separation and delamination can occur where the layers do not bond properly. This can be seen in frayed areas where the layers appear to fall apart. This printing defect not only affects the aesthetics, but also the stability of the printed object.
Solutions for this 3D printing error:
- Use support structures: Proper alignment and support of the printed object is essential. Avoid minima, i.e. isolated areas that are not directly connected to the main print. Create support structures for steep angles and peaks to ensure better connection and stability during printing.
- Ensure a clear light path: Make sure the light path is not blocked by dirt particles or debris. Clean the resin regularly and remove residue from previous prints. Also check the film in the resin vat for signs of use.
- Shorter IPA wash cycles: Cleaning in isopropanol (IPA) for too long can further weaken weak layer compounds. Keep IPA cleaning time to a minimum and remove uncured resin quickly and carefully.
- Checking and maintaining the printing plate: Ensure that the printing plate is correctly adjusted and aligned with the resin vat. Unevenness or misalignment can lead to uneven printing and therefore delamination.
Fine Plates on the Object (Ragging)
A phenomenon called “ragging” can occur during SLA 3D printing. This manifests itself in thin, shelf-like structures that protrude horizontally from the printed object. These deformations, also known as “flaps”, are not part of the original design and affect the surface quality of the print. They can detach from the object during the printing process and float freely in the resin tank.
This problem occurs when diffused light expands the curing area beyond the intended limits of each layer contour.
Solutions for this 3D printing error:
- Filter Resin: To remove particles from previous prints, the resin should be passed through a filter that captures large particles.
- Mix resin: Resin can settle if left to stand for long periods of time. It should be mixed thoroughly so that pigment and photopolymer are evenly distributed.
- Inspect the resin tank: The tank should be inspected for damage, contamination or signs of wear. If necessary, it should be cleaned or replaced.
- Check restricted resin flow: Overly dense support structures or improper alignment can impede resin flow and cause this error pattern.
Small Details are not Printed Well
With SLA 3D printing, it sometimes happens that fine details of the model are not reproduced correctly. They either appear reduced in size, partially invisible or lose their sharpness and appear blurred. This problem can occur when reproducing very small or fine structures.
Solutions for this 3D printing error:
- Check the printer resolution: first check whether the details of your model are within the detail resolution of your 3D printer. Every printer has a limit below which it can no longer print fine details accurately.
- Adjust the exposure time: Incorrect exposure times can lead to loss of detail with both overexposure and underexposure. Exposure times that are too short can result in small details not hardening sufficiently, while exposure times that are too long can result in details blurring or becoming out of focus.
- Perform calibration: Use calibration files to determine the optimal exposure time for your specific resin. Dyes and other impurities in the resin can affect the required exposure time. Here you will find a guide on how to calibrate the exposure time correctly.
- Optimizing the layer height: The layer height also influences the print quality. A lower layer height leads to finer surfaces, but increases the printing time. After adjusting the exposure time, you should also recalibrate the layer height, as these two settings are linked.
- Optimize antialiasing settings: Antialiasing settings that are too high can blur fine details. In most cases, low to moderate antialiasing is ideal.
Disclosure: This website is the property of Martin Lütkemeyer and is operated by Martin Lütkemeyer. Martin Lütkemeyer is a member of the Amazon Services LLC and other Affiliate Programs. These are affiliate advertising programs designed to enable websites to earn advertising revenue through advertising and linking to Amazon.com and others. Links marked with * are affiliate links.
