- Z Seam | How to Hide & Avoid | Cura & PrusaSlicer - April 20, 2024
- Qidi Tech Q1 Pro – Best Orca Slicer Settings & Profile - April 9, 2024
- Creality Ender-3 V3 Review – Will CoreXZ be the New Trend? - March 27, 2024
Disclosure: Links marked with * are Affiliate Links. I earn from qualifying purchases if you decide to make a purchase through these links – at no additional cost for you!
The free slicer software Cura is one of the most popular programs for 3D printing. However, its Combing function is highly controversial among the slicer’s many users, as it is not always necessarily helpful.
In this article I’ll show you what Combing Mode does and what you can use it for.
Table of Contents:
What is Cura Combing?
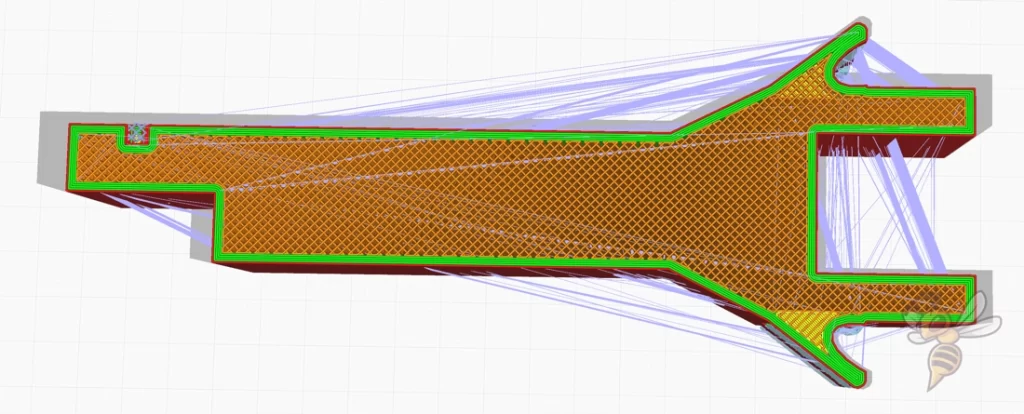
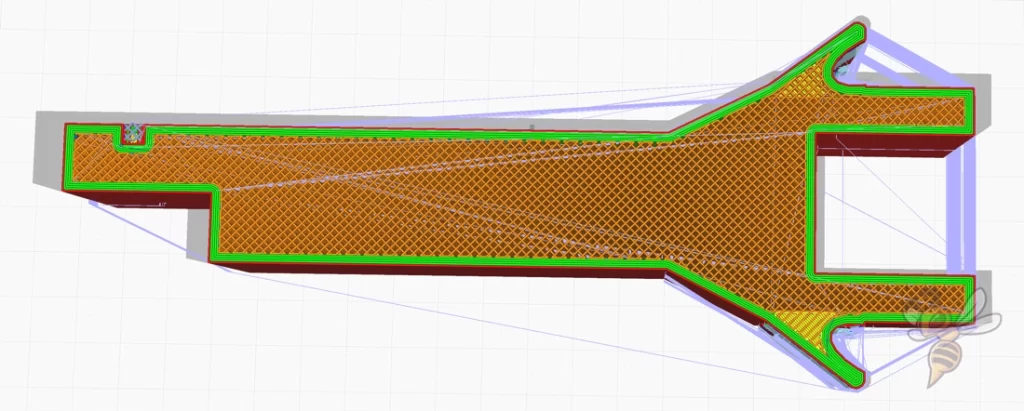
The Combing Mode in Cura causes the print head to move mainly over already printed areas during extrusionless movements. This reduces the number of retractions, which in turn prevents stringing and clogging of the nozzle.
If the combining mode is not activated, the printhead moves in a straight line to the next layer. If there are no already printed areas between the two points, stringing can occur here (fine filament hairs spun between two points).
The Combing mode in Cura has the following important advantages:
- Combing reduces retractions: Because the print head moves over already printed areas, the respective retraction is omitted. This prevents certain printing errors.
- Combing reduces stringing: Uncontrolled material that escapes is not visible because it is inside the object.
- Combing reduces clogging: Nozzle clogging often occurs due to excessive retraction movements. Especially for filaments with additives, like wood or metal, this is a big advantage.
Combing mode is not perfect, however. There are some parts of the object where movement over already printed areas is not possible. Nevertheless, the total number of movements over free surfaces is greatly reduced.
The disadvantage of the combining mode is that it increases the printing time somewhat. Usually, the movements between layers are longer than before. The print head then needs a bit more time to get from the end point of the last layer to the start point of the next layer.
But which settings of the combining mode are correct and which are best suited for your project?
The Settings of Cura Combing
The so-called Combing mode of the Cura slicer software has four different setting options. These include “Off”, “All”, “Not in Skin” and “Within Infill”.
In general, you can think of it as the Combing mode telling the slicers the way to print, telling them to hold the nozzle where it tells them to, and also telling them to print only in those specific areas of the object.
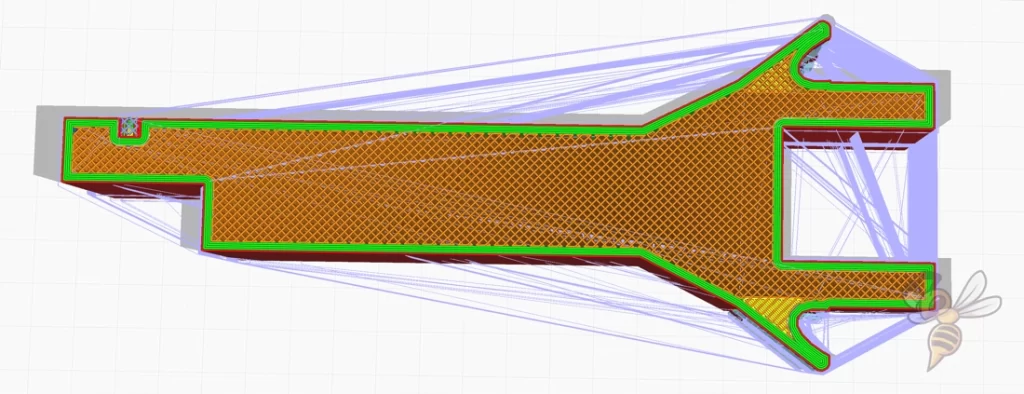
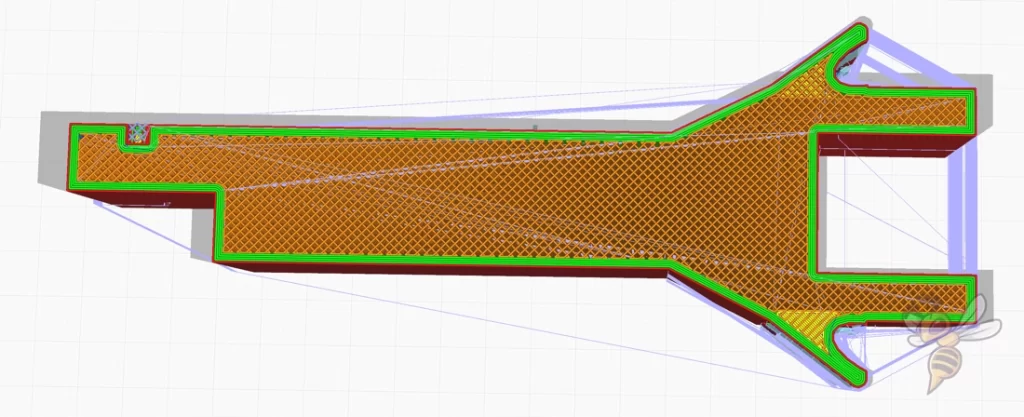
By default, “All” is activated in Cura Combing. However, the function can also be changed to “Not in skin” and even switched off completely so that the printer retracts before each empty run. It is usually most useful to set the Combing Mode setting to Within Infill.
This reduces the number of retractions required and protects the filament. In this mode, the nozzle of your 3D printer remains within the filling areas of the object to be printed and does not move back and forth if it is not absolutely necessary. The print time may be a little longer, but you protect your filament.
Depending on the settings and the print object, unsightly threads may form on the model during 3D printing. These occur in particular if the printing temperature, the movement speed and the feed length are set incorrectly.
The calibration of the extruder must also match the material used and the printing temperature. But even if these settings are all correct, the wrong combining mode can lead to stringing, i.e. so-called thread formation. Especially with the first layers of a 3D object and also with horizontal planes and ceilings, which is often called outer skin, stringing is often necessary and thus combining is not advantageous. That’s why you should set combing to “Not in Skin” in these steps and enter a combing distance of more than 0.

Related Post:
Stringing Test | Best 3D Printer Calibration Objects
Use of Cura Combing for Traces on the Surface
Another common problem of many 3D printers are unwanted marks on the surface of the 3D object. They are also called scars, which are only in the top layer of the printed model and then appear when the printer’s nozzle moves to a new position, tracing already melted filament.
You can prevent these scars on the Cura slicer by reducing the flow rate to 100% and activating the Z-Hop function, or by reducing the print temperature. With the Combing mode, you can also prevent these unsightly marks on the surface of your 3D model. When you activate the mode, the print head of your printer moves along the contour and no longer crosses it so that no scratches occur on the surface.
Is the Use of Cura Combing Useful?
The Combing function is set to “All” by default in the Cura software, as already mentioned. However, this is not always necessarily useful. Especially when printing the outer skin, it is usually not helpful to leave Combing switched on, as this can cause strong thread formation in the outer layers of the printed object.
While you want to determine the correct values for the feed of your 3D printer, you should also turn off the combining to really get the correct values displayed.
As a general principle, you can remember the following regarding combining in Cura: The longer the distance of the empty run, the less sense it makes to have the combining switched on.
Simply set a “Max combing distance” with a few mm, because if the distance of the empty run is further than the combing distance, the printer will still make a feed, even if combing is activated. This is usually the best way to use combining.
Combing in other Slicers
Besides Cura from the printer manufacturer Ultimaker, there are numerous other slicers for 3D printers on the market. These include Simplify3D, for example. However, this software does not have a special combining mode like Cura itself.
In this slicer, to achieve the same effect as when combing in Cura, you have to activate the “Retraction over open areas only”, deactivate the “Forced retraction” and then activate the “Avoid crossing the contour”. If necessary you have to define a “Minimum path for the retraction”. This way you get the same result as with Cura, but the way to get there is a bit more cumbersome. The same applies to the slicer software Slic3r, which is also a free open source program. Here, too, you have to make the settings separately to achieve similar results as with Cura’s combining mode.
Conclusion: What is Cura Combing recommended for?
The combing function of the open-source slicer Cura can be very helpful and useful in some cases. However, it is not always the right choice to have combing turned on during 3D printing.
If you often have problems with annoying scars and marks on the top layer of your printed objects, Cura Combing can be a good way to prevent this. However, you should turn off Combing while printing the outer skin of a model, otherwise stringing may occur. And you should also disable combining when setting the correct retraction values. Accordingly, it always depends on your current work whether combining is useful or not.
So it’s probably best to always set the combing for the inside of the print object by default and then adjust the settings regarding the combing depending on the work step. This way you will always get an optimal print result.
Disclosure: This website is the property of Martin Lütkemeyer and is operated by Martin Lütkemeyer. Martin Lütkemeyer is a member of the Amazon Services LLC and other Affiliate Programs. These are affiliate advertising programs designed to enable websites to earn advertising revenue through advertising and linking to Amazon.com and others. Links marked with * are affiliate links.

