
- Wet Filament: Prevention, Symptoms & Drying - July 18, 2024
- Sovol SV08 – Best PrusaSlicer Settings & Profile - June 26, 2024
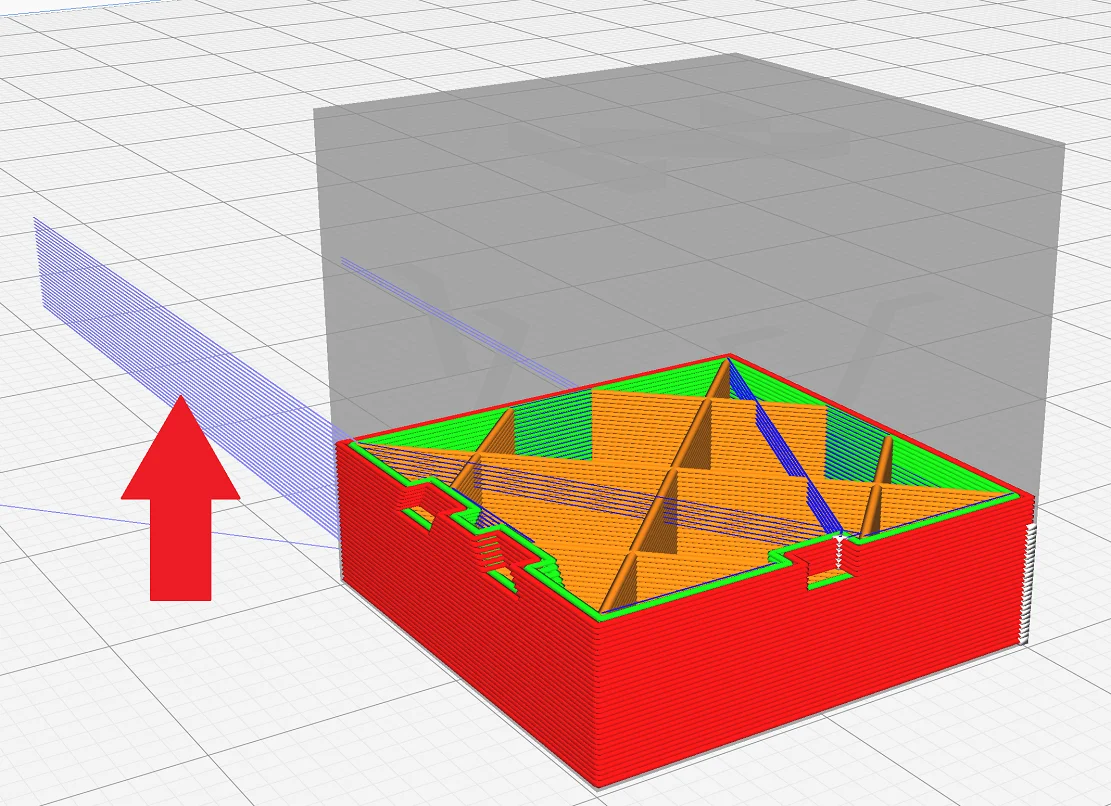
- Sovol SV08 – Best Orca Slicer Settings & Profile - June 26, 2024
Disclosure: Links marked with * are Affiliate Links. I earn from qualifying purchases if you decide to make a purchase through these links – at no additional cost for you!
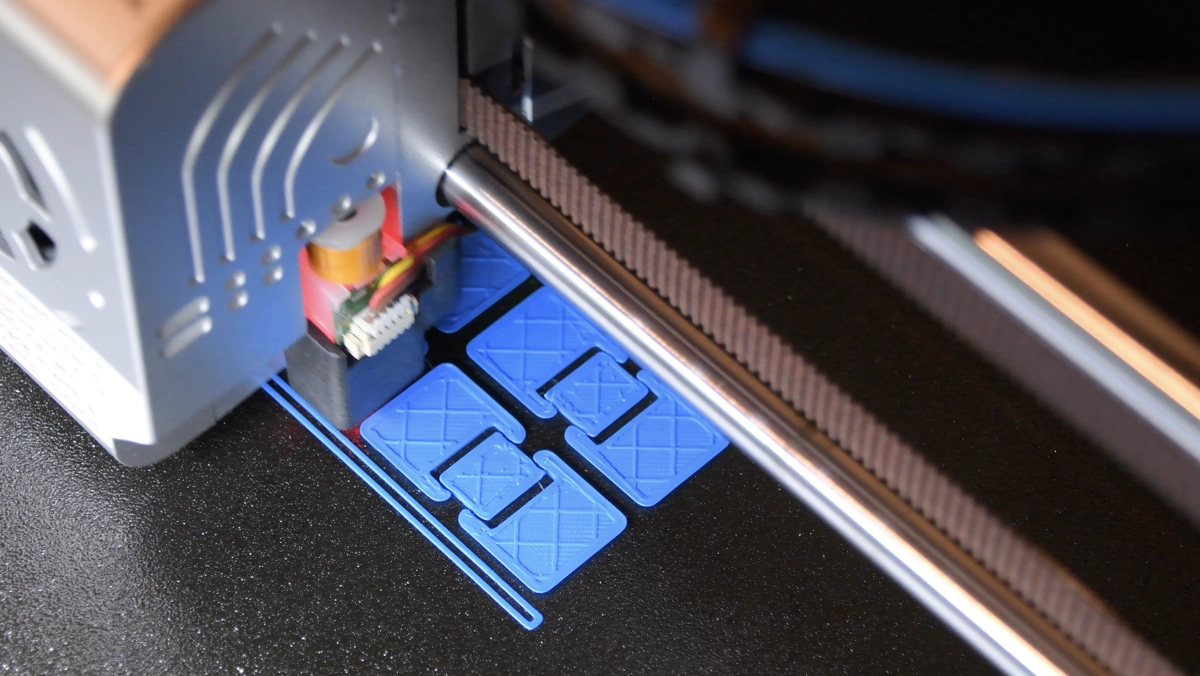
Dealing with stringing is a common challenge in 3D printing, often leading to frustration for even the most experienced users. These unwanted filament strings not only mar the aesthetics of the printed object, but can also leave stubborn residues upon removal. Addressing stringing proactively, therefore, becomes essential for achieving cleaner and more professional-looking prints.
To avoid stringing in 3D printing, dry and store filament properly, clean the nozzle, adjust cooling, calibrate retraction and temperature, and use slicer tricks like combing and coasting.
That was the short answer. In this article, you’ll learn how to do that in detailed, practical steps.
Table of Contents:
Causes of Stringing in 3D Printing
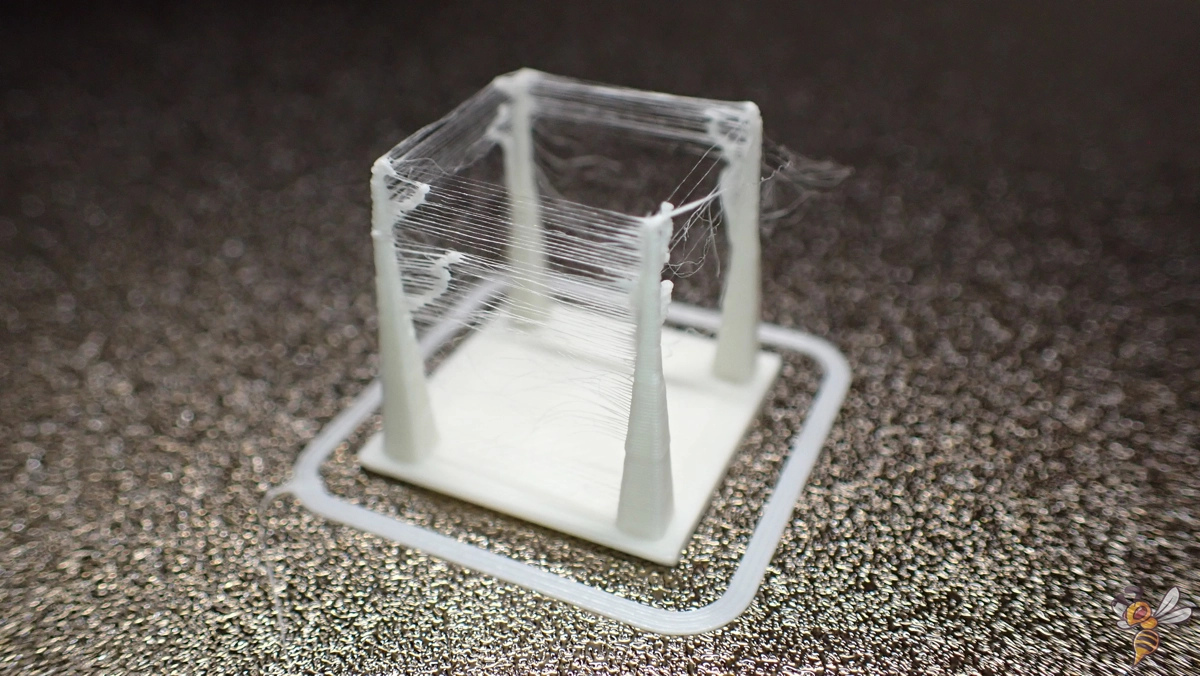
Stringing in 3D printing is primarily caused by the uncontrolled oozing of liquid filament during non-extrusion movements. This fundamental issue can arise from various factors and can be mitigated through several strategies.
Here’s a brief overview of the solutions that prevent this unwanted extrusion between printing movements, with each point covered in detail in this article:
Basics:
- Dry and Properly Store Filament: Using dry filament and maintaining its condition to prevent moisture-related issues.
- Clean the Nozzle: Regularly removing any residue to ensure consistent extrusion.
- Activate or Increase Cooling: Using adequate cooling to solidify the filament quickly and reduce stringing.
Fine-Tuning:
- Calibrate the Retraction: Incorrect retraction settings are the most common cause for stringing. Fine-tuning the retraction to pull the filament back into the nozzle during travel movements to prevent it from oozing out.
- Calibrate the Print Temperature: Optimizing the temperature to ensure proper filament flow and avoiding too fluid filament.
Slicer Tricks:
- Increase the Travel Speed: Speeding up movements between extrusions to reduce oozing.
- Activate Combing: Changing the nozzles’ path to avoid open spaces.
- Activate Coasting: Stopping extrusion just before the end of a movement to use the residual filament.
- Activate Wiping: Implementing a wiping mechanism to clean the nozzle after each layer.
Dry and Properly Store Filament
To enhance 3D print quality and prevent stringing, it’s crucial to use dry filament. Wet filament is a common culprit behind 3D print stringing, as moisture in the filament can turn into steam during printing, leading to inconsistent extrusion and strings of molten plastic. This issue can compromise the integrity of your printed object.
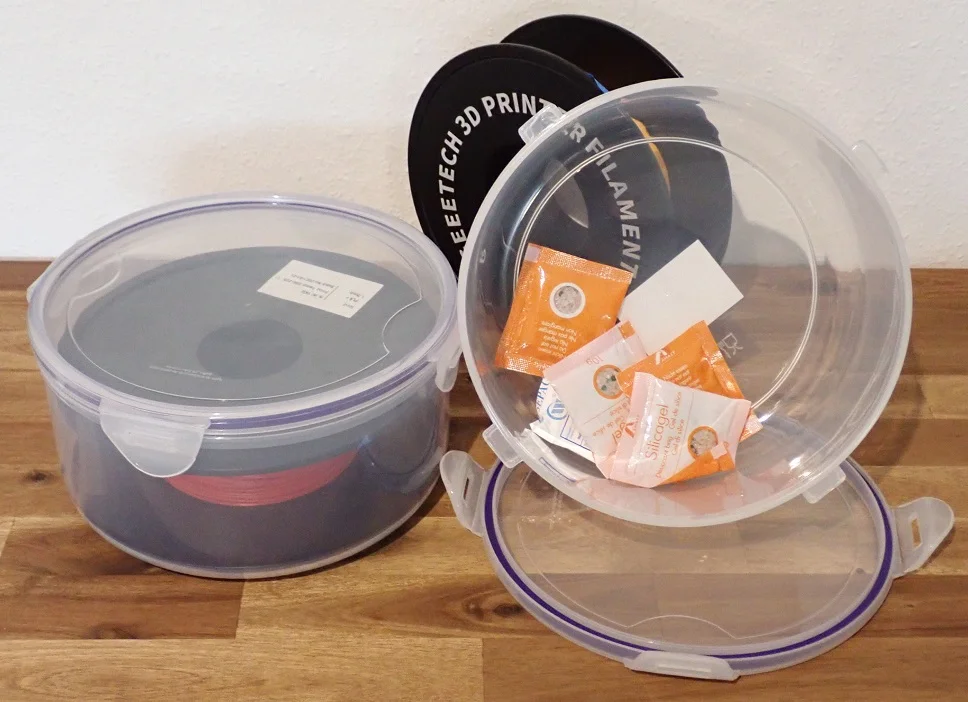
To keep your filament dry, store it in an airtight container with desiccants. These absorb moisture, ensuring the filament remains in optimal condition. Consider investing in a filament dryer, especially for materials prone to moisture absorption. Regularly drying your wet filament before use, particularly if it’s been exposed to open air, can significantly reduce stringing.
If you use PLA and store it at a relative humidity under 60%, you don’t need to store it airtight with desiccants for a few weeks. But almost every other filament should be stored in a dry place immediately. Especially PETG and Nylon filaments absorb moisture from the air at a fast rate and become wet quickly.
If you want to know more about how to store 3D printing material properly, you should read this guide: 3D Printer Filament Storage: Complete Guide & Best Practices
Clean the Nozzle
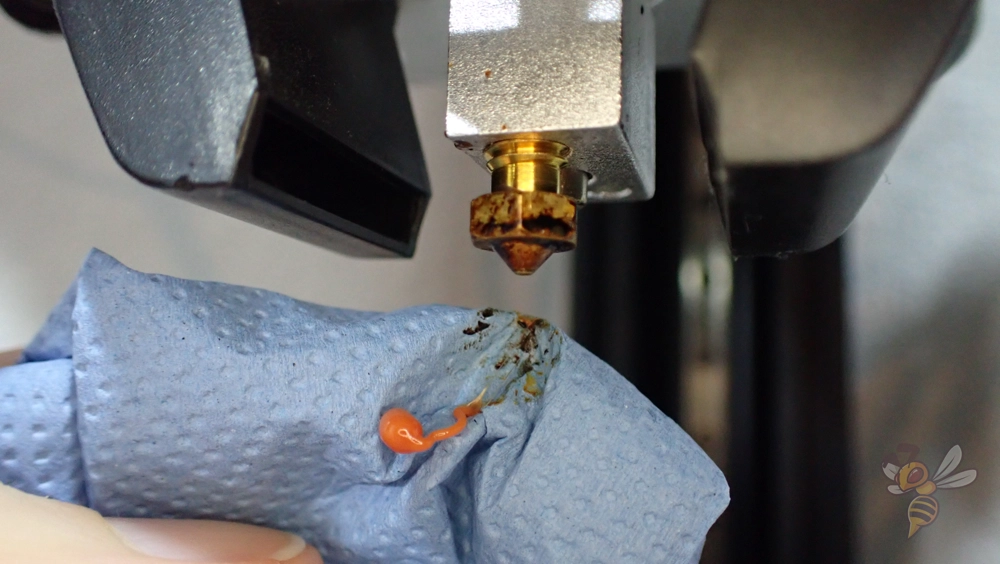
A clean nozzle is essential to avoid 3D print stringing and maintain print quality. Over time, filament residue can build up inside the nozzle, which can lead to a partial clogged nozzle. This not only affects the flow of the melted filament but also contributes to the formation of stringing in your printed parts.
Essential nozzle cleaning steps:
- Paper towel: Wipe the hot nozzle with a paper towel or damp cloth before each print. Do this at the right temperature for your last used filament to ensure any remaining filament residue is removed. This simple step can significantly reduce the likelihood of stringing issues because the extruded filament won’t stick to any residues on the nozzle.
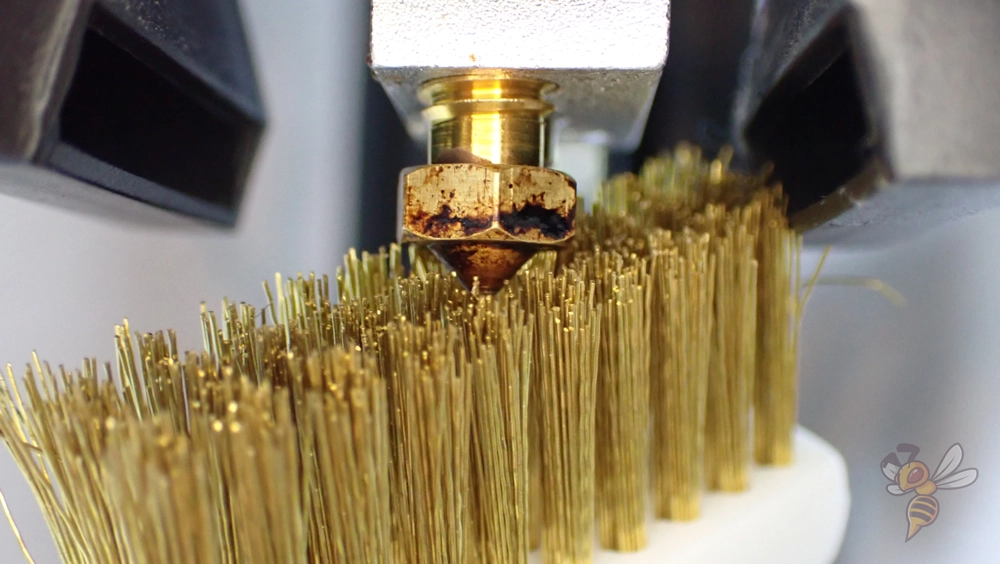
- Wire brush: For burnt in residue. Use gently and only if needed.
- Cleaning filament: This specialized filament cleans the nozzle from the inside. Use it regularly to avoid clogging and ensuring a smooth filament flow.
- Needle or Acetone: If your nozzle is heavily or completely clogged, carefully insert a needle into the hot nozzle and try to loosen the residue. If this does not help, remove the nozzle from the hot end and soak it in acetone until the residue has dissolved.
Activate or Increase Cooling
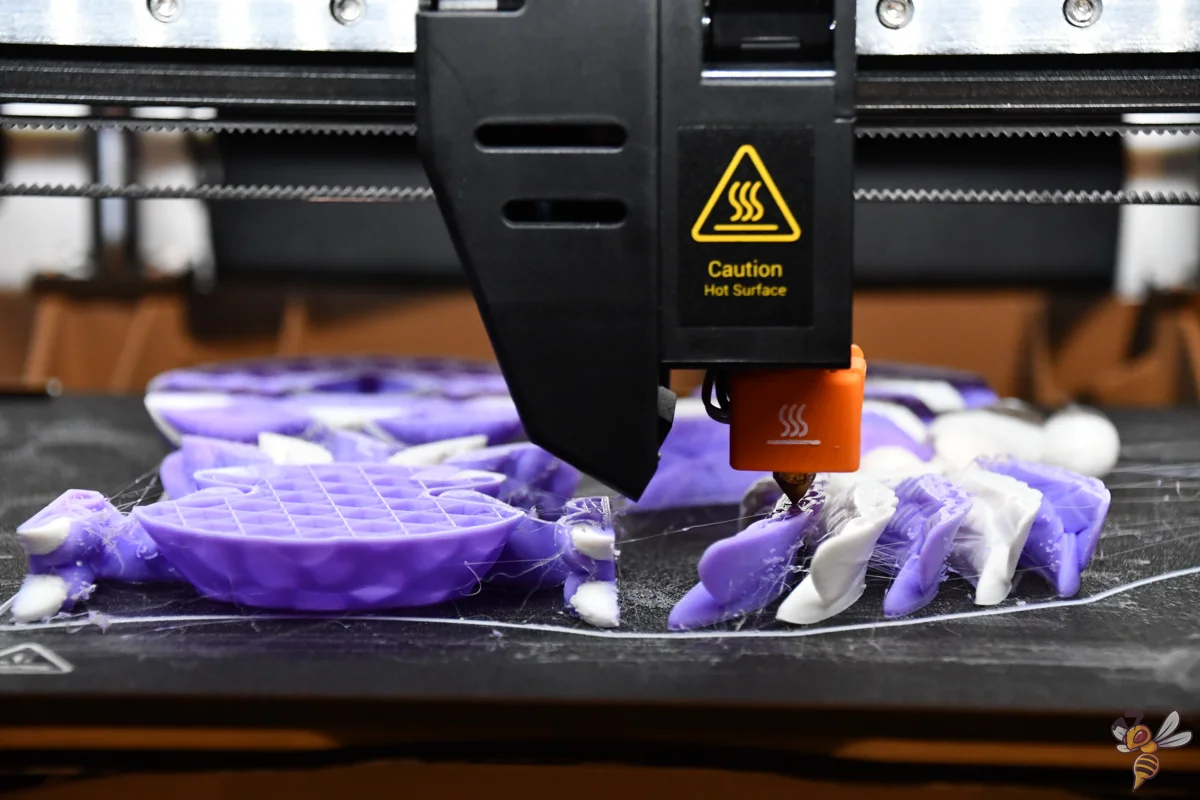
Cooling in 3D printing solidifies the molten filament faster, reducing stringing. When the melted filament extrudes from the nozzle, it’s in a liquid state. Without adequate cooling, this filament remains semi-fluid for longer, still partly sticking to the nozzle and stretching into thin strings as the print head moves away from the previously printed line.
Proper cooling quickly solidifies the extruded filament, minimizing its tendency to stick to the nozzle and form strings. This rapid solidification is crucial in maintaining print quality and avoiding the formation of unwanted thin strands between different parts of the printed object.
Different materials require distinct cooling settings. For PLA, cooling is generally set to 100% for most of the print, while ABS often requires minimal to no cooling to prevent warping. PETG, being somewhere in between, usually needs moderate cooling to strike the right balance.
Note: It’s important to deactivate cooling for the first 1-2 layers regardless of the material. This helps in maintaining strong bed adhesion.
Calibrate the Retraction
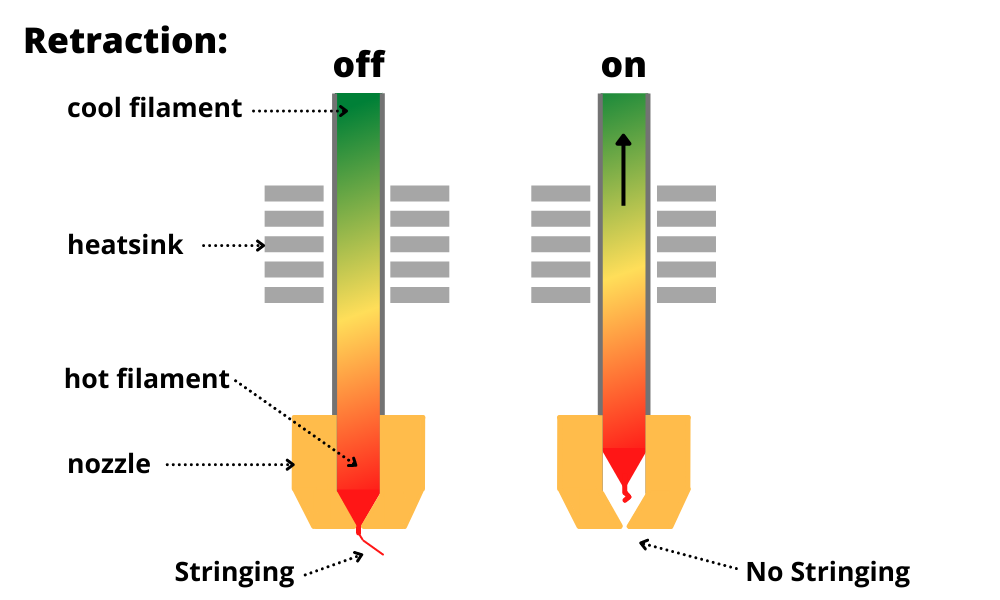
Make sure you enable retraction, as this is an important setting in 3D printing that prevents stringing. It works by pulling the filament back into the nozzle or retracting it during the non-printing movements of the print head. This action prevents the molten plastic from oozing out and forming those pesky thin strands known as stringing.
The correct retraction settings are arguably one of the most potent tools against 3D print stringing. To calibrate it, you’ll need to adjust two primary settings: retraction speed and retraction distance (or sometimes called retraction length).
The retraction speed dictates how quickly the filament is pulled back, while the distance determines how far back it retracts. It’s a delicate balance; too much retraction can cause clogged nozzles or under-extrusion, while too little leads to stringing.
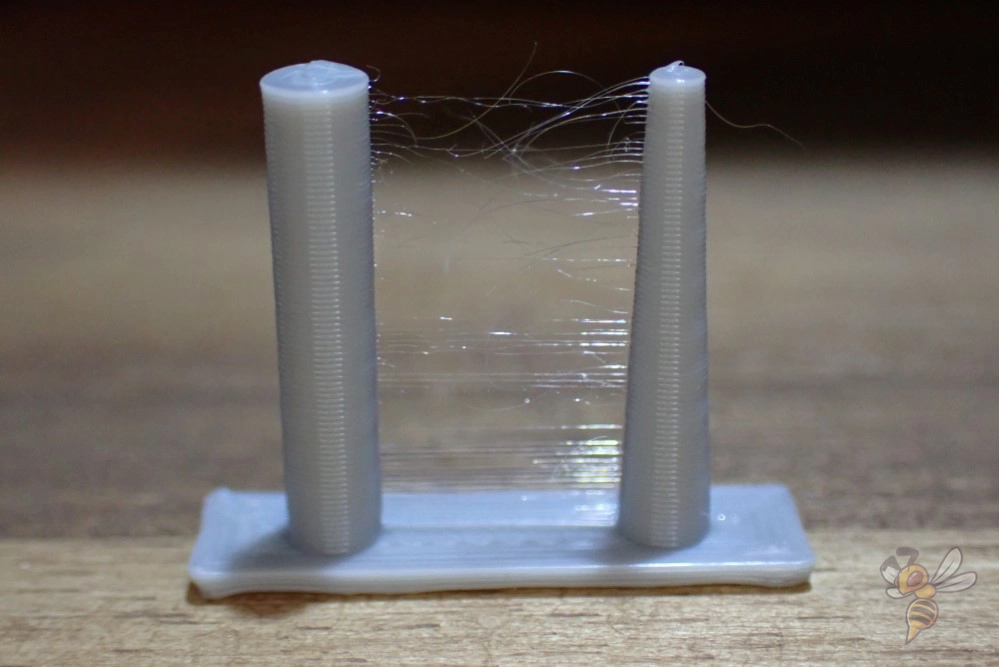
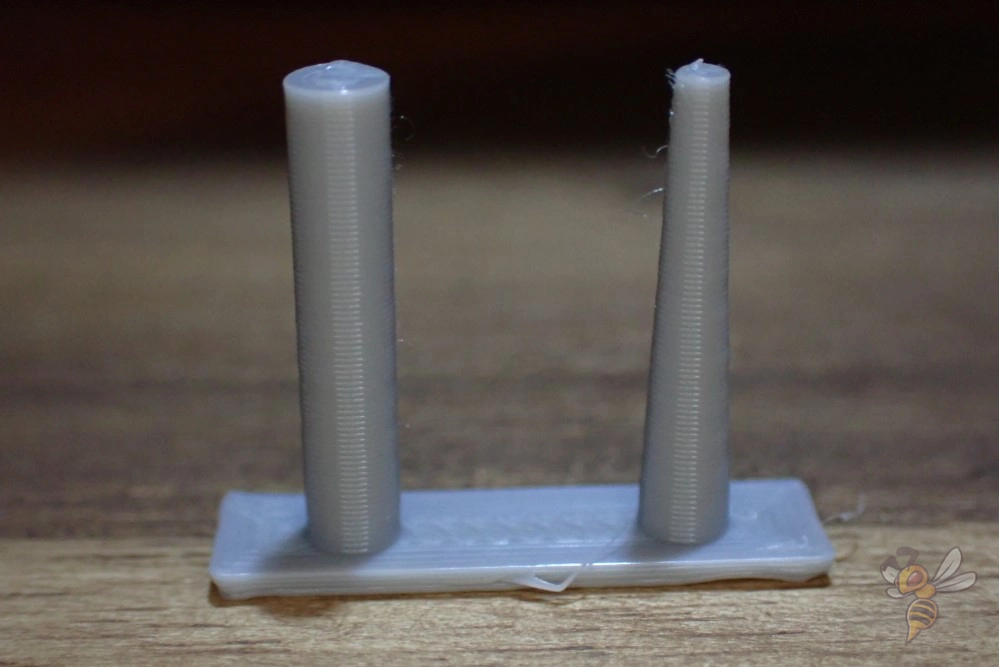
To find the perfect retraction settings for your printer, you have to calibrate them and try different retraction settings to find the optimal values. Start with the printer’s pre-configured profiles and adjust the retraction distance and retraction speed incrementally.
Be sure to only adjust one retraction setting at a time, either the retraction distance or the speed. If you adjust both at the same time, you won’t know which new setting is responsible for the changing stringing behavior.
For an in-depth guide on calibrating FDM 3D printers and comprehensive information on avoiding stringing, don’t forget to check out my article on FDM printer calibration and my 3D printing course. These resources delve into optimizing print settings and techniques to achieve the best print quality and minimize stringing issues.
Calibrate the Print Temperature
Calibrating the print temperature is essential for minimizing 3D print stringing. Higher temperatures can lead to more fluid filament, resulting in drips and stringing as the molten plastic is prone to ooze out of the nozzle. Adjusting the nozzle temperature downwards, in increments of 5-10°C, can effectively reduce stringing, but be cautious not to drop below the filament’s recommended minimum temperature.
Different printing materials require specific nozzle temperatures. For instance, PLA, ABS, PETG, TPE, PVA, and TPU each have their own ideal temperature ranges. Start with the recommended hot end temperature for your filament (usually printed on the filament spool) and try different nozzle temperatures.
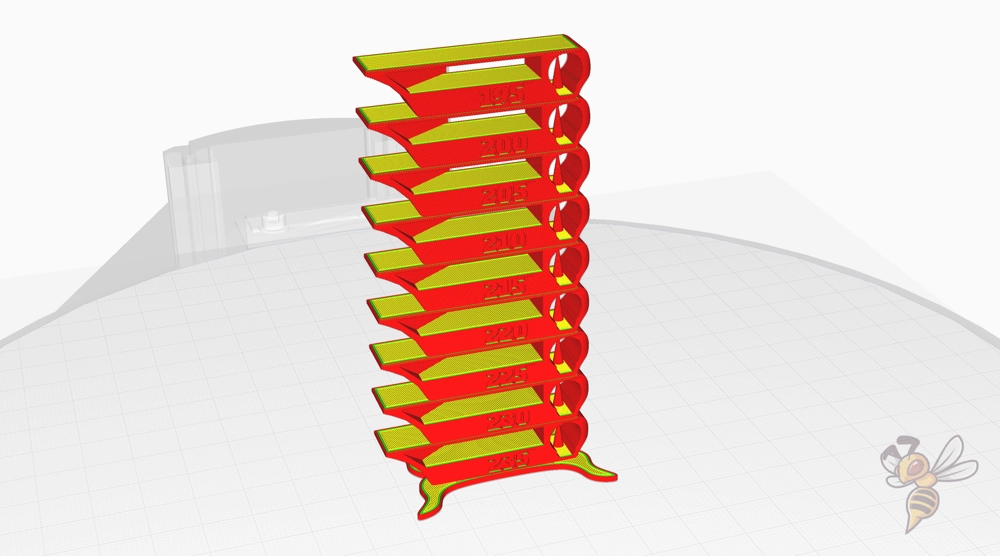
To precisely calibrate the temperature for your material, consider using temperature towers. These are special 3D prints designed to test filament behavior at various temperatures, helping you to visually identify the setting where stringing is minimized without compromising surface quality.
Remember, the key is to strike a balance. The temperature should be low enough to prevent excessive fluidity of the filament, thus reducing stringing, but high enough to ensure smooth flow and proper layer adhesion. Experimentation and gradual adjustments based on the specific characteristics of your filament and 3D printer will lead you to the ideal setting.
Increase the Travel Speed
Stringing only occurs during the non-printing movements of the print head. Addressing this, increasing the travel speed – the speed at which the print head moves when not extruding filament – can effectively reduce stringing. This is because faster movements leave less time for filament to ooze out of the nozzle, thus decreasing the formation of stringing.
It’s important to distinguish travel speed from print speed. While the print speed refers to the speed of printing actual layers, travel speed refers to the movement between these layers.
Adjusting the travel speed can lessen stringing, but it’s not a complete solution.
Activate Combing
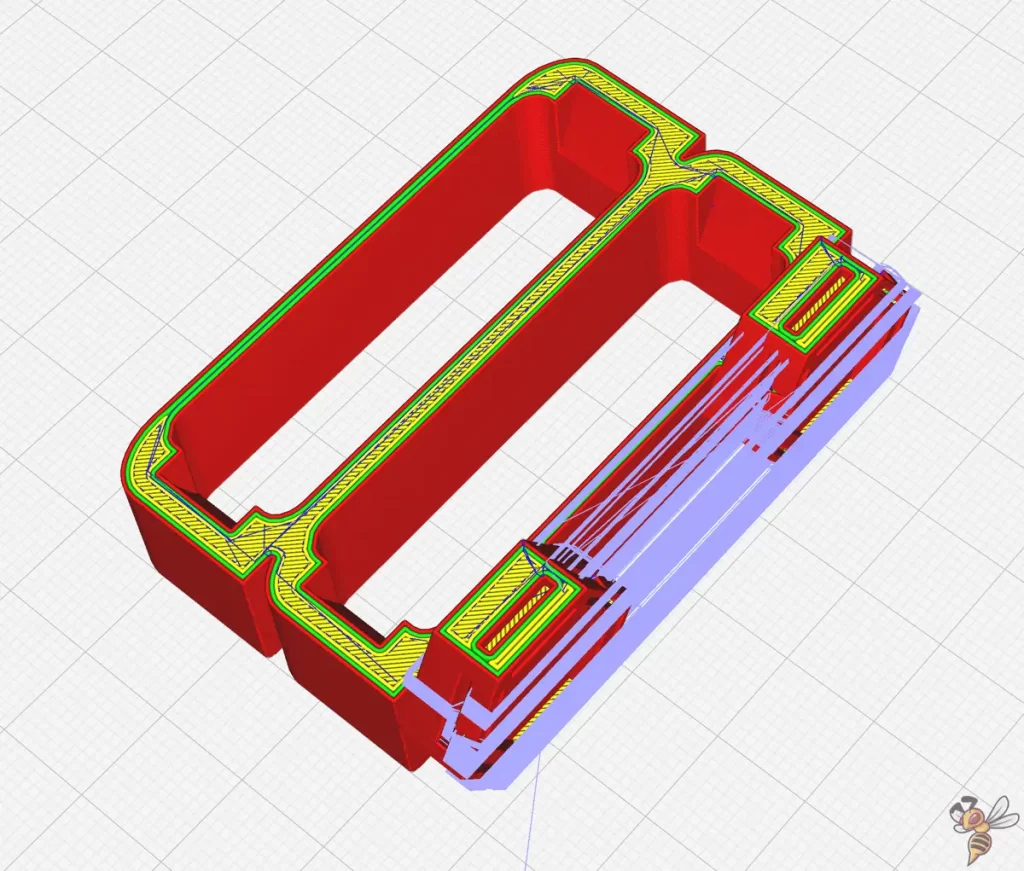

Combing is a technique in 3D printing that helps to minimize stringing by adjusting the travel path of the print head. This method involves the print head moving within the already printed parts instead of over open space, thereby avoiding stringing issues.
Key Points of Combing:
- Travel Path Optimization: Combing alters the travel path of the print head to stay within the boundaries of the print. This reduces the likelihood of stringing since the print head doesn’t cross open air where oozing and stringing are more likely to occur.
- Integration with Slicer Software: Most slicer software includes a combing mode setting. You can activate it in the print settings, usually under the travel or retraction settings section.
- Balancing Combing with Other Print Settings: While combing can significantly reduce stringing, it should be balanced with appropriate nozzle temperature, retraction settings, and printing speed to optimize print quality.
- Effectiveness Across Different Materials: Combing is particularly effective for materials prone to stringing like PETG and TPU. However, for materials that ooze less, like PLA, the benefits might be less noticeable.
Activate Coasting
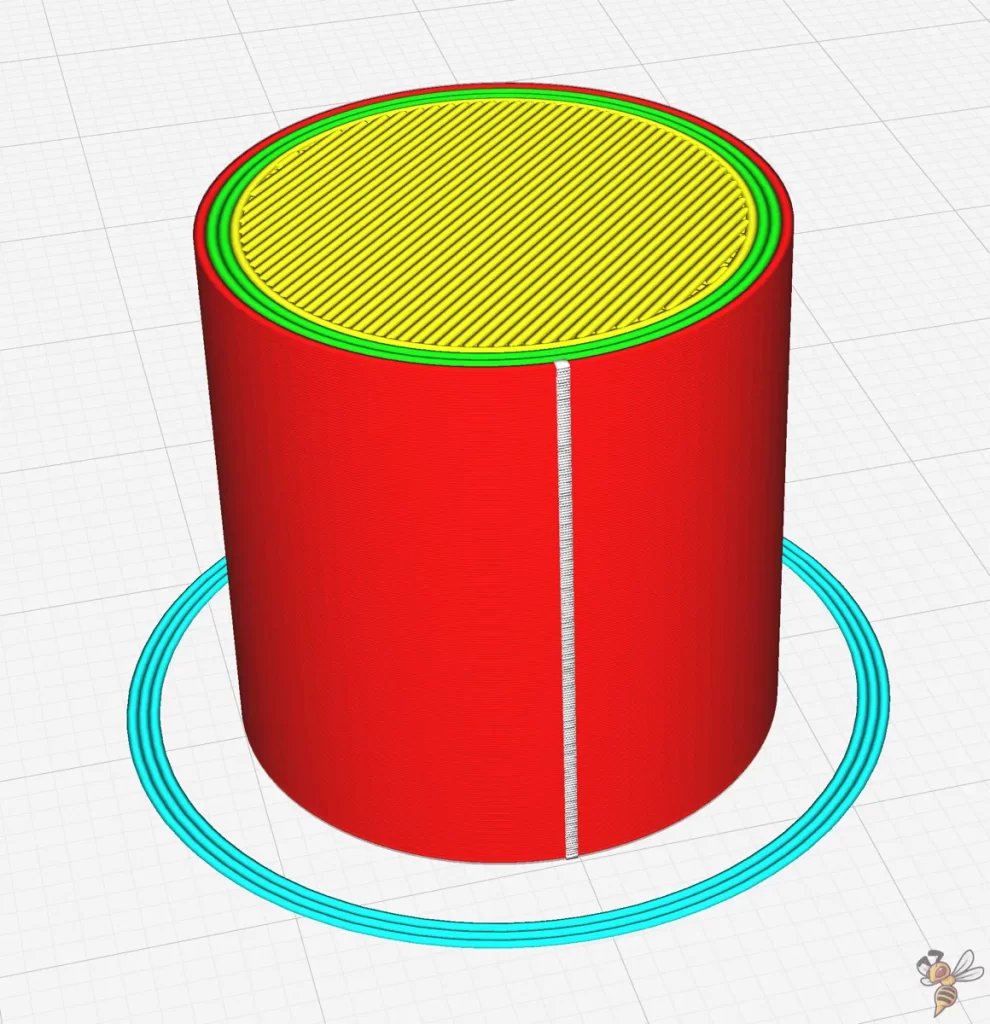
Coasting is an advanced technique used in 3D printing to help reduce stringing. This method involves automatically stopping the extrusion of filament a short distance before the end of a print movement. By doing this, it utilizes the molten filament still present in the nozzle, rather than adding more, which can lead to stringing.
When activated, coasting stops the extruder a bit early at the end of a print line. The remaining pressure in the extruder and the melt zone is enough to complete the line without additional extrusion.
Start with a small distance and increase it incrementally. A longer distance might be needed for more fluid filaments. Experiment with different coasting distances to find the balance that minimizes stringing without creating gaps in your printed part.
Remember, coasting is a complement to other settings like retraction speed, retraction distance, and nozzle temperature. It’s crucial to balance all these elements to achieve optimal print quality and minimize stringing.
Activate Wiping
In addition to the strategies already discussed, activating the wiping feature in your 3D printer’s settings is an effective method to further reduce stringing. Wiping is a function that cleans the nozzle of any excess molten filament before the print head moves to a new location, helping to minimize the formation of unwanted strings.
Wiping works by moving the print head over a small area or a ‘wipe tower’ after each layer is printed. This action scrapes off any oozing or excess filament from the nozzle, ensuring that when the print head moves, it does not drag any molten plastic across the printed part.
This process is especially beneficial when working with materials like PETG or Nylon, which are more prone to stringing. It is a makeshift solution if the other settings or methods discussed in this article didn’t work.
Conclusion
In summary, effectively reducing 3D print stringing involves a multifaceted approach. By carefully adjusting retraction distance, nozzle temperature, and implementing techniques like coasting and combing, you can significantly improve print quality.
Each 3D printer and filament type may require different settings, so experimentation and fine-tuning are key!
Disclosure: This website is the property of Martin Lütkemeyer and is operated by Martin Lütkemeyer. Martin Lütkemeyer is a member of the Amazon Services LLC and other Affiliate Programs. These are affiliate advertising programs designed to enable websites to earn advertising revenue through advertising and linking to Amazon.com and others. Links marked with * are affiliate links.
