
- Wet Filament: Prevention, Symptoms & Drying - July 18, 2024
- Sovol SV08 – Best PrusaSlicer Settings & Profile - June 26, 2024
- Sovol SV08 – Best Orca Slicer Settings & Profile - June 26, 2024
Disclosure: Links marked with * are Affiliate Links. I earn from qualifying purchases if you decide to make a purchase through these links – at no additional cost for you!
In 3D printing, over-extrusion is a significant problem. It often results in suboptimal results. Sometimes, you may even have to restart the process completely.
These incorrectly selected settings are usually to blame for over-extrusion:
- printing temperature too high
- feed length too long / flow too high
- empty runs that last too long (movements of the nozzle without printing)
In this article, you will learn more about these points, how to avoid over-extrusion alltogether and which aspects you should pay attention to when setting up the printer.
Table of Contents:
- 1 Consequences of Over-Extrusion
- 2 How Over-Extrusion Occurs
- 3 How to Avoid Over-Extrusion
- 3.1 It all depends on the material
- 3.2 Pay attention to the printing temperature
- 3.3 Do not set the feed length too high
- 3.4 The most important settings for movement speed
- 3.5 This is important for the feeding speed
- 3.6 This is what the maximum number of feeds and the minimum movement is all about
- 3.7 With Coasting to a clean print
- 3.8 Set the wipe
- 3.9 Deactivate the Z-Hop
- 3.10 Pay attention to the condition of the nozzle
- 3.11 The length of the melting zone depends on
- 4 Further Information
Consequences of Over-Extrusion
Over-extrusion is a major problem in 3D printing. This is especially true when the condition is chronic. The device then prints far too hot, which leads to so-called stringing or blobs. It is therefore essential to calibrate the extruder correctly. It is essential that the material output is correct. This is the only way to ensure that the result is really beautiful and in line with your expectations.
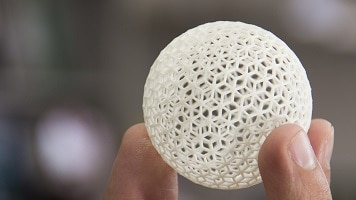
Over-extrusion proves to be a problem especially with sensitive, softer materials and with filigree printing. This is where it is particularly important that the device works with great attention to detail.
The phenomenon can also cause each layer to be slightly thicker than originally intended. In the worst case, the tip of the nozzle will pass through the print, which will significantly affect the result.
Related Post:
PLA Stringing Guide: 12 Solutions to Avoid Hairs
Related Post:
3D Printer Guide 👉 Avoid Blobs, Picks, Blobs & Zits
How Over-Extrusion Occurs
Over-extrusion is mainly caused by a printing temperature that is set too high. The hotter the printer, the more liquid the material in question becomes, with large quantities of it escaping from the nozzle. As a result, the details are no longer solidly bonded, and the result is imprecise. So if you want to avoid this scenario, you should reduce the printing temperature.
Another factor that can lead to over-extrusion is the wrong feed length. This value is also often set too high. This is of course associated with damaging effects on the printed image. This often results in indentations that take the form of pockmarks. This can also lead to blockages on the device after a long printing time.
You should also pay attention to the movement speed. In this context, you have to pay special attention to the idle speed. Keep the so-called “empty runs” as short as possible – in this way you avoid a liquid material dripping from the nozzle.
How to Avoid Over-Extrusion
Over-extrusion can be avoided with a few simple steps. In this chapter you will get an overview of the individual methods. But keep in mind that the ideal setting always depends on the printer model and the material used and the desired result.
It all depends on the material
Feed length, printing temperature and feed speed must be matched to the filament type. Many manufacturers provide you with prefabricated profiles for certain materials. Choose the option that best suits the chosen material.
You will then have the opportunity to make adjustments. In doing so, you always have to proceed precisely and carefully. Make sure that you do not accidentally overwrite the basic settings of the profiles permanently. This could have a negative effect on future prints.
Usually, the settings menus are clearly arranged. So even as an inexperienced user you should have no problems making the desired changes.
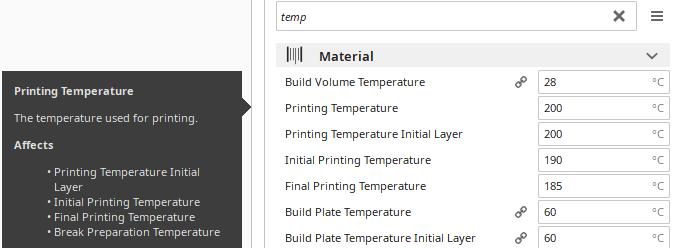
Pay attention to the printing temperature
If the printing temperature is set too high, on the one hand too much filament comes out of the nozzle and on the other hand, it leads to so-called stringing and has negative consequences for the result.
So for some materials, the solution to this problem is to keep the print at the lowest possible temperature. However, this is a disadvantage with some filaments – they tend to string even if the printing temperature is set too low. In general, you will get the best results between 195°C and 205°C. However, you should always pay attention to the nature and requirements of the filament in question.
If you are not sure about the correct settings for your material, you should make test prints. This way you can see if the look is what you want, and save yourself additional time.

Do not set the feed length too high
As already mentioned, the feed length or flow is often set too high. If you are working with a direct extruder, lengths between 0.5 and 2 millimeters are usually perfectly adequate. You can choose a slightly higher value if you use a Bowden extruder. In this case, feed lengths between 3 and 8 millimeters are the best choice.
If you want to avoid over-extrusion, start at a low range. Later you can increase the length step by step. It is also recommended to make test prints. With them you will find out which value is the best choice for you.
It should also be noted that the consequences of a too high feed length are not always immediately visible. This is especially true if the print lasts for several hours. In this case the nozzle can become gradually blocked.
PLA* then begins to soften too early – i.e. above the melting zone. If the area in question cools down again, the material solidifies, resulting in clogging. Remember that the glass transition temperature for PLA starts at 55°C.
You can define the feed length in the material profile already described. This is a process that does not take much time.
The most important settings for movement speed
In 3D printing, you should always keep in mind that molten material remains in the nozzle. It doesn’t matter how fast you shape to the feed. This is because it is not possible to create a vacuum in this process. During very long empty runs, there is therefore a possibility that the material drips out of the nozzle – the selected temperature also has an influence on this.
So if you want to do a test print, you should rely on a realistic empty run. A sample with only short intervals proves to be less suitable in this respect.
Also keep in mind that stringing always occurs during empty runs. So if you want to get a perfect result, you should also optimize this factor. All slicers show the empty runs in their print preview. It is best to keep this value as short as possible. To achieve this, it is sometimes necessary to arrange the objects on the printing bed intelligently. In this case, set to short distances.
You can also shorten empty runs by programming your printer not to bypass support structures or printed parts. Alternatively, it is possible to keep the bypass distance short. However, this may cause the problem that the liquefied material drips from the nozzle onto the already printed parts. So you should only select this option if you are working with materials that have a comparatively high melting point.
An alternative option is the intelligent positioning of the layer transition point. The correct setting of the Z-seam plays an important role here. Usually, both points can be set separately.
Ultimately, empty runs can also be avoided by a high speed of movement. This will ensure that you arrive quickly at the endpoint of the empty run. The liquefied material thus has less time to drip out of the nozzle. The filament thread also breaks off quickly – it does not pull any threads, so you counteract the stringing.
However, you will soon reach your limits when it comes to speed. This is especially true for the i3 design when the bed moves in the Y-direction. A heavy glass bed does not allow for too fast movements. If you set the speed too high, layer shifts and vibrations are the result. The same applies if the extruder design is heavy. In this case the X-axis will soon reach its limit.
You can easily increase the speed of beds that move only in the Z direction. Even with light Bowden extruders, you should have no problems. A speed of up to 200 millimeters per second is no problem.

Related Post:
PLA Print Speed: How to Find the Optimal Settings
This is important for the feeding speed
To achieve a good result, it is important to determine the feeding speed correctly. Make sure that you do not set the retract and feed speed too high.
This is sometimes counterproductive and leads to suboptimal printing. It is worth testing different speeds for feed and take-up. This way you can see what result you can expect with the different settings.
This is what the maximum number of feeds and the minimum movement is all about
With the setting “Combing” you can prevent indenting. But you also have other options to do this. Most notably, the “minimum movement for indentation” is worth mentioning here. With this option, you determine that the move-in is only carried out when the distance is noted as an empty trip. If this value is lower, there will be no moving in.
Another essential feature is the “Maximum indents” function – it is coupled with the “Minimum extrusion distance” option. In this case, the goal is to prevent the filament from sliding back and forth over a point on the filament several times. This is because the latter could be damaged in the process, making it impossible to print the filament properly. You can counteract this scenario by specifying in the settings that only a certain number of indents may be made on one stretch – the length is specified here in millimeters. Users can use the length of the indents as a guide. As a rule, however, there should never be more than 90 indents on a distance of a few millimeters.
With Coasting to a clean print
In general, the feeder needs precise control over the filament so that the printer can perform the retraction cleanly. In concrete terms, this means that when the feeder stops, no more liquid material may drip from the nozzle. Otherwise, pimples and lumps can form on the print. These are often found at the beginning of the empty run, i.e. at the end of the layer. In addition, stringing can occur in this case.

Coasting means translated as “rolling out”. So you give the printer the opportunity to stop the filament feed before the end of the layer. This creates a torn gap. This is intentional because the excess filament fills this area. If the empty run then begins, there is no more liquid material in the nozzle.
In this respect, it is necessary to work with a volume of material. For some models, however, the specification of a “roll-out distance” in millimeters is sufficient. However, there is a risk that you will stop the material flow too early. As a result, your model will end up with holes, so do not set the value too high if you are not experienced in this area.
Set the wipe
The “wipe” function refers to the wiping of the nozzle towards the end of the layer – this process takes place before the nozzle is idle. In this way you can get rid of excess material before it runs out. You also create a smooth transition to the line printed before. These aspects also have a positive effect on the final result. At the layer change points you avoid dents with this technique, and the activation of the wipe also counteracts stringing. In this case, you don’t have to deal with surplus material.
However, in this case you must make sure that the nozzle does not touch the printed piece. This often occurs with over-extrusion. Therefore, you should also rely on test prints in this case.
Deactivate the Z-Hop
If your 3D printer is correctly calibrated, you don’t need Z-Hop. Because this feature can cause picking at the feed points. This in turn reinforces the stringing.
Over-extrusion often tries to combat the problem with the Z-Hop. Although this already avoids grinding the nozzle on the workpiece, it can make the stringing even stronger.
If you want to activate the Z-Hop anyway, you should test the settings first. This way you can see if this option solves your problem or strengthens the stringing.
Pay attention to the condition of the nozzle
Wear and tear or damage to the nozzle can also result in over-extrusion. Therefore, if the print is faulty, check the condition of the nozzle. Watch out for cracks or chipping.
If this part of the 3D printer is simply dirty, you should clean it. If there are deposits in the nozzle, they can cause the machine to reject too much material.
In case of doubt, you should simply replace this part. However, you will have to accept additional expenses.

The length of the melting zone depends on
This factor plays an important role especially for high-speed printers or particularly large nozzles. If it is rather high, a large supply of molten material accumulates. This makes it easier to produce strings or print errors. In this case, it is recommended to use a smaller, more precise article.
Further Information
Where can prospects find a good quality 3D printer?
If you want to enjoy beautiful results, you should first of all make sure that you buy a good quality device. Today you can find all models online*. You can look forward to a large selection. But as a beginner, you can easily lose track of what’s going on. In order to make a well-thought-out decision, you should take a close look at the individual devices. Get an impression of their features, strengths and weaknesses – ideally you should also compare several products with each other so that you can make a well-considered choice.
You can also purchase a 3D printer from your local dealer. This gives you the advantage of being able to get an on-site impression of the device in question and its capabilities. Plus, if you have any questions, you’ll have a knowledgeable representative ready to help you. However, in this case, you must limit yourself to the offer of the seller in question. Even a price comparison is not so easy with this type of purchase.
Which option you choose is ultimately up to you. However, the focus should always be on the quality and functionality of the printer.
How much does a 3D printer cost?
The cost of a 3D printer is generally affordable. You can expect to spend hundreds of dollars. However, beginner models are usually available for as little as 200 dollars*. In general, the more features the machine has, the higher the price.
You can upgrade your 3D printer at any time, if necessary. Special kits are available for this purpose. Again, you can expect double-digit costs. If you want to save money, you should compare the prices of different dealers. Also, look out for discounts and special offers.
But never make your decision based on price alone. It’s important that the 3D printer fits you and your needs. If you purchase a device online, the seller should also grant you the right to return and exchange it. That way you avoid unnecessary expenses.
Disclosure: This website is the property of Martin Lütkemeyer and is operated by Martin Lütkemeyer. Martin Lütkemeyer is a member of the Amazon Services LLC and other Affiliate Programs. These are affiliate advertising programs designed to enable websites to earn advertising revenue through advertising and linking to Amazon.com and others. Links marked with * are affiliate links.
