
- Wet Filament: Prevention, Symptoms & Drying - July 18, 2024
- Sovol SV08 – Best PrusaSlicer Settings & Profile - June 26, 2024
- Sovol SV08 – Best Orca Slicer Settings & Profile - June 26, 2024
Disclosure: Links marked with * are Affiliate Links. I earn from qualifying purchases if you decide to make a purchase through these links – at no additional cost for you!
Blobs and Zits can make your 3D printed objects unsightly and ruin all your work. Since this error is determined by so many influencing factors, it is often not easy to get the error under control without help.
Blobs and Zits are caused by either wet filament or incorrect print settings. Only dry filament should be used for 3D printing – dry storage is important. Optimizing the print speed and especially the retraction settings prevents Blobs and Zits.
How to implement and test this, you will learn in this article.
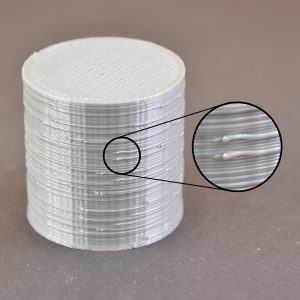
Table of Contents:
Why do Blobs and Zits form?
Blobs and zits occur because the extruder starts and stops very often during the 3D printing process.
Blobs are thus created at the point where the extruder has started to print a section of the outer shell and returns to this point after the 3D printing of the circumference.
This joint is very tricky in 3D printing, as it is not easy to join two plastic sections together without leaving ugly marks.
The causes for the formation of these bumps are numerous and we would like to give you an overview of the most common causes that promote the formation of these blobs and zits.
However, there are some solutions that we would like to present to you now so that the unpleasant blobs do not appear on the surface of your 3D object.
What are Blobs and Zits in 3D Printing?
The majority of extruders ensure a uniform extrusion during the printing process, but constant switching on and off can cause problems.
If you look closely at the outer shell of your 3D object, you may notice a small mark on the surface.
This mark represents the point where your extruder started printing this section. In addition, the extruder will return to this mark when printing is finished. These marks are called blobs and zits.
Too much Filament
Before you try to reduce unsightly bumps, you should find out where exactly the little blobs form.
Observe the printing process in progress. If blobs and zits occur when the extruder is about to start printing the circumference, your extruder is extruding too much filament. The same happens if blobs appear at the end of the layer to be printed.

To prevent blobs and zits at the beginning or end of a print turn, you should adjust the retraction settings. It is recommended to add an additional negative retraction distance.
The additional restart distance determines the difference when the extruder stops between the retraction distance and the new intake.
If you notice the surface defect right at the start, your extruder will prime too large a quantity of filament. You should therefore reduce the suction distance by programming a negative value for an extra restart distance.
For example, if your retraction distance is 2.0 millimeters, you should add an extra restart distance of minus 0.4 millimeters. This will cause your extruder to stop every time the filament retracts 2.0 millimeters.
As soon as your extruder starts up again, your material is pushed back into the nozzle by only 1.6 millimeters.
This way you can adjust the number until the unsightly blobs and zits are no longer displayed.
Too High Pressure in the Extruder
Blobs and zits occur more frequently when too much pressure builds up in the extruder. Too much pressure causes larger quantities of liquid filament to be squeezed out than you intended.
Tip for Preventing Blobs and Zits at Startup
If you notice that blobs and zits appear when your extruder has finished printing the circumference, you should adjust the so-called roll-out setting.
If you change this setting, you can release some pressure in the extruder. This will cause the extruder to shut down just before the printing process is finished.
Slightly increase the roll-out value and see if there are still unsightly blobs and zits.
If these are still visible but less pronounced, you know that you have identified the cause and can adjust the setting with sensitivity.
Tip for Preventing Blobs and Zits at the End
If you notice the defect at the end of the circumferential printing, i.e. when your extruder comes to a standstill, you have to adjust the setting of the unrolling.
Directly below the settings for the retraction, there is also the setting “Rollout”. When rolling out, your extruder will be switched off just before the circumference print is finished.
This leads to a reduction of the pressure built up in the nozzle. Activate this roll-out option and increase the value until this unsightly printing error no longer occurs. You should observe your extruder when it comes to a standstill after printing the outline.
In most cases, a roll-out distance of 0.2 to 0.5 millimeters is completely sufficient and can prevent the unpleasant formation of spots.
Avoid Unnecessary Withdrawals
The settings just described with regard to the retraction and roll-out of the filament help to avoid misprints when retracting the nozzle.
In some cases, however, avoiding filament retraction is the solution to the occurrence of blobs and zits.
This means that it is no longer necessary for your extruder to be reversed. If no filament is retracted, your extruder can continue the extrusion continuously and evenly.
Especially if you use a Bowden extruder*, this approach is recommended. With Bowden extruders, the distance between the nozzle and the motor of the extruder is large and therefore the retraction of the filament is difficult.
Withdrawals are mainly used to prevent the filament from running out when moving the nozzle between the individual pressure sections.
However, if the nozzle does not cross an open space, the liquid filament drips only on the inside. However, this is not particularly problematic as you cannot see any unattractive blobs and zits from the outside.
This is the reason why many 3D printers use the “Retract only when crossing open spaces” setting.
You can usually make a similar setting in the 3D printer’s motion behavior. If your 3D printer only retreats when crossing open areas, you should redirect the return path.
Simplify3D offers a very practical feature that allows you to redirect the path of your extruder to prevent it from exceeding an outline. This also prevents your extruder from retracting and liquid filament from leaking out unintentionally.
If you want to use this feature, enable the “Avoid outlines for travel movements” option.
Unsteady Retraction
Another useful feature of your Simplify3D software is the ability to perform unsteady retractions.
Especially if you have a Bowden extruder, you can try this solution. With these 3D printers, there is a high risk that a spill of liquid filament will be discharged due to overpressure, even when the extruder is at a standstill.
That’s why Simplify3D comes with a handy option that lets you keep the nozzles moving while you retreat.
To activate this function you have to adjust some settings.
First, you have to click the button “Edit process settings”.
Now switch to the “Extruder” tab and make sure that you have activated the “Wiper Nozzle” option.
If this option is active, your nozzles will be wiped at the end of each print cut.
Enter the wiping distance for this. Five millimeters is a good starting point.
Now switch to the “Tab Advanced”. Enable the option called “Perform retraction while wiping”. This allows you to prevent the nozzle from retracting stationary. Your 3D Printer is now only instructed to wipe the nozzle and not retract it.
This powerful feature is an optimal solution to prevent the unsightly blobs and zits and create a clean surface.
Position of the Starting Points
If you still notice small pimples on the surface of your three-dimensional object, you can use another option of Simplify3D.
This option allows you to control the position of the starting points.
To do this, click on the “Edit process settings” button. Select the “Level” tab. Usually, these positions of the starting points are selected to optimize the printing speed.
Now you have the possibility to determine the placement of the starting points. Either you choose them randomly or you align the starting points at a certain position.
For example, if you want to print a sculpture, you can align any starting points so that they are on the back of your object. This has the advantage that the starting points are not visible from the front and small bubbles do not stick out because they are on the back.
If you want to change the starting points, activate the option “Select starting point closest to a certain location” in the Simplify3D software. Enter the corresponding XY-coordinate where you want to place the start points.
Reduce Printing Speed
Often a high printing speed leads to errors. A fast print is usually at the expense of the quality of the object. If the print speed is set too fast, your 3D printer will not be able to hold the exact position and the risk of small filament smudges on the outer shell of your object will increase.
To do this, simply reduce the speed of the printing process and observe whether the surface finish improves.
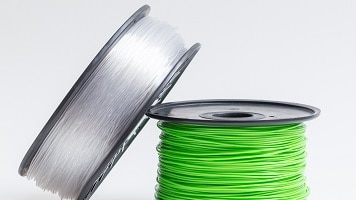
Filament Drying
The formation of blobs and zits is also supported by a filament that is too wet. The majority of filaments is hygroscopic.
This means that the filament absorbs water molecules from the air and binds them to itself. Due to the absorbed liquid, the filament becomes wet. If there is a wet material in the nozzle, the moisture is converted into steam.
Consequently, the pressure created is reduced via the exit of the nozzles. This process is often accompanied by unattractive filament splashes, which settle on your object in the form of bubbles.
To ensure that your material for 3D printing doesn’t bind too many water molecules, you should optimize storage. With many filaments, just a few hours without appropriate packaging are enough to saturate with water.
You cannot see the moisture content of your 3D material with the naked eye.
Manufacturers of 3D filaments seal the materials immediately after production to prevent moisture to get in.
Wrongly stored filaments not only form unsightly bubbles, but they can also make your object more susceptible to breakage, become brittle or change diameter or color!
Do not open your filament out of curiosity, but only when you need the material for 3D printing. Make sure that your filament is always packed airtight. This way you avoid unnecessary moisture in the filament.
Ideally, the filament should be placed in a bag and the air should be sucked out with a vacuum sealer*.
Alternatively, you can wrap your material airtight in foil and store it in a box. It is also important that you store your filament in a dark place. Add some desiccant* which absorbs the water molecules from the air.
It is also advisable to store them in airtight vacuum boxes or paint buckets, which you can buy in a DIY store.
If you have less storage space available, you can also store your material in a vacuum pouch or vacuum bag. Don’t save at the wrong end and buy a vacuum bag made of sturdy plastic with a double zipper. These models have a lower risk of getting cracks or holes.
Test Print with Special Objects
Because these blobs are a common problem in the 3D printing community, there are a few nifty hobby printers who have designed special objects to test the settings of your 3D printer:
With this object you can adjust your 3D printer perfectly to your filament to avoid these nasty misprints!
Disclosure: This website is the property of Martin Lütkemeyer and is operated by Martin Lütkemeyer. Martin Lütkemeyer is a member of the Amazon Services LLC and other Affiliate Programs. These are affiliate advertising programs designed to enable websites to earn advertising revenue through advertising and linking to Amazon.com and others. Links marked with * are affiliate links.
