
- Wet Filament: Prevention, Symptoms & Drying - July 18, 2024
- Sovol SV08 – Best PrusaSlicer Settings & Profile - June 26, 2024
- Sovol SV08 – Best Orca Slicer Settings & Profile - June 26, 2024
Disclosure: Links marked with * are Affiliate Links. I earn from qualifying purchases if you decide to make a purchase through these links – at no additional cost for you!
Stringing in 3D printing creates frustration and often a feeling of being overwhelmed when you don’t know why it occurs or how to fix it.
With 3D printing, print errors are not uncommon and you are not alone with the problem of your PLA pulling strings.
In this article, you will learn what stringing is, why this printing error occurs and what the possible solutions are. I have calibrated over 40 different 3D printer models and guarantee that the steps will work for PLA.
To avoid stringing with PLA these steps are necessary:
- Use dry PLA only
- Clean the nozzle
- Reduce print temperature
- Activate retraction
- Optimize retraction settings
- Increase speed
Table of Contents:
- 1 What is Stringing in PLA Printing?
- 2 Why does PLA Leak from the Nozzle?
- 3 Is PLA more Susceptible to Stringing than other Filaments?
- 4 How to Avoid Stringing Step-by-Step
- 4.1 Step 1: Dry PLA Filament
- 4.2 Step 2: Clean the Nozzle
- 4.3 Step 3: Lower the Print Temperature
- 4.4 Step 4: Enable the Retraction
- 4.5 Step 5: Optimize Retraction Settings
- 4.6 Step 6: Raise Travel Speed
- 4.7 Step 7: Deactivate Z-Hop
- 4.8 Step 8: Activate Wipe
- 4.9 Step 9: Activate Coasting
- 4.10 Step 10: Replace Nozzle
- 4.11 Step 11: Smaller Nozzle
- 4.12 Step 12: Thinner Bowden Tube
- 5 Test Your Printer Settings
- 6 Bottom Line
What is Stringing in PLA Printing?
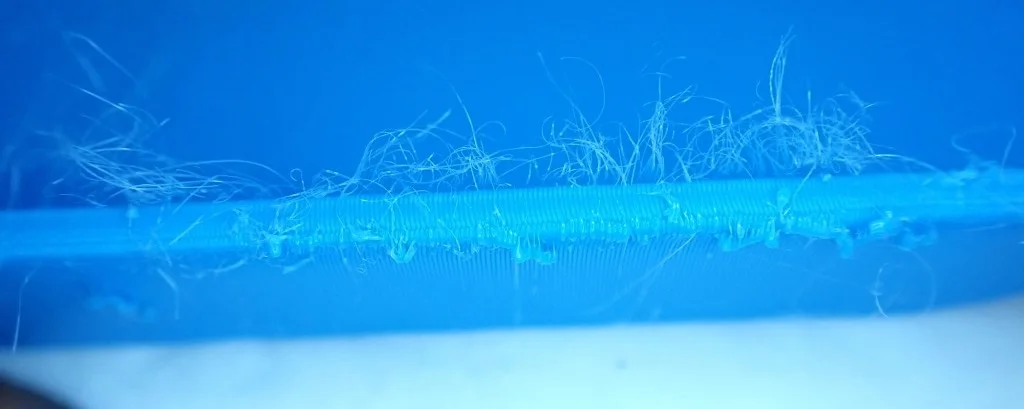

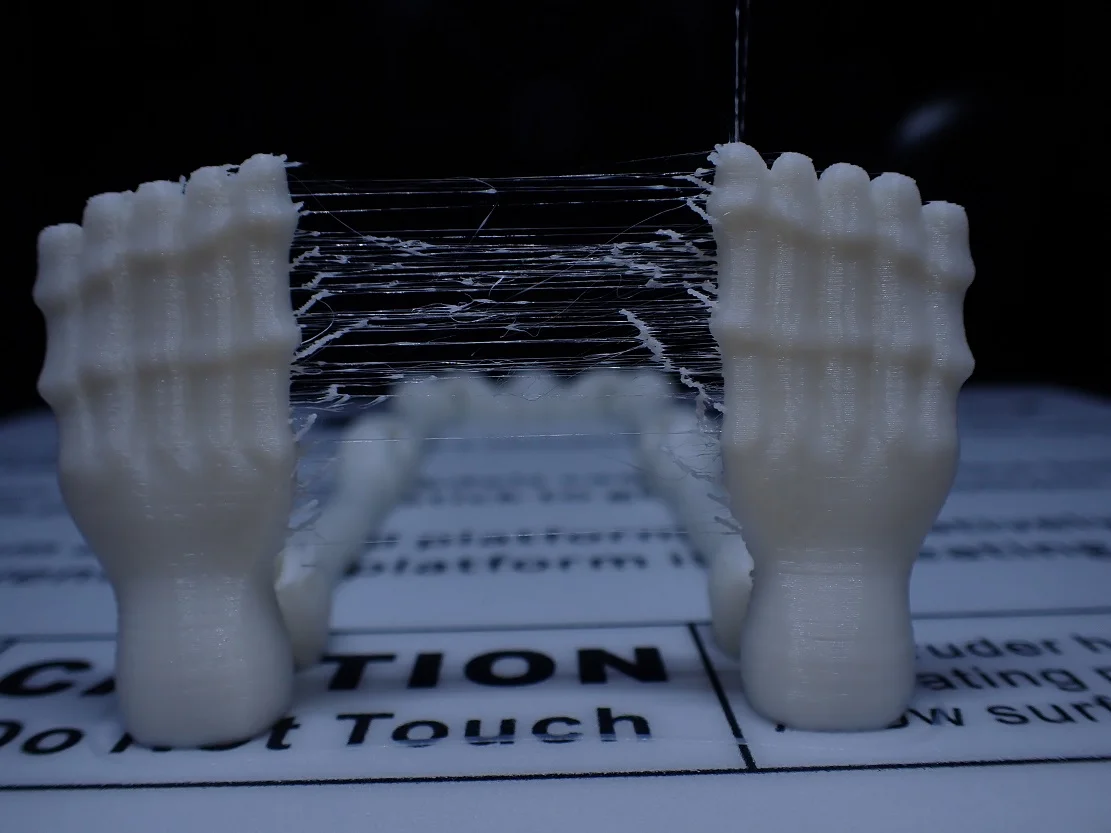
If you work with PLA filament, this material may pull threads. Stringing is one of the most common problems encountered in 3D printing.
Stringing describes the effect in which unattractive thin filament threads or hairs are formed.
If you print an object from PLA filament, this material may draw unsightly threads that resemble a hair or cobweb.
In most cases, the printed object is ugly to look at and unusable due to the unwanted strings.
Stringing occurs when the PLA filament exits at areas of your nozzle where no pressure should be applied. This phenomenon is also known as oozing. The nozzle oozes especially when the head of the nozzle moves from one pressure section to the next.
However, it is also possible that the stringing problem occurs in the middle of a gap. This often leaves small lumps or columns of PLA, which are then connected to the rest of the object by the threads.
Why does PLA Leak from the Nozzle?
The reason for this is that parts of the material were exposed to the heating element. Thus the PLA has been melted and is now in the nozzle.
When the extruder does not apply pressure to the molten PLA, gravity strikes and the liquid filament exits the nozzle uncontrolled.
The release of the PLA material is extremely slow and the quantity is small. As a result, only hair-thin strands are formed, which are known as filament strings.
If you see larger amounts of ooze, you may also see unsightly blobs and zits. This article describes how to correct this misprint: 3D-Printer-Guide 👉 How You Can Avoid Blobs & Zits!
Is PLA more Susceptible to Stringing than other Filaments?
Each material has a different printing temperature range. With PLA the printing temperature range is 185 to 205 degrees Celsius.
Other filaments such as PETG have a printing temperature range of 220 to 245 degrees.
In general, higher temperatures reduce the viscosity of the filament and therefore these materials tend to be more prone to stringing than PLA. However, this printing error also occurs with PLA, as other factors are also responsible for this phenomenon.
Once you have mastered the stringing problem with the PLA, you can try a different filament type. You can find inspiration in our extensive filament guide: 40 Types of 3D Printer Filaments – List, Uses & Guide
How to Avoid Stringing Step-by-Step
There can be many different causes for this printing error. We would like to give you an overview of possible solutions to avoid pulling PLA strings, either by changing the printer settings or by other means.
Step 1: Dry PLA Filament
Make sure your PLA filament is not wet. Like other 3D materials, PLA tends to absorb water molecules. This is especially the case if you leave the PLA in the air for a long time without adequate packaging.
Since the moisture is microscopic, you cannot always see it with the naked eye. These accumulations of moisture can form small bubbles that burst when they expand.
The filament expands when your PLA is exposed to the high printing temperatures in the hot end. The pressure created when the air bubbles burst is often sufficient to allow the molten PLA to escape from the nozzle unintentionally, creating the unpleasant stringing effect.
How can I Protect my PLA Filament from Moisture?
Avoid stringing due to wet PLA by storing your filament airtight. Vacuuming sealers* are suitable for this purpose. You can use them to suck the air out of the bag and prevent your filament from binding water molecules from the air.
Alternatively, airtight containers are available for storage. It is recommended to add one sachet of desiccant*.
You can also dry your PLA filament in an oven. Place your PLA material in the oven to dry and make sure you do the drying at a temperature that is not too high so that the filament does not overheat or melt.
Step 2: Clean the Nozzle
Not only after long print jobs PLA tends to leave thin residues on the inner surface of your nozzle.
If you continue with the 3D print despite these residues, there is a risk that larger amounts of filament will be deposited on these residues. As a result, the melted PLA will not be able to flow out of the nozzle unhindered. In addition, the molten PLA no longer sticks to the inner walls of the nozzle and runs out of the nozzle unhindered.
How do I clean the nozzle?
Clean the nozzle after each 3D print and make sure that no residue sticks to the inside of the nozzle. You have the choice between different cleaning methods, which we would like to explain to you now.
Alternatively, you can also take a look at this article: How to Clean a 3D Printer Nozzle | All Methods Step by Step
The easiest way to clean is to brush the nozzle. Use a brush with metal wires for this.
Another option is to use a piece of PLA filament so that you can perform the cold pull method.
You can also disassemble the nozzle and put the nozzles in acetone.
Special cleaning sets for 3D printer nozzles are perfect to clen the nozzle. I use this one* regularly.
Step 3: Lower the Print Temperature
If you can rule out the causes of the stringing problem listed above, you should check the print temperature. The stringing problem often occurs because the print temperature is too high.
The stringing probability is reduced by reducing the printing temperature.
If you reduce the printing temperature, you should also reduce the speed of extrusion. This is because melting the PLA filament at a lower temperature takes longer.
First of all, the ideal setting is the maximum temperature at which no stringing occurs. Now you can try step by step to find the so-called sweet spot.
To do this, reduce the printing temperature in small steps of five degrees Celsius.
It is also recommended that you perform a test print so that you can check the temperature calibration before you start working with your 3D object.
Step 4: Enable the Retraction
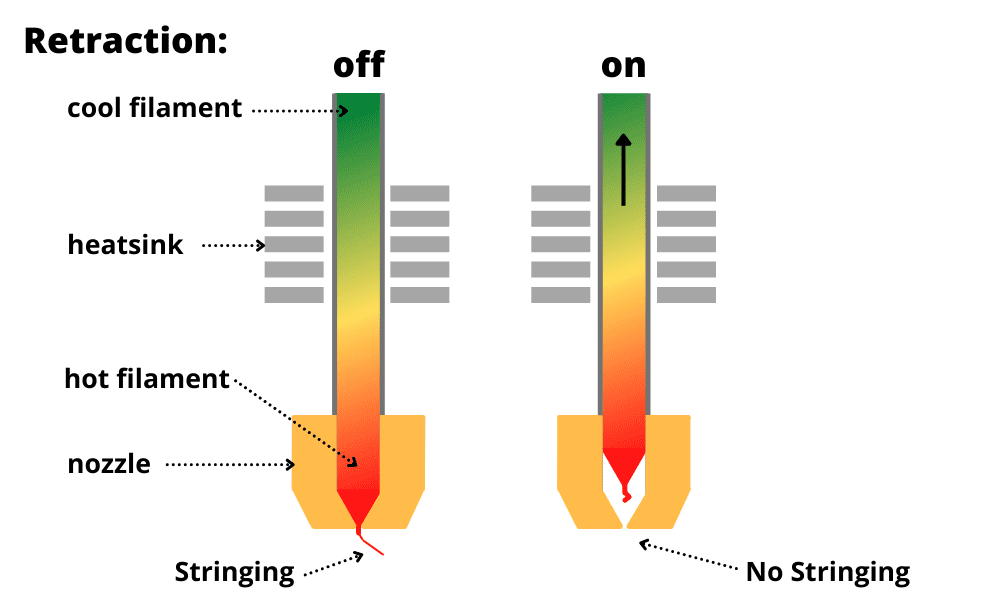
A quite reliable secret weapon to solve the stringing problem is the activation of the retraction.
During retraction, parts of your PLA filament are pulled back from the nozzle end. During this process, the extruder gears rotate in the opposite direction and only small amounts of PLA material are pulled away from the nozzle.
However, the already melted PLA will not be withdrawn. In this process, the pressure exerted on the PLA is reduced by the PLA above it. This pressure relief is usually sufficient to activate the retraction and prevent the stringing problem.
3D printers activate the retract mechanism when there is an empty space over which the print head has to pass.
The retraction mechanism is active by default in most of the common slicers. However, it’s worth taking a look at the actual activation before the 3D print, as this setting will help you to solve the stringing problem quickly and easily.
Step 5: Optimize Retraction Settings
You can play with two settings in terms of retraction. These include the retraction distance and the retraction speed.
Both settings usually have some built-in defaults, but the default settings may not be ideal for all 3D prints.
Retraction Distance
The retraction distance indicates the distance your PLA has to travel when the filament is retracted.
In general, the retraction distance should be set larger for stringing problems. But keep in mind that you don’t have to increase the retraction distance to the maximum immediately. Often a small change is sufficient since the PLA must be available at the hot end immediately when you continue your 3D printing process.
Retraction Speed
You can also adjust the speed of the retraction. If the retraction speed is fast, the melted PLA will be released from the additional pressure more quickly.
Even a slight increase in the speed of the retraction can reduce the risk of stringing problems.
Just as with the retreat distance, you should aim for a sweet spot in the retraction speed. Higher settings minimize the stringing problem!
Keep in mind, however, that an extremely fast setting can lead to the PLA filament being stripped off the extruder drive wheel. This can cause problems during extrusion or even block the nozzles.
Step 6: Raise Travel Speed
The travel speed is the least critical setting of the 3D printer that can contribute to stringing. Even if you adjust the travel speed, you won’t solve the problem. You need to optimize the retraction and temperature settings.
This is just the last step to allow you to completely solve the stringing problem.
Most of the common slicer programs offer the possibility to increase the traversing speed of the print head when the print head only moves over empty areas.
If you increase the travel speed, the time without printing is reduced. So your PLA filament has less time to flow out of the nozzle and pull unsightly threads.
A setting between 150 and 200 millimeters per second is recommended.
Make sure that your print head does not exceed the maximum speed as this will have a negative effect on the quality of your 3D print. In addition, setting the speed too fast can negatively affect the structural integrity of your print. So start at an acceptable low value and work your way up in steps of ten.
Step 7: Deactivate Z-Hop
If your 3D printer is normally calibrated, you can do it without Z-Hop. Z-Hop can cause blobs at the points of feed and thus increase the risk of stringing problems.
Step 8: Activate Wipe
The Wipe setting should be active so that the nozzle end is cleaned of excess PLA before emptying. Only if the excess PLA does not adhere to the nozzle end can you create a smooth transition to the previously printed line.
If the Wipe function is active, you can also prevent unsightly dents at the change points of the individual layers.
Step 9: Activate Coasting
This setting is simple in Simplify3D, while the configuration in Cura is a little more complicated.
For a clean execution of the retraction, the feeder needs precise control over the PLA. If the feeder says stop, the material exit from the nozzle is stopped.
Bowden systems have the disadvantage that this setting is not precise. Coasting can provide a remedy, as the feed of the PLA filament is stopped prematurely and, as the name Coasting suggests, can roll out.
Due to the inertia and gravity, the PLA filament that flows after can infiltrate the intentional gaps and does not run out during empty runs.
If you are using Simplify3D, you can change the roll-out distance setting.
If you use Cura, you have to calculate the throughput yourself.
Step 10: Replace Nozzle
The stringing problem can also occur due to a damaged nozzle. Check if your nozzle is damaged, corroded or poorly drilled.
If you have previously performed 3D printing with Carbon* or Glow in the Dark Filament*, your nozzle may have been damaged when printing with these materials, causing the stringing problem.
A remedy could be nozzles made of hardened steel*.
Step 11: Smaller Nozzle
Another possible cause of the stringing problem can be a too long melting zone. If your nozzle has a large diameter, the risk of stringing is greater than if you use a small diameter nozzle.
Larger nozzles let more liquid PLA through than nozzles with a small diameter.
The actually recommendable SuperVolvano Hot End or the Volcano nozzle tends to stock more PLA and therefore stringing is more common than when using small and precise nozzles.
A recommended small nozzle is the e3d V6*, as it rarely causes stringing problems.
Step 12: Thinner Bowden Tube
If you are using a Bowden 3D printer, we recommend using a Bowden tube with a smaller inside diameter*.
You don’t have to buy an expensive blue tube, a thin tube with an inner diameter of 1.9 is sufficient for 1.75 millimeters of PLA. In contrast to the standard diameter of 2.00 millimeters, the risk of stringing is minimized.
Test Your Printer Settings
When you have optimized all parameters, you should definitely do a test print.
Of course a test print is paralyzing, but you can prevent the waste of filament by another misprint.
So take your time and check your settings before you start with the actual object.
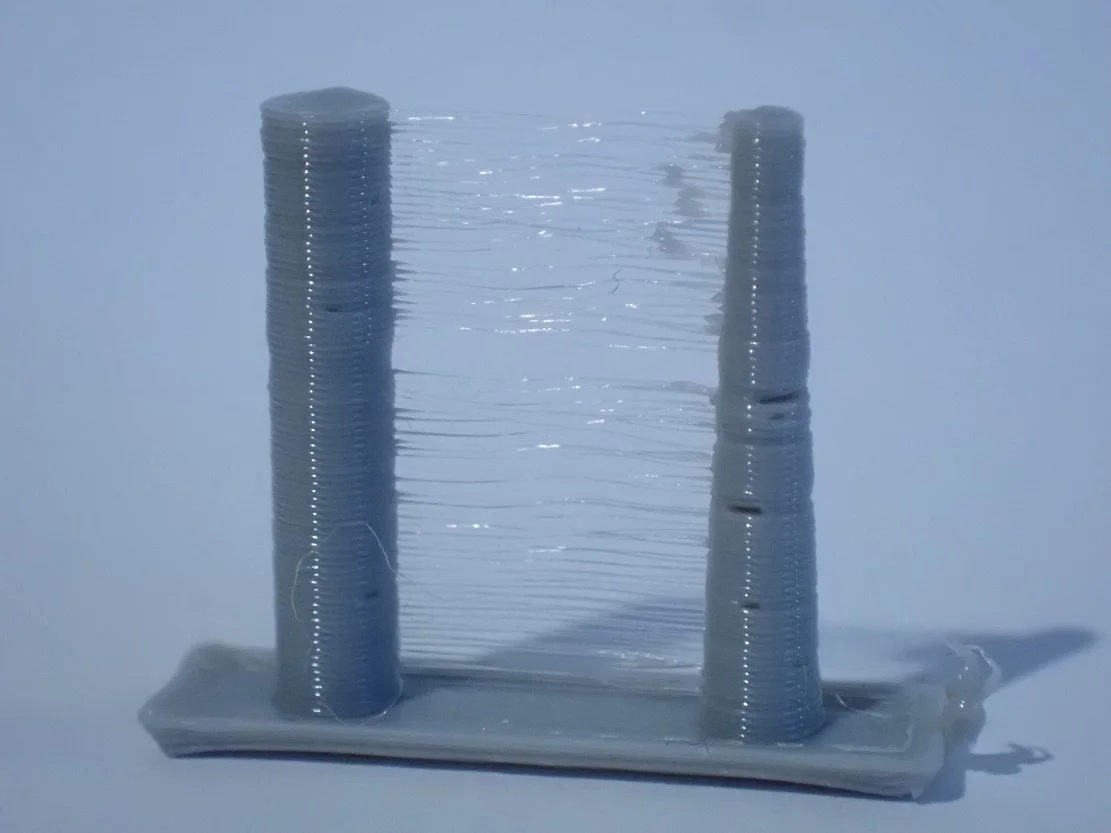
A perfect stress test is a retraction cube. This cube is composed of many identically small cubes, separated by tiny, small or larger gaps. When you test this retraction cube you can check if you have made the optimal settings and if the stringing problem is solved or not.
Bottom Line
If you have some experience in 3D printing, string troubleshooting is easier than if you’re a novice. We’ve now introduced you to a number of ways to get the stringing problem under control.
Always be careful not to change settings too drastically and prefer step-by-step changes. After changing the settings, take the time for a test print and perhaps play around with various settings again before you dare to approach your planned 3D object.
Usually, several changes are necessary to get the stringing problem or stringing in PLA 3D printing under control. Work according to the exclusion procedure and go through all the points in the order we have listed.
Disclosure: This website is the property of Martin Lütkemeyer and is operated by Martin Lütkemeyer. Martin Lütkemeyer is a member of the Amazon Services LLC and other Affiliate Programs. These are affiliate advertising programs designed to enable websites to earn advertising revenue through advertising and linking to Amazon.com and others. Links marked with * are affiliate links.
