
- Wet Filament: Prevention, Symptoms & Drying - July 18, 2024
- Sovol SV08 – Best PrusaSlicer Settings & Profile - June 26, 2024
- Sovol SV08 – Best Orca Slicer Settings & Profile - June 26, 2024
Disclosure: Links marked with * are Affiliate Links. I earn from qualifying purchases if you decide to make a purchase through these links – at no additional cost for you!
Warping or poor print bed adhesion is a real problem with some filaments that are susceptible to cold air currents (such as PETG or ABS). For such filaments, Cura’s draft shield can protect the object from the air currents.
The Draft Shield can be activated in Cura under the experimental settings. The Draft Shield protects the print object from cold air currents and can prevent warping and poor print bed adhesion.
Where you can find this option, how it works, what the draft shield actually does in a practical test and what alternatives you have, you will learn in this article.
Table of Contents:
Where Can I Find the Draft Shield in Cura?
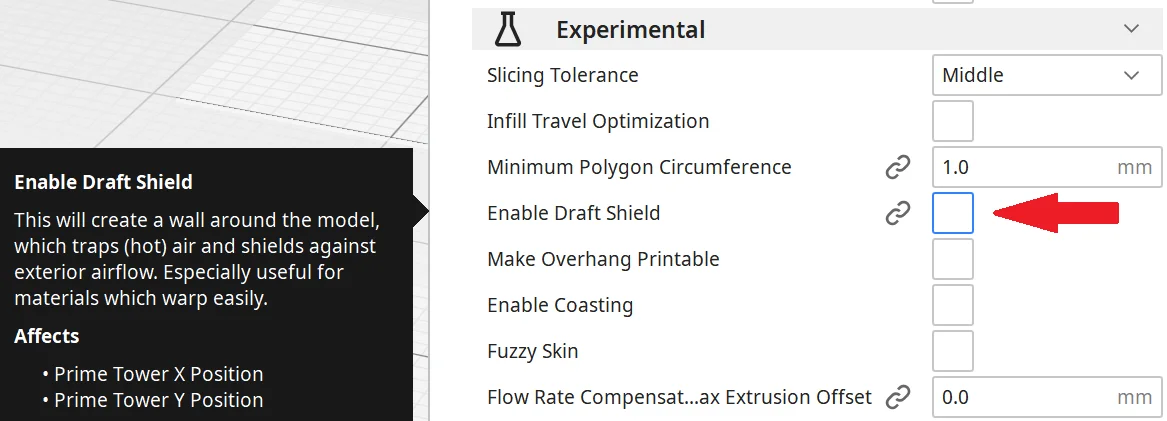
You can find the Draft Shield under the experimental settings in Cura.
If you can’t find the setting there, you have to activate the visibility in the options. You can do this either via the menu icon on the experimental settings tab or via the menu bar (Settings > Set Visibility).
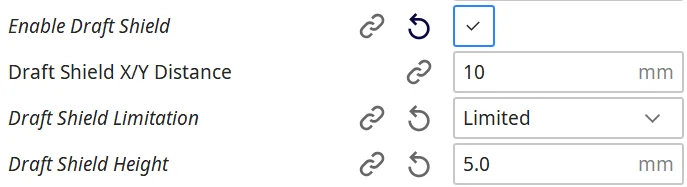
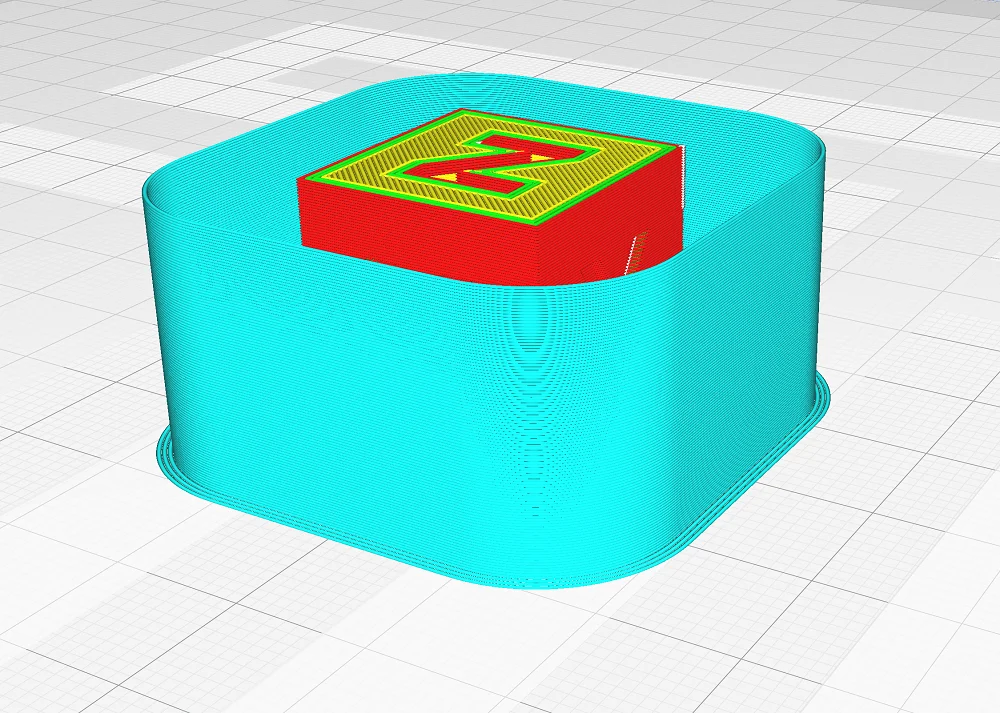
As soon as you activate the draft shield, 2-3 more options appear. You can define the XY distance of the draft shield to the object and how high it should be. If you select “Limited” at the Draft Shield Limitation option, another option for the height of the draft shield appears.
You’ll notice that the draft shield looks like a high Skirt. In other slicers, a draft shield is controlled by the number of layers in the skirt. This makes sense in principle, but a customizable option like in Cura is more practical.
How Does the Draft Shield Work in Cura?
After activating the draft shield, a wall is printed at a certain XY distance from the object. It protects the printed object from drafts and can thus prevent warping.
After you have enabled the Draft Shield in the experimental options, you can customize the result with the following 3 settings:

Draft Shield X/Y Distance: The closer the draft shield is to the object, the more effectively it protects against drafts. However, if it is too close to the object, warm air can build up between the object and the draft shield. The default setting of 10 mm is a good start for most objects. For very large and massive objects, a larger distance might be useful.
Draft Shield Limitation: Here you have the choice between Limited and Full. If you select Limited, you can set the height of the draft shield individually. If you select Full, the draft shield will be printed as high as the object.
Draft Shield Height: If you selected Limited when limiting the draft shield, this option appears where you can specify the height of the draft shield in millimeters. If you mainly have problems with the first layers, a draft shield of 5 mm might be enough to prevent warping.
As you can see, the settings for the draft shield are pretty straightforward and self-explanatory. Most of the time the default settings are already sufficient. For some objects, however, it is worthwhile to optimize the settings or to save filament by limiting the height.
Comparison With/Without Cura Draft Shield
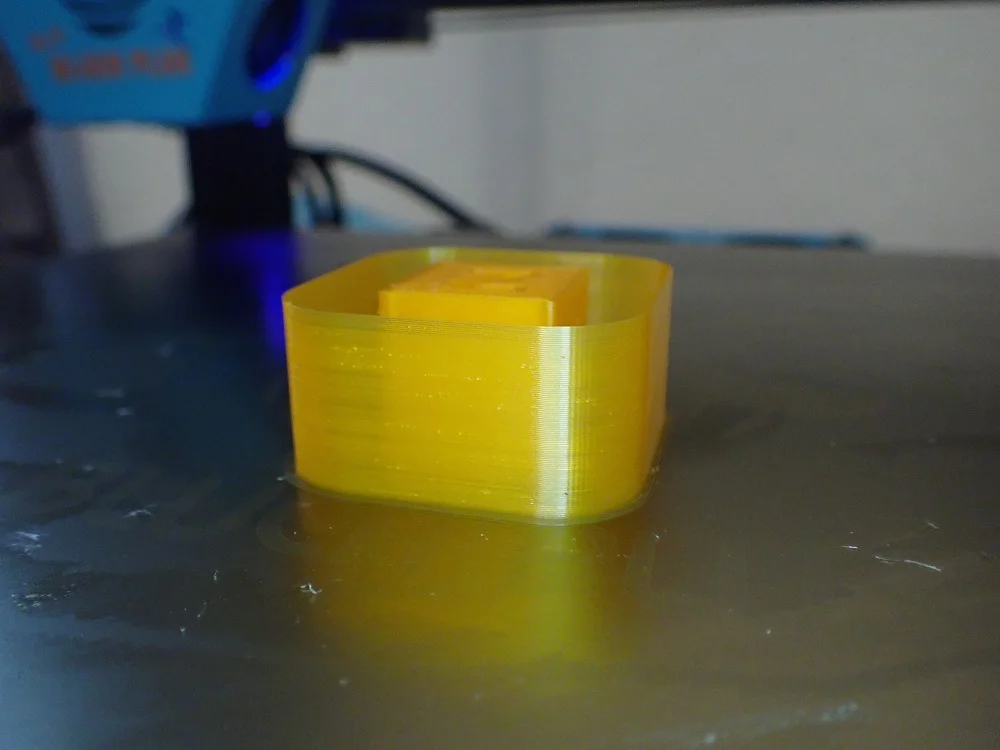

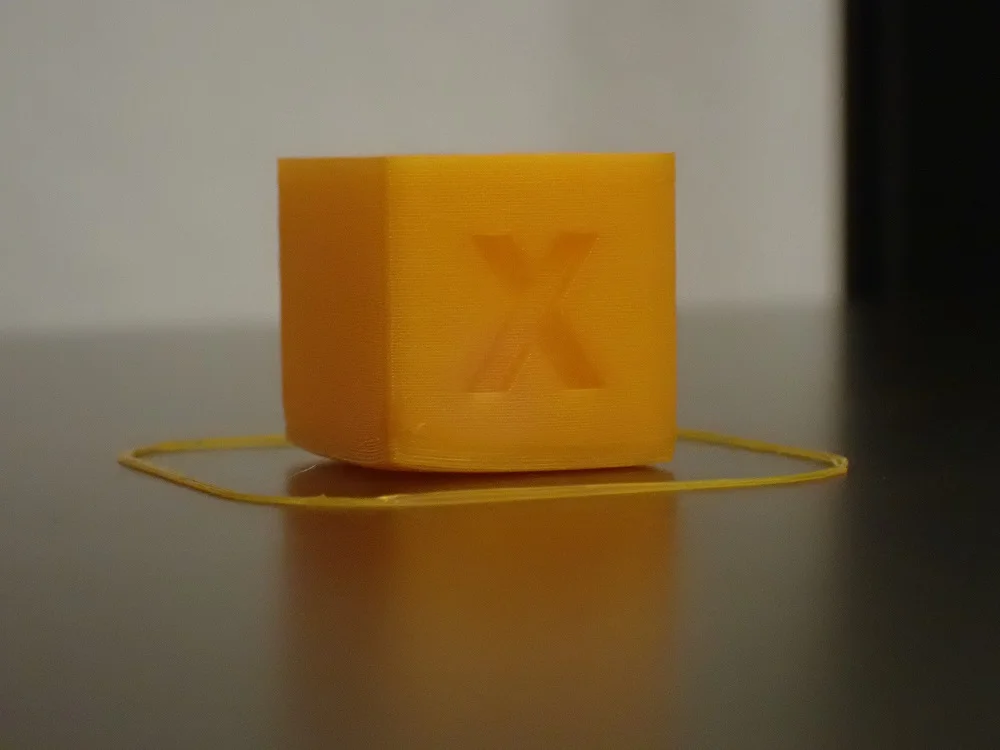
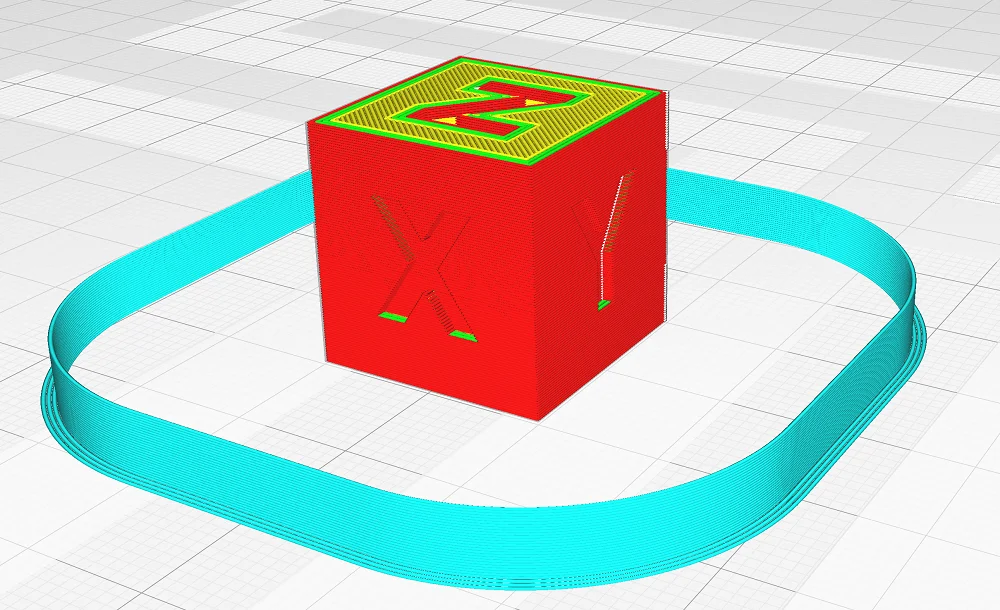
To show the effect of the draft shield, I printed PETG once with and once without the draft shield. PETG tends to warp when cold air currents are present and is therefore perfect for demonstration.
When I wrote this article it was much colder outside than in the environment of the 3D printer. I printed both prints with an open window and a strong draft to provoke warping. This also worked very well, as you can see with the calibration cube without a draft shield.
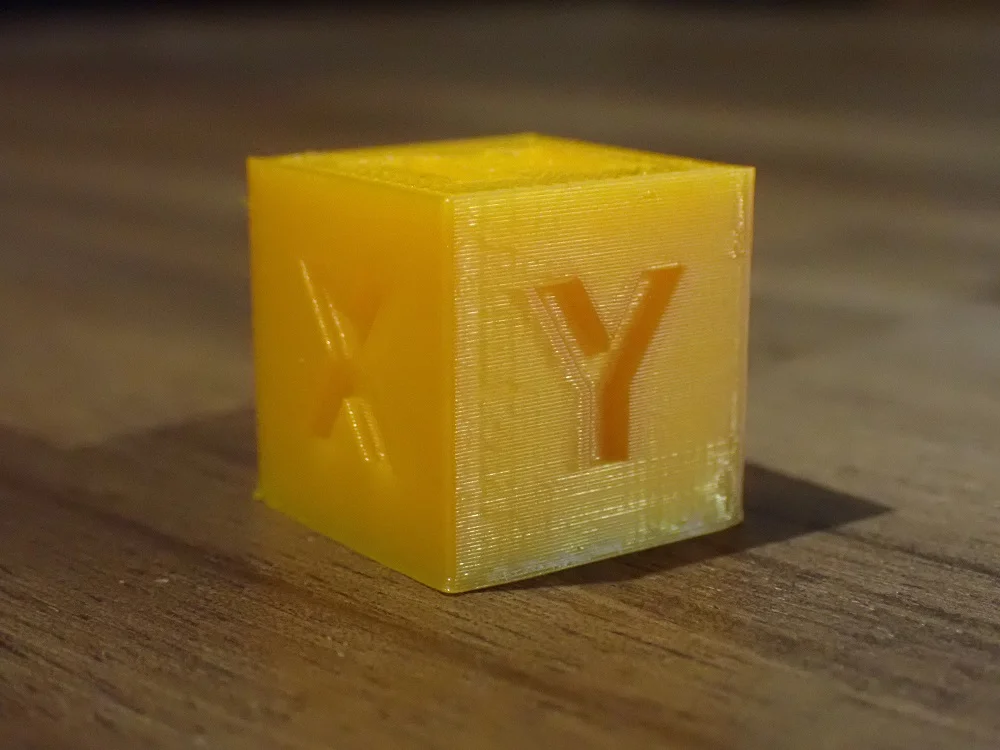
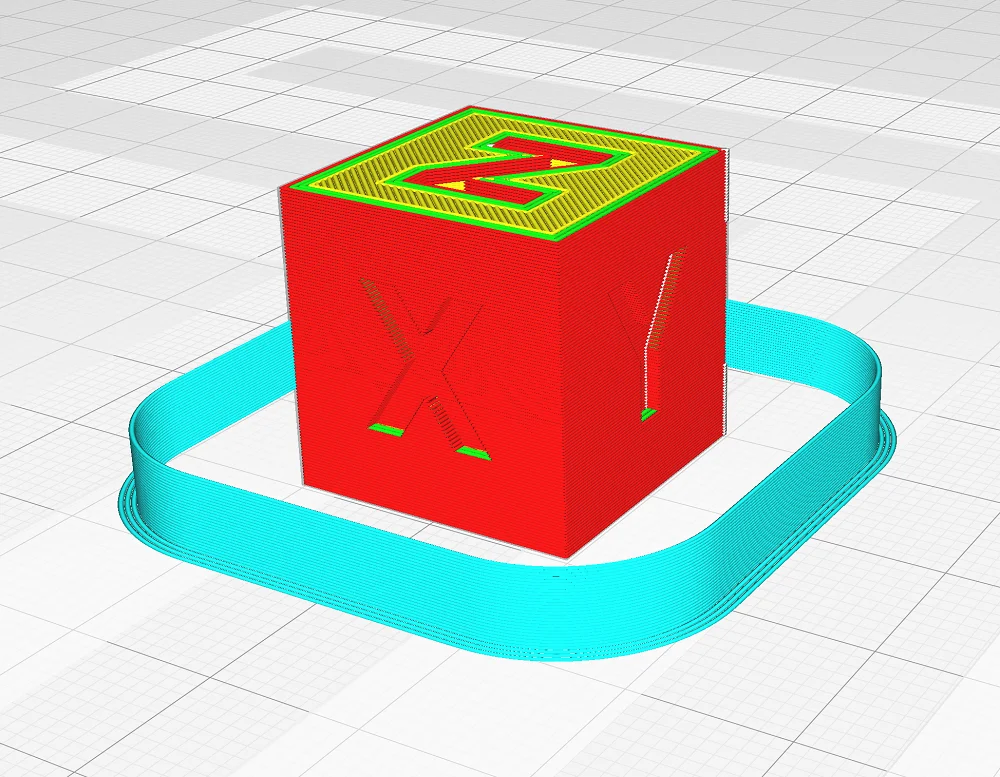
Under the same conditions, I printed the calibration cube again but this time with a draft shield over the complete height. Since I have rarely worked with a draft shield (because I use warping-prone filaments either with a housing or a closed printer), I was very surprised about the result. I was not aware that a draft shield could be so effective.
The calibration cube printed with the draft shield showed no warping and had excellent print bed adhesion!
Alternative: 3D Printer Enclosure
If you want to be on the safe side, or the draft shield in Cura doesn’t work perfectly, you should consider getting a 3D printer enclosure. Especially if you often print with filaments that tend to warp, this investment will pay off.
Creality offers a very good printer enclosure, which is available in two variants for different 3D printer dimensions. It is of course also compatible with 3D printers that are not manufactured by Creality. In this article I have tested the enclosure in detail.
Not only does it provide you with consistent temperatures and protection from unwanted airflow throughout the print volume, but it is also fire-resistant and protects against dust as well.

For more details:
Creality 3D Printer Enclosure | Practical Test & Review
There are also some hobbyists who make their own enclosures out of old furniture, plexiglass, or other inexpensive materials. Sometimes these DIYs can be cheaper and offer the same effectiveness. In my eyes, investing in a professional enclosure is better, as you not only save time but also usually get a better product.
Disclosure: This website is the property of Martin Lütkemeyer and is operated by Martin Lütkemeyer. Martin Lütkemeyer is a member of the Amazon Services LLC and other Affiliate Programs. These are affiliate advertising programs designed to enable websites to earn advertising revenue through advertising and linking to Amazon.com and others. Links marked with * are affiliate links.
