
- Wet Filament: Prevention, Symptoms & Drying - July 18, 2024
- Sovol SV08 – Best PrusaSlicer Settings & Profile - June 26, 2024
- Sovol SV08 – Best Orca Slicer Settings & Profile - June 26, 2024
Disclosure: Links marked with * are Affiliate Links. I earn from qualifying purchases if you decide to make a purchase through these links – at no additional cost for you!
If the adhesion of the first layer to the printing plate is not optimal, if the material is output strangely at the start of printing, or if the printer needs a bit of time to heat up before the filament flow works reliably, a Skirt is useful.
The auxiliary construction Skirt lies at some distance around the outside of the actual print part, protects the sensitive first layer from drafts and ensures that the filament flow first gets going and you can detect errors early on.
But this is only possible with the correct settings in Cura.
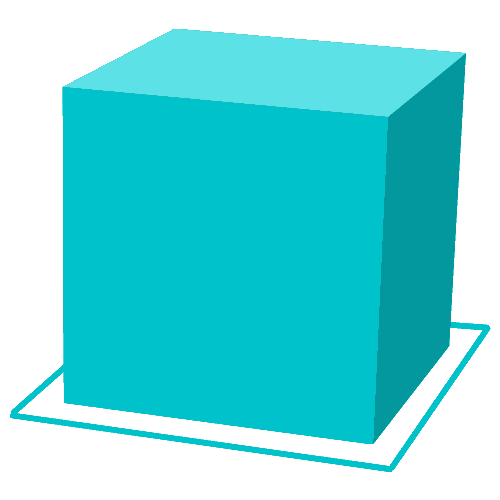
Table of Contents:
Skirt Advantages and Benefits
The Skirt is one of the auxiliary constructions. As a slightly thicker printed line or low wall, it lies like a Skirt around the outside of your print object. This does not make the print object any prettier, but the Skirt is useful as an auxiliary construction: it is printed first.
So, while the Skirt is still being printed, you can see whether the filament flow is satisfactory, whether the filament adheres sufficiently to the build plate, whether the second layer adheres well to the first, and so on.
In a nutshell: You can see if the print will be clean.
If it doesn’t, you can correct settings on the fly, adjust leveling, fix under-extrusion, or simply restart the print if necessary.
The Skirt is printed quickly and does not consume much material. This means you have a chance to check the quality of the print with minimal loss of material and time.
Skirt Settings in Cura
So there’s no question that you’re using a Skirt. But how exactly do you set it up? In Cura, the settings for the Skirt are well hidden in the menu. You can find them under “Build Plate Adhesion Type”. If you can’t find this setting right away, you can use the search box to find it or set it to visible in the Cura settings first.
If you now select Skirt as Adhesion Type, you can change 3 settings:
- Skirt Line Count: This setting is primarily dependent on how large your model is. With a Skirt, you want to test the filament flow. If the Skirt is too short, you might miss problems, if it is too long, you waste material. So the smaller the object, the higher this value needs to be.
- Skirt Distance: This value determines the horizontal distance of the first Skirt line to the actual print object. Since the Skirt should not touch the object, this value is always > 1 mm and should not exceed 10 mm.
- Skirt/Brim Minimal Length: This value allows you to override the Skirt Line Count and determines the minimum amount of filament the extruder should use for the Skirt before starting the actual object. This setting solves the problem of not having to estimate how many lines you need for small objects. Lines are automatically added until the minimum length is printed.
Cura has a default setting for the Skirt. It looks like this:
- Skirt Line Count = 1
- Skirt Distance = 3 mm
- Skirt/Brim Minimum length = 250 mm
If you are working with a Skirt for the first time, the default values in Cura are actually quite good. Once you’ve printed objects with different sizes, you’ll see which settings work best.
Apply presets or not?
Since many parameters always come together in 3D printing and the final print result never depends on one parameter but on the interaction of them, you should just try it out first. The Skirt fulfills its task if it is long enough or large enough that the nozzle prints evenly until the actual print object is started. So you use the Skirt first only to “shoot the nozzle free” and to check the settings.
For the latter, it may be useful to print the Skirt more than one layer high. The standard is one to two layers, no more. Printing a higher Skirt gives you time to readjust the bed alignment, check the nozzle spacing, and take care of other small details.
However, a higher Skirt has another advantage: it protects the first print layer built up inside this line from any drafts that may be present. Many 3D printers for home use, so-called desktop solutions, do not have a closed print chamber. If a window is open somewhere, if the crack under the door is not plugged, and if the keyhole is not taped off, the drafts can cause the first layer on the print object to cool down too quickly. However, this is not the actual task of the Skirt.
Your own settings depend on your working method
Ultimately, the settings for the perfect Skirt under Cura are always about finding the best solution for your own working method and the current task. Therefore, there are no general statements on how to make the Skirt perfect.
The Skirt is output at the same print speed as the rest of the print object. And what the best settings are for the entire print object also depends on the filament.
Possible Errors and Their Correction
3D printing fans are used to surprises: The printed object never turns out as it should. It is simply not possible to predict how the material will respond to the settings, what influence the printing environment will have and whether the settings made will be effective. The adhesion of the first layer in 3D printing is crucial for a good print result.
Because if this first layer does not adhere optimally or is built up incorrectly, the entire rest of the model shifts and can only be completed with errors. The Skirt helps to check the settings in the first layer even before the first layer is printed, so to speak. The most common problems that can still be fixed after or during the printing of the Skirt are described below:
Low-Quality Filament
The filament is transported to the print nozzle via a small gear wheel in the printer. If the teeth do not grip properly, firstly there is no filament available for printing, and secondly, the teeth shred the filament during unsuccessful transport, so that the guide no longer grips and small plastic chips travel through the printer.
Both are undesirable. If you notice during the printing of the Skirt that the filament is not being conveyed correctly, stop the print immediately and insert another filament.
Although the manufacturers specify the diameter of the filament, deviations do occur from time to time. As long as they are within a maximum range of 0.1 millimeters, this is not a problem. Often, however, it is more – and then the filament is picked apart instead of being conveyed.
Clogged Extruder
The extruder must of course be free so that the liquid filament can pass through. Sometimes, however, cooling material clumps after printing, gets stuck in the extruder and clogs the nozzle. You’ll notice this if no material comes out of the nozzle when you print the Skirt. If the Skirt is printed smoothly, the nozzle is free.
If the Skirt is printed poorly, stop printing and disassemble the extruder as much as possible. A thorough cleaning can help. If you are in a hurry, use a replacement nozzle. Or you don’t disassemble the extruder, but run some Cleaning Filament* through the extruder.

Oozing
The first layer is only really applied regularly if the material comes out of the extruder right from the start. But especially at the beginning of printing, there may be an undersupply of material. This is because the extruder may be preheating, or it may not yet have cooled down sufficiently after the last print.
In both cases, the filament is liquid in the nozzle before it is really needed. It drips out, which is called oozing. If printing is then started, the nozzle cannot output any filament at first, because there is none left. it must first be conveyed through the extruder and liquefied by the heating element. After that, the first layer can be applied. Until that time comes, you have to wait.
The phenomenon is then called under-extrusion (too little extrusion) and leads to a defective, patchy first layer. If this patchy first layer sits in the Skirt, your print object is still defect-free. By the time the 3D printer has printed the Skirt, the filament is flowing again.
Sometimes, however, under-extrusion is also caused by the print bed. The reasons for this can be a poorly aligned Z-axis, contamination or too much oil.
Poor print bed alignment
If you do not align the plate correctly before printing, the result will be poor. This is because if the printing plate is crooked, the nozzle is too close to the plate on one side. It clogs because it can’t dispense the material. It may also deliver too little material or none at all.
On the other hand, the nozzle is then too far away from the build plate, which leads to problems with the adhesion of the filament to the build plate. If the filament does not adhere, the first layer is printed poorly, and the other layers cannot be built upon it without errors. If a Skirt is printed before the actual print object, you can still check the alignment of the build plate during printing and adjust it if necessary. This is made possible by the leveling function in the printer.
Print bed not quite clean
If the print bed is not completely clean, the first layer will not adhere perfectly. You can already see this while the Skirt is being printed. Dust particles and fingerprints on the plate can cause the filament not to adhere to the build plate.
If you notice this, stop printing immediately and clean the build plate with a clean cloth and perhaps some water. If there is more than a speck of dust on the plate, or if you are using a coated plate, you should use isopropanol for cleaning. If this is not enough to achieve better adhesion, you should reconsider the print settings, perhaps adjust the temperature of the print bed, or consider a coated, heatable build plate if necessary.
Sometimes it is also sufficient to apply Scotch Blue Tape* for PLA filament or Kapton tape* for ABS filament for better adhesion.

Incorrect distance between nozzle and print bed
The filament is only applied evenly to the print bed if the distance between the nozzle and the print plate is correct. If the distance is too big, the filament will not adhere to the build plate. If the distance is too small, the printer cannot output enough filament.
You can also determine this when printing the Skirt and can adjust the distance. Stop printing and scale the distance between the nozzle and the build plate. The distance is just right when you can just pull a piece of thermal paper between the nozzle and the print bed.
Caution: Thermal paper is, for example, sales slips from the supermarket! Other paper is thicker, has a rough surface or is so dusty (high wood content) that it damages the nozzle! A proper measuring instrument like a feeler gauge is of course the more elegant solution. What exactly the correct height looks like is specified by the manufacturer of the print bed.
Too high printing speed for the first layer
To ensure that the first layer adheres reliably to the printing plate, you should print it at a slower speed than the rest of the print object. A test print will show you which speed is really low enough, from where it becomes too slow – or you can find out while your 3D printer is producing the Skirt.
You can set the print speed for the first layer in Cura independently of the speed of the other layers. The percentage throttling is quite easy to use with a little experience.
Shrinking
The filament is heated in the 3D printer and thus liquefied. The liquid mass is dispensed onto the build plate and slowly cools there. During this process, the material also shrinks. If it does this too quickly, the other layers will no longer adhere well. The component is therefore not well bonded and falls apart. You cannot influence the final shrinkage rate of the material.
But you can influence how quickly the material cools and shrinks by adjusting the temperature of the print bed and the cooling. So these parameters are especially important for the first layer – and you have full control over the printing of a Skirt before you produce the actual component.
Filaments and Their Advantages and Disadvantages
PLA
The most common filament is PLA. PLA is normally printed at a temperature of around 200 °C, the build plate should be heated to around 60 °C. As a printing speed, 50 millimeters per second is a good guideline, the layer height can be around 0.12 millimeters.
The speed of the first layer would then be 20 millimeters per second, the fan should remain switched off for the first layers. PLA is stiff and has high mechanical strength, but absorbs moisture. Little shrinkage and easy handling make the filament a real deal for beginners. The filament is inexpensive and biodegradable, which makes it very popular.
ABS
ABS is also quite stiff and tough, and also has good impact and scratch resistance. ABS requires minimal finishing, and the material does not deform even after a long time. However, shrinkage is significant, ABS is soluble in ester and acetone and is not food safe. The extrusion temperature should be 230 to 260 °C, and the hot plate should perform between 80 and 130 °C. As far as output speed and layer height are concerned, the various manufacturers make different recommendations.
PETG
When printing with PETG, the heating bed should also be preheated to around 50 to 75 degrees. The output temperature is ideally in the range between 220 and 250 °C. The first layers are printed without a fan, only then is the fan fully switched on.
The recommended printing speed is usually 60 to 100 millimeters per second. PETG absorbs moisture from the air before it is printed. After extrusion, the material is very sticky, support structures cannot be printed well with it.
Nylon
Nylon* scores with high strength, flexibility and great durability. It can be dyed even after printing and is extremely durable. However, nylon shrinks and warps strongly during printing. The filament is well suited for functional models and mechanical parts. The recommended printing temperature is 240 to 260 °C, and the print bed should be between 70 and 100 °C.
Flexible filaments
TPE* and TPU have rubber-like properties that are great for household appliances, sanitary products, and even sport shoes. Depending on the composition, the material can be elastic and stretchy, withstand shock well, or have other properties.
In the case of extrusion, however, the material is flexible and sticky. The printing temperature is specified by the manufacturers as 210 to 230 °C, the printing bed should have a maximum of 60 °C, but does not have to be heated.
In addition to these common filaments, there are many other materials that can be processed with the 3D printer. For each material and each individual component, the settings have to be found anew – the Skirt helps with this.
Related Post:
3D Printer Filament Guide: 40 Filaments Introduced
Conclusion
There is no guide for the best settings for the Skirt in Cura, because the ideal settings have to be found out individually for each print object, for each material. However, a Skirt is always better than no Skirt!
The Skirt is useful for finding these settings without too many misprints and with little time spent. The default settings give you a good starting point for creating a Skirt. You adjust the three parameters given there until you find the best print settings for your application.
If you have very severe problems with poor print bed adhesion, you should also try a Raft.

Related Post:
Cura Raft | Best Settings for Good Bed Adhesion
Disclosure: This website is the property of Martin Lütkemeyer and is operated by Martin Lütkemeyer. Martin Lütkemeyer is a member of the Amazon Services LLC and other Affiliate Programs. These are affiliate advertising programs designed to enable websites to earn advertising revenue through advertising and linking to Amazon.com and others. Links marked with * are affiliate links.
