
- Wet Filament: Prevention, Symptoms & Drying - July 18, 2024
- Sovol SV08 – Best PrusaSlicer Settings & Profile - June 26, 2024
- Sovol SV08 – Best Orca Slicer Settings & Profile - June 26, 2024
Disclosure: Links marked with * are Affiliate Links. I earn from qualifying purchases if you decide to make a purchase through these links – at no additional cost for you!
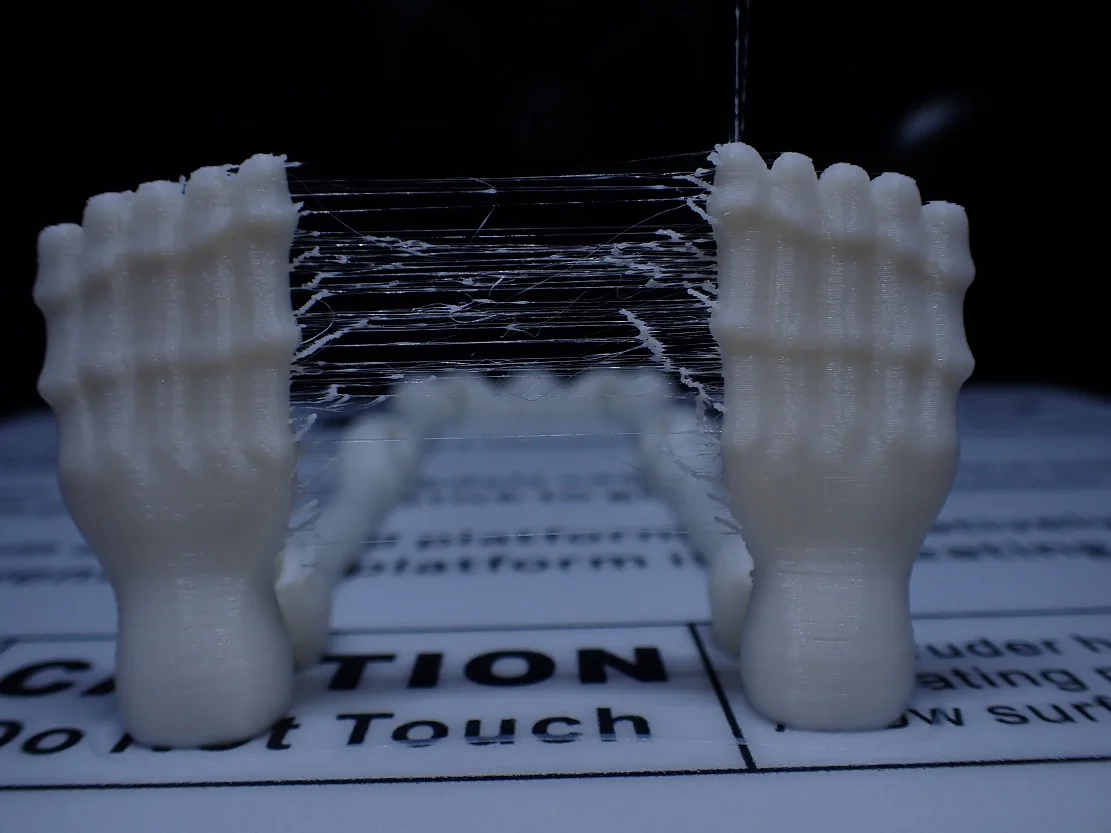
Sometimes it can be very difficult to get over-extrusion or stringing under control. Especially with stubborn filaments like PETG it can sometimes seem impossible.
For such cases, however, there is a feature in Cura with which you can wipe the nozzle after each layer to avoid stringing or ugly blobs.
By activating the Wipe Nozzle Between Layers setting, the nozzle moves to a specific location on the X-axis after each layer. A brush can be installed there to wipe the nozzle each time to avoid stringing.
Where you can find this option and how it works in detail you will learn in this detailed guide. At the end you will also learn how to avoid stringing or over-extrusion in general.
Table of Contents:
How to Activate Wipe Nozzle Between Layers in Cura?
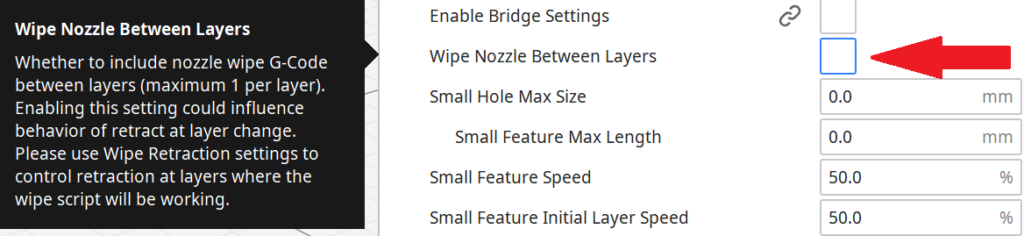
The Wipe Nozzle Between Layers option is located under the experimental options in Cura. The visibility of the option can be toggled in the settings. After activating it, more options appear to optimize the wiping movement.
Many options are not visible by default. You can adjust their visibility via the settings to show only the settings you need.
After you have activated the option, further settings will appear to adjust the wipe individually. What the individual options do and which settings you should start with can be found further down in the text.
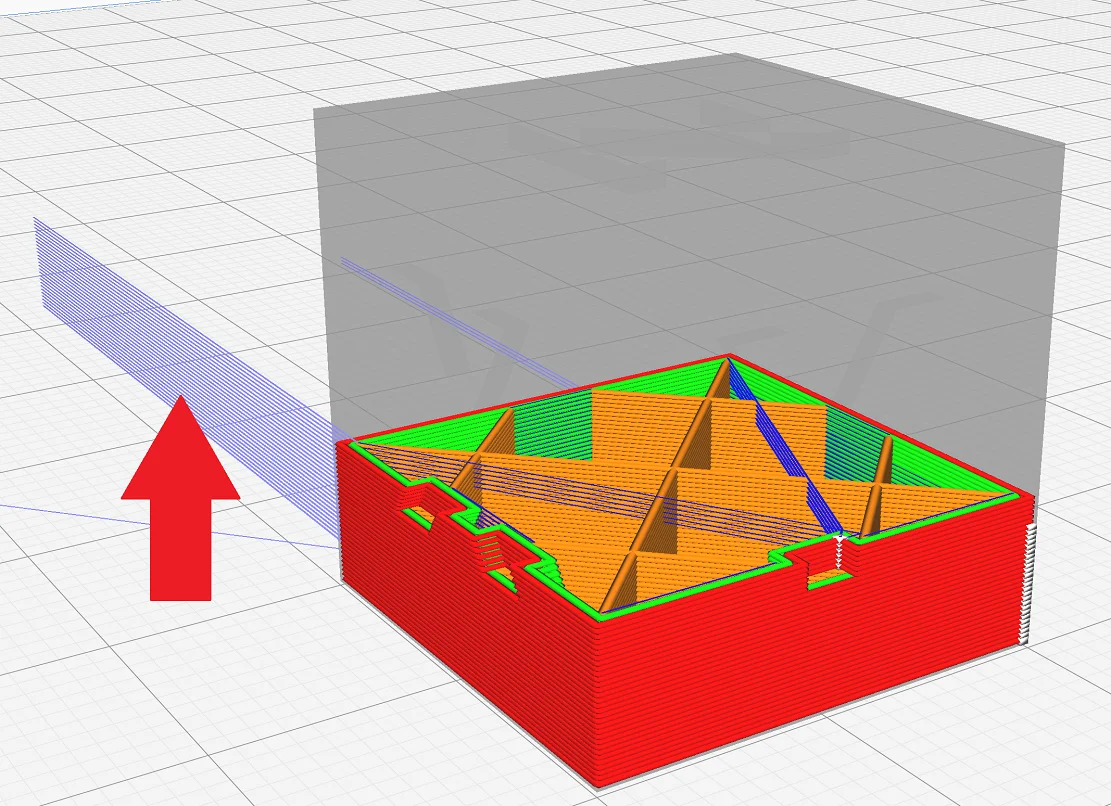
So that you can already see in the slicer how the settings affect the print, you can activate the visibility of the movements in the preview. This way you can see exactly how the nozzle moves during printing.
How Does Wiping the Nozzle Between Layers Work in Cura?
With Wipe Nozzle Between Layers, the nozzle moves to a specific position after each layer, where it is automatically wiped off by a brush after each layer. In the case of stringing or over-extrusion, this can improve print quality.
The nozzle moves to a specific position on the X-axis. The Y or Z coordinates cannot be determined. Therefore, the brush must be installed so that it moves upwards with the print head. If you install the brush to the side of the print bed on the X-axis, it would probably make the most sense.
The default settings for wiping between layers are already very good, but the X position will probably not fit your setup. To help you optimize the settings, here is a simple explanation of each option:
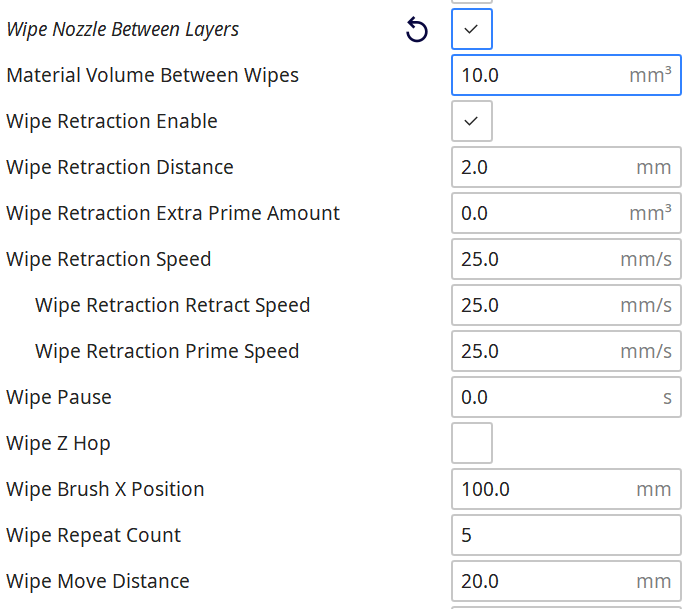
Material Volume Between Wipes: With this parameter, you can set after how much extruded filament the nozzle should be wiped. If the specified volume is less than the filament required for the layer, the nozzle is wiped at most once per layer.
If the value is greater than twice the filament volume required for a layer, the nozzle is wiped only every two layers, and so on. The default value of 10 mm³ usually causes the nozzle to be wiped once per layer.
Wipe Retraction Enable: Enabling this option makes sense to avoid stringing while the nozzle is moving to the brush. When the option is activated, the filament is retracted a bit into the nozzle to prevent it from escaping uncontrollably.
Wipe Retraction Distance: Here it is best to use the default settings for the retraction. Cura uses the default settings automatically and you should only change this value if you still observe strong stringing.
Wipe Retraction Extra Prime Amount: So that you don’t have to change the default settings for the retraction distance, there is this additional option. Since the distance between the print object and the brush can be quite long, the liquid filament could flow downwards and escape despite the retraction due to gravity and time. If you observe this, you should try to keep the filament in the nozzle with small steps.
Wipe Retraction Speed: Just as with the default retraction settings, there is an option here to set the speed for the retraction. I would also stick to the standard settings here.
Wipe Pause: This is the duration of the pause after retraction. Recommended setting: disabled.
Wipe Z-Hop: The Z-hop raises the nozzle or lowers the print bed, depending on how your printer is set up. This prevents the Nozzle from damaging already printed parts of the object when moving to the brush. I recommend you enable this option and leave the distance and speed options that appear at their default settings.
Wipe Brush X Position: This setting is the most important. Here you specify where the brush is located on your 3D printer. The wiping process starts at the set position. The preset 100 mm are mostly not suitable.
Wipe Repeat Count: The wiping of the nozzle is repeated with the number set here on the brush. In my experience, a higher number is better for PETG and the preset 5 repetitions are sufficient for PLA.
Wipe Move Distance: This setting is defined by the size of your brush. It determines the distance the nozzle moves back and forth while wiping. The larger the brush, the greater this distance can be.
The recommended settings may differ depending on the filament and 3D printer used. I tested them with an X-Max with PLA and with the Ender 3 V2 with PETG.
When to Use Wipe Nozzle Between Layers in Cura?
Wiping the nozzle between layers is helpful when stringing or other symptoms of over-extrusion occur and cannot be avoided by normal measures. Especially with filaments like PETG this function can be helpful.
Sometimes print defects can be very stubborn and difficult or impossible to fix. In addition, some combinations of 3D printer and filaments are unfavorable for certain errors. Especially with filaments that tend to string, such as PETG, it can be useful to wipe the nozzle between layers.
In my experience, wiping the nozzle between layers only makes sense with stringing-prone filaments like PETG and low-budget 3D printers. All other combinations of filaments and 3D printers can be optimized with the right extrusion settings so that this feature does not have to be used at all.
It also takes some effort to install the brush correctly on the 3D printer. There are suitable objects for various 3D printers that you can use for assembly. You can find the models on sites like Thingiverse.
Alternatives
The disadvantage of the feature of wiping the nozzle between layers is that the printing time is considerably increased. The additional movements of the print head are clearly noticeable. And you may want to try something else first before you have to modify your 3D printer by mounting a brush.
Therefore, you should not use the function by default and enable it only when all other measures have failed. So before you enable this option, you should first try to avoid stringing or over-extrusion in general.
How to Avoid Stringing
Activate retraction: Filament retraction prevents uncontrolled leakage of liquid filament. When this option is activated, the extruder retracts the filament into the nozzle by the specified length. This prevents or at least significantly reduces the formation of strings.
Reduce temperature: The higher the printing temperature, the more liquid the filament is inside the nozzle. And the more liquid the filament is, the easier it can escape uncontrolled from the nozzle and create strings. If you want to know which temperatures are best for which filament, you can check out this article.
Dry Filament: Moist filament can cause all kinds of printing errors and stringing is one of them. So it’s important to keep the filament dry. In this article you will find everything you need to know about that topic.
Increase print speed: It is often sufficient to slightly increase the printing speed. The increased speed gives the filament less time to escape uncontrollably. However, too high a printing speed can lead to inaccuracies.
Keep the nozzle clean: A dirty or worn-out nozzle can also lead to stringing. So you should make sure that you clean the nozzle regularly and replace it if you have worked too much with abrasive filaments like wood* or metal* filaments.
How to Avoid Over-Extrusion
Filament diameter: Fluctuating filament diameters on a filament roll are fortunately becoming increasingly rare. However, with some cheap filament brands, there can still be variations in filament diameter over the length of the filament. This can lead to over extrusion. So make sure that you only buy high quality filament.
Reduce flow rate: You can set the flow rate directly in the slicer. If you increase it, more filament will be extruded, if you decrease it, less filament will be extruded. This allows you to calibrate the extrusion accurately and avoid over- or under-extrusion.
Reduce print temperature: As with stringing, too high a temperature is a classic error that triggers over-extrusion. Therefore, stick to the recommended temperatures and perform a temperature calibration with a temperature tower. You can find corresponding objects either on platforms like Thingiverse or in the Calibration Shapes plugin in the Marketplace of Cura.
Disclosure: This website is the property of Martin Lütkemeyer and is operated by Martin Lütkemeyer. Martin Lütkemeyer is a member of the Amazon Services LLC and other Affiliate Programs. These are affiliate advertising programs designed to enable websites to earn advertising revenue through advertising and linking to Amazon.com and others. Links marked with * are affiliate links.
