
- Wet Filament: Prevention, Symptoms & Drying - July 18, 2024
- Sovol SV08 – Best PrusaSlicer Settings & Profile - June 26, 2024
- Sovol SV08 – Best Orca Slicer Settings & Profile - June 26, 2024
Disclosure: Links marked with * are Affiliate Links. I earn from qualifying purchases if you decide to make a purchase through these links – at no additional cost for you!
PETG is very popular for 3D printing due to its versatility and strength. It is a great material to 3D print durable and strong objects. However, this material is very prone to stringing.
In this guide, I’ll show you how to prevent PETG stringing effectively. We’ll start with the basic calibrations of your 3D printer and then move on to specific slicer settings that help to further reduce PETG stringing.
I’ve organized these steps in order of effectiveness, so I recommend you go through them in order.
Table of Contents:
- 1 Step 1: Calibrate the Printing Temperature
- 2 Step 2: Calibrate the Retraction Settings
- 3 Step 3: Dry the Filament
- 4 Step 4: Calibrate the Flow Rate
- 5 Step 5: Clean the Nozzle
- 6 Step 6: Increase the Travel Speed
- 7 Step 7: Adjust the Print Head Path
- 8 Step 8: Calibrate the Fan Speed
- 9 Step 9: Use High-Quality Filament
- 10 FAQ – Frequently Asked Questions
- 11 Conclusion
Step 1: Calibrate the Printing Temperature
Calibrating the printing temperature is crucial when working with PETG, as it significantly influences stringing. Too high a temperature can overly liquefy the filament, leading to PETG stringing, while too low a temperature may result in weak layer bonding. Therefore, finding the right temperature is a balancing act that greatly impacts the overall print quality.
Here’s a step-by-step guide for calibrating the printing temperature:
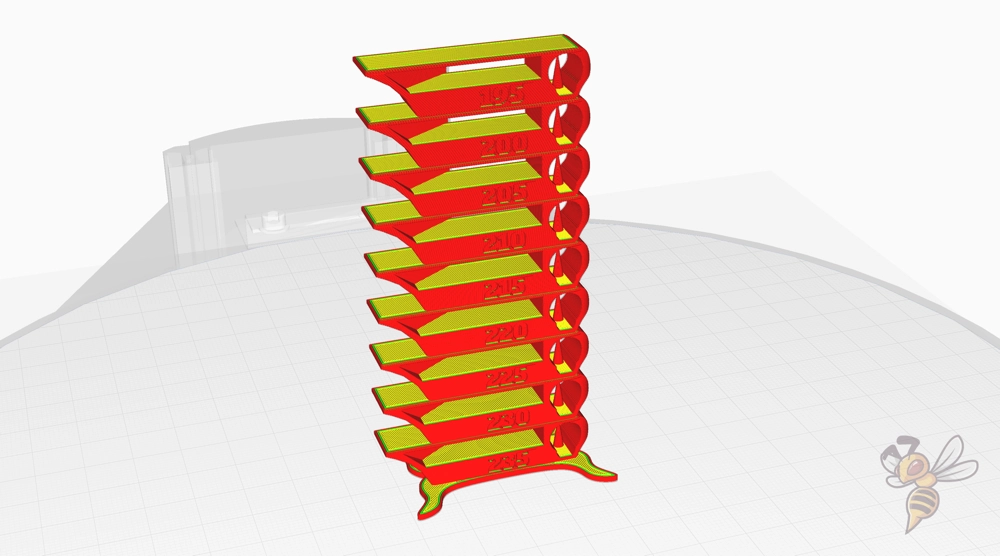
- Get a Temperature Tower: This is a special object designed to test a range of temperatures on the same object. You can find temperature tower models on various 3D printing websites. I like this model because it tests different printing errors in one go.
- Adjust Nozzle Temperature: Using your slicing software, configure different layers of the temperature tower to print at various temperatures. Typically, this range is between 210 °C and 260 °C for PETG. In Slicers like Cura, you can define these temperature steps via a pre-made script. In this article, I show you how to do that.
- Start the Print: Begin printing the temperature tower. As it prints, observe the differences in stringing, layer adhesion, and overall quality at different temperature levels.
- Analyze the Results: Once the print is complete, examine each section of the tower. Look for the temperature where the print has minimal stringing but still maintains good layer adhesion.
- Apply the Optimal Temperature: Use the identified temperature as your standard setting for future PETG prints.
Remember, environmental factors and filament quality can also affect the optimal temperature, so it’s a good idea to recalibrate if you switch filaments or printing conditions change.
Step 2: Calibrate the Retraction Settings
Retraction is vital for reducing PETG stringing. It involves pulling back the filament during non-printing movements to prevent oozing. The key elements of retraction are the distance and speed at which the filament is retracted. While other settings exist, these two have the most significant impact on PETG stringing issues.
Here’s a step-by-step guide to calibrate the retraction settings:
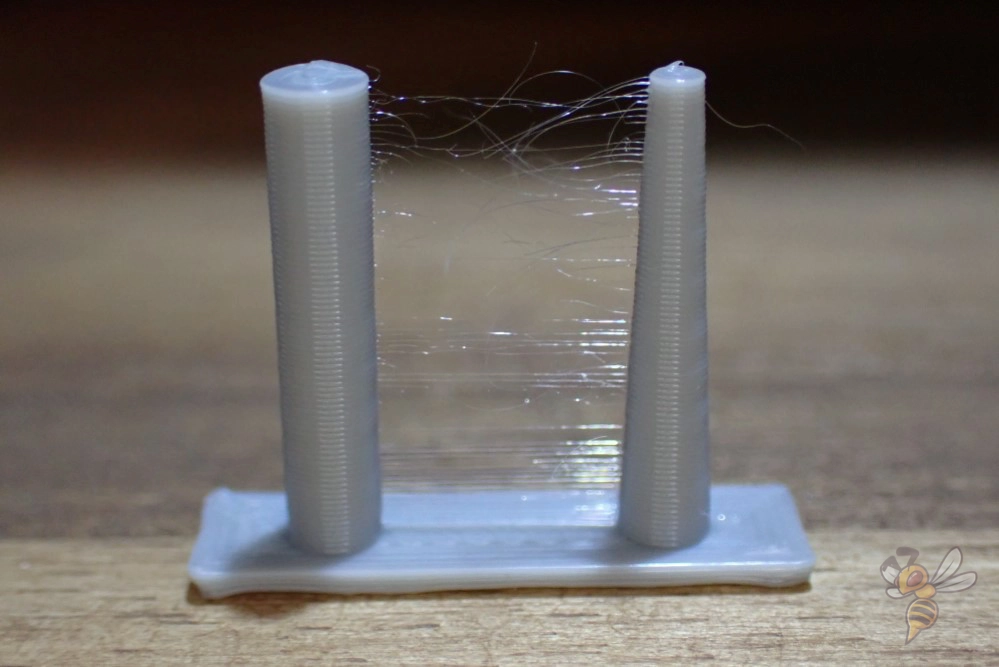
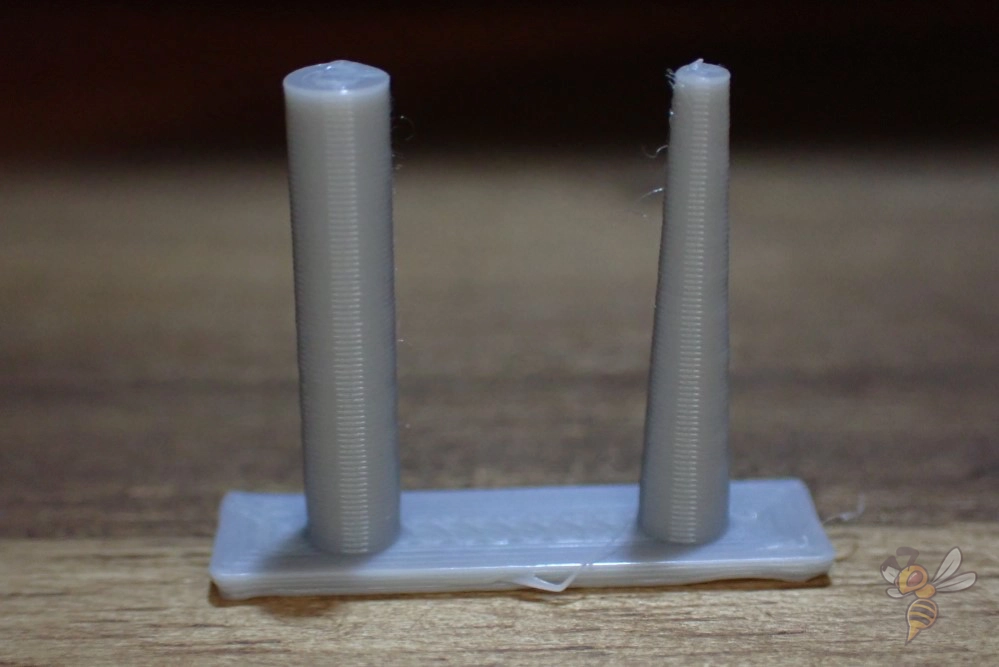
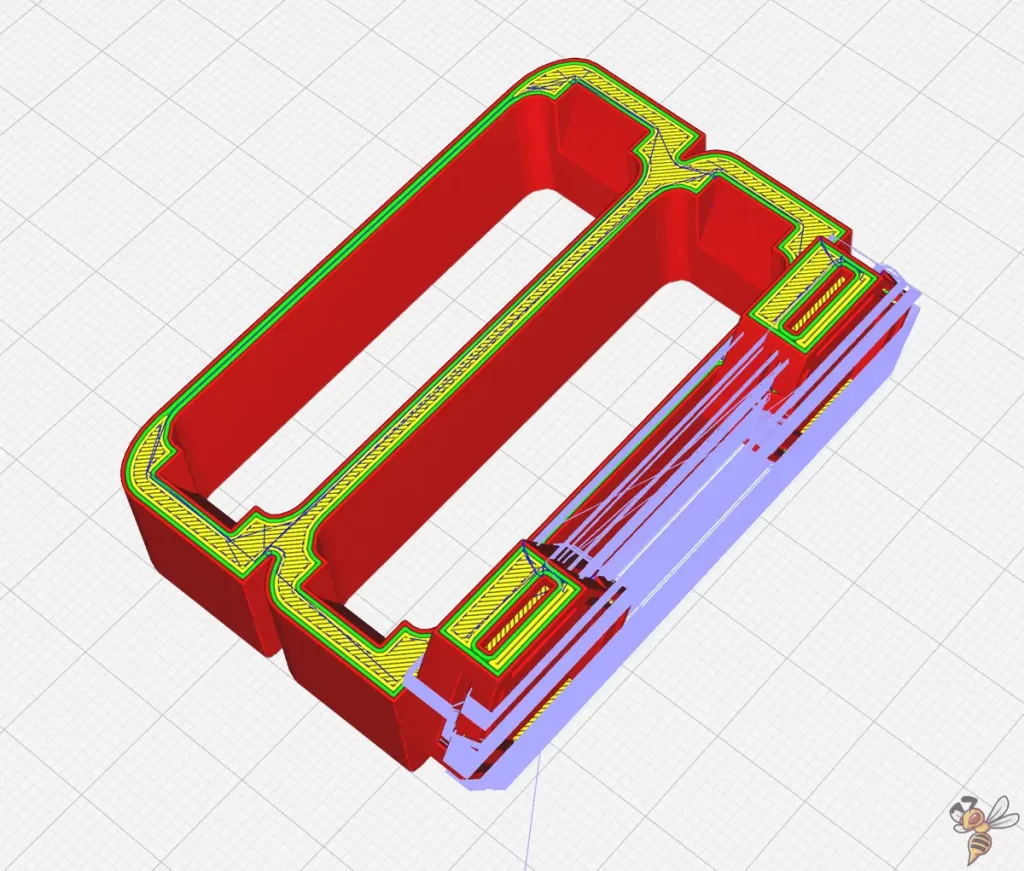
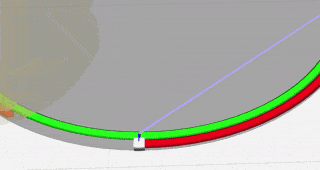
- Choose a Test Object: Use a simple model like the two-column test (found in the Calibration Shapes Plugin in Cura) for a quick and effective way to evaluate retraction. I also used this object in the pictures above.
- Set Initial Retraction Parameters: Start with recommended settings for PETG for your 3D printer, or just use your previous settings as a baseline.
- Print and Observe: Print the test object and observe the stringing between columns. Note the quality and extent of stringing or oozing.
- Adjust Settings Incrementally: If stringing is present, adjust the retraction distance and speed in small increments (0.5 mm and 5 mm/s) but never both at the same time. Increase the distance and speed to reduce stringing, but avoid going too high to prevent clogging the nozzle. You can still see excessive stringing after the first one or two adjustments, you can lower both settings at the same time.
- Repeat the Test: After each adjustment, reprint the test object to observe changes. This iterative process helps hone in on the optimal settings.
- Balance with Temperature: Since retraction and temperature settings are interrelated, recalibrate them in tandem. A change in one might require a tweak in the other.
Remember, patience is key. Finding the perfect balance might take several iterations, but the result will be cleaner prints with minimal stringing.
Step 3: Dry the Filament
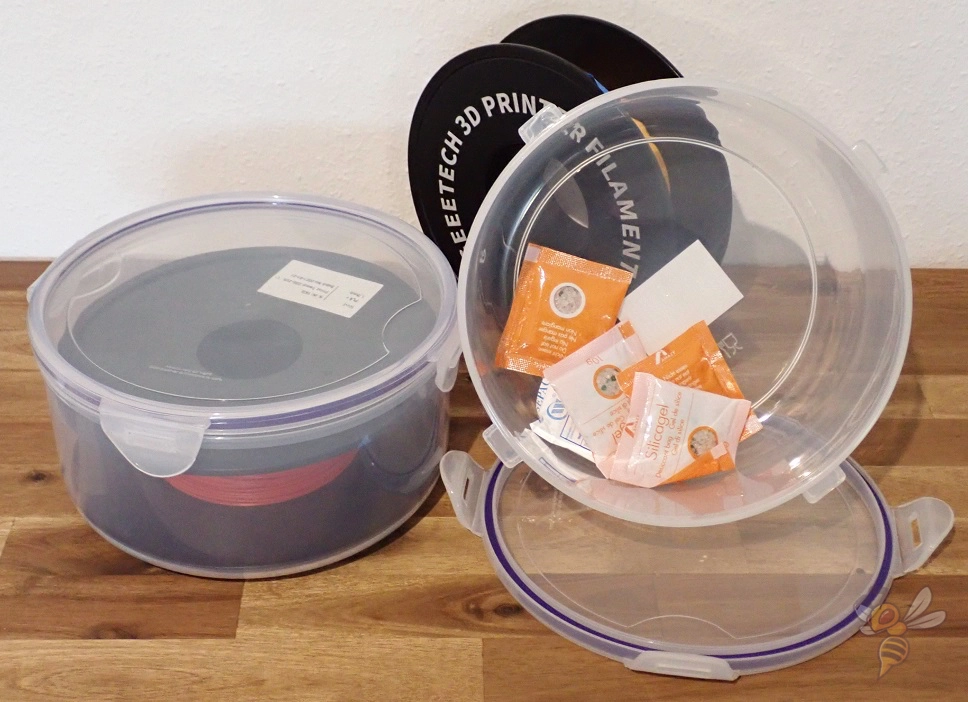
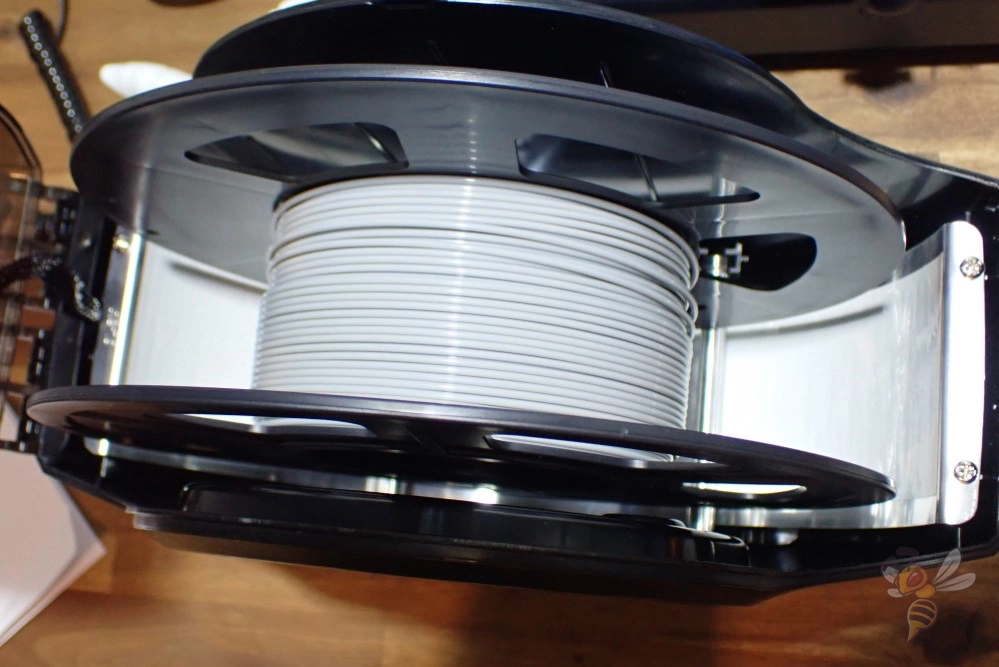
Moisture absorption in PETG filament can seriously impact print quality, causing increased stringing and inconsistent extrusion. To maintain optimal printing conditions, it’s essential to store PETG in a dry environment, such as airtight containers with desiccants.
Should your filament absorb moisture, here’s how to effectively dry it:
- Oven Drying (not recommended): Preheat your oven to a low temperature, around 45-55 °C. Place the filament spool in the oven and dry it for several hours. Monitor closely to avoid overheating, which could deform the filament.
- Using Filament Dryers (recommended): Dedicated filament dryers provide a safer, more controlled drying environment. These devices maintain a consistent temperature and protect the filament from direct heat, reducing the risk of warping. I have tested the Sunlu FilaDryer S2 myself and was able to reduce PETG stringing by a lot with this device.
- Drying Time: The drying time can vary depending on the amount of moisture absorbed. Generally, 4-6 hours is sufficient, but heavily saturated filaments may require longer.
- Post-Drying Storage: After drying, immediately store the filament in a moisture-free environment. Use vacuum-sealed bags or containers with desiccants to prevent reabsorption of moisture. Here you can find more information about correct filament storage.
Regularly drying and properly storing your PETG filament will significantly reduce issues like stringing and improve your 3D printing results.
Step 4: Calibrate the Flow Rate
Flow rate calibration is crucial for fine-tuning PETG printing, especially to address stringing. The flow rate, typically set around 100%, controls filament extrusion. Misalignment in this setting can cause improper filament deposition, leading to stringing or other issues.
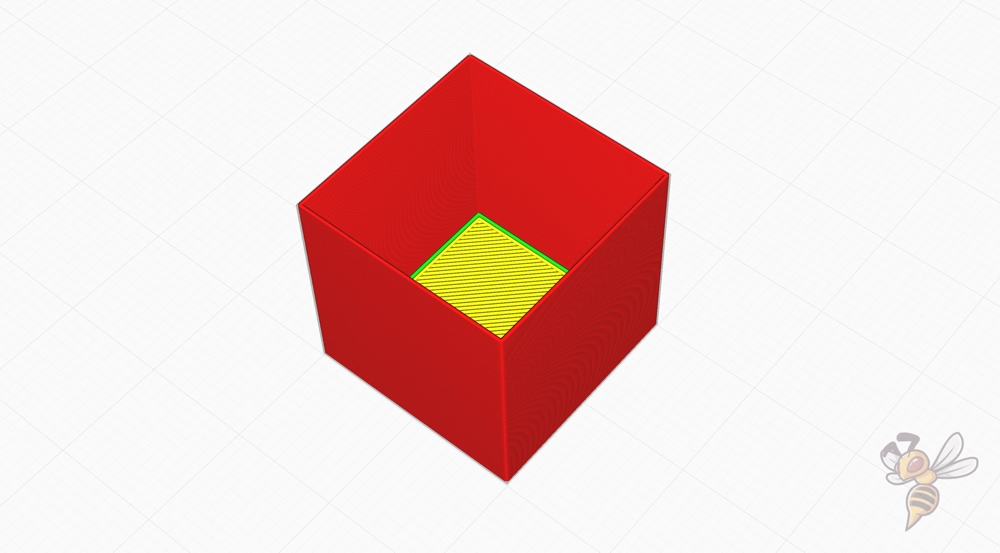
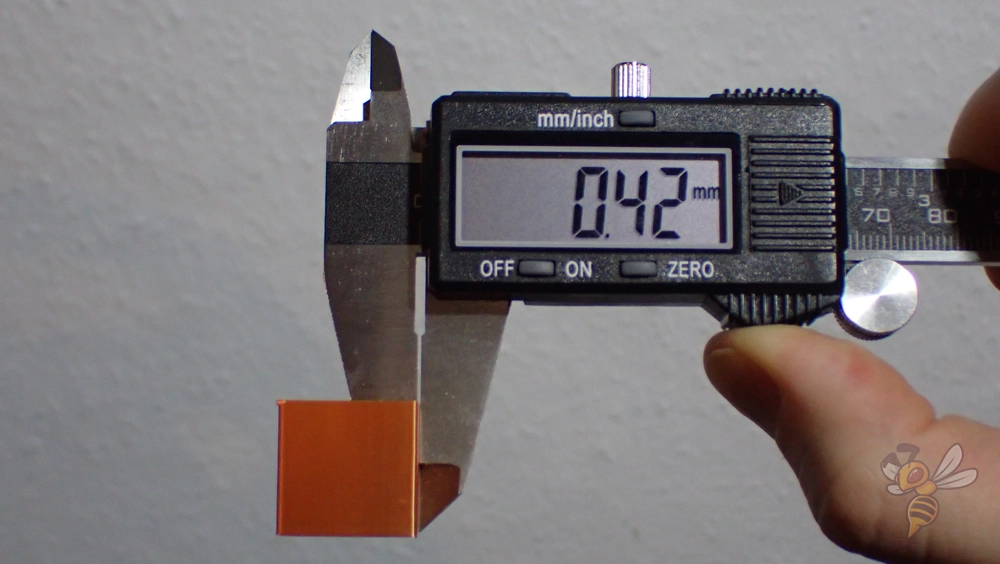
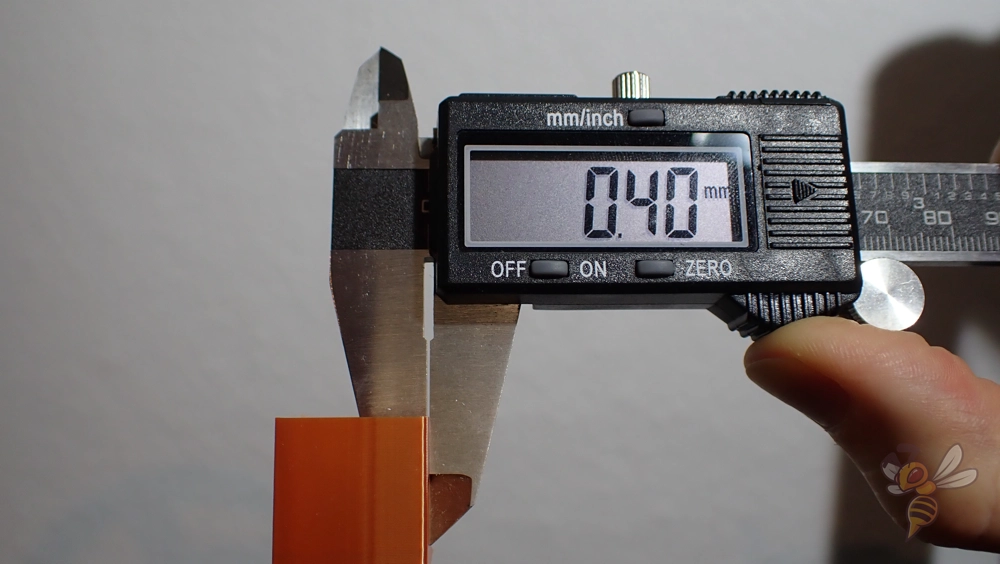
Here are the steps to calibrate the flow rate with the cube wall test:
- Prepare for Calibration: Choose a simple, standardized calibration cube design from a reliable 3D printing resource.
- Print Settings: In your slicer, set the model to print with no infill and no top layers, and specify two perimeter walls.
- Conduct the Test Print: Print the calibration cube with your current flow rate settings.
- Measure Wall Thickness: Use precise calipers to measure the thickness of the cube walls. Compare this measurement to the expected wall thickness based on your slicer settings.
- Adjust Flow Rate: If there’s a discrepancy in the wall thickness, adjust the flow rate in your slicer. Increase the flow rate if the walls are thinner than expected, and decrease it if they are thicker.
- Iterate as Needed: It may take several iterations of adjusting and printing to dial in the correct flow rate.
By methodically adjusting and testing the flow rate, you can significantly reduce stringing in PETG prints, leading to cleaner and more accurate results. But be sure to calibrate the printing temperature and the retraction settings beforehand.
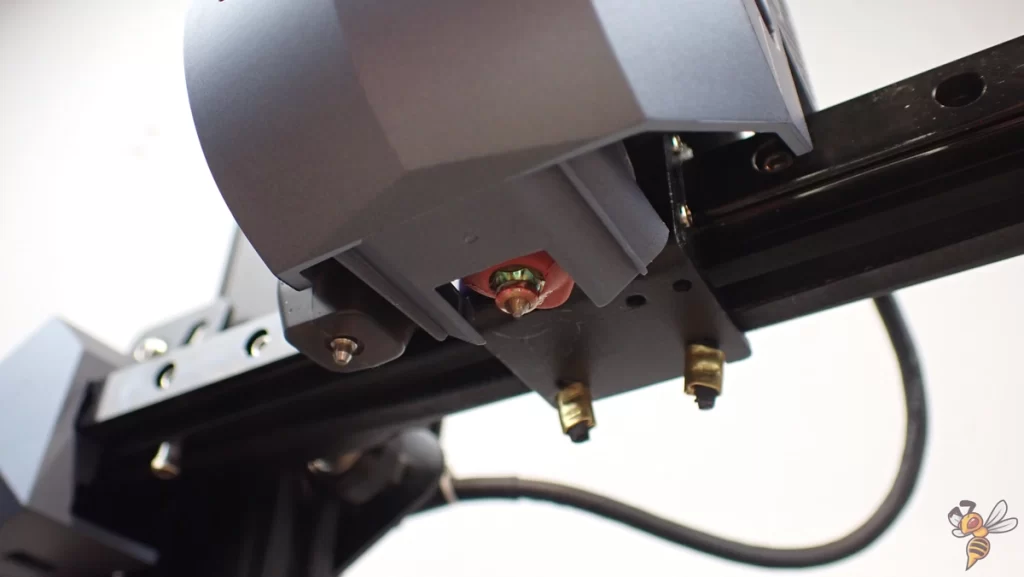
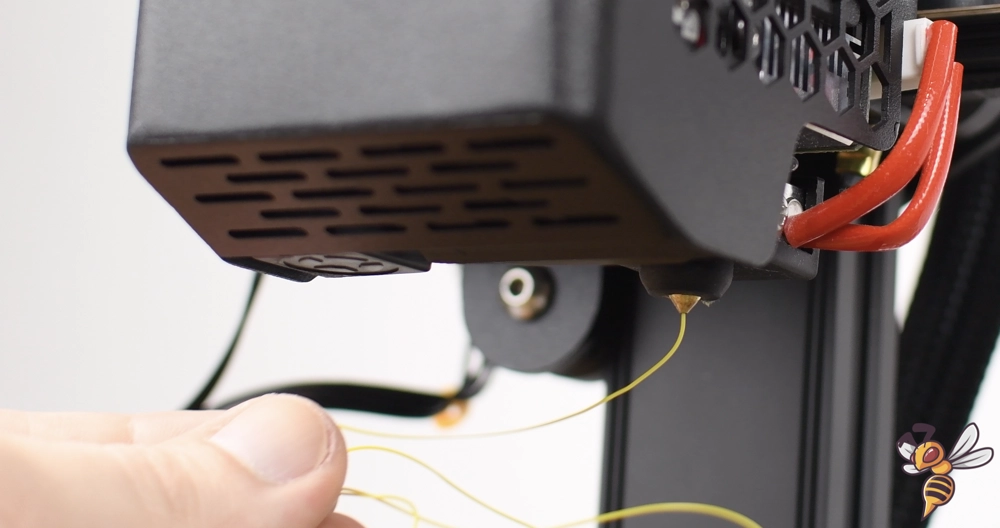
Step 5: Clean the Nozzle
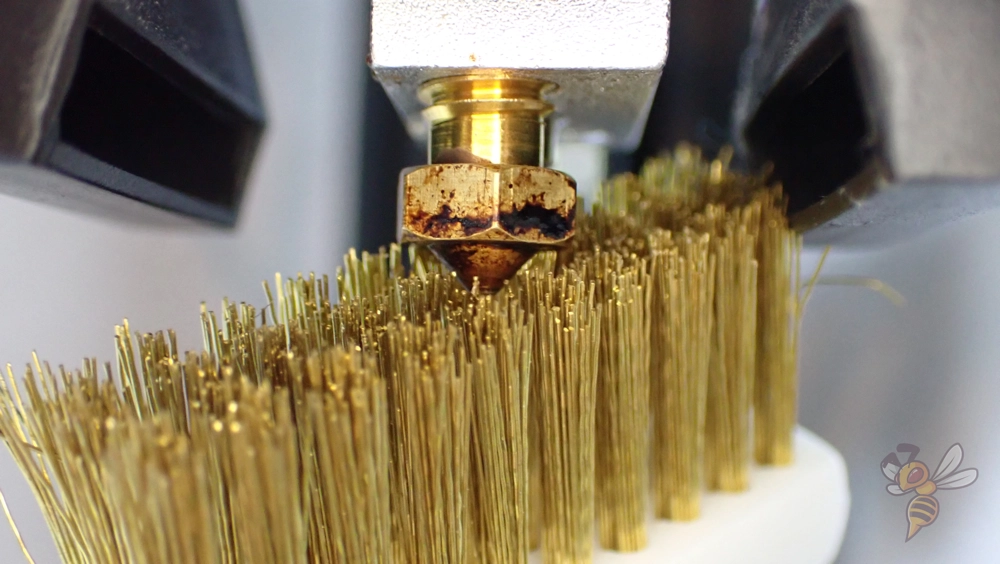
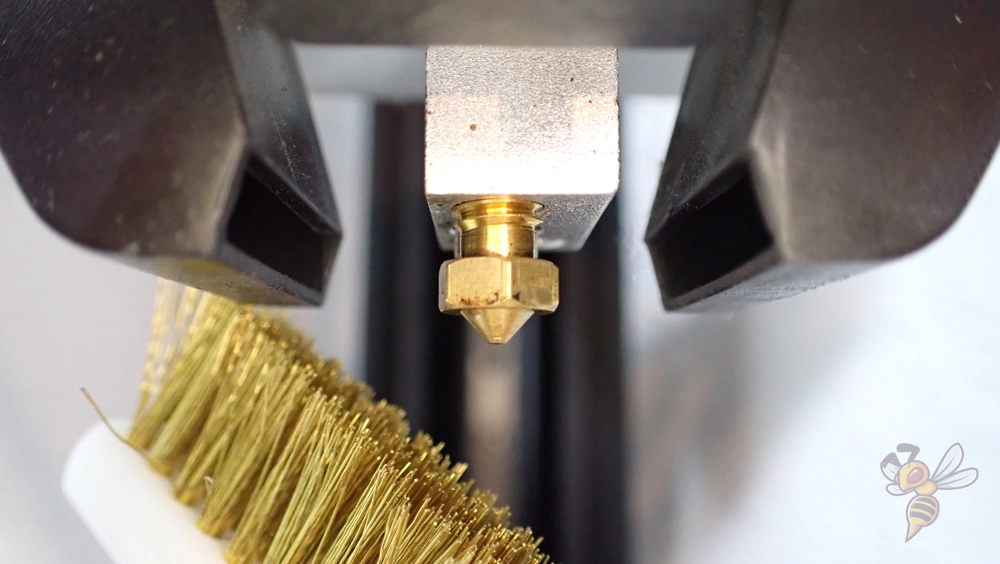
Maintaining a clean nozzle is vital for preventing stringing when printing with PETG. Accumulated residue, either inside or around the nozzle, can hinder filament flow, causing stringing and other printing issues like oozing and blobs.
Here are ways to clean the nozzle of your 3D printer:
- Heat and Clean: Heat the nozzle to soften any stuck filament. Then, use a paper towel to carefully remove outside residue on the nozzle. Do this before and after each print.
- Use Cleaning Filament: For minor residue inside the nozzle and for regular maintenance, cleaning filament* is ideal. Just extrude it at printing temperature until it comes out clean.
- Use a Needle: For stubborn residues inside the nozzle, carefully insert a fine needle into the nozzle when it’s heated to remove any internal blockages.
- Chemical Cleaning: For thorough cleaning, remove the nozzle and soak it in acetone or a specialized cleaning solution. This method is effective for removing stubborn residues.
- Regular Maintenance: Incorporate nozzle cleaning into your regular maintenance routine. Clean it after every few prints or when switching materials to ensure optimal performance.
For even more detailed instructions on nozzle cleaning, read this guide.
Step 6: Increase the Travel Speed
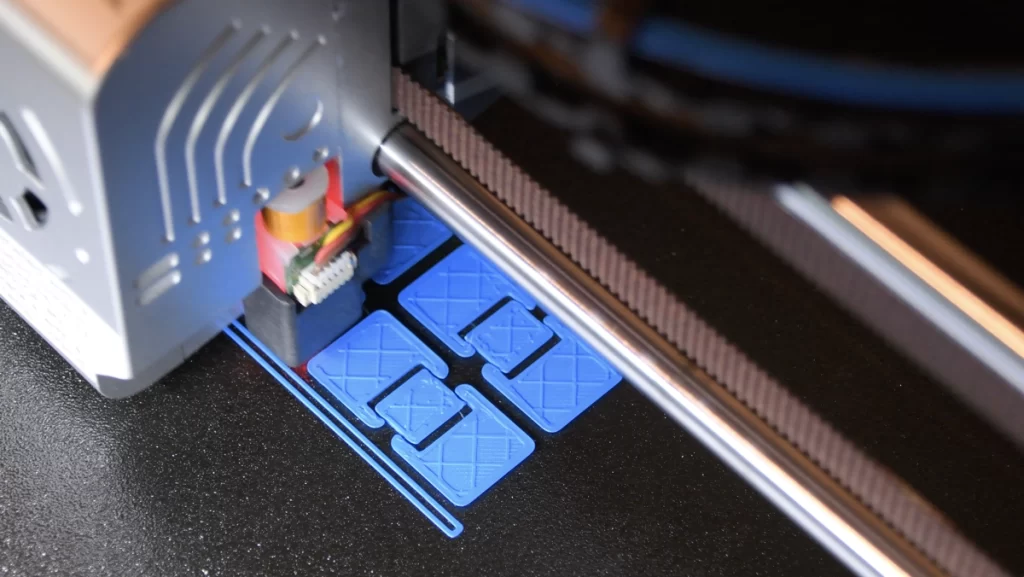
Optimizing travel speed is another approach to minimize PETG stringing. Faster travel reduces the duration the nozzle is over open areas, minimizing oozing and therefore stringing.
Travel speed in 3D printing refers to how fast the printer’s nozzle moves from one point to another when it’s not extruding filament. For PETG especially, adjusting this speed is important:
- Too Slow: If the nozzle moves slowly, it gives the hot, melted filament more time to ooze out of the nozzle, leading to the PETG stringing.
- Just Right: By increasing the speed, the nozzle spends less time over areas where it’s not printing, reducing the chance of stringing.
- Balance is Key: However, if the speed is too fast, it might affect the printer’s accuracy or cause shaking, impacting the overall quality of the print with print errors like ringing or ghosting.
Follow these steps to calibrate the travel speed:
- Initial Speed Adjustment: Begin with a moderate increase in travel speed from the standard setting.
- Monitor Print Quality: Observe how the increase impacts stringing and overall print quality. Look for improvements in stringing without compromising the print’s integrity.
- Incremental Increases: If stringing persists, continue to increase the speed incrementally, monitoring the results after each adjustment.
- Balance Speed and Quality: Aim to find a speed that significantly reduces stringing without introducing new issues like vibrations or poor layer bonding.
By methodically adjusting and evaluating the travel speed, you can significantly enhance the quality of your PETG prints.
Step 7: Adjust the Print Head Path
Adjusting the nozzle’s path can greatly reduce PETG stringing. Techniques such as Combing, Z-Hop, Coasting, and Wiping can be used to optimize the movement of the nozzle.
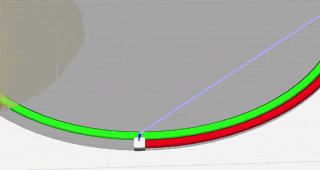
Combing
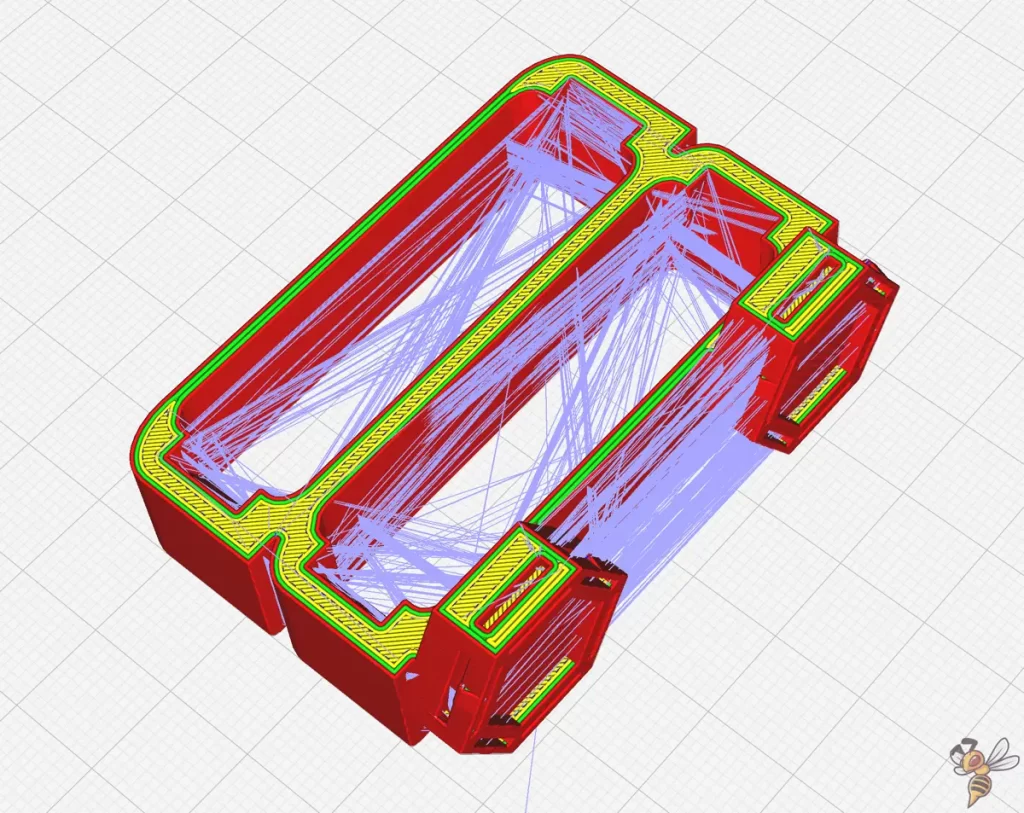
Combing navigates the print head within the confines of already printed areas, avoiding travels across open spaces.
Impact on Nozzle Path: This technique minimizes the distance the nozzle travels over non-printed areas. By doing so, it reduces the chance of oozing and stringing because the filament is less likely to leak out during these movements. And if it leaks, it leaks into the printed object, rendering this printing error invisible.
Z-Hop
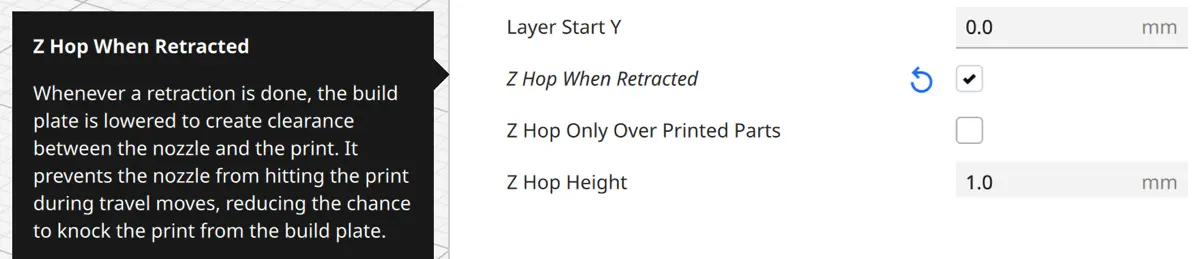
Z-Hop is a feature that lifts the nozzle slightly off the print during non-printing movements.
Impact on Nozzle Path: By raising the nozzle during transitions, Z-Hop prevents it from dragging over the print. This reduces the risk of pulling strings of filament from one part of the print to another, leading to a cleaner print with less stringing.
Coasting
Coasting is a setting that halts the extruder just before the end of a print path.
Impact on Nozzle Path: It utilizes the residual pressure in the extruder to finish extruding filament, minimizing the amount of filament oozed during path transitions. This can significantly reduce stringing as the nozzle moves to the next print area. But be careful not to overdo it. Too much coasting leads to holes.
Wiping
Wiping involves dragging the nozzle across the most recently printed layer to remove any excess filament before moving to a new location.
Impact on Nozzle Path: This action cleans the nozzle, thereby preventing the excess filament from creating strings between different parts of the print. Wiping ensures smoother transitions with less risk of stringing.
Step 8: Calibrate the Fan Speed
Calibrating the fan speed is crucial when printing with PETG. Effective cooling can solidify the extruded filament quickly, reducing stringing. However, too much cooling can lead to poor layer adhesion.
Start with a lower fan speed and gradually increase it, observing the effects on stringing and overall print quality. I usually start at 50% fan speed and work my way up in steps of 10 to 20%. You won’t fix PETG stringing directly by adjusting the fan speed, but it definitely helps.
Step 9: Use High-Quality Filament
The quality of the filament used in 3D printing plays a pivotal role in the outcome of your prints, especially when it comes to minimizing stringing issues when printing PETG. High-quality filament can significantly enhance the precision and aesthetics of your prints, while poor-quality filament can exacerbate problems like stringing, oozing, and inconsistent layering.
These are features of high-quality filament:
- Consistency in Diameter: High-quality filaments maintain a consistent diameter throughout the spool, ensuring uniform extrusion and reducing the chances of stringing and other extrusion-related problems.
- Proper Composition: Premium filaments are formulated with precise compositions, lacking impurities that can cause irregular melting and cooling, leading to stringing and poor layer adhesion.
- Moisture Content: Superior filament is typically packaged with better moisture protection, reducing the likelihood of moisture-induced stringing and bubbling during prints.
When choosing a filament, consider the following aspects:
- Brand Reputation: Opt for brands known for their quality control and customer satisfaction. When it comes to PETG filament, I really like SUNLU PETG*.
- User Reviews: Look for user feedback and reviews, particularly regarding stringing and print quality with PETG.
- Compatibility: Ensure the filament is compatible with your printer’s capabilities and temperature ranges.
FAQ – Frequently Asked Questions
Why Does PETG String More Than Other Filaments?
PETG tends to string more than other filaments like PLA due to its physical properties. PETG has a higher melting temperature and is more hygroscopic, meaning it absorbs moisture more readily.
The material’s viscosity at printing temperatures also plays a role; PETG is less viscous compared to some other filaments, leading to more stringing as it easily flows from the nozzle.
How Do I Remove Stringing From the Finished Print?
To remove the excess material from PETG stringing, use a heat gun set to a low or medium temperature. Carefully wave the heat gun over the affected areas to soften the stringing. Once softened, these strings can be easily pulled away or brushed off. It’s important to keep the heat gun moving to avoid warping or damaging the print due to concentrated heat.
How Can I Adjust My Printer Settings to Fix PETG Stringing?
Adjusting printer settings is key to reducing PETG stringing. Key adjustments include:
- Retraction Settings: Increase retraction distance and speed to help pull the filament back during travel moves.
- Print Temperature: Lower the printing temperature to reduce its fluidity.
- Travel Speed: Increase the travel speed, so the nozzle moves quickly between print areas, minimizing the time for stringing to occur.
- Cooling Fan Speed: Adjust the cooling fan speed to optimize the filament cooling process, preventing stringing without causing layer adhesion issues.
Does the Humidity Level Affect PETG Stringing?
Yes, humidity levels significantly affect PETG stringing. PETG absorbs moisture from the air, which can lead to stringing and other printing issues. The absorbed moisture turns into steam during printing, causing bubbles and increased stringiness. Storing PETG in a dry environment and using a filament dryer before printing can reduce these issues.
What Role Does Filament Quality Play in PETG Stringing?
Filament quality greatly impacts the incidence of stringing in PETG prints. High-quality PETG typically has more consistent diameter and composition, reducing the likelihood of stringing. Poor-quality filament may contain impurities or inconsistencies, leading to uneven extrusion and increased stringing. Investing in a reputable brand can make a significant difference.
Conclusion
Effectively minimizing PETG stringing requires a methodical approach, focusing on various aspects of your 3D printing setup.
This guide has provided you with practical, step-by-step instructions on how to calibrate your printing temperature, retraction settings, filament drying, flow rate, nozzle cleanliness, travel speed, print head path, and fan speed. Each of these steps is vital for achieving the best possible print quality with PETG.
By following these guidelines and patiently fine-tuning your printer’s settings, you can significantly reduce stringing and achieve cleaner, more precise prints.
Disclosure: This website is the property of Martin Lütkemeyer and is operated by Martin Lütkemeyer. Martin Lütkemeyer is a member of the Amazon Services LLC and other Affiliate Programs. These are affiliate advertising programs designed to enable websites to earn advertising revenue through advertising and linking to Amazon.com and others. Links marked with * are affiliate links.
