
- Wet Filament: Prevention, Symptoms & Drying - July 18, 2024
- Sovol SV08 – Best PrusaSlicer Settings & Profile - June 26, 2024
- Sovol SV08 – Best Orca Slicer Settings & Profile - June 26, 2024
Disclosure: Links marked with * are Affiliate Links. I earn from qualifying purchases if you decide to make a purchase through these links – at no additional cost for you!
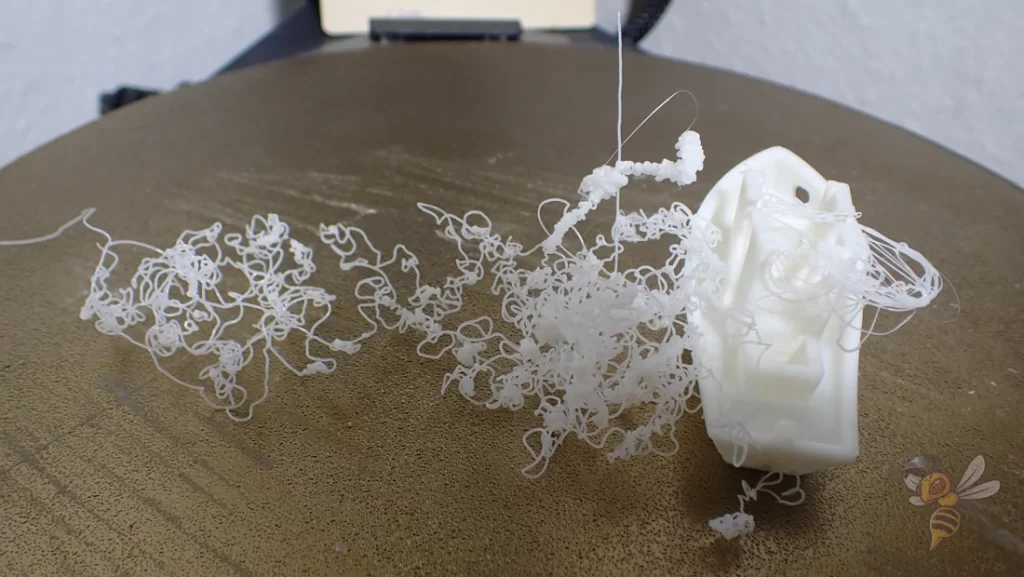
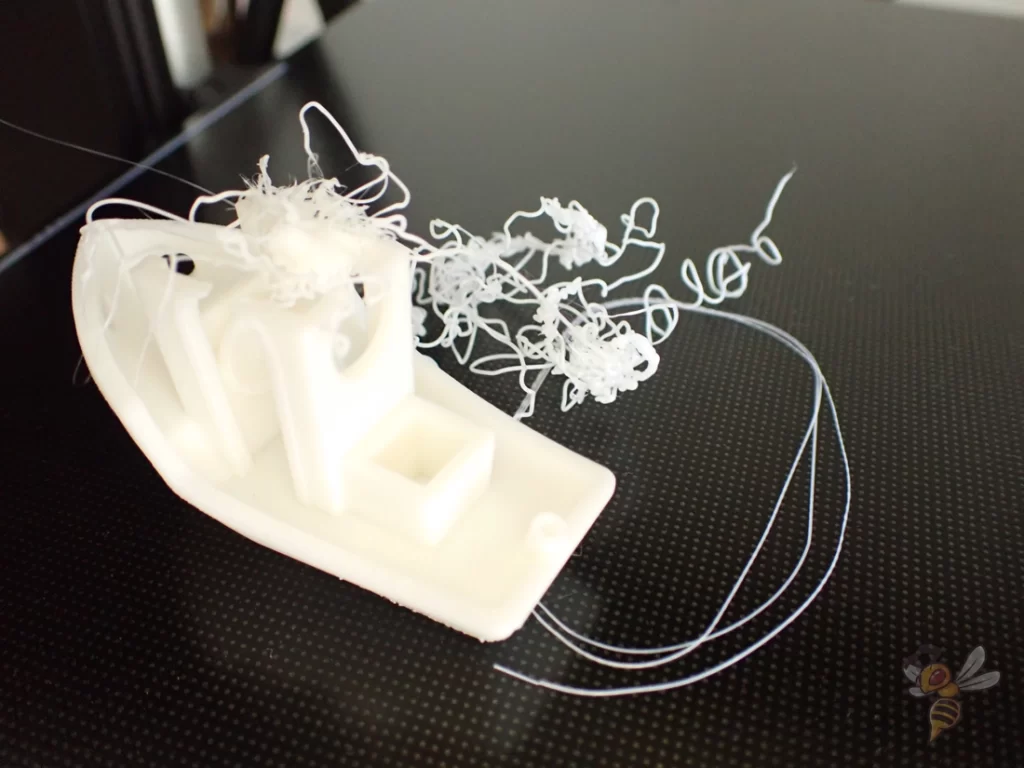
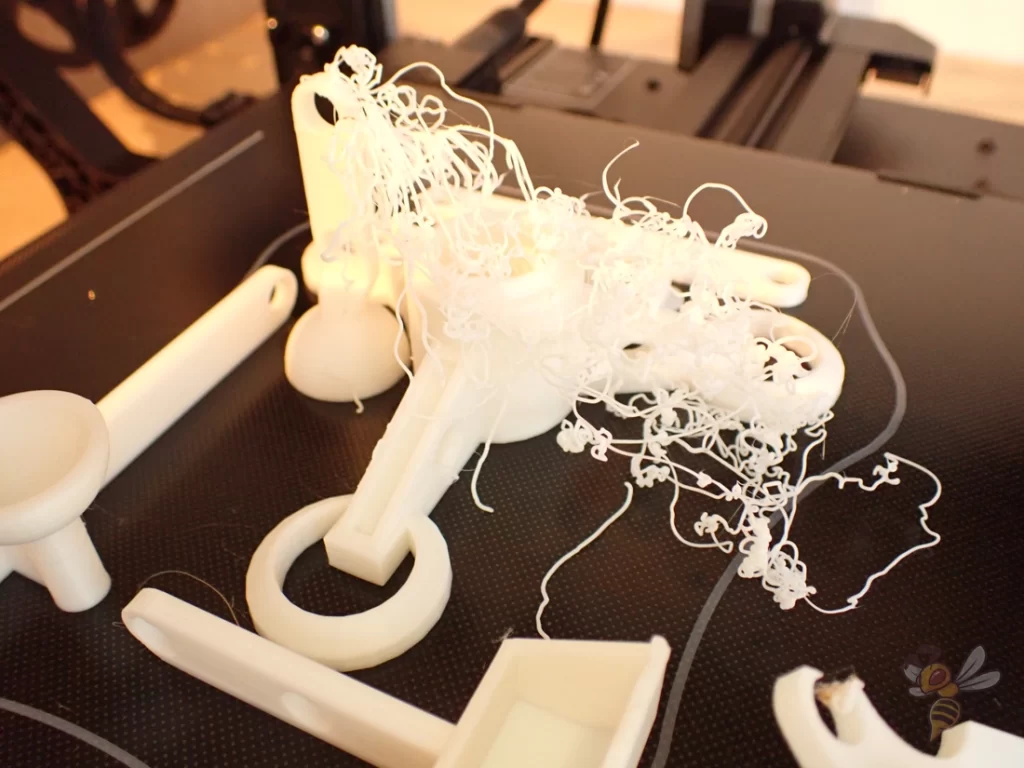
If the spaghetti error occurs in 3D printing, the print fails and has to be restarted. This can result in higher costs due to unnecessary filament consumption. Since it is not always clear where the error comes from, the spaghetti phenomenon often causes a lot of frustration.
The spaghetti error in 3D printing is caused by the nozzle extruding filament in the air rather than on a layer that has already been printed. The main causes of this are poor print bed adhesion or layer shifts.
How you can avoid all these causes and eliminate the spaghetti problem for good, you will learn in this article.
Table of Contents:
Causes of the Spaghetti Error in 3D Printing
There are several possible causes for the spaghetti error. A few of them are much more likely than others. The main reason for the spaghetti error is poor print bed adhesion or layer shift.
Here are all the possible causes of the spaghetti error in 3D printing:
- Print bed adhesion
- Layer shift
- Poor supports
- Warping
- Poor overhangs
- Clogged nozzle
- Too narrow Bowden tube
I have used dozens of different 3D printers and have several thousand hours of 3D printing behind me. Of course, I have observed the spaghetti error before and can roughly estimate how likely the mentioned causes will be in your case.
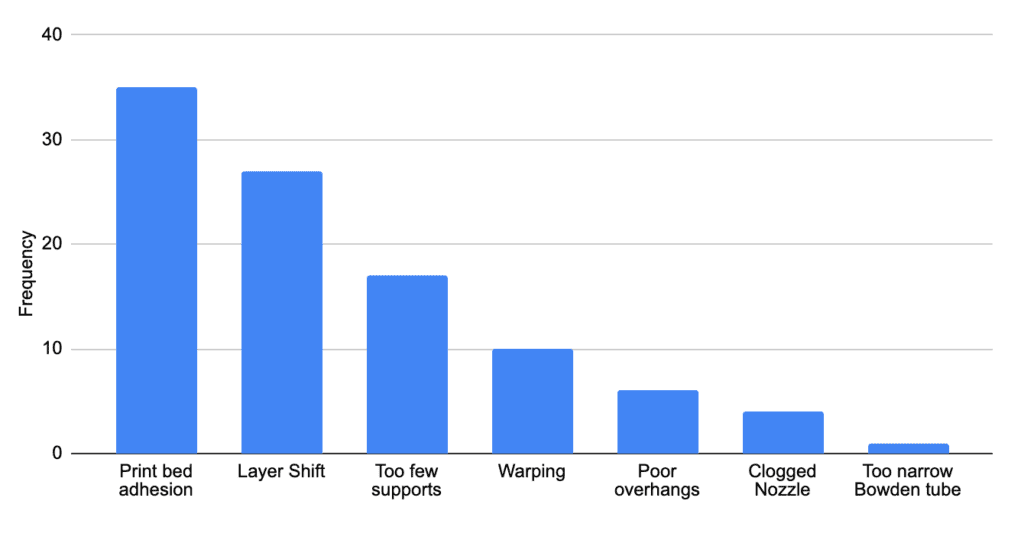
The outline in this article is therefore sorted according to this frequency. When troubleshooting the spaghetti error, you should therefore work in this order. First, try to increase the print bed adhesion, then avoid layer shifts, and so on.
If you follow all these steps, you won’t get spaghetti errors anymore!
How to Avoid the Spaghetti Error in 3D Printing
Increase Print Bed Adhesion
When print bed adhesion fails during a 3D print, the printed object moves freely across the print bed. Eventually, the nozzle will no longer be above the object and will print freely in the air. A failing print bed adhesion is the most common cause for the spaghetti print failure.
To increase print bed adhesion, there are a total of 10 proven steps. The first two of these, print bed cleaning and re-leveling the print bed, are among the basics that should be followed for every print anyway.
The remaining steps on this list increase print bed adhesion and should be used in the order listed to avoid the spaghetti print error.
- Clean the print bed: The hot filament can only adhere to the print bed if there are no foreign objects such as filament residue or dust on it. Grease and adhesive residue can also reduce print bed adhesion.
- Re-level the print bed: If the print bed is uneven, the object may come off preferentially on one side of the print bed during printing. To avoid this, careful leveling of the print bed is necessary.
- Reduce the z-offset: The distance between the nozzle and the print bed is called z-offset. The smaller it is, the more the filament is pressed onto the print bed. It can then flow better into the small depressions of the print bed and creates better adhesion. However, do not set the z-offset too small. Otherwise you will create an elephant foot or prevent extrusion completely.
- Reduce the print speed of the first layer: The slower the first layer is printed, the longer the extruded filament stays hot and fluid. This gives it longer to flow into the small depressions of the print bed, resulting in better print bed adhesion.
- Disable cooling of the first layer: This also increases the amount of time it takes for the filament to cool.
- Increase print bed temperature: With this setting, you also have an impact on how long the first layer filament stays hot and liquid. Be careful with this setting though, as you can quickly create an elephant foot with too high values.
- Thicker and higher lines of the first layer: The larger the cross-section of the printed line, the larger the thermal mass. Due to the inertia of cooling, this also keeps the filament hot longer and allows it to bond better to the print bed.
- Use a Raft or Mouse Ears: Print bed adhesion can also be increased by making the base of the object wider. A raft creates a large first layer on which to print the object. Mouse ears are small brims printed at the corners of an object.
- Use adhesives: You can use adhesives like hairspray, glue sticks, or blue tape to directly increase the print bed adhesion. However, there are also special 3D printing adhesives like Magigoo.
- Replace the print bed surface: Some print bed materials are better suited than others to create good adhesion for certain filaments. In my experience, the spaghetti print defect is least likely to occur on a PEI print bed*.
If you would like to learn more about each step, you should read the complete guide to improving print bed adhesion.
Once you’ve checked off these steps for improving print bed adhesion, you should have eliminated the most likely cause of the spaghetti print error. If you’re still having trouble with it, you should look out for layer shifts.
Avoid Layer Shifts
In my experience, the second most common cause of spaghetti error in 3D printing is a layer shift. In a layer shift, one layer is no longer printed exactly on top of the layer below it for a specific reason. The already printed layers are then offset.
Depending on how much the layer has been offset, the nozzle may then print the filament over empty space, producing the dreaded spaghetti error.
Again, there are several causes that can result in a layer shift. We have already eliminated a few of them by improving print bed adhesion and leveling the print bed.
To avoid the spaghetti print error caused by layer shifts, you can take the following steps:
- Tighten the belts: If the belts are too loose, they may slip when changing the direction of the print head. If, after printing, you can still determine in which direction the layer has been shifted, you can identify which of the two toothed belts needs to be tensioned. Tension the toothed belt until it gives off a bright sound when plucked with your finger.
- Reduce the print speed: If the print speed is much too high, the stepper motors may not be able to keep up and may skip individual steps. Also, a higher print speed can cause the belts to slip. Therefore, the combination of belts that are not tensioned tightly enough and a printing speed that is too high is more common.
- Remove foreign bodies from the axes and the belts: Over time, filament residue and dust can accumulate on the moving parts of the 3D printer. The more of these foreign objects stuck in the moving parts, the higher the likelihood of a blockage.
- Cool the electronics: On particularly hot summer days, I have observed layer shift and thus the spaghetti error due to overloaded electronics. On such hot days, you might consider additional cooling for the 3D printer’s electronics.
- Avoid collisions with z-hop: While moving without extrusion, sometimes the nozzle can hit an already printed part of the object. Especially if you have a problem with warping, this is likely. The z-hop setting in the slicer causes the nozzle to move up a bit after extrusion before moving.
- Avoid strong vibrations: A layer shift can also result from subjecting the 3D printer to strong vibrations. You can avoid this with proper shock absorbers under the feet of the 3D printer.
If you continue to have problems with layer shifts, you can read the individual solutions in the detailed guide: How to Prevent Layer Shifting in 3D Printing
Improve the Supports
For objects with overhangs or slight slopes, support structures can help prevent the spaghetti print error. Even with poor supports, the spaghetti error can occur if their support function is insufficient.
Sometimes you will not notice the spaghetti print failure until you check after several hours to see if the 3D print is finished. However, if you have a camera installed for monitoring or happen to be watching the print at the right time, you can determine if insufficient supports are the cause of the spaghetti error.
If you have overhangs in your 3D print, you should activate the support structures in your slicer. This supports overhangs so that the nozzle can print the filament on a base and not in the air.
Positioning is essential and what settings you define in the slicer. If you print too many supports, you will waste filament unnecessarily, but if you print too few supports, you may get a spaghetti error.
If you still suspect the spaghetti error in these places, try to optimize the support structures of your object and make them more stable. You can increase their density, reduce the threshold at which supports are generated, or print a brim for better print bed adhesion of the supports.
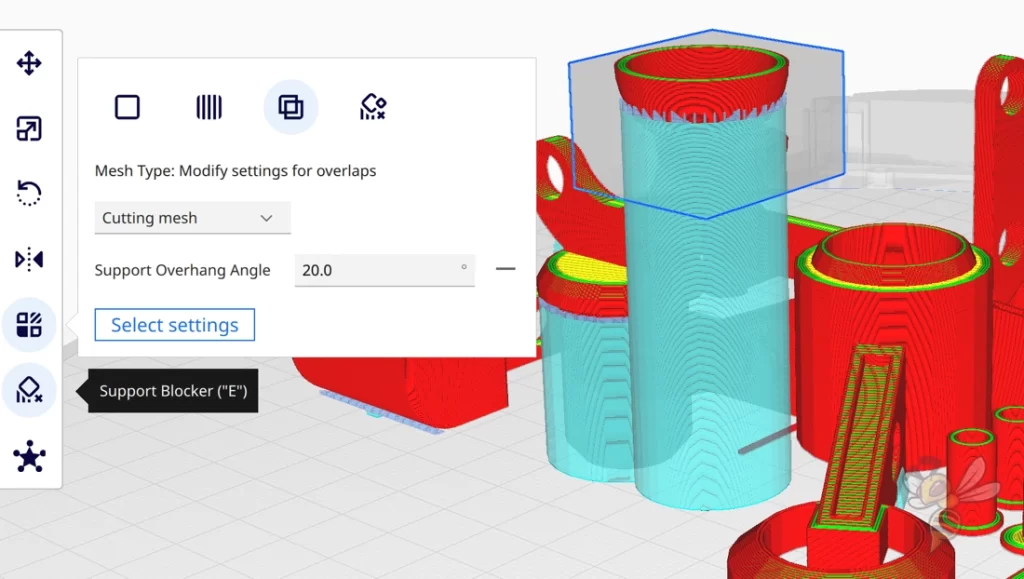
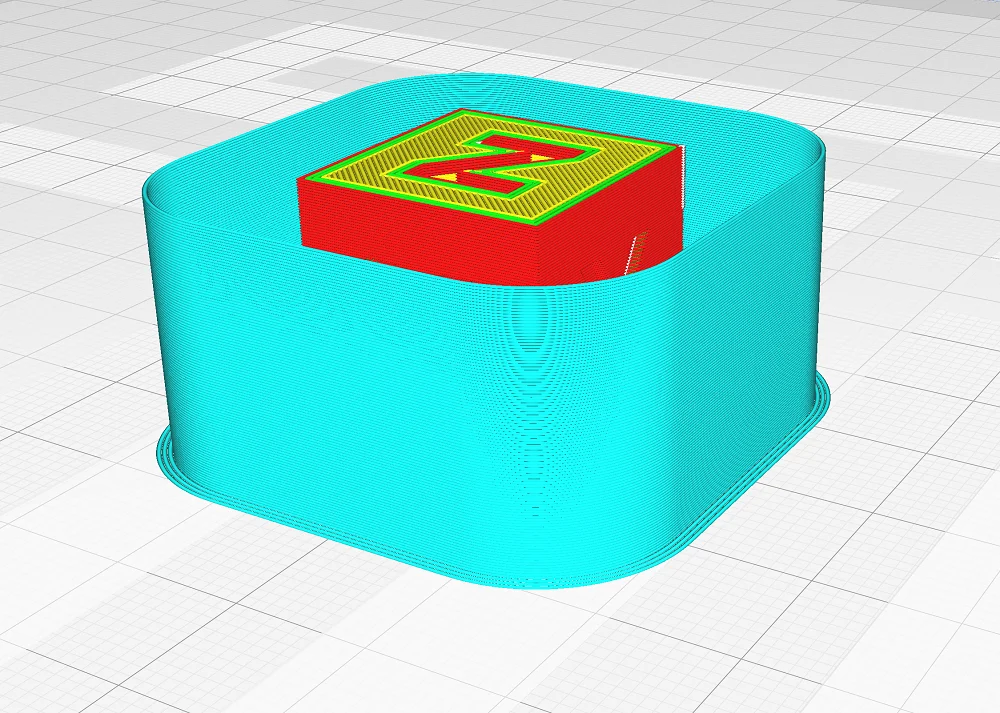
If you want to do this only in certain places and not change the support structures in the rest of your object, you can use the Support Blockers in Cura for this.
Place a support blocker where you wish to change the settings for the supports. In the settings for the overlapping areas of the support blocker with your object, you can change all the settings of the supports. In the example above, I have lowered the threshold at which supports are generated, which will generate more supports for that location.
Avoid Warping
Strong warping can cause collisions where the nozzle moves the print object. Then the nozzle does not find the place where it should print and continues to print in the air and the spaghetti error occurs.
If the print object has warped considerably during printing, part of it may protrude further up than it should. The nozzle cannot detect this and moves into the already printed object.
Even if you have optimal print bed adhesion, you can hardly avoid object detachment if the nozzle collides with the object.
Warping can have many causes. It also often depends on what filament you are using. Some filaments tend to warp much more than others. ABS in particular is known to shrink a lot as it cools. If this causes it to partially detach from the print bed, part of the object can stick up and collide with the nozzle.
By improving print bed adhesion, you will have eliminated one of the biggest causes of warping. To avoid the spaghetti error caused by warping altogether, you need to slow down or eliminate the cooling of the object.
With some filaments, it’s enough to reduce cooling during printing, such as with some PETG filaments. For other filaments, like ABS, you need a warm and homogeneous ambient temperature. Cold air currents cool the filament too quickly.
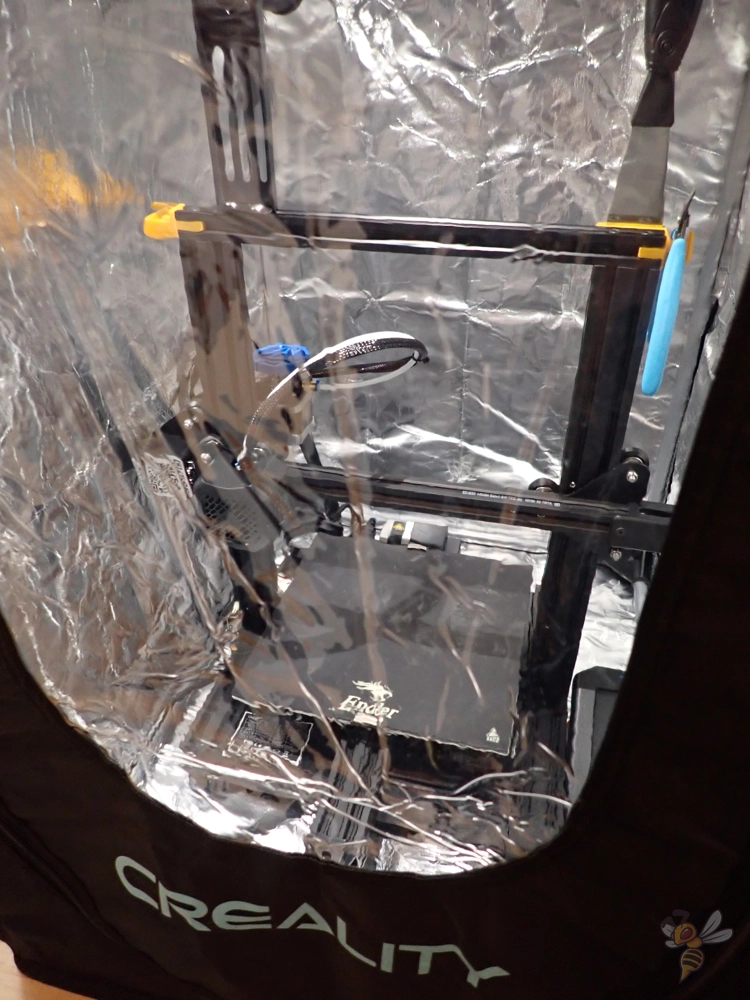
The best way to do this is to use a suitable enclosure or tent. There is a 3D printer tent from Creality that fits many 3D printers and provides a warm and homogeneous ambient temperature. The temperature of the print bed is enough to warm the ambient temperature inside the tent.
For small objects, it is sufficient if you print a Draft Shield around the object. This is a thin wall of filament that protects the object from cold air currents. The air between the object and the Draft Shield is warmer than the surrounding air because the heat from the print bed collects there.
With these measures, you should avoid the major causes of warping, including the spaghetti error caused by collisions with a warped part of the object.
If you would like to learn more about warping, its causes and solutions, you should read this article: Warping in 3D Printing | Guide with Causes and Solutions
Improve Overhangs

Often the spaghetti error in 3D printing occurs under overhangs. This can result in either a fatal spaghetti error where the entire object will not continue to print correctly, or only a partial spaghetti error under overhangs.
If you want to avoid using supports for these overhangs, you have to optimize your print settings. Especially the print temperature, the cooling and the print speed are essential to print overhangs correctly.
- Decrease the print temperature in small increments so that the filament is not quite as fluid and cures faster when printed over an overhang.
- Increase the cooling so that the filament cures faster after extrusion and does not sag when printed over overhangs.
- Reduce the print speed so that the extruded filament finds more support between the nozzle and the previously printed filament. If the nozzle moves away too quickly, the filament will not have a chance to cool down through the cooling and will only find a suboptimal support on the already printed side.
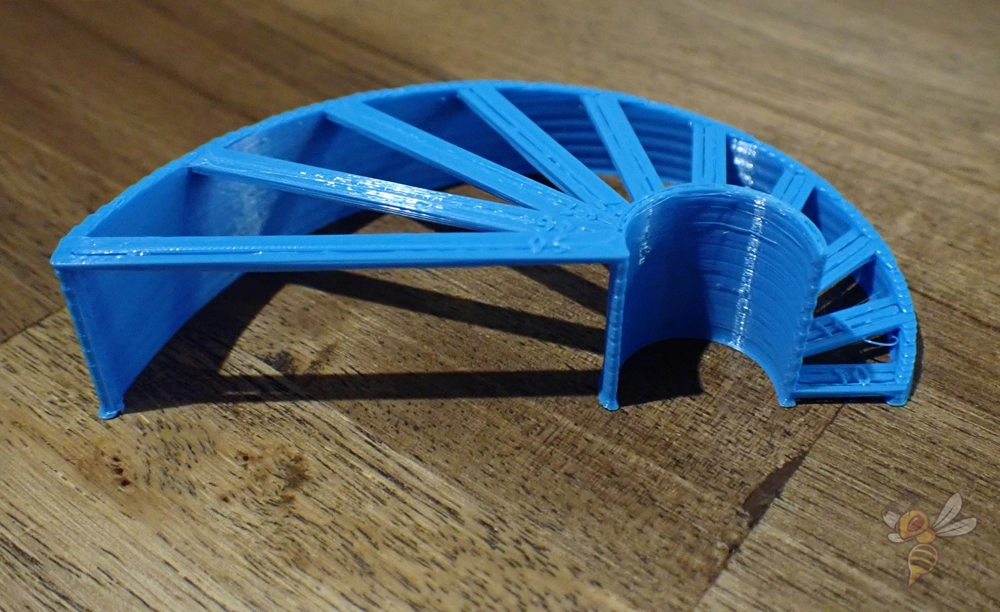
If you use Cura, you can activate the Bridge Settings. This will print overhangs differently than the rest of the object. This allows you to define the settings in the slicer for the overhangs differently than for the rest of the object. I use Cura’s Bridge Settings on every object with larger overhangs, applying the tips above.
Clean the Nozzle
In some cases, a clogged nozzle can cause the spaghetti error in 3D printing. If the nozzle becomes clogged during printing and then clears as the extruder pressure increases, it could have missed printing a spot or even an entire layer of the object.
Once the nozzle then becomes free again, it prints the filament freely in the air and the spaghetti error occurs. It is therefore important to regularly clean the nozzle of a 3D printer and free it from foreign objects.
Depending on how bad the clog is, there are different methods to clean it:
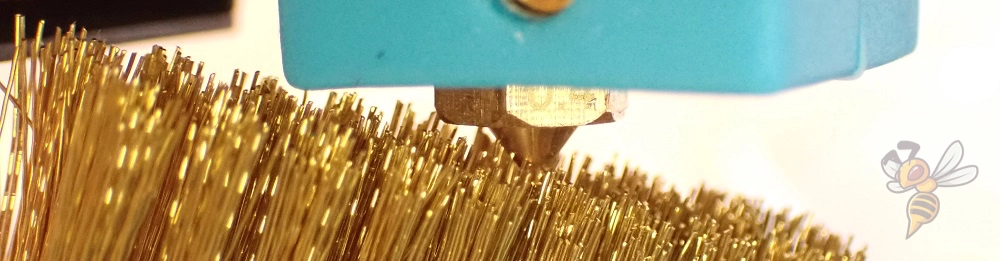
- Cleaning filament*: You can use cleaning filament to flush out charred filament residue in the hotend. It is not used for printing, it is just extruded a bit until no more dirt sticks to it.
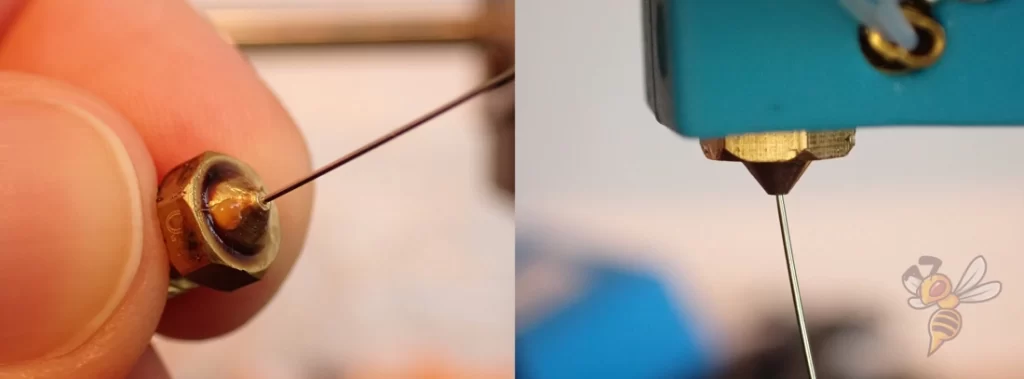
- Needle: A fine needle can be used to loosen more stubborn clogs in the nozzle. Many modern 3D printers already come with a needle for the nozzle. Otherwise, there are practical cleaning kits* available online.
- Acetone: For very stubborn blockages, you can remove the nozzle and soak it in acetone. The plastic inside the nozzle will be dissolved by the acetone.
To avoid the spaghetti error caused by a clogged nozzle, you should regularly protect it from clogging. Before and after each print, you can wipe the surface of the nozzle with a piece of paper at printing temperature to remove filament residue. Regular use of cleaning filament will keep the inside of the nozzle clean.
If you want to learn more about cleaning your nozzle, you can check out this article: How to Clean a Clogged 3D Printer Nozzle
Use a Larger Nozzle
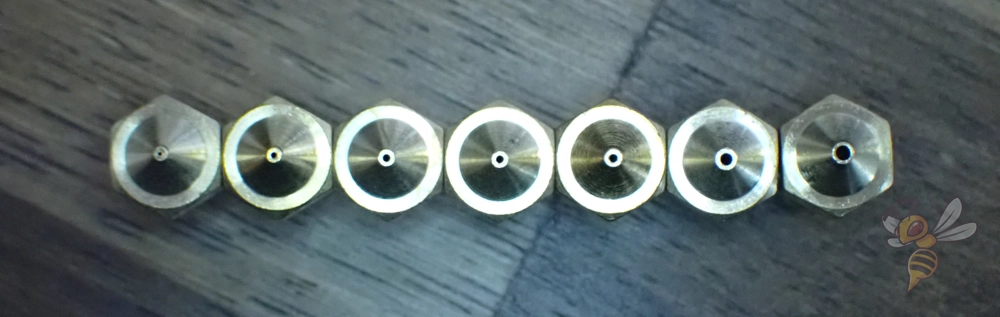
If you often work with filaments with additives, a larger nozzle is worthwhile. Additives such as wood or carbon make it more likely that annoying filament debris will build up inside the nozzle and cause it to clog during printing.
If these additives are deposited in the nozzle, clogging can occur during printing, which can also be released spontaneously. This is another way that the spaghetti error can occur in 3D printing. While I have rarely observed this case, it could be just the solution for you.
By default, FDM 3D printers use a 0.4 mm nozzle. With such filaments, it might be worthwhile to switch to a 0.6 or 0.8 mm nozzle. In a wider nozzle, the filament has more room to flow and tolerates larger particles in the filament.
The downside to a larger nozzle, of course, is that you may lose some accuracy. As the diameter of the nozzle gets larger, so do the layers.
The layer height you can achieve with a nozzle is between 25% and 75% of the diameter of the nozzle. So if you change from a 0.4 mm nozzle to a 0.8 mm nozzle, the smallest layer height is no longer 0.1 mm, but 0.2 mm.
Replace the Bowden Tube
In rare cases, the spaghetti error in 3D printing can also be caused by a Bowden tube with an inner diameter that is too small. In a Bowden extruder, the filament is fed from the extruder through a long tube to the hotend. If this is a bit too narrow, the filament can sometimes get stuck and partially prevent extrusion.
I have only been able to observe this error once. However, there are others who have had this error (link to report).
If a too narrow Bowden tube should be the cause of the spaghetti error with your 3D printer, you will be able to observe other printing errors before. Holes or other phenomena of under-extrusion indicate that the filament in the Bowden tube experiences too much friction.
Another sign of this would be a slipping or cracking extruder, when the extruder tries to push the filament through the tube and there is too much resistance. Then the extruder will crack as it slips through.
If you are looking for a new Bowden tube, I can recommend the tubes from Capricorn*. They have a very accurate tolerance and offer minimal friction.
Spaghetti Detective
If you can’t get the spaghetti error under control or want to make sure you can stop printing in time, you can use Spaghetti Detective.
This is a software that uses a camera to automatically detect if there is an error in your 3D print or not. As soon as the software assumes that your 3D print has failed, you will be notified and you can stop the print in time without wasting more filament and time.
Disclosure: This website is the property of Martin Lütkemeyer and is operated by Martin Lütkemeyer. Martin Lütkemeyer is a member of the Amazon Services LLC and other Affiliate Programs. These are affiliate advertising programs designed to enable websites to earn advertising revenue through advertising and linking to Amazon.com and others. Links marked with * are affiliate links.
