
- Wet Filament: Prevention, Symptoms & Drying - July 18, 2024
- Sovol SV08 – Best PrusaSlicer Settings & Profile - June 26, 2024
- Sovol SV08 – Best Orca Slicer Settings & Profile - June 26, 2024
Disclosure: Links marked with * are Affiliate Links. I earn from qualifying purchases if you decide to make a purchase through these links – at no additional cost for you!
The function to add support structures in Cura guarantees you mostly a successful 3D print.
Sometimes, however, automatically inserted support structures can be a hindrance and even render the object unusable or result in unsightly rework.
To work around this you can activate the support blocker. We’ll show you how it works!
(If you are more experienced, you can skip the introduction by clicking here.)
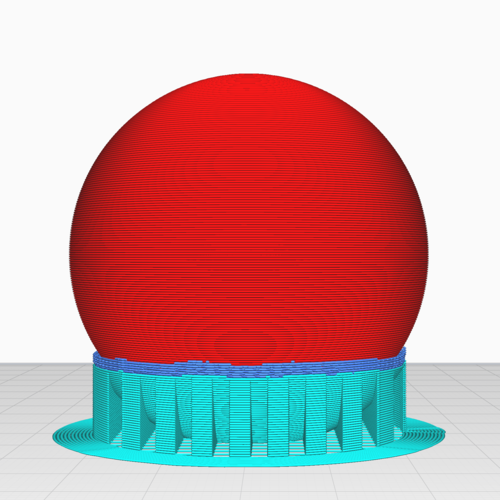
Table of Contents:
Introduction
What is Cura Anyway?
Cura is a slicing software for 3D printing from Ultimaker. It was developed by David Braam.
It is compatible with the Windows, macOS and Linux operating systems and is available in 15 languages. This software is used by over one million users worldwide. Around 1.4 million print jobs are processed each week.
Cura is preferably used with 3D printers made by Ultimaker. But it can also be used with other devices.
The respective model file is digitally cut into layers by Cura. The software then generates a G-code which is specific to the printer. Once this is done, you can send that G-code to the printer to physically create the desired object.
There is hardly a desktop 3D printer that this software is not compatible with. It can be used with image formats like PNG, JPG, GIF and BMP and 3D formats like X3D, STL, OBJ and 3MF.
The following chronicle shows when which of the versions was released:
- On 07.06.2016 Ultimaker announced their latest main version of Cura. It was called version 2.1.2, taking the place of the previous version 15.04.6.
- In September 2016 the main version, called Version 2.3, was released. It included increased speed, new print profiles and cutting functions. With the printer model Ultimaker-3, dual extrusion was also possible with this version.
- The new main version, version 3.0, was released on 17.10.2017. For those, the user interface was updated and CAD integration was ensured. It was also the first one to be able to support plugins.
- Cura-Connect was published in November 2017. The aim was to give users the ability to control, monitor and configure multiple networked 3D printers from a single interface.
- Version 3.5 was launched in October 2018. Since then, all files are saved in 3MF format. In this way, compatibility with other 3D programs could be improved. In addition, this version included hotkeys and a profile guide which could be searched.
- Version 3.6. will follow in November 2018, which will offer material profile support to its users. This concerned materials produced by members of the Materials Alliance Program Consortium. These included large companies such as BASF, Clariant and DuPont.
- Version 4.0 was released in March 2019. Extensive changes were made to the user interface. In addition, there was a cloud backup function. Support for additional printers from other providers was also added.
There are also more versions. We would like to mention version 3.1, which also supports printers connected via USB. So if you only have a USB printer or if you really want to use a USB connection, you will need to use Cura 3.1 or higher.
What are Slicing Softwares doing?
A slicing software (short form: slicer) is a software that during the process of most 3D printing methods converts the model of the respective object into concrete commands for the 3D printer.
One form of conversion in particular plays a role here: In Fused Deposition Modeling (FDM) or similar processes, an object in STL format is converted into commands for the printer in G-code format.
Initially, the object is converted into a construction of stacked flat layers. A description of this as linear movements of the extruder follows. Instead of the extruder, it can also be a fixing laser or another device.
The data in STL or other formats are transformed by the software into the model of a three-dimensional grid. This grid is then cut horizontally.
All this, together with various specific commands to the printer, is then converted into a readable G-code file. Such specific printer commands can be, for example, the temperature control of the extruder or the bed.
The G-Code file is then forwarded to the printer. G-code refers to a programming language that is used for numerical controls.
In this way, the 3D device can be given commands for various process steps, such as infeed, moving the axes or printing. In other words, the instructions that your 3D printer is to perform are translated into a language it can understand.
Infill in the Slicer
Most of the slicers have additional functions, such as
Infill or filling.
Objects that are solid usually require a large amount of material and time. However, the slicer is capable of converting solid to hollow objects. This saves material and time during the printing process.
Full Article: 3D Printing Infill Guide 👉 Basics, Patterns and Stability
In order to give the hollow object more stability, internal structures can be inserted to some extent. Interior walls are suitable for this purpose, for example. The quantity of such structures is described by the so-called fill density. This parameter is one of the adjustments that must be made to the slicing software.
Infill Problems: Brims, Rafts, Skirts
There are some problems with the first layer of the object, which lies directly on the printer bed. These difficulties include unevenness, adhesion to the substrate and smooth deposits caused by the first quantities of filaments.
However, the slicer is able to automatically add several structures, which can be removed and should minimize those negative effects. Typical examples of such basic structures are brims, rafts and skirts.
Brims are several lines of filament that run around the base of the body until it is touched. They do not lie under the body, however.
Rafts are several layers of material. They form a base that can be removed. The body is printed on this base.
Skirts are single bands that are drawn around the base of the body. Unlike brims, however, they do not touch them.
Cura Support Blocker
In 3D printing, the body is built from bottom to top and layer by layer. The layer that is currently being built up is placed over the previous one. Consequently, all components must be placed on top of each other, either in whole or in part.
To create figures with horizontally stretched limbs, houses with flat roofs or other objects with floating planes, the slicing software can automatically insert support structures. Once the body is finished, those supports can be easily removed.
If you now apply the slicing software to a digital object with floating layers, such support structures are automatically inserted.
However, this may affect regions where experience has shown that this is unnecessary, such as holes. It can also be very complicated to remove support structures from such areas. The Support Structure Blocker helps you to solve this problem.
In the following, we will explain step by step which functions that blocker has in detail and how to execute them. All information refers to Cura version 4.4.1, so minor deviations are possible in future updates.
Option 1
The first possibility is, as already mentioned, the removal of supporting structures that you find unnecessary and impractical.
Steps:
- Select an object.
- Click on the object.
- Click on the bottom of the six fields on the left side of the screen (“Support Blocker”).
- Click on the object again at any position.
- At this point, a cube with a blue border should appear.
- Click on the top of the six fields on the left side of the screen (“Move”).
- Click on the second of the six fields from above (“Scale”).
- There you can give the cube the desired dimensions.
- Move the cube inside the object to where no support structure should appear.
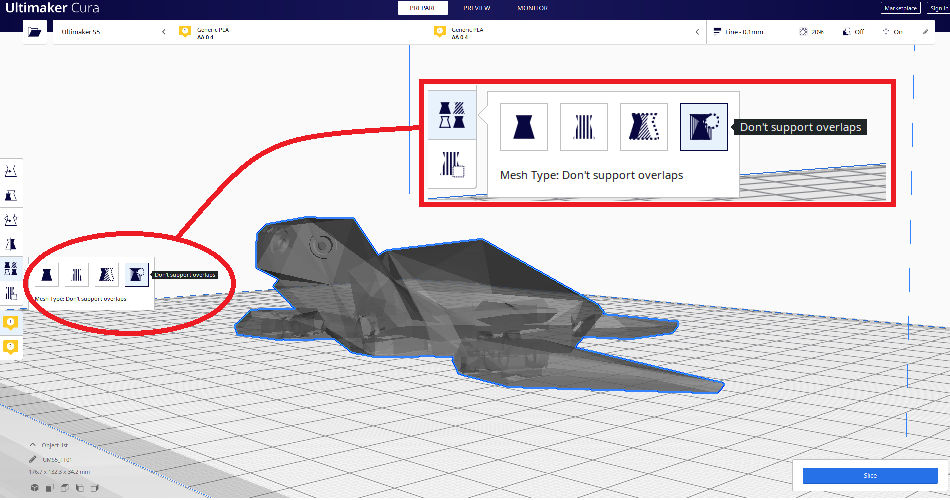
- Click on the second of the six fields from below (“Settings per object”).
- Then an additional window with four more options should appear.
- Click on the ones on the far right (“Don’t support overlaps”).
- Do the slicing.
- In the preview, you should see that no support structure appears at this point.
Option 2
The second possibility is that you can add a stronger filling, i.e. a higher density of inner walls, in some places if necessary. This may be necessary to prevent a possible breakage in those places by increasing stability.
Steps:
- Select an object.
- Click on the object.
- Click on the bottom of the six fields on the left side of the screen (“Support Blocker”).
- Click on the object again at any position.
- At this point, a cube with a blue border should appear.
- Click on the object again at any position.
- Click on the top of the six fields on the left side of the screen (“Move”).
- Click on the second of the six fields from above (“Scale”).
- There you can give the cube the desired dimensions.
- Move the cube inside the object to where you want to change the fill.
- Click on the second of the six fields from below (“Settings per object”).
- Then an additional window with four more options should appear.
- Click on the second from the right (“Modify settings for overlaps”).
- Click on the newly appearing option “Select Settings”.
- Now a new window should appear.
- There you can select “Fill Density” under “Filling”.
- And you can select “Fill Pattern” under “Filling”.
- Close this window.
- In the previous window, you should see the options “Fill Density” and “Fill Pattern”.
- Both can be modified accordingly.
- Uncheck the box of the “Infill Only” option.
- Do the slicing.
- In the preview, you should see how the fill density and fill pattern have changed.
Of course, these are only two examples. There are also a lot of other functions, but most of them, like these two, are based on the same basic principle.
So don’t hesitate to play around with the software to your heart’s content and to experience and learn for yourself what Cura has to offer.
Disclosure: This website is the property of Martin Lütkemeyer and is operated by Martin Lütkemeyer. Martin Lütkemeyer is a member of the Amazon Services LLC and other Affiliate Programs. These are affiliate advertising programs designed to enable websites to earn advertising revenue through advertising and linking to Amazon.com and others. Links marked with * are affiliate links.
