
- Wet Filament: Prevention, Symptoms & Drying - July 18, 2024
- Sovol SV08 – Best PrusaSlicer Settings & Profile - June 26, 2024
- Sovol SV08 – Best Orca Slicer Settings & Profile - June 26, 2024
Disclosure: Links marked with * are Affiliate Links. I earn from qualifying purchases if you decide to make a purchase through these links – at no additional cost for you!
Besides features like Coasting and the Draft Shield, there are other useful things in Cura’s experimental settings. The bridge settings are one of them and can significantly improve your printing results.
In the bridge settings of Cura, various settings for bridge segments of an object can be adjusted. These mainly include the print speed, cooling (fan speed) and flow rate.
In this detailed guide you will learn where to find the bridge settings, what each setting does in detail and what you should do before optimizing the bridge settings.
Table of Contents:
Where Do I Find the Bridge Settings in Cura?

You can find the bridge settings under the experimental settings in Cura.
If you don’t see the bridge settings, their visibility might be disabled. You enable the visibility of settings either via the menu icon in the experimental settings tab or via the Cura menu bar (Settings > Set Visibility).
How do the Bridge Settings Work in Cura?
Under the bridge settings you can set the print speed, the flow rate, the cooling (fan speed) and other things that only come into effect when Cura detects a bridge. You can also define when Cura recognizes an overhang as a bridge and thus prints with the special bridge settings.
In these special bridge settings you will find three of the most important settings for perfect bridges: Print speed, flow rate and fan speed/cooling – only the print temperature is missing, which you should test and optimize separately.
Besides the correct printing temperature, the flow rate and especially the ventilation during the printing of bridges is crucial for the final quality. With these special settings you can print the bridges almost perfectly.
You can adjust settings such as fan speed differently for the first three layers. For example, the first layer is printed with cooling enabled so that the filament solidifies quickly and stays exactly where it was extruded. The next two layers are printed without cooling so that they can bond well with the first to create a stable bridge.
Further down in this article I will go into detail about the individual settings. But before that, we’ll take a look at their effects so that you can assess whether these settings can be worthwhile for you or not.
Finding the Right Temperature for Perfect Bridges
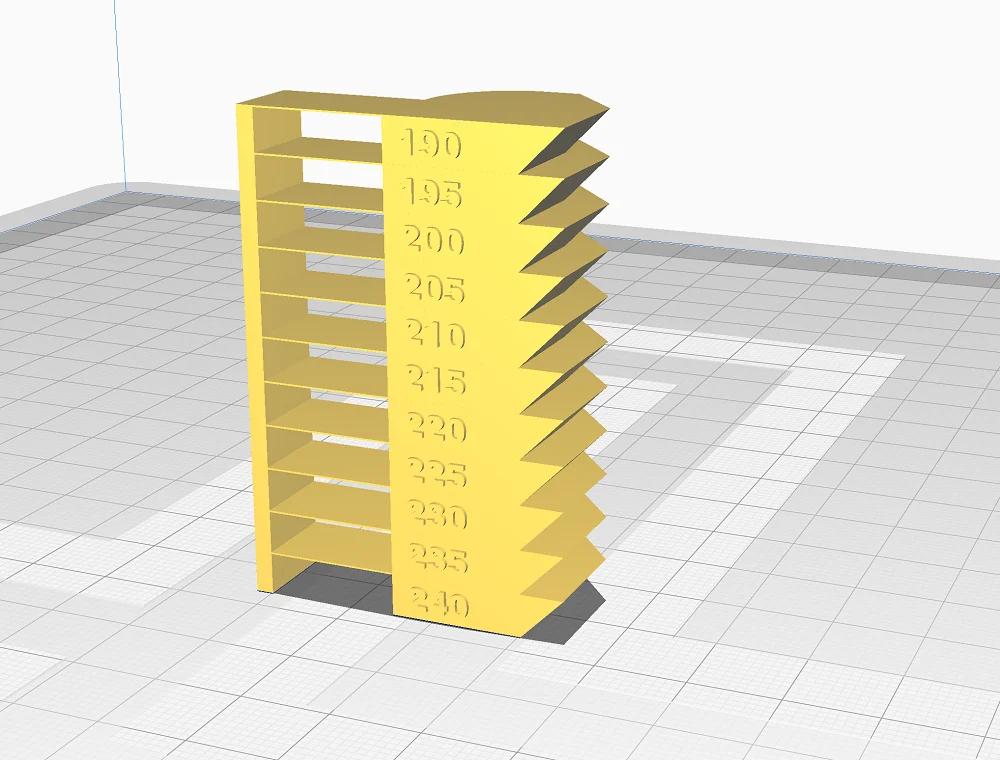
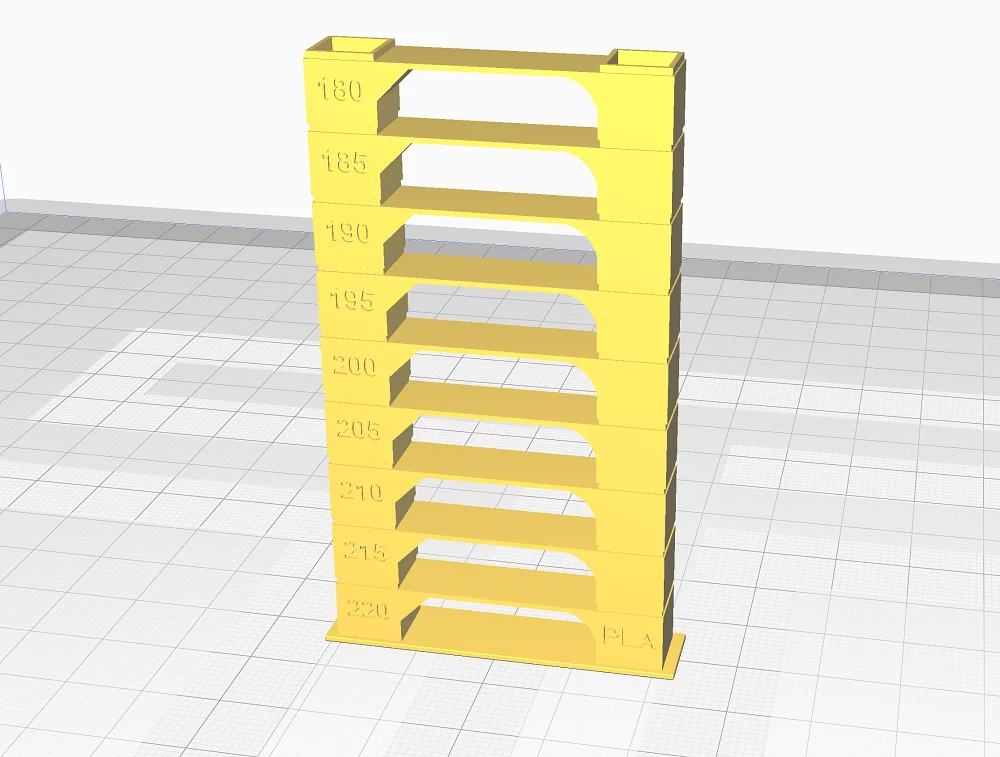
Before you start working on the right bridge settings, you should find the right temperature for the filament you are using. The best way to do this is to print a temperature tower where you can see the bridge behavior at different temperatures.
Only then should you activate and optimize the bridge settings. You can find suitable temperature towers either in the Calibration Shapes plugin from Cura via the marketplace (available for free), or you can find a suitable model on Thingiverse.

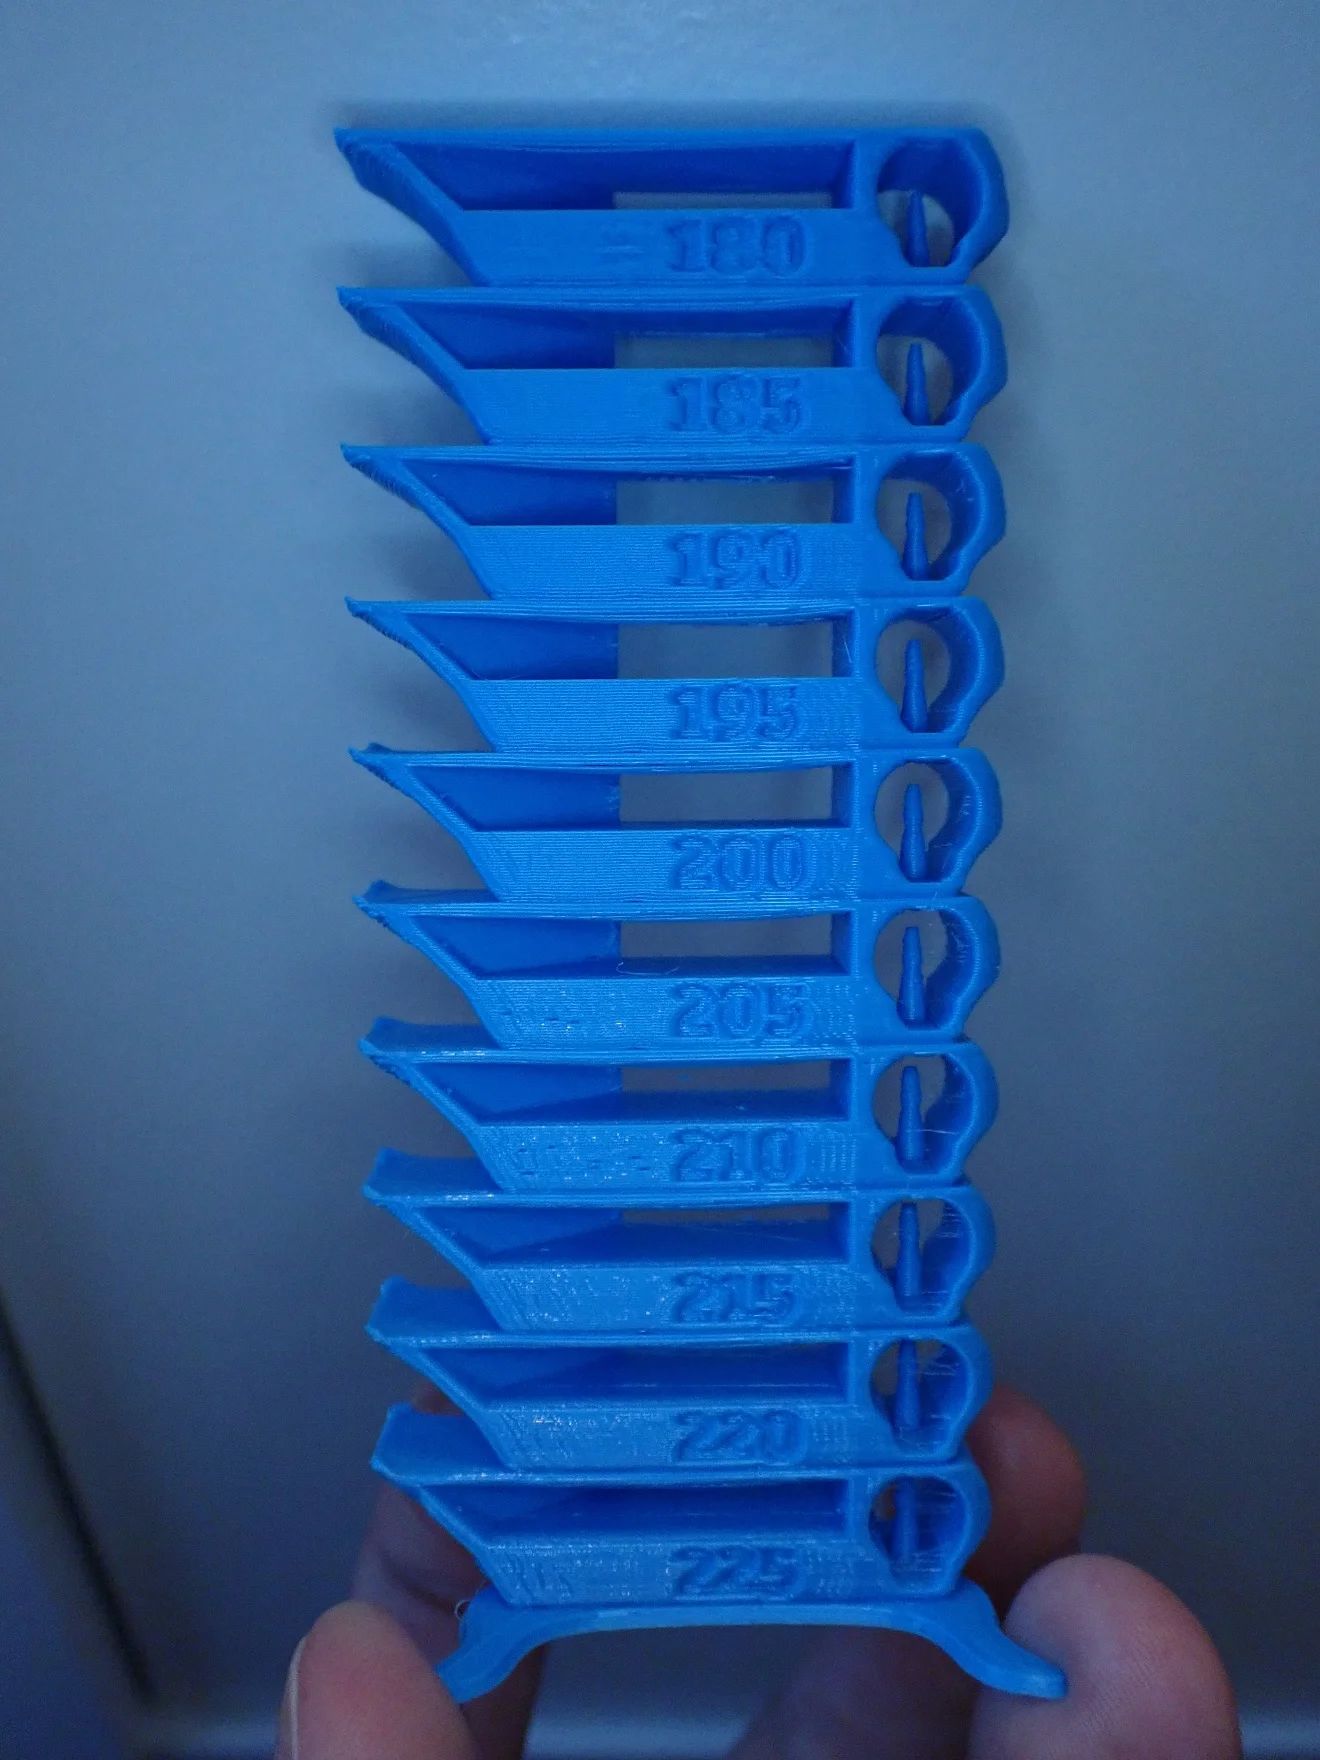
Bridging Test With and Without Cura Bridge Settings
After I found the right temperature settings, which resulted in a great optimization of the bridging behavior, I enabled the bridge settings in Cura. The difference is quite remarkable!
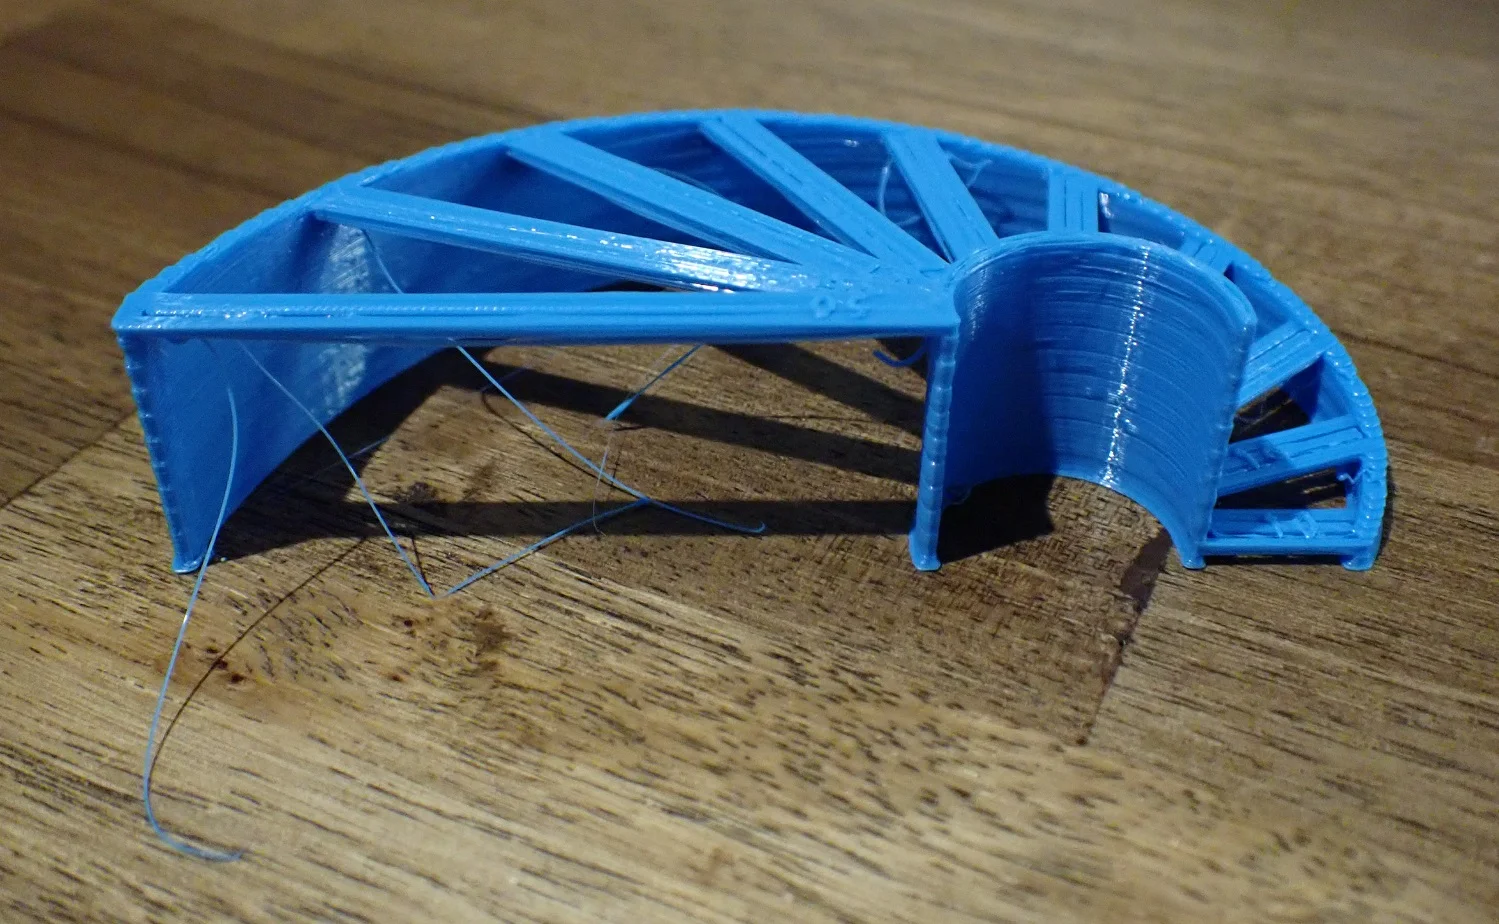
Disabled bridge settings (default profile):
- Eryone PLA at 195 °C (nozzle) and 55 °C (print bed)
- 40 mm/s Print speed
- 100 % Fan speed
- No Coasting
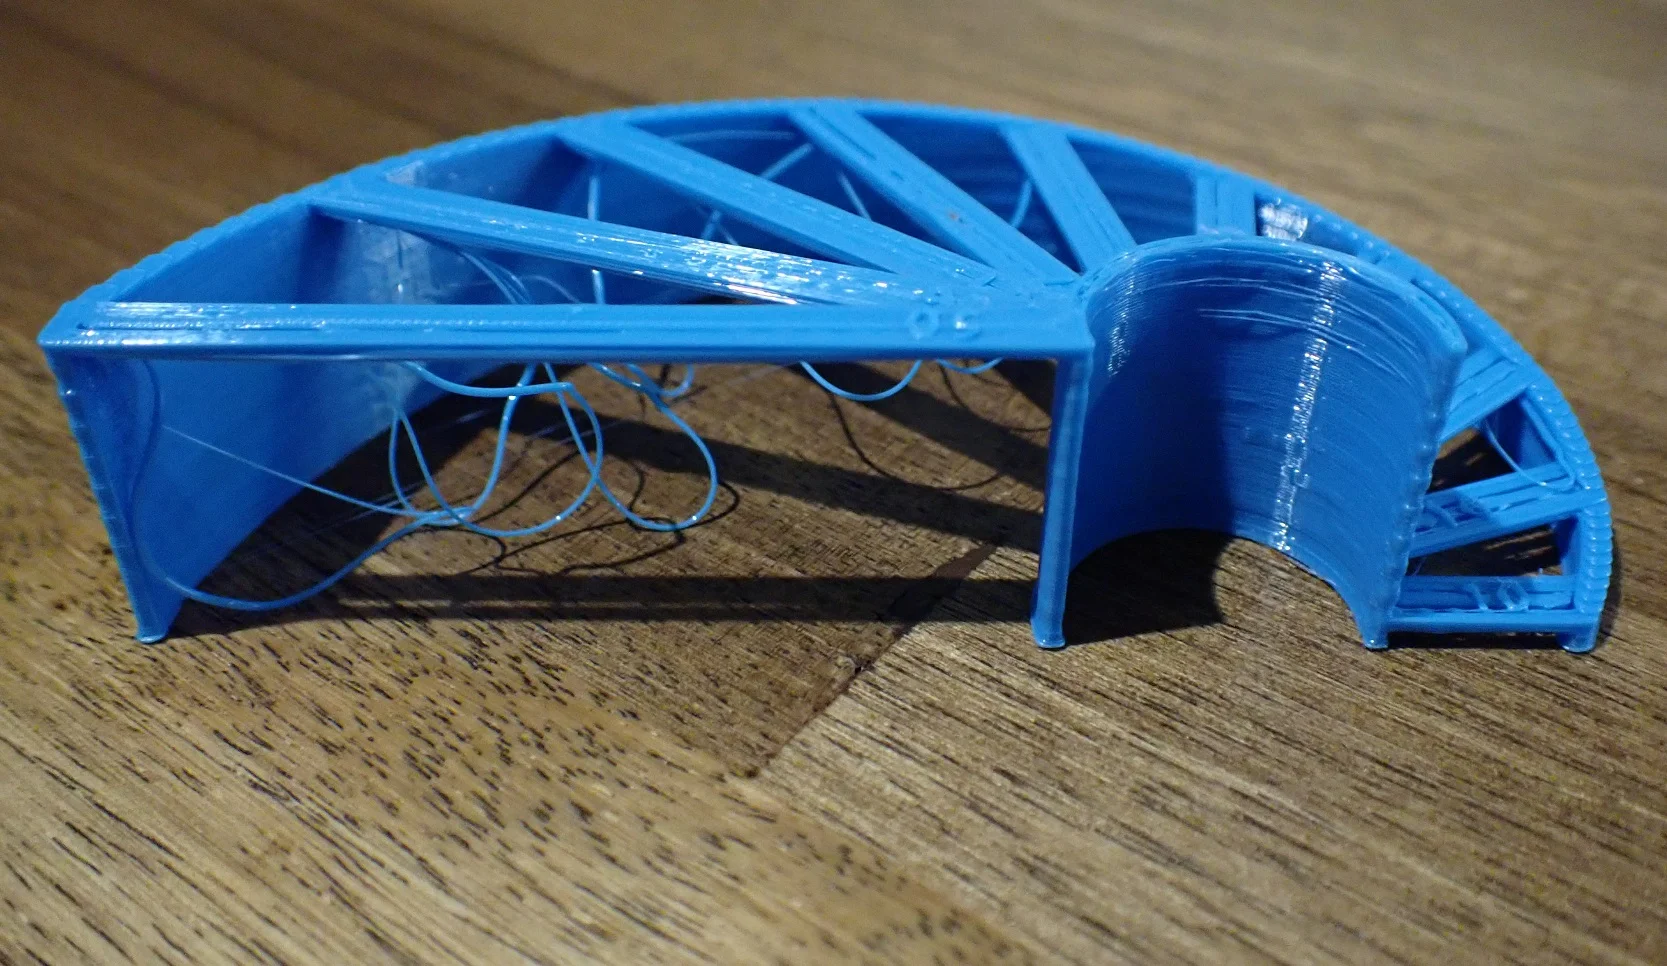
Next, I used the default bridge settings and printed the test object again.
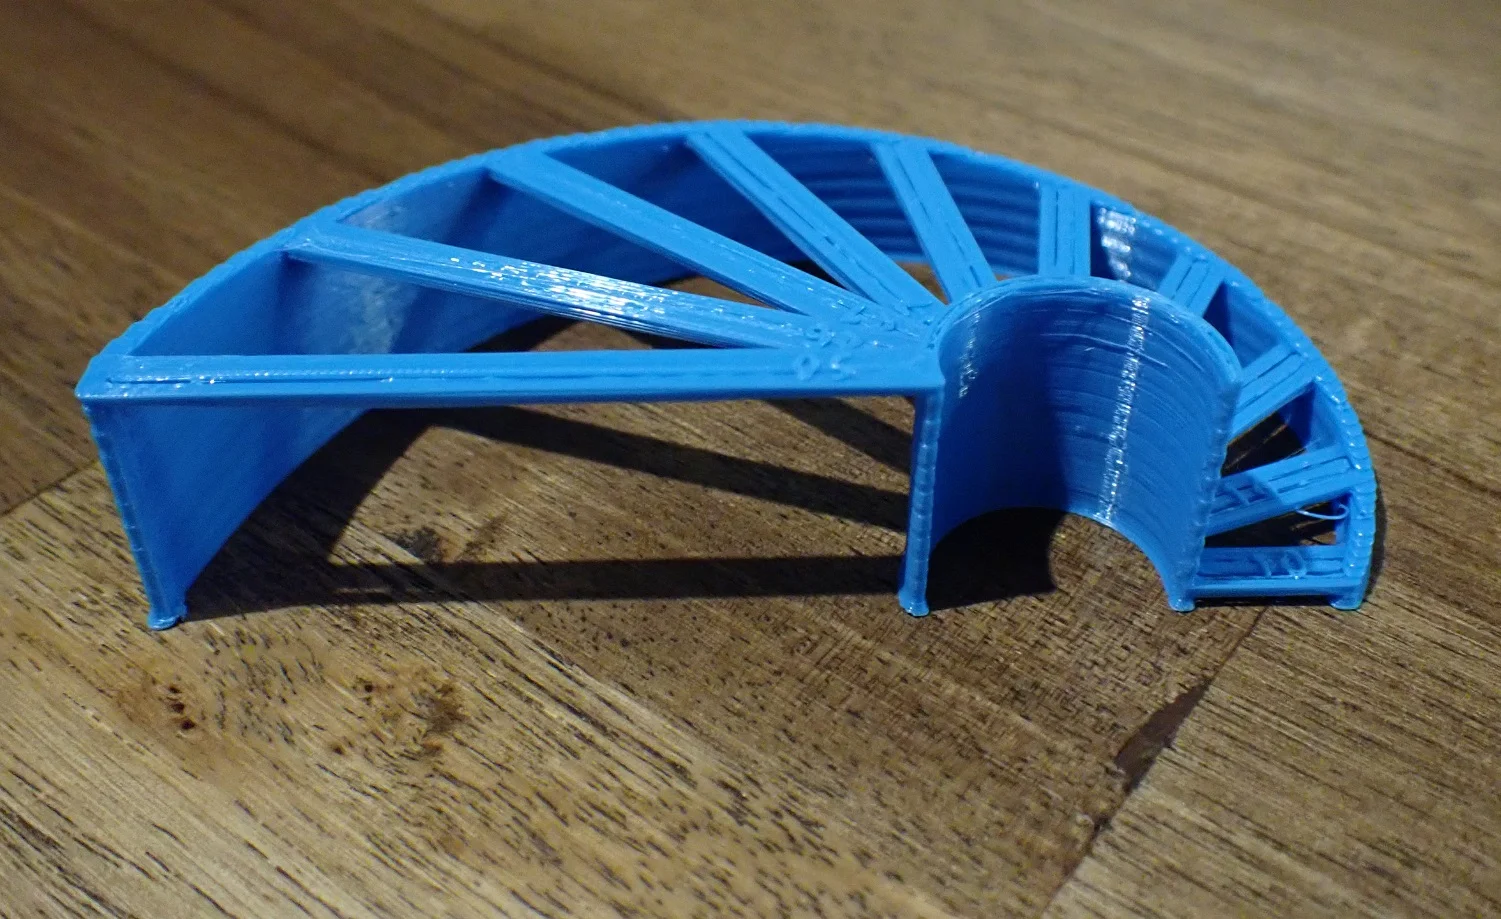
As you can clearly see, the last loose threads under the bridges are gone. The bridges are not perfect but much better than before and I am sure that I can optimize the result even further. For certain objects, this will definitely be an upgrade!
TIP: Learn how to calibrate your 3D printer to get perfect results every time in my 3D printing course: FDM 3D Printing: The Comprehensive Course from A to Z
(The course teaches everything you need to know for FDM 3D printing in over 60 lessons. The course will get beginners up to my level in no time!)
Cura Bridge Settings in Detail
At first glance, the bridge settings can be very confusing. However, they are divided into a few general settings and specific settings for the first, second and third bridge layers. The most important settings you should pay attention to are the speed, cooling and flow rate.
To give you a better overview, I have grouped the individual settings by color-coding (Cura 4.12.0).
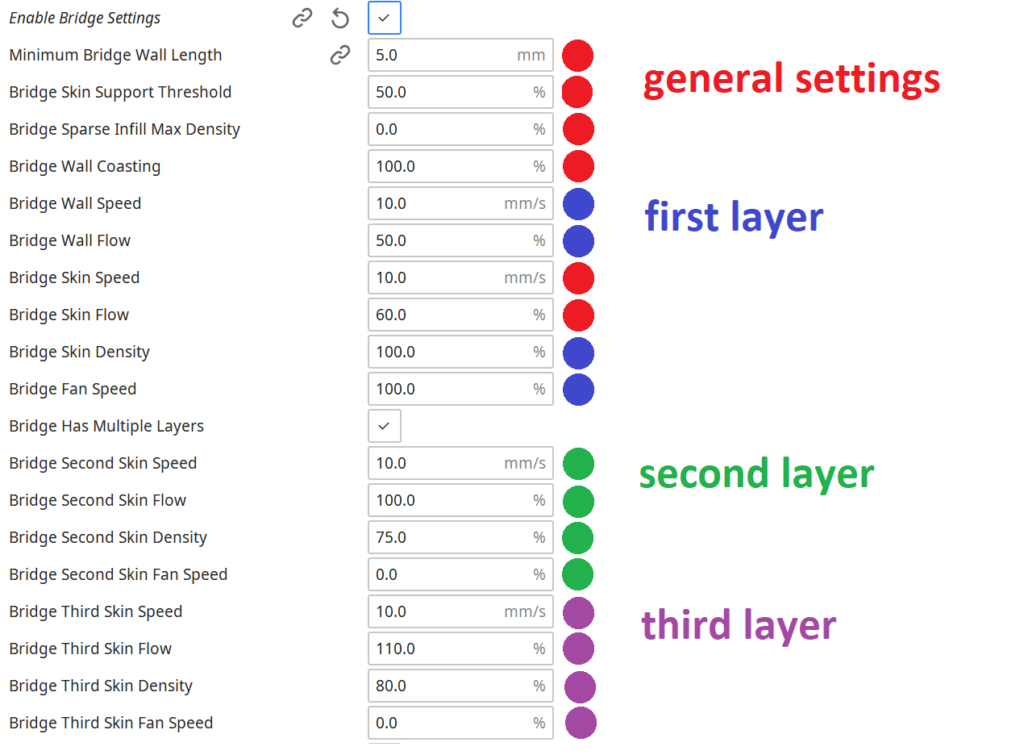
Minimum Bridge Wall Length: With this setting, you define the threshold at which these special bridge settings are applied. The default setting is 5 mm, which means that these special bridge settings are only applied to bridges with a length of 5 mm or more. I recommend you to set the value to 0 mm.
Bridge Skin Support Threshold: At this threshold, the bridge skin is printed with the bridge settings set. If the percentage of the skin that is supported is less than this value, normal skin settings are used.
Bridge Sparse Infill Max Density: For a very sparse infill, the infill density is so low that the first layers of the object top can be interpreted as multiple bridges. The skin over this sparse infill is treated as a bridge skin because it is unsupported.
Bridge Wall Coasting: With this setting, you activate Coasting at the beginning of the bridges. Since the flow rate of the bridges is much lower than in the rest of the model, there would otherwise be an ugly over-extrusion and the bridge would sag a lot at the beginning.
Bridge Wall Speed: The bridge wall speed is the most important setting among the bridge settings. The default value of 10 mm/s is a very good default value. Bridges should be printed at a slower speed because the liquid filament will have more time to solidify and stay exactly where it was printed. If the speed is too fast, the liquid filament will not have time to cool down quickly enough and will bend in the soft state.
Bridge Wall Flow: Sets the flow rate for the first layer of the bridge. The flow rate basically determines how thick the printed line will be. The thicker the line, the heavier the bridge. With a heavier weight, there is a greater risk of sagging. Therefore, the bridges are printed with smaller flow rates.
Bridge Skin Speed: Most of the time the bridge skin is printed at the same speed as the rest of the bridge. Again, slower is better because it allows the liquid filament to cool down quickly enough.
Bridge Skin Flow: This setting does the same thing as Bridge Wall Flow, but only for the bridge skin lines.
Bridge Skin Density: The smaller the density, the larger the gaps between the bridge skin lines.
Bridge Fan Speed: This determines the fan speed while the bridge is printing. It should always be set to 100% by default. When printing bridges, it is important that the filament solidifies as quickly as possible. Too little cooling could cause the filament to be too soft, causing it to hang down.
Bridge Has Multiple Layers: This setting allows you to define the speed, flow rate, density and fan speed for the second and third layers of the bridge (the first bridge layer is the lowest, the second layer is the one above the first, etc.). If you want to keep it simple, leave this option unchecked, though adjusting for the second and third layers often provides even more improvements.
Bridge Second Skin Speed: The speed of the second layer of the bridge should be small just like the first layer. By default, 10 mm/s is set, which is a good value.
Bridge Second Skin Flow: Where the flow rate of the first bridge layer was reduced, the flow rate of the second layer is set to 100%.
Bridge Second Skin Density: The density of the bridge’s second skin is slightly reduced compared to the first skin. With 75% the default value is noticeable. Values lower than 100% mean that gaps between single lines become visible. If you want to avoid this, you should use 100%.
Bridge Second Skin Fan Speed: The cooling or fan speed of the second skin is set to 0% by default. This is to ensure a good connection between the first bridge skin and the second skin. If you set the fan speed here to 100%, it could be that the first layers do not connect to the next and only loose spaghetti will result.
Bridge Third Skin Speed: The speed of the third bridge is also set to 10 mm/s by default. Most of the time this is also the smallest value you can specify.
Bridge Third Skin Flow: The third skin is printed with an increased flow rate of 110%. This makes the bridge more and more stable.
Bridge Third Skin Density: At 80%, the density of the bridge’s third skin is slightly higher than that of the second skin.
Bridge Third Skin Fan Speed: Cooling is also disabled by default on the bridge 3rd skin to ensure good adhesion between the 2nd and 3rd skins.
The Best Bridging Test Objects
If you want to test your bridging settings, you can use specially designed test objects. There is a bridging test in the Calibration Shapes plugin in Cura, but also many objects from the 3D printer community on Thingiverse.
If you want to know which test object is best for you to test your bridging settings, you should take a look at this article. In the article, I introduce you to the best bridging test objects.

Disclosure: This website is the property of Martin Lütkemeyer and is operated by Martin Lütkemeyer. Martin Lütkemeyer is a member of the Amazon Services LLC and other Affiliate Programs. These are affiliate advertising programs designed to enable websites to earn advertising revenue through advertising and linking to Amazon.com and others. Links marked with * are affiliate links.
