
- Wet Filament: Prevention, Symptoms & Drying - July 18, 2024
- Sovol SV08 – Best PrusaSlicer Settings & Profile - June 26, 2024
- Sovol SV08 – Best Orca Slicer Settings & Profile - June 26, 2024
Disclosure: Links marked with * are Affiliate Links. I earn from qualifying purchases if you decide to make a purchase through these links – at no additional cost for you!
Poor bridging behavior often leads to frustration in 3D printing. However, the behavior can be easily optimized and even more easily tested.
A bridging test tests how well the 3D printer can print 90° overhangs. Good bridging test objects use as little filament as possible and offer multiple bridge lengths. Bridging tests are available either in slicer plugins or on platforms like Thingiverse.
These are the best bridging test objects:
- Bridging Test in the Calibration Shapes Plugin in Cura
- “Bridging Test (Customizable)” by walter (link to object)
- “Double Helix bridging torture test” by WildRoseBuilds (link to object)
- “Bridge Calibration Test” by 3D-ME (link to object)
After an introduction of these bridging test objects, you will learn how to easily optimize the bridging behavior.

Temperature Tower Before Bridging Test
Before you optimize the bridging behavior and perform a bridging test, you should first find out the perfect temperature for your filament. Only then can you print error-free bridges.
Just as for the bridging test, there are pre-built models for temperature towers in Cura in the Calibration Shapes plugin. In addition, there are various temperature towers on Thingiverse as a free download.
Temperature tower from the Cura Calibration Shapes
Via the Marketplace in Cura, you can install the free plugin Calibration Shapes. Besides the standard calibration cube, retraction/stringing test and much more, there are temperature towers.
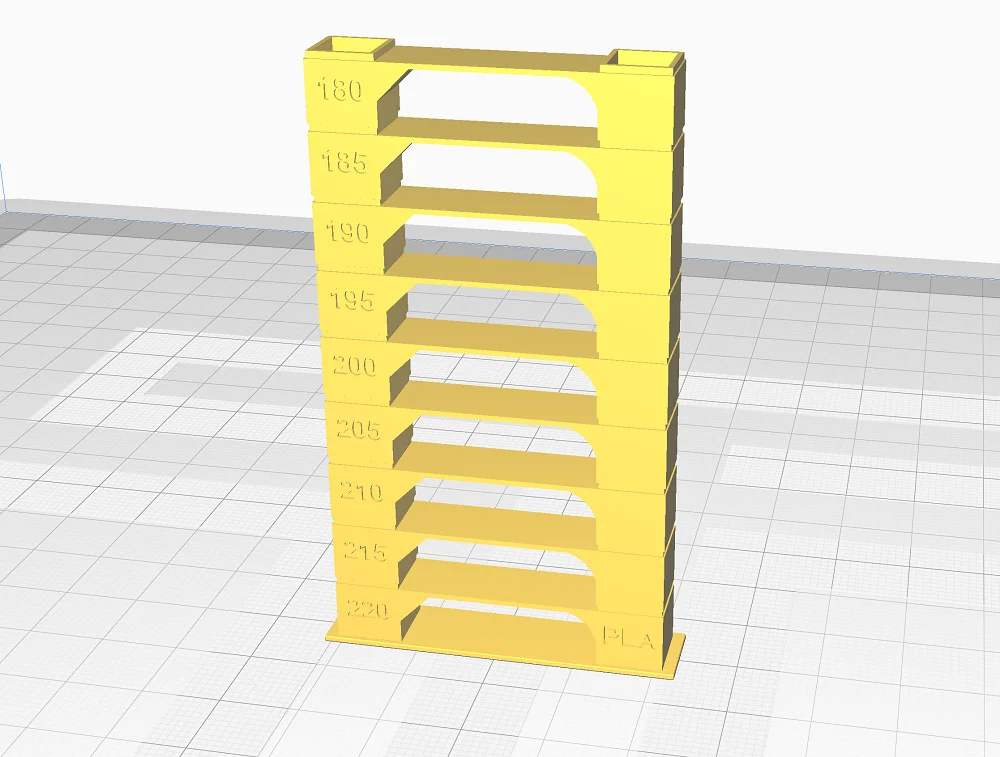
The temperature towers are available for different filament types, for example PLA or ABS. The different towers all have the same shape and go from 180 to 220 °C for PLA and 210 to 250 °C for ABS.
In principle, the shape of the temperature towers is always the same. One bridge of the same length is printed per temperature level to test the extrusion of the filament at that temperature. If the right temperature is there, you will get perfect bridges.
The handy thing about the Calibration Shapes plugin are the included scripts for the respective test models. To adjust the printing temperature at each new level, it requires a script to change the G-code accordingly. You can find the script menu in Cura at the top of the menu bar: Extensions > Post Processing > Modify G-Code
Heat Tower from Akiland
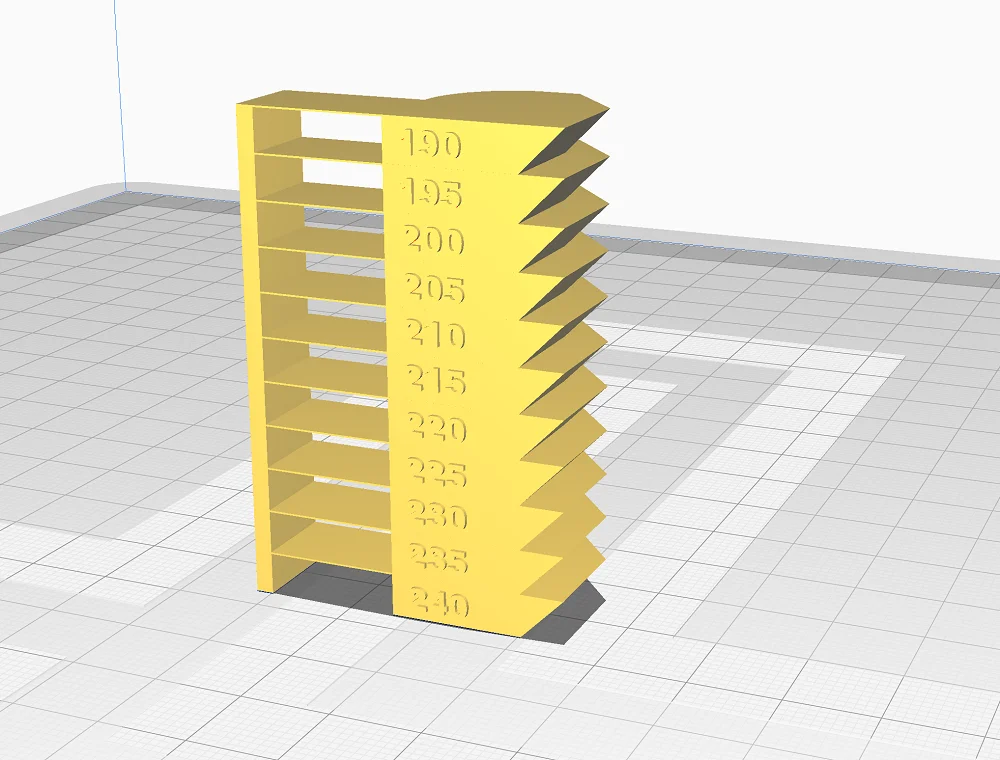
If you prefer to use something from the 3D printing community, there are also very good models for temperature towers on Thingiverse, such as the “Heat tower (190-240) 5mm steps” by Akiland (link to object).
As the name suggests, this temperature tower goes from 180 °C to 240 °C in 5 mm steps and is therefore suitable for PLA. Here, too, a bridge is printed at each temperature. In addition, a 45° overhang is printed on the other side.
The Best Bridging Test Objects
A good bridging test object is characterized by the fact that it is either customizable or directly offers different bridge lengths. It should also use as little filament as possible to test bridging behavior.
If you use Cura as a slicer, you have the choice to use an object from the Calibration Shapes plugin. But there are also excellent tests on Thingiverse that all work without a script or other G-code changes.
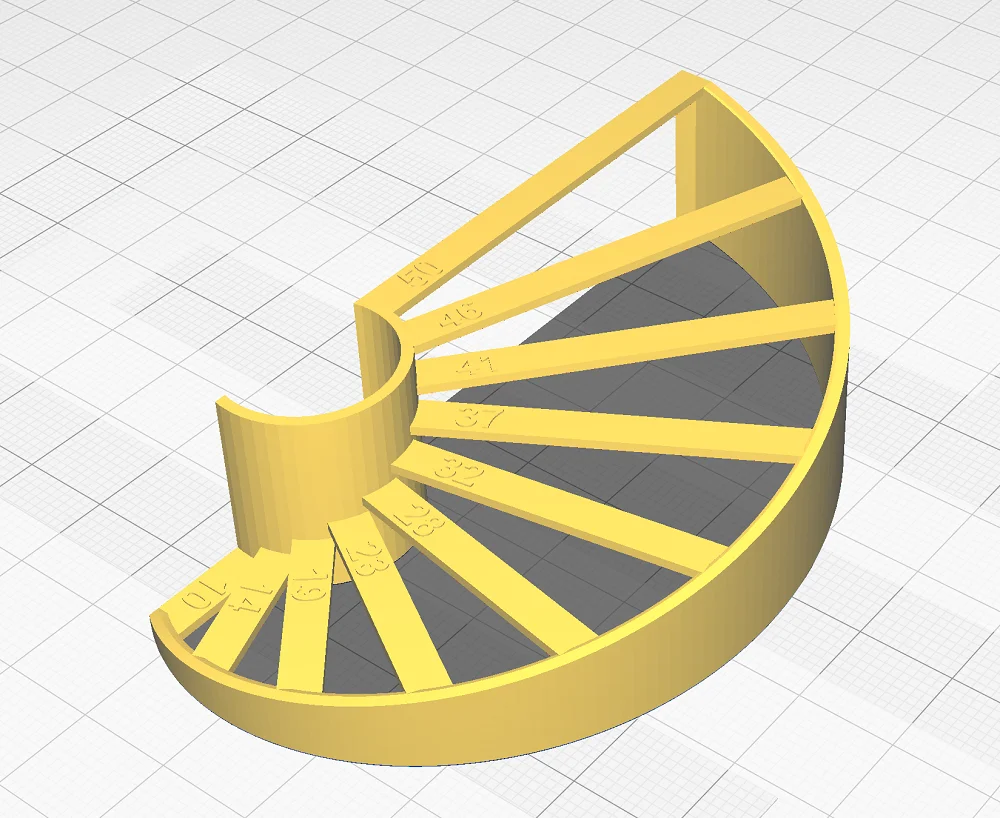
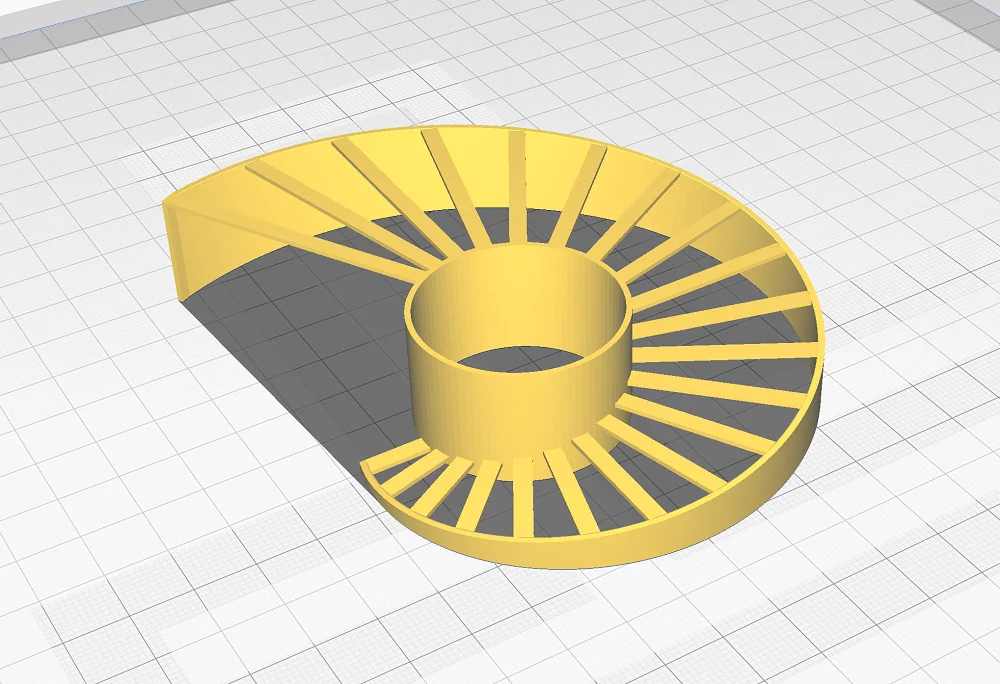
Bridging Test from the Cura Calibration Shapes

The bridging test from the Calibration Shapes plugin in Cura offers ten different bridge lengths from 10 to 50 mm. If you want to print even longer bridges, you could simply scale the model larger (but then remember that the labeling will no longer be correct).
The bridging test is constructed in such a way that the individual bridges are not in the same layer on the Z-axis, but are always offset a little further up. This means that they are printed one after the other and an ever-increasing spiral staircase is created on which the bridging behavior is tested.
In the plugin, there is also an overhang test object with which you can test overhang angles from 40° to 80°. If your bridging test was ok, this test object will surely work as well.
Bridging Test by walter on Thingiverse

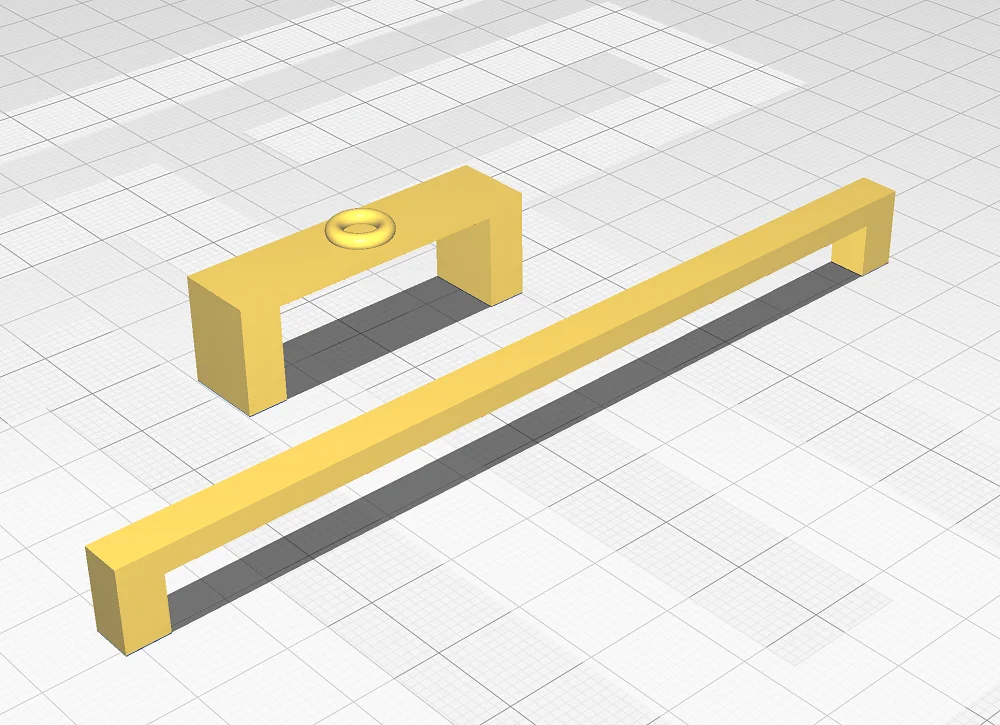
The very popular “Bridging Test (Customizable)” by walter is available on Thingiverse (link to the object).
Using the built-in customizer in Thingiverse, you can still customize the object to your liking. You can set the minimum and maximum bridge length, the number of bridges, the width of the bridges and their Z-distance. You can then download your customized object at the click of a button.
Except for the missing labels on each bridge, this bridging test is very similar to the test from the Calibration Shapes plugin in Cura but is also perfect for testing bridging behavior.
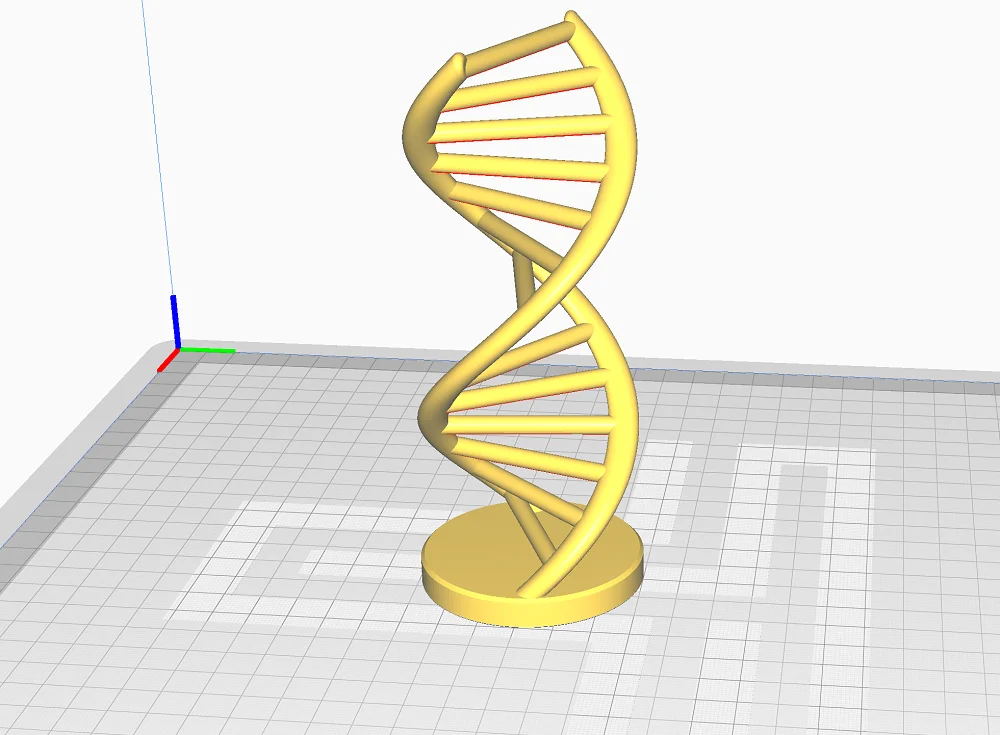
Double Helix Bridging Torture Test by WildRoseBuilds on Thingiverse

The “Double Helix bridging torture test” from WildRoseBuilds on Thingiverse gives you the possibility to print a pretty bridging test (link to the object). I like the idea – I don’t know about you, but my shelf is overflowing with useless calibration objects…
The disadvantage of this object is that the bridge length is always the same. To get different bridge lengths, you would have to print the object with different scales more often. And then we are back to the topic of waste.
Therefore, this object is more suitable for a quick test in between with which you want to check a previously calibrated 3D printer again (e.g. if you use a new filament).
Bridge Calibration Test from 3D-ME on Thingiverse
During the development of the “Bridge Calibration Test” by 3D-ME on Thingiverse, efficiency was the main focus (link to the object). This test uses as little filament as possible to test the bridging behavior.
You test the different bridge lengths by printing single bridges with different lengths. To make the test more difficult for the printer, there is a small weight of printed filament on top of the bridge.
Bridging Optimization in 3D Printing
Poor bridging behavior is a common problem in 3D printing. Now that you know how to best test it, it’s time to learn how to optimize it.
There are a total of 3 important settings with which you can improve the bridging behavior:
- Increase the cooling (or fan speed)
- Reduce the printing speed
- Reduce the printing temperature
There are also two emergency solutions: Avoid bridging completely by changing the orientation of the object or print supports for the bridges.
Increase the Cooling
The most important setting to be able to print better bridges is cooling. If the filament is too liquid, it will flow down due to gravity. If the temperature is too high or the cooling too low, the filament remains too liquid and the bridge bends down.
If you increase the cooling rate, the filament will solidify faster and stay exactly where the print head extruded it. In most slicers, you change the cooling rate with the fan speed.
If your fan speed or cooling rate was already set to 100% by default, the following settings will help you.
Decrease the Print Speed
During bridging, the liquid filament is held on one side by the already printed bridge and on the other side by the nozzle. If the speed is too high, the length of the area where the filament is still liquid is too long, resulting in sagging bridges.
In order for the filament to harden quickly enough, a low print speed is important in addition to good cooling. In some slicers, you can set the print speed for bridges individually. Either way, you should try to reduce the speed in steps of 5 to 10 mm/s and check the result afterward.
Decrease the Printing Temperature
You should have already covered this point with the temperature tower. With the correct printing temperature, you prevent the sagging of bridges.
If the temperature is too high, the filament is still too soft and will sag. However, the printing temperature must not be too low to avoid other printing errors or poor print bed adhesion.
Avoid Bridging Through Other Orientation
With some objects, it often makes more sense to simply turn it 90° in another direction to avoid bridges completely. Although this is only an emergency solution and does not solve the basic problem, it is a quick and frustration-free solution for some models.
Supports for Bridges
Another emergency solution is to insert supports for the overhangs or for the bridges. Inserting supports sometimes feels like giving up, but especially with long bridges, it is often the only way to print them without errors.
Most of the time, the bridge is also oriented in such a way that the supports do not leave any visible remains after you have removed them from the object.
Disclosure: This website is the property of Martin Lütkemeyer and is operated by Martin Lütkemeyer. Martin Lütkemeyer is a member of the Amazon Services LLC and other Affiliate Programs. These are affiliate advertising programs designed to enable websites to earn advertising revenue through advertising and linking to Amazon.com and others. Links marked with * are affiliate links.
