
- Wet Filament: Prevention, Symptoms & Drying - July 18, 2024
- Sovol SV08 – Best PrusaSlicer Settings & Profile - June 26, 2024
- Sovol SV08 – Best Orca Slicer Settings & Profile - June 26, 2024
Disclosure: Links marked with * are Affiliate Links. I earn from qualifying purchases if you decide to make a purchase through these links – at no additional cost for you!
The Anycubic Kobra is an affordable entry-level 3D printer with many useful features. Anycubic has its own slicer “Photon Workshop”, but this slicer is only suitable for resin 3D printers like the Photon Mono X 6K. The most popular slicer for the Kobra and also recommended by Anycubic is Cura.
For the perfect Cura profile for the Anycubic Kobra, the machine parameters have to be defined and the print settings have to be set for the respective filament used and, best of all, calibrated.
Cura often has very good standard profiles for most 3D printers on the market, but these must still be calibrated to the individual device and the filament used. Also, these profiles are usually only available some time after the release of the device. If you are looking for the perfect Cura settings for the Anycubic Kobra, you will find them in this article.
Table of Contents:
How to Create a Profile for the Anycubic Kobra in Cura


It is not difficult to create a profile for a new 3D printer in Cura. You just need to pay attention to the machine parameters and adjust the print settings to the filament you are using.
First, let’s take a look at the machine parameters and then at the individual filaments and their print settings.
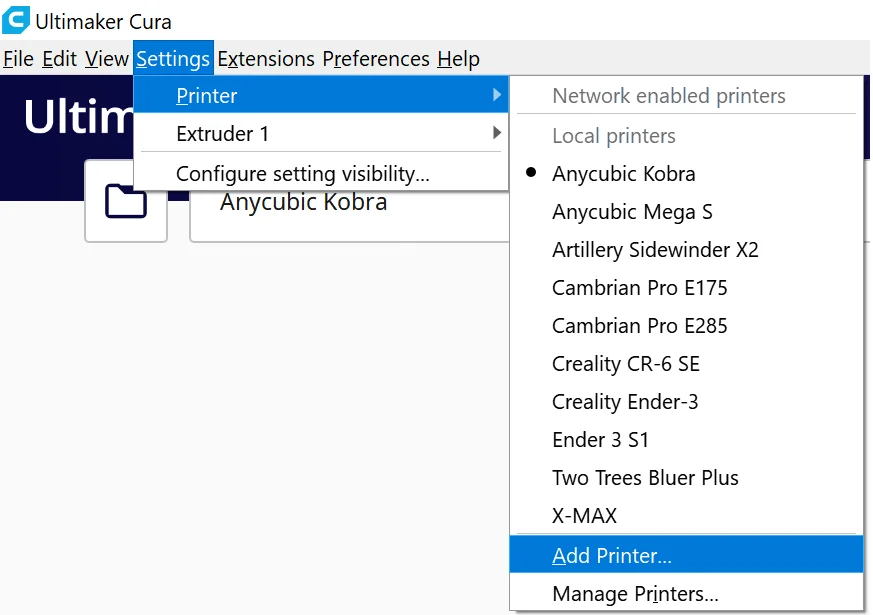
To create a new profile for the Anycubic Kobra, follow these steps:
- At the top of the Cura interface, click “Settings” and then “Printer” and “Add Printer…”.
- After that a popup menu opens where you can add new printers. Select “Add a non-networked printer”.
- Scroll down, open the Custom menu and select “Custom FFF printer”.
- Name the new 3D printer “Anycubic Kobra” in the menu on the right.
- After that, the machine settings for the newly created 3D printer will open. Enter the following values there:
- Printer Settings:
- X (Width) = 222 mm
- Y (Depth) = 222 mm
- Z (Height) = 252 mm
- Print plate shape = Rectangular
- Origin at center = No
- Heated bed = Yes
- Heated Build Volume = No
- G-code flavor = Marlin
- Printhead Settings:
- X min = -20 mm
- Y min = -10 mm
- X max = 10 mm
- Y max = 252 mm
- Number of Extruders = 1
- Apply Extruder offsets to GCode = Yes
- Start G-Code = Leave at default values
- End G-code = Leave at default values
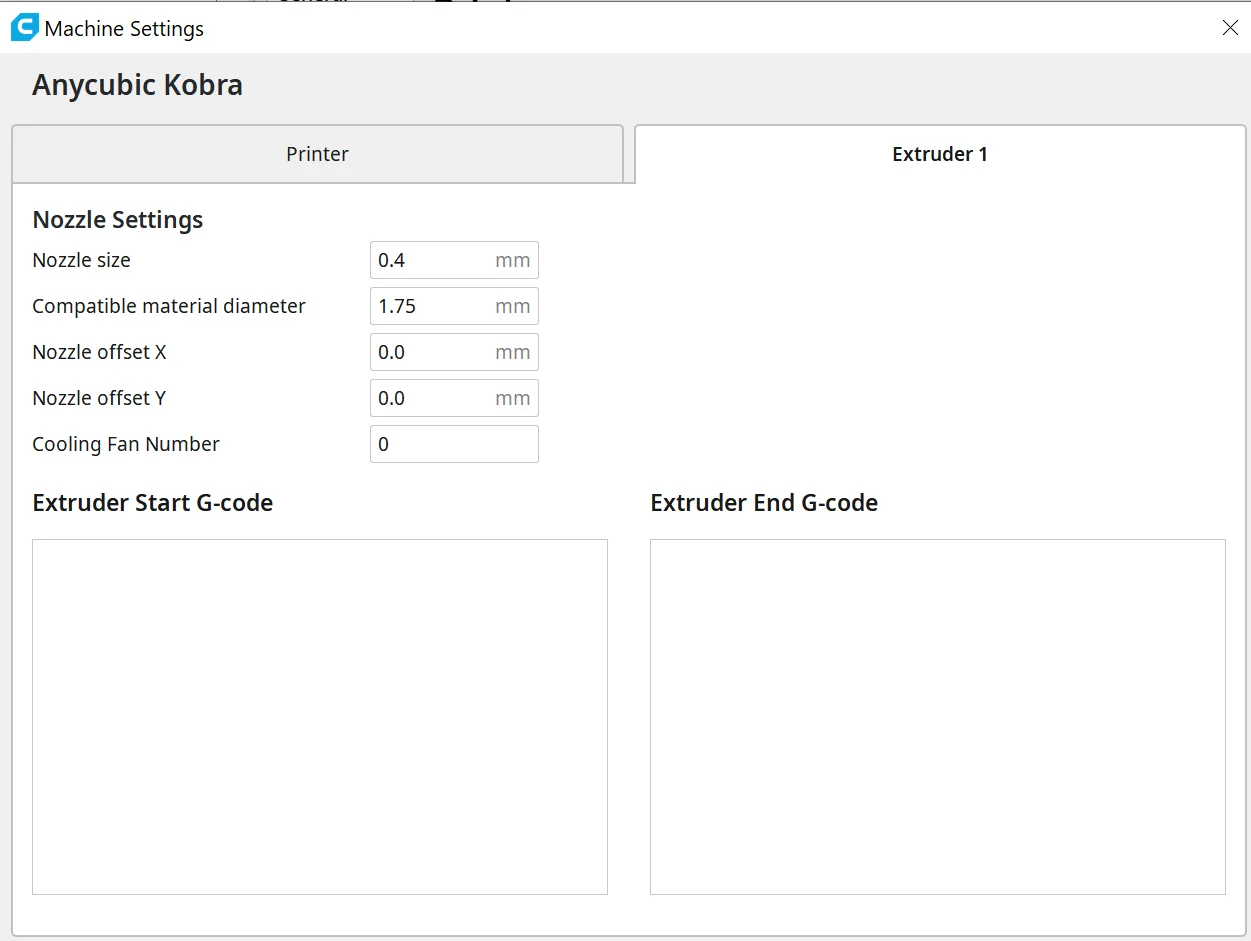
- Nozzle Settings:
- Nozzle Size = 0.4 mm
- Compatible material diameter = 1.75 mm
- Nozzle offset X = 0.0 mm
- Nozzle offset Y = 0.0 mm
- Cooling Fan Number = 0
- Extruder Start G-code = Leave at default values
- Extruder End G-code = Leave at default values
- Printer Settings:
- Then close all menus.
Cura then automatically creates multiple profiles for a wide range of accuracies. The accuracies range from 0.06 mm to 0.6 mm. However, these profiles are not yet matched to the individual filaments and the printer and will deliver suboptimal results.
To get perfect results you need to adjust and calibrate the print settings to the filament you are using. In the next lines, I will show you the best settings for PLA, ABS and TPU.
You can find more information on how to create a 3D printer profile in Cura and what you need to pay attention to in this article: How to Create a Custom 3D Printer Profile in Cura
PLA Settings at a Glance
PLA is one of the easiest filaments to use for 3D printing. It can be processed with any FDM 3D printer and forgives many a mistake.
The default PLA settings for the Anycubic Kobra are listed below. However, I advise you to always calibrate the settings. More about this later.
These are the best settings for PLA with the Anycubic Kobra:
- Printing temperature: 200 °C
- Print bed temperature: 60 °C
- Printing speed: 50 mm/s
- Retraction: 6 mm at 40 mm/s
- First layer: 0% cooling, 100% extrusion width, 100% layer height

3D printing can be difficult – especially in the beginning. Many beginners struggle with print errors, poor print bed adhesion, or don’t know how to properly set up the slicer.
That’s why I created an online course to get everyone up to my expert level and as quickly as possible.
The course covers everything you need to know about FDM 3D printing to get perfect results every time. Click the link below to learn more about the content and what to expect (and don’t worry: there are no tests! Learn at your own pace, completely stress-free).
ABS Settings at a Glance
ABS is much more demanding than PLA. Not only do you need higher temperatures, a constant ambient temperature is also important so that the filament does not warp during cooling.
To keep the ambient temperature homogeneous, the Creality 3D printer enclosure is best suited for the Anycubic Kobra. In this article, you will find a detailed test. If you have problems with the print bed adhesion, Magigoo can help.
These are the best settings for ABS with the Anycubic Kobra:
- Printing temperature: 230 °C
- Print bed temperature: 80 °C
- Printing speed: 50 mm/s
- Retraction: 6 mm at 40 mm/s
- First layer: 0% cooling, 140% extrusion width, 100% layer height
TPU Settings at a Glance
Thanks to the direct drive extruder, the Anycubic Kobra can process TPU very well. However, due to the flexible nature of the filament, the print settings are important so that the filament does not get tangled. It is even more important to calibrate these settings, as each TPU filament can behave slightly differently depending on the manufacturer.
These are the best settings for TPU with the Anycubic Kobra:
- Printing temperature: 230 °C
- Print bed temperature: 60 °C
- Printing speed: 50 mm/s
- Retraction: 8 mm at 60 mm/s
- First layer: 0% cooling, 140% extrusion width, 100% layer height
Best Cura Settings for the Anycubic Kobra
In this part of the article, you will learn in detail what the individual settings do and which settings are best for the different filaments. We will then look at the calibration of the most important settings so that you can optimize the default values given here for your system.
Printing Temperature

The printing temperature is mainly dependent on what filament you are using. Wrong printing temperatures can also cause many of the most common errors. These include over- and under-extrusion, stringing and other extrusion problems such as the formation of spots or blobs.
The hotends of the various 3D printer models sometimes differ greatly in their effectiveness. For example, the perfect temperature for a filament can be several degrees different for the Anycubic Kobra than for the Ender 3 S1.
For PLA, 200 °C has proven to be the best temperature for the Anycubic Kobra. Depending on the manufacturer of the filament, the perfect temperature can also be between 190 and 200 °C. You can find out how to find the perfect temperature in the calibration section of this article below. Otherwise, you should start at 200 °C and optimize in 5 °C steps.
ABS and TPU require somewhat higher temperatures of 220 to 250 °C. For me, 230 °C has proved ideal for both filaments.
The best printing temperatures for the Anycubic Kobra in Cura:
- PLA: 190-200 °C
- ABS: 220-250 °C
- TPU: 220-250 °C
Print Bed Temperature
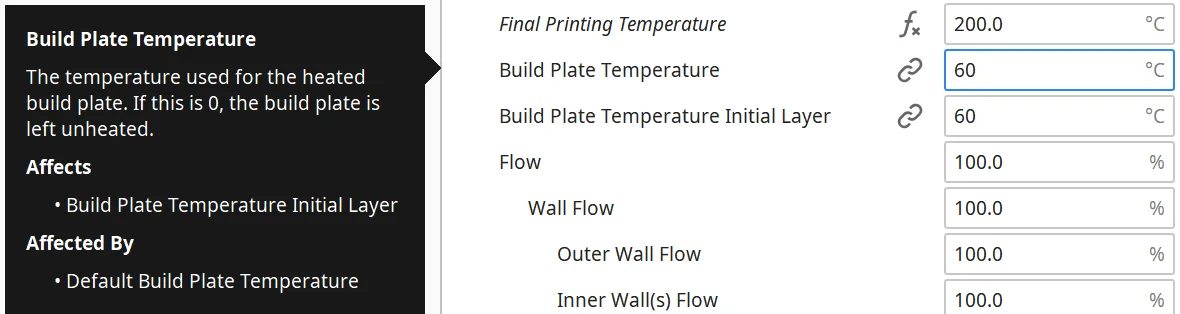
The print bed surface of the Anycubic Kobra is very good and provides very good print bed adhesion for most filaments. However, you need to set the correct print bed temperature to benefit from this. Too low a print bed temperature can lead to poor print bed adhesion and too high a temperature can lead to other print defects such as warping or elephant foot.
PLA filament does not require a heated print bed. However, you will get the best results if you set the print bed temperature to about 60 °C. If you have problems with poor print bed adhesion, you can also increase the print bed temperature a bit or use aids like Magigoo or an auxiliary print like a Raft or Brim.
For ABS, you need somewhat higher print bed temperatures. For the Anycubic Kobra, 90 to 100 °C is a good choice. Always remember that ABS contracts strongly during cooling and can even form cracks. Therefore, the ambient temperature should be as homogeneous as possible and higher than normal room temperature. A suitable enclosure for the Anycubic Kobra can be found here.
I have only tested one type of TPU on the Anycubic Kobra, but Anycubic also recommends 60 °C – the same temperature at which I had very good results. However, you should not go much higher than that and rather look for the optimal temperature in the range between 50 and 60 °C.
The best print bed temperatures for the Anycubic Kobra in Cura:
- PLA: 55-60 °C
- ABS: 90-100 °C
- TPU: 50-60 °C
Print Speed
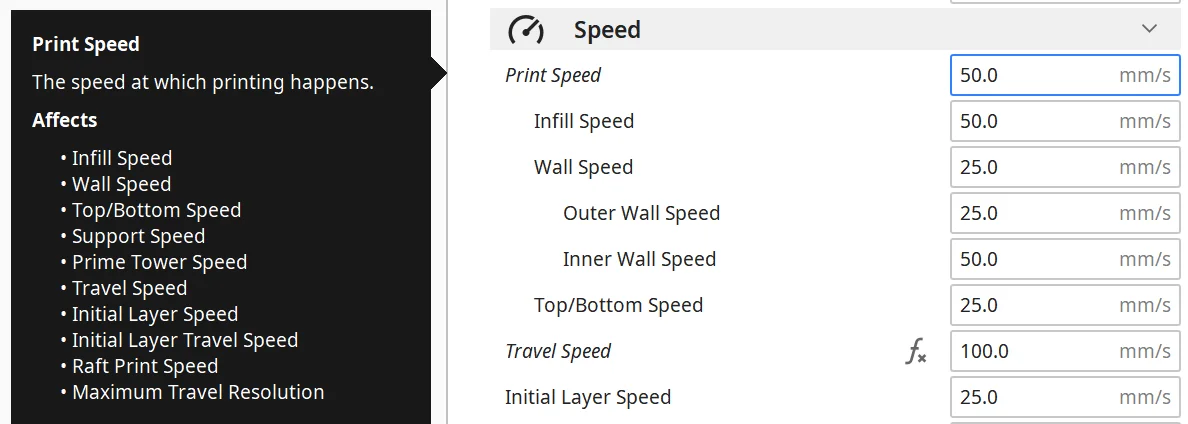
The lightweight direct drive extruder of the Anycubic Kobra allows high print speeds to be achieved without the risk of vibration. Although the print speeds used in practice are much lower than the theoretically possible print speeds, these are mainly intended for rough prototypes and not for fine details.
The Anycubic Kobra offers print speeds between 40 and 60 mm/s for most filaments. Especially for PLA and ABS these are proven standard values.
For TPU, you should optimize the print speed closely with the retraction settings, as the flexibility of the filament influences where the perfect print and retraction speed lies.
If you want to approach the optimal printing speed, rough steps of 5 mm/s and then smaller steps of 2 mm/s are useful.
The best printing speeds for the Anycubic Kobra in Cura:
- PLA: 50 mm/s
- ABS: 50 mm/s
- TPU: 50 mm/s
Layer Height
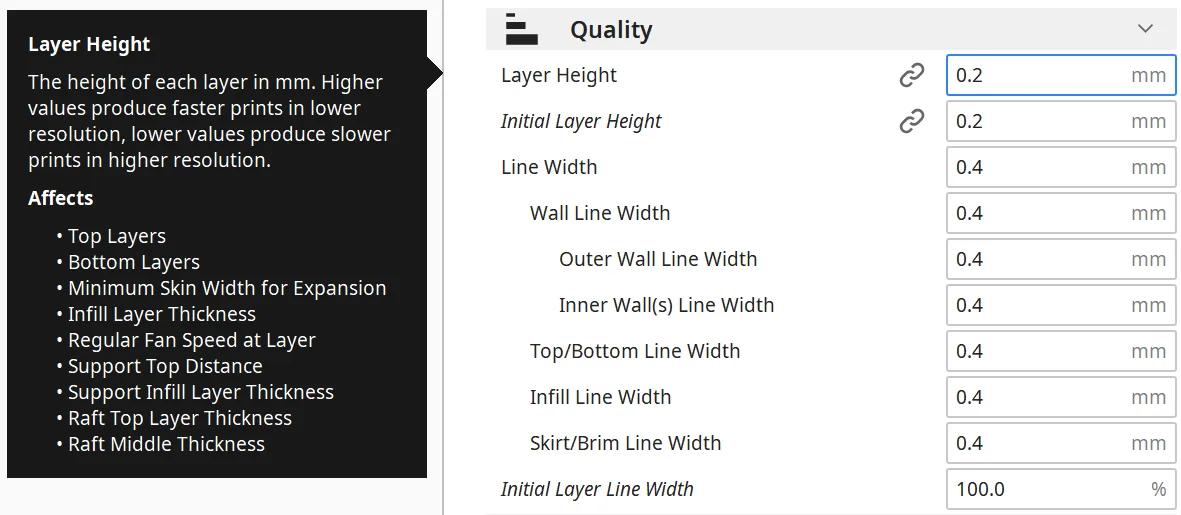
In 3D printing, the layer height is a measure of the accuracy, how smooth the surface of the object becomes and how many details remain visible. The smaller the layer height, the more accurate the print. However, with a low layer height, the printing time also increases considerably.
After you create the Anycubic Kobra as a new printer, Cura will create the following profiles by default:
- Extra Fine 0.06 mm
- Fine 0.1 mm
- Normal 0.15 mm
- Draft 0.2 mm
- Extra Fast 0.3 mm
- Coarse 0.4 mm
- Extra Coarse 0.6 mm
How thick you set the layer height depends on what purpose you have in mind for the object. If it is mainly decorative, you should of course choose a thinner layer height. For rough prototypes or parts that only have a mechanical purpose and don’t need to look nice, you can increase the layer height in favor of a faster print time.
The best layer height for the Anycubic Kobra in Cura:
- Decorative objects: 0.08 and 0.12 mm
- Standard: 0.16 and 0.20 mm
- Coarse, fast prints: 0.24 and 0.28 mm
Flow
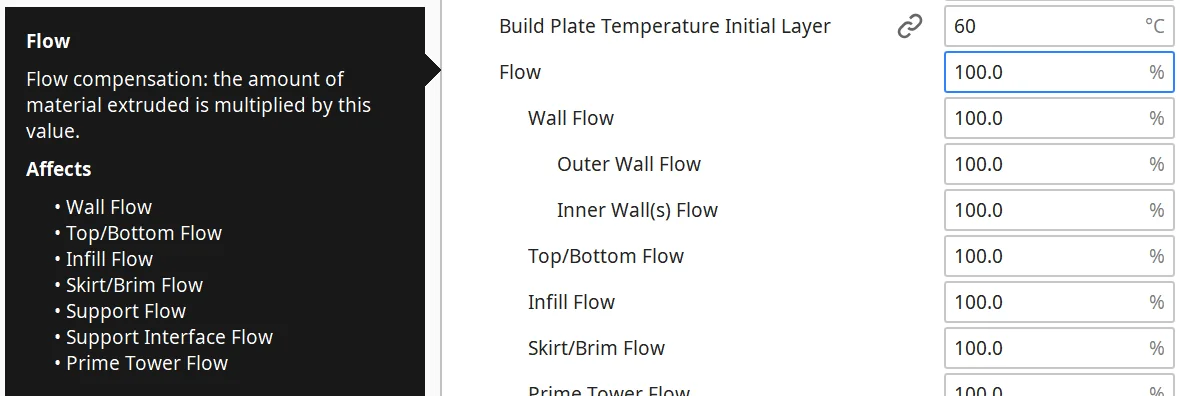
With the flow rate you can adjust the amount of filament that is extruded per second. If you set values higher than 100%, more filament will be extruded, if you set lower values, less filament will be extruded.
The flow rate of the 3D printer is multiplied by the specified value. This allows many extrusion problems to be tackled.
Normally, the start value of 100% is correct in most cases. However, sometimes the extruder needs some calibration and the value needs to be set higher or lower. The best way to calibrate this value is explained later in this article.
The best flow rate for the Anycubic Kobra in Cura:
- Default value: 100%
- For over-extrusion: 90% to 99
- For under-extrusion: 101% to 110%.
Retraction
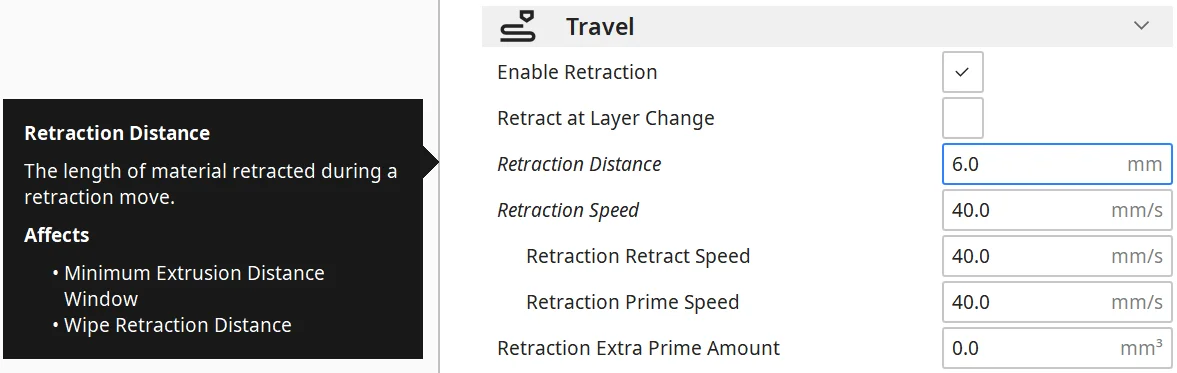
The most common printing defects include the formation of threads (stringing) and, in extreme cases, the formation of larger blobs and zits. Some filaments are more prone to stringing than others. Either way, you can get these problems under control with the right retraction settings.
If there is excess material at the opening of the nozzle when it moves over the object without extruding filament, thin hairs of filament will form between the beginning and end of the movement. The filament feed prevents this by pulling the filament back into the nozzle at a certain speed and a certain distance.
However, the settings must be adapted to the respective 3D printer and the filament used for this to work. There are big differences between different filament types and 3D printers. Even 3D printers of the same model from the same manufacturer differ slightly here.
Therefore, the values given here are rough guidelines to give you a good starting point for optimization. How to do this is described further down in this article.
The best retraction settings for the Anycubic Kobra in Cura:
- PLA: 6 mm at 40 mm/s
- ABS: 6 mm at 40 mm/s
- TPU: 8 mm at 60 mm/s
Infill
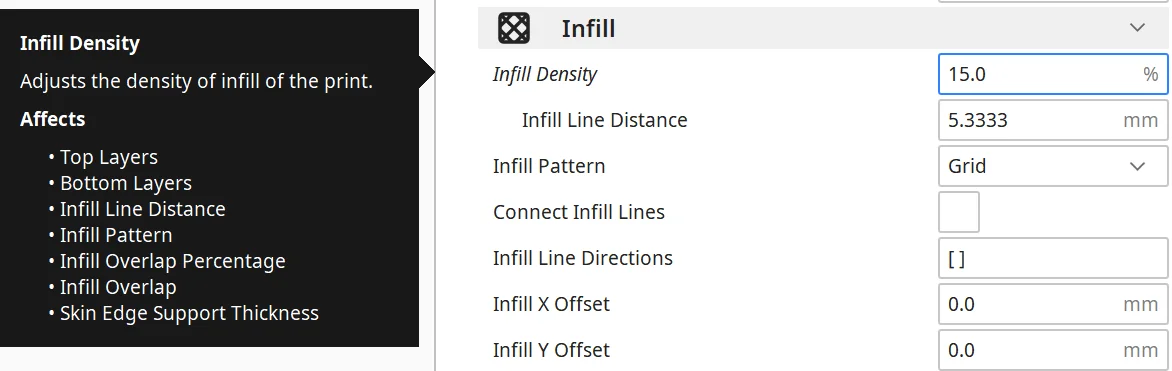
Even though the infill is an important parameter in the print settings, it is independent of the 3D printer used. The pattern and density of the infill determine the stability of the object. Depending on the purpose of the printed object after printing, you should choose the right pattern and density here.
High stability (for stable objects):
- Cubic
- Cubic Subdivision
- Octet
- Gyroid
Medium stability (for standard objects):
- Grid
- Triangles
- Tri-Hexagonal
Low stability (for decorative objects):
- Lines
- Zigzag
- Lightning
In addition to the pattern of the infill, the density also determines how stable the object will be in the end. A density of 0% means that the object becomes hollow, a density of 100% results in a solid object. For most objects, a density of 15 to 25% is perfect.
The best infill densities for the Anycubic Kobra in Cura:
- Decorative objects: 0-15%
- Standard objects: 15-50%
- Sturdy objects: 50-100%
First Layer
The settings for the first layer of the print have a big influence on how good the print bed adhesion is. Even though the print bed adhesion of the Anycubic Kobra is very good, the wrong settings for the first layer can ruin the print.
With a higher layer thickness of the first layer, you can increase the print bed adhesion. In most cases, the standard layer thickness is sufficient to achieve good results. However, if you have problems with the layer thickness, you should first try to increase the layer thickness a little before you resort to other aids.
The thicker the first layer, the slower it cools down. This gives the hot filament longer to bond with the surface of the print bed. The same applies to the line width. If you increase the line width, you also improve the print bed adhesion.
You can also extend the time the filament needs to cool down by other settings. You can increase the print temperature, decrease the print speed or increase the print bed temperature.
The best settings for the first layer for the Anycubic Kobra in Cura:
- Layer thickness: 100-200% of normal layer thickness (higher values in case of poor print bed adhesion)
- Line width: 100-200% of normal line width (higher values in case of poor print bed adhesion)
- Print temperature: Same as the rest of the object or 5-10 °C higher for better print bed adhesion.
- Print speed: 50% of the normal print speed
- Flow: 100-110% (higher values in case of poor print bed adhesion)
How to Calibrate the Anycubic Kobra
The settings you have seen in this article so far are very good guidelines for the Anycubic Kobra. However, you should calibrate the most important settings, the print temperature, the flow rate and the retraction for each filament. Even the smallest deviations can ruin the result.
For the calibration, you need suitable objects. On portals like Thingiverse you can find suitable objects for most printing errors that you can print quickly. They provoke the respective error so that you can quickly find the right setting.
But there is also a handy plug-in in Cura, the “Calibration Shapes” plug-in. If you have installed this plug-in, you can load and print suitable calibration objects for different settings via the user interface.

Read the full calibration guide:
3D Printer Calibration: Step-by-Step to Perfect Results
How to Calibrate the Printing Temperature
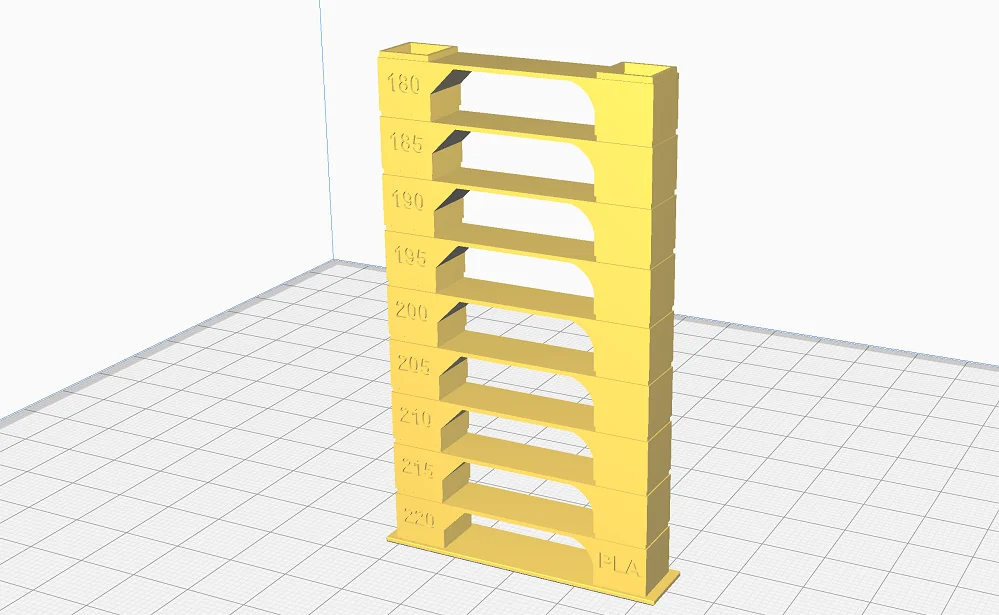
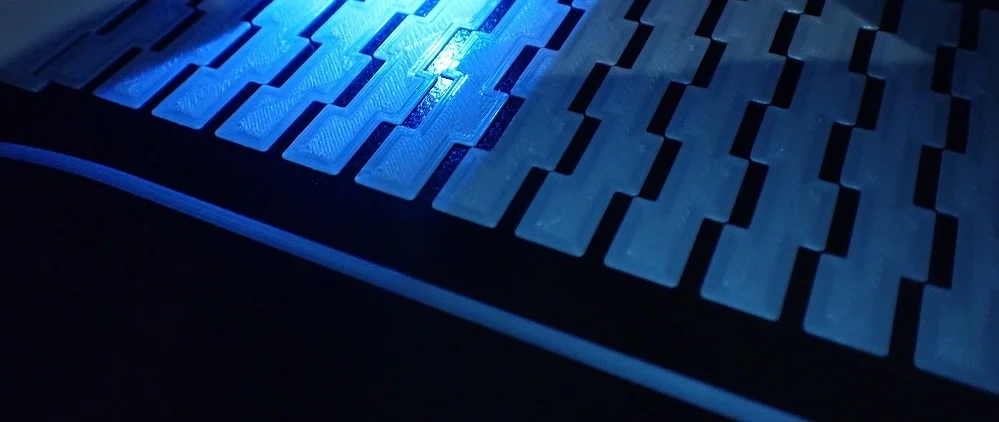
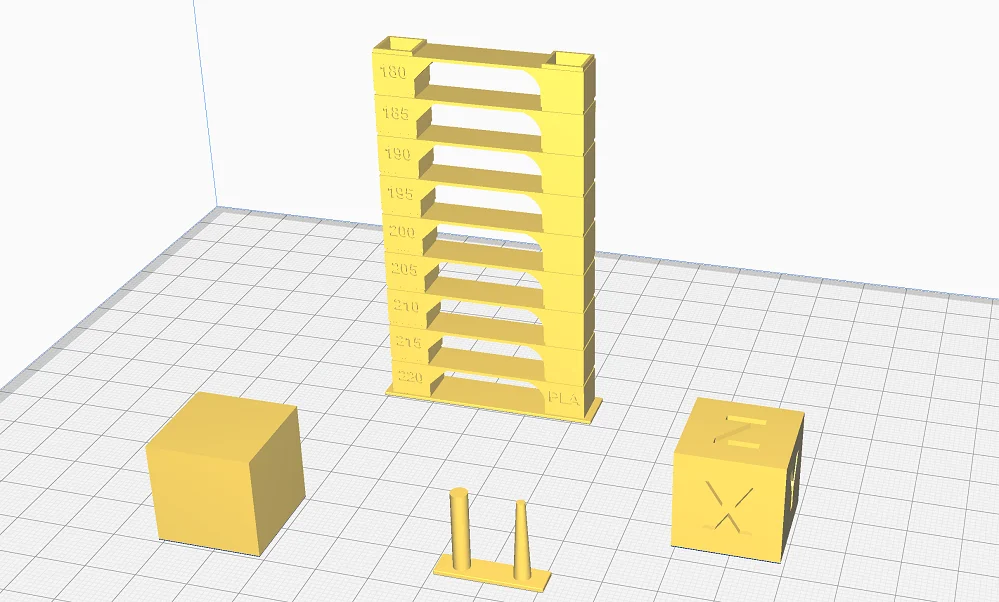
To calibrate the printing temperature, you can best use a so-called temperature tower. This tower consists of several levels, each of which uses a different printing temperature. The floors are designed in such a way that errors like stringing are provoked. This way you can quickly see which temperature is perfect.
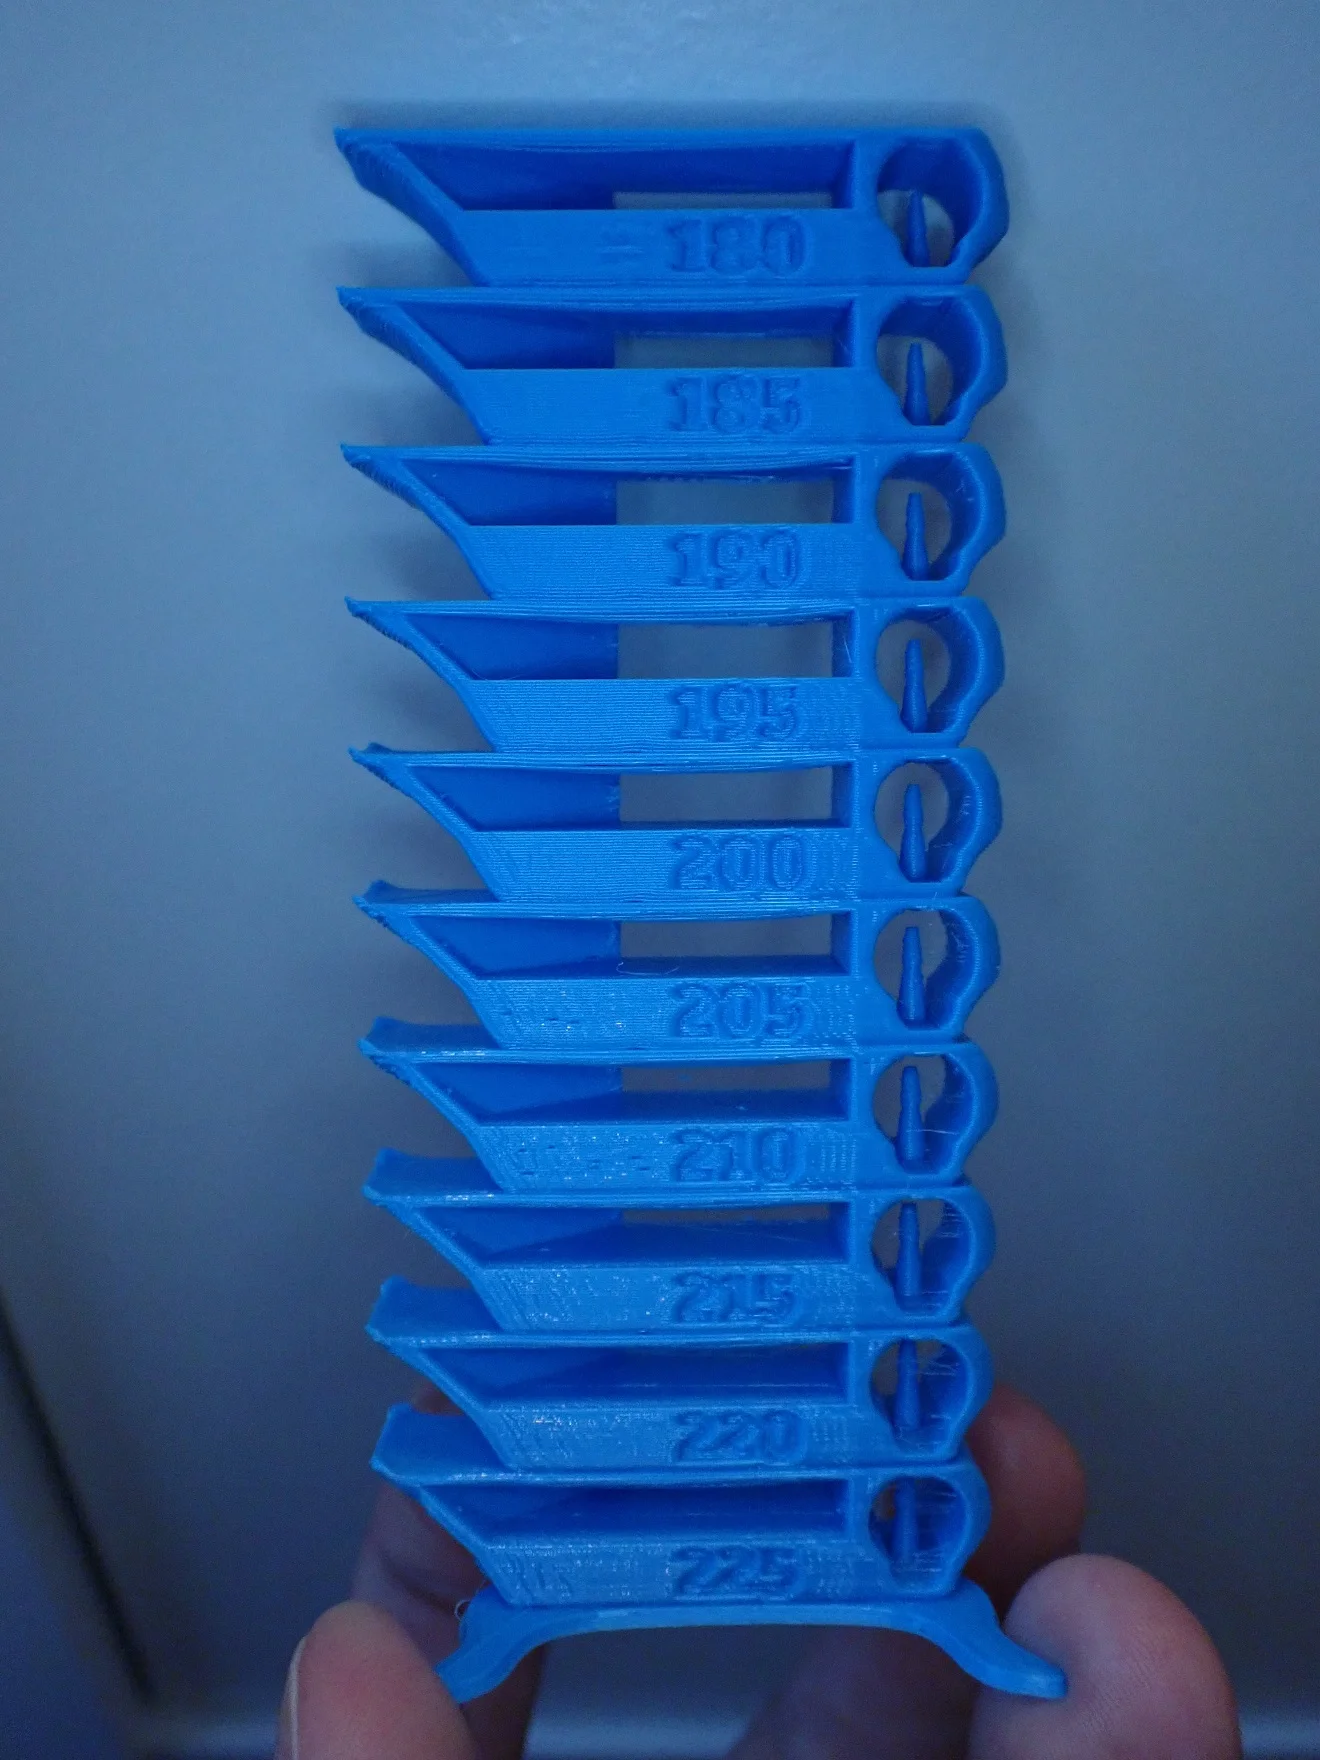
The tower consists of so many floors that you can test the entire temperature range of a filament. You can then easily recognize the correct temperature by the fact that there are no print errors on the respective floor.
If this is too complicated for you, because you also need a script for the temperature change (can be configured within Cura via the user interface), you can also use the calibration object for the retraction. Just print it several times and change the temperature in small steps of 5 °C each time. This way you will not detect all printing errors that can be caused by an incorrect temperature, but you will still quickly find the correct temperature when comparing the individual objects with each other.
How to Calibrate the Filament Flow
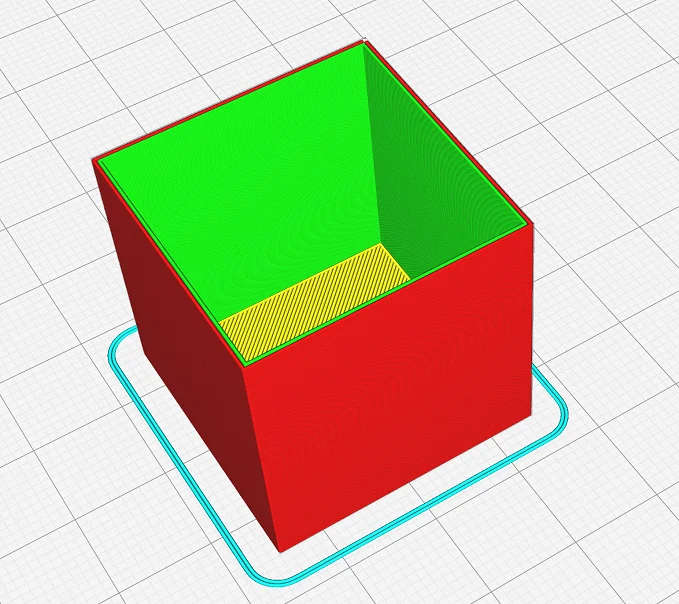
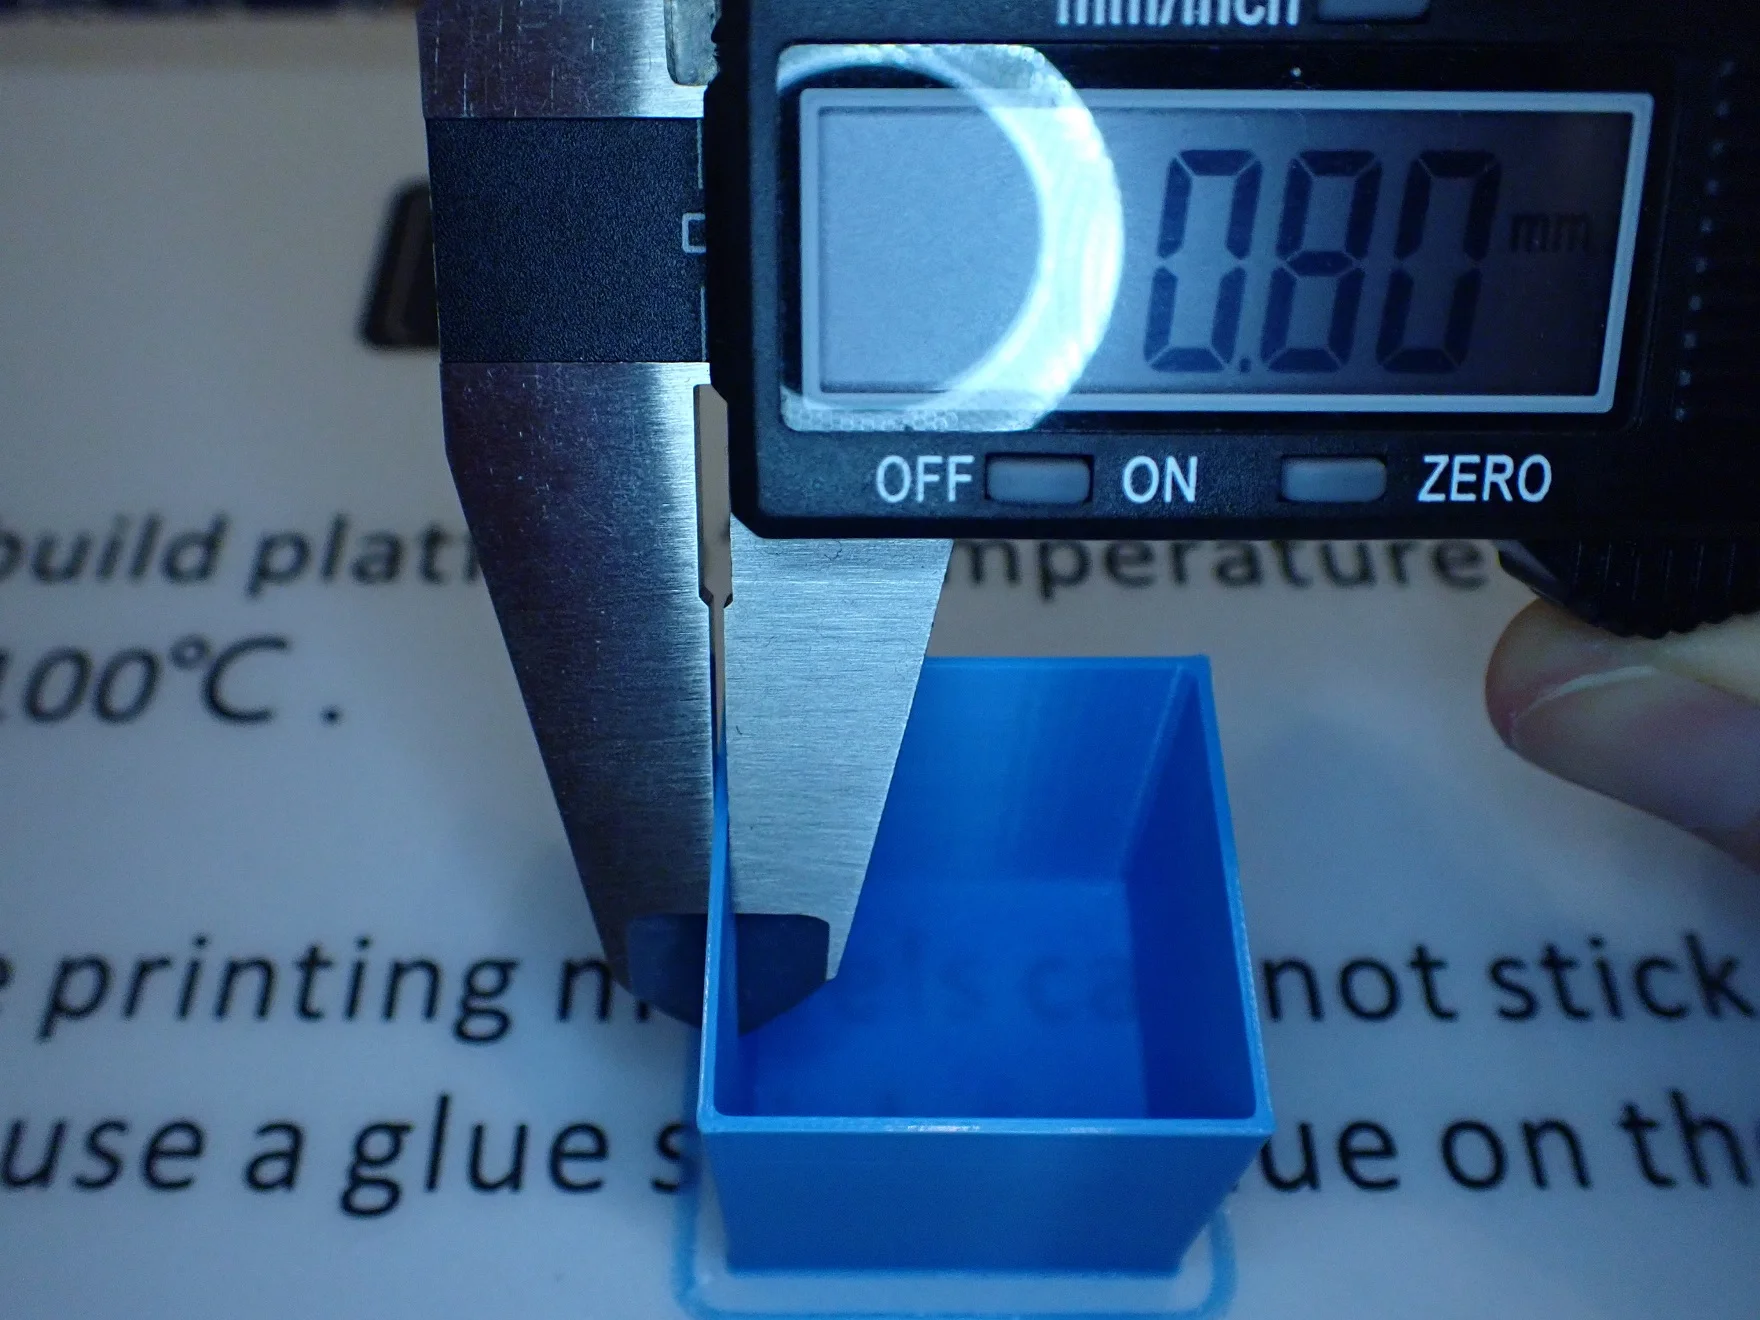
To calibrate the flow rate, you use exactly the same calibration objects for the Anycubic Kobra as for other 3D printers. The best object to calibrate the flow rate is a hollow cube.
Set the print to print with two walls, with 0% infill and no top layers. This way you can measure the wall thickness as soon as the print is finished.
With a caliper gauge you can easily measure the wall thickness to calculate deviations in the flow rate. If the wall thickness is too high, the flow rate must be reduced accordingly, if the wall thickness is too small, the flow rate must be increased.
How to Calibrate the Retraction
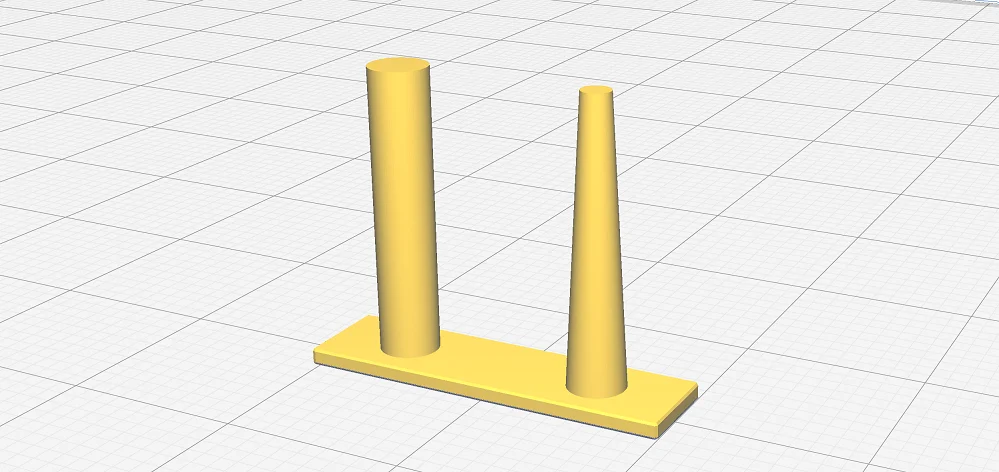
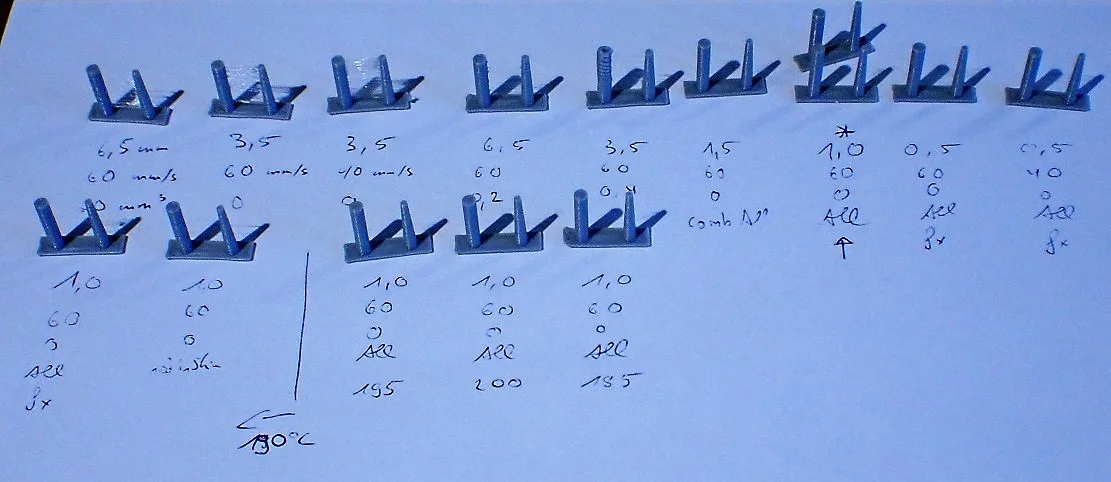
The settings for the retraction have a very large influence on print quality. Too large or too small a retraction distance or an inaccurate retraction speed can cause severe stringing and other printing errors.
Fortunately, it is quite easy to calibrate these two parameters for the retraction. My favorite is the calibration object from the Calibration Shapes plugin in Cura. It’s so small that you can print it within a few minutes and it shows you well if the settings are correct or still need to be optimized.
Start with the guide values from this article and approach the optimal values in small steps. You should adjust the retraction distance in small steps of 0.1 mm and the retraction speed in 5 mm/s steps. Remember, however, that you should only change one value at a time so that you know which parameter caused the changes.
The Anycubic Kobra is Perfect for Beginners
If you want to learn about the right settings before you buy the Anycubic Kobra with this article, you are one of the praiseworthy few who do so!
However, if all the values and calibrations have scared you off, don’t shy away from 3D printing as a whole or the Anycubic Kobra. This 3D printer is not only affordable, it’s also perfect for beginners. It works very precisely, has many useful features and forgives many a mistake in operation. This makes it quite easy to find the right settings if the default values in this article are not even perfect already.
Conclusion
With the Cura settings for the Anycubic Kobra from this article, you should have very good starting values for your first test prints.
It may be that the given guidelines already work perfectly for your printer and your used filament, but I would advise you in any case to calibrate the most important settings. The calibration requires only a little time and is simplified by existing calibration objects. So it is not difficult to perfect the print result with little effort.
Disclosure: This website is the property of Martin Lütkemeyer and is operated by Martin Lütkemeyer. Martin Lütkemeyer is a member of the Amazon Services LLC and other Affiliate Programs. These are affiliate advertising programs designed to enable websites to earn advertising revenue through advertising and linking to Amazon.com and others. Links marked with * are affiliate links.
