
- Wet Filament: Prevention, Symptoms & Drying - July 18, 2024
- Sovol SV08 – Best PrusaSlicer Settings & Profile - June 26, 2024
- Sovol SV08 – Best Orca Slicer Settings & Profile - June 26, 2024
Disclosure: Links marked with * are Affiliate Links. I earn from qualifying purchases if you decide to make a purchase through these links – at no additional cost for you!
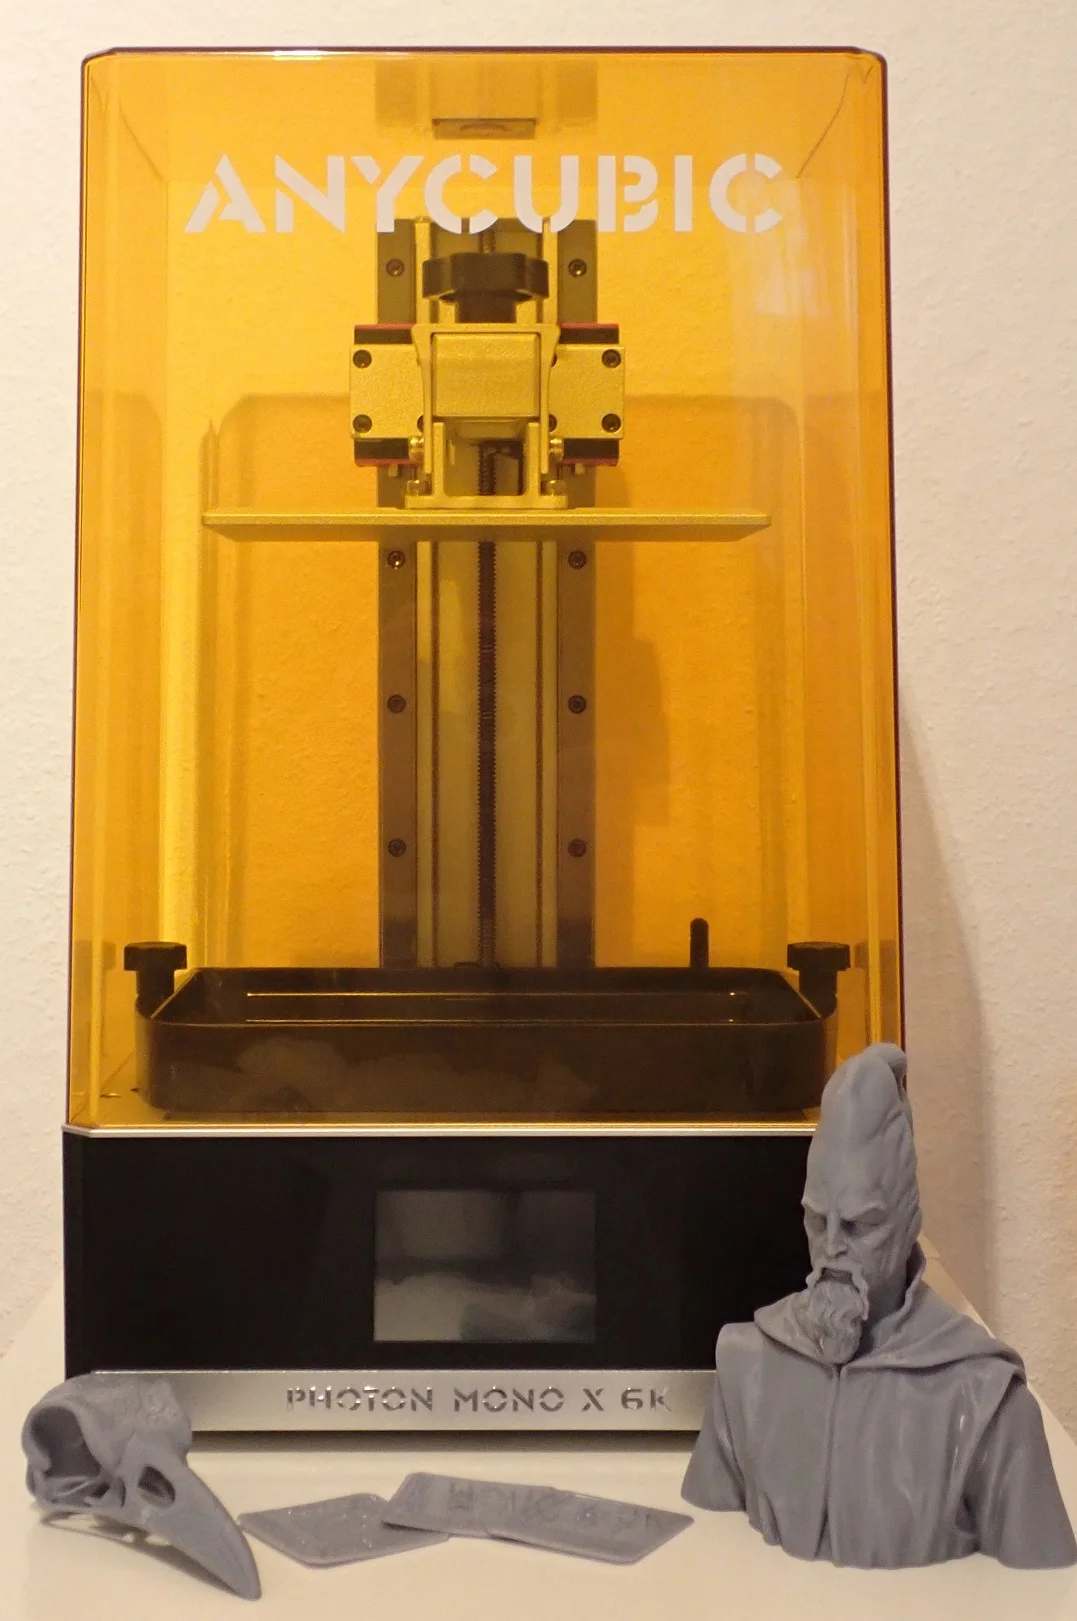
With the Photon Mono X 6K*, Anycubic sends a revolutionary 3D printer to the market. It is a large format resin 3D printer with a fast print speed and an untypically high accuracy for the size.
The Anycubic Photon Mono X 6K has a print volume of 197 x 122 x 245 mm and prints with an extremely high accuracy of 34.4 µm (XY resolution) and layer thicknesses of 10 – 50 µm. It reaches a print speed of 60 mm/h and can be monitored and controlled via an app.
Find out if the Photon Mono X 6K really is the perfect combination of size, resolution and speed in this practical and detailed review.

Check Price at:
Table of Contents:
- 1 Key Takeaways
- 2 Who Should Buy the Anycubic Photon Mono X 6K?
- 3 Advantages & Disadvantages > Anycubic Photon Mono X 6K
- 4 Scope of Delivery > Anycubic Photon Mono X 6K
- 5 Setup > Anycubic Photon Mono X 6K
- 6 Features > Anycubic Photon Mono X 6K
- 7 Noise Level > Anycubic Photon Mono X 6K
- 8 Print Speed> Anycubic Photon Mono X 6K
- 9 Print Quality > Anycubic Photon Mono X 6K
- 10 Technical Specifications > Anycubic Photon Mono X 6K
Key Takeaways
- Extremely accurate (34.4 µm XY resolution, 10 µm layer height)
- Large print volume of 197 x 122 x 245 mm
- Very fast with 60 mm/h
Who Should Buy the Anycubic Photon Mono X 6K?
The Anycubic Photon Mono X 6K is suitable for anyone who wants to print large objects quickly and with high accuracy. Despite its size, the accuracy is better than the current standard of 50 µm. Due to the simple operation, the 3D printer is also suitable for beginners.
Advantages & Disadvantages
> Anycubic Photon Mono X 6K
PRO:
- Very high accuracy
- Fast printing speed
- Large print volume
- Simple design and operation
CON:
- Only compatible with Photon Workshop Slicer
- Expensive (but good value for money!)
Scope of Delivery
> Anycubic Photon Mono X 6K
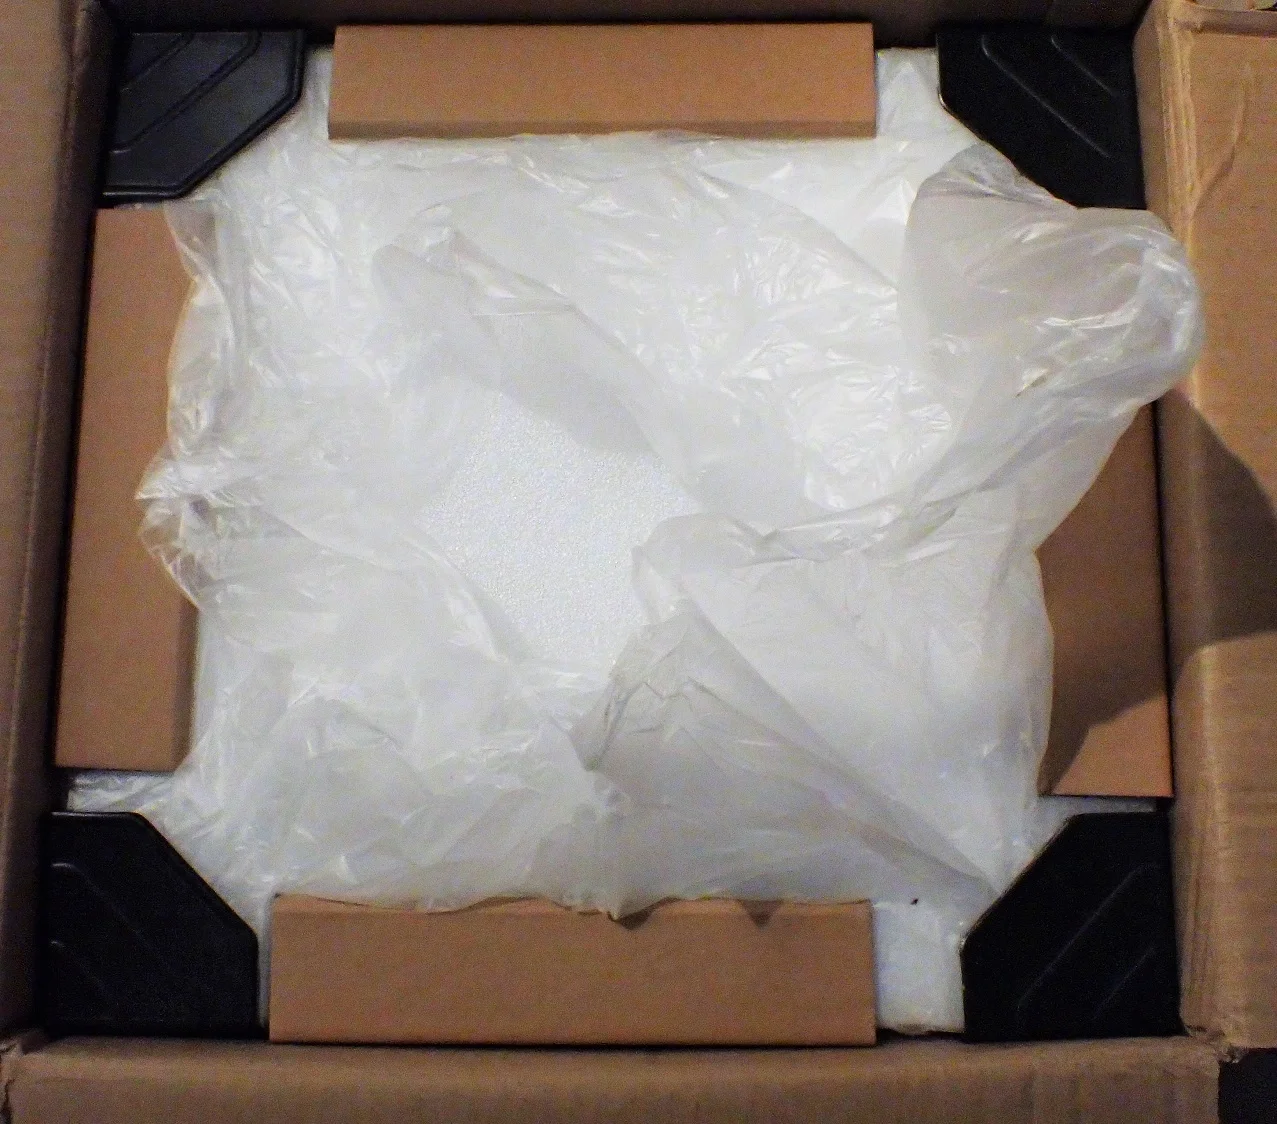
As you would expect from Anycubic, the Photon Mono X 6K* is very well packaged. Apart from resin and isopropyl alcohol, it comes with everything you need to start printing right away.
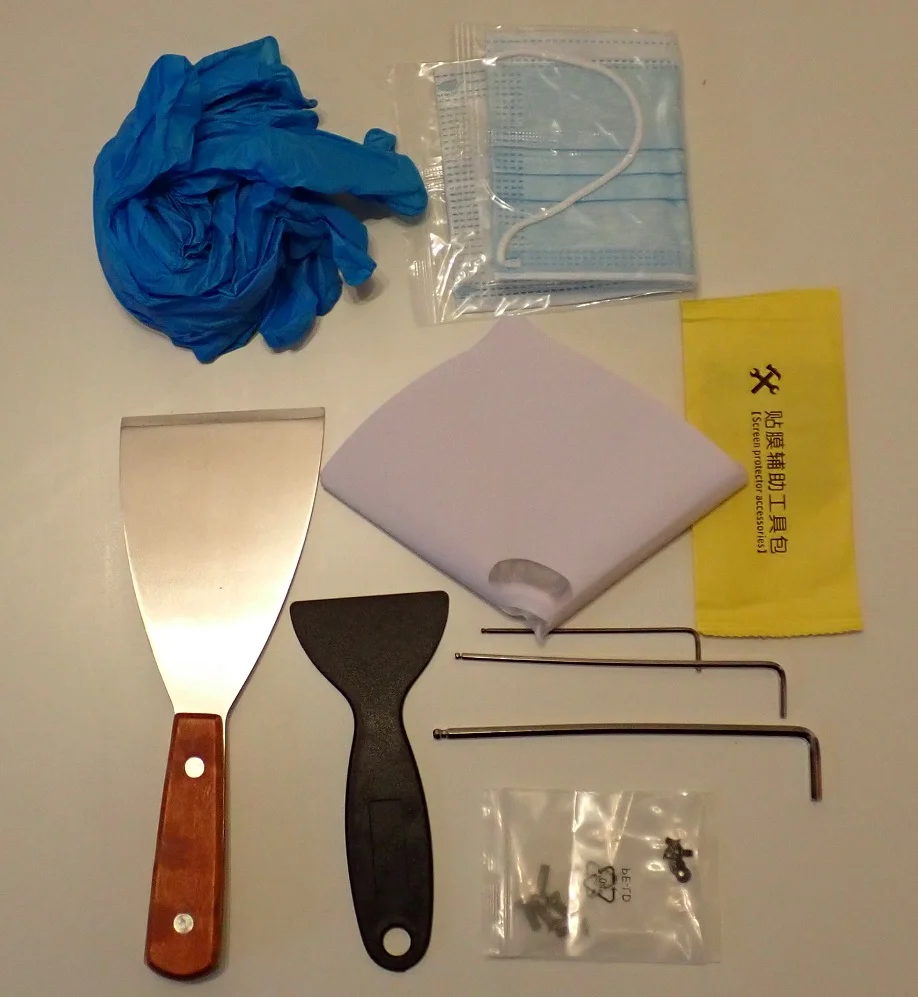
The following items are included in the scope of delivery:
- The preassembled printer
- UV-light protective cover
- WiFi antenna
- Printing plate
- Resin tank
- Operating instructions
- Paper for print bed leveling
- Replacement UV screen protection + alcohol wipe
- Screws and suitable Allen keys
- Metal spatula for the print bed
- Plastic spatula for the resin tank
- Disposable resin filter
- Gloves
- Masks
- USB flash drive:
- Sliced test model
- Operating instructions
- Photon Workshop Slicer incl. manual
What you need besides these things is compatible resin (I used the Eco Resin from Anycubic*, because it is not as harmful to health and environment as normal resin), isopropyl alcohol* for cleaning, a lot more gloves (preferably nitrile*), FFP2 masks* and a lot of paper towels.
To get the resin back in its bottle, you should also purchase a reusable resin filter*. You can also buy the one-time filters*, but in the long run, a reusable filter is cheaper.
Tip: Depending on the resin you are using, the first layers may stick to the FEP film of the resin tank and not to the print bed. If this is the case, you can lubricate the FEP film with a drop of PTFE lubricant* to reduce its adhesion.
Use extremely little of it and dry any residue with a dry paper towel. It is best to try it without and only use it when the print does not adhere to the plate but to the FEP film.
If the first layers stick to the FEP film, it is quite difficult to remove them from it. It is a bit time-consuming and tedious, but the best thing to do is to soak the failed print in the resin container overnight with isopropyl alcohol. Then the print will come off by itself and you won’t run the risk of damaging the FEP film.
Setup
> Anycubic Photon Mono X 6K
The enclosed operating instructions, which are stored on the USB stick, explain the assembly with easy-to-understand illustrations and instructions.
These are the steps to get the Photon Mono X 6K ready for use:
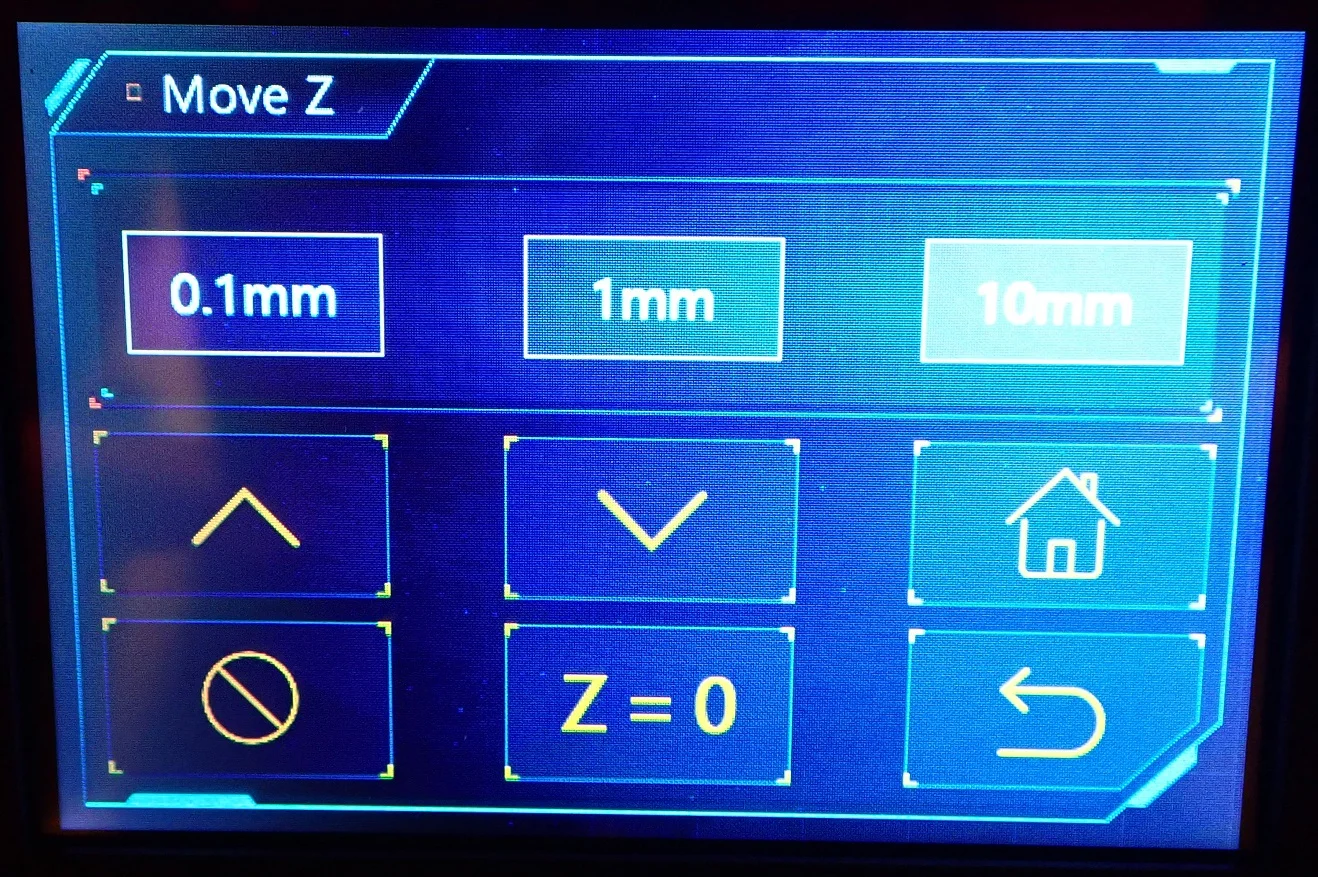
- Raise the Z-axis via the menu
- Insert print bed
- Print bed leveling (more on this later)
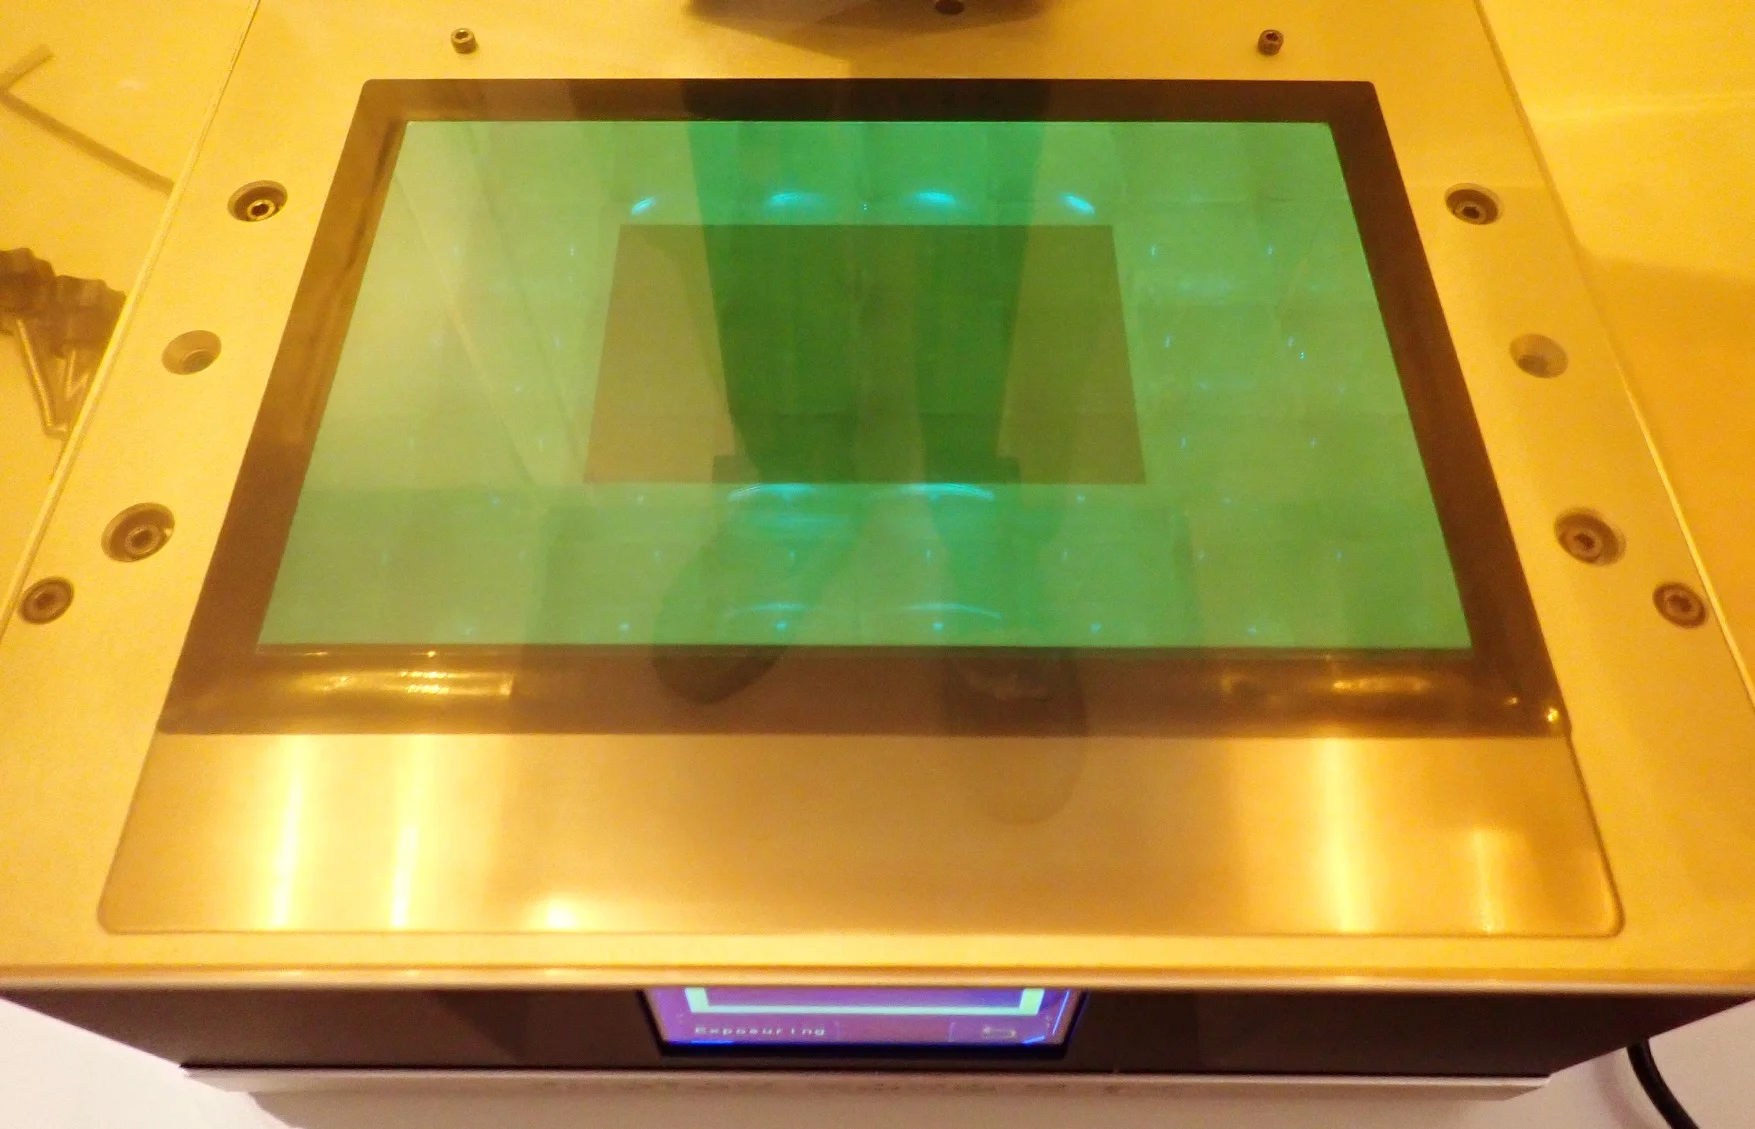
- Test UV screen
- Insert resin container and screw tight
- Install antenna
After these steps, the Photon Mono X 6K is ready to start your first test print. All you have to do is fill in the resin and start the print file.
Print Bed Levelling
Print bed leveling on the Photon Mono X 6K happens just like it does on most other resin 3D printers. It is a combination of manual alignment and a menu-assisted height adjustment.
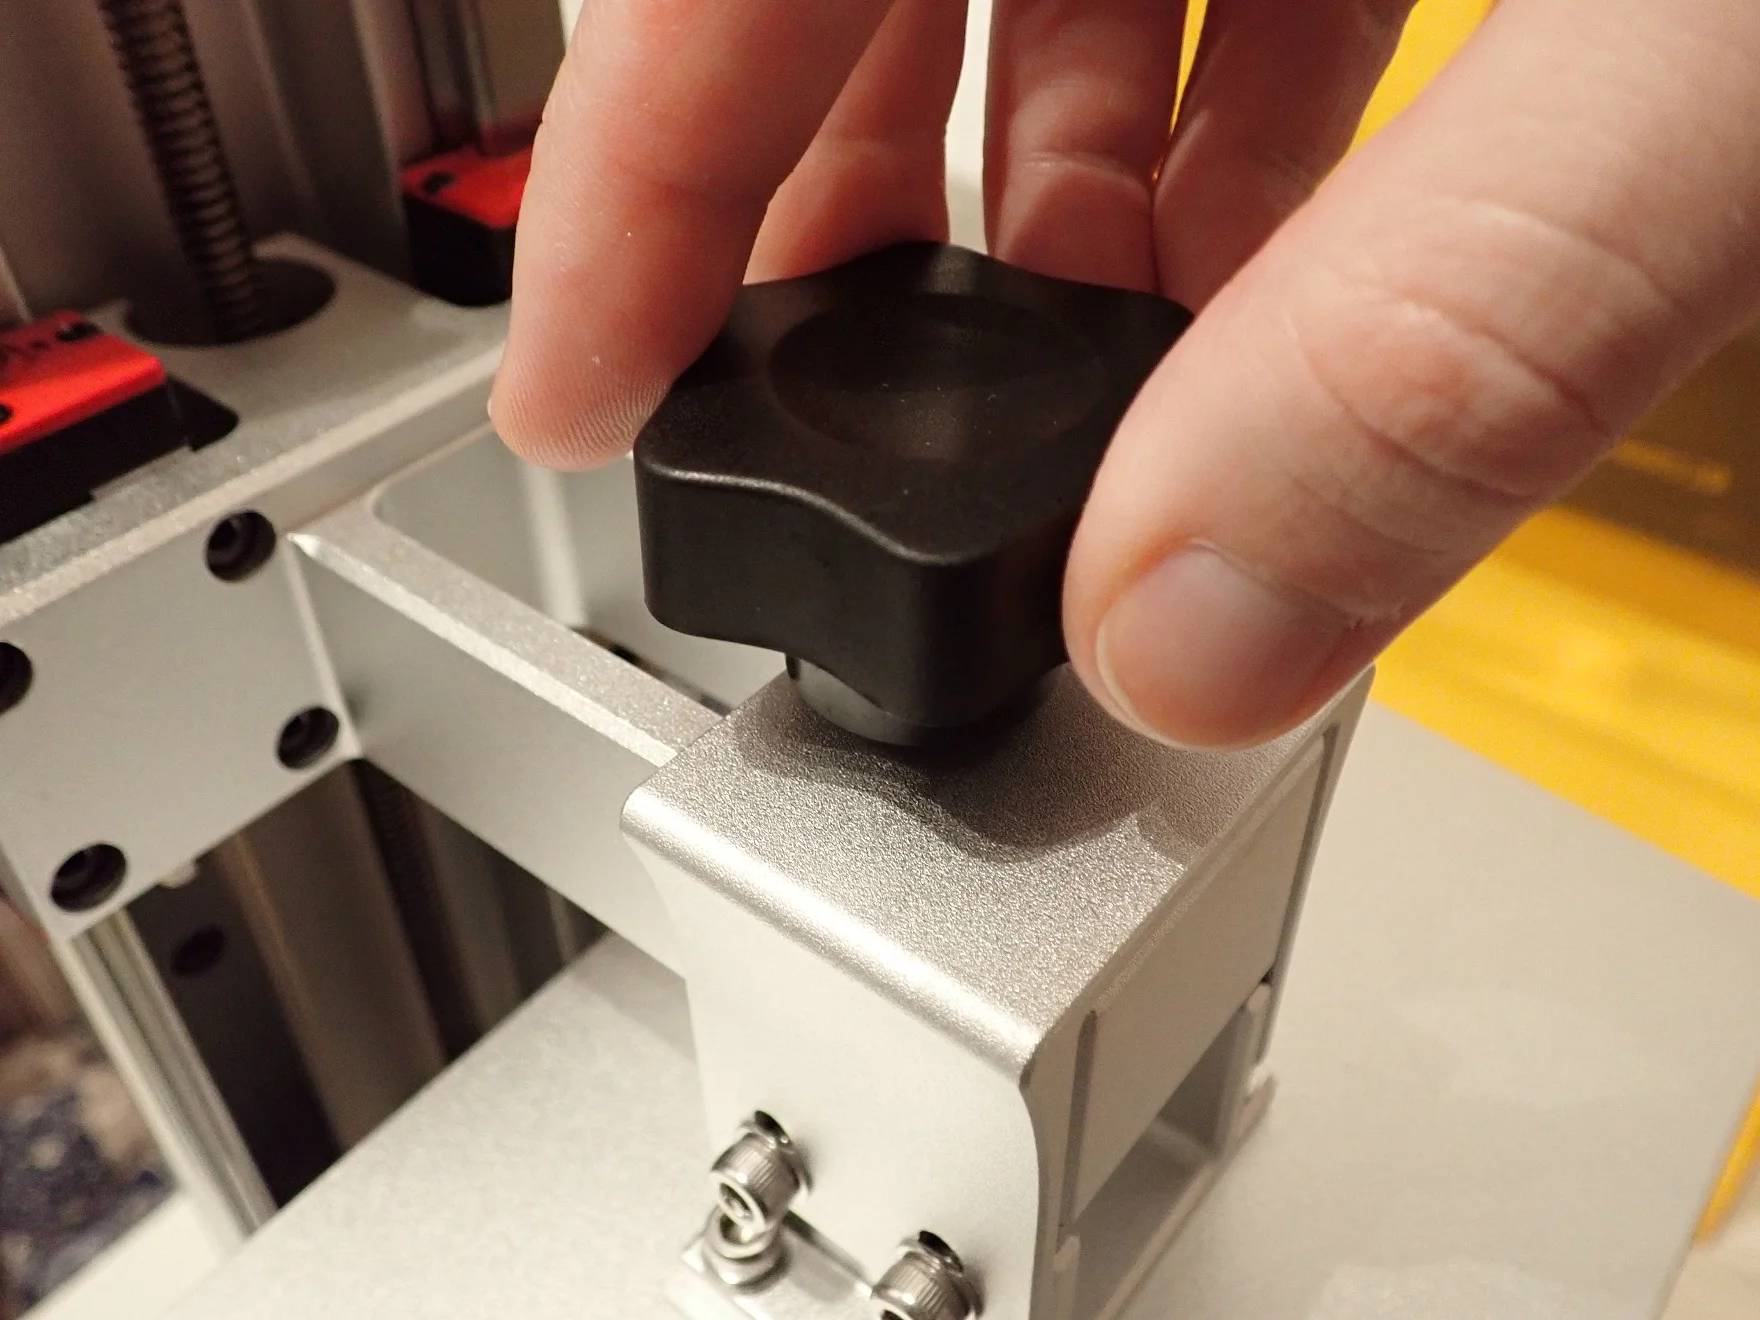
Mount the printing plate: To mount the printing plate you first have to move the Z-axis upwards via the menu. With the turning screw, you fix the rather large printing plate to the Z-axis.
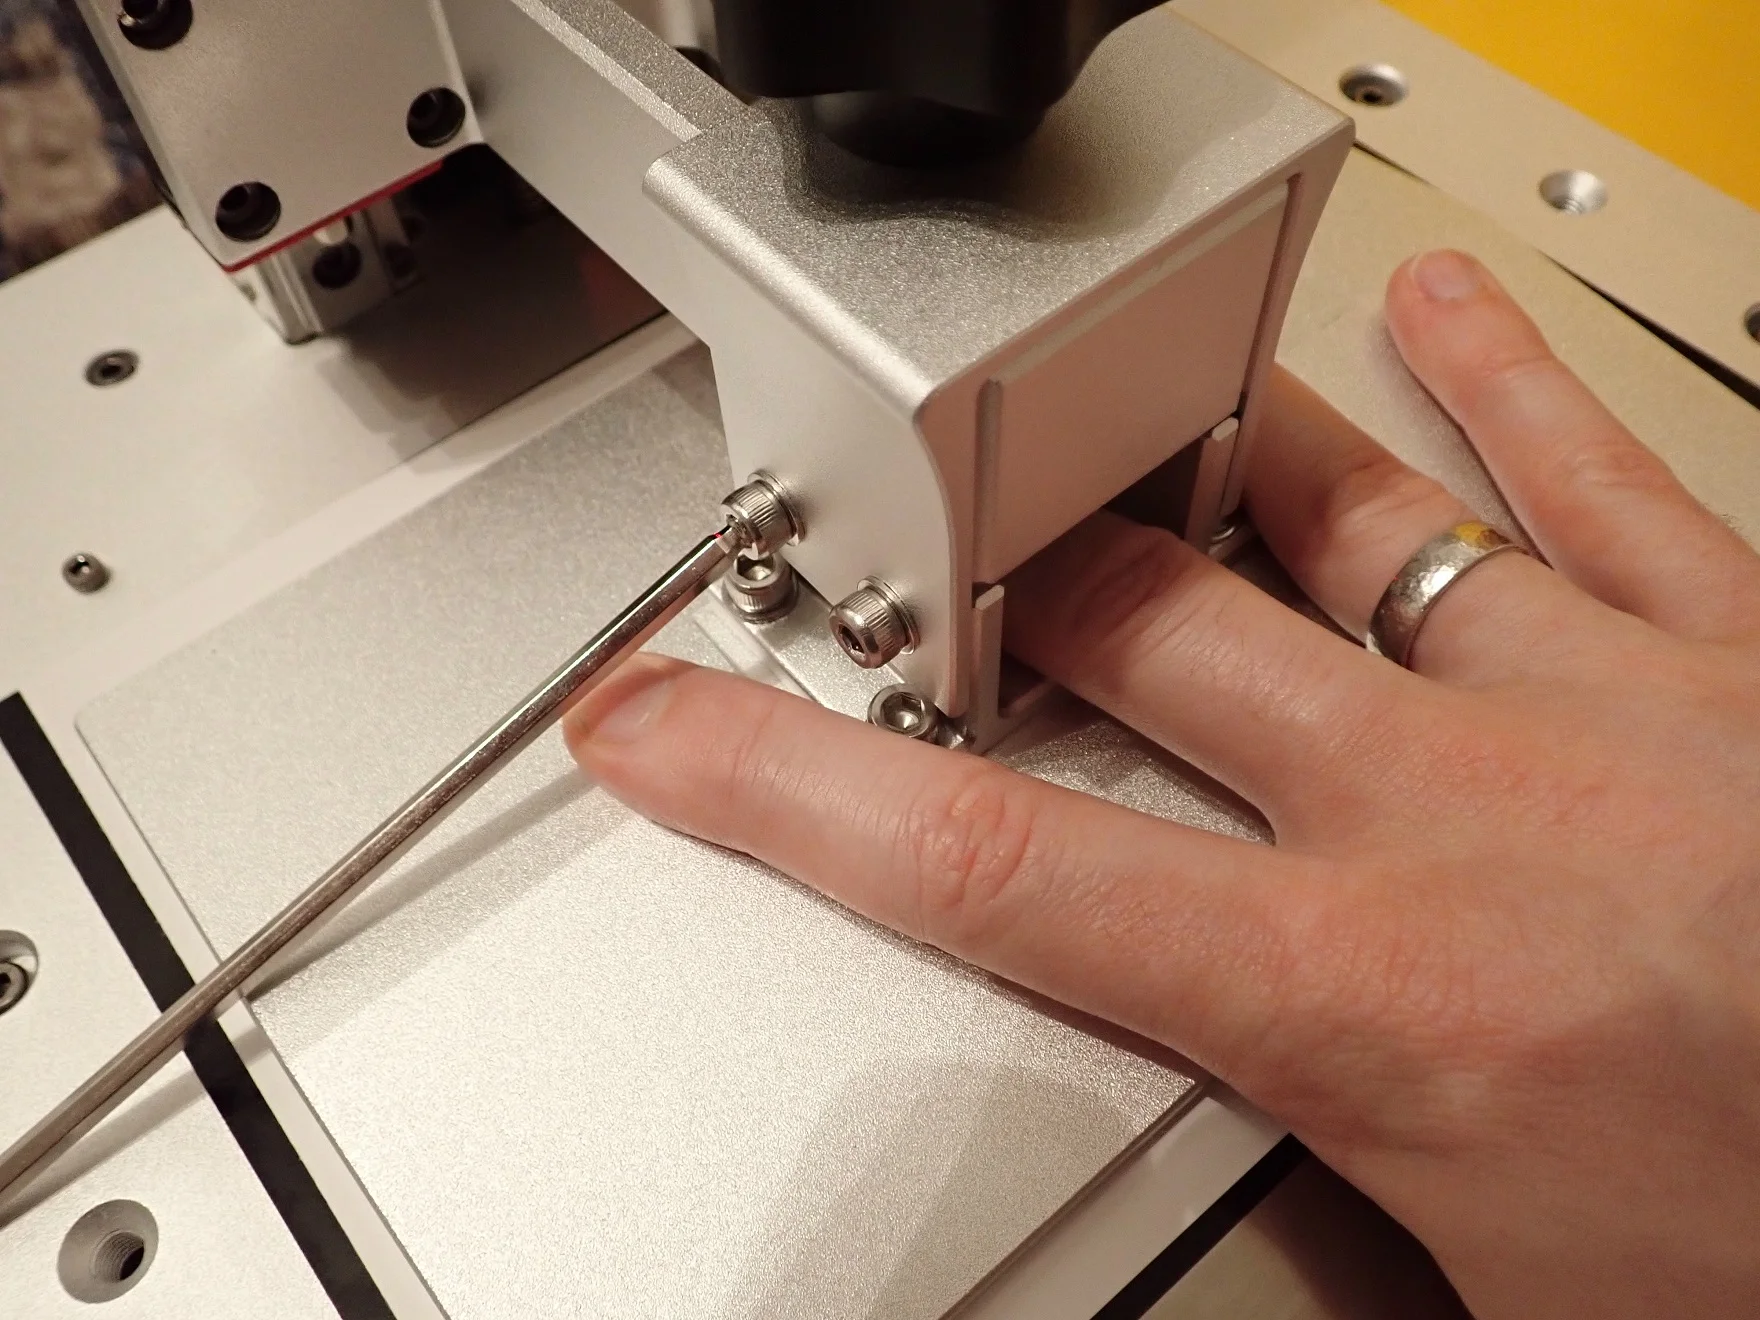
Loosen four screws on the side: There are two screws on each side of the printing plate suspension that you have to loosen with the Allen key included in the package. This allows you to freely adjust the angle of inclination of the printing plate.
Place paper on the UV screen: To properly adjust the distance from the printing plate to the UV screen, a piece of paper is included. This piece of paper is placed between the printing plate and the UV screen.
Move to home position: The Home Position is already set very accurately by Anycubic. After you have loaded the paper, you can move to the home position via the menu. You will notice that the print bed touches down, but can give way due to the loosened screws.
Press down the print bed and tighten the screws: This step determines the inclination of the print plate. Press the print bed down on the paper with one hand and tighten the four screws carefully one after the other with the other hand. This adjusts the inclination of the printing plate to the UV-Screen.
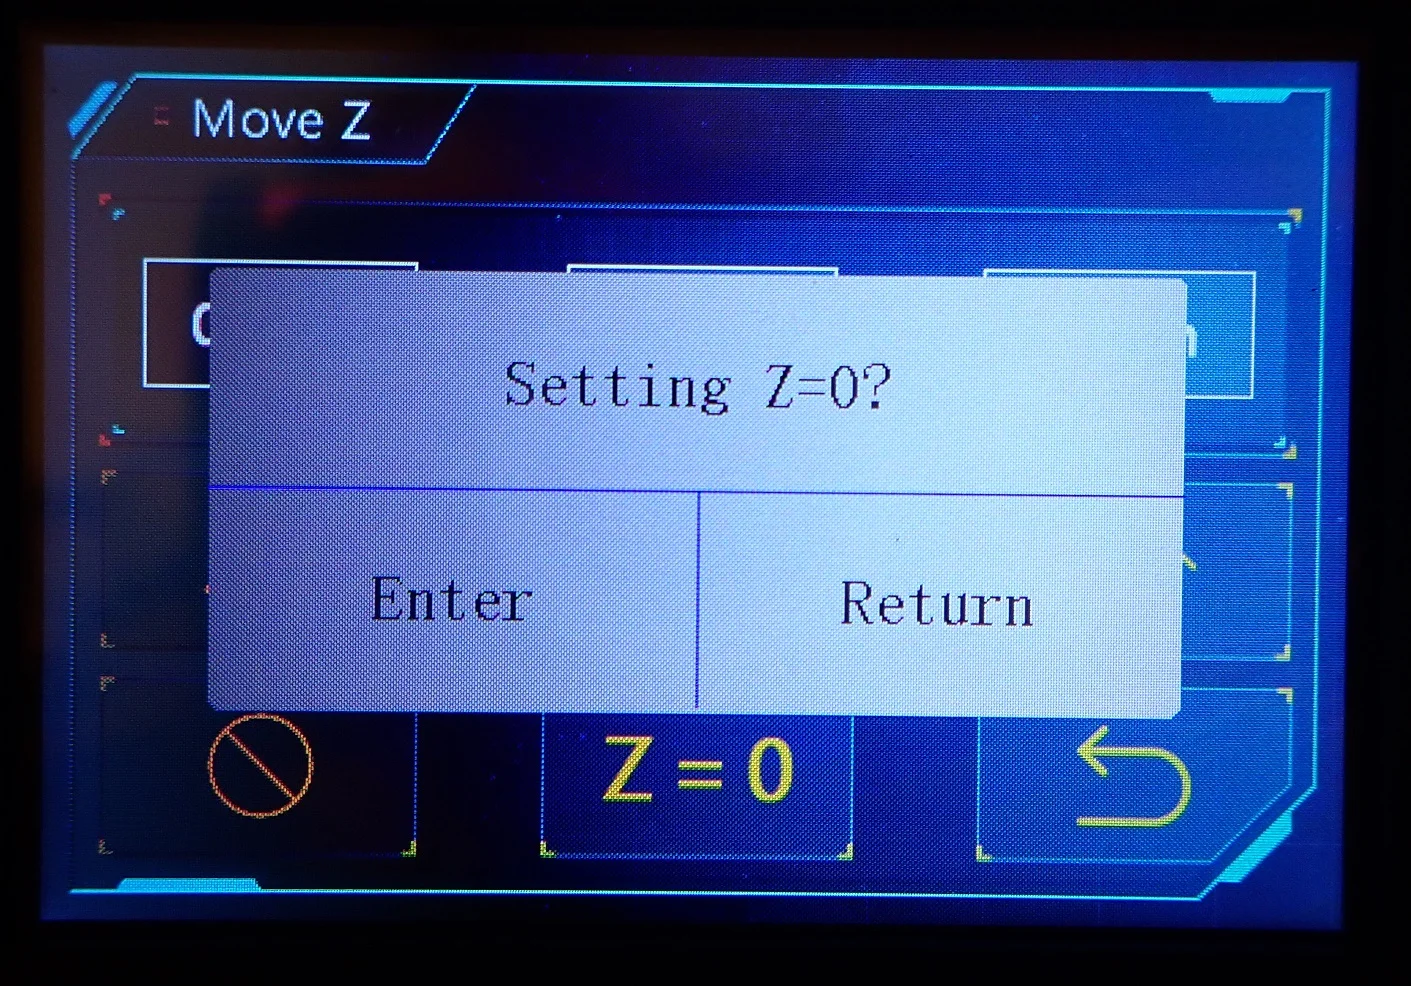
Adjust the home position: Tightening the screws will have changed the home position on the Z-axis. Adjust the distance via the menu in 0.1 mm steps so that the piece of paper can be moved with some friction between the UV screen and the print bed.
If you are not too rough with the printer and the print bed, the print bed leveling of the Photon Mono X 6K lasts extremely long. Due to the fixation with the four screws, the tilt angle can only change with difficulty.
Check Price at:
Features
> Anycubic Photon Mono X 6K
The Photon Mono X 6K* is very similar to its predecessor. In principle, only its resolution is higher. But if there was something that could have been improved on the Photon Mono X*, it would have been the resolution, although at 50 µm it was already very good for the large print volume.
Large Print Volume
The print volume of the Anycubic Photon Mono X 6K is 197 x 122 x 245 mm (L x W x H) or approx. 5.89 liters!
With this huge print volume, you will very rarely have to break your 3D printed objects into smaller pieces to print them. With this large print volume, even large objects can be printed in one piece.
But keep in mind that such large prints also take a very long time. Depending on the layer thickness you set, a print process that uses the entire print volume can take several days. With such prints, you must also refill resin in between, so that the printer does not run empty.
By comparison, the Elegoo Mars 2 Pro has a print volume of only 129 x 80 x 160 mm, or about 1.65 liters. So with the Photon Mono X 6K, not only do you print more accurately, you can also print approximately 3.5 times larger objects in one piece!
34.4 µm XY Resolution
A 4K resolution is now the standard for hobby resin 3D printers. Depending on how big the UV screen is, you get a coarser or finer resolution.
Large format resin 3D printers with a 4K resolution usually have an XY resolution or pixel size of about 50 µm. This is a very common resolution found in most hobby resin 3D printers.
Due to the 6K UV screen with a resolution of 5760 x 3600 pixels on an area of 197 x 122 mm, the Photon Mono X 6K has a pixel size of only 34.4 µm!
For a large format resin 3D printer this is extremely good and really surprised me. With such a small resolution, even the finest structures are visible and you don’t have to compromise on size and resolution.
10 µm Z Resolution / Layer Height
With the Anycubic Photon Mono X 6K, you can achieve a layer height of only 0.01 mm or 10 µm. However, Anycubic itself recommends the usual 0.05 mm for standard prints.
With the very small XY resolution and these thin layers, you get 3D prints with a very fine surface. Depending on how the print object is oriented, you will not see any steps on the surface. In addition, the Photon Workshop slicer has antialiasing (edge smoothing), with which you can refine the result even further.
To realize these precise layer heights, the Photon Mono X 6K has a double Z-axis. This makes the movements in the Z-direction vibration-free and extremely accurate. Because of the weight of the printing plate and the potentially very heavy 3D prints hanging from it, the stepper motors are very powerful and move vibration-free and precisely even under this load.
Monochrome LCD Screen
The Anycubic Photon Mono X 6K has a monochrome display, which gives it part of its name. Through this now quite established technology among the hobby resin 3D printers, it reaches a print speed of up to 60 mm/h. In addition, it achieves this very high accuracy through the 6K monochrome display.
Monochrome screens can last several thousand hours of operation before they need to be replaced. So before you get a defective LCD screen, other components of the 3D printer will probably give up.
The powerful LCD screen is effectively cooled by internal fans in the housing.
Textured Print Bed
The print bed has a textured surface so that the cured resin adheres better to it. Even large or heavy objects will not fall from the printing plate into the resin tank during printing. This would completely ruin your 3D print and also damage the FEP film of the resin tank.
I’ve actually had this happen to me before with another resin printer and the resulting mess was extremely frustrating.
But speaking of creating a mess, on the top of the print bed of the Photon Mono X 6K are the mounting screws. Four of them are oriented so that they fill with resin when submerged. When cleaning the print bed, these little resin reservoirs in the screw heads are a bit of a pain to clean.
Touch Screen
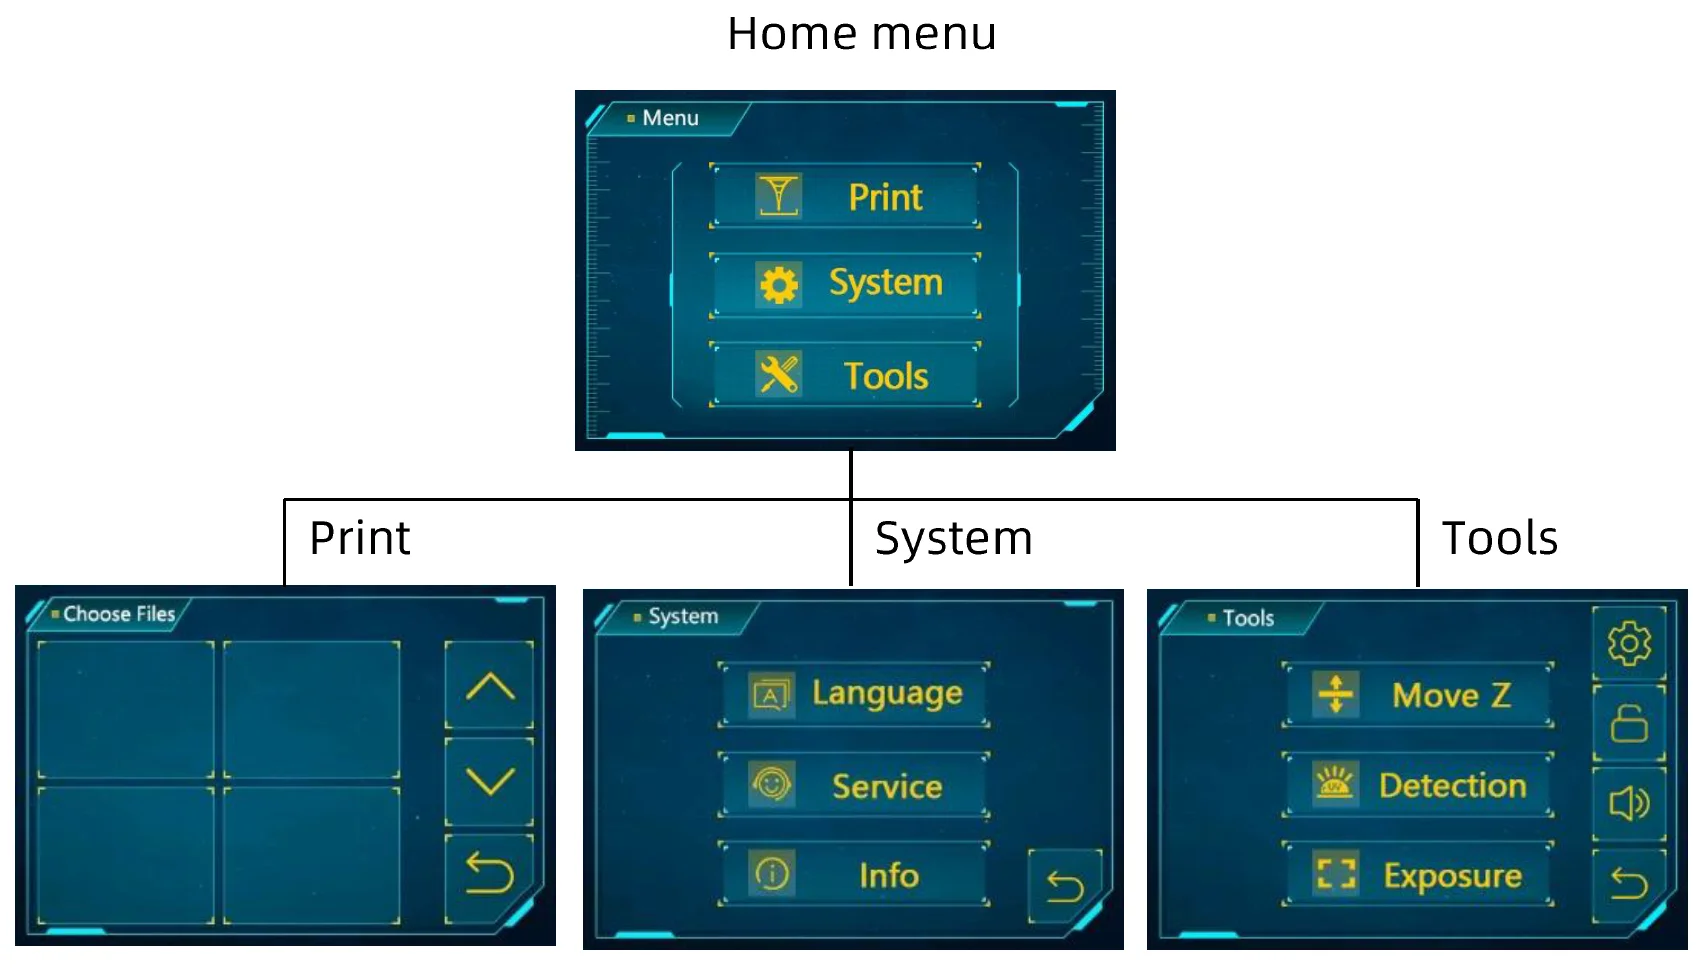
The 3.5” touch screen guides you with a few clicks to all important settings. The menu navigation is very intuitive and similar to the operation of other modern resin 3D printers.
The touchscreen itself has a nice resolution and responds precisely to your touch. In the submenu for starting a print, you see small thumbnails (preview images) of the individual print files. In addition to the name, you can also see from the image which objects you have in front of you.
Slicer
Anycubic’s slicer, Photon Workshop, has very well set profiles for all Anycubic resin 3D printers.
The slicer also has all the usual functions you need for slicing resin objects:
- Hollowing: This allows you to hollow out the inside of the 3D object to save a lot of resin. You can set the wall thickness individually and even determine an infill pattern.
- Punch hole: This allows you to make holes in your 3D object so that you can rinse out the hollowed-out inside with isopropyl alcohol. Otherwise, at the end of your object’s life, you’d be throwing liquid resin in the trash. And liquid resin is toxic and must be disposed of properly!
- Generate support structures: You can either have the support structures generated automatically or set them manually. You can also set their contact points and diameters as you need.
- Cut through objects: You can also cut through objects with the slicer to avoid printing unwanted parts of the object.
- Insert Text: Lets you add a personal touch to your objects by inserting custom text.
- Up to 8x antialiasing: With edge smoothing, visible steps are reduced even further and the surface becomes smoother and smoother.
At the moment ChiTuBox does not support the Anycubic Photon Mono X 6K. The output file format is not recognized by the 3D printer.
App
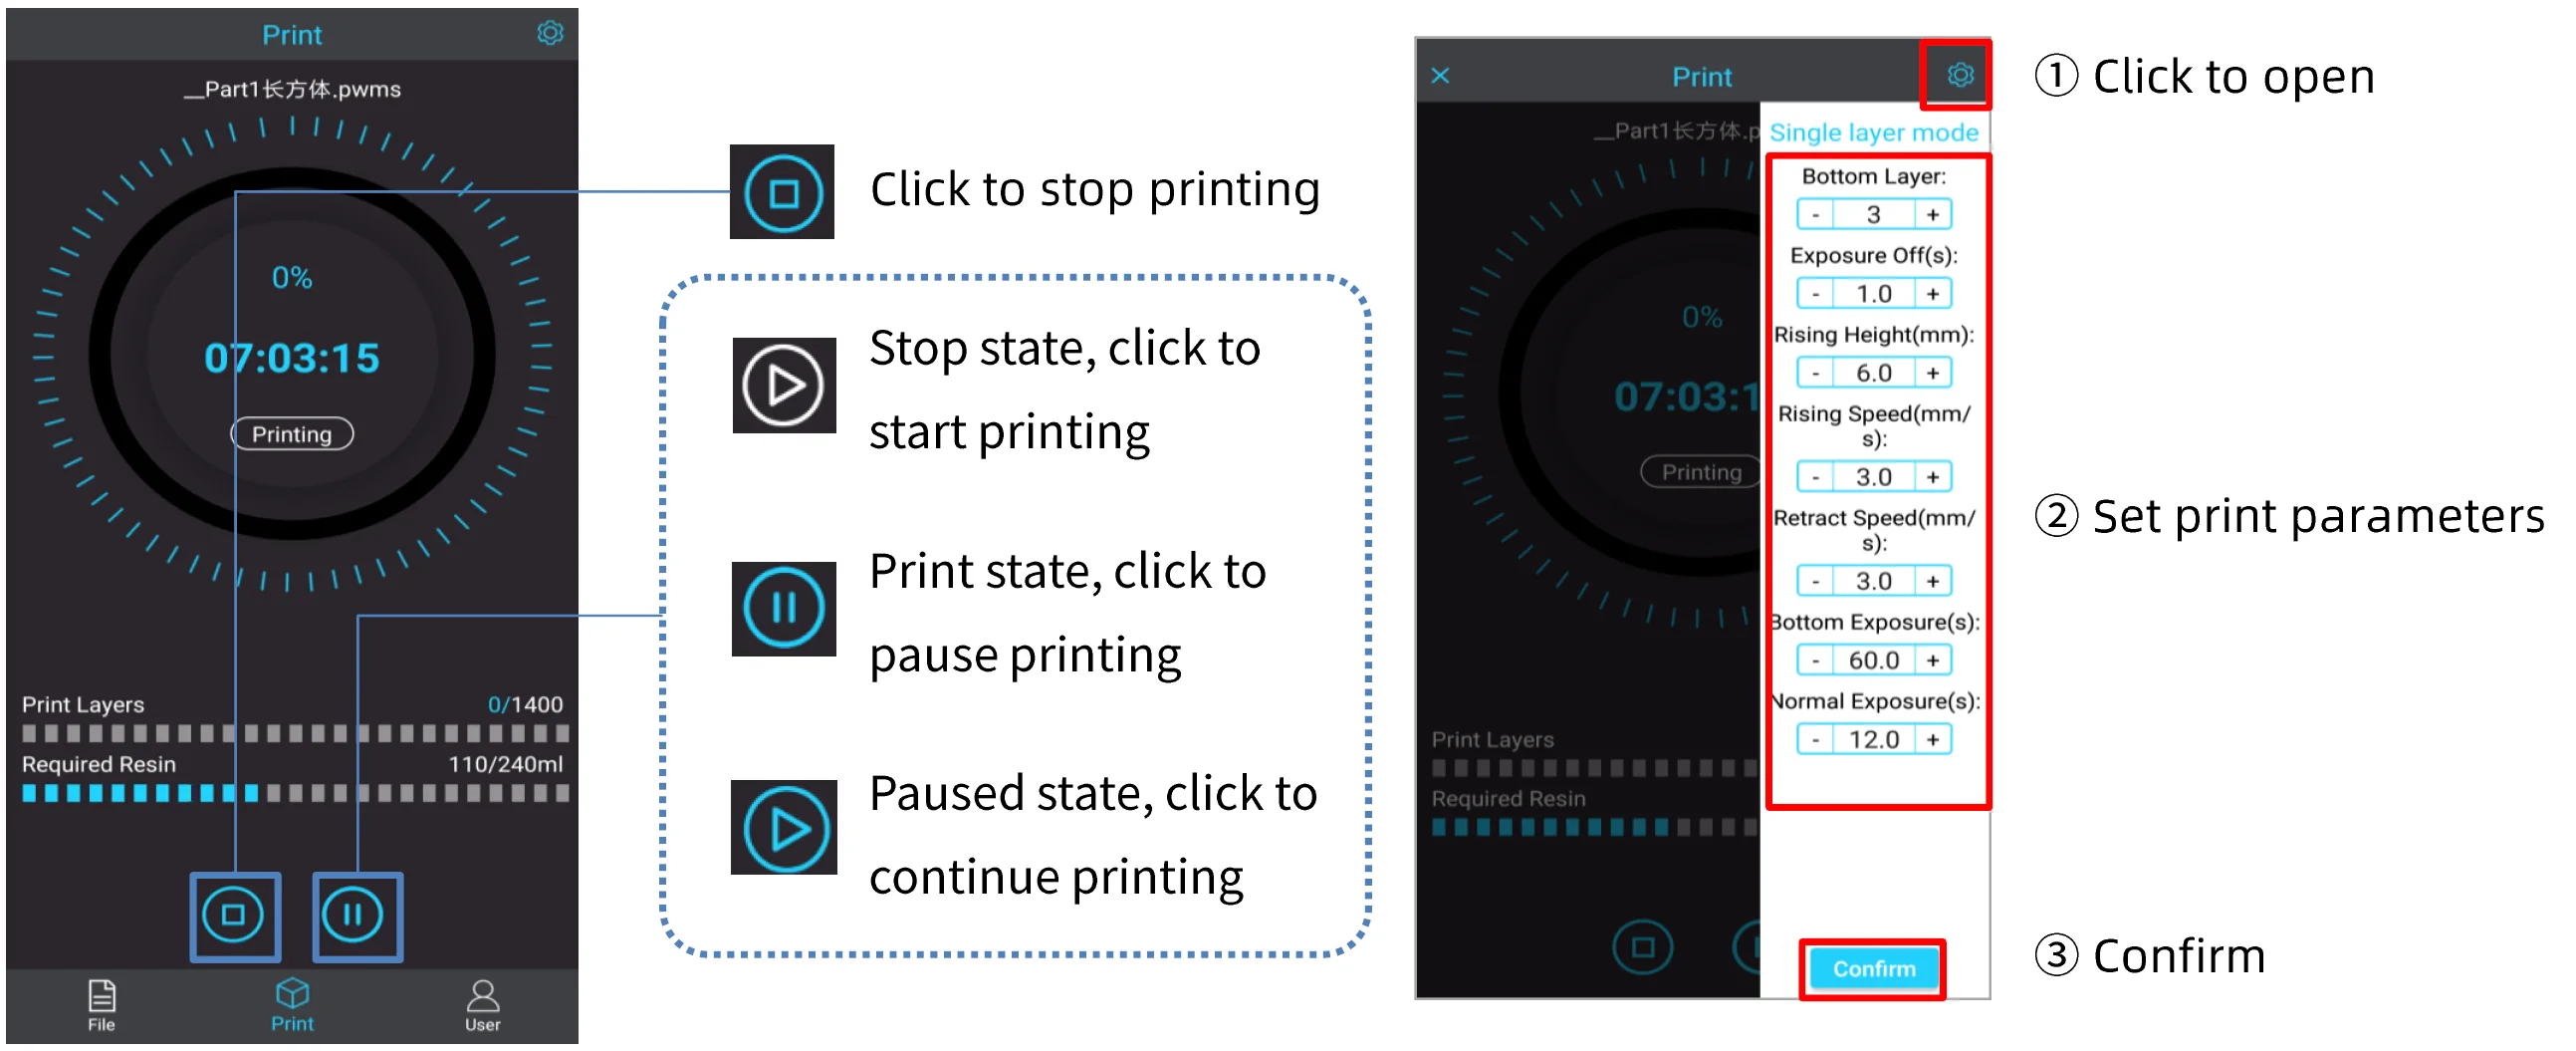
You can connect to the Anycubic Photon Mono X 6K via the Wi-Fi antenna using the Photon Remote Control App. You can control, monitor and adjust it via the app.
You can even make settings before printing that can normally only be made in the slicer. These include, for example, the exposure time, the speeds and how many lower layers should be printed.
Since you will often be printing large objects with this 3D printer that will take some time to complete, the app is very useful for monitoring the progress of the print. Without the app, I was always setting an alarm or running to the 3D printer way too often to monitor the status of the print.
Stop Function
The newer resin 3D printers from Anycubic usually have this automatic stop function when the hood is lifted. You can optionally turn this feature on or off on the Anycubic Photon Mono X 6K.
This is a good thing because sometimes you need to refill resin for very large objects and you don’t want the printer to stop. Most of the time the printing is already so far advanced that you don’t have to stop the printing process to refill the resin.
Especially in a household with children this feature is very useful. So you can be sure that no one in your house is in danger of being blinded by the powerful UV light source.
Max. Fill line
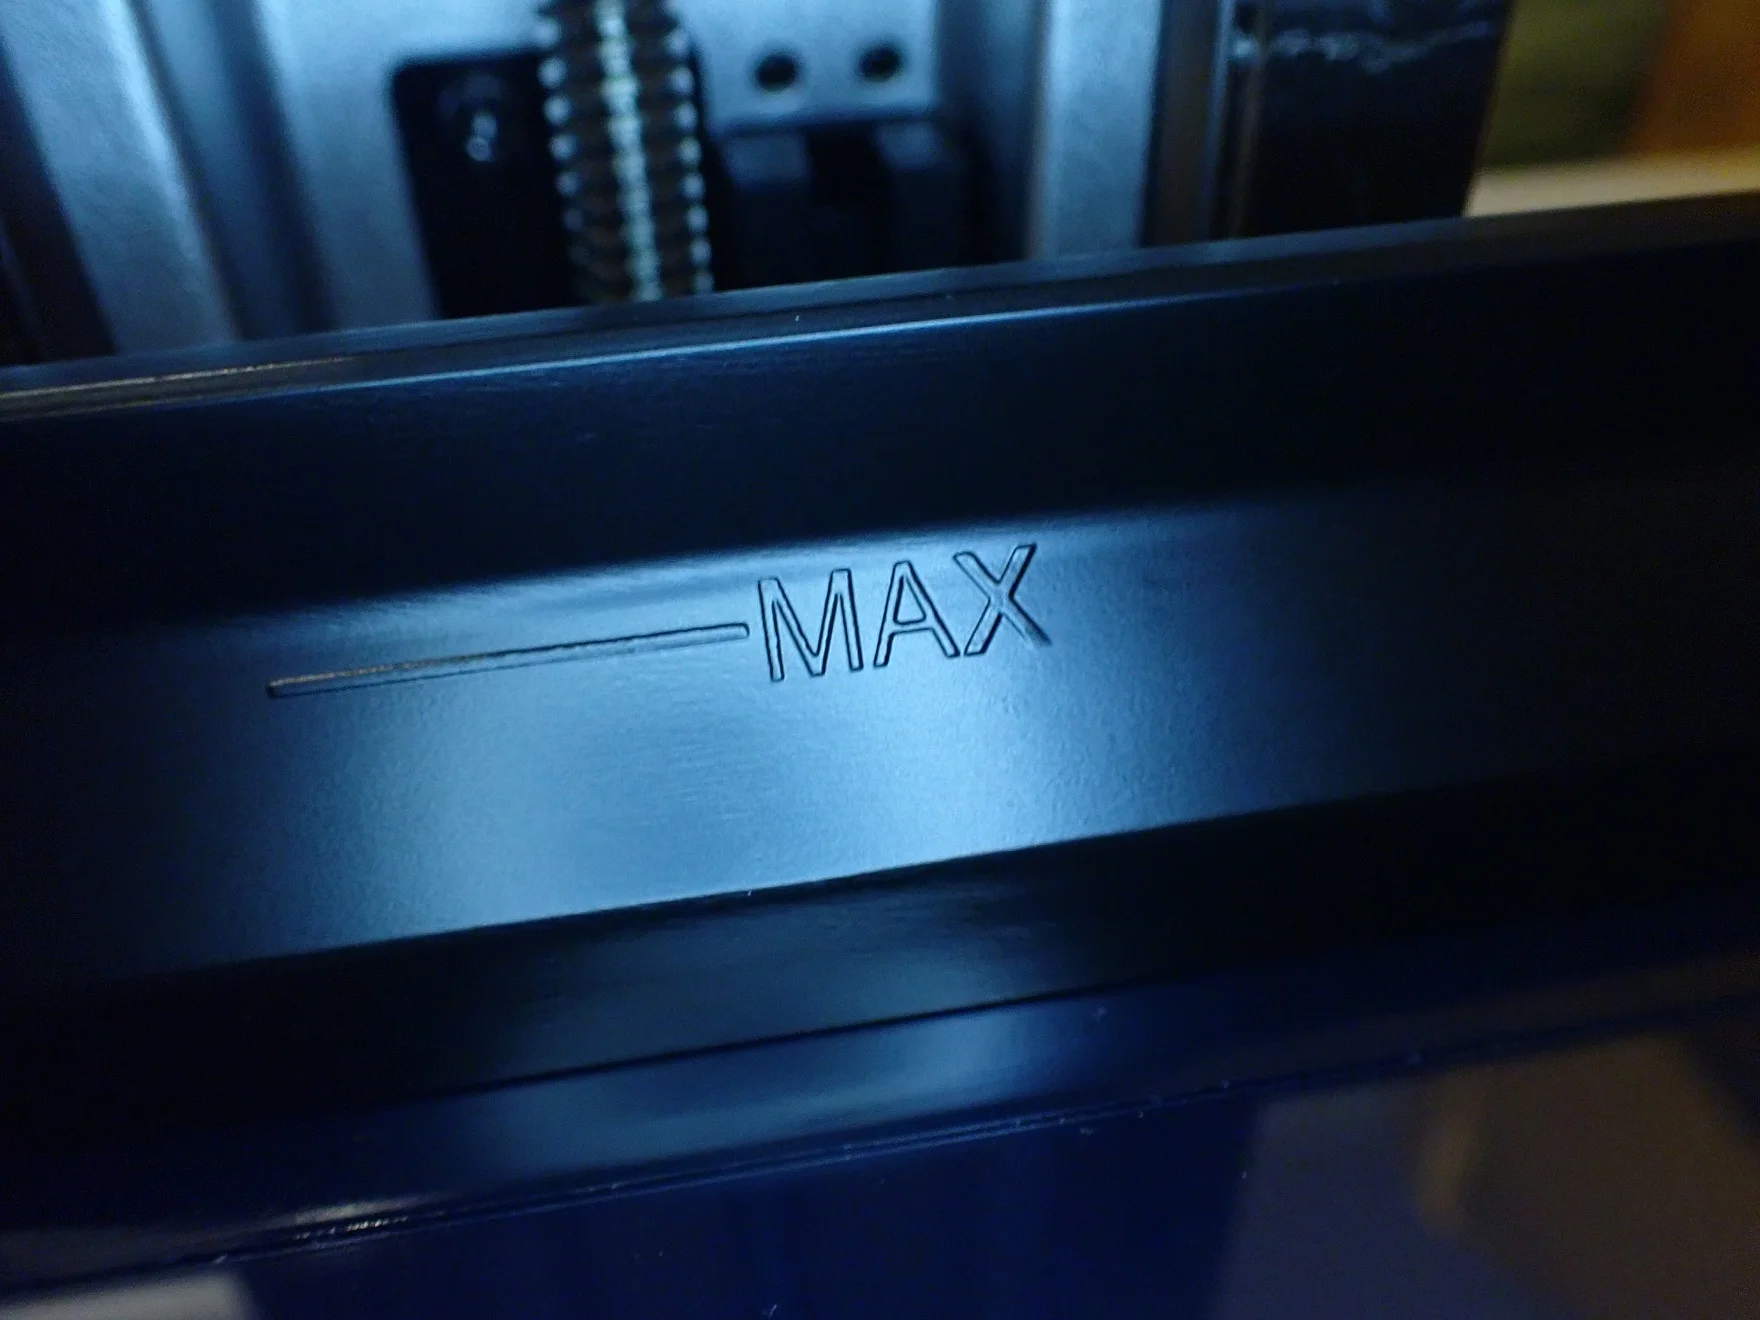
Probably the most boring feature is the maximum fill line of the resin tank. By now it is available on every resin 3D printer, but it is still very important.
If you pour too much liquid resin into the container, it will overflow as soon as the print bed is pressed into it. And you should avoid that at all costs because the resulting mess would be enormous…
Noise Level
> Anycubic Photon Mono X 6K
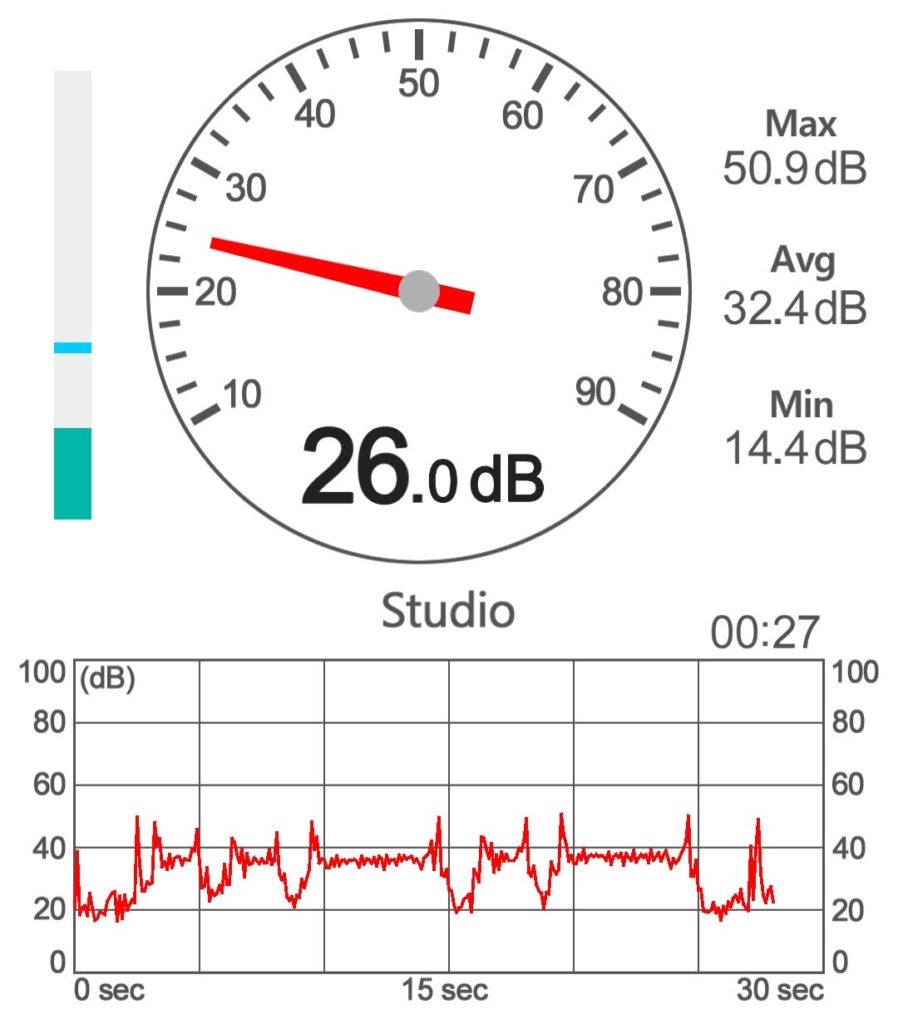
The volume of the Anycubic Photon Mono X 6K averages 38 decibels at a distance of about 1.5 meters. This value is reached as soon as the Z-axis moves. When the Z-axis is not moving, the internal fans are only about 25 decibels loud at this distance.
At this volume, you could theoretically leave the 3D printer running next to you while you concentrate on your work. However, since the fumes from liquid resin are toxic, you should not do this! At its low volume, you won’t hear the printer in the next room.
This noise level is relatively normal for 3D printers, but a few decibels higher than average for resin 3D printers. This is simply because the Anycubic Photon Mono X 6K is much larger than most other resin 3D printers and the large UV screen requires more cooling.
Print Speed
> Anycubic Photon Mono X 6K
Ideal 3D printers print quickly and accurately. With the new monochrome display technology, both are possible. Also, the UV screen on the Anycubic Photon Mono X 6K is very powerful, which meant I had to print a lot of calibration objects.
My standard curing times per layer were far too long for this performance. Even with the Eco Resin from Anycubic*, which normally takes three to four times longer to expose than normal resin, I had to adjust it to 2.4 seconds per layer.
Compared to other resin 3D printers, this is about 2-3 times faster printing speed. Due to the powerful monochrome screen, it reaches print speeds of 60 mm per hour with a layer thickness of 0.05 mm.
In addition to this high print speed, there is also the large print volume of 197 x 122 x 245 mm. If you want to print smaller objects, you can use the Anycubic Photon Mono X 6K to print the object directly multiple times, which multiplies the absolute print speed even more.
Print Quality
> Anycubic Photon Mono X 6K
The Anycubic Photon Mono X 6K can print layer heights from 0.01 – 0.15 mm with an XY resolution of 0.0344 mm (34.4 µm). This means that even the smallest details are precisely represented. In addition, antialiasing can be set via the slicer to further refine the result.
To test the print quality I first printed calibration objects to adjust the exposure time correctly. Then I printed an object with a lot of details (a 1:1 raven skull with runes) and then I printed a large bust to use the print volume more.
Resin Test Matrix
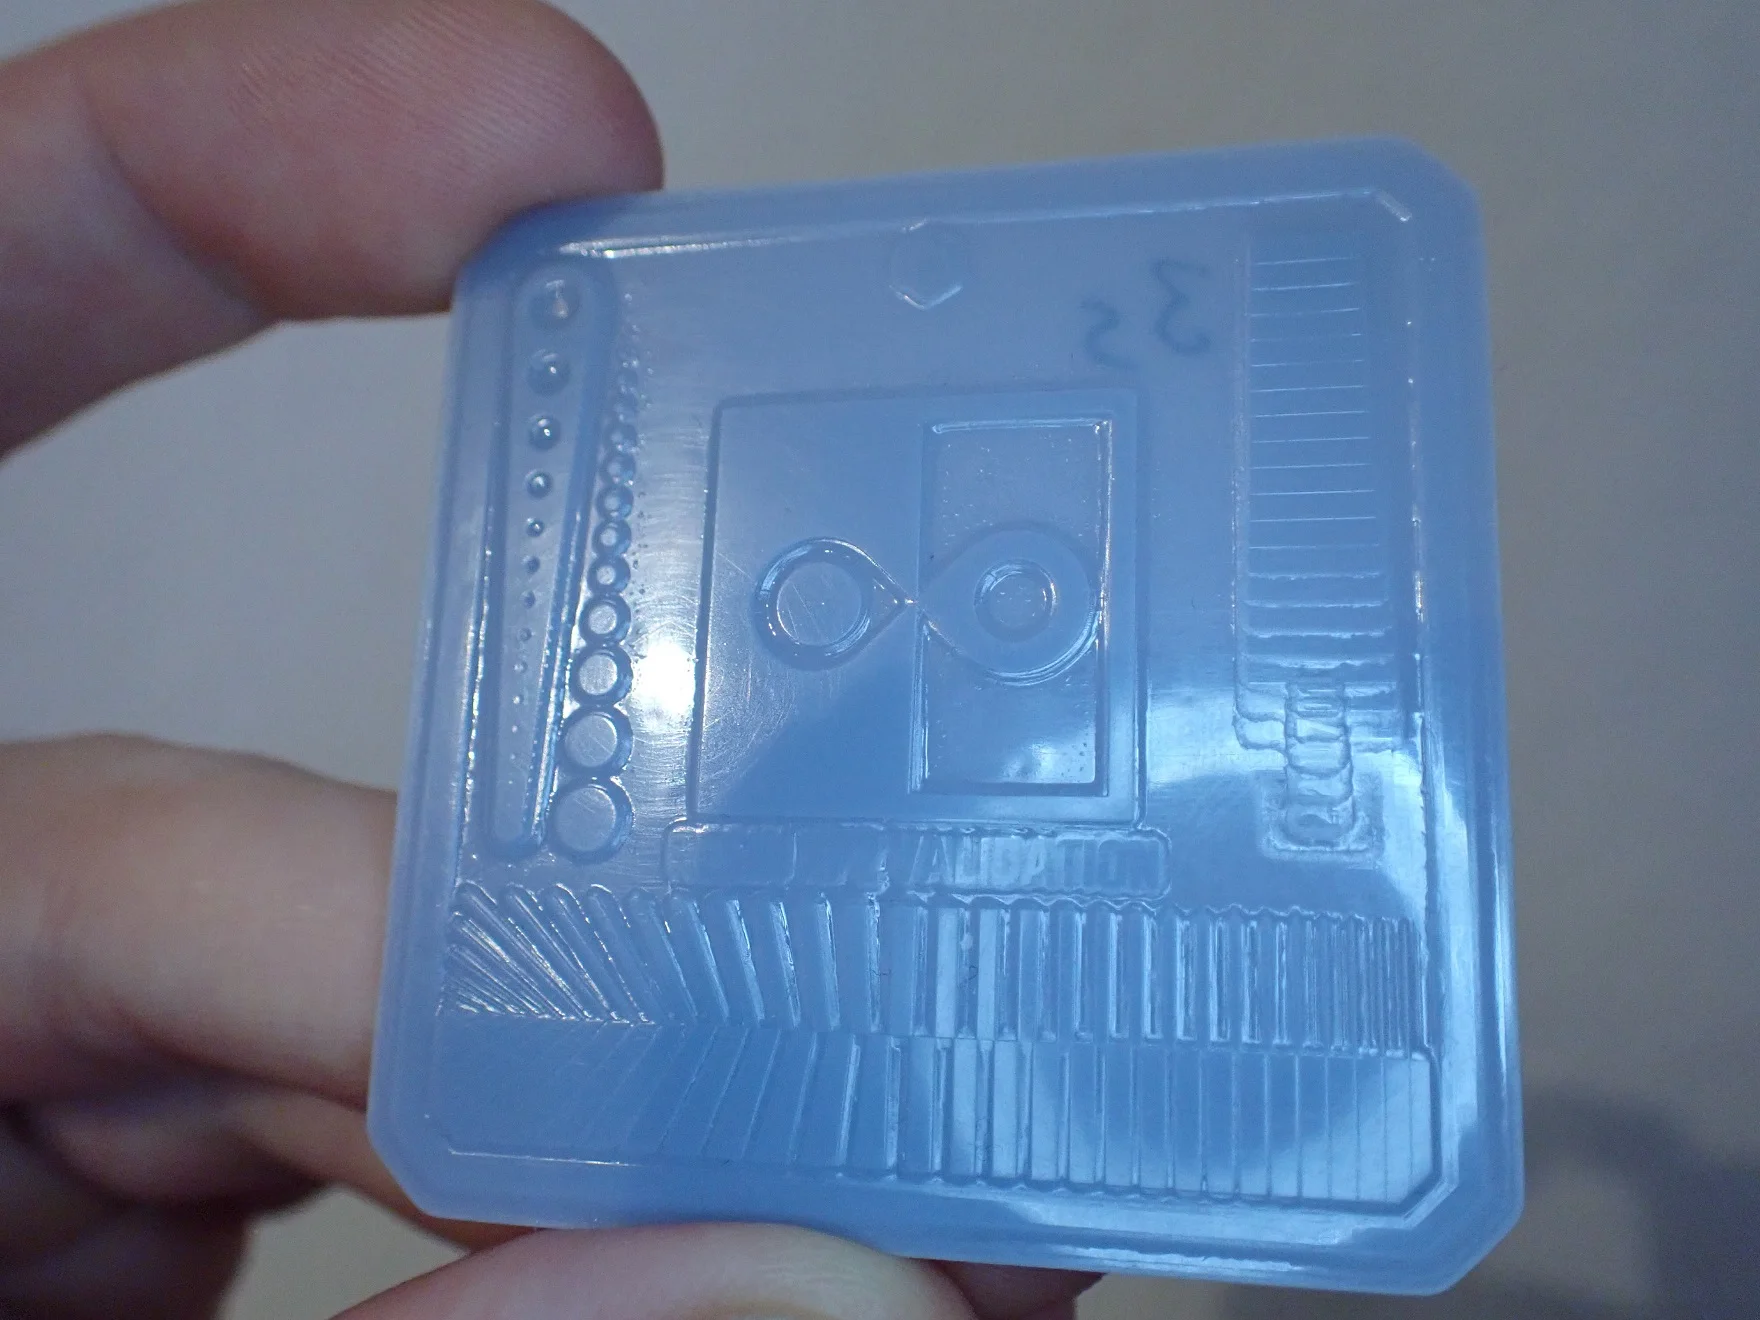
I would recommend you to always print this resin test matrix (link to the model) as the very first step with every resin 3D printer. This also applies if you change the type of resin.
I used the Anycubic Photon Mono X 6K with Eco Resin from Anycubic*. Since this resin usually requires much longer exposure times than normal resin, the calibration was even more important.
With this test matrix, you can see if your exposure time is set too long or too short. Especially the shapes in the middle are a very good indicator. If the two tips just touch, the exposure is set correctly. If the protruding tip is thicker than the other, the exposure is too long. How to use this test matrix correctly is explained very well in this video.
Learn to print perfect details:
Resin 3D Printer Calibration: Step-by-Step Guide
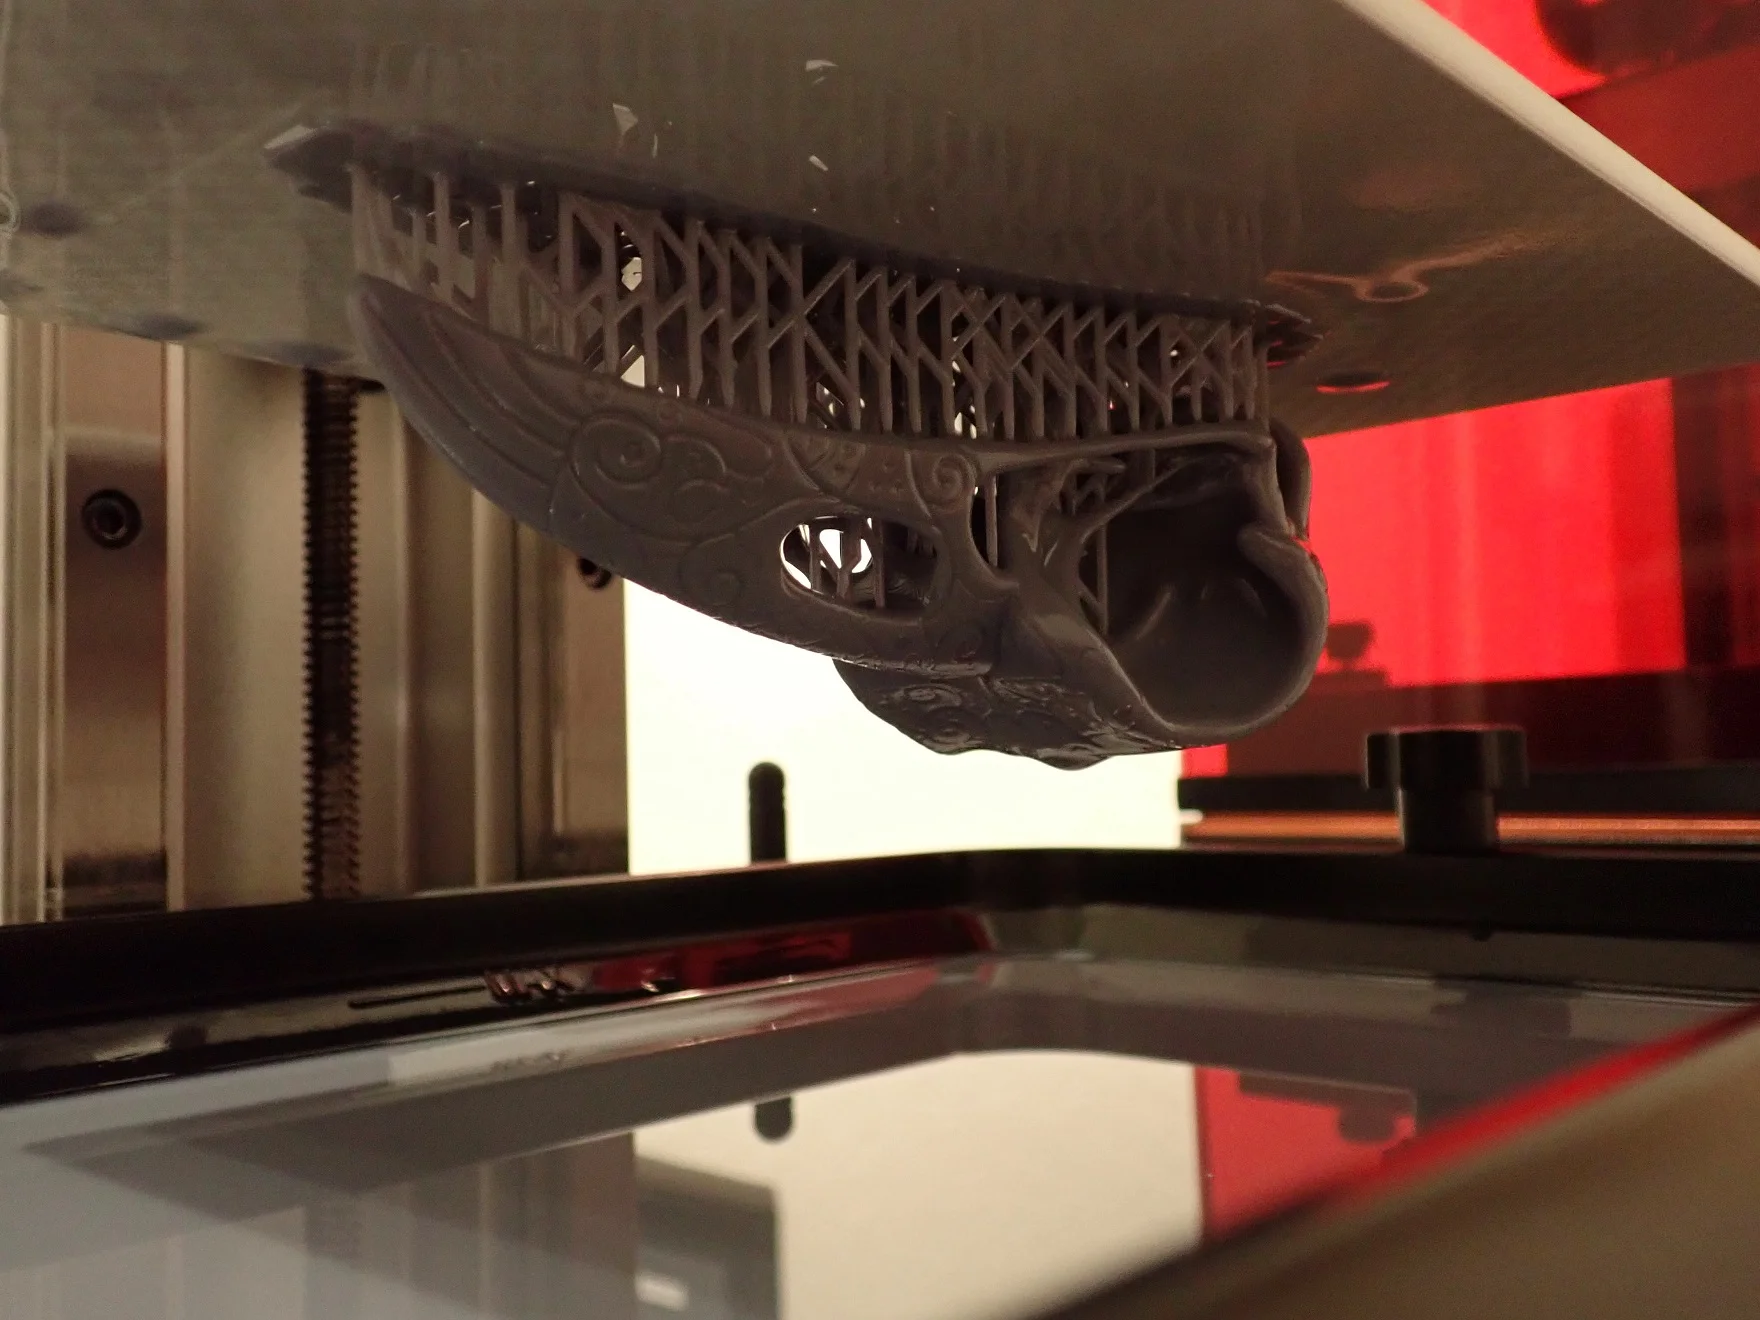
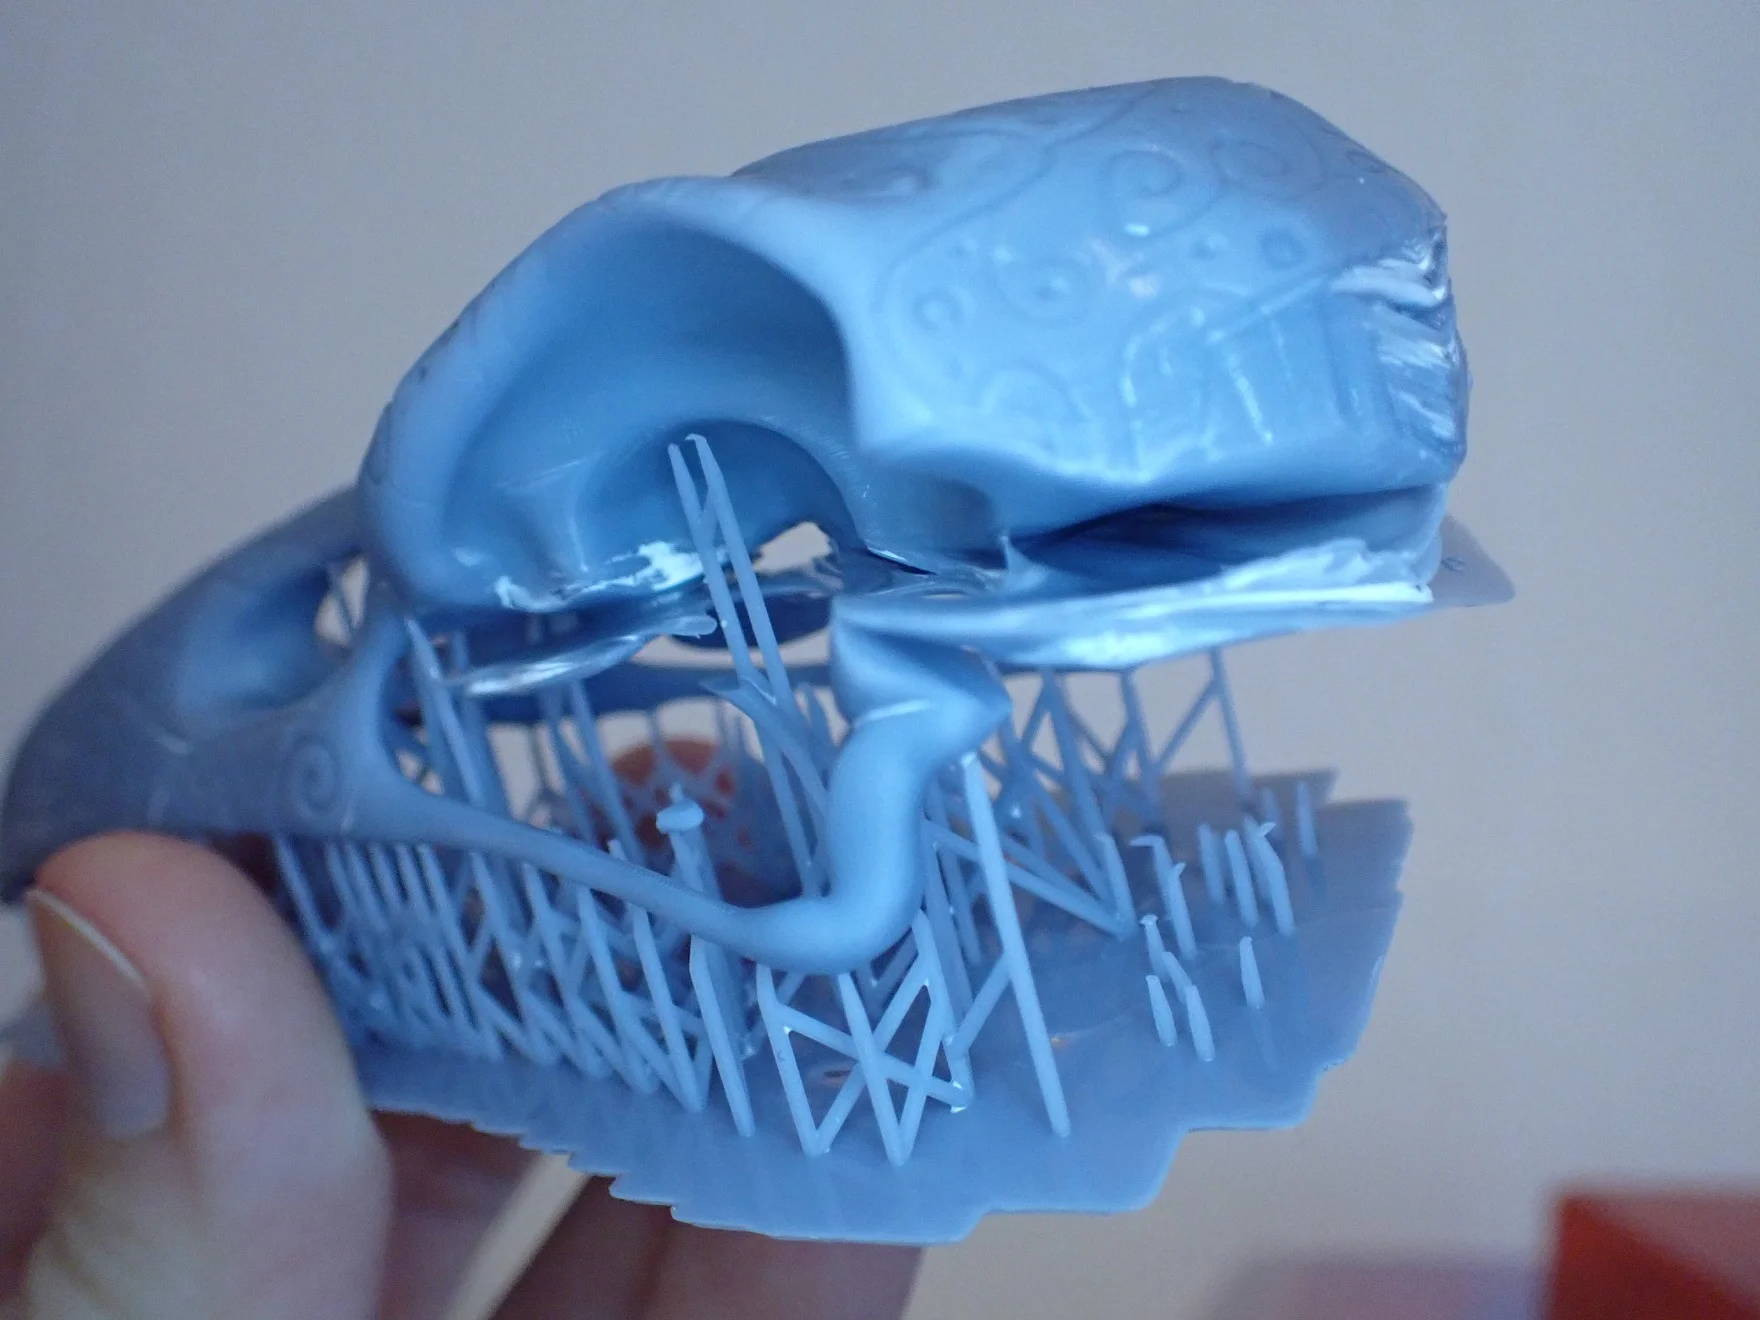
Raven Skull With Runes
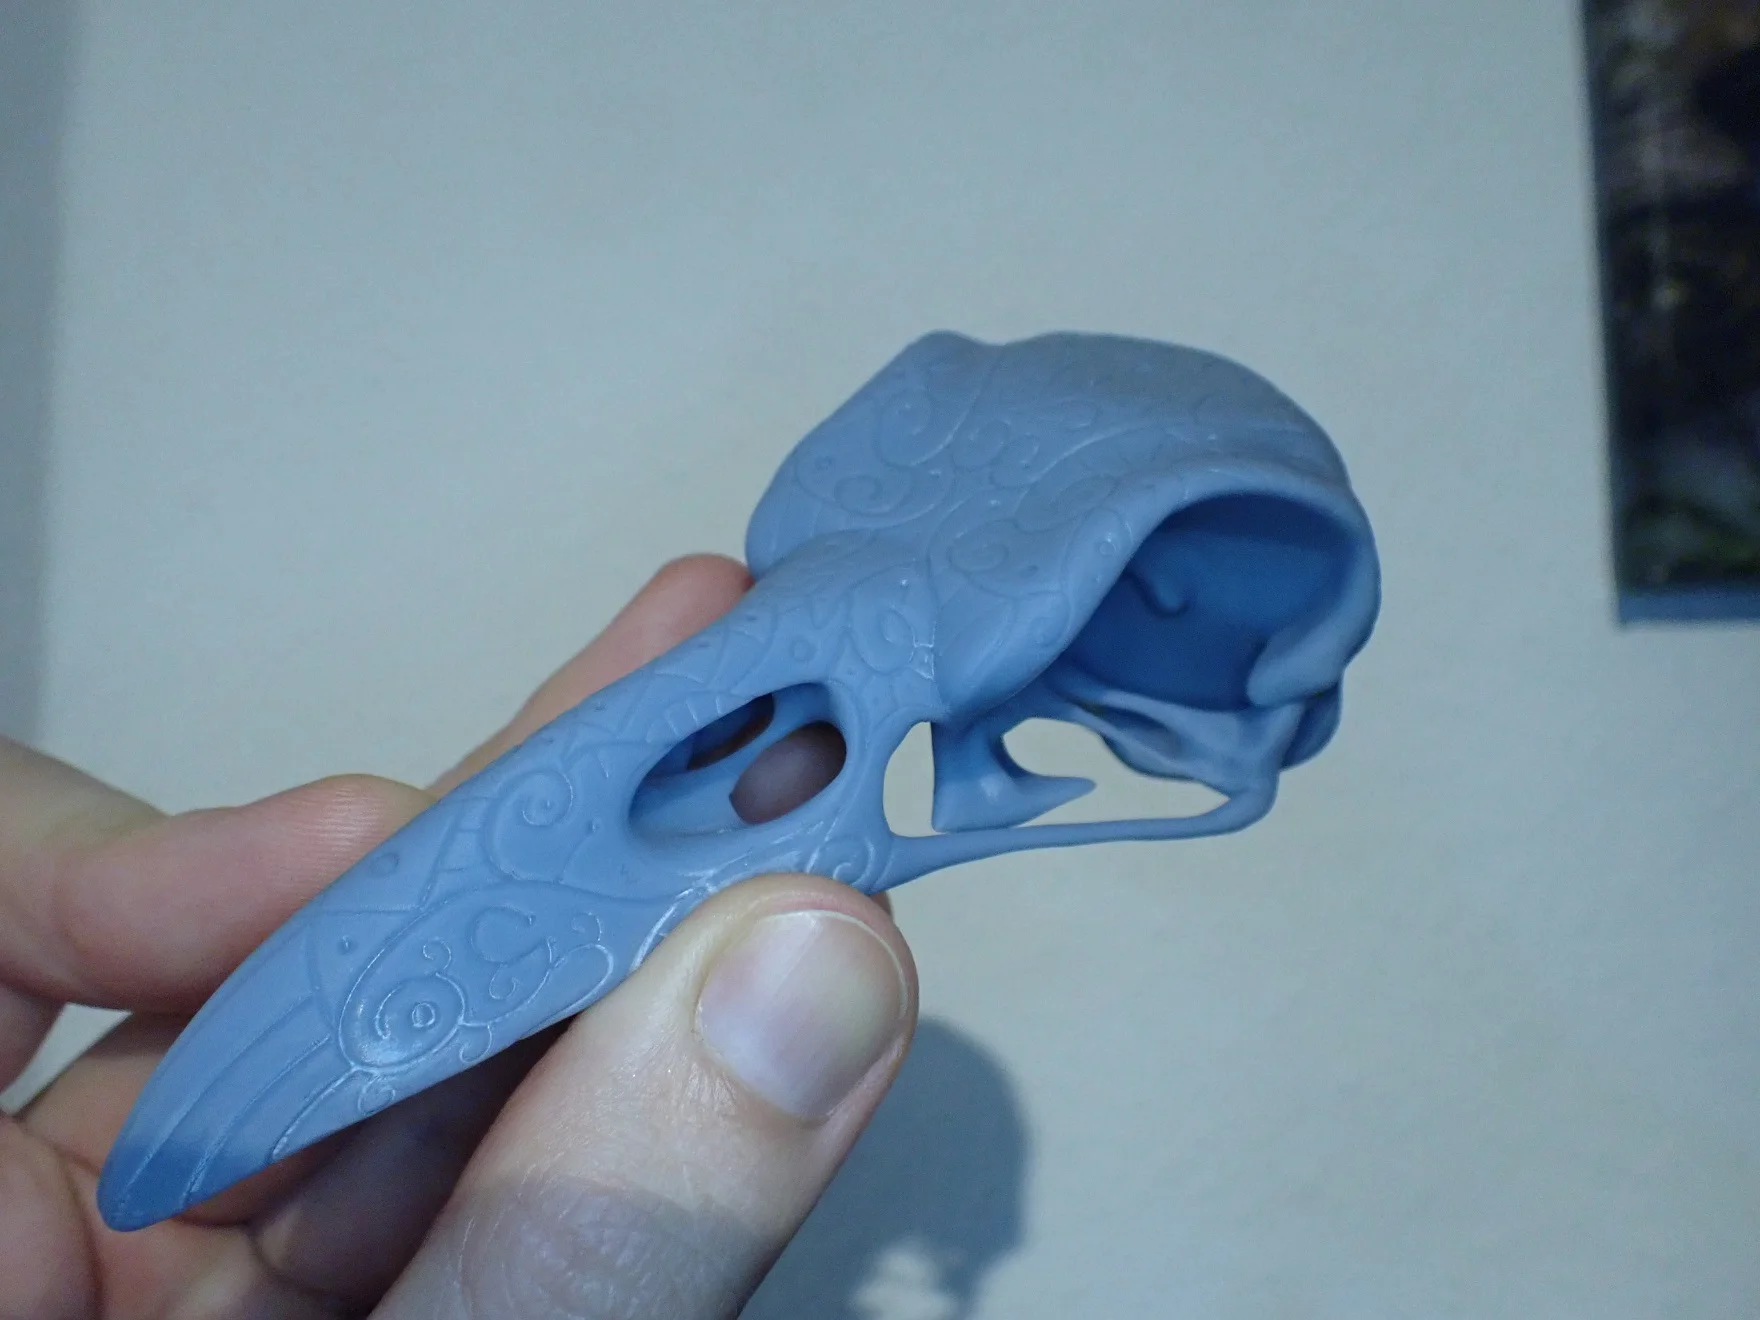
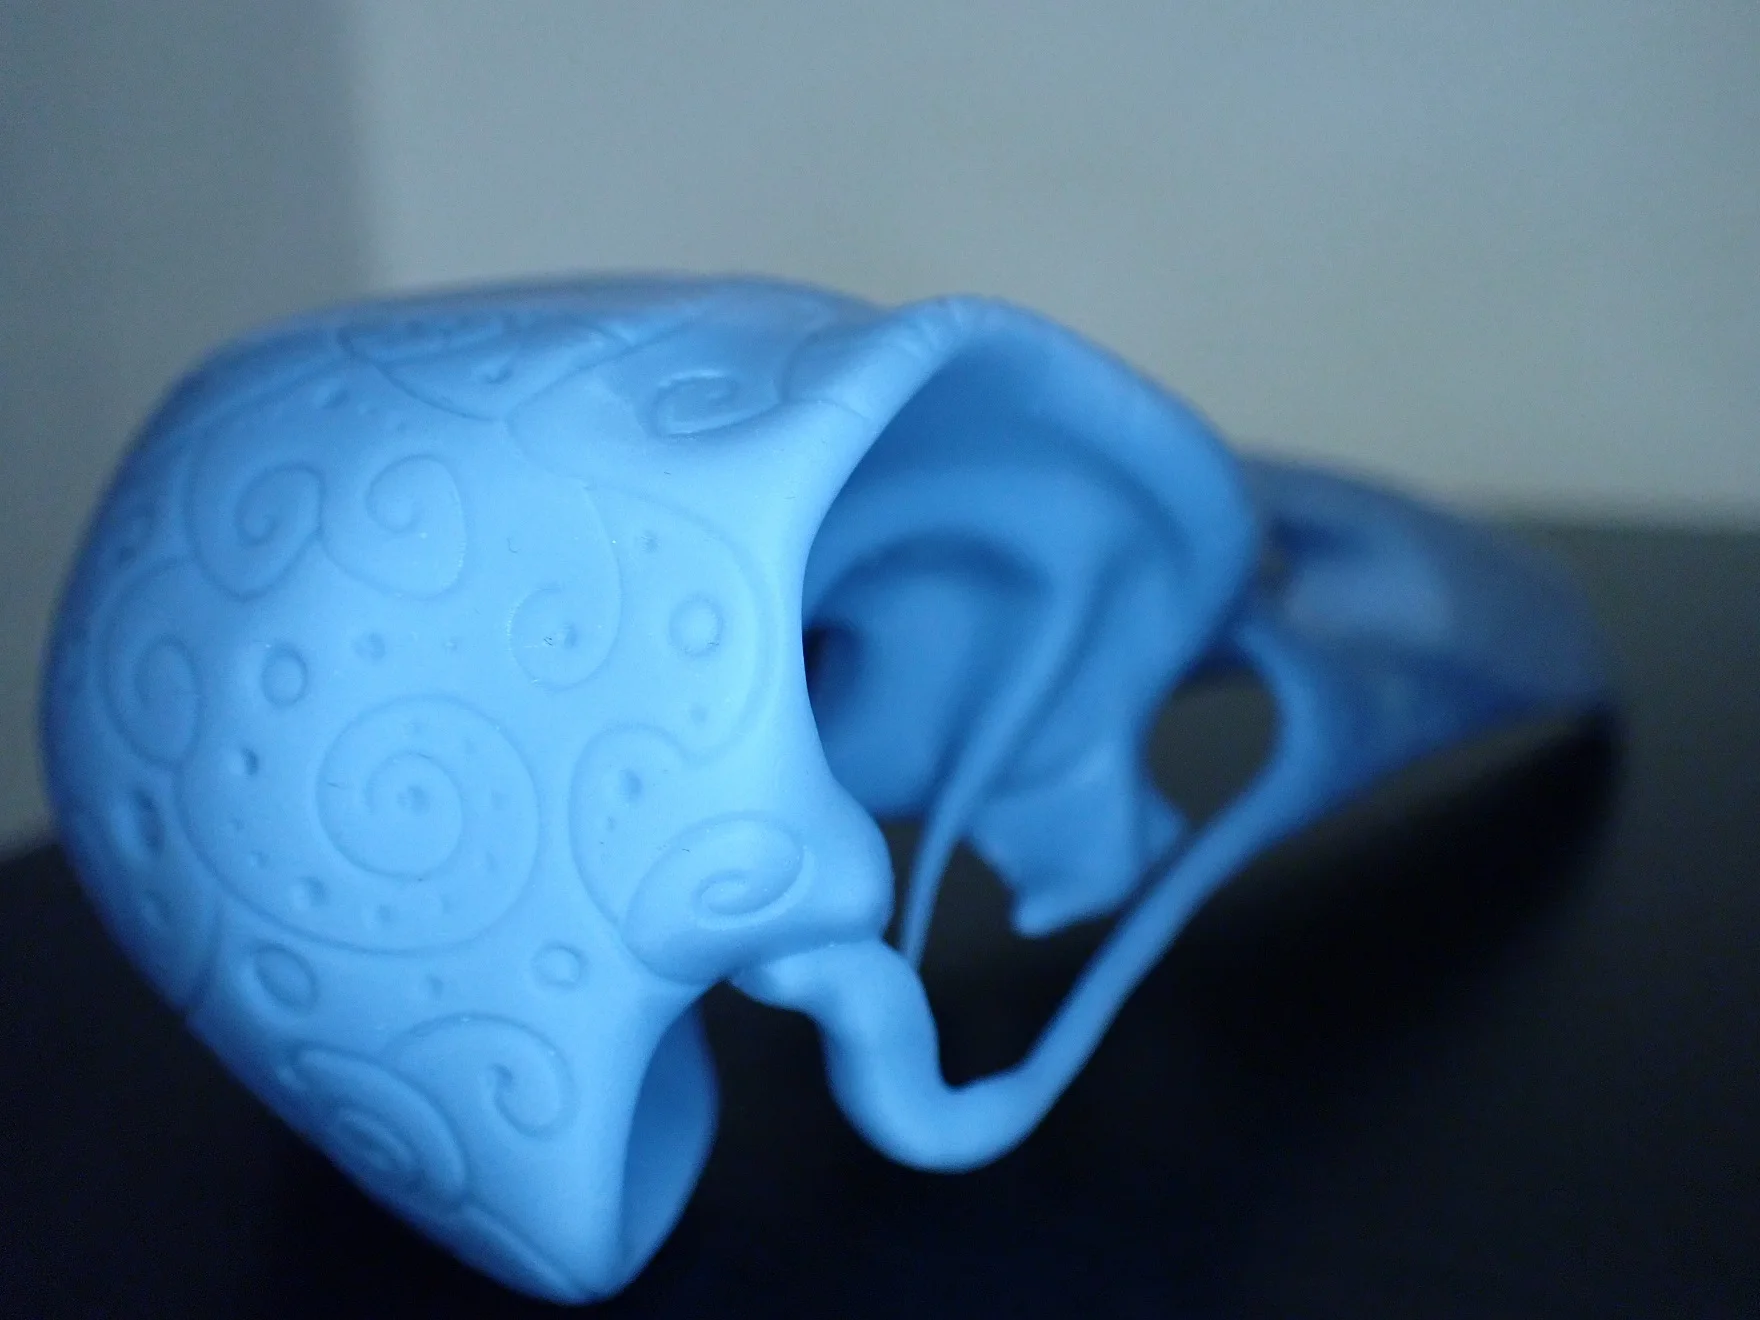
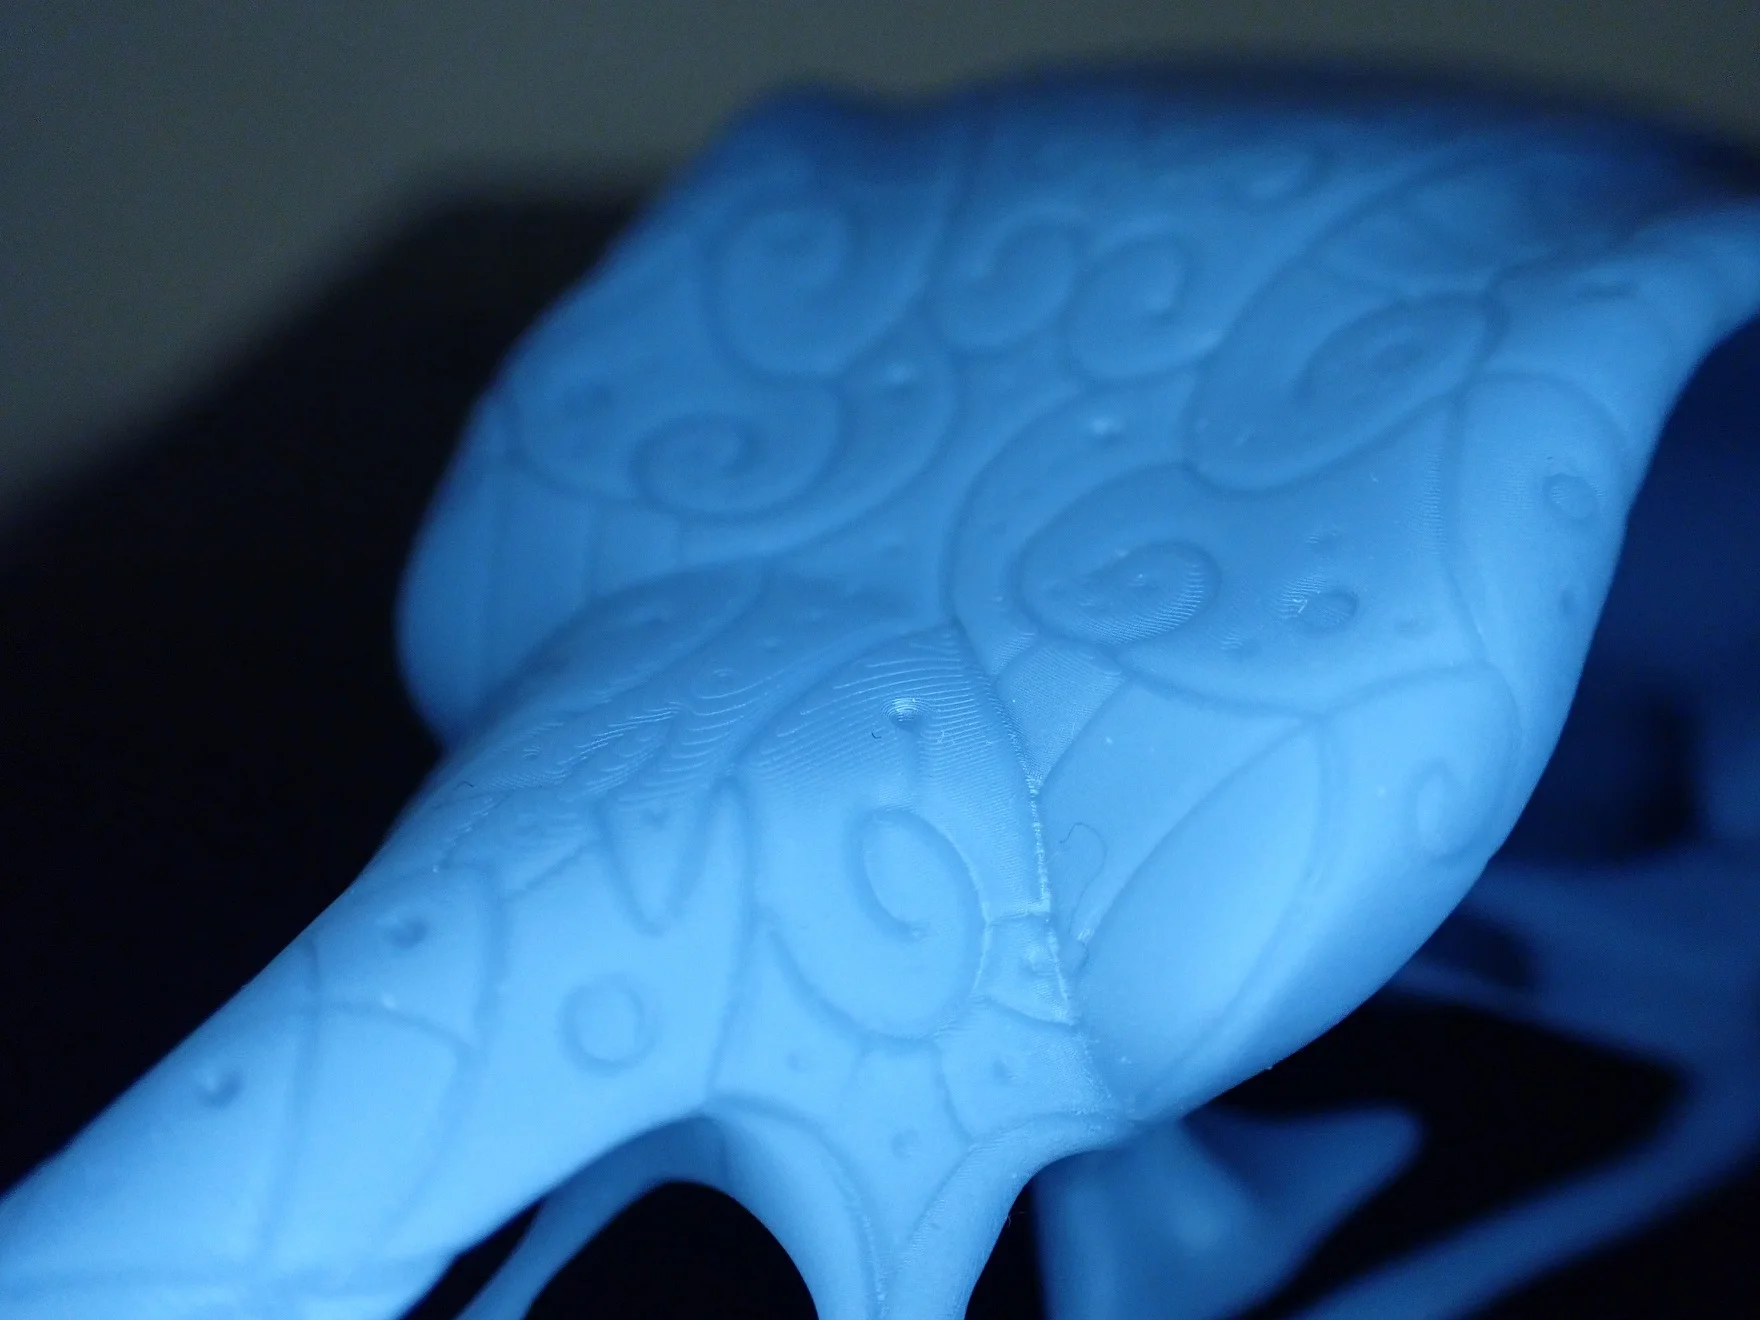
I wanted to print this raven skull (link to Thingiverse) because of its fine details. Not only the surface decorated with runes, but also the filigree bones on the bottom of the skull are a good indicator for the accuracy of the printer.
Due to the orientation of the model I also had a more or less straight surface on the top of the skull. On such straight surfaces that are parallel to the printing direction, you can see the layer height very well.
I printed the raven skull with a layer thickness of 0.05 mm. This layer height can be seen in the Z-direction on this straight surface.
The very high XY resolution means that all other sides of the raven skull are completely smooth and extremely accurate. If I had oriented the skull more reasonable, you would not have been able to see any steps at all. Also, I only worked with 1x antialiasing.
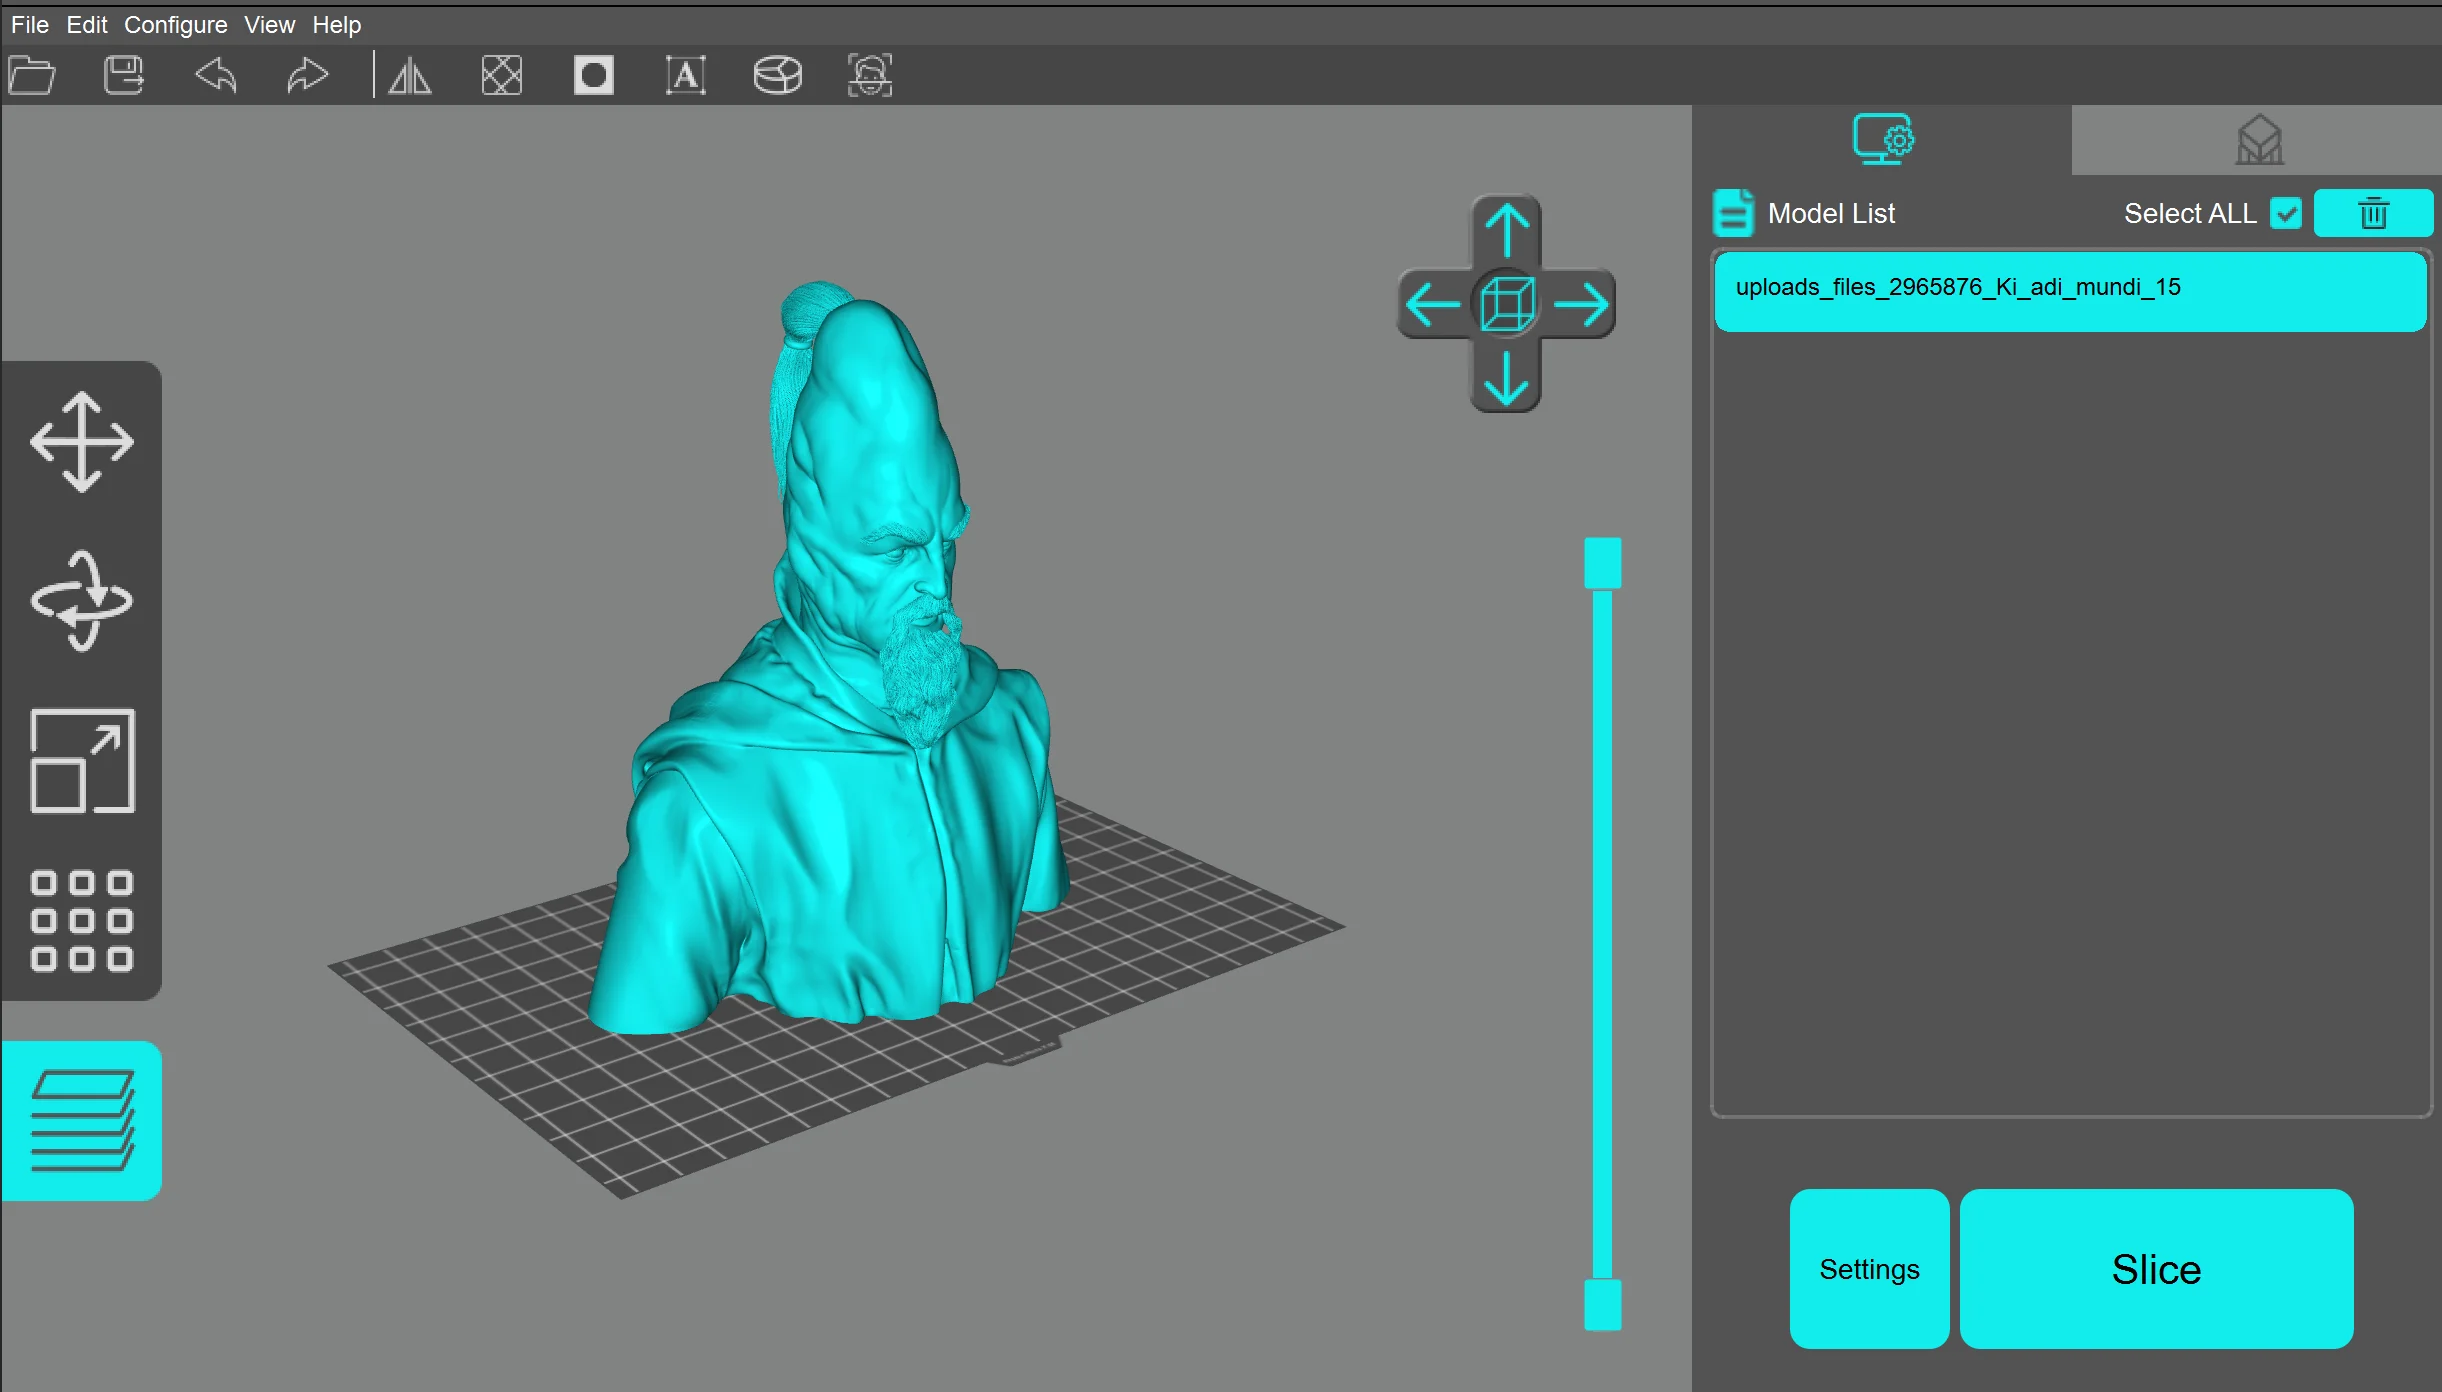
Ki Adi Mundi Bust (Star Wars Jedi)
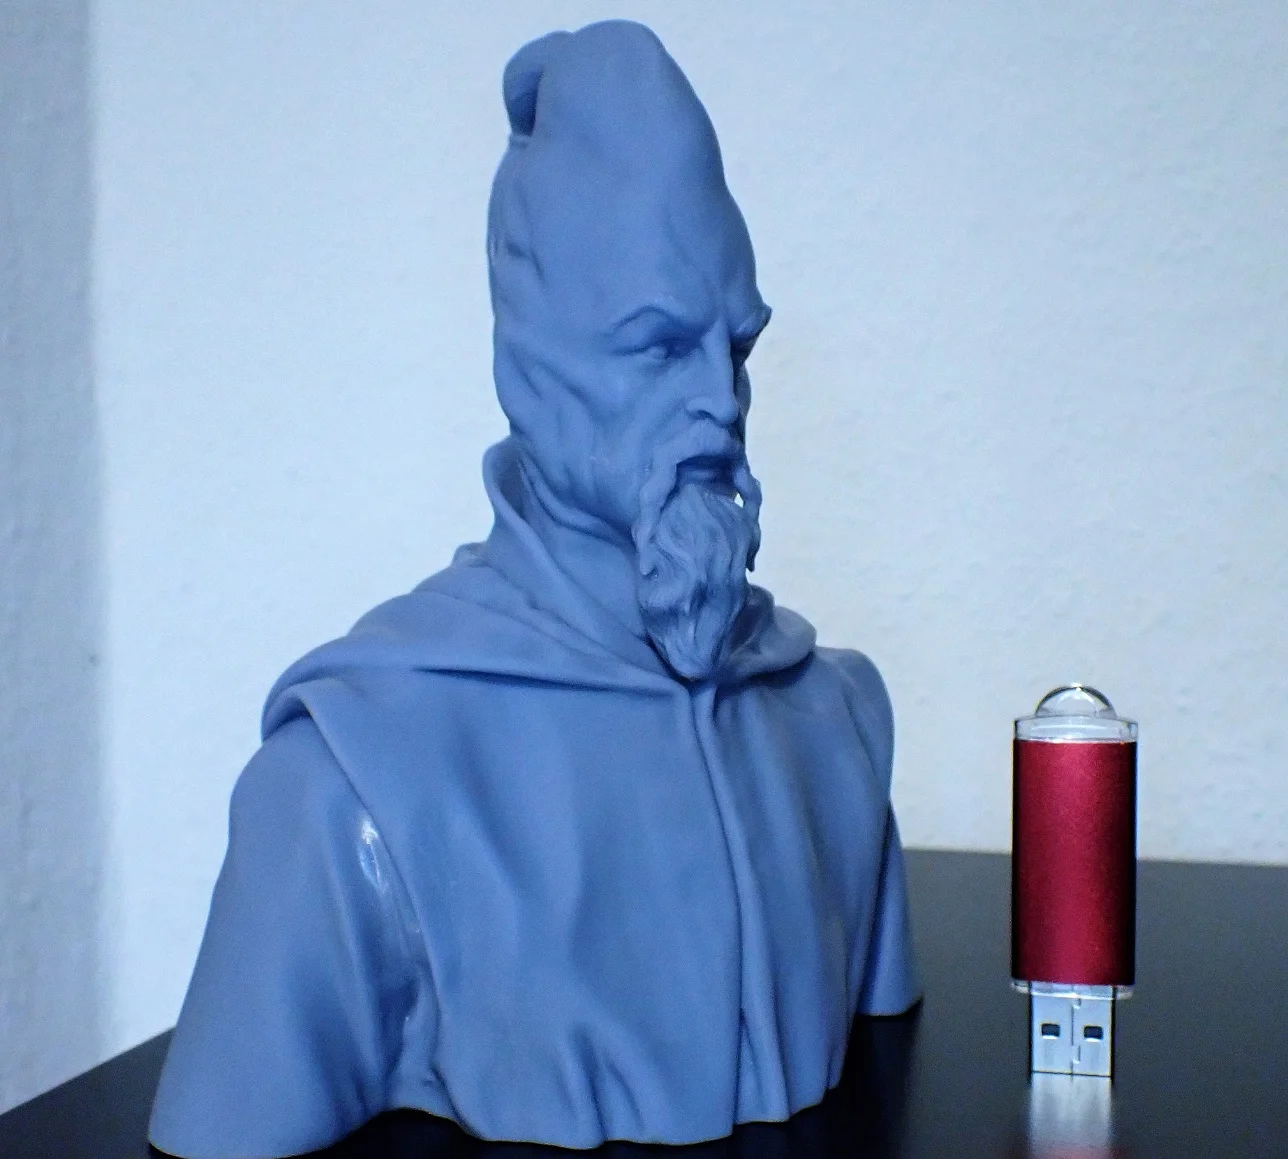
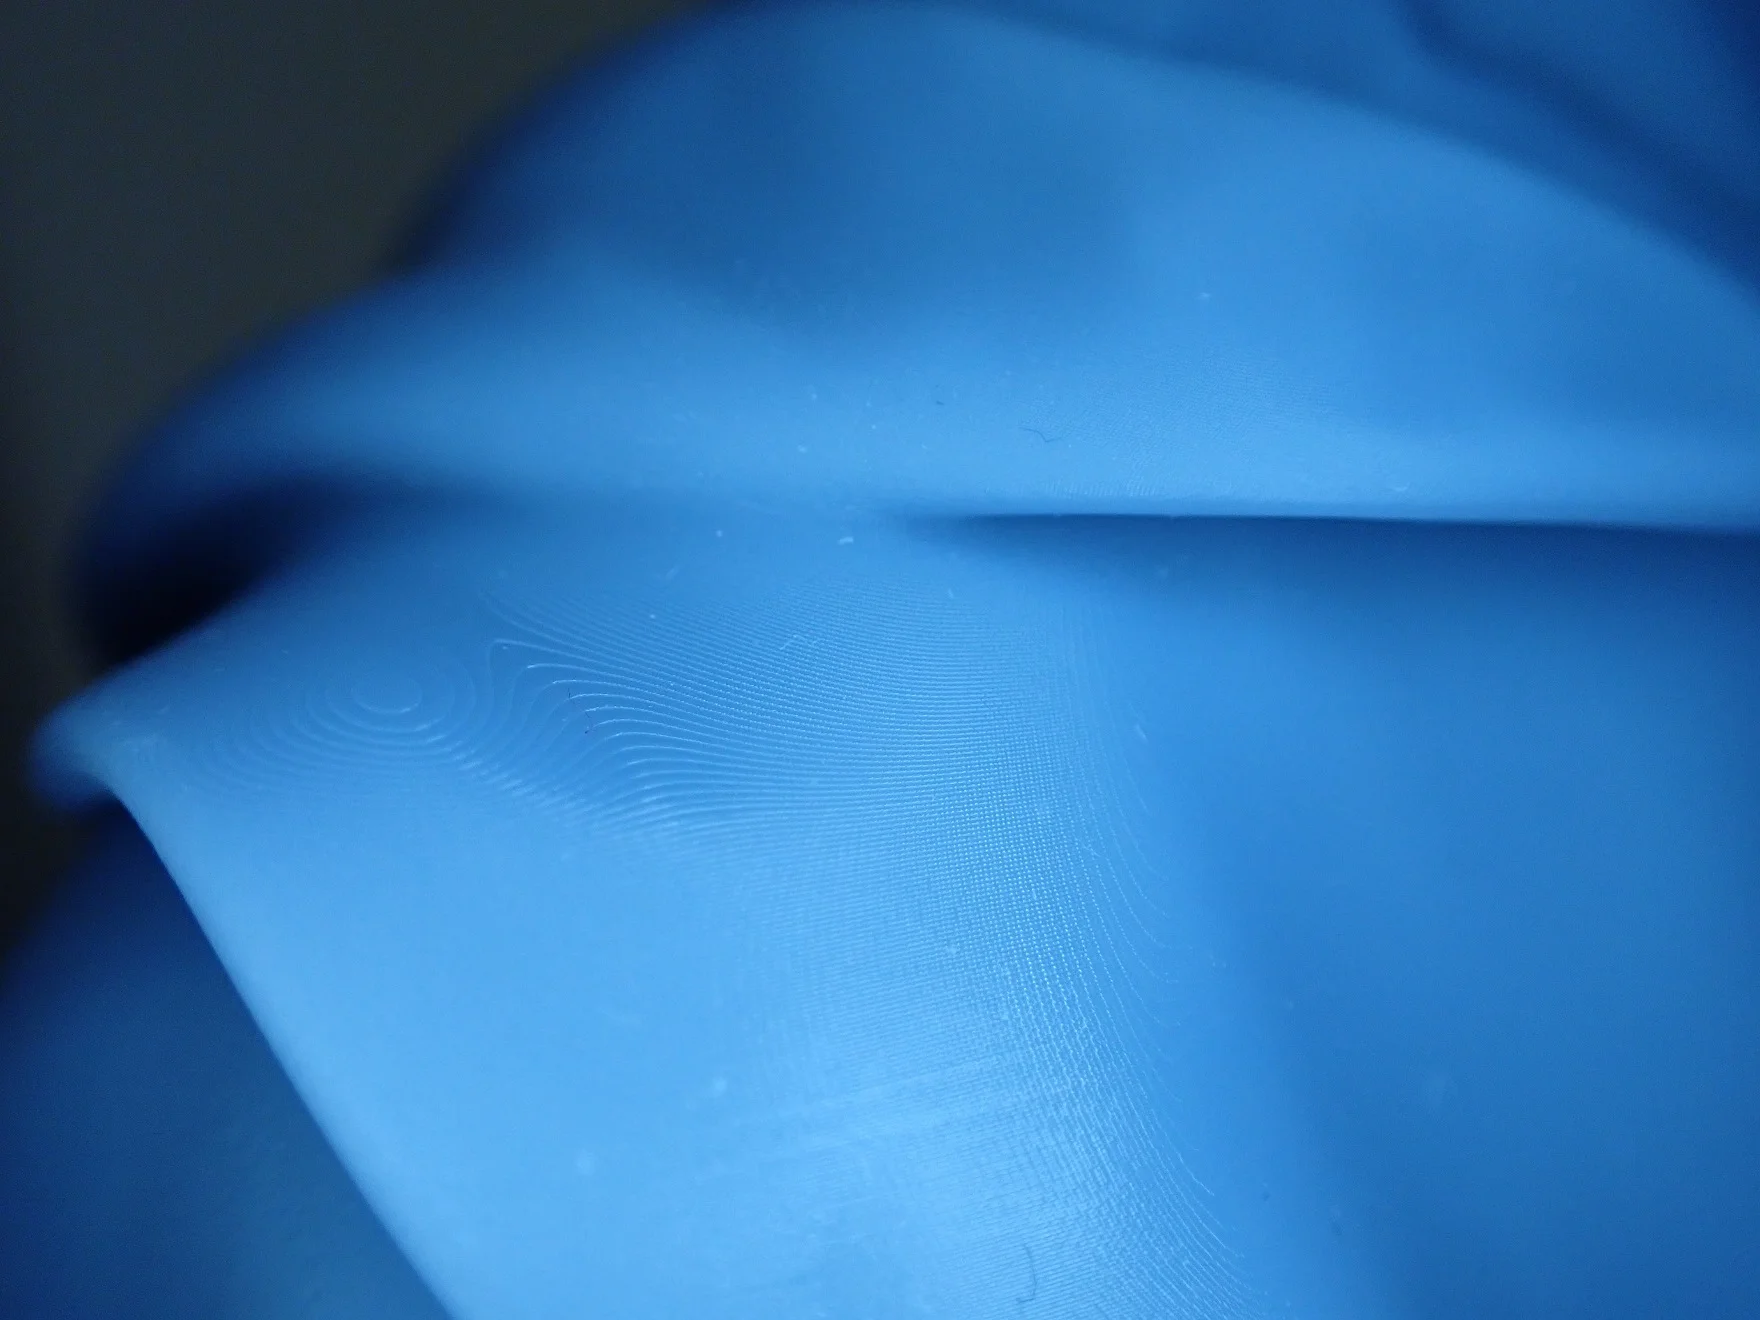
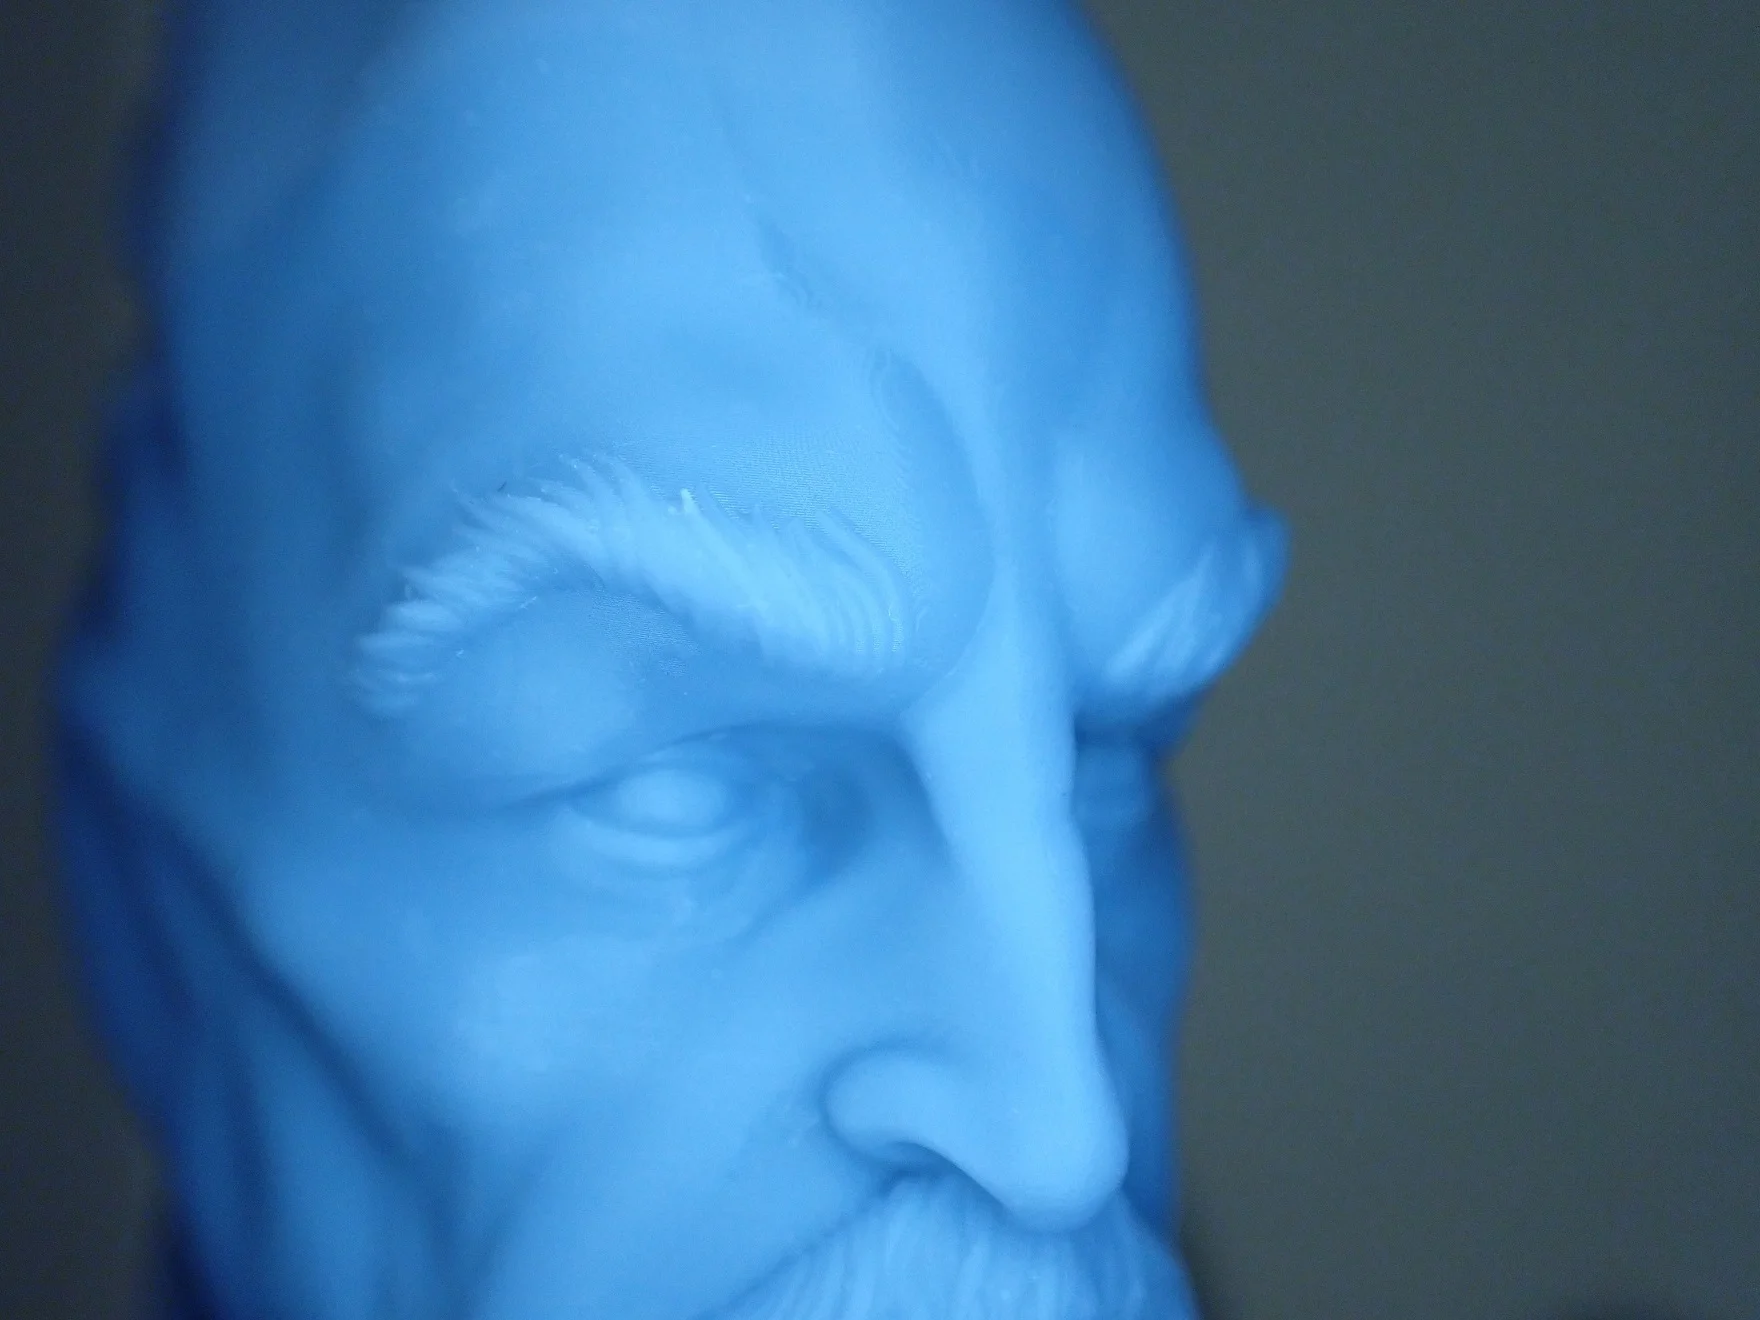
To max out the print volume, I printed a bust of the Jedi Master Ki Adi Mundi (link to model). The model has very fine hair and smooth surfaces – perfect to test the accuracy!
The result was really impressive. The hair has been printed in extreme detail and even individual hairs are visible. There are almost no steps visible and at first glance, you can not distinguish the model from an injection molded model.
In order not to use too much resin for such a large object I hollowed out the model with the Photon Workshop and made two holes at the bottom to be able to rinse it with isopropyl alcohol. Inside I also generated supports automatically.
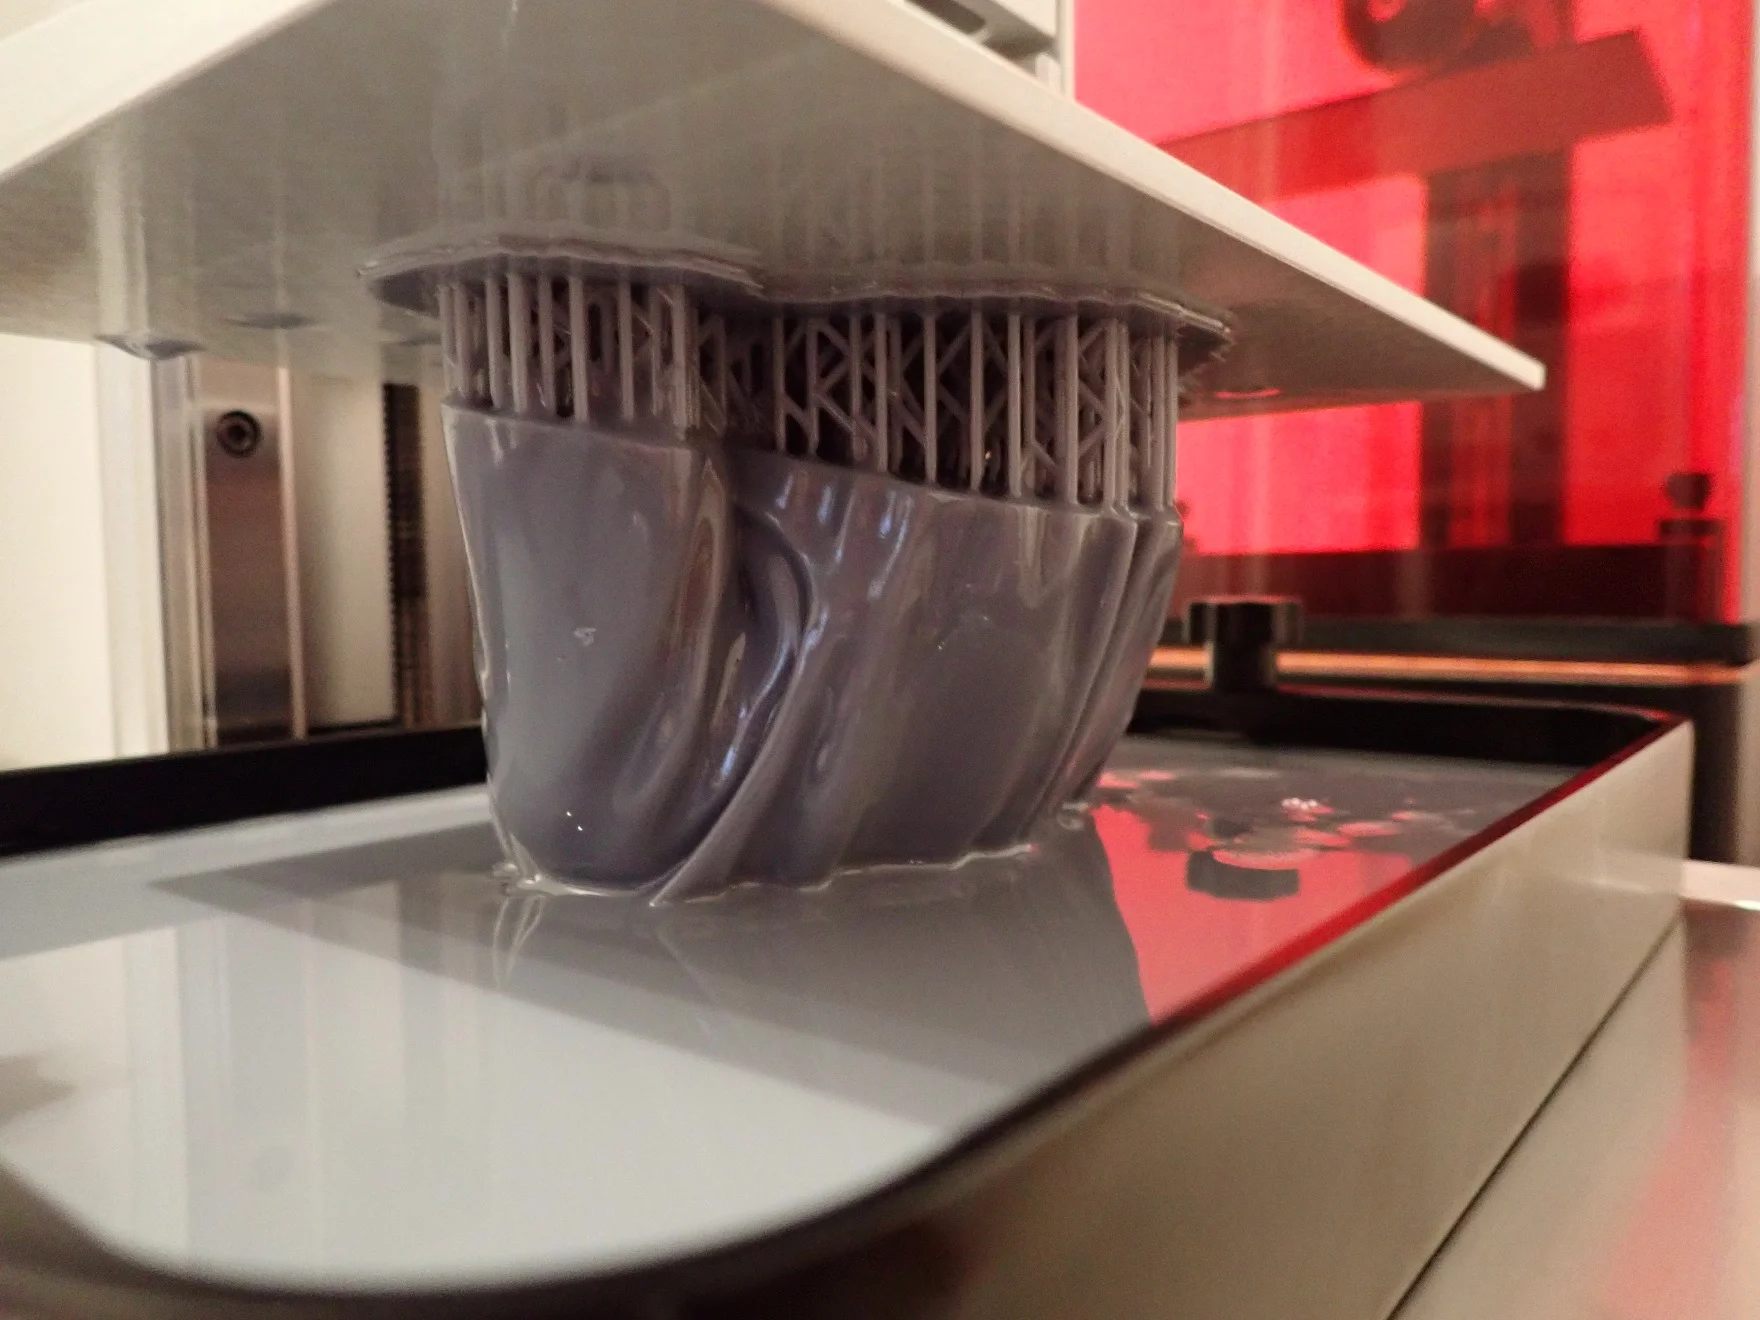
Failed Prints
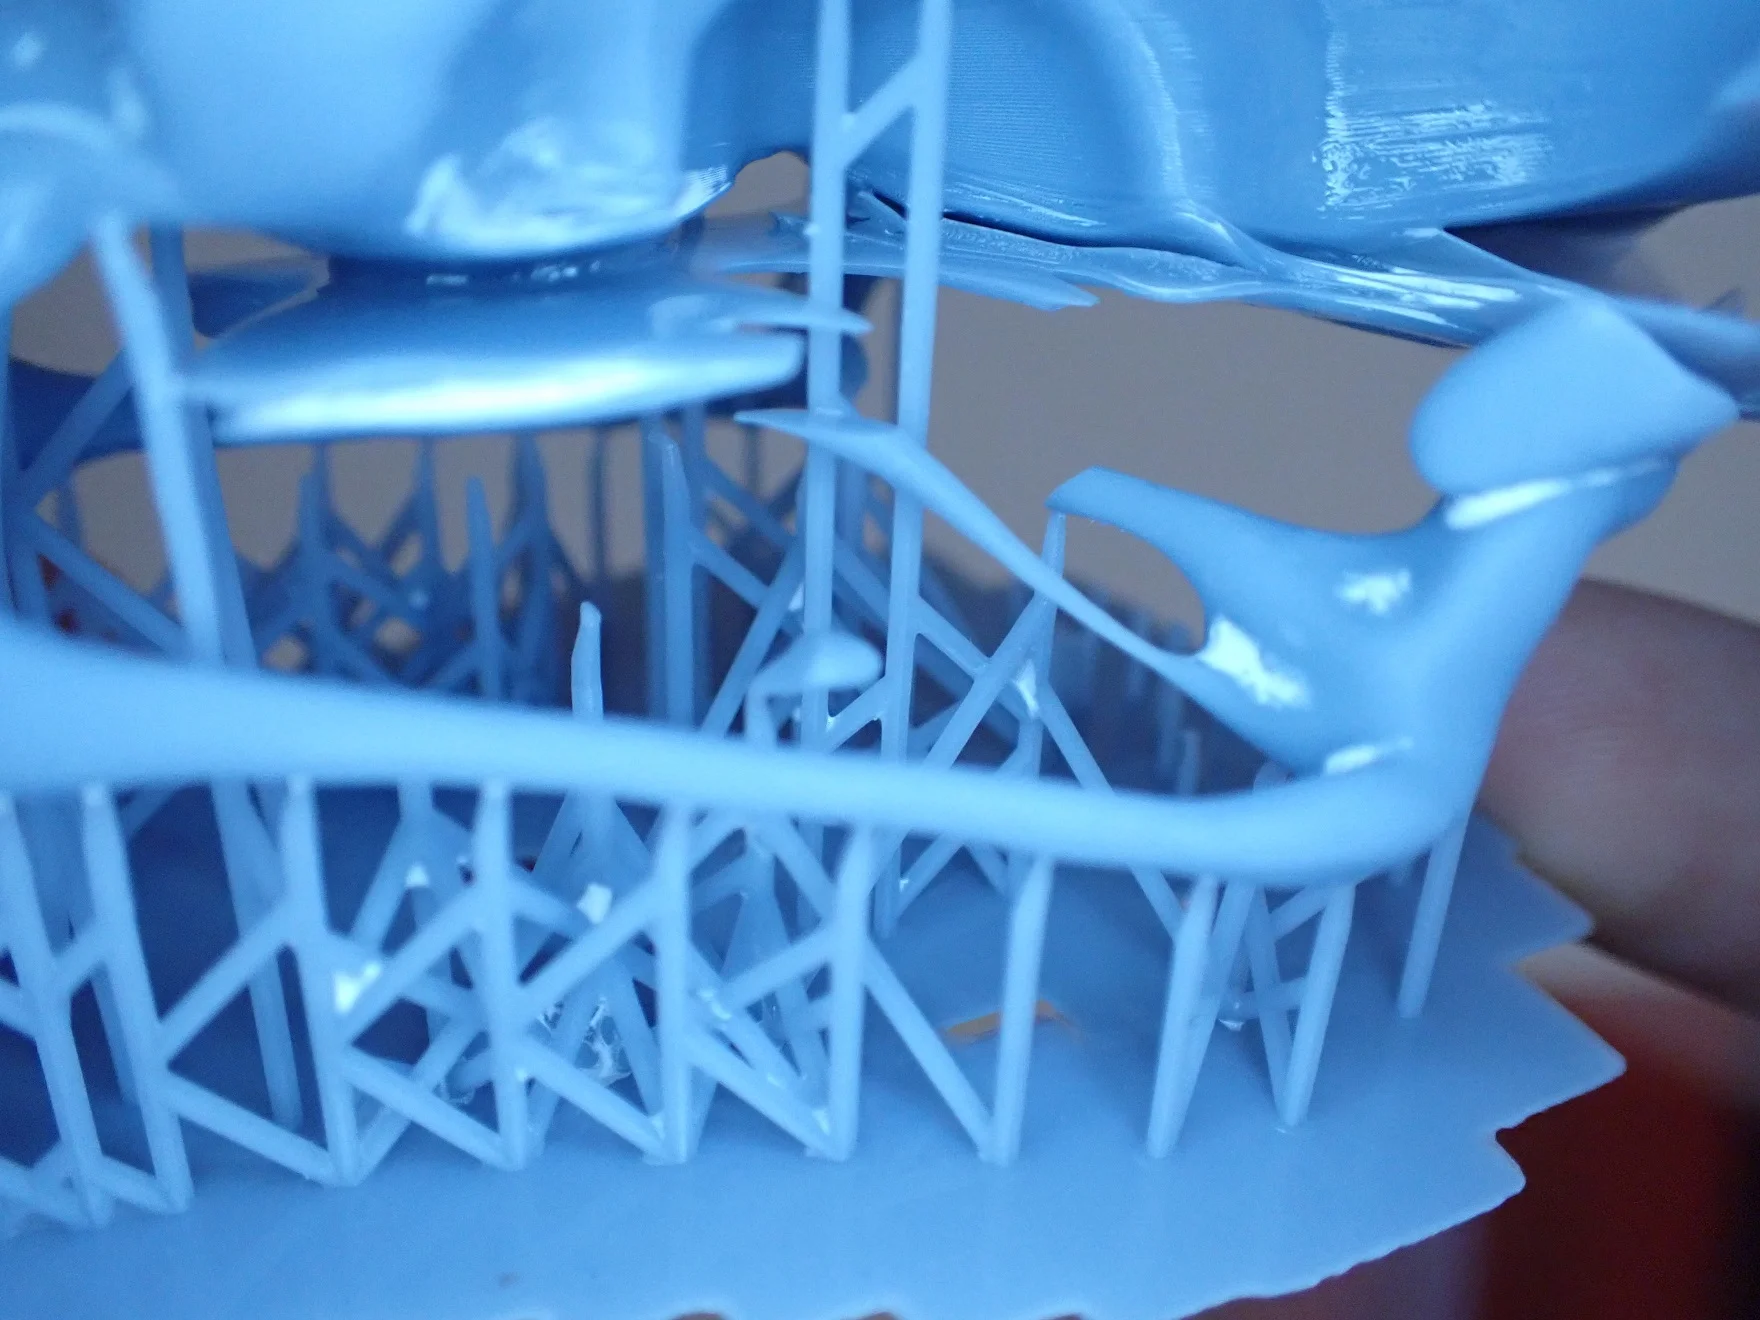
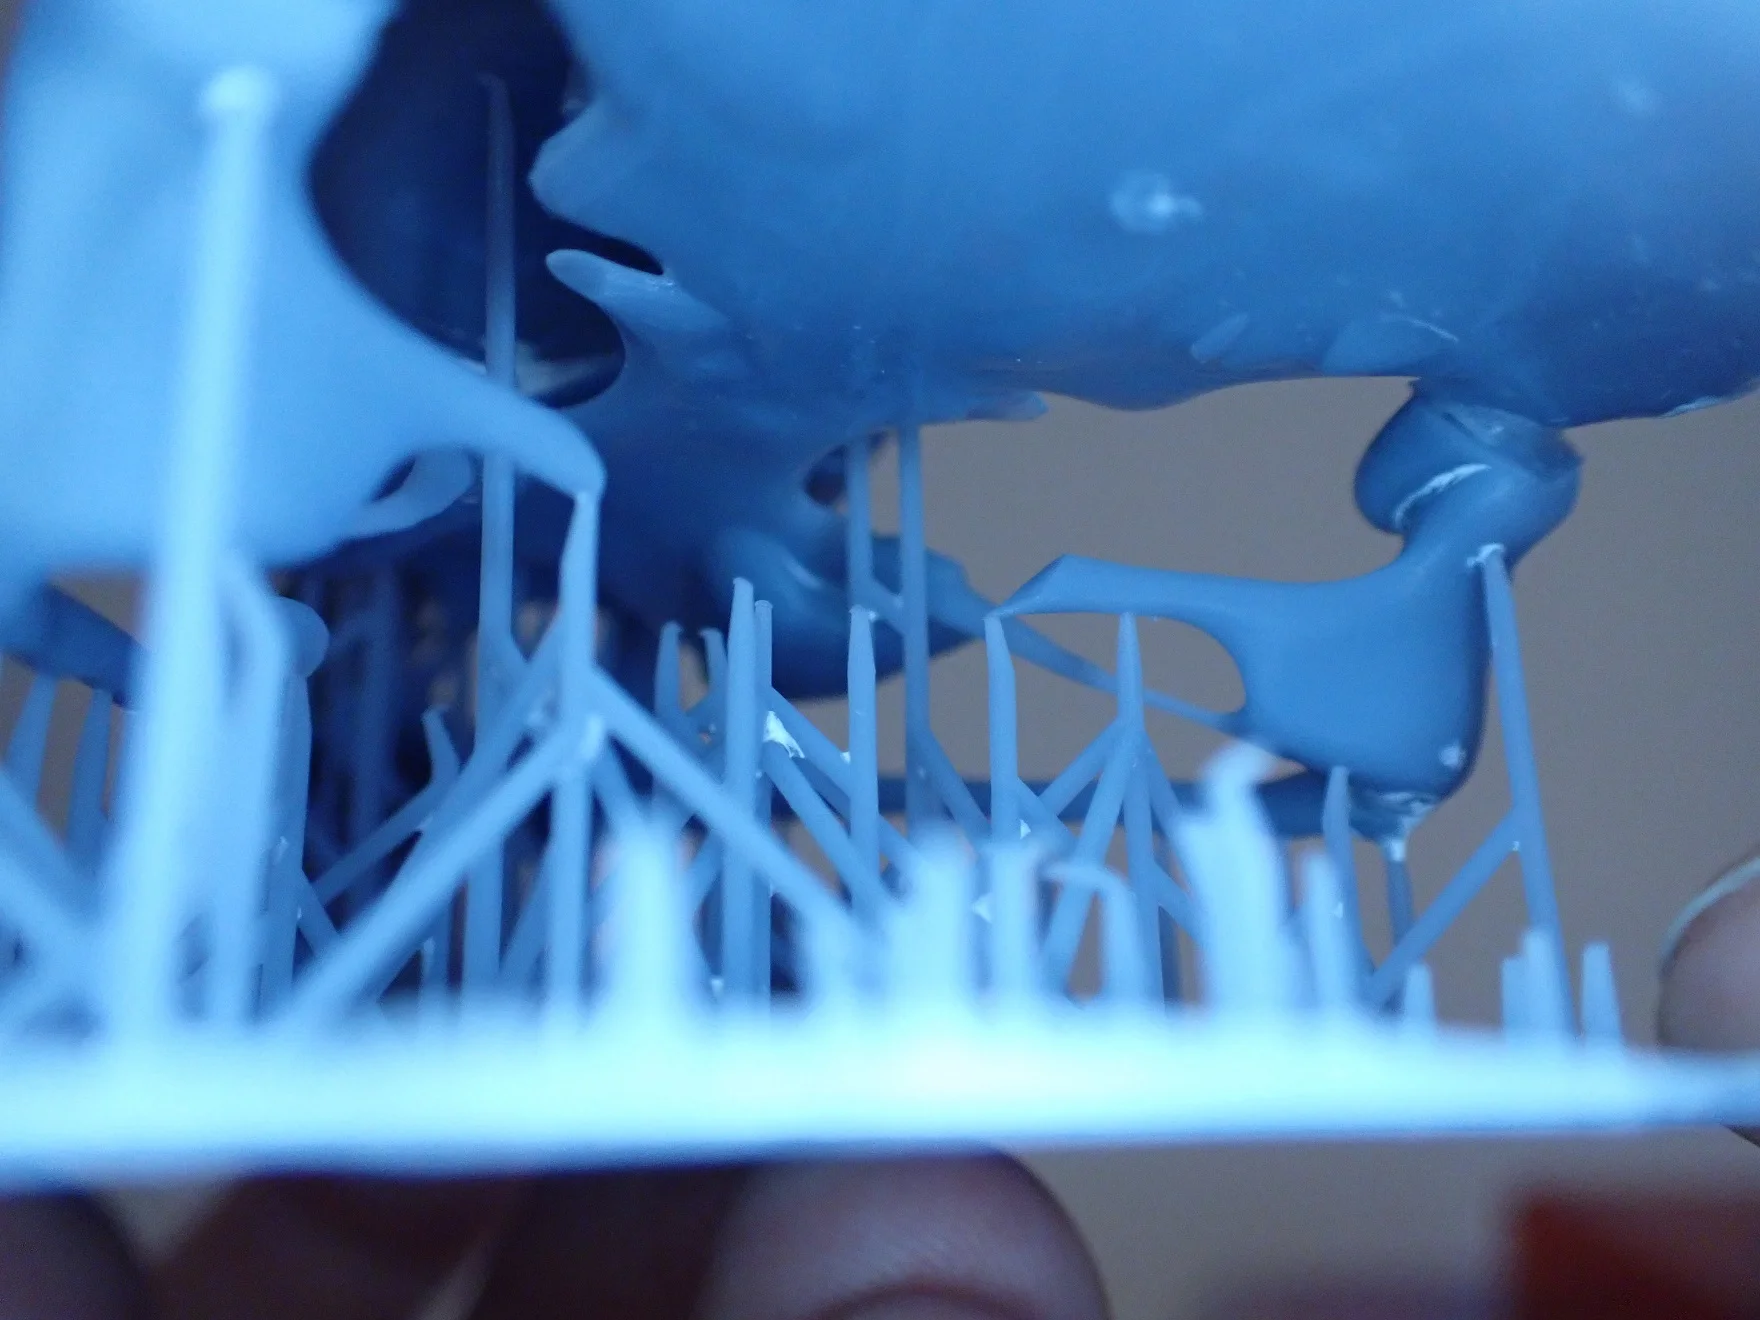
After using the resin test matrix to optimize the exposure times, the first thing I tried to print was the raven skull. I used the standard supports in the Photon Workshop.
However, it turned out that the diameter of the supports is a bit too small for the large printing plate. The thin supports were simply bent over like blades of grass by the resin flow during the up and down movement of the Z-axis.
The strong flow through the displaced volume and the long way from the resin along the printing plate to the outside, the thin supports simply could not withstand. The result is a raven skull that is completely destroyed in the rear, lower area. I was still amazed that the upper area still worked even though there were no supports there. This shows once again that you actually need much less support than you think.
To solve the problem I had the choice between thicker supports and a slower movement speed. But since I didn’t want to miss the advantages of the high print speed, I decided for thicker supports. The additional consumption of resin can be completely neglected with Supports, which made it an easy decision.
Check Price at:
Technical Specifications
> Anycubic Photon Mono X 6K
DEVICE
- Technology: LCD Shadow Masking
- Assembly: Completely pre-assembled
- Size: 270 x 290 x 470 mm
- Weight: 10,75 kg
- Power: 120 W
- Operation: 3.5” colour TFT touch screen
- Print volume: 197 x 122 x 245 mm
- Layer height: 0.01 – 0.15 mm
- XY resolution: 0.0344 mm (34.4 µm)
- Resolution: 5760 x 3600 Pixel
- LCD screen: 9.25”
- Printing speed: max. 60 mm/h
- Print bed leveling: manual + menu support
- Material: 405 nm UV Resin
SOFTWARE
- Slicer: Anycubic Photon Workshop
- Operating Systems: Windows, macOS
- Connectivity: USB, WiFi, App
- File format: STL
Disclosure: This website is the property of Martin Lütkemeyer and is operated by Martin Lütkemeyer. Martin Lütkemeyer is a member of the Amazon Services LLC and other Affiliate Programs. These are affiliate advertising programs designed to enable websites to earn advertising revenue through advertising and linking to Amazon.com and others. Links marked with * are affiliate links.
