
- Wet Filament: Prevention, Symptoms & Drying - July 18, 2024
- Sovol SV08 – Best PrusaSlicer Settings & Profile - June 26, 2024
- Sovol SV08 – Best Orca Slicer Settings & Profile - June 26, 2024
Disclosure: Links marked with * are Affiliate Links. I earn from qualifying purchases if you decide to make a purchase through these links – at no additional cost for you!
Cura has many prefabricated profiles, but not for all 3D printers. And especially with recently launched models, it can sometimes take weeks or even months before a suitable standard profile is available – if at all. In such cases, you need to create your own profile in Cura so that you can start using Cura directly as a slicer for your new 3D printer.
In this article, I will show you step by step how to create your own Cura profile with the appropriate machine settings and print settings.
TIP : You can learn how to calibrate the print settings mentioned in this article to get perfect results every time in my 3D printing course: FDM 3D printing: The comprehensive course from A to Z
You may also find the right Cura profile among my collection of practically tested and calibrated Cura profiles for various printers: 3D Printer Cura Profiles
Table of Contents:
Step 1: Add a New 3D Printer
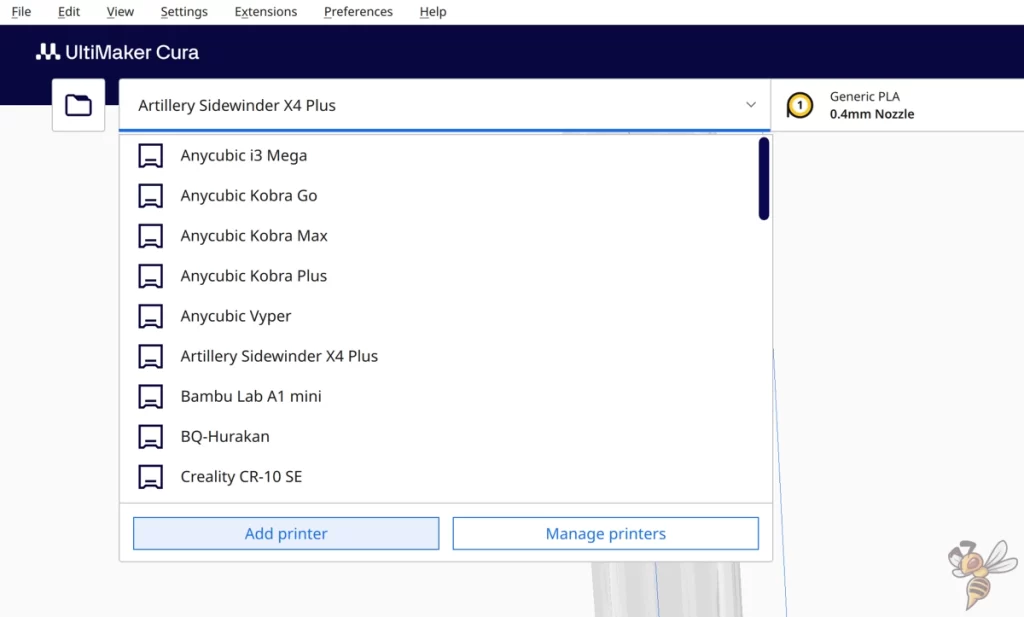
Use the menu bar or the drop-down menu to open the menu for adding a new 3D printer. (Note: You should not have as many 3D printers as I have in the screenshot above).
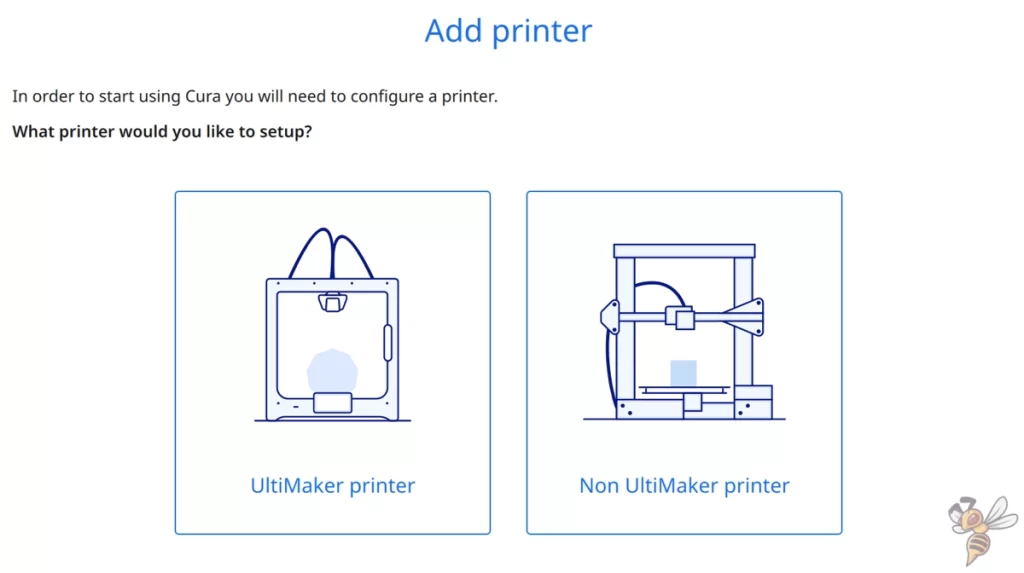
In the next step, you will be asked whether the new 3D printer is from UltiMaker or not. In most cases, it is not.
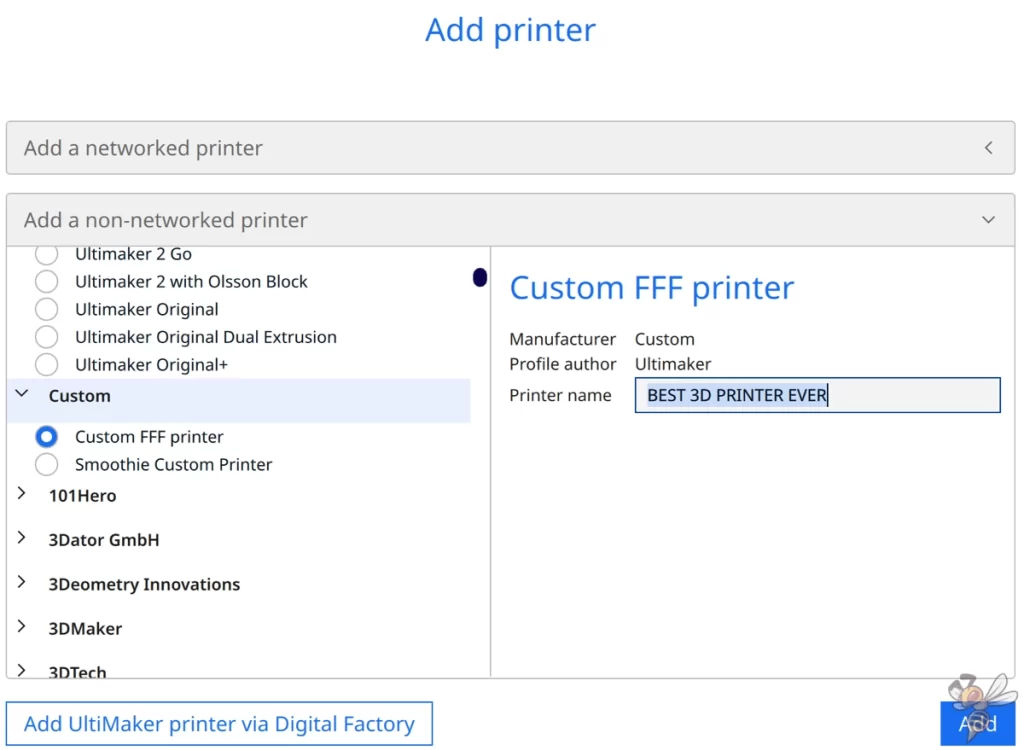
Then select “non-networked printers” and search for the brand of your 3D printer in the list. If your 3D printer is a relatively new model, it is highly likely that there is no ready-made profile for it yet. In this case, start with a completely empty profile and select “Custom” and then “Custom FFF printer”.
You can then enter the name of your 3D printer on the right-hand side. Then click on add.
The next step is to adjust the machine settings to your 3D printer.
Step 2: Adjust the Machine Settings
The machine settings refer to the specific hardware features of your 3D printer. These include the dimensions of the build space, the type of extruder, the number of extruders and other physical attributes of your printer. These settings are essential because they inform Cura about the limits and capabilities of your printer so that the software can prepare your models accordingly.
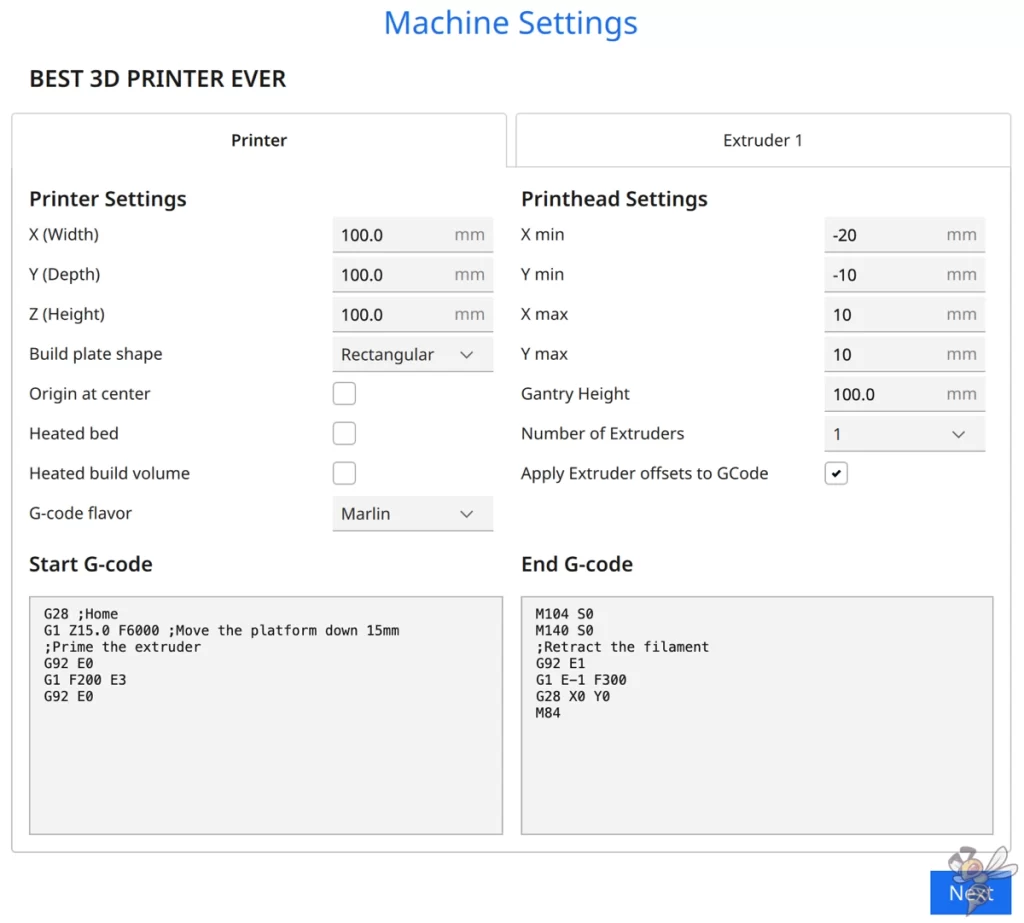
The empty profile is filled with default values that will not fit your 3D printer. You must adapt them to your particular model.
Most of these values can be found in the specifications of your 3D printer. Others you will have to measure or try out yourself. Next, we will go through all the settings in detail.
Printer Settings
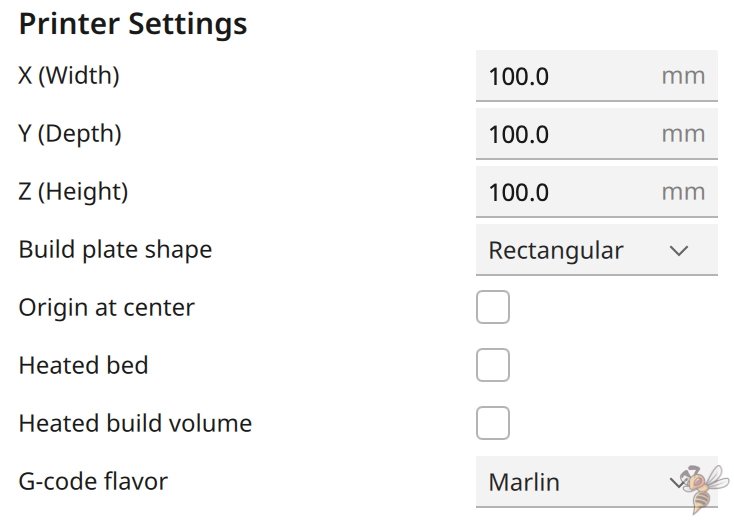
- X (Width): The length of the print volume in the x-direction. This value is in the specifications of your 3D printer.
- Y (Depth): The length of the print volume in the y-direction.
- Z (Height): The height of the print volume in the z-direction.
- Build Plate Shape: The shape of the print plate.
- Origin at Center: Whether the coordinate system has its origin at the center of the printing plate. I usually leave out the check mark here.
- Heated Bed: Whether the 3D printer has a heated print bed. In almost all cases, the check mark must be set here.
- Heated Build Volume: If your 3D printer has a heated print volume, check the box here.
- G-code flavor: You can leave this field at the default value.
Printhead Settings
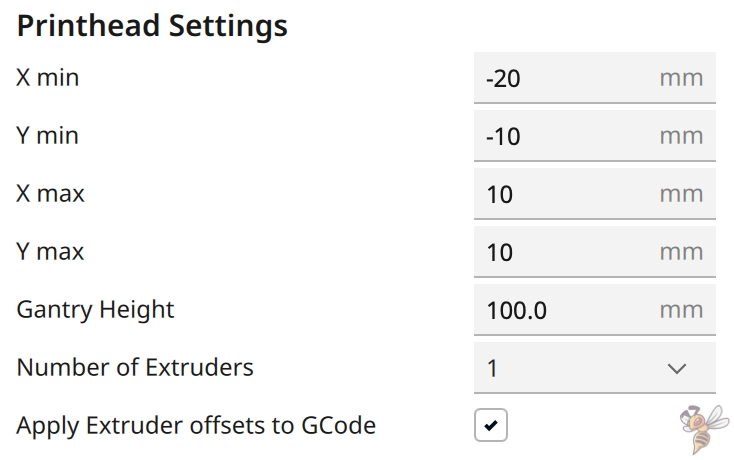
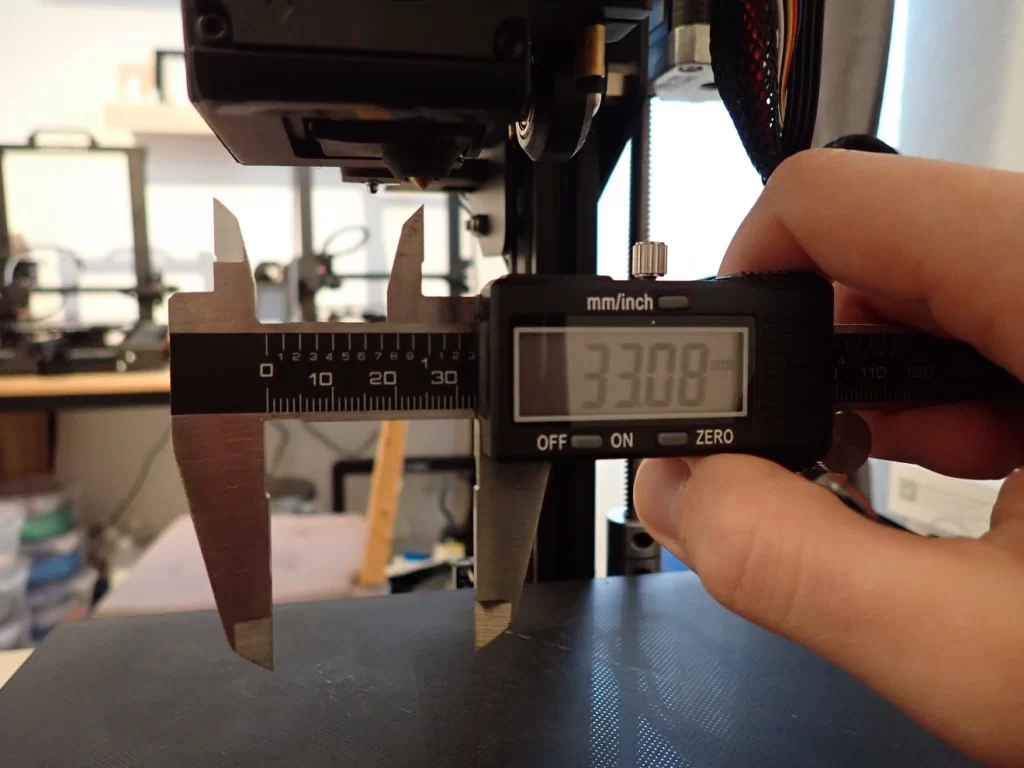
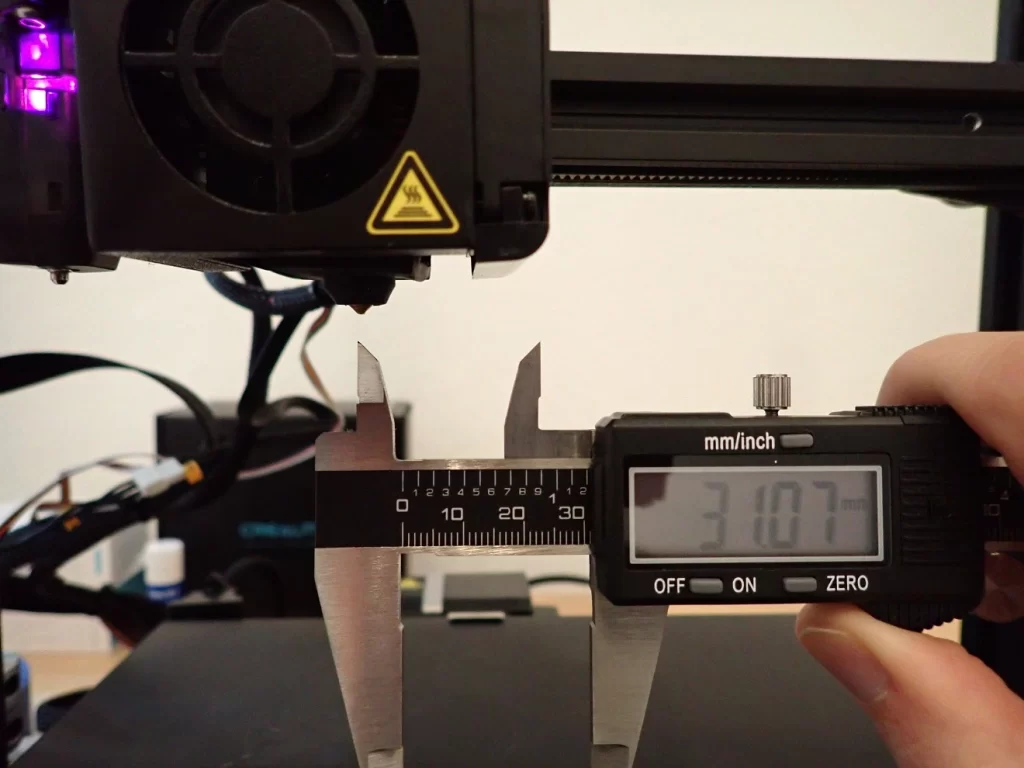
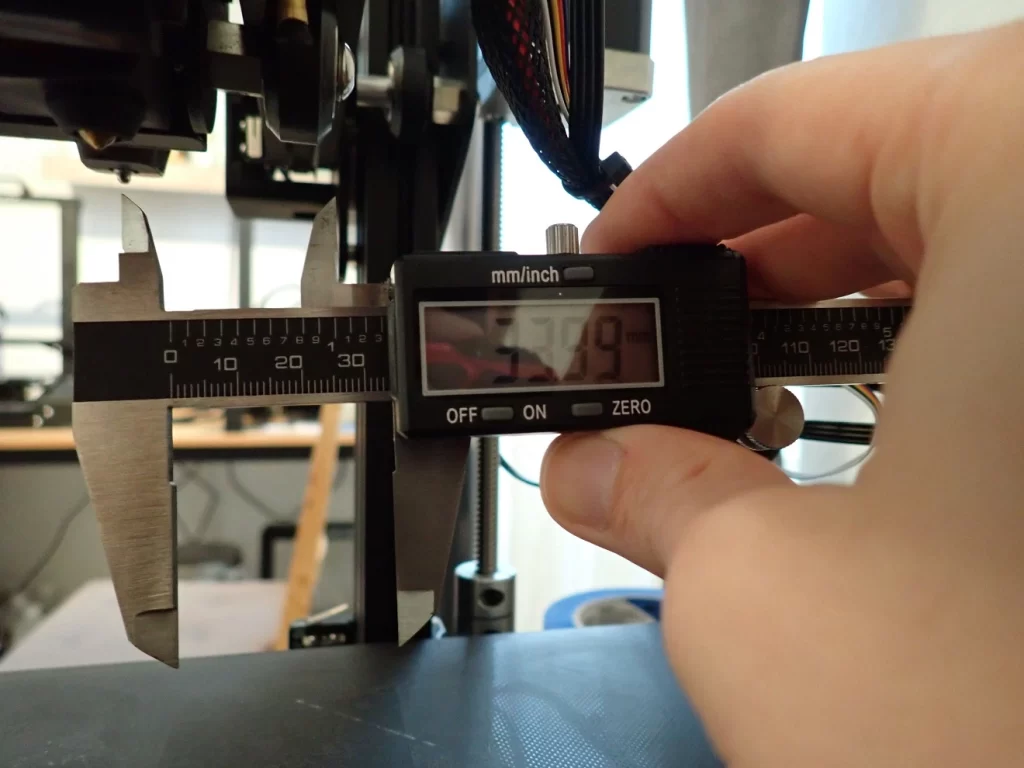
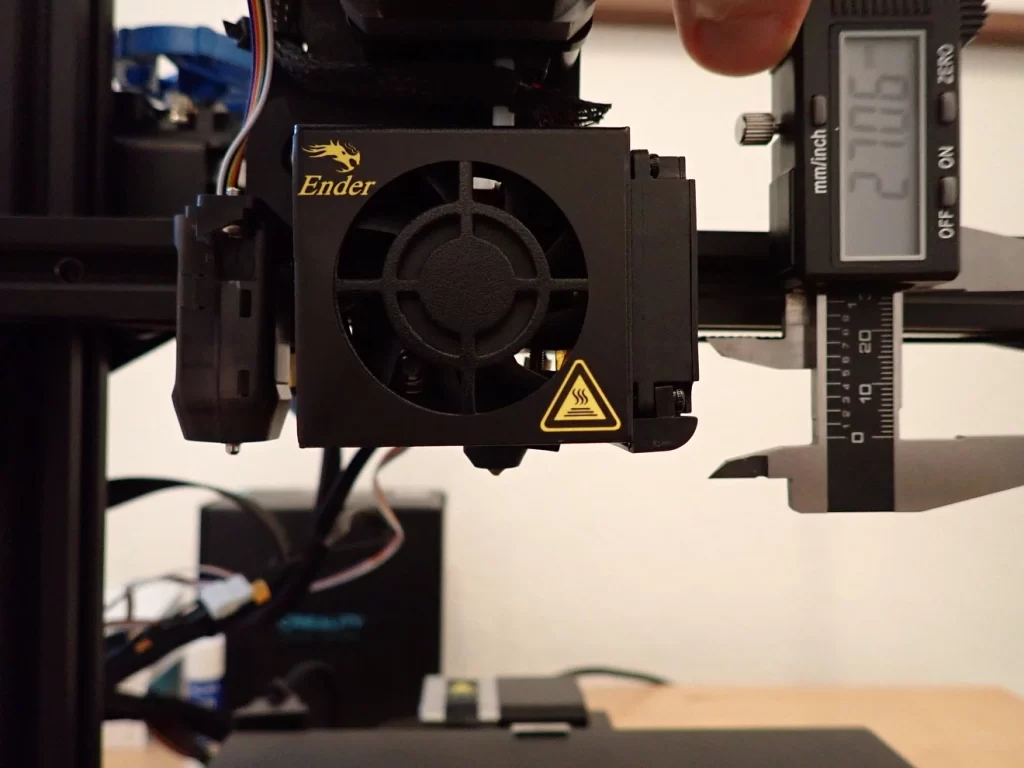
- X min: Expansion of the print head in the negative x-direction from the nozzle center point. You only need the values for the expansion of the print head if you want to print several objects one after the other in the same print. These values are then important to avoid collisions. If you only want to print one object at a time, you can leave these values at the default values.
- Y min: Expansion of the print head in the negative y-direction from the center of the nozzle.
- X max: Expansion of the print head in the positive x-direction from the nozzle center point.
- Y max: Expansion of the print head in the positive y-direction from the nozzle center point.
- Gantry Height: Height of the axis seen from the tip of the nozzle in the z-direction.
- Number of Extruders: The number of extruders. In most cases equal to 1.
- Apply Extruder offsets to GCode: Always activate.
In Cura, the print head shape setting defines how the print head of your 3D printer looks from above. This information is crucial to avoid collisions in “One at a Time” mode. This creates a collision area around the print objects based on a polygon formed from coordinates around the print head position and nozzles.
This area prevents objects from being placed too close together and the print head colliding with already printed objects during printing.
Start G-code
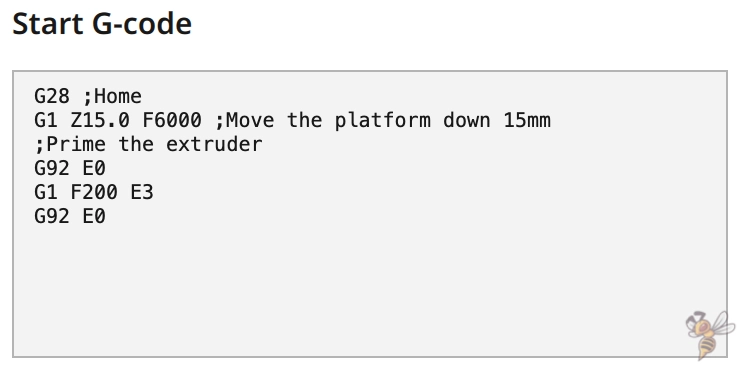
The Start G-code in Cura is a sequence of G-code commands that are executed before the actual start of a 3D printing process.
G-code is the language that 3D printers use to execute print jobs. The start G-code prepares the 3D printer and the print bed for printing in order to achieve optimal results. These preparation actions may vary depending on the printer model and the specific requirements of the print object.
Here are the main functions and actions performed by the Start G-Code in Cura:
- Heating: heats the print bed and nozzle(s) to the required temperatures for the filament being used.
- Home Positioning: Moves the print head and print bed to their home positions. This step ensures that the print starts at the correct position and in the correct orientation.
- Bed leveling: For printers with an automatic leveling function, performs a check of the print bed surface to compensate for unevenness.
- Stimulate filament flow and clean nozzle: A filament line is extruded at the edge of the print bed to guarantee that the nozzle is completely filled with material and ready for printing.
The Start G-Code is customizable, so you can add or remove specific commands to optimize the print preparation according to your needs.
Here is the Start G-Code that I always use with a new profile and works for most 3D printers:
- G28 ;home
- G92 E0 ;Reset extruder
- G1 Z4.0 F3000 ;Move Z Axis up
- G92 E0 ;Reset extruder
- G1 X1.1 Y20 Z0.28 F5000.0 ;Move to start position
- G1 X1.1 Y80.0 Z0.28 F1500.0 E10 ;Draw the first line
- G1 X1.4 Y80.0 Z0.28 F5000.0 ;Move to side a little
- G1 X1.4 Y20 Z0.28 F1500.0 E20 ;Draw the second line
- G92 E0 ;Reset extruder
- G1 Z2.0 F3000 ;Move Z Axis up
End G-code
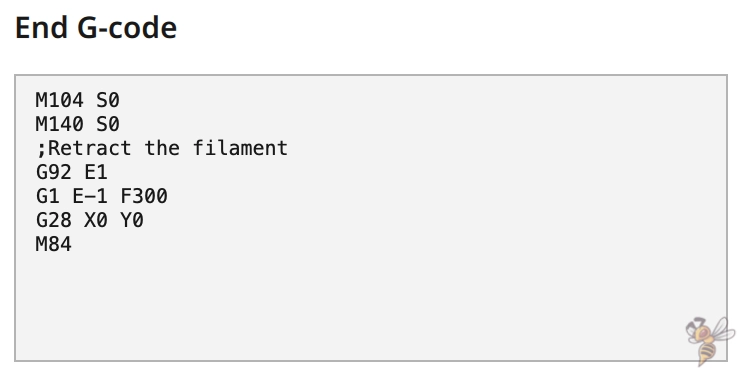
The End G-code in Cura is a collection of G-code commands that are executed after the actual 3D printing process has been completed.
Its main purpose is to put the 3D printer in a safe state, make the print object accessible and prepare the printer for the next print.
Here are the main functions and actions performed by the End G code in Cura:
- Lowering the print bed temperature: cools down the print bed to allow easier removal of the printed object and prevent deformation.
- Retracting the filament: A small piece of filament is retracted to prevent it from dripping out of the nozzle after printing.
- Lowering the nozzle temperature: Prevents excess material from escaping at the end of printing.
- Positioning the print head: Moves the print head to a parking position to facilitate access to the print bed and the printed object without the risk of damaging the object.
- Lowering the print bed or moving it forward: Depending on the printer model, the print bed is lowered or moved forward to make it easier to remove the printed object.
- Switch off the motors: Deactivates the stepper motors, allowing axes to be moved manually. This makes cleaning and maintenance easier.
- Switch off fans: Stops the operating fans to save energy and avoid unnecessary noise after printing.
The End G-code is just as customizable as the Start G-code, which means you can make specific adjustments to tailor the final printing process to your needs.
Here is the End G-Code that I always use with a new profile and works for most 3D printers:
- G91 ;Relative positioning
- G1 E-2 F2700 ;Retract a bit
- G1 E-2 Z0.2 F1600 ;Retract and raise Z
- G1 X5 Y5 F3000 ;Wipe out
- G1 Z10 ;Raise Z more
- G90 ;Absolute positioning
- G1 X0 Y{machine_depth} ;Present print
- M106 S0 ;Turn-off fan
- M104 S0 ;Turn-off hotend
- M140 S0 ;Turn-off bed
- M84 X Y E ;Disable all steppers but Z
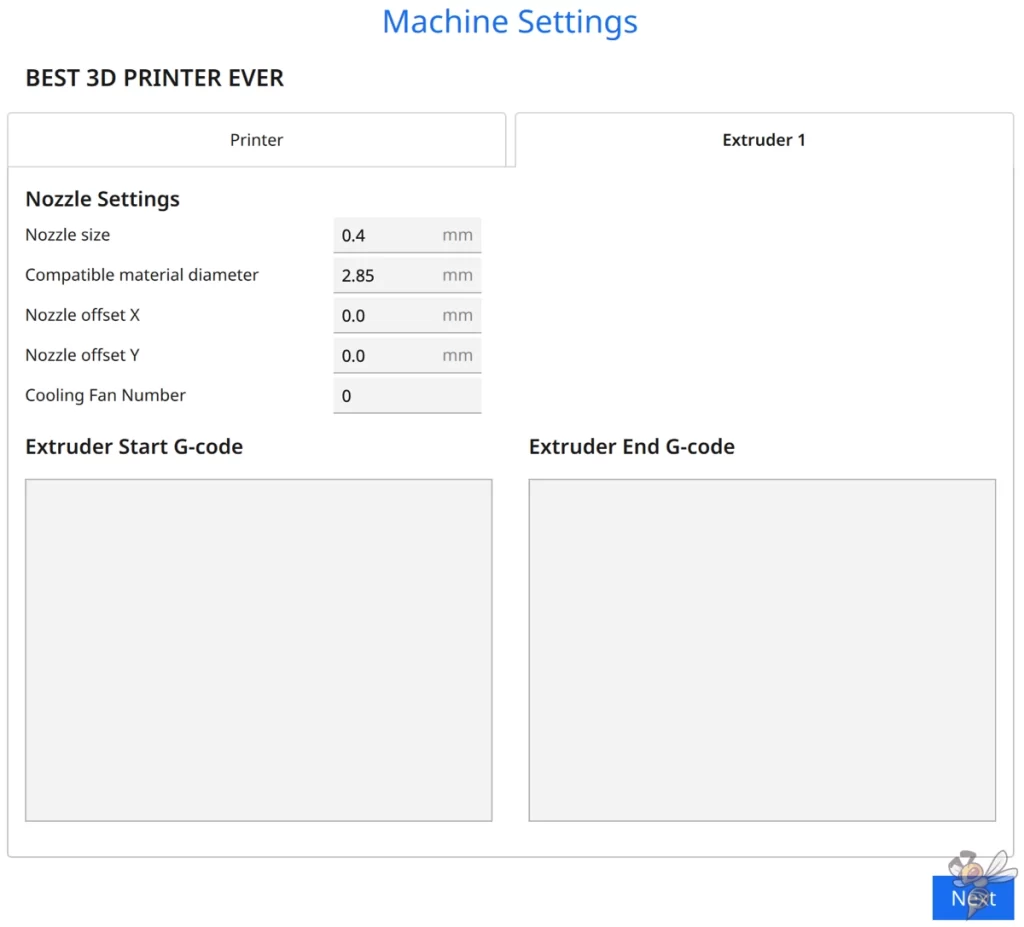
Nozzle Settings
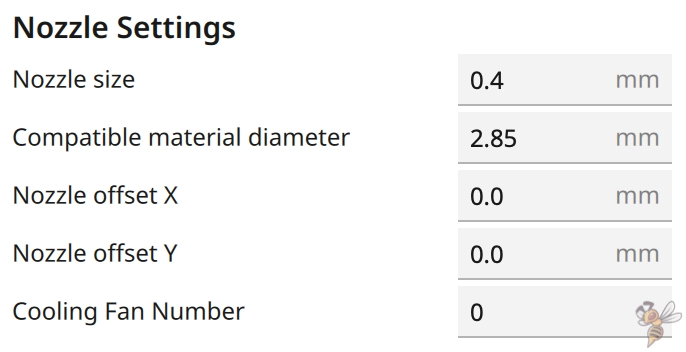
Here is the explanation of the individual settings for the nozzle in Cura:
- Nozzle size: This value must match the actual diameter of your printer’s installed nozzle. A common size is 0.4 mm, which provides a good balance between print speed and detail. Most 3D printers are sold with this size.
- Compatible material diameter: This value indicates the diameter of the filament being used. It must match the filament that your printer can use. Typically, this is 1.75 mm or 2.85 mm. In over 95% of cases, it is 1.75 mm.
- Nozzle offset X and Y: These values are used to calibrate the physical offset of the nozzle from a defined zero point if your printer has multiple nozzles or if for some reason the nozzle is not exactly aligned on the X or Y axis. This value usually remains at 0 mm.
- Cooling Fan Number: This setting defines which fan is used to cool the print object if more than one is available. If your printer only has one fan, this value should be set to 0. This value should also be 0 in most cases.
Extruder G-code
These G-code fields can be left blank.
Step 3: Adjust the Print Settings
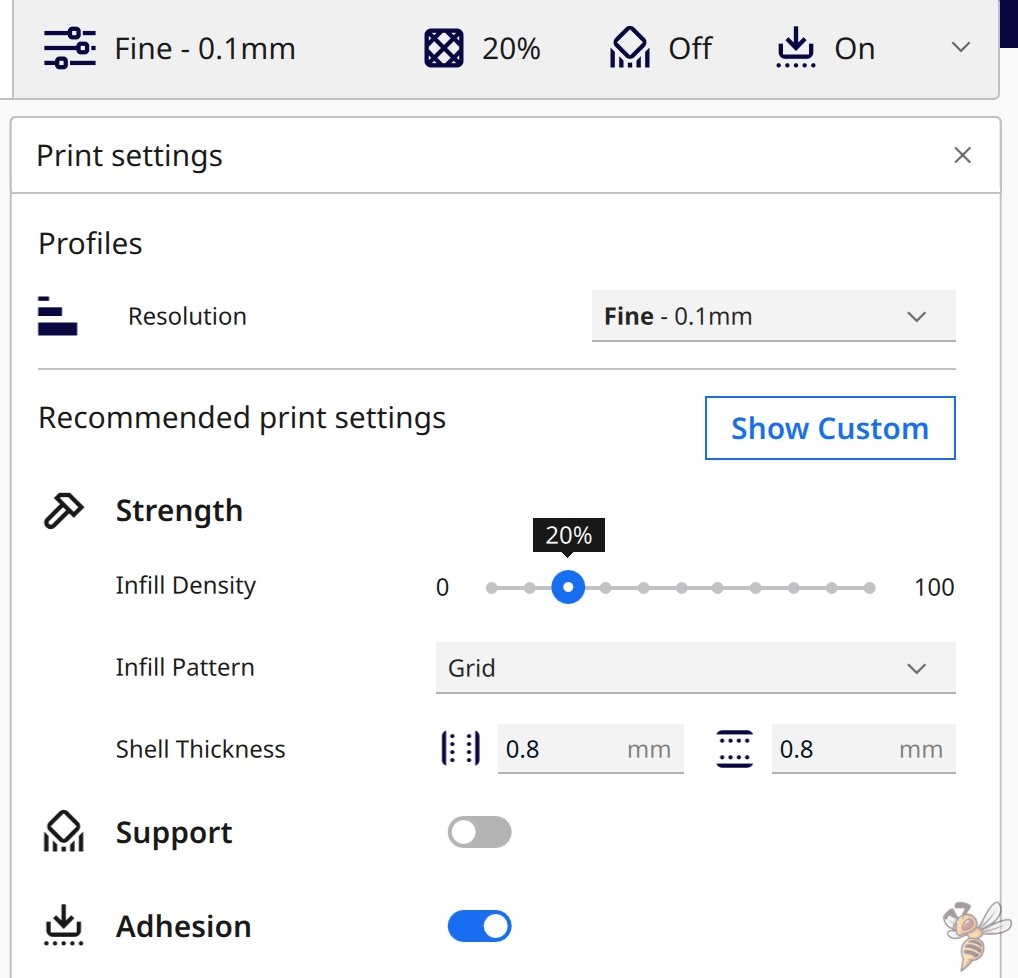
The print settings affect the quality, thickness and appearance of your printed object. They include aspects such as print speed, layer height, fill pattern and support structures. These settings allow you to fine-tune the end result of your print to achieve the best results for your specific project.
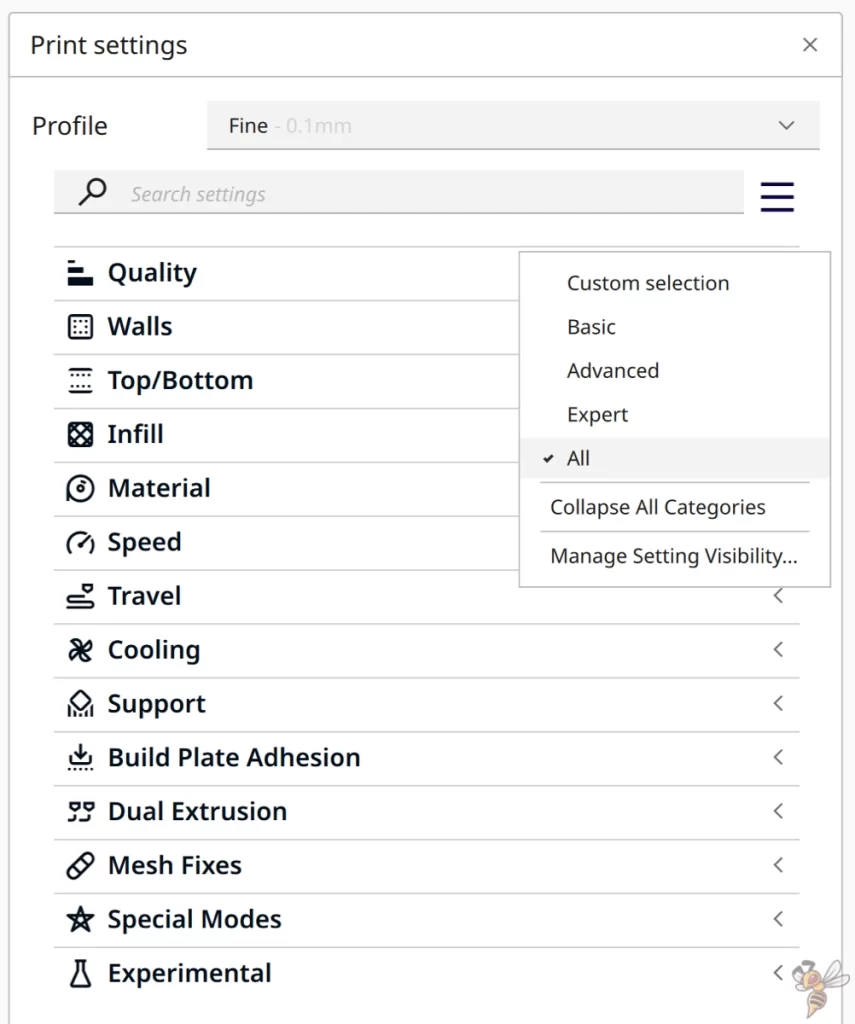
Once you have defined the machine settings, Cura generates several profiles for the print settings with different levels of detail. Cura usually calls these profiles “Fine”, “Normal”, “Coarse” or similar. You can select them from the drop-down menu at the top.
There are a number of print settings in Cura that can be changed. You don’t need to adjust most of them for now. However, some of them are very printer-specific and need to be adjusted and sometimes even calibrated.
In the following chapters, I will show you which of these print settings are particularly important and how you can adjust them for your 3D printer.
Quality
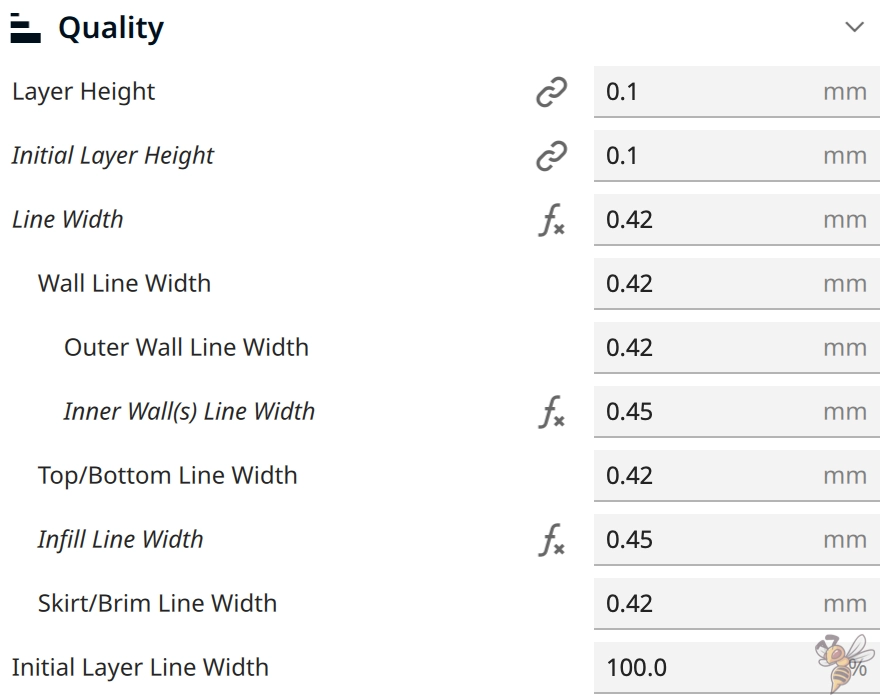
In the quality settings in Cura, the layer thickness and line width influence the print quality:
- Layer Height: This is the height of each layer that the 3D printer prints. A smaller layer thickness results in a higher resolution and usually a smoother surface of the printed object, but requires more time to print. The layer thickness often depends on the nozzle size and should typically not be greater than 80% of the nozzle diameter.
- Line Width: The line width is the width of the filament string that the printer lays down. It can affect how well the individual lines adhere to each other and increase the strength of the printed part. The line width is often set slightly larger than the nozzle diameter to ensure good adhesion between the lines. By default, it is set to the nozzle diameter or slightly larger, as shown here, where it is 0.42 mm with a nozzle size of 0.4 mm.
Walls
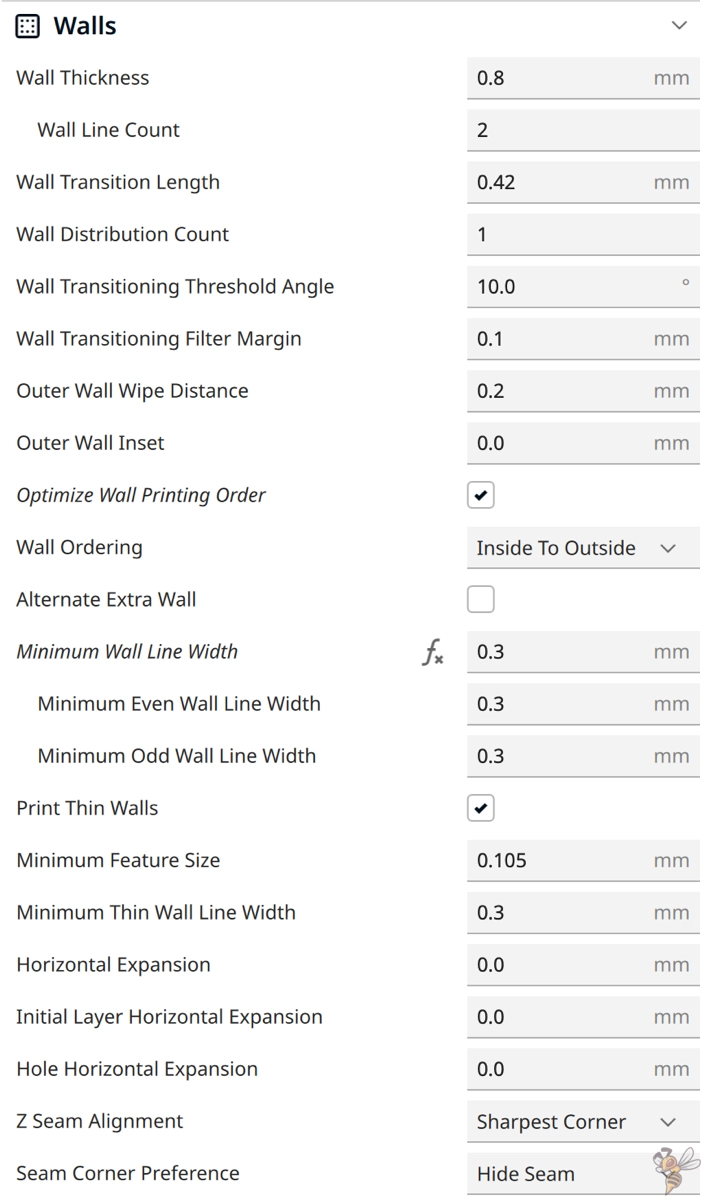
In Cura, the settings for the walls of a 3D print refer to the parameters that determine the thickness and quality of the outer and inner walls of the print. The three important settings to start with are:
- Wall Thickness: This is the overall thickness of the walls of the printed object. It is typically set as a multiple of the line width to ensure that the walls are made up of solid lines, which improves the strength and quality of the print. In the image above, the wall thickness is set to 0.8 mm. This means that, based on a line width of 0.42 mm, two lines (perimeters) are placed next to each other to form the wall.
- Wall Line Count: This setting determines how many lines are laid to achieve the wall thickness. A higher number of lines increases the thickness and possibly also the quality of the print, but also increases the printing time and material consumption. Typical values = 2 to 4.
- Wall Ordering: The order in which the walls are printed can affect how the walls look and how they line up with the infill. It is usually best to start with the inside wall and work your way out to ensure the best finish on the outside.
Top/Bottom
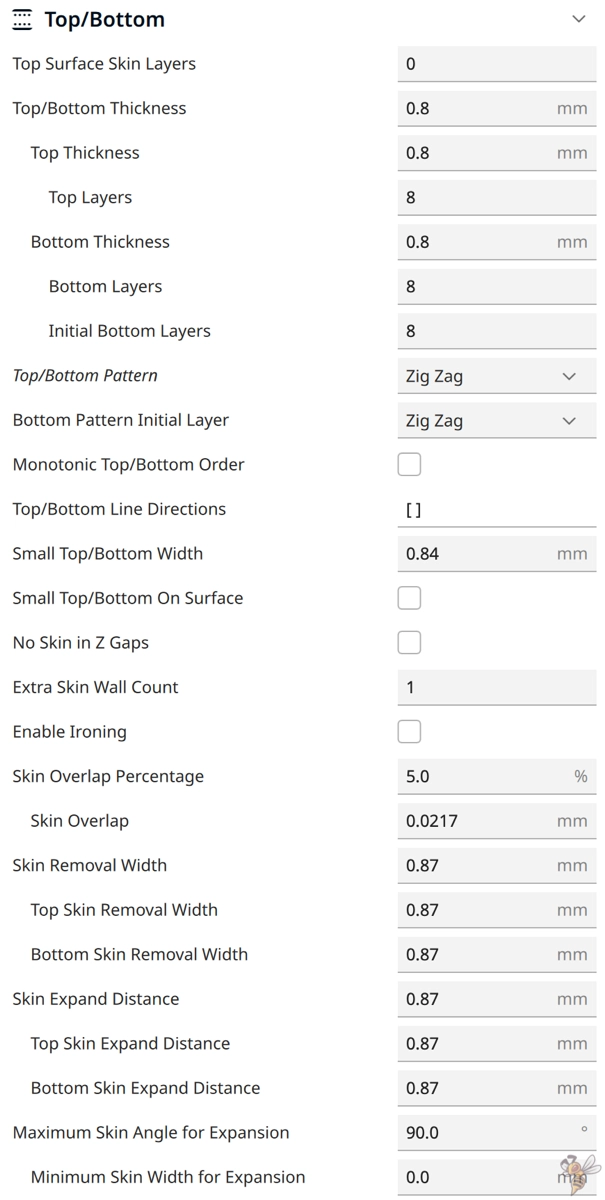
In Cura, the Top Layers & Bottom Layers settings affect the quality of the surface and the strength of the printed object. Here are the two settings you should pay attention to in this section:
- Top Layers: This setting determines how many horizontal layers are placed at the top of the printed object before it is considered the “surface” or “skin” of the object. A higher number of layers can result in a smoother surface and better coverage over the infill, which is especially important if your object has a flat surface at the top that you want to look good. In the example above, the “Top Layers” are set to 8, which means that 8 layers will be printed to form the top surface of your object.
- Bottom Layers: Similar to the “Top Layers”, the “Bottom Layers” define how many layers will be placed at the bottom of the print object. A larger number of layers provides a stronger base and can help prevent the infill material from showing through the underside. This is particularly important for adhesion to the printing plate and the durability of the finished object. Here too, 8 layers are useful as standard.
The rest of the settings in this section can initially remain at the default settings until you want to make more specific adjustments based on your printing requirements or if you notice problems with the surface quality or strength of your prints.
Infill
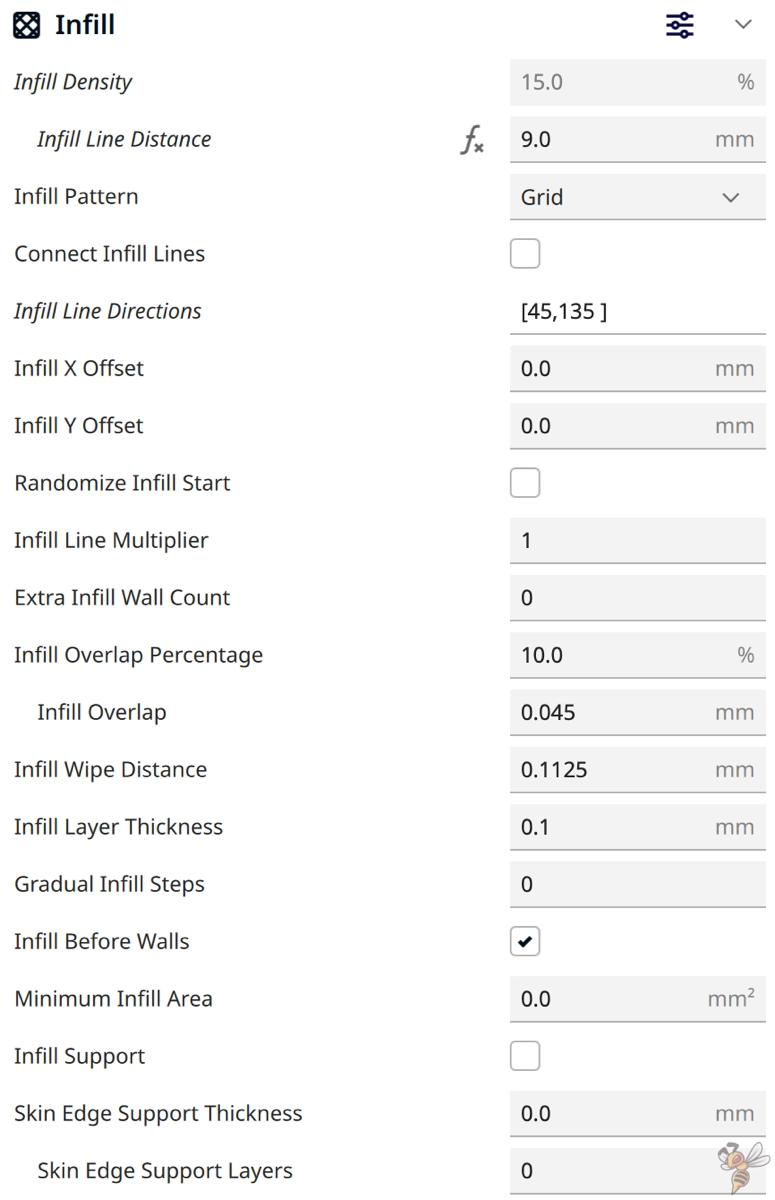
In Cura, the infill settings of your 3D print are important for the structural integrity and weight of the printed object.
Two settings you should pay attention to at the beginning are
- Infill Density: This setting affects how dense the grid pattern is inside your print. A higher value means more material consumption and increases the strength, but also the weight of your print. A lower value means less material and a lighter end product, but with reduced strength. The infill density is given as a percentage and shows how much of the inner volume of the print is filled with material. In the image above, the infill density is set to 15%, which is a good compromise between strength and material savings for many applications.
- Infill pattern: The pattern with which the infill is printed can influence the strength of your object in different directions and has an influence on the printing time. Different patterns offer different advantages: Some are faster to print, others offer more strength. The “Grid” pattern is a standard pattern that offers a good balance of strength and print speed. It creates an even grid of horizontal and vertical lines and is well suited to most printing applications.
The remaining settings in the Infill section can initially remain at their default settings, as they offer more specific adjustments that will only become relevant once you have familiarized yourself with the basics or if you have specific requirements for your print.
Material
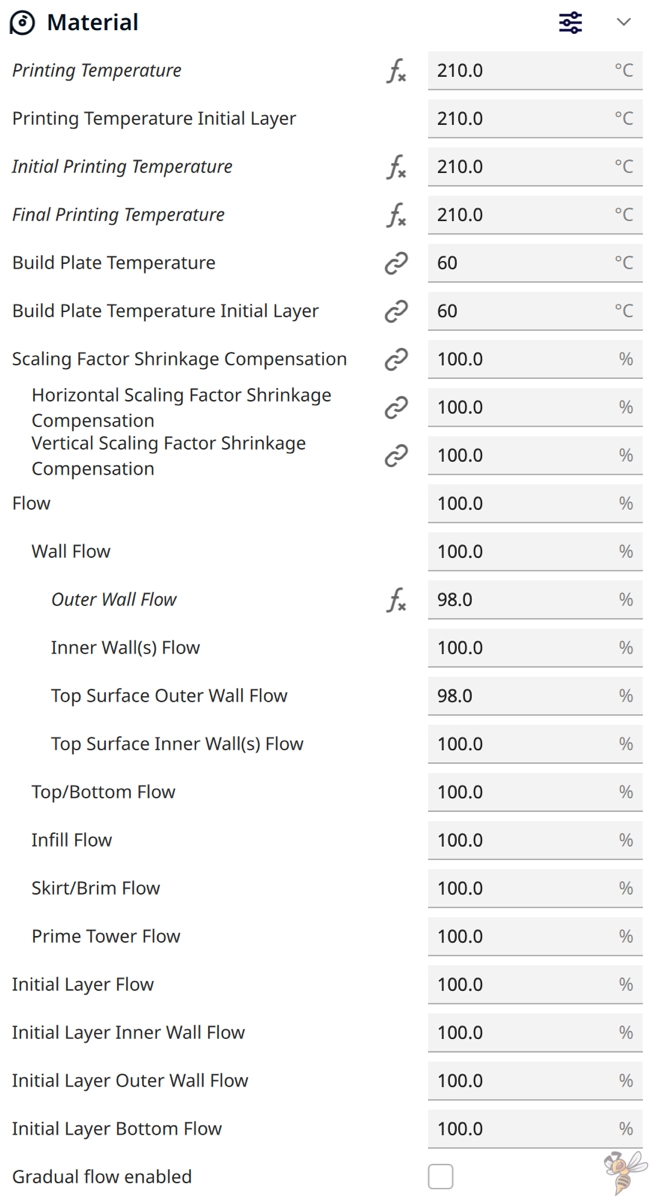
There are also two important settings for the material that you should keep an eye on at the beginning:
- Printing Temperature: This temperature is the heat at which your filament is melted. Finding the right printing temperature is essential as it affects the adhesion of the layers and therefore the strength of your print object. Temperatures that are too low can lead to poor layer adhesion, while temperatures that are too high can lead to stringing. It is best to use the recommended temperature for your specific filament and then, if necessary, calibrate in small increments to achieve the best quality.
- Build Plate Temperature: The build plate temperature helps to improve the print adhesion of the first layers of your print object and avoid warping. The ideal bed temperature can vary depending on the type of filament used. For many common filaments such as PLA, a lower temperature is often sufficient, while ABS and other heat-sensitive materials require a higher bed temperature. Standard values recommended by the filament manufacturer are usually a good starting point.
Speed
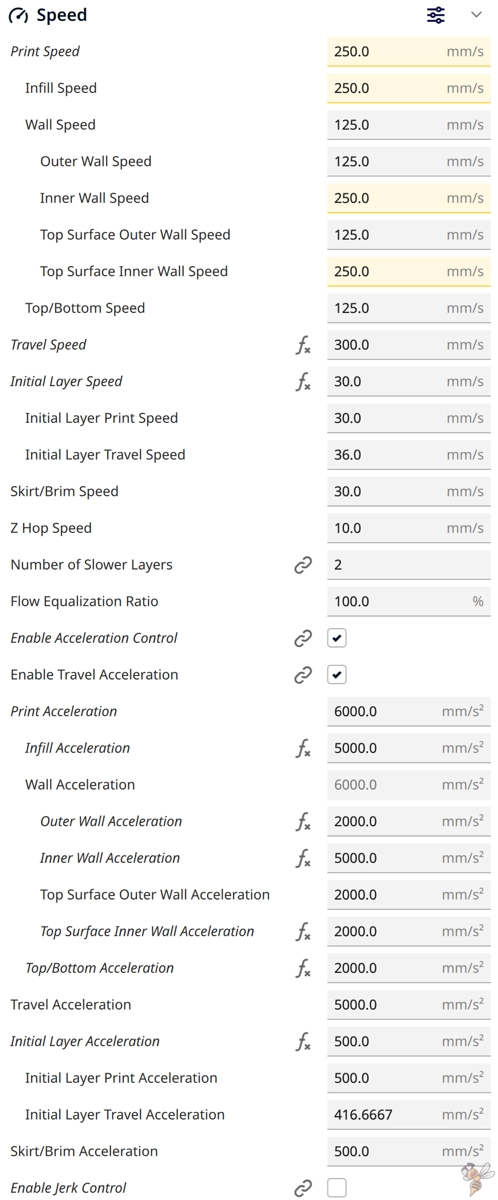
These are the most important speed settings in Cura:
- Print Speed: This is the general print speed for your print. As a beginner, you should start with the default value given in the specifications of your 3D printer. With experience and testing, you can calibrate this value to find the perfect balance between print speed and quality for your specific needs.
- Initial Layer Speed: The speed of the first layer is crucial for good adhesion to the print bed. It is often helpful to reduce this speed to ensure that the first layer adheres properly and without problems.
- Enable Acceleration Control: This option allows you to adjust the acceleration values of the print head. If there are suitable values in the 3D printer specifications, you can enter them here.
Travel

In the movement settings, only the two settings Retraction Distance and Retraction Speed are important at the beginning. These two parameters are crucial for achieving clean printing results and must be carefully calibrated.
- Retraction Distance: The Retraction Distance is the distance your filament is retracted as soon as the print head stops printing and moves to a new position. If you set this value too low, it can happen that filament is pulled out of the nozzle and so-called stringing occurs, i.e. thin threads between the print areas. If you set it too high, you run the risk of not having enough filament available immediately when you resume printing, which can lead to gaps in the print.
- Retraction speed: The retraction speed is the speed at which the filament is retracted. Too slow and you may not be able to avoid unwanted filaments, too fast and you could strain the extruder or even damage the filament.
Start with the values at the top of the picture when you begin. You will see severe printing errors depending on how well these values happen to be set. Calibration is essential here!
Cooling
In the cooling settings of your Cura program, only two settings are important at the beginning: Fan Speed and the Minimum Layer Time:
- Fan Speed: The Fan Speed influences how fast the fan rotates and therefore how quickly the material is cooled after exiting the nozzle. A high fan speed is particularly helpful for overhangs and small details because the material sets faster and does not deform as easily. A speed of 100% is often a good starting point for many materials, but can be adjusted if necessary, for example if you are working with materials that need to cool down more slowly, such as ABS.
- Minimum layer time: The minimum layer time indicates the minimum amount of time to wait before starting a new layer. This gives the material time to cool and solidify before the next layer is printed. A value of 5 seconds ensures that each layer has enough time to cool down before the next one begins, which is particularly important for smaller objects to prevent warping and melting.
Support
As you can see, there are many settings for the supports. Here are the most important ones:
- Support Structure: The “Support Structure” setting specifies the type of support structure to be generated. The “Tree” option is often my first choice, as it generates tree-like supports that start from a main trunk and then split into branches to support the overhanging parts of your object. This type of support saves material and is usually easier to remove from the finished object after printing.
- Support Placement: “Support Placement” determines where the support structures are placed. The “Touching Buildplate” setting means that supports are only generated where they can grow upwards from the buildplate and touch the object. This is usually the safest option to save material and ensure that the supports are only placed where they are really needed.
The remaining settings are usually well configured for most objects that require supports. They influence aspects such as the density and pattern of the supports or the distances between support and print object, but are set so that they should be suitable for a variety of prints.
You can keep or copy these default settings from the screenshot for now.
Build Plate Adhesion
The adhesion of the object to the printing plate plays a decisive role. Here are the most important settings for this:
- Build Plate Adhesion Type: this setting determines what type of adhesion aid is created around the print object. “Skirt” is a border line that is drawn around the object without touching it. It is used to stabilize the filament flow before the actual printing begins and does not provide an adhesion aid. If you have problems with adhesion, you can choose “Brim“, which creates a wider platform around the object that connects directly to the object and thus increases the adhesion surface. “Raft” is an even more pronounced option that creates a thick mesh structure under the object, which improves adhesion, especially for difficult prints.
- Smart Brim: This setting is not shown in the screenshot above, only when Brim is selected. This setting should always be activated for a brim as it makes it easier to remove.
- Raft Air Gap: This setting, which is also not shown in the screenshot, defines the distance between the last layer of the raft and the first layer of your print object. A larger gap makes it easier to remove the raft after printing, but can reduce the adhesion between the raft and the object, while a smaller gap ensures better adhesion but can make removal more difficult.
With these settings, you can control the adhesion of your print to the build plate, which is especially important for large prints or materials that tend to warp.
Dual Extrusion
The Dual Extrusion settings are specific to printers that are equipped with two extruders and can therefore print two different filaments or colors at the same time.
If you are using a single extruder printer or only use one material in your printing process, the Dual Extrusion settings can be ignored in most cases.
Mesh Fixes
To get started, you can leave all mesh repair settings at the default values.
Special Modes
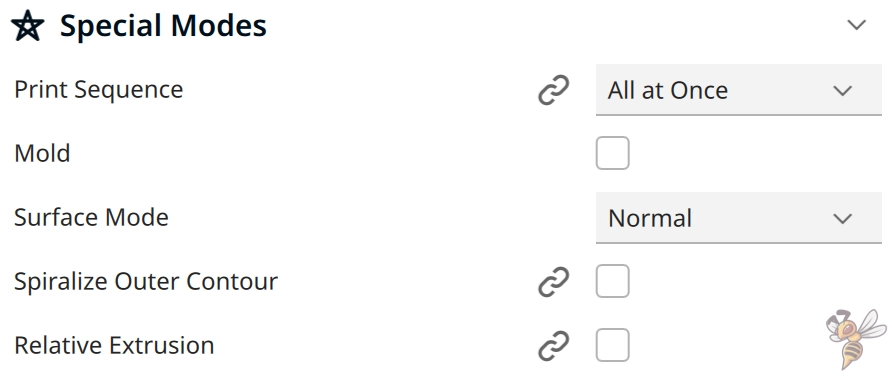
In Cura, you can use the special modes to make interesting adjustments to your print that go beyond the conventional printing methods:
- Print Sequence: With this setting, you can specify the order in which several objects are printed on the printing plate. “All at Once” means that all objects are printed simultaneously from bottom to top. “One at a Time” means that objects are printed one after the other. The print head settings are crucial here to avoid collisions.
- Spiralize Outer Contour: This function, also known as “Vase Mode“, is particularly interesting. It allows you to print objects with a continuous outer contour by synchronizing the Z-axis feed with the extruder. This creates smooth surfaces without visible layer transitions, ideal for vases or pot containers.
Experimental
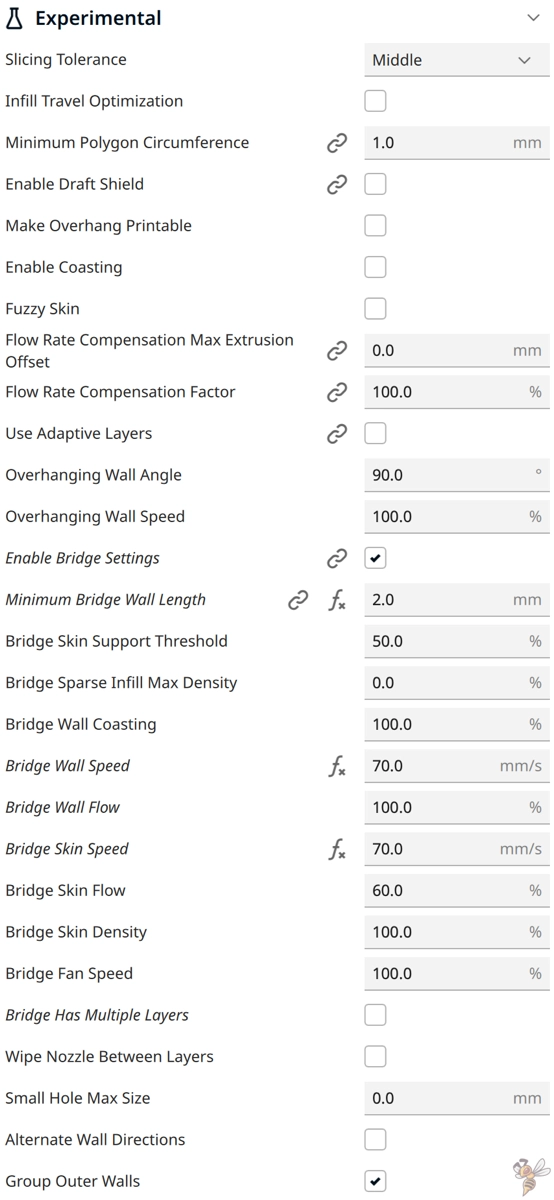
Under the experimental settings in Cura, you should initially only activate the “Enable Bridge Settings” option. By activating this function, Cura adjusts the printing behavior if it detects bridging structures in the model. A bridge is a part of the print that is created between two points in the air, without support from below.
When “Enable Bridge Settings” is enabled, the slicer optimizes the print settings for these bridge areas to achieve better quality and stability of the bridging segments. This includes adjustments to the print speed, material flow rate and cooling specifically tuned to successfully print bridges to counteract sagging and insufficient adhesion between anchor points.
All other settings can be left at their default values.
Step 4: Optimize
Now that you’ve set up your Cura profile for your 3D printer, it’s time to optimize the quality of your prints. The first thing you need to do is fine-tune the most important print settings: the print temperature and retraction. If you need help with this, see the guide mentioned at the beginning or the 3D printing course.
- Calibrate the print temperature: Start with the temperature recommended for your filament. From there, make test prints and observe how your print reacts. Pay particular attention to unwanted stringing or poor layer bonding. Then adjust the temperature in small steps until you achieve a clean and clear print surface without defects.
- Set the retraction: The retraction setting prevents the filament from dripping when the print head moves. If not adjusted, this leads to unwanted threads between the parts of your print. However, too much retraction can also cause problems, such as the filament sticking. Experiment with your printer’s retraction values to find the perfect amount for your setup. Note that different materials may require different adjustments.
Once you have optimized these key settings, you can move on to the other print parameters. Fine-tune settings such as print speed, cooling, layer height and infill density to suit your project.
Remember: every change can affect the end result and sometimes patience is required to achieve the optimum settings.

3D printing can be difficult – especially in the beginning. Many beginners struggle with print errors, poor print bed adhesion, or don’t know how to properly set up the slicer.
That’s why I created an online course to get everyone up to my expert level and as quickly as possible.
The course covers everything you need to know about FDM 3D printing to get perfect results every time. Click the link below to learn more about the content and what to expect (and don’t worry: there are no tests! Learn at your own pace, completely stress-free).
Disclosure: This website is the property of Martin Lütkemeyer and is operated by Martin Lütkemeyer. Martin Lütkemeyer is a member of the Amazon Services LLC and other Affiliate Programs. These are affiliate advertising programs designed to enable websites to earn advertising revenue through advertising and linking to Amazon.com and others. Links marked with * are affiliate links.
