
- Wet Filament: Prevention, Symptoms & Drying - July 18, 2024
- Sovol SV08 – Best PrusaSlicer Settings & Profile - June 26, 2024
- Sovol SV08 – Best Orca Slicer Settings & Profile - June 26, 2024
Disclosure: Links marked with * are Affiliate Links. I earn from qualifying purchases if you decide to make a purchase through these links – at no additional cost for you!
The Ender 3 V2 Neo is one of the best beginner 3D printers on the market. While it has many features that improve its operation and print quality, even the best 3D printer can’t deliver good results without the right slicer settings.
To create a good Cura profile for the Ender 3 V2 Neo, you can either copy the default profile from Creality Slicer or customize the profile for the original Ender 3 in Cura.
Find out how to do all this, which Cura settings work well for the V2 Neo, and how to calibrate the settings in this detailed guide.
| PLA | ABS | PETG | |
|---|---|---|---|
| Printing temperature | 200 °C | 230 °C | 245-255 °C |
| Print bed temperature | 60 °C | 85 °C | 60 °C |
| Print speed | 50 mm/s | 50 mm/s | 40 mm/s |
| Retraction | 5 mm at 60 mm/s | 5 mm at 55 mm/s | 4 mm at 60 mm/s |
| Cooling | 100 % | 0% + enclosure | 50-100 % |
Table of Contents:
Creating a Profile for the Ender 3 V2 Neo in Cura
The 3D printer profile in Cura is a detailed description of the machine settings and print settings for a 3D printer. It includes print quality, speed, infill density, retraction, and more.
The 3D printer profile is important because it ensures that your prints are of the highest quality and are compatible with your specific printer. To get the best results, it’s important that you know all the settings in your 3D printer profile and how they affect your prints.
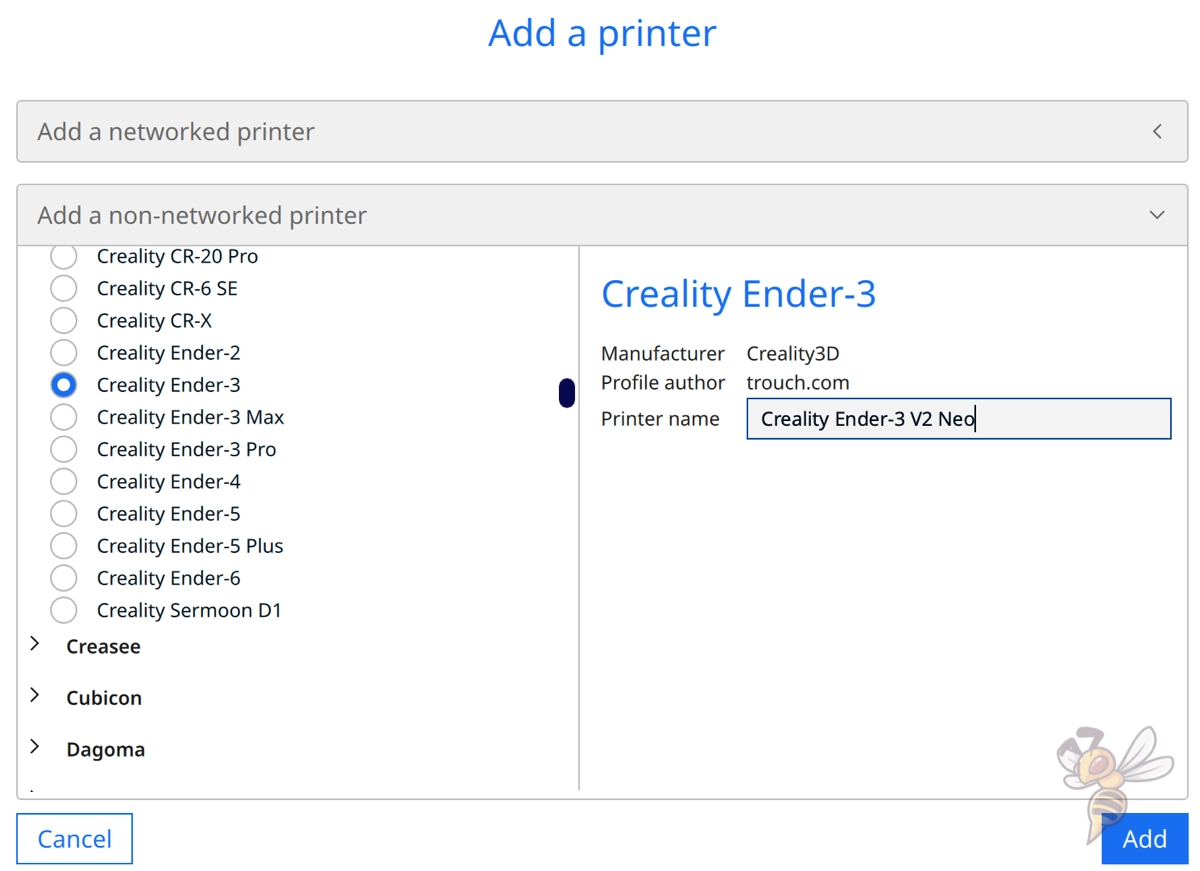
To create a Cura profile for the Ender 3 V2 Neo, click on the “Settings” menu. Then click “Printers” and “Add printer”. A new window will appear with a list of manufacturers and models. Select the “Ender 3” from the list and click “Add”.
If there is already a predefined profile for the Ender 3 V2 Neo, you can, of course, select it. There are many settings that need to be adapted to the V2 Neo.
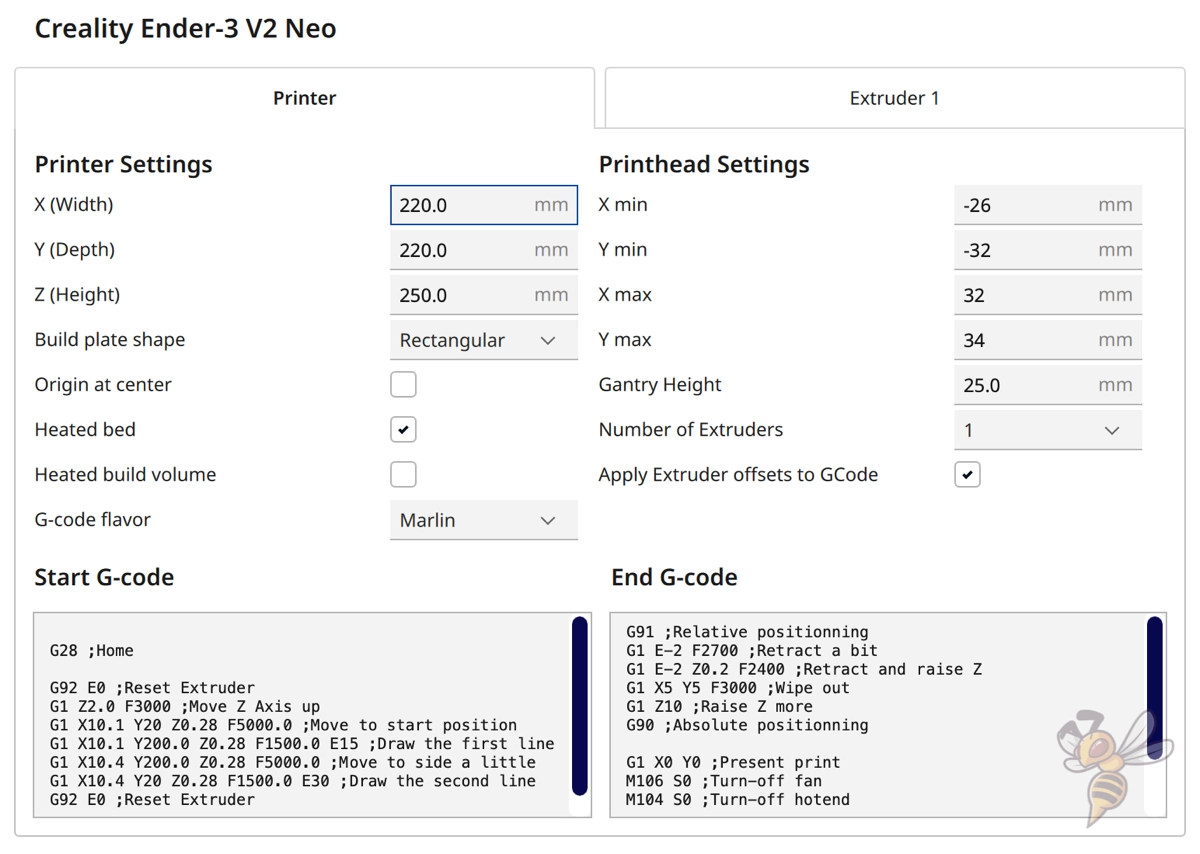
The machine settings should be defined as shown in the screenshot above. This way, Cura knows how big the printer and its print head is.
In addition to other data, a start and end G-code is also defined. These are commands that the printer executes before and after the print job. It prints for example two lines before printing to stimulate extrusion and to wipe off any leaked filament (like a skirt).
Start G-code:
G28 ;Home
G92 E0 ;Reset extruder
G1 Z2.0 F3000 ;Move Z Axis up
G1 X10.1 Y20 Z0.28 F5000.0 ;Move to start position
G1 X10.1 Y200.0 Z0.28 F1500.0 E15 ;Draw the first line
G1 X10.4 Y200.0 Z0.28 F5000.0 ;Move to side a little
G1 X10.4 Y20 Z0.28 F1500.0 E30 ;Draw the second line
G92 E0 ;Reset extruder
G1 Z2.0 F3000 ;Move Z Axis up
End G-code:
G91 ;Relative positioning
G1 E-2 F2700 ;Retract a bit
G1 E-2 Z0.2 F2400 ;Retract and raise Z
G1 X5 Y5 F3000 ;Wipe out
G1 Z10 ;Raise Z more
G90 ;Absolute positioning
G1 X0 Y0 ;Present print
M106 S0 ;Turn-off fan
M104 S0 ;Turn-off hotend
M140 S0 ;Turn-off bed
M84 X Y E ;Disable all steppers but Z
You can find more information on how to create a 3D printer profile in Cura and what you need to pay attention to in this article: How to Create a Custom 3D Printer Profile in Cura
PLA Settings at a Glance
These are the correct Cura settings for the Ender 3 V2 Neo for PLA:
- Print temperature: 200 °C
- Print bed temperature: 60 °C
- Printing speed: 50 mm/s
- Retraction: 5 mm at 60 mm/s
- Cooling: 100%
- First layer: 5-10 mm/s, 0% cooling, 100% extrusion width, 100% layer height

3D printing can be difficult – especially in the beginning. Many beginners struggle with print errors, poor print bed adhesion, or don’t know how to properly set up the slicer.
That’s why I created an online course to get everyone up to my expert level and as quickly as possible.
The course covers everything you need to know about FDM 3D printing to get perfect results every time. Click the link below to learn more about the content and what to expect (and don’t worry: there are no tests! Learn at your own pace, completely stress-free).
PLA is the most popular filament for 3D printers because it is easy to print and offers a wide range of colors. However, there are a few things to keep in mind when printing with PLA on the Ender 3 V2 Neo.
The recommended printing temperature for PLA is between 185 and 205 °C. With the Ender 3 V2 Neo, I have achieved good results with different PLA filaments at 200 °C.
The temperature of the print bed should be perfect at 60 °C for every PLA filament on the PC-coated print bed.
The print speed should be slow enough to allow the PLA to cool properly, values around 50 mm/s work well with this extruder.
You may need to experiment with the retraction settings to avoid stringing. The above values are a good starting point for further optimization – you’ll learn how to calibrate them later in this article.
ABS Settings at a Glance
ABS is popular for 3D printing due to its stability and resistance to breakage. However, to be able to print with ABS, a 3D printer must have certain properties. First and foremost, the printer must be able to reach and maintain a high temperature – the Ender 3 V2 Neo easily achieves the necessary temperatures for this type of filament.
One of the biggest problems is that ABS shrinks when it cools, which can cause objects to warp. To prevent this, it is important to keep the ambient temperature even and high.
Since the Ender 3 V2 Neo does not have an enclosure, it often has problems with deformation when the material cools down too quickly – especially with large objects. If you have problems with warping with ABS, you should invest in a 3D printer tent. This one from Creality is perfect for the V2 Neo.
TPU Settings at a Glance
The Ender 3 V2 Neo has a Bowden extruder and is therefore not well suited for flexible filaments like TPU.
If you still want to try printing with TPU, you need to calibrate the retraction well. Flexible filaments are sensitive to incorrect retraction settings. Stringing is difficult to control with a Bowden extruder for flexible filaments.
That doesn’t mean it’s impossible to get good prints from TPU with the Ender 3 V2 Neo. It just takes a little more trial and error and calibration than with inflexible filament.
Another tip for TPU: Set all speeds very slowly so that the filament has enough time to follow the movements of the extruder.
PETG Settings at a Glance
These are the correct Cura settings for the Ender 3 V2 Neo for PETG:
- Print temperature: 245 to 255 °C
- Print bed temperature: 60 °C
- Printing speed: 40 mm/s
- Retraction: 4 mm at 60 mm/s
- Cooling: 50-100%
- First layer: 5-10 mm/s, 0% cooling, 100% extrusion width, 100% layer height
PETG filament is easy to print and is durable and stable. It is a good choice for printing items that are used regularly, such as tools or household items. It is also ideal for outdoor applications.
Unfortunately, PETG is extremely prone to stringing, which is why it is more difficult to print than PLA, for example. So calibrating the settings is a must. However, the values given above should provide a good starting point. For some PETG filaments, the settings might already be ideal.
Depending on which PETG filament you are using, it may be necessary to set the cooling to 100% or reduce it slightly. Pay attention to the stringing behavior and how overhangs are printed to adjust the cooling.
Import the Ender 3 V2 Neo Profile from Creality Slicer into Cura
The Creality Slicer is a Cura clone. The user interface is mostly identical and so are the type of print settings. However, Creality Slicer has default profiles for Creality 3D printers quickly after their release and Cura only after several weeks or even months.
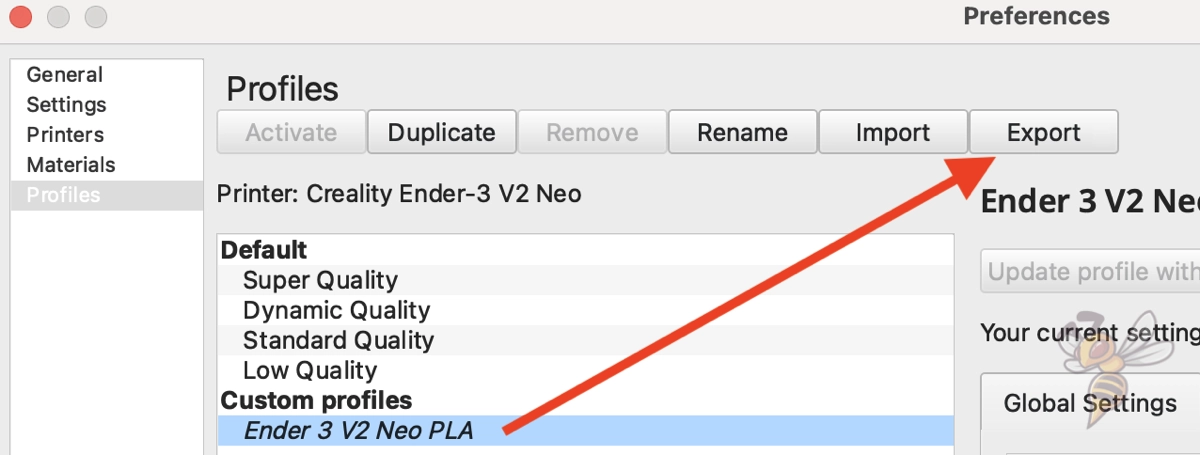
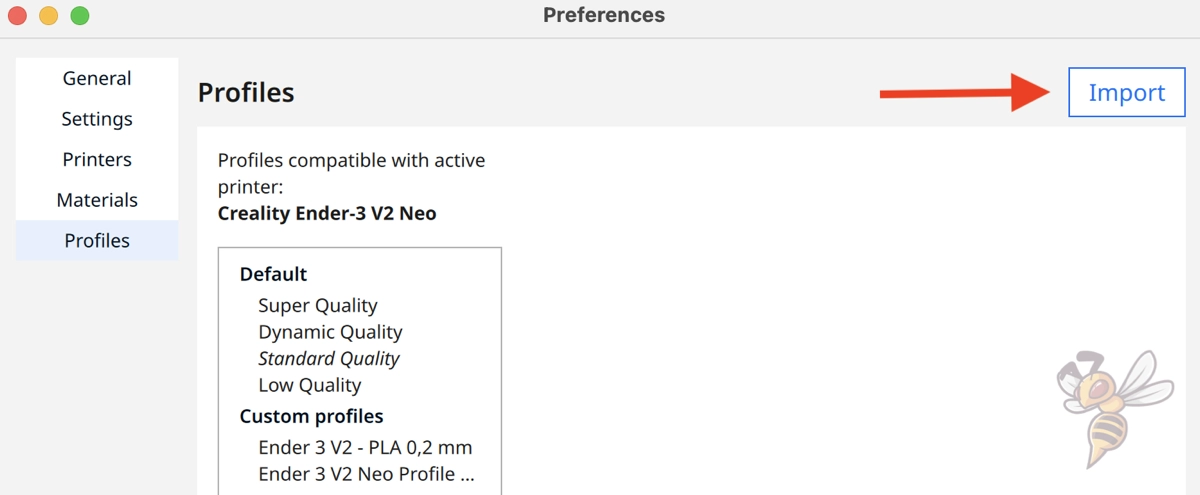
Therefore, often, as with the Ender 3 V2 Neo, you can copy the settings from Creality Slicer and paste them into Cura. A time-saving alternative would be to export the printer settings profile and import it into Cura. You then only have to manually transfer the machine settings when creating a new printer profile.
The default profile from Creality Slicer is a great starting point for further optimizations. I also used this profile as a basis for my settings and then optimized them further.
Best Cura Settings for the Ender 3 V2 Neo
Print Temperature
The best print temperatures for the Ender 3 V2 Neo in Cura:
- PLA: 200 °C
- ABS: 230 °C
- PETG: 245 to 255 °C
Print temperature is one of the most important settings you need to optimize to produce high-quality prints. If the temperature is too high, problems such as stringing or over-extrusion can occur. If the temperature is too low, holes or poor adhesion of the print bed or the individual layers can occur.
Therefore, it is important that you find the right temperature for your particular printer and filament combination.
The Ender 3 V2 Neo reaches printing temperatures of 260 °C. This allows it to process most filaments, including ABS and PETG.
The print temperature is one of the settings that must be calibrated. You will learn how to do this later in this article. The good thing is that you only need to optimize the settings once per filament.
Print Bed Temperature
The best print bed temperatures for the Ender 3 V2 Neo in Cura:
- PLA: 60
- ABS: 85
- PETG: 60
Thanks to the good adhesion of the PC-coated print bed, the adjustment of the print bed temperature is not quite as critical for the Ender 3 V2 Neo. The above values should provide sufficient adhesion for the respective filaments.
Since the print bed reaches a temperature of 100 °C, you have plenty of room for exotic filaments.
If you still have problems with print bed adhesion, you can try raising the print bed temperature a few degrees. Be careful not to accidentally cause an elephant foot.
With the Ender 3 V2 Neo, there should be no reason to use a Raft or Brim with the standard filaments. Fortunately, with the correct temperature setting and the excellent adhesion of the print bed, such auxiliary constructions are not necessary.
The prerequisite for this is, of course, that the z-offset is set correctly and the print bed is properly levelled (click here for the levelling guide).
You can increase the print bed adhesion by reducing the distance between the nozzle and the print bed. There are other methods to increase adhesion. If you have issues with this, you should follow the steps in this guide.
Print Speed
The best printing speed for the Ender 3 V2 Neo in Cura:
- PLA: 50 mm/s
- ABS: 50 mm/s
- PETG: 40 mm/s
Although the Ender 3 V2 Neo can reach print speeds of up to 120 mm/s, print errors are more likely to occur at such high speeds. The best results are achieved with the V2 Neo between 40 and 60 mm/s.
If the print quality is not important to you, you can also increase the print speed. Thanks to the Bowden extruder, which is relatively light, annoying vibrations do not occur that fast. It is therefore possible to print at high speeds with little or no print errors.
Layer Height
The best layer height for the Ender 3 V2 Neo in Cura:
- Decorative objects: 0.12 mm
- Standard: 0.16-0.20 mm
- Coarse, fast prints: 0.24-0.28 mm
When choosing the layer height, you always have to find a compromise between print quality and print time. The finer the layers, the smoother the object will be, but the print will take significantly longer.
Therefore, it makes sense to create different profiles with different layer heights. Then you can easily switch between print settings for decorative objects or fast prototypes.
Since the Ender 3 V2 Neo comes standard with a 0.4 mm nozzle, layer heights of 0.12 to 0.28 mm are possible. In general, the layer height should be between 25 and 75% of the diameter of the nozzle. Values outside this range could lead to unsightly printing errors.
Flow Rate
The best flow rate for the Ender 3 V2 Neo in Cura:
- Default value: 100
- With over-extrusion: 90 to 99%.
- For sub-extrusion: 101 to 110%.
The optimal flow rate rarely deviates from the default value (100%), and when it does, it deviates by only a few percent or fractions.
An incorrectly adjusted flow rate can lead to many printing errors. On the other hand, a slight adjustment of the flow rate can also correct many printing errors. Therefore, the flow rate is also one of the settings you should calibrate.
You can also change the flow rate for the first layer only. If you increase it slightly, you can improve the print bed adhesion. With the Ender 3 V2 Neo, however, you probably won’t need to do this because the print bed provides excellent adhesion.
Retraction
The best retraction settings for the Ender 3 V2 Neo in Cura:
- PLA: 5 mm at 60 mm/s
- ABS: 5 mm at 55 mm/s
- PETG: 4 mm at 60 mm/s
For many beginners, retraction is often the biggest problem when calibrating a 3D printer. If the retraction is not adjusted to the extruder, it quickly comes to various print errors.
The first visible defect would be stringing, which develops into blobs at even worse settings. On the other side of the spectrum of bad retraction settings, holes or cracks can also appear on the surface.
The settings for the retraction depend mainly on the installed extruder. Therefore, they must be calibrated individually for each 3D printer.
The above values are an optimal starting point for the Ender 3 V2 Neo, but they should be calibrated for the filament used. Two different filaments of the same type but from different manufacturers may require different retraction settings to achieve the best results.
Infill
The best infill density for the Ender 3 V2 Neo in Cura:
- Decorative objects: 0-15%
- Standard objects: 15-50%
- Stable objects: 50-100%
The material inside a 3D-printed object is called infill. How densely this is printed and in what pattern determines the later stability of the object.
This setting is completely independent of the 3D printer and depends entirely on the intended use of the object. For decorative objects, lower densities are therefore suitable to save filament and time. The more stable the object needs to be, the more material must be present inside the object to make it mechanically stable.
But also the pattern in which the filament is printed inside has an influence on how stable the object will be in the end.
High stability (for stable objects):
- Cubic
- Cubic subdivision
- Octet
- Gyroid
Medium stability (for standard objects):
- Grid
- Triangles
- Tri-Hexagonal
Low stability (for decorative objects):
- Lines
- Zigzag
- Lightning
First Layer
These are the best Cura settings for the first layer on the Ender 3 V2 Neo:
- Layer height: 100-200% of normal layer height (higher values to increase print bed adhesion)
- Line width: 100-200% of normal line width (higher values to increase print bed adhesion)
- Print temperature: Same as the rest of the object, or 5-10 °C higher for better print bed adhesion.
- Print speed: 50% of normal print speed (i.e., 25 mm/s for a normal print speed of 50 mm/s) or 5-10 mm/s for high print bed adhesion
- Flow rate: 100-110% (higher values in case of poor print bed adhesion)
The first layer is often a source of frustration in 3D printing. If it does not adhere properly to the print bed, the print fails entirely.
Fortunately, with the Ender 3 V2 Neo, it is not complicated to ensure good print bed adhesion. Print bed leveling is simple and the print bed surface provides excellent adhesion for most filaments.
However, if you need to increase the adhesion even more, there are a few options open to you. The ones you can control via Cura are listed above. If you have leveled the print bed properly and set the z-offset well, even delicate objects will adhere well. If not, my first tip would be to reduce the print speed of the first layer to between 5 and 10 mm/s.
How to Calibrate the Cura Settings for the Ender 3 V2 Neo
Recommended and perhaps as already tested values for certain print settings can sometimes still not deliver the optimal results. Every 3D printer/filament combination is slightly different and requires some effort to get perfect printing results.
The settings that should be calibrated on every 3D printer and filament are the print temperature, flow rate and retraction. If these settings are well calibrated, you will be able to avoid most printing errors.
There are many objects that can be used to calibrate these settings. On portals like Thingiverse, there are numerous examples. An easy way to get started is to use the Calibration Shapes plug-in in Cura.

Read the full calibration guide:
3D Printer Calibration: Step-by-Step to Perfect Results
How to Calibrate the Print Temperature
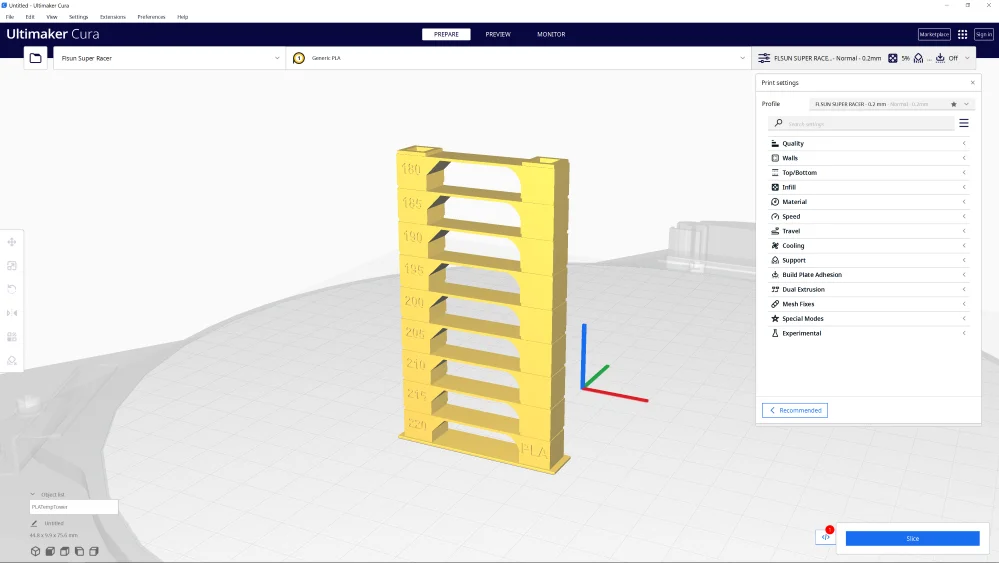
You can find out the optimal printing temperature for your filament relatively quickly with a so-called temperature tower. Such a tower consists of several levels that are printed at different temperatures.
The design of these layers is such that they are particularly prone to certain printing errors, such as stringing. After printing, you can quickly see at which temperature the fewest printing errors occur.
How to Calibrate the Flow Rate
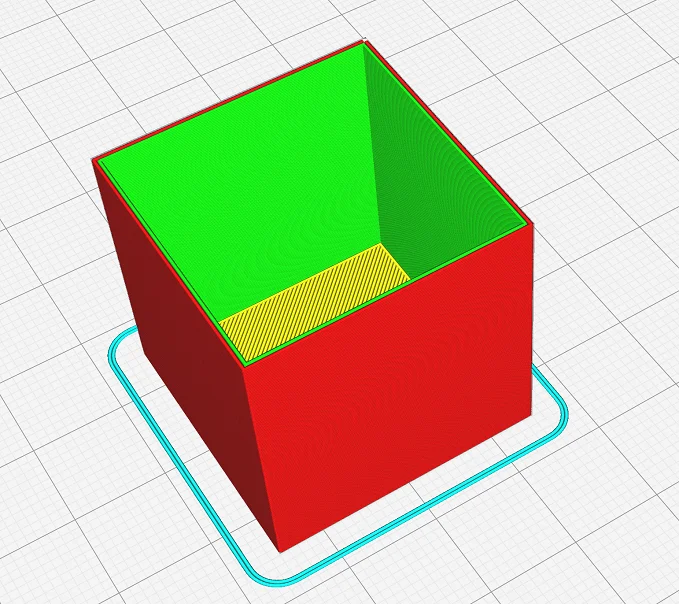
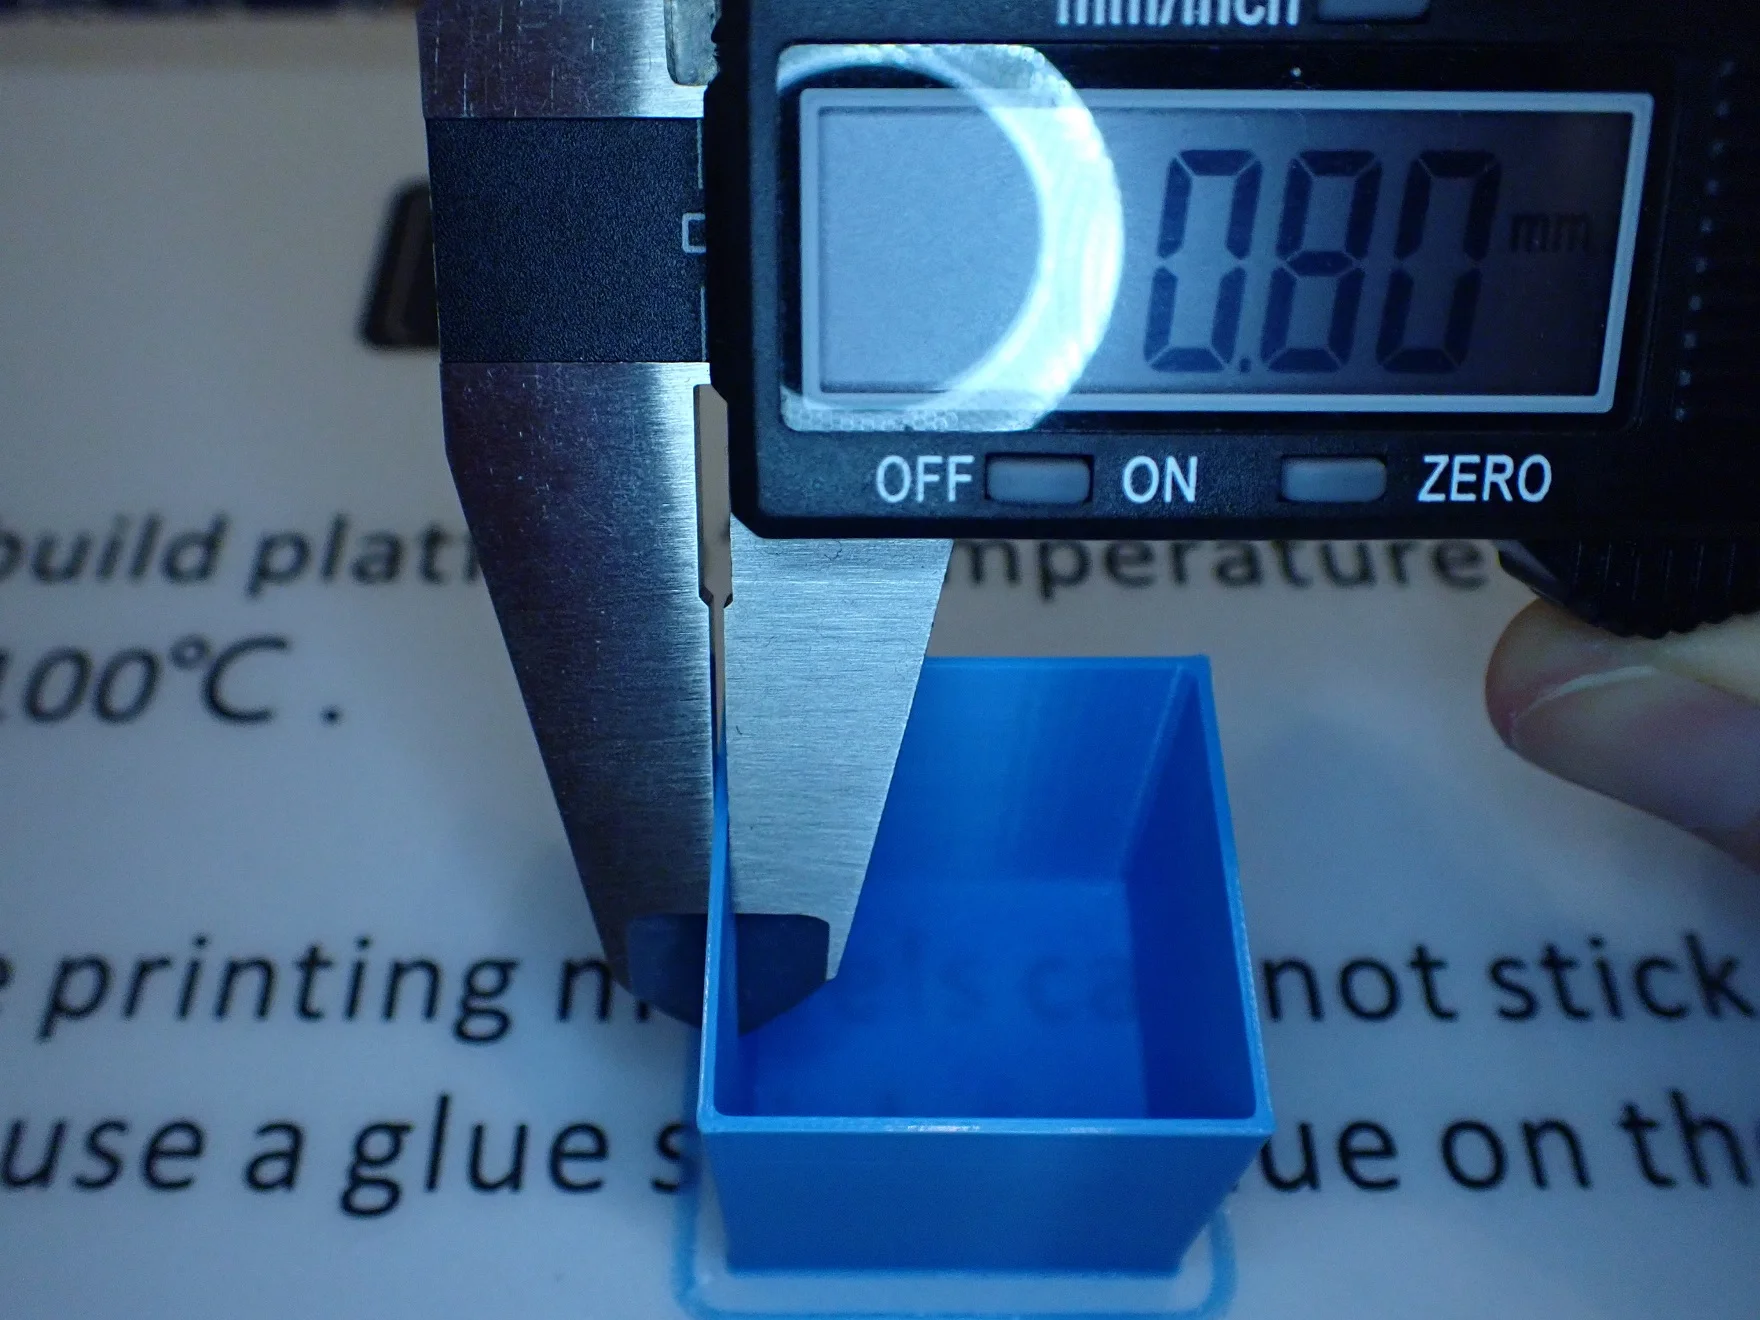
When calibrating the flow rate, the goal is that the line width that is actually printed matches the value from the slicer. One of the easiest ways to calibrate this is to print a hollow cube without top layers.
After printing, you can measure the wall thickness of the cube with a caliper. The wall thickness should then be the product of the line width and the number of wall lines. If it does not, you can adjust the flow rate either up or down to find the perfect value.
How to Calibrate the Retraction
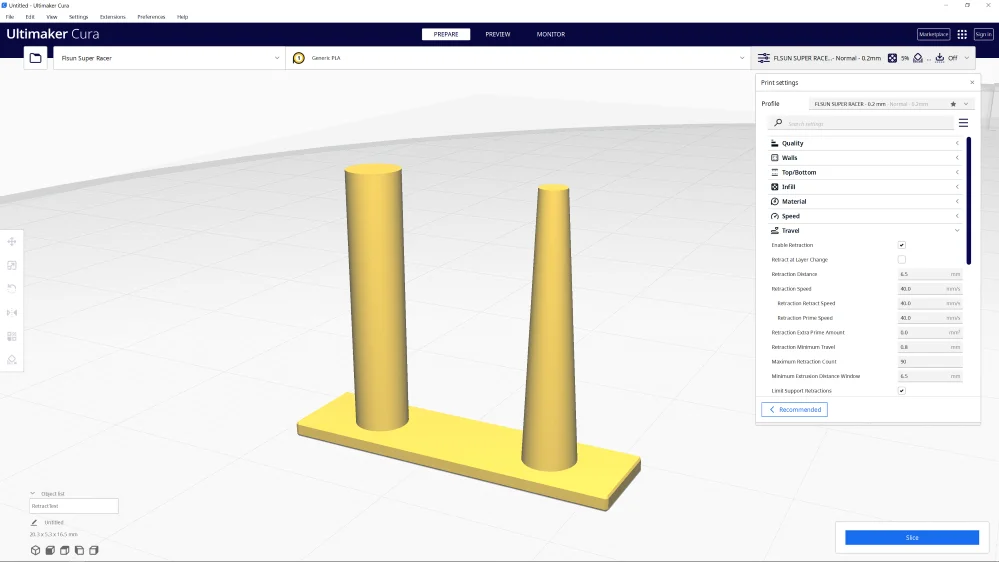
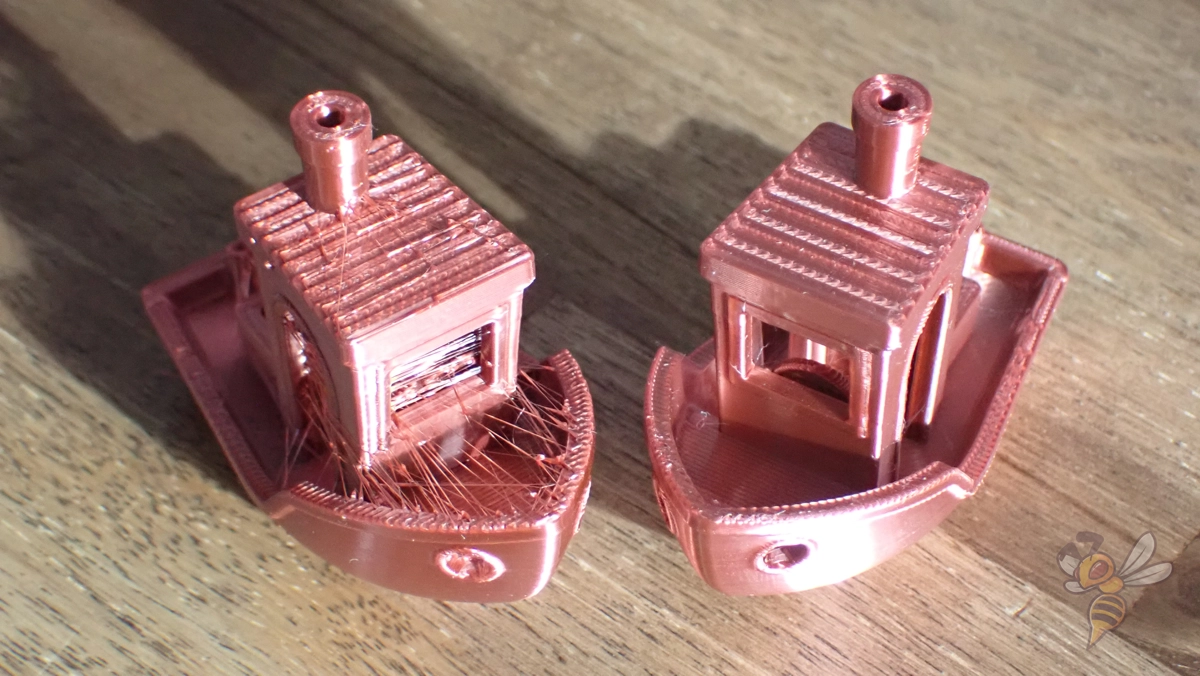
Wrong retraction settings can cause a lot of printing errors. The first print error caused by a suboptimal retraction is stringing. Therefore, most retraction calibration objects are designed to favor stringing.
Theoretically, the object only has to consist of two small columns between which the printer switches back and forth in each layer. If the retraction is not set correctly and filament escapes uncontrollably from the nozzle between the movements, fine threads will form between these two columns.
Since the retraction consists of two settings (the retraction distance and the speed), you should only change one of these settings at a time and observe the effects of it before you change the other.
It is perfectly normal to need several passes until the optimal retraction settings are found.
Conclusion
With the settings presented here, you have a perfect starting point to optimize the Cura profile for your Ender 3 V2 Neo.
If your 3D printer still produces severe printing errors, you should calibrate it. And you will only achieve perfect results with a calibration.
Disclosure: This website is the property of Martin Lütkemeyer and is operated by Martin Lütkemeyer. Martin Lütkemeyer is a member of the Amazon Services LLC and other Affiliate Programs. These are affiliate advertising programs designed to enable websites to earn advertising revenue through advertising and linking to Amazon.com and others. Links marked with * are affiliate links.
