- Wet Filament: Prevention, Symptoms & Drying - July 18, 2024
- Sovol SV08 – Best PrusaSlicer Settings & Profile - June 26, 2024
- Sovol SV08 – Best Orca Slicer Settings & Profile - June 26, 2024
Disclosure: Links marked with * are Affiliate Links. I earn from qualifying purchases if you decide to make a purchase through these links – at no additional cost for you!
The Ender-3 Neo* is the new version of the successful original Ender-3. It offers a quick entry into 3D printing and excellent print quality with little effort. However, it can only achieve this quality with the right settings in Cura.
To create a Cura profile for the Ender-3 Neo, the machine settings must be adjusted in a blank profile. After that, the print settings for the extruder have to be optimized and best calibrated.
In this article, I’ll show you my Cura settings that I’ve been using the Ender-3 Neo with regularly since its release. I’ll also show you how to calibrate the most important print settings to achieve perfect results.
| PLA | ABS | TPU | PETG | |
|---|---|---|---|---|
| Print temperature | 190-205 °C | 230-240 °C | 205-215 °C | 230-250 °C |
| Print bed temperature | 60 °C | 90 °C | 60 °C | 65 °C |
| Print speed | 50 mm/s | 50 mm/s | 30 mm/s | 40-50 mm/s |
| Retraction | 5 mm at 60 mm/s | 4.5-5.5 mm at 50-60 mm/s | 4-6 mm at 55-65 mm/s | 5-6 mm at 60-70 mm/s |
| Cooling | 100% | 0% + enclosure | 100% | 50-100% |
Table of Contents:
How to Create a Cura Profile for the Ender-3 Neo
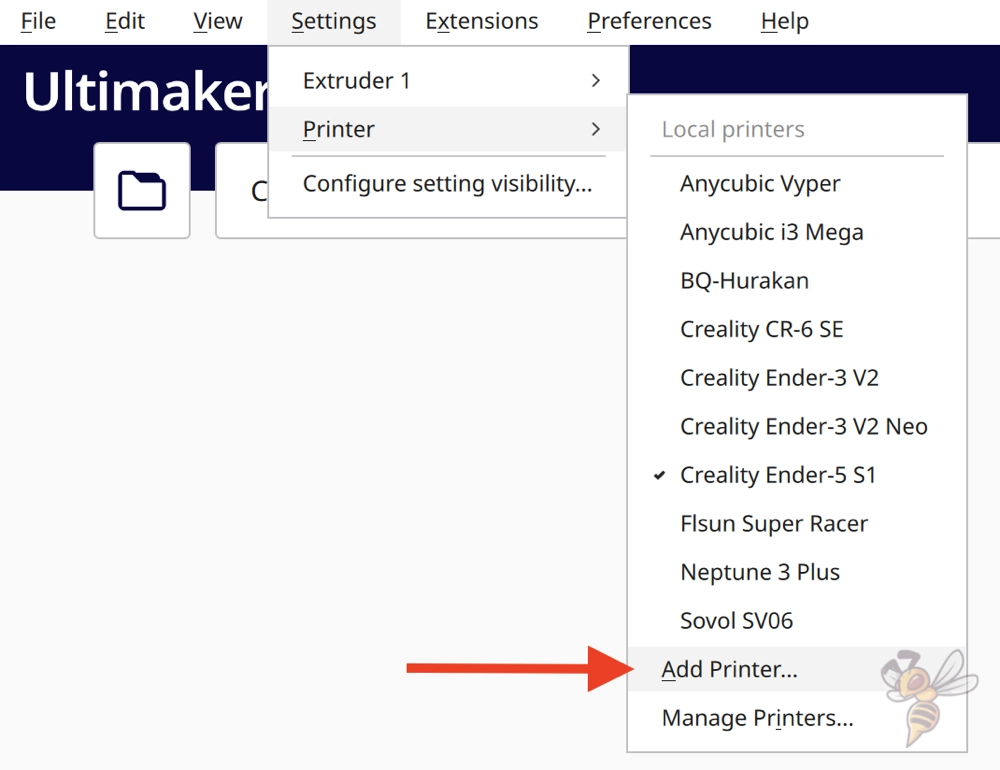
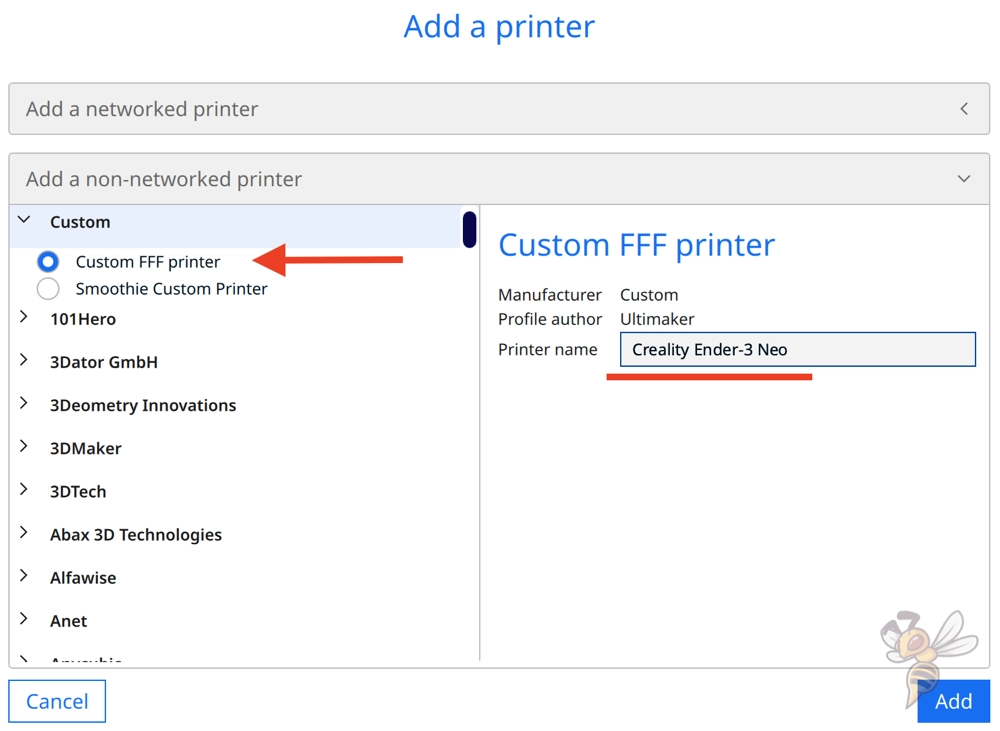
A Cura profile is composed of the machine settings and the print settings. First, the machine settings are defined. For the Ender-3 Neo, you need to create a blank profile and specify the respective values for the 3D printer.
To do this, go to the dropdown selection of the various manufacturers via the menu and select “Custom FFF printer“. Name the 3D printer “Creality Ender 3 Neo“.
After you have pressed “Add”, the machine settings will open.
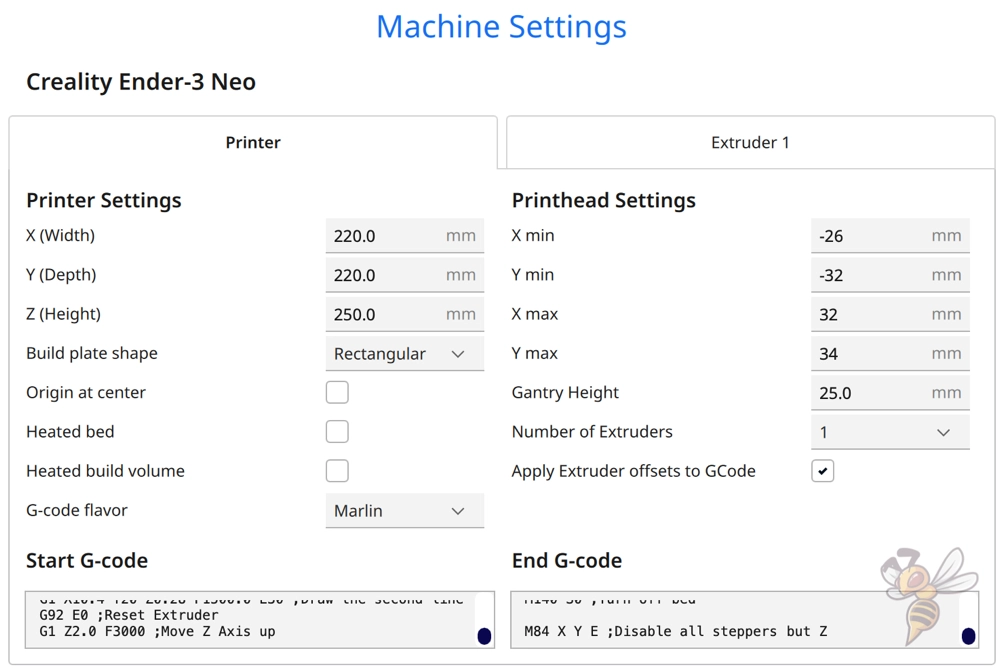
In the machine settings you need to specify the print volume of the Ender-3 Neo, what dimensions the print head has, and what start and end G-code you want to use.
Below are the G-code snippets that work well for the Ender-3 Neo. The Start G-code given below will print two small lines on the side of the print bed to eliminate excess filament. This basically replaces a skirt.
Start G-Code:
- G28 ;Home
- G92 E0 ;Reset extruder
- G1 Z2.0 F3000 ;Move Z Axis up
- G1 X10.1 Y20 Z0.28 F5000.0 ;Move to start position
- G1 X10.1 Y200.0 Z0.28 F1500.0 E15 ;Draw the first line
- G1 X10.4 Y200.0 Z0.28 F5000.0 ;Move to side a little
- G1 X10.4 Y20 Z0.28 F1500.0 E30 ;Draw the second line
- G92 E0 ;Reset extruder
- G1 Z2.0 F3000 ;Move Z Axis up
End G code:
- G91 ;Relative positionning
- G1 E-2 F2700 ;Retract a bit
- G1 E-2 Z0.2 F2400 ;Retract and raise Z
- G1 X5 Y5 F3000 ;Wipe out
- G1 Z10 ;Raise Z more
- G90 ;Absolute positionning
- G1 X0 Y0 ;Present print
- M106 S0 ;Turn-off fan
- M104 S0 ;Turn-off hotend
- M140 S0 ; Turn-off bed
- M84 X Y E ;Disable all steppers but Z
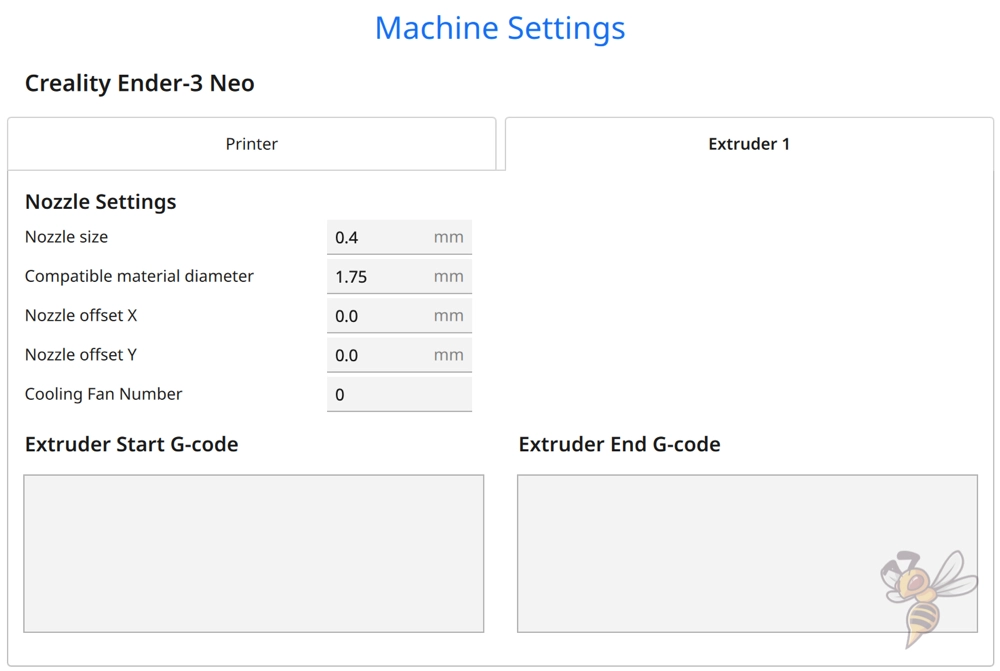
On the second page of the machine settings, you will find the nozzle settings and the compatible filament diameter. You can leave the Start and End G-codes empty on this page.
After defining the machine settings, Cura generates several print settings for different print qualities. These range from layer heights of 0.06 to 0.6 mm. However, with the 0.4 mm nozzle, I would advise you to print layer heights of 0.1 to 0.3 mm with the Ender-3 Neo. Here you can achieve the best results.
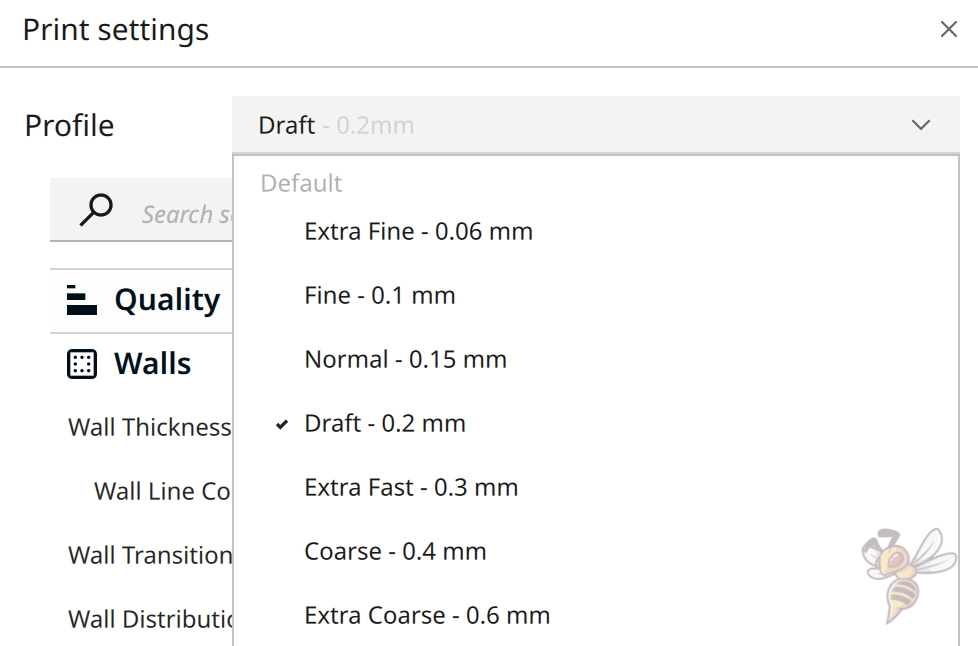
The automatically generated print settings are very general and do not work well for the Ender-3 Neo. You will need to make strong adjustments here to achieve acceptable print quality.
However, the correct print settings depend not only on the 3D printer, but also on the filament you are using. So, before we get into the individual print settings in detail, I’ll show you which settings have produced good results for me with the four standard filaments.
You can find more information on how to create a 3D printer profile in Cura and what you need to pay attention to in this article: How to Create a Custom 3D Printer Profile in Cura
PLA Settings
These are the correct Cura settings for the Ender-3 Neo for PLA:
- Print temperature: 190-205 °C
- Print bed temperature: 60 °C
- Print speed: 50 mm/s
- Retraction: 5 mm at 60 mm/s
- Cooling: 100%
- First layer: 5-10 mm/s, 0% cooling, 100% extrusion width, 100% layer height
The Ender-3 Neo is excellent for PLA filament. The print bed adhesion could be improved with a PEI print bed, but otherwise it’s easy to achieve good results with PLA on this 3D printer.
As you may have noticed, the range of print temperature is relatively wide at 190 to 205 °C. This is because there are many PLA filaments, and the Ender-3 Neo is sensitive to their differences. It is therefore necessary to calibrate the printing temperature to achieve perfect results. I’ll show you how to do that later in this article.
To improve print bed adhesion on the glass print bed, you can print the PLA filament extremely slowly. You can adjust the print speed only for the first layer in Cura. I have always had good results with values between 5 and 10 mm/s.
Some PLA filaments tend to string more than others. You can get this print error under control with the right retraction settings, though. The above values should be a good start for most PLA filaments to achieve relatively good results.
If you observe strong stringing, you should calibrate the retraction. Later in this article, in the chapter on retraction, I show you how to calibrate this print setting.
ABS Settings
These are the correct Cura settings for the Ender-3 Neo for ABS:
- Print temperature: 230-240 °C
- Print bed temperature: 90 °C
- Print speed: 50 mm/s
- Retraction: 4,5-5,5 mm at 50-60 mm/s
- Cooling: 0% + housing
- First layer: 5-10 mm/s, 0% cooling, 100% extrusion width, 100% layer height
ABS is very popular for objects with a mechanical application. It is strong and durable, but is more difficult to print compared to PLA.
The biggest difficulty with ABS is that if it cools too quickly, it shrinks and can contract uncontrollably. If this happens during printing, it can separate from the print bed, crack, or otherwise warp.
While the Ender-3 Neo can handle ABS well, it has an open print volume, which makes the ABS filament susceptible to cold air currents during printing. If you want to print larger objects out of ABS with the Ender-3 Neo, you should get a 3D printer tent to go with it.
I rarely print ABS with the Ender-3 Neo, but Creality’s 3D printer tent should be an ideal fit for it. I’ve often been able to print ABS prints flawlessly with it on other 3D printers without it warping.
If you have issues with print bed adhesion to the glass print bed, you can use Magigoo. I always print ABS filament objects with a very filigree first layer on a thin layer of this adhesive, as this creates the necessary print bed adhesion.
TPU Settings
These are the correct Cura settings for the Ender-3 Neo for TPU:
- Print temperature: 205-215 °C
- Print bed temperature: 60 °C
- Print speed: 30 mm/s
- Retraction: 4-6 mm at 55-65 mm/s
- Cooling: 100%
- First layer: 5-10 mm/s, 0% cooling, 100% extrusion width, 100% layer height
The Ender-3 Neo is not well suited for flexible elements such as TPU. It uses a Bowden extruder, where the distance between the extruder and the nozzle is relatively long. Flexible filaments can partially compensate for the movement of the extruder on the long path and reduce extrusion accuracy.
If you still want to process flexible filaments with the Ender-3 Neo, I advise you to start with stiffer variants first.
Due to the phenomenon described above, it is advisable to print flexible filaments at slow print speeds to give the flexible filament enough time to stretch and elongate on the path between the extruder and nozzle.
Also, with TPU, it is important to calibrate the retraction. As you may have seen above, I have given quite a wide range of possible values for retraction. This is because the TPU filaments on the market sometimes have an extremely different shore hardness.
Getting a completely flawless print with the Ender-3 Neo and flexible filaments is very difficult. However, with an accurate calibration you can minimize the printing errors to an acceptable level.
PETG Settings
These are the correct Cura settings for the Ender-3 Neo for PETG:
- Print temperature: 230-250 °C
- Print bed temperature: 65 °C
- Print speed: 40-50 mm/s
- Retraction: 5-6 mm at 60-70 mm/s
- Cooling: 50-100
- First layer: 5-10 mm/s, 0% cooling, 100% extrusion width, 100% layer height
PETG filament is stronger than PLA and easier to print than ABS. The Ender-3 Neo can also handle PETG filament well.
The biggest problem with PETG filament is that it is very prone to stringing. Therefore, print temperature and retraction settings are especially important with PETG.
However, the correct settings for the particular PETG filament can vary greatly. A calibration of these two values is therefore advisable to achieve perfect results.
With the above values you will probably produce stringing at the beginning, but with a calibration, you can eliminate this printing error.
The Ender-3 Neo has a glass print bed. This can cause unusual problems with PETG. Normally in 3D printing, you have the issue that the print bed adhesion is too weak. Therefore, one would prefer to improve it all the time. However, with PETG on glass, the print bed adhesion may be too good and it may be difficult to detach the finished object from the print bed without damaging the object or the print bed.
To avoid this problem, you can print the PETG filament on Blue Tape. This tape creates a good print bed adhesion and is easy to remove after printing.
Best Cura Settings for the Ender-3 Neo
Now that I’ve shown you the best Cura settings for the Ender-3 Neo for the four standard filaments, let’s go into detail about the individual print settings. Only then can you set your 3D printer to achieve perfect results with the filament you are using.
Print Temperature
The best print temperatures for the Ender-3 Neo in Cura:
- PLA: 190-205 °C
- ABS: 230-240 °C
- TPU: 205-215 °C
- PETG: 230-250 °C
The printing temperature of the Ender-3 Neo can be adjusted up to 260 °C. This allows you to process a wide variety of filaments. However, it must be perfectly matched to the particular filament used to avoid printing errors.
If the print temperature is too high, it can lead to print errors such as stringing or oozing. If you set it too low, under-extrusion can occur.
To avoid such printing errors, it is recommended to calibrate the printing temperature. There are many calibration objects for this, but I prefer to use a temperature tower.
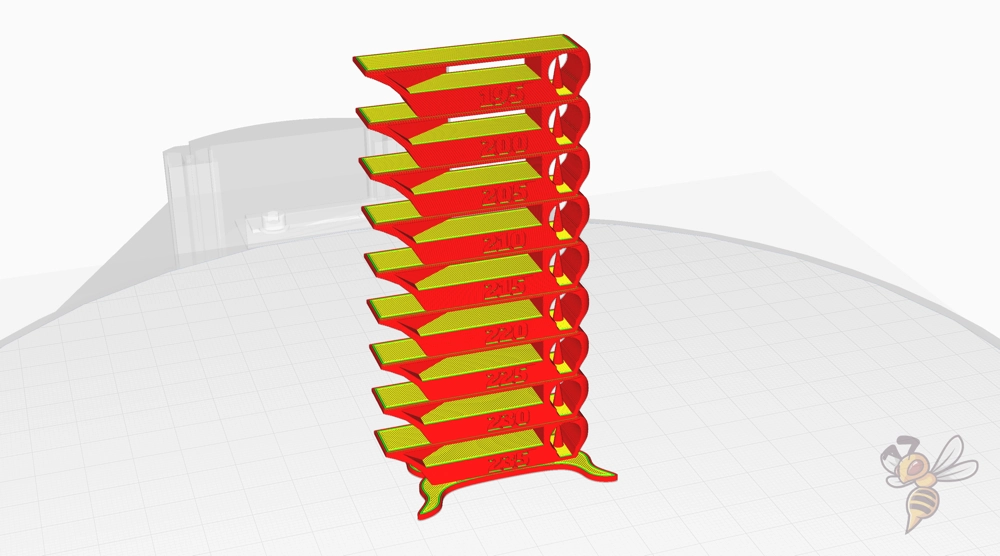
You can find suitable objects either on portals like Printables or Thingiverse. Otherwise, you can use a suitable plugin in Cura and have the towers generated automatically.
The idea with a temperature tower is that the individual layers are printed at different printing temperatures. These calibration objects are designed to provoke certain printing errors. So, after printing, you can see directly at which temperature the fewest printing errors were generated.
Print Bed Temperature
The best print bed temperatures for the Ender-3 Neo in Cura:
- PLA: 60 °C
- ABS: 90 °C
- TPU: 60 °C
- PETG: 65 °C
With the glass print bed of the Ender-3 Neo, you will create a good adhesion with the right print bed temperature. In the case of PETG, you can even create too good adhesion, as mentioned above.
You can increase the print bed temperature to improve adhesion. However, you must be careful not to create an elephant foot. With an elephant foot, the print bed temperature is too high, causing the first layers to flow too far out and widen the bottom of the object.
So, in setting the print bed temperature correctly, you are trying to find the lowest temperature where the print bed adhesion is still adequate.
If this temperature is so high that you create an elephant foot, you can improve the adhesion with different settings and tools and thereby reduce the temperature. With which settings you can improve the adhesion, you can read further down in this article.
Otherwise, you can try to improve the adhesion with tools like a raft, different glues or mouse ears.
Print Speed
The best print speed for the Ender-3 Neo in Cura:
- PLA: 50 mm/s
- ABS: 50 mm/s
- TPU: 30 mm/s
- PETG: 40-50 mm/s
The print head of the Ender-3 Neo is relatively light, although it still has a CR-Touch. Since the extruder is not integrated in the print head due to the Bowden system, the weight of the print head can be kept small. When it comes to printing speed, the weight of the print head plays a major role.
The lighter a print head is, the faster the printing speed can be. When the direction of movement of the print head is changed, vibrations occur that are reflected on the print object. If the vibrations become too strong, visible printing errors such as ringing or ghosting will occur.
The values given above for the print speed are relatively conservative. Usually, you can increase them a bit more without creating visible errors.
Only with flexible filaments should the print speed be set very slowly. Otherwise, the filament can get tangled in the long PTFE tube between the extruder and the nozzle or worsen the extrusion accuracy.
Check Price at:
But there is another option to improve the speed of the Ender-3 Neo extremely. With the Creality Sonic Pad, you can operate the Ender-3 Neo with Klipper and mount an accelerometer on the print head. Through this sensor, this firmware measures the vibrations that occur and can compensate for them.
In my test, I used the pad with the Ender 3 V2 and was able to achieve print speeds of 250 mm/s without generating print errors!
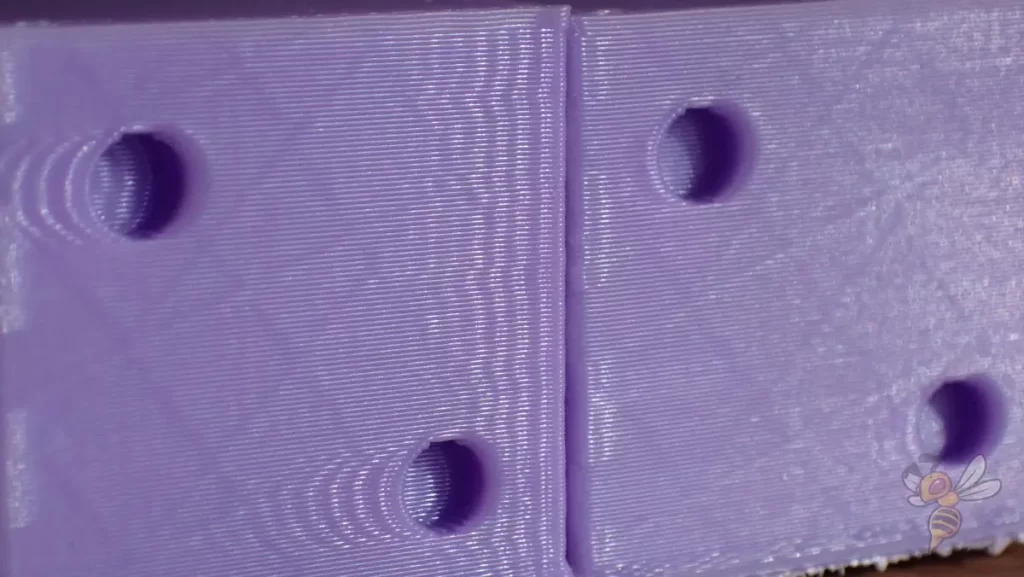
If you don’t want to use the Sonic Pad, but still want to increase the print speed, you can calibrate it. There are also suitable calibration objects for this purpose, where you mainly have to watch out for ringing, i.e. echoes of surface details. You can increase the printing speed until you notice these printing errors.
Layer Height
The best layer heights for the Ender-3 Neo in Cura:
- Decorative objects: 0.1 mm
- Standard: 0.2 mm
- Rough, fast prints: 0.3 mm
Apart from the fact that the correct setting of the other print settings avoids printing errors, the layer height has the greatest influence on the print quality. The smaller the layer height, the smaller the steps between individual layers, which makes the surface smoother.
For decorative objects, a layer height of 0.1 mm is therefore ideal. A low layer height is also advantageous for objects with a mechanical purpose, as it improves the layer adhesion and the resulting strength of the object.
However, if neither the optical nor the mechanical properties of the object are important to you, you can increase the layer height to save printing time.
The Ender-3 Neo comes standard with a 0.4 mm nozzle. As a rule of thumb, the layer height can be 25% to 75% of the nozzle diameter. It can be higher or lower, but this often leads to print errors and requires even more accurate calibration.
Flow Rate
The best flow rate for the Ender-3 Neo in Cura:
- Default value: 100%
- For over-extrusion: 90% to 99%
- For under-extrusion: 101% to 110%
The flow rate in Cura allows you to define how much filament the Ender-3 Neo should extrude per second. The higher the flow rate, the more filament will be extruded. Normally, the flow rate is always 100%, but can be adjusted to match the actual line width with the theoretical value in the slicer.
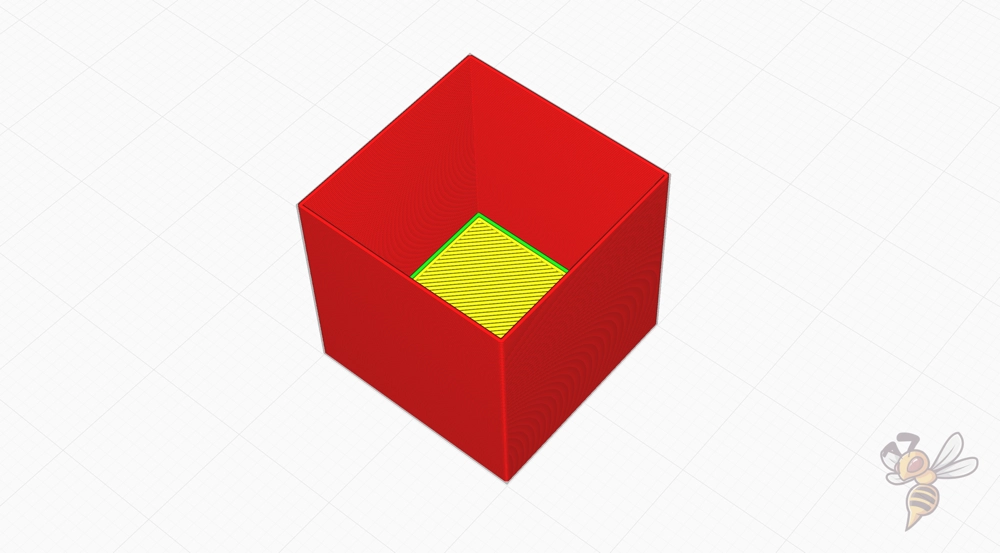
I like to use a hollow cube to calibrate the flow rate. Print it without infill and without top layers. Note the number of walls printed, print the cube, and then measure the wall thickness.
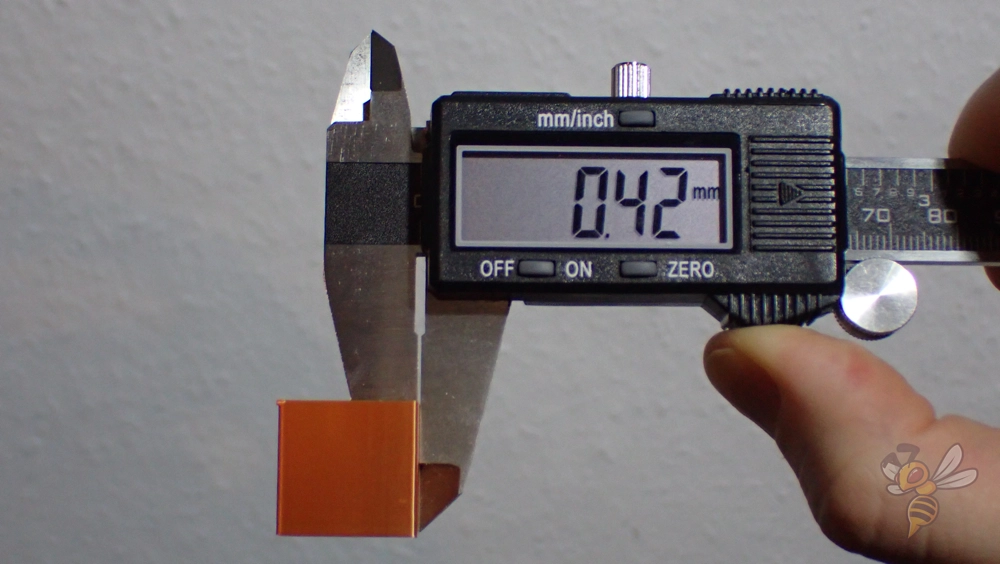
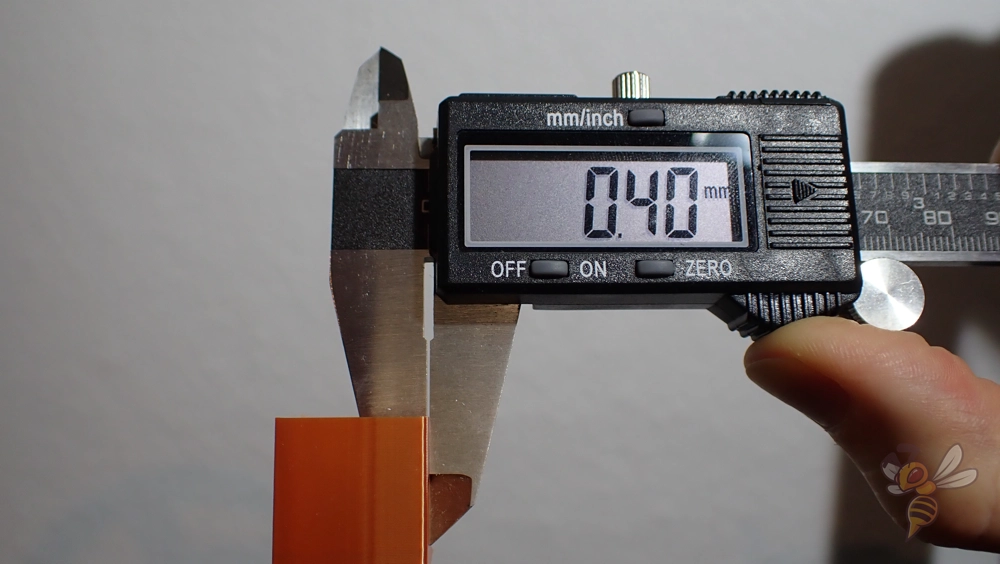
Depending on the actual wall thickness, you need to increase or decrease the flow rate.
Retraction
The best retraction settings for the Ender-3 Neo in Cura:
- PLA: 5 mm at 60 mm/s
- ABS: 4.5-5.5 mm at 50-60 mm/s
- TPU: 4-6 mm at 55-65 mm/s
- PETG: 5-6 mm at 60-70 mm/s
Retraction, along with print temperature, is the print setting that is most dependent on the filament used. It also often differs between manufacturers, which is why calibration is appropriate, even if you are just changing manufacturers.
By calibrating the retraction, you can avoid printing errors such as stringing.
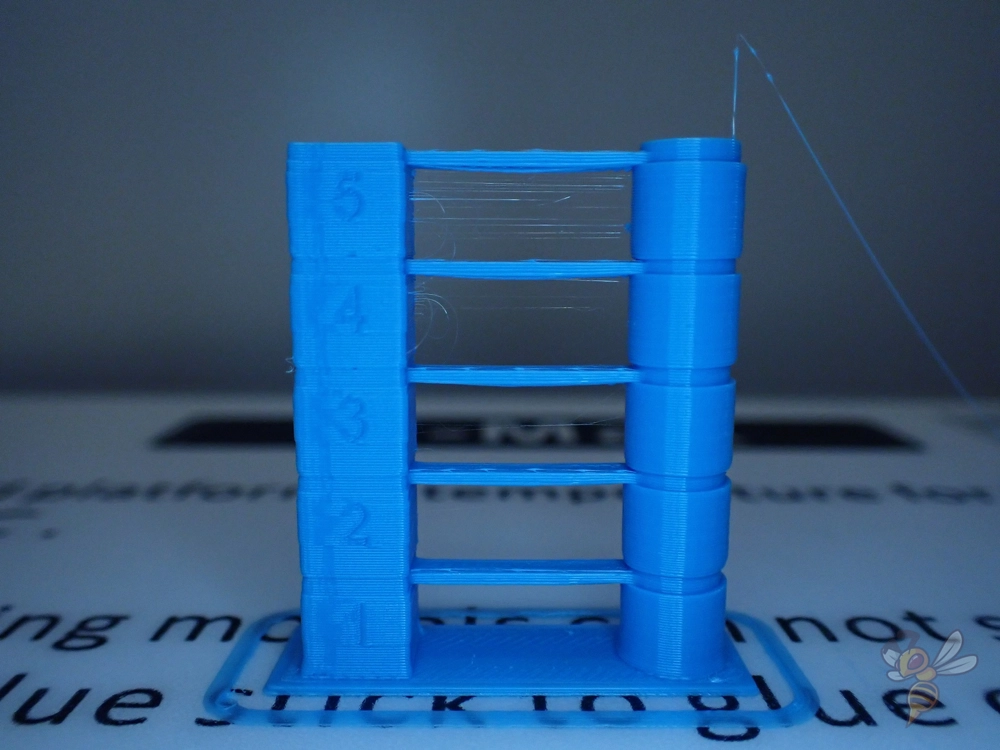
There are also suitable calibration objects for retraction. Similar to the print temperature, there is also a retraction tower. However, since the retraction is mainly divided into two values, you have to print this tower at least twice to find the correct values.
With particularly susceptible filaments, you sometimes have to calibrate the print temperature and the retraction several times in succession, since they are dependent on each other.
Infill
The best infill density for the Ender-3 Neo in Cura:
- Decorative objects: 0-15%
- Standard objects: 15-50%
- Stable objects: 50-100%
The internal structure of the object is independent of the 3D printer used. How dense you want the infill to be inside the object and what pattern you choose for it depends solely on how stable you want the object to be in the end. The higher the density, the more stable it will be.
High stability (for stable objects):
- Cubic
- Cubic subdivision
- Octet
- Gyroid
Medium stability (for standard objects):
- Grid
- Triangles
- Tri-Hexagon
Low stability (for decorative objects):
- Lines
- Zigzag
- Lightning
First Layer
These are the best Cura settings for the first layer on the Ender-3 Neo:
- Layer height: 100-200% of normal layer height (higher values to increase print bed adhesion)
- Line width: 100-200% of normal line width (higher values to increase print bed adhesion)
- Print temperature: Same as the rest of the object or 5-10 °C higher for better print bed adhesion.
- Print speed: 50% of normal print speed (i.e. 25 mm/s for a normal print speed of 50 mm/s) or 5-10 mm/s for high print bed adhesion
- Flow rate: 100-110% (higher values for poor print bed adhesion)
You have a great influence on the print bed adhesion with the settings for the first layer in Cura. All of the above settings are aimed at making the filament cool more slowly. The longer it sits hot on the print bed, the better it can bond to its surface.
On my Ender-3 Neo, reducing the print speed to 5 mm/s was enough to create good adhesion for most filaments.
If you continue to have problems with adhesion, you can apply the other tips or use tools like glue. All the steps you can take to increase print bed adhesion can be found in this article: 3D Print Not Sticking to the Bed: How to Fix it Step-by-Step
Conclusion
In addition to the correct machine settings, the print settings are also important for producing good print quality. With the values given here, you should get relatively good results.
Perfect results can only be achieved if you calibrate the most important print settings as described in this article.
Have fun 3D printing with your Ender-3 Neo!
Disclosure: This website is the property of Martin Lütkemeyer and is operated by Martin Lütkemeyer. Martin Lütkemeyer is a member of the Amazon Services LLC and other Affiliate Programs. These are affiliate advertising programs designed to enable websites to earn advertising revenue through advertising and linking to Amazon.com and others. Links marked with * are affiliate links.

