
- Wet Filament: Prevention, Symptoms & Drying - July 18, 2024
- Sovol SV08 – Best PrusaSlicer Settings & Profile - June 26, 2024
- Sovol SV08 – Best Orca Slicer Settings & Profile - June 26, 2024
Disclosure: Links marked with * are Affiliate Links. I earn from qualifying purchases if you decide to make a purchase through these links – at no additional cost for you!
What influence do the layer height and the nozzle diameter have on the end result in a 3D print? In a 3D printer, individual layers are applied on top of each other using a filament. The layer height refers to the height of each individual layer.
For most printers, the adjustable layer height is between 0.1 and 0.4 mm. At the same time, however, the layer height also depends on the nozzle diameter. This is because the nozzle diameter results in a maximum and a minimum achievable layer height.
But how do the layer height and nozzle diameter affect print quality?
Thicker layers offer higher printing speeds with lower resolution. With thinner layers, higher resolution can be achieved with increased printing time. The maximum layer height is about 75% of the diameter of the nozzle and the minimum layer height about 25%.
That was the short version. You can find out exactly how that works in this article.
Table of Contents:
- 1 Layer Height
- 2 Nozzle
- 3 Relationship Between Layer Height and Nozzle Diameter
- 4 Practical Test & Comparison
- 5 Related Questions
- 5.1 Which layer heights are typical for the different printing processes?
- 5.2 What materials are most nozzles made of and why?
- 5.3 What are brass nozzles coated with?
- 5.4 What are stainless steel nozzles suitable for?
- 5.5 How much does a nozzle actually cost?
- 5.6 Which nozzle diameter is suitable for what? What is the standard diameter?
- 5.7 What else should be considered for the nozzle diameter?
- 6 Conclusion
Layer Height
In 3D printing, the object is built up layer by layer. For commercially available 3D printers, the layer height is approximately between 0.1 and 0.4 mm. Of course, there are also 3D printers available that can also create a layer height below 50 μm (= 0.05 mm).
With some printing processes, the layer height has hardly any effect on the result. But especially with the SLA and FDM processes, the choice of layer thickness is a very important factor.
The effect of layer height on the printing process
The selected layer height has a direct effect on the print result. Choosing the right layer height is quite comparable to deciding on the resolution of a TV screen. A lower layer thickness leads to a higher resolution of the object and to smoother surfaces. The layer thickness (= Z-resolution) can be set on every 3D printer and is sometimes also dependent on the 3D printing process.
On the other hand, the layer height has significant effects on the printing process. If, for example, the layer height is halved from 300 μm to 150 μm, then printing takes twice as much time and the costs also increase enormously. With a lower layer thickness, more layers are applied on top of each other, this circumstance leads to a higher error rate.
When lower layer thicknesses make little sense
A lower slice height leads to a higher Z-resolution, nevertheless, it is not always useful. The key question when deciding on the slice height is – is appearance more important or functionality?
If the object has only horizontal surfaces and no or hardly any curves, then the effects of a lower layer height are hardly noticeable. If the angle between two layers is 90°, then a reduced layer height makes no sense. If the target object is, for example, a cube with an edge length of 60 mm, then reducing the layer height from 150 μm to 60 μm has no effect.
With a lower layer height, not only the printing time and the costs increase. In the end, a greater layer height often leads to improved mechanical properties. If, for example, the part is to be post-processed (sanded or painted), then a reduced layer height is more of a disadvantage.
The advantages of a lower layer height
The result of a lower layer height is a higher Z-resolution and thus a smoother surface. If you are dealing with delicate, detailed objects, then you should tend to use a lower layer height.
The effect is most effective when the object has curves, angles, or holes. Imagine there is a hole printed along the horizontal axis.
The hole would have to be cut in several superimposed layers, resulting in stair-like edges on the surface. With a significant proportion of curves, the lower layer height leads to higher accuracy and detail.

Nozzle
The nozzle is one of the most important components of a 3D printer. The nozzles have a tapered shape and are made of various materials.
They have a thread at the bottom end with which they can be screwed to the hot end of the 3D printer. The length of the thread and also the diameter can differ for the individual nozzles. You should therefore check in advance whether the respective nozzle is compatible with your 3D printer and for which filaments it is suitable.
Nozzle diameter
The borehole diameter (nozzle diameter) for most nozzles is between 0.1 and 2 mm. The standard are nozzles with a diameter of 0.4 mm. It is worth buying a set of different nozzles. The nozzle diameter has a significant influence on the printing result.
Nozzles with a large diameter are suitable for an increased layer height, nozzles with a small diameter are ideal for a low layer height and thus for a higher resolution.
Nozzle materials
The nozzles for 3D printers are often made of brass, copper or (stainless) steel*. Optionally, a coating is also available. Depending on the intended use and requirements, nozzles made of other materials or alloys are also available. Some nozzles are made of ruby at the tip, for example.
The ideal material depends on the filament and your own requirements. For example, for a very hard filament, stainless steel nozzles are more suitable than brass, even if the thermal conductivity is somewhat worse.
Relationship Between Layer Height and Nozzle Diameter
The nozzle diameter in the 3D printer has a direct influence on the recommended layer thickness and thus also on the printing speed. Depending on the nozzle diameter, there is a recommended maximum and minimum layer height.
The maximum layer height is calculated according to formula 1, the minimum layer height according to formula 2:
- maximum layer height = 0.75 * nozzle diameter
- minimum layer height = 0.25 * nozzle diameter
Of course, these are rules of thumb, but they are helpful for orientation. If the nozzle diameter is 500 μm, then the maximum layer height is 375 μm and the minimum layer height is 125 μm. For example, many experts print with only half the nozzle diameter. With a nozzle diameter of 0.2 mm (= 200 μm), they print with a selected layer height of 100 μm. The given nozzle diameter limits the maximum amount of material that can be extruded.
A very small nozzle diameter also implies some low printing speed for the following reasons:
- the diameter limits the amount of material to be extruded
- more pressure is needed to press a large amount of filament through a small nozzle
- at an increased speed, more material must be transported in the same time period
With an increased nozzle diameter, it is therefore possible to print faster. With a larger nozzle, however, you have to choose a larger layer height, which leads to a coarser resolution.
Practical Test & Comparison
To put these formulas to the test, I equipped my Anycubic Mega S with different nozzles. I set the layer height to 25%, 50% and 75% of the nozzle diameter respectively.

| Layer Height | Nozzle Diameter | Print Time |
|---|---|---|
| 0.7 mm | 1.0 mm | 0:06 |
| 0.5 mm | 1.0 mm | 0:08 |
| 0.25 mm | 1.0 mm | 0:15 |
| 0.6 mm | 0.8 mm | 0:07 |
| 0.4 mm | 0.8 mm | 0:10 |
| 0.2 mm | 0.8 mm | 0:19 |
| 0.45 mm | 0.6 mm | 0:13 |
| 0.3 mm | 0.6 mm | 0:18 |
| 0.15 mm | 0.6 mm | 0:37 |
| 0.3 mm | 0.4 mm | 0:24 |
| 0.2 mm | 0.4 mm | 0:38 |
| 0.1 mm | 0.4 mm | 1:03 |
| 0.225 mm | 0.3 mm | 0:46 |
| 0.15 mm | 0.3 mm | 1:07 |
| 0.075 mm | 0.3 mm | 2:15 |
| 0.15 mm | 0.2 mm | 1:26 |
| 0.1 mm | 0.2 mm | 2:08 |
| 0.05 mm | 0.2 mm | 4:18 |
What is directly noticeable in the pure data is the big difference between the printing times.
Especially with the smaller diameters, this difference becomes greater and greater. With the 0.2 mm nozzle and at 25%, i.e. 0.05 mm layer height, this is already over four hours for the selected object!
Here you can see how the settings and the different nozzle diameters affected the surface:
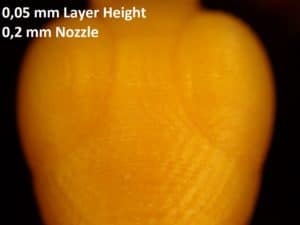
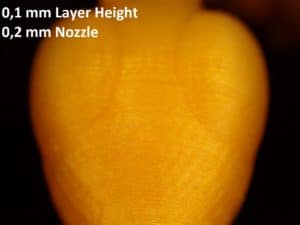
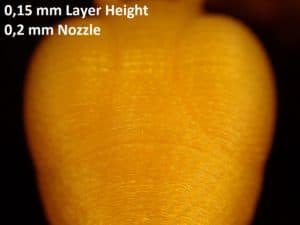
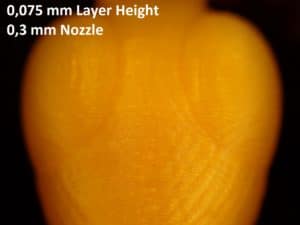
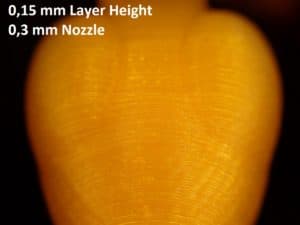
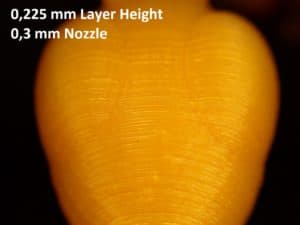
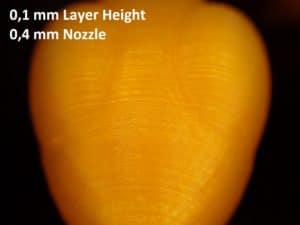
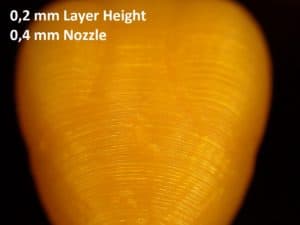
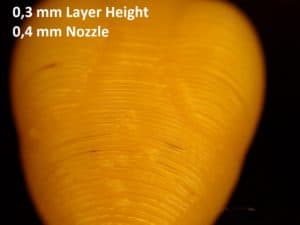
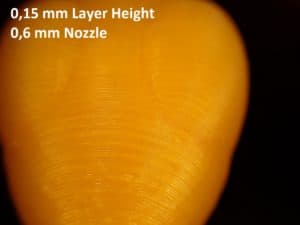
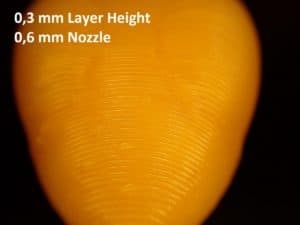
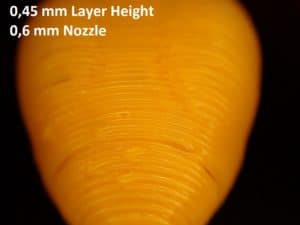
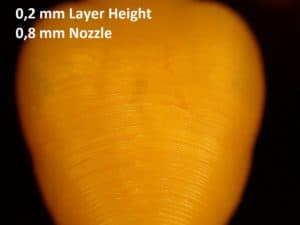
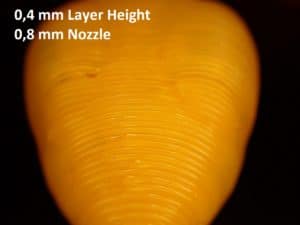
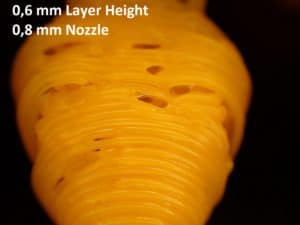
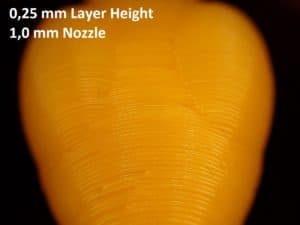

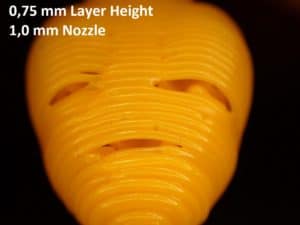
From the tests, I have learned that for most objects it makes no difference to the eye if you use a layer height of 0.1 mm or less.
You can really only see the difference between 0.1 mm and 0.05 mm if you look very closely.
Besides, it’s always a question of whether it’s worth the time.
The printing time doubles very quickly. Likewise, the printing time doubles quickly if you want to print the same layer height with a smaller nozzle (e.g. 0.15 mm layer height with a 0.6 mm nozzle takes 37 minutes and 0.15 mm with a 0.3 mm nozzle takes 1 hour and 7 minutes).
This is, of course, because you have to print the same volume. With a smaller extrusion width, the printhead has to travel more distance and print more infill walls to get the same printed volume.
TIP: Learn how to calibrate your 3D printer to get perfect results every time in my 3D printing course: FDM 3D Printing: The Comprehensive Course from A to Z
(The course teaches everything you need to know for FDM 3D printing in over 60 lessons. The course will get beginners up to my level in no time!)
Related Questions
Which layer heights are typical for the different printing processes?
- FDM: 0.05 to 0.4 mm (standard 0.1 mm)
- SLA/DLP: 0.025 mm to 0.1 mm (standard 0.05 mm)
- SLS: 0.08 mm to 0.12 mm (standard 0.1 mm)
- Material jetting: 0.016 to 0.03 mm (standard 0.016)
- Binder Jetting: 0.1 mm
- DMLS: 0.03 mm to 0.05 mm
What materials are most nozzles made of and why?
Most 3D printer nozzles are made of brass. Brass has proven itself especially due to its good thermal conductivity. These nozzles are very easy to manufacture and are inexpensive. Brass nozzles are not suitable for filaments with a strong abrasive effect.
What are brass nozzles coated with?
A coating protects the brass nozzle from excessive abrasion. Chrome or nickel can be used as a coating.
What are stainless steel nozzles suitable for?
Stainless steel nozzles are much more robust than those made of brass or copper. A disadvantage is the poorer thermal conductivity, so you have to set a higher pressure temperature.
How much does a nozzle actually cost?
The price, of course, depends on the material. The cheapest are nozzles made of nickel without coating, these are sometimes available for less than 10 bucks. The price for stainless steel nozzles ranges from $15 to $25. Noticeably more expensive are nozzles with ruby, these can also cost $90 or more.
Which nozzle diameter is suitable for what? What is the standard diameter?
Most 3D printers are equipped with 0.4 mm nozzles. Nozzles with a diameter of < 0.4 mm are suitable for objects with intricate details. Nozzles with a diameter of 0.6 to 1 mm are perfect for less precise and fast 3D prints.
What else should be considered for the nozzle diameter?
With a higher nozzle diameter and a higher printing speed, more filament must be melted. Note that the extruder and the heating cartridge have a power limit.
Conclusion
Both the layer height and the nozzle diameter have a decisive influence on the printing time, the costs and the printing result. The given nozzle diameter results in a minimum and a maximum layer height each (see formulas 1 and 2).
Basically, the higher the nozzle diameter, the greater the maximum possible layer height. A greater layer height often also leads to fewer print defects and improved material properties. If the part is to be reworked, then a greater layer height is optimal.
In 3D printing, the object is built up layer by layer, with the layer height defining the height or thickness of each individual layer. A low layer height leads to a higher Z-resolution and to a significantly increased printing time. The maximum printing speed is also limited by the nozzle diameter. A higher nozzle diameter enables faster printing.
Nozzles with a small diameter of < 0.4 mm are suitable for printing fine, delicate objects with many details. The ideal material for the nozzles depends on the filament, but nickel is often a very good choice. With numerous curves, a better result is achieved this way due to the flatter surface. One disadvantage is that it increases the time needed for printing. If you halve the layer height, then the 3D printer will take twice the time.
So, when choosing nozzle diameter, the following factors are crucial:
- Does the object have many curved surfaces, holes or fine details? Then small nozzles and a low layer height are ideal. For non-curved objects with horizontal surfaces and 90° angles (cubes, cuboids), you should choose a high layer height.
- Is it a matter of visual appearance or functionality? If the object has to be reworked, then a greater layer height is clearly more practical. After all, printing is also a question of cost. If it’s mainly about functionality, then you should go for a greater layer height.
Disclosure: This website is the property of Martin Lütkemeyer and is operated by Martin Lütkemeyer. Martin Lütkemeyer is a member of the Amazon Services LLC and other Affiliate Programs. These are affiliate advertising programs designed to enable websites to earn advertising revenue through advertising and linking to Amazon.com and others. Links marked with * are affiliate links.
