
- Wet Filament: Prevention, Symptoms & Drying - July 18, 2024
- Sovol SV08 – Best PrusaSlicer Settings & Profile - June 26, 2024
- Sovol SV08 – Best Orca Slicer Settings & Profile - June 26, 2024
Disclosure: Links marked with * are Affiliate Links. I earn from qualifying purchases if you decide to make a purchase through these links – at no additional cost for you!
Upgrades have always been very popular with 3D printers. Especially with Creality models, a feature is often added or replaced with something better. With the Creality Sonic Pad* the operation is improved and the print speed is increased without losing print quality. Especially with older models, the increase in value through this upgrade is enormous.
The Creality Sonic Pad is a 3D printing pad based on the Klipper firmware and compatible with most FDM printers. This device allows a 3D printer to be operated via the pad. It also installs Klipper as firmware, which increases printing speed.
In this hands-on review, I’ll introduce you to the Creality Sonic Pad in detail and show you what improvements you can expect in print speed and accuracy. As an example in this review, I use the Ender 3 V2.
Check Price at:
Table of Contents:
- 1 Key Takeaways
- 2 Who Should Buy the Creality Sonic Pad?
- 3 Advantages & Disadvantages of the Creality Sonic Pad
- 4 Technical Specifications of the Creality Sonic Pad
- 5 Unboxing and Overview of the Creality Sonic Pad
- 6 The Best Features of the Creality Sonic Pad
- 7 Using the Sonic Pad with a Creality 3D Printer
- 8 Speed vs. Quality – With and Without Sonic Pad
- 9 Is the Creality Sonic Pad Worth It?
Key Takeaways
- The Creality Sonic Pad is connected to the 3D printer and serves as the new user interface.
- The software is based on Klipper, which creates many new operating possibilities.
- Due to the Klipper firmware, high print speeds can be achieved while maintaining the same print quality.
Who Should Buy the Creality Sonic Pad?
The Creality Sonic Pad is a great choice for anyone looking to enhance their 3D printing experience. The firmware offers many features that can maintain excellent quality even at high print speeds. The Sonic Pad is also pre-configured for many Creality 3D printers, making it a great choice for anyone with a compatible printer.
Advantages & Disadvantages of the Creality Sonic Pad
PRO:
- Increases print speed
- Based on Klipper
- Large touch screen
- Powerful processor
- Many connection possibilities
- Model preview
- Open source
- Macros are possible
CON:
- (Insignificant:) The 3D printer can only be operated with the pad.
Technical Specifications of the Creality Sonic Pad
- Processor: CrealityT800 64-bit
- RAM: 2 GB
- ROM: 8 GB
- WLAN Standard: 802.11 b/g/n
- Connections: USB 2.0×4, LAN
- Display: 7-inch IPS, 1024 × 600 resolution, multi-touch
- Size: 222 × 128 × 40 mm
- Weight: 0.46 kg
Check Price at:
Unboxing and Overview of the Creality Sonic Pad
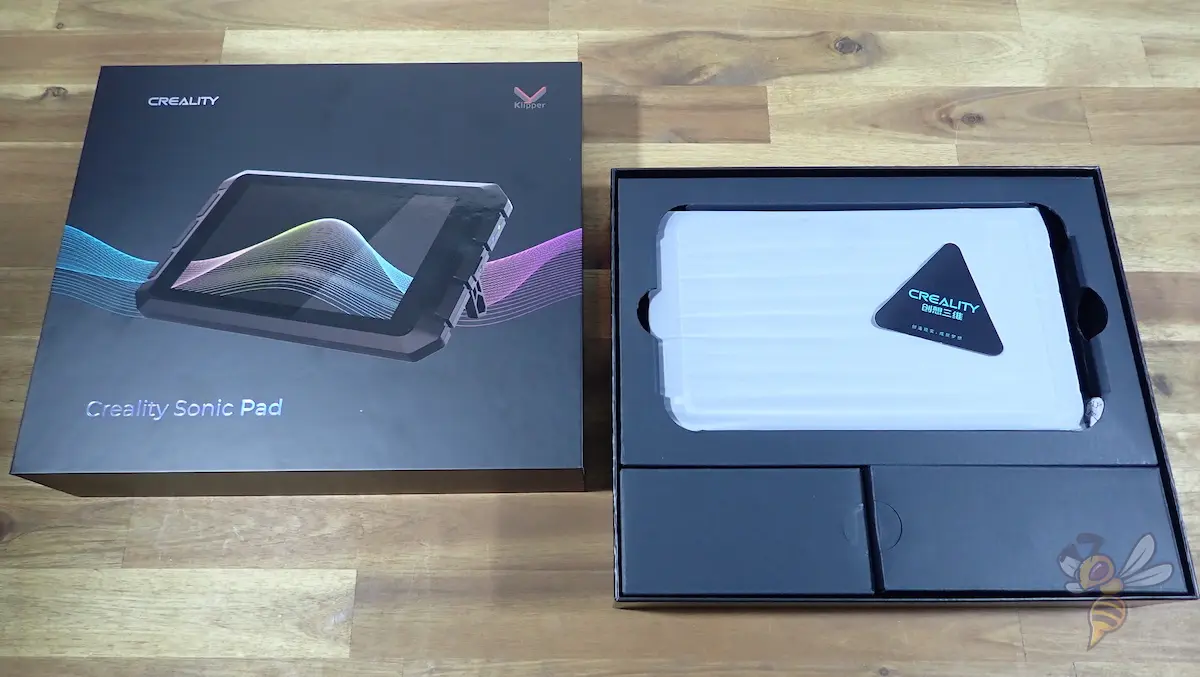
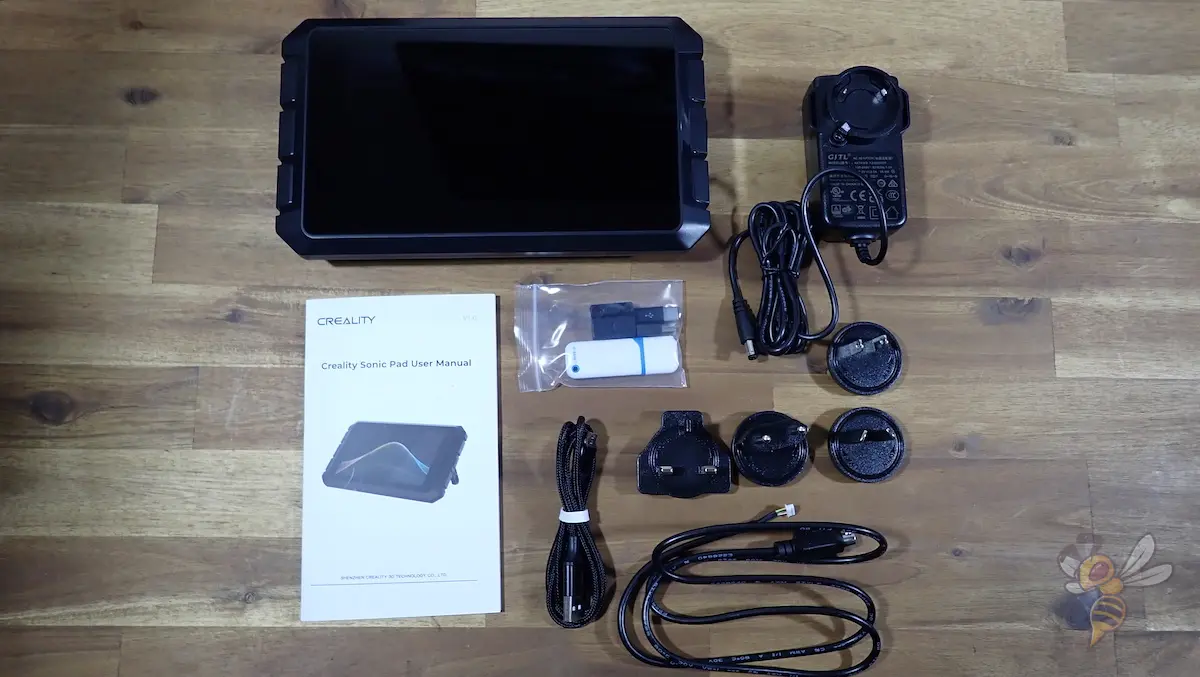
The Creality Sonic Pad comes well packaged and includes everything to connect it to most 3D printers.
The following items are included in the scope of delivery:
- Creality Sonic Pad
- Power supply with the most common adapters
- G-sensor with matching cable (measures the acceleration forces when the hotend moves)
- USB cable
- Micro-USB to Mini-USB adapter
- Micro USB to Type-C adapter
- Operating instructions
- Screws
- USB flash drive:
The goal of the Sonic Pad is to be as ergonomic as possible while still offering as many technical features as possible. For the most part, this has been achieved both on the hardware level and in the software.
The front of the Sonic Pad mainly consists of the large 7-inch color touchscreen and grippy elements on the sides. This definitely makes it look and feel like a “pad”. However, it is quite a bit thicker than a tablet, as there are many connectivity options on the back.
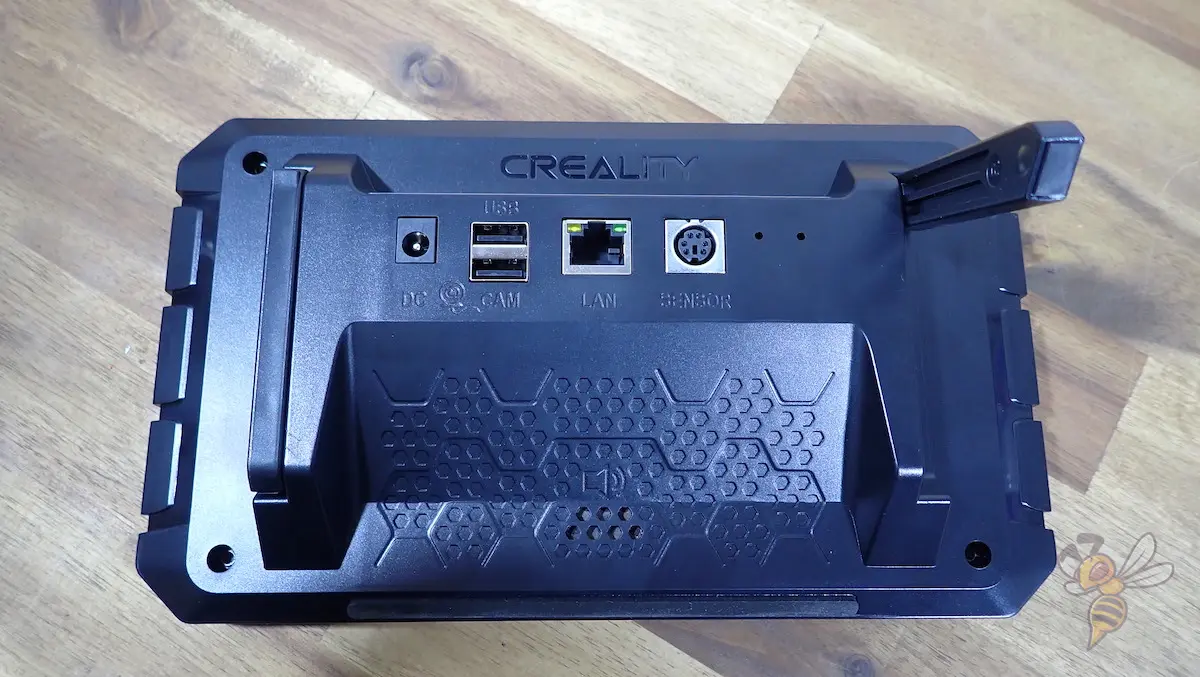
Besides the two USB slots on the left side and the on/off switch on the right side, there are another 2 USB slots, the power supply, a LAN port and the slot for the accelerometer or G-sensor on the back.
There is also a speaker on the back that provides audible feedback for certain controls in the interface.
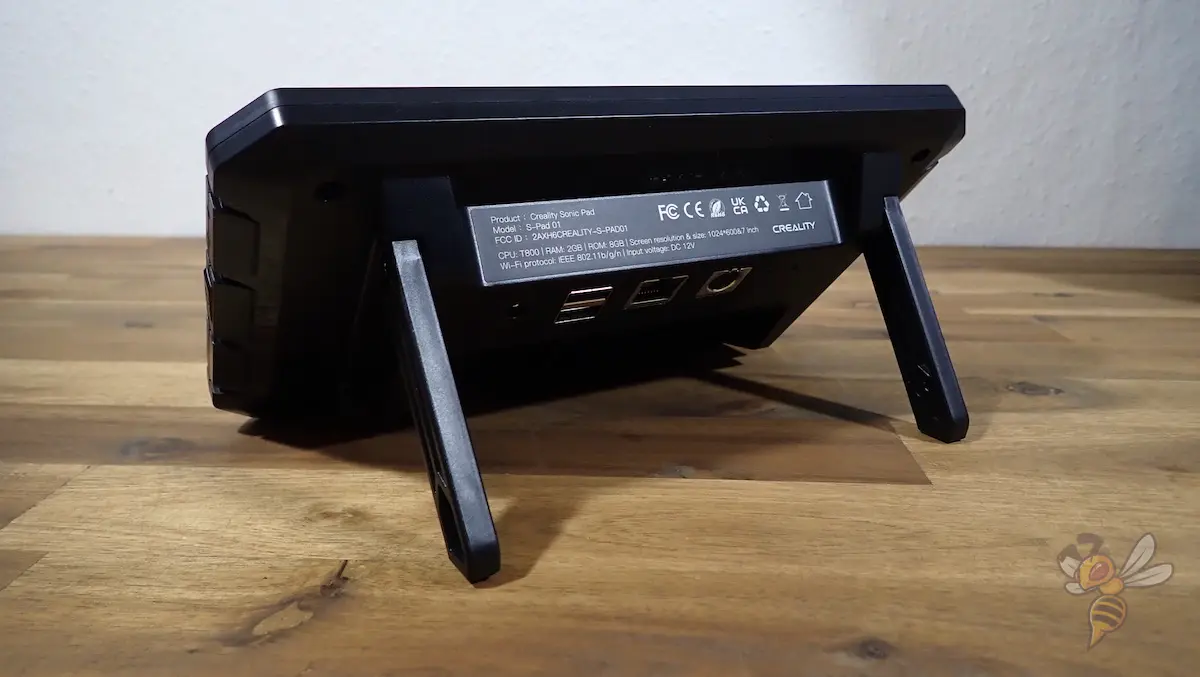
Another practical design features are the two feet that fold out on both sides of the back of the Sonic Pad. This allows the pad not only to be held and put down in the hand, but also to be set up.
Before we get to the practical test of the Sonic Pad, let’s take a look at the most important features in detail.
The Best Features of the Creality Sonic Pad
The Creality Sonic Pad has many features that can enhance the 3D printing experience.
The powerful processor and large memory help to ensure good print quality even at high speeds. The large touchscreen makes it easy to navigate menus and set up prints, and the multiple connectivity options mean it can be connected to almost any printer. Plus, the open-source firmware means you can customize the software to suit your needs.
Higher Speed with Constant Quality with Klipper

Klipper is a 3D printer firmware that reduces or eliminates ringing by adjusting the print speed on the sonic pad based on measurements of the acceleration forces as the hotend moves.
The result is smoother prints with less ringing. The processor in the Creality Sonic Pad is fast enough to run Klipper without any problems. That means you can take advantage of higher print quality without sacrificing speed.
Further down in this review, I practically tested what a difference this makes on an Ender 3 V2 (spoiler: a big one!).
In order for Klipper to be able to compensate for the accelerations of the hotend by adjusting the printing speed, it requires data about this acceleration. For this purpose, there is the G-sensor included in the scope of delivery, including a cable.
The G-sensor is attached to the hotend and measures the acceleration forces during printing as the hotend moves. This data is then used by the Klipper firmware to adjust the print speed, resulting in smoother prints with less ringing.
Klipper uses the Sonic Pad’s powerful processor to calculate the movements of the printer’s stepper motors with an accuracy of 25 microseconds or better. This also reduces oozing and improves print quality.
Klipper also supports printers with multiple microcontrollers, allowing clock variations between controllers to be compensated for.
In a nutshell, the two main features why Klipper is so popular are Resonance Compensation and Pressure Advance:

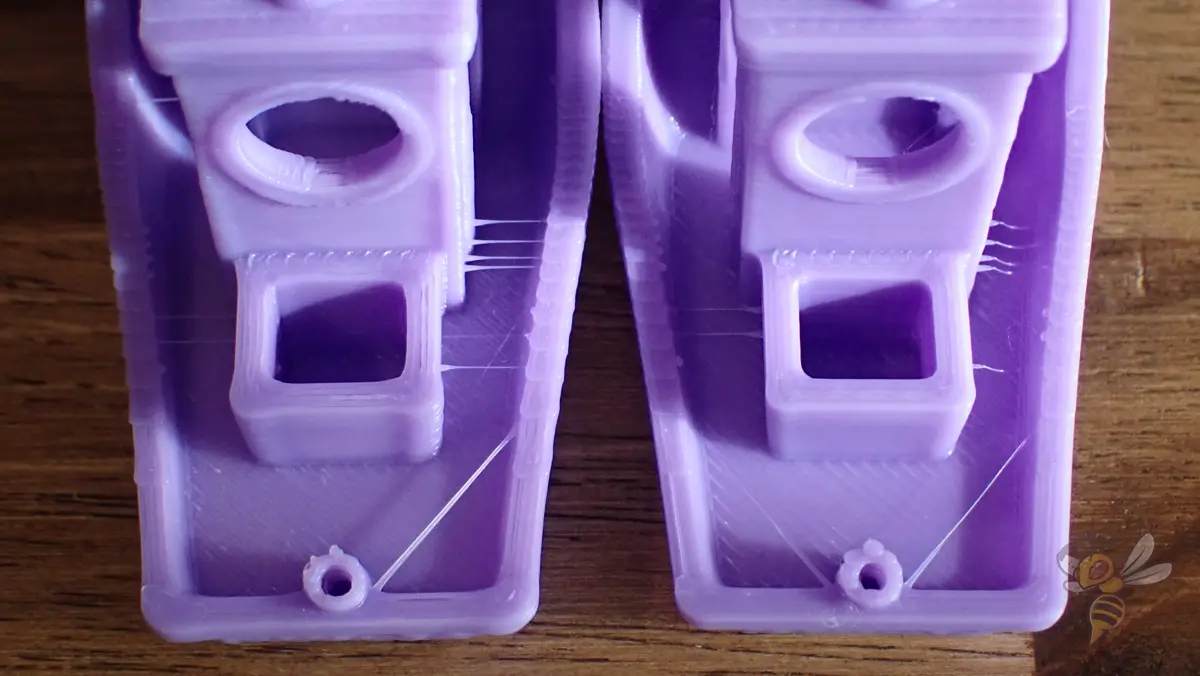
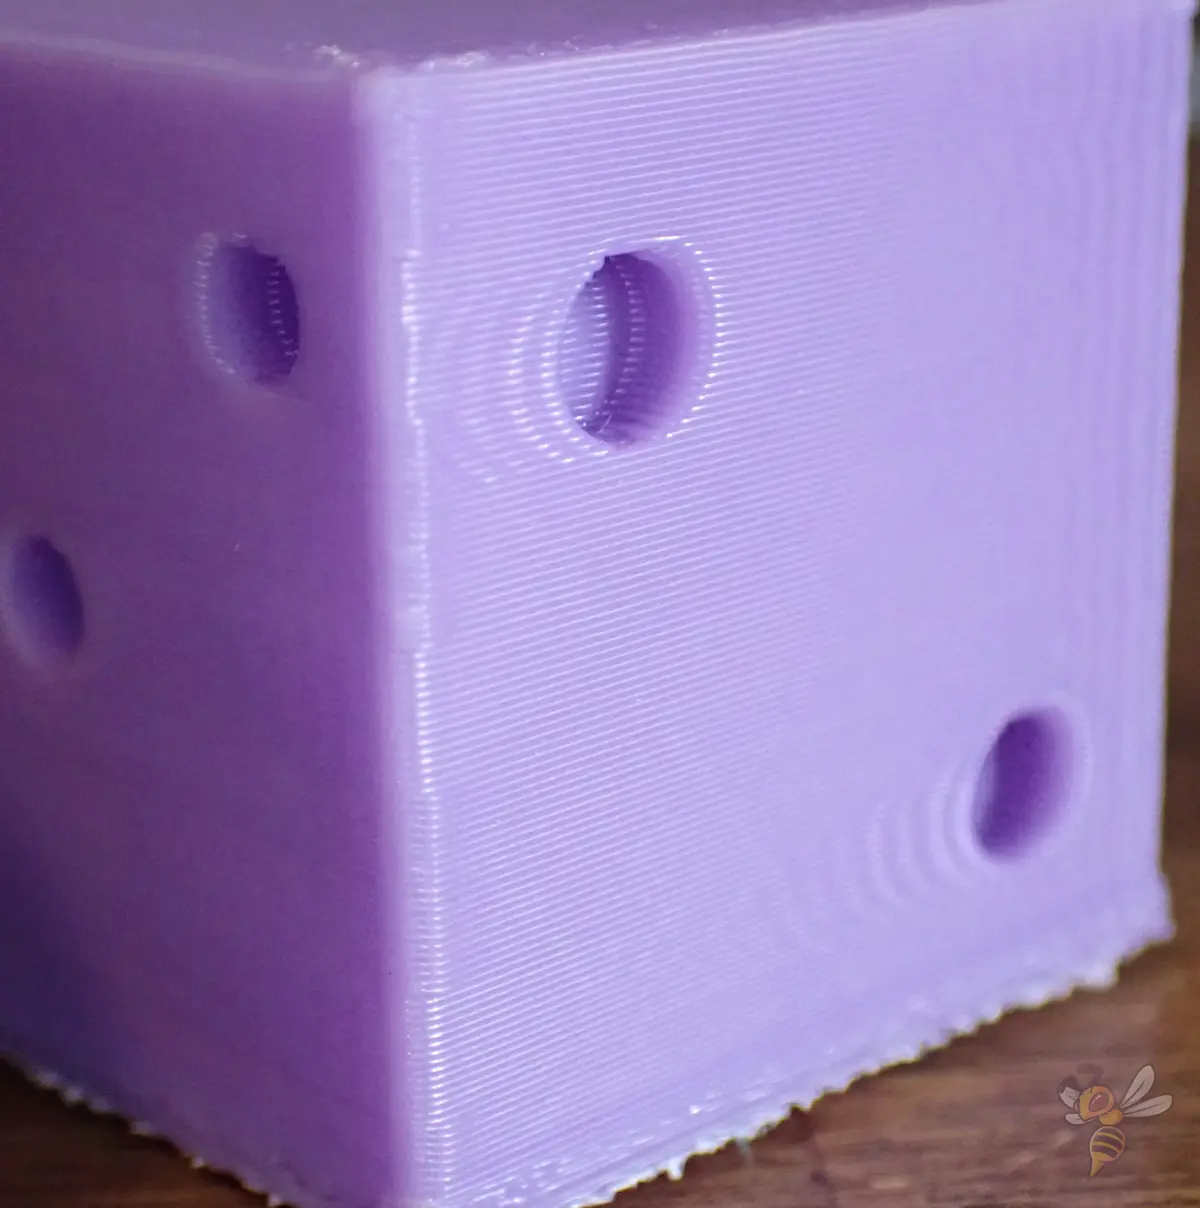
Resonance Compensation: Rapid changes in direction of the hotend create acceleration forces that can alter the pre-programmed movement of the nozzle. The result is ringing – a print error that multiplies certain surface features, like a slight echo (see pictures). Klipper can compensate for these acceleration forces, or even measure and compensate for them via the G-sensor. This minimizes this printing error.
Pressure Advance: This prevents uncontrolled leakage during non-extrusion movements. This can greatly reduce printing errors like stringing. In addition, the Pressure Advance improves the extrusion behavior at corners.
Compatible with Most 3D Printers
The Creality Sonic Pad is compatible with all Creality FDM 3D printers and comes with several pre-built profiles that make setup effortless.
The Creality Sonic Pad is compatible with a wide range of 3D printers. As long as the 3D printer can be connected to the pad and has a Klipper firmware, it can be operated via the Sonic Pad.
Additionally, the Creality Sonic Pad has pre-built profiles that make setup very straightforward. So, you can quickly and easily connect your 3D printer to the Creality Sonic Pad.
If your 3D printer is not one of those for which a pre-built profile is available in the Sonic Pad, you will need to get a config file or create one yourself. The easiest way is to find the right profile in the list on GitHub. Although Klipper is classically run from a Raspberry Pi, the installation documentation on Klipper3D.org is still very helpful. There, the software is also described in detail if you want to learn more about it.
Big Touch Screen
The Creality Sonic Pad has a large 7-inch color touchscreen with a resolution of 1024 × 600 pixels. This makes the display clear and pleasant to look at.
The touchscreen is also very responsive, so you can select the different menu items quickly and easily.
All the usual settings can be made via the menu, but with an improved graphics output. Especially for older 3D printers, this is a good upgrade. So, the Sonic Pad is not only a bigger screen for your 3D printer, it also offers a better operation.
The main menu displays the current temperature of the hotend and the print bed, including a graphical representation. This allows you to estimate approximately when the desired temperature will be reached.
The user interface, or more precisely the settings you can make, differs to some extent between the 3D printers. Nevertheless, the menus look very similar and the icons and colors are identical.
Thanks to the high resolution of the screen, you can also connect a webcam to the Sonic Pad. At first glance, this sounds relatively pointless, since the pad is always close to the 3D printer, but you can then monitor the 3D print via the web interface.
While modern 3D printers have better and better screens and touchscreens, the pad is still worth it in my eyes. It is still a bit bigger than normal 3D printer displays and offers besides the better usability also the remote control function via the web interface and other great features. It is therefore not only a perfect upgrade for older 3D printers.
Powerful Hardware
The Creality Sonic Pad has a powerful processor and lots of RAM. This ensures a stable connection with the 3D printer and fast response times. So, you can operate the 3D printer quickly and easily via the Sonic Pad.
Instead of a Raspberry Pi, the Sonic Pad is used here to run the Klipper software. And if you compare it to the solution with a Raspberry Pi, the installation of the Creality Sonic Pad is much easier and the result is nicer and better suited to the application.
The advantage of this individual solution is that the software and the hardware are exactly coordinated and therefore work smoothly and quickly together.
The four USB ports – two on the side and two on the back – are also very handy. You can also connect a camera to the Creality Sonic Pad via one of the USB ports. With the camera or webcam connected, you can monitor your print from anywhere via the web interface. There are also Creality 3D printers that come with a webcam (like the CR-10 Smart Pro for example). In this case, you don’t need an additional camera to monitor the 3D printer via the Sonic Pad.
Model Preview
The Creality Sonic Pad displays preview images of the 3D print files. This allows you to select the right files not only by name, but also by image. This makes operation more efficient and visually appealing.
To activate the model preview, different actions have to be performed depending on the slicer. With Cura, for example, a “Create Thumbnail” script must be activated and the file must be saved in UFP format after slicing.
Custom Macros and Advanced Options
The advanced options allow you to further configure the Creality Sonic Pad. Custom macros can be created, PID calibrations can be made, the G-Sensor can be installed and much more.
Display macros: Using these macros, certain sequences can be defined and automatically executed one after the other. Especially in the professional field, this can significantly increase efficiency because time is money, as the saying goes.
PID Calibration: This option allows you to calibrate the temperature fluctuations of the hotend and the print bed. The so-called PID tuning is greatly simplified and can be done within 5 to 10 minutes. Especially, the PID tuning of the hotend can improve the print quality because the extrusion becomes more even.
Measure resonances (G-sensor): This menu allows you to install the included resonance sensor, or accelerometer or G-sensor. After you have mounted it on the hotend as described, you can connect it to the Sonic Pad via the menu. The menu guides you through the entire process with clear images and instructions.
Timelapse Videos
A camera can be connected to the Creality Sonic Pad via a USB interface. A time-lapse recording of the 3D print can then be started via the menu.
You can set the connected camera to connect automatically when the printer and Sonic Pad are started. If you check the box to activate the time-lapse video function, the camera will take pictures with every print. You can also define how many images are taken, but by default one image is taken per layer.
The pad stores the recorded videos on the inserted media and they can be played, deleted or exported via the folder icon in the menu on the pad.
While this feature is not interesting for me personally, as I create time-lapse videos with an SLR camera (and upload them to YouTube), this feature is great for anyone who wants to share their 3D prints.
Operable via Browser
The Creality Sonic Pad can also be operated via a browser. This allows the 3D printer to be monitored from anywhere and also with a smartphone.
To access the pad via the browser, you need the IP address of the pad. You can find this out in the menu. Then you can simply open a new tab in your browser and enter the IP address with “http://” in front of it as the address.
Through the browser interface, you can not only monitor the current progress of the print or access the connected camera, you can also make all the settings here. The browser interface is just as much a full-fledged interface as the pad itself.
Open Source
The Creality Sonic Pad is open source and anyone can modify and customize the source code. This gives users more control over their printer and allows them to change its functionality as they wish.
A large part of the 3D printing community is interested in upgrades or other improvements to their 3D printers. Therefore, it is no wonder that open source is very common. So that specialists can also let off steam creatively with the Sonic Pad, Creality has not put a stop to this and made the complete source code open source.
Many Interfaces
With four USB ports, a LAN port, a sensor port and a WLAN module, the Creality Sonic Pad has a wide range of connection options. Thus, various printers, storage media or cameras can be connected simultaneously.
In my case, I need a total of four of the six ports on the Ender 3 V2. I require one USB slot for the USB stick, one to connect the Sonic Pad to the printer, another USB slot for the USB camera and the slot for the G-sensor. I didn’t connect the network via the LAN port, but via WLAN. As you can see, there would be only one USB port left.
So, normally, the number of slots is absolutely sufficient.
Updates Offline or Online
The Creality Sonic Pad can either be updated via an existing internet connection using the menu in the pad or offline via a USB interface.
Since most users connect the Sonic Pad to the Internet to control it via the browser interface or to monitor the print remotely, the online update function is probably the most commonly used. Otherwise, you can download the latest firmware for the Sonic Pad from Creality’s pages and transfer it via a USB stick.
Using the Sonic Pad with a Creality 3D Printer
For the practical test of the Creality Sonic Pad, I used my Ender 3 V2 with Direct Drive Extruder Upgrade. For this 3D printer and for a few other Creality 3D printers, there was already a pre-made profile available at the time of this review.
Thanks to the manual, it is easy to connect the Sonic Pad to a 3D printer. Since the interface is very intuitive, it is not necessary to use the manual for the first steps.

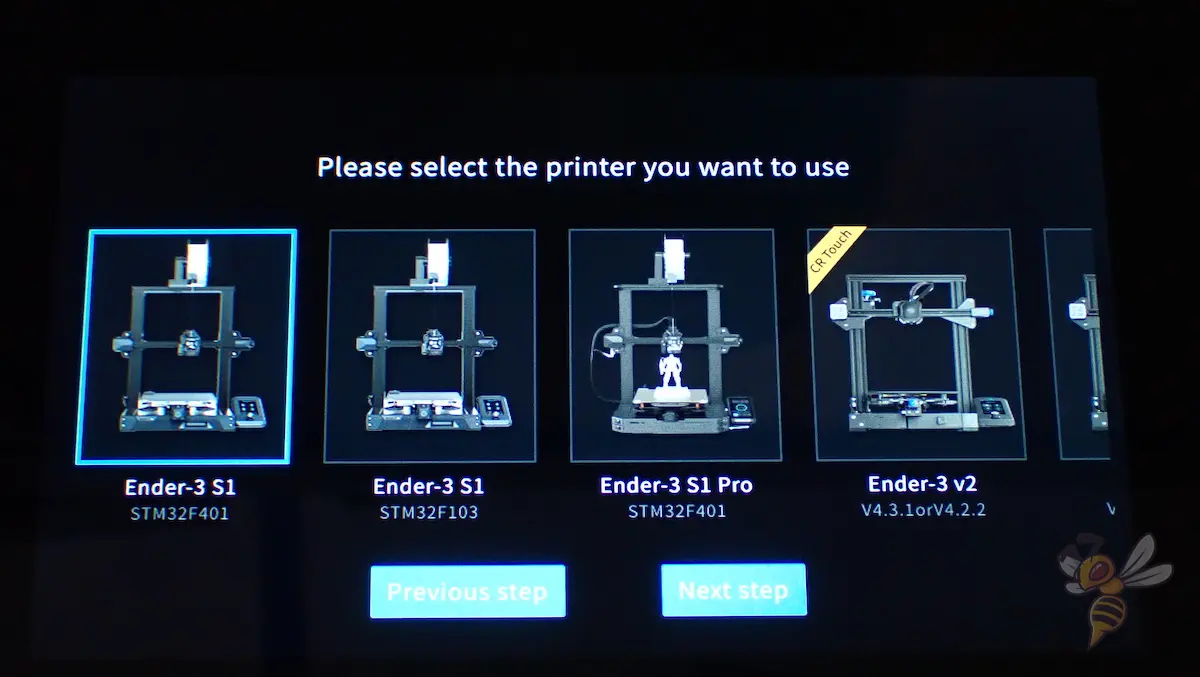
Immediately after the first start of the device, the menu guides you through the installation with simple instructions and clear images. The main steps of the installation are as follows:
- Select a 3D printer: At the time of the review, there were several Ender 3 variants to choose from, with ready-made Klipper profiles. However, 3D printers unknown to the pad can also be connected.
- Save firmware from the Pad to a suitable data medium: Can be done via the pad by pressing a button during the installation.
- Flash the firmware to the 3D printer: Insert the data medium into the 3D printer and switch on the 3D printer.
- Connect the 3D printer to the Sonic Pad: Adapters for the USB cable are also included in the scope of delivery.

At the end of the installation, the Sonic Pad starts a self-test to check if everything is working. This tests the fans and levels the print bed.
After that, the combination of 3D printer and Sonic Pad is ready to print. Although optional, but I would recommend it in any case, is the mounting of the accelerometer on the print head. On the USB stick are already prefabricated mounts for the said Ender 3 models. You can also glue the sensor to the print head or make your own mount.


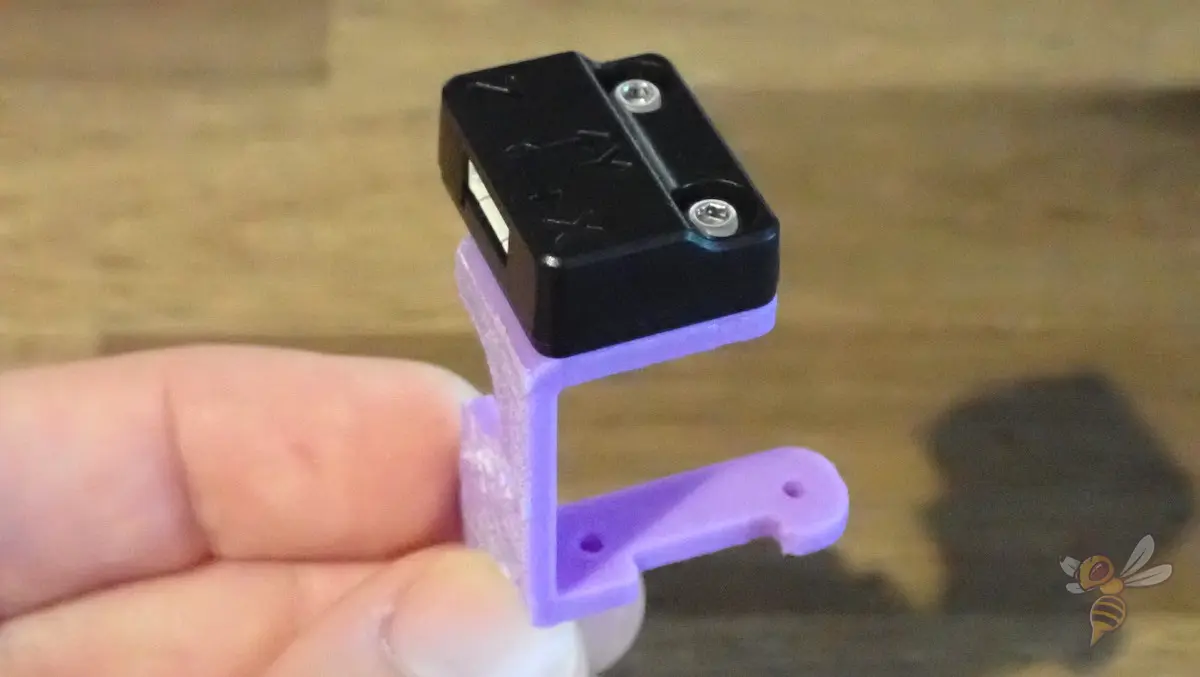
After mounting, the Sonic Pad performs an interesting calibration of the sensor. It makes the print head vibrate in different directions to show the sensor different vibrations and measure its data.
I am actually very surprised at the impact of this resonance compensation. The amount of ringing and over-extrusion at the corners have gotten much better!
Speed vs. Quality – With and Without Sonic Pad
To give you an idea of how the Creality Sonic Pad affects print speed and print quality, I printed a few test prints at different print speeds – each with and without Klipper:

- Ringing Test Cube:
- 250 mm/s without Klipper
- 250 mm/s with Klipper
- 250 mm/s with Klipper and G-Sensor
This calibration cube was designed to cause/show ringing. As a worst-case test, I printed the cube with an extremely high printing speed of 250 mm/s. The result without Klipper shows some ghosting and ringing. What is particularly noticeable, however, are the wide corners where strong over-extrusion occurs due to the high speed.
Printing with Klipper has improved this problem and generally increased the surface accuracy somewhat, but ringing has become much stronger. Klipper alone is not a miracle solution here. I was actually surprised by the result with the accelerometer. The ringing is extremely improved and the surface quality is as good as with a very slow print without Klipper.
So, Creality’s promise of a huge speed increase is true!
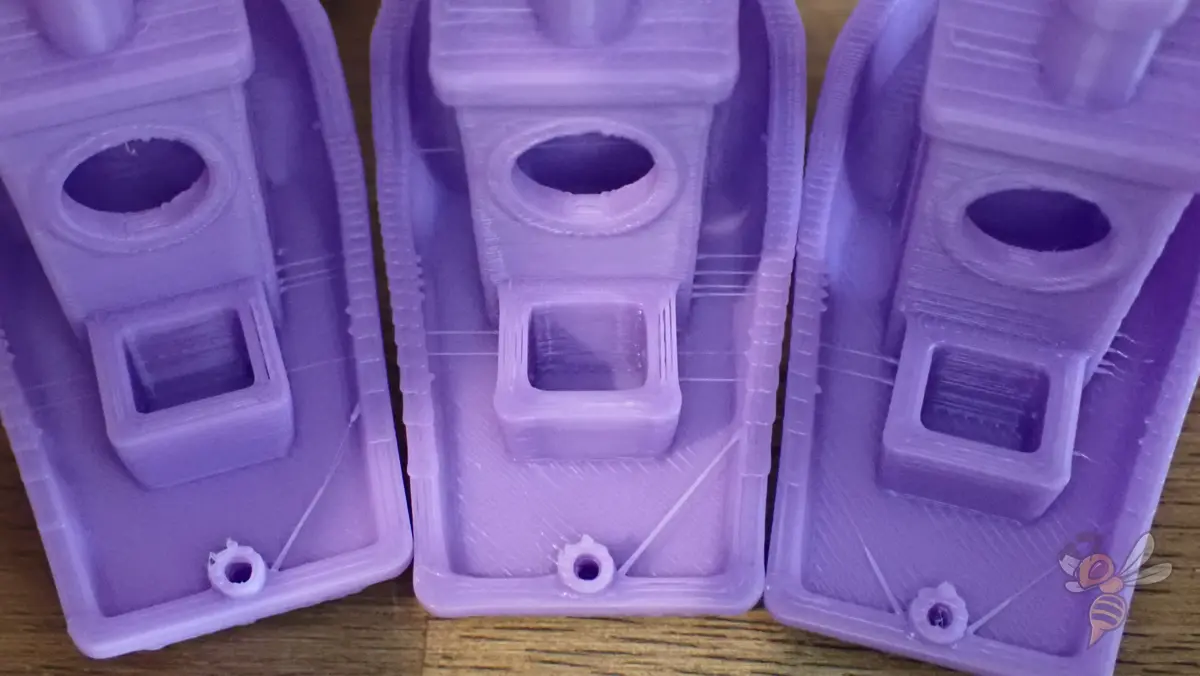
- 3DBenchy:
- 50 mm/s without Klipper (left Benchy)
- 160 mm/s without Klipper (middle Benchy)
- 160 mm/s with Klipper and accelerometer (right Benchy)
I also wanted to try the influence of Klipper on one of the most popular calibration objects – the 3DBenchy. I printed the small ship in a normal printing speed of 50 mm/s and in a super high printing speed of 160 mm/s. Again, at the high print speed, the typical print errors like the widened corners appeared.
However, with Klipper and the accelerometer the result was again as good and partly better than at the slow speed without Klipper!
Is the Creality Sonic Pad Worth It?
The Creality Sonic Pad* is a great choice for anyone looking to improve their 3D printing experience. The firmware offers many features that can improve the printing result. The Sonic Pad is also pre-configured for many Creality 3D printers, making it a good choice for anyone with a compatible printer.
I will be using it with every compatible printer from now on, as it makes the printing experience very convenient and attractive! I’m especially excited about Klipper and the accelerometer – the increase in speed and quality is truly remarkable!
Check Price at:
Disclosure: This website is the property of Martin Lütkemeyer and is operated by Martin Lütkemeyer. Martin Lütkemeyer is a member of the Amazon Services LLC and other Affiliate Programs. These are affiliate advertising programs designed to enable websites to earn advertising revenue through advertising and linking to Amazon.com and others. Links marked with * are affiliate links.
