
- Wet Filament: Prevention, Symptoms & Drying - July 18, 2024
- Sovol SV08 – Best PrusaSlicer Settings & Profile - June 26, 2024
- Sovol SV08 – Best Orca Slicer Settings & Profile - June 26, 2024
Disclosure: Links marked with * are Affiliate Links. I earn from qualifying purchases if you decide to make a purchase through these links – at no additional cost for you!
Automatic print bed leveling is a popular feature in 3D printers and one of the most common upgrades for hobby 3D printers. The BLTouch* is the most popular sensor that enables automated print bed leveling.
The BLTouch is a sensor for automatic print bed leveling. A Hall sensor is triggered by an electromagnetic field as soon as the sensor pin moves back into the housing by touching the print bed. It is extremely accurate with a repeatability of about 0.001 mm.
In this detailed hands-on test and review, you’ll learn everything you need to know about the BLTouch. I go into detail about function, accuracy, setup and its long term performance. At the end, I compare it to two other popular leveling sensors so you can make the right decision.

Check price at:
Table of Contents:
Key Takeaways
- Enables automatic print bed leveling
- Extremely accurate (about 0.001 mm repeatability)
- Compatible with many 3D printers
- Easy installation
- Saves a lot of time previously spent on manual leveling and can save money by avoiding misprints.
- Sensor = Hall Sensor (sensor for electromagnetic fields)
Who Should Buy the BLTouch?
To avoid various printing errors, a good first layer is important. Accurate print bed leveling that is repeated frequently plays a major role in this. With an automatic print bed leveling before each print a perfect leveling is guaranteed. The BLTouch is therefore suitable for all those who want to save a lot of time and avoid printing errors.
How Does the BLTouch Work?
The BLTouch is a mechanical sensor for print bed leveling. During leveling, the printhead moves down with the BLTouch until the sensor touches the print bed and measures the print bed height. The print bed tilt is calculated from several measurement points (usually 4-5).
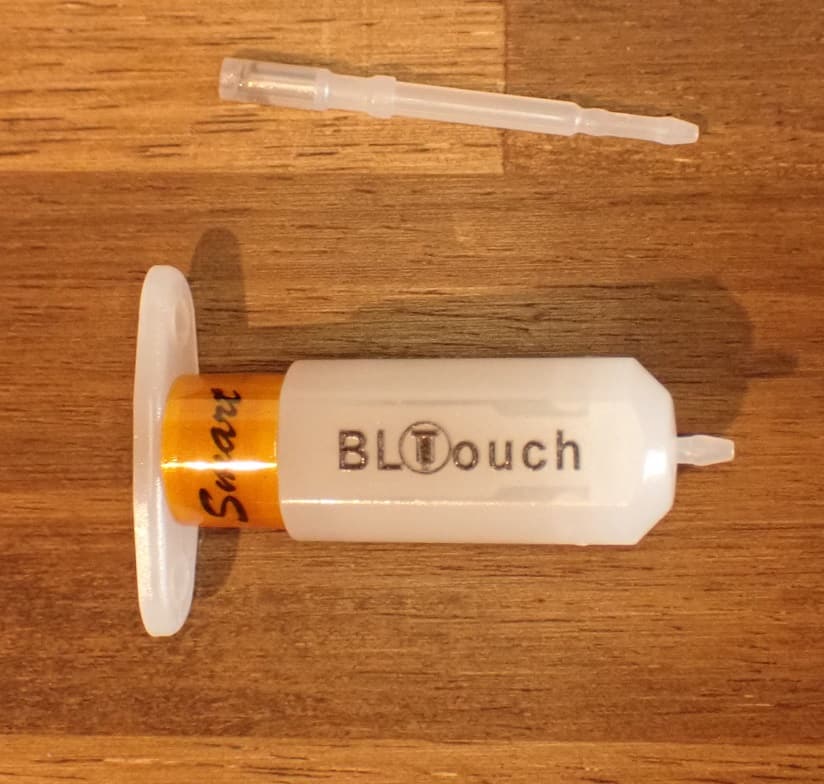
The BLTouch consists of a microcontroller, a Hall sensor, a magnetic switch and the sensor tip which jumps back on contact and triggers the signal.
The sensor tip is made of the same plastic as the housing and can be replaced if it should break off. The sensor tip is mounted and tensioned in such a way that it immediately springs back at the slightest touch and triggers the magnetic switch. Due to this special design, the mechanical BLTouch is compatible with all print bed surfaces.
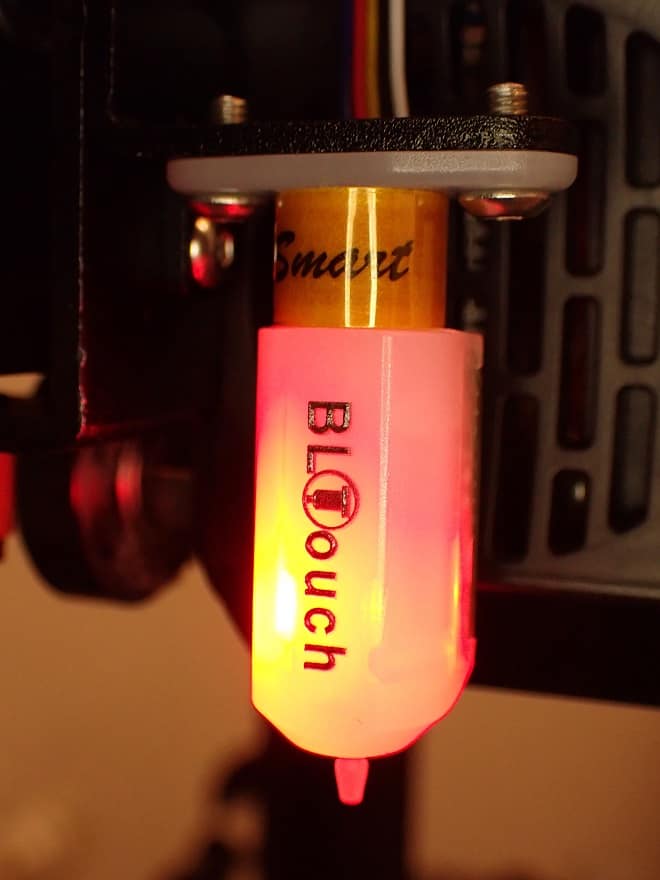
Mostly the BLTouch is mounted on the side of the printhead and connected to the motherboard. The necessary mounts can be purchased as well as printed by yourself.
During automatic print bed leveling with the BLTouch, the print head usually scans 4 to 5 points on the print bed (the 4 corners of the print bed and its center). The print bed inclination is calculated from the determined values.
If the print bed is mounted stable, the print bed leveling has to be repeated only after 10-20 prints or after print errors. With an automatic print bed leveling, it is also useful to have the leveling always done automatically at the start of the print. This will only add a few minutes to the print time, but you will never have to worry about print bed leveling again.
The measurement with the BLTouch is so reproducible that there is virtually no difference in slope between two measurements taken in succession.
BLTouch Accuracy
The BLTouch is extremely accurate. I wanted to test this myself and have made the Marlin M48 Probe Accuracy Test. This allows you to check the repeatability of the sensor with a certain G-code.
During this test, the distance to the print bed is measured in 5 passes with 10 measurements each at one point. The mean value can be calculated from the 5 standard deviations, which in principle corresponds to the repeatability. Of course, lower values are better than higher ones. As you can see, the repeatability of the BLTouch is extremely accurate.
| Measurement | BLTouch |
|---|---|
| 1 | 0,001358 |
| 2 | 0,001234 |
| 3 | 0,001427 |
| 4 | 0,001198 |
| 5 | 0,001247 |
| Mean value | 0,001293 |
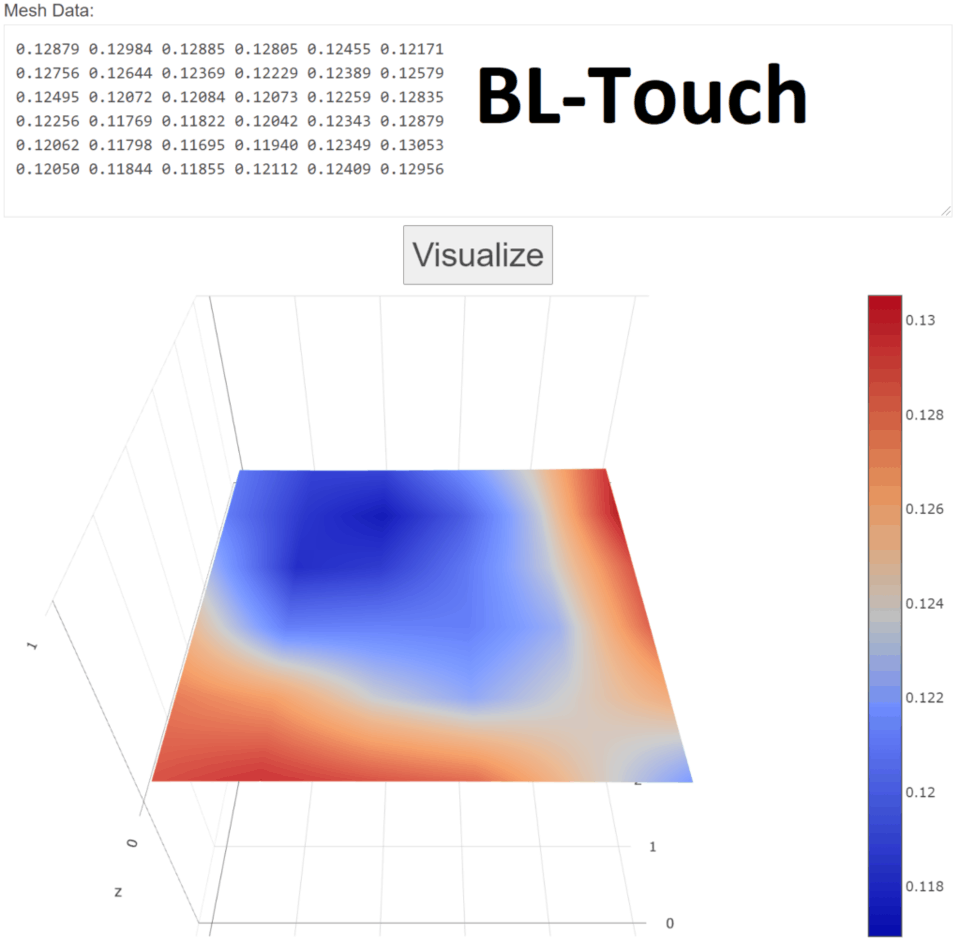
If you want to know the unevenness of your print bed even more precisely, you can use the 3D Printer Auto Bed Leveling Mesh Visualizer to convert the individual values into a visual display of the print bed curvature. I have done this with my values.
No matter how many times I repeated the measurement, the result was as good as identical.
BLTouch Setup
The setup of the BLTouch is in principle always the same, but the details differ from printer to printer. To illustrate the assembly, I use the popular Ender 3 V2 as an example.
To mount the BLTouch to your 3D printer, you need to attach it to the print head, connect the cables to the mainboard, update and adjust the software and re-level the print bed. How this is done in detail, you will learn in the following lines.
Mounting the BLTouch on the Printhead
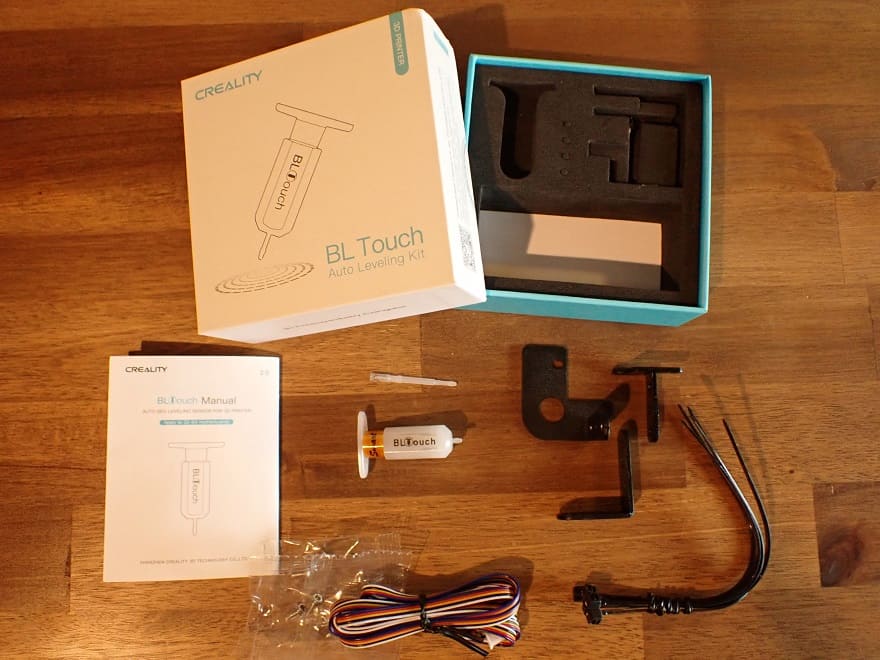
The BLTouch is available either individually or in prefabricated kits that are suitable for certain 3D printers.
- BLTouch Kit: Creality*, Amazon*
- Single BLTouch: Amazon* + 3DJake Extension Cable*
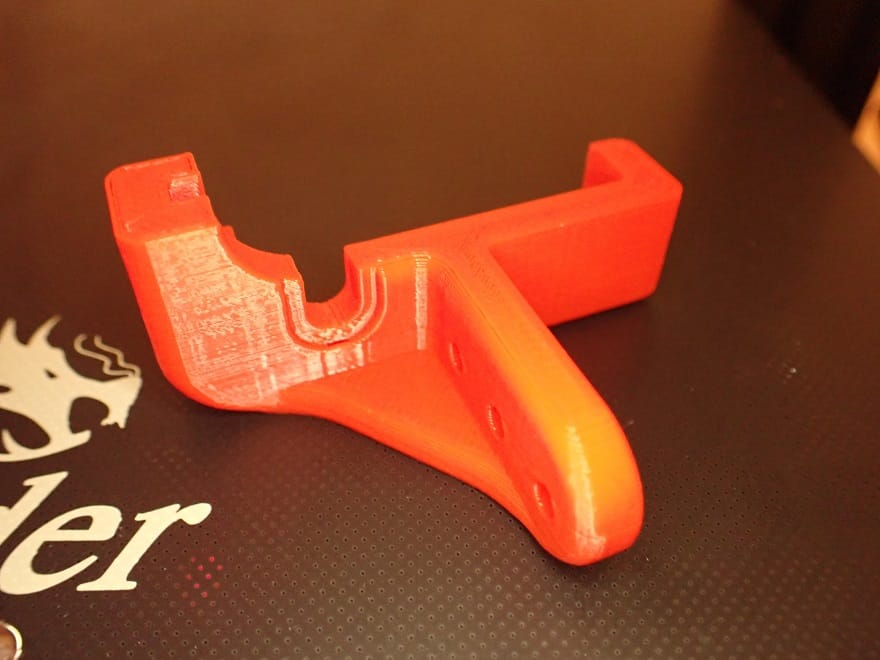
- Self-printed mount: Thingiverse
- M3 screws: Amazon*
If we stay with the example of the Ender 3 V2, you have the option to either buy a single BLTouch with extension cable and print the mount yourself or buy a pre-made bundle.
On Thingiverse you can find many mounts for different 3D printer models. And if you can’t find what you’re looking for, you can design your own mount with free CAD programs like Tinkercad.
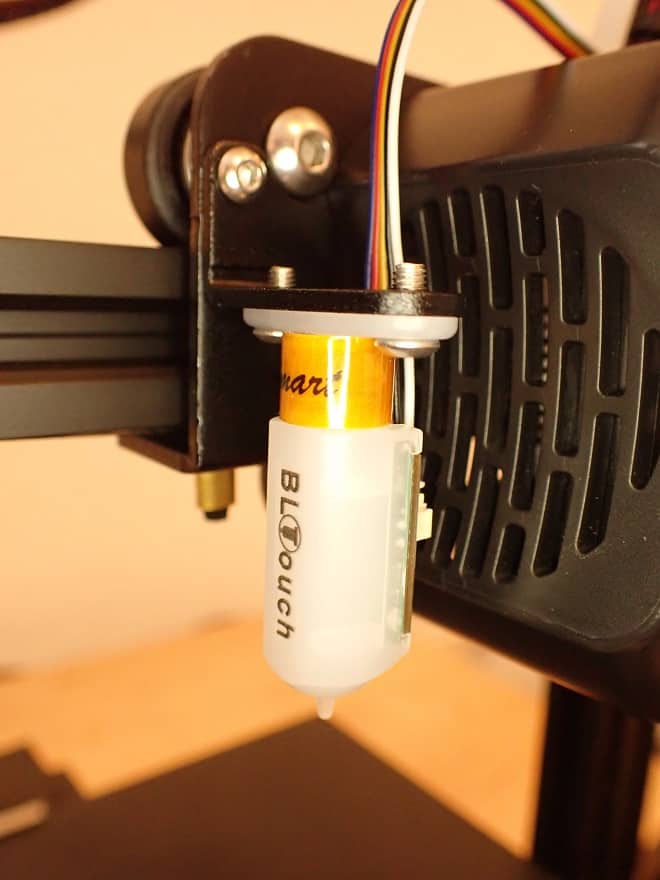
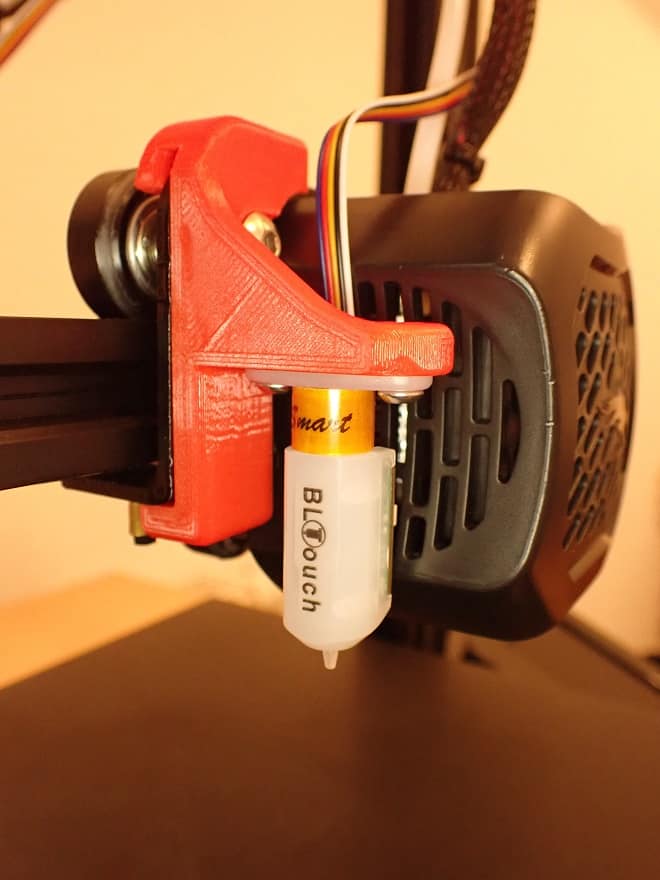
Getting all the parts you need is the biggest effort of this step. The assembly itself only takes a few minutes. Now you only have to connect the BLTouch with the cable and fix it with the respective mount on the print head. The most important thing when mounting is that the BLTouch cannot wobble so that no measurement errors can occur.
Connect the Cable to the Mainboard
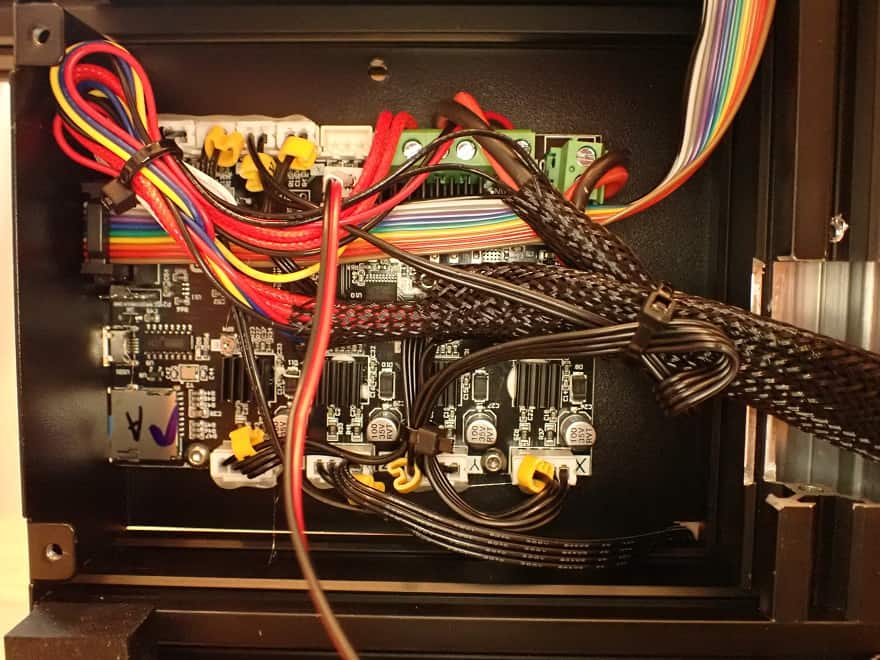
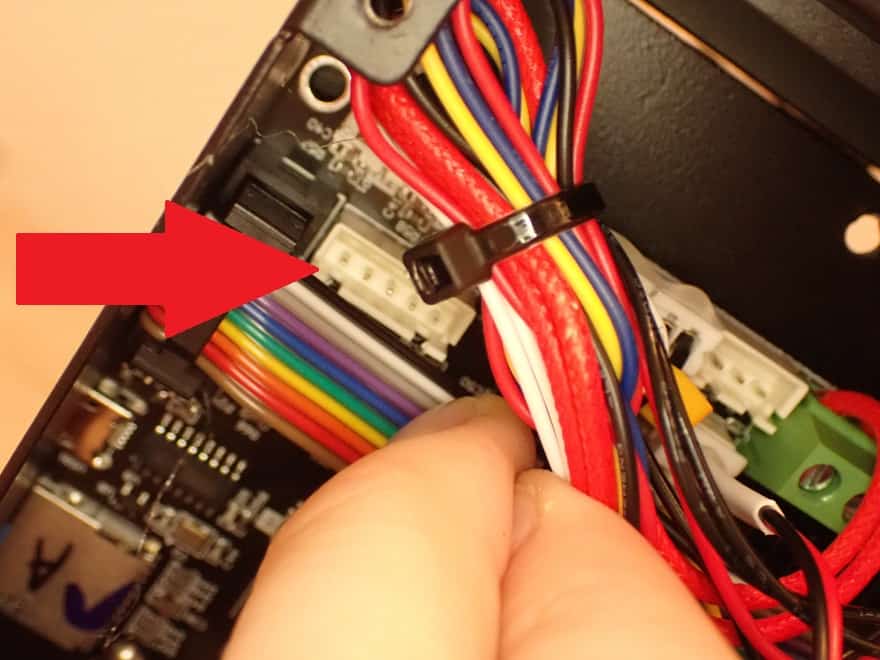
The connector for the BLTouch on the motherboard often varies between 3D printers. If you look for the slot in the manual, it will probably be marked for Z-probes. For example, the newer models from Creality have a special slot for such sensors on the motherboard.
If you bought the single BLTouch, the cable will probably not be long enough. Most of the time, the extension cable is necessary to allow the print head to travel to any location in the print volume without stretching the cable. If the cable is too short and the print head continues to travel anyway, a catastrophic accident would occur.
Often the wiring of the motherboard is so tight that you have to make some space to be able to plug in the connector. Finally, make sure that the cable from the motherboard to the BLTouch is well routed and cannot get tangled with moving parts.
Update the Firmware
Now comes the part that is very daunting for many users. With some 3D printers, it is extremely easy to update the firmware so that it is compatible with the BLTouch.
For the Creality 3D printers you only need to download the latest firmware version (Link1, Link2). Just like most other 3D printers, the Creality 3D printers can be updated by putting the new firmware on the SDcard and starting the 3D printer with it.
If you are running your 3D printer with Marlin, the customization is a bit more complicated.
Marlin
To include the BLTouch in the Marlin software, you need to open and edit the code. First you have to define the BLTouch under configuration.h:
#define BLTOUCH
Next you have to define the spatial position of the sensor tip. To do this, you need to measure the distance between the sensor tip and the nozzle in the X, Y and Z axis and define it in the code. On the page of Marlin there is a very good documentation with code snippets that you can use (link).
Once you are done defining the sensor, you can define the type of print bed leveling. You can apply or program a total of 5 different print bed leveling methods (link to doc):
- //#define AUTO_BED_LEVELING_3POINT
- //#define AUTO_BED_LEVELING_LINEAR
- //#define AUTO_BED_LEVELING_BILINEAR
- //#define AUTO_BED_LEVELING_UBL
- //#define MESH_BED_LEVELING
3POINT: A surface is defined with at least 3 points. Therefore, the curvature of a printing plate can also be determined with at least 3 points. This method is the fastest, but also the most inaccurate. It is particularly suitable for checking the leveling in between.
LINEAR & BILINEAR: With these print bed leveling methods, the print bed is divided into a grid and measured at the resulting points. This leveling is naturally much more accurate than 3 point leveling, as the curvature of the printing plate itself can also be taken into account.
UBL: This method combines the advantages of 3 point, linear, bilinear and mesh leveling. The UBL method is also recommended by Marlin itself.
MESH: Here, the print bed is also divided into a specific grid and the print head moves to the resulting points one after the other. The leveling is carried out manually with a piece of paper, which we actually want to avoid with automatic leveling with the BLTouch.
Set Z-Offset
An important detail when mounting Z-probes is to readjust the Z-offset. To do this, you need to take out another piece of paper and adjust the distance between the nozzle and the print bed so that there is some friction when you move the paper between the nozzle and the print bed. You then define the Z-position as the new Z-home position.
This step is necessary because the 3D printer now moves to the home position via the BLTouch instead of the Z-endstop.
Manual Leveling of the Print Bed
Even if you have now installed a BLTouch for automatic print bed leveling, it is advisable to level the print bed again at least roughly manually. The BLTouch can compensate very well for inclinations, but not too strong inclinations.
Optional: Customize Cura
You can customize the startup G-code of your 3D printer in Cura to automatically level the print bed each time you start a print. The appropriate G-code command is as follows:
G29 ; 'Comment'

It makes the most sense to include it right after the command for the home position of the axes. Also, I advise you to comment on all your code. In Cura everything after a semicolon in the line is a comment. This way you still know later what effect this command has.
Testing
If you’ve done everything right, the test will work on the first try and take the hassle out of manually leveling the print bed for all time. If it doesn’t, don’t get frustrated right away, but review your steps. Most mistakes are made in the software.
BLTouch Long Term Test on the Ender 3 V2
I have now installed my BLTouch for several 100 operating hours in my Ender 3 V2. Even if I advise to manually level the print bed after some time, I have not done this myself yet, because the leveling is perfect since the first calibration of the BLTouch.
Even though I’m used to manually leveling the print bed with other 3D printers, it’s a relief not to have to do this anymore. Also, the automatic leveling at the start of each print job has proven itself and the additional printing time does not bother me in the least.
The accuracy of the BLTouch is still comparable to the initial values I showed above. And I find that quite amazing, because I had not expected it with such a strain on the plastic. On the other hand, the mechanical forces acting on the sensor tip are very small and cannot lead to wear at all.
All in all, the BLTouch definitely passed the long-term test and will probably continue to run flawlessly for the next 500 hours of operation.
BLTouch vs. Manual Print Bed Leveling
Manual print bed leveling is often difficult and confusing, especially as a beginner.
I remember trying to level the print bed with the paper method on my very first 3D printer. I think it took at least half an hour and a lot of nerves. At that time there were not as good tutorials as nowadays and I had to explain it to myself.
However, once you have performed manual print bed leveling for the first time, you will understand the principle. With a little practice, manual print bed leveling only takes a few minutes.
The suspension of printing plates in modern 3D printers is usually so stable that a leveling lasts a very long time (provided you remove your print objects carefully and generally avoid larger mechanical forces acting on the printing plate). Therefore, it is not absolutely necessary to constantly re-level the print bed.
On the other hand, regular print bed leveling prevents misprints and poor quality of the first layers, which will increase in the long run. With an automatic print bed leveling, you can exclude such errors.
Also, it borders on luxury if you can directly rule out a poorly leveled print bed when troubleshooting. Many print errors are caused by a badly leveled print bed and can be prevented by an automatic leveling like with the BLTouch.
Check price at:
Conclusion: Is the BLTouch Worth it?
To avoid various printing errors and to guarantee a high quality of the first layers, regular print bed leveling is necessary. With the BLTouch, this print bed leveling can be done automatically before each print, which saves a lot of time and gives more accurate results.
For most users, the BLTouch* is worth it, as the advantages just mentioned greatly outweigh the disadvantages of low initial cost and installation. However, if you enjoy manual print bed leveling and don’t mind spending time on it, the BLTouch will hardly be worth it for you.
BLTouch Alternatives
There are now a few alternatives to the BLTouch. The two most popular are the CR-Touch from Creality* and the 3D Touch*. They are also mechanical and work with a sensor tip that measures the print bed in several places.
CR-Touch
The CR-Touch from Creality is a mechanical sensor for automatic print bed leveling. Thanks to its optical sensor, it works extremely accurately and offers other advantages over its competitors besides its robust design.

Check Price at:
CR-Touch vs. BLTouch
The CR-Touch is not a BLTouch clone. At least not on a technical level. From the pure principle and the optics it is of course very similar to the BLTouch, but the sensor technology is different.
The BLTouch works with a Hall sensor that measures the approach of the pin by means of an electromagnetic field. The CR-Touch has a very precise optical sensor that registers the metal pin extremely quickly as soon as it moves back into the housing.
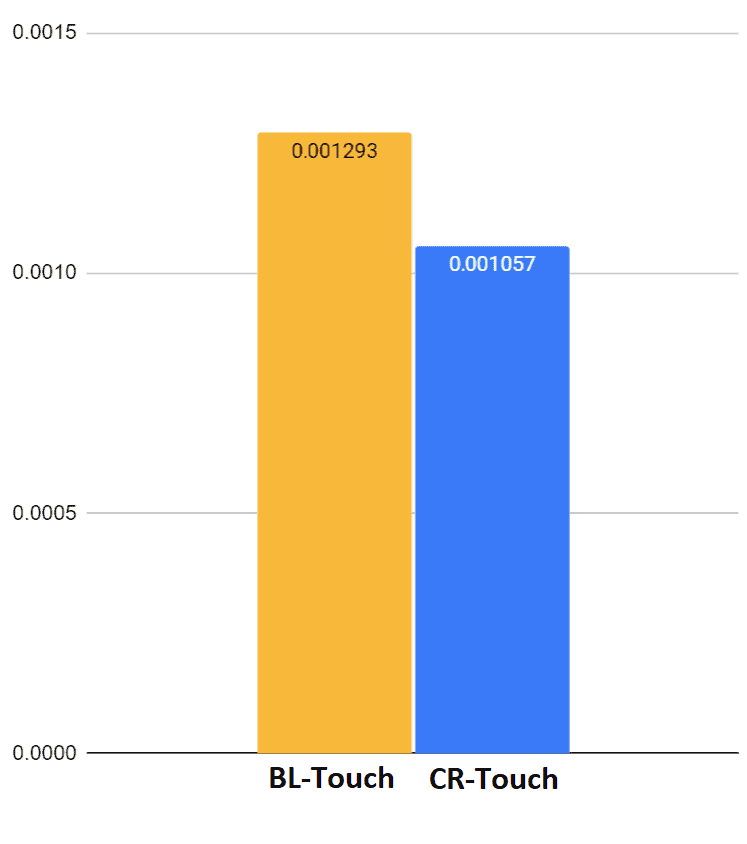
This high-quality sensor technology also makes the CR-Touch slightly more accurate than the BLTouch.
In addition, the CR-Touch has a metallic sensor Pin, whereas the BLTouch is made of plastic. This makes it much more robust and will probably also have a longer service life.
The setup of the CR-Touch is basically the same as for the BLTouch. The kit from Creality comes with suitable mounts for various Creality 3D printers. But even if you have another 3D printer, you will be able to use some mounts that were designed for the BLTouch. You can then print them yourself and use them for mounting.
Overall, the CR-Touch is definitely better than the BLTouch.
3D Touch
The 3D Touch is a sensor for automatic print bed leveling. Inside hides an electromagnet that through the pressure pin together produces the signal that is triggered by touching the print bed surface.

Check Price at:
3D Touch vs. BLTouch
The 3D Touch is usually cheaper than the BLTouch but does not have the high quality and accuracy. It is therefore particularly suitable for low-budget 3D printers.
Compared to the accuracy of the BLTouch, about 0.001 mm, the 3D Touch is much less accurate at 0.005 mm. However, this accuracy is still sufficient to level the print bed accurately enough.
Thanks to its operation, it is also suitable with all print bed surfaces such as glass, PEI or metal. Its connectors are compatible with most motherboards, which allows it to be installed in most 3D printers.
The 3D Touch has a built-in self-test that it automatically performs before use. If it detects a problem, an internal LED flashes as a warning. The internal structure heats up almost not at all because during the standby mode almost no currents flow in the internal circuits.
Disclosure: This website is the property of Martin Lütkemeyer and is operated by Martin Lütkemeyer. Martin Lütkemeyer is a member of the Amazon Services LLC and other Affiliate Programs. These are affiliate advertising programs designed to enable websites to earn advertising revenue through advertising and linking to Amazon.com and others. Links marked with * are affiliate links.
