
- Wet Filament: Prevention, Symptoms & Drying - July 18, 2024
- Sovol SV08 – Best PrusaSlicer Settings & Profile - June 26, 2024
- Sovol SV08 – Best Orca Slicer Settings & Profile - June 26, 2024
Disclosure: Links marked with * are Affiliate Links. I earn from qualifying purchases if you decide to make a purchase through these links – at no additional cost for you!
The root cause of ringing and ghosting in 3D printing are mechanical vibrations and instabilities caused by rapid movements and changes in direction of the print head. That is why the best solutions for this include reducing the print speed, ensuring mechanical stability, and dampening vibrations.
These defects are very common 3D printing errors, manifesting as repetitive patterns or ghost-like echoes on the surface of printed objects.
This article offers practical steps to fix ghosting and ringing on your 3D prints.
Table of Contents:
- 1 Definition & Examples
- 2 Cause
- 3 Solutions
- 4 FAQ – Frequently Asked Questions
- 4.1 What is the easiest way to reduce ringing and ghosting in my prints?
- 4.2 How often should I calibrate my 3D printer?
- 4.3 Can software updates impact the surface quality?
- 4.4 Is it necessary to upgrade parts of my 3D printer to reduce ringing and ghosting?
- 4.5 Will changing the filament type affect ringing and ghosting?
- 5 Conclusion
Definition & Examples
While ringing and ghosting are essentially the same, the terms are used in the 3D printing community for slightly different visual manifestations of the same error.
How It Looks:
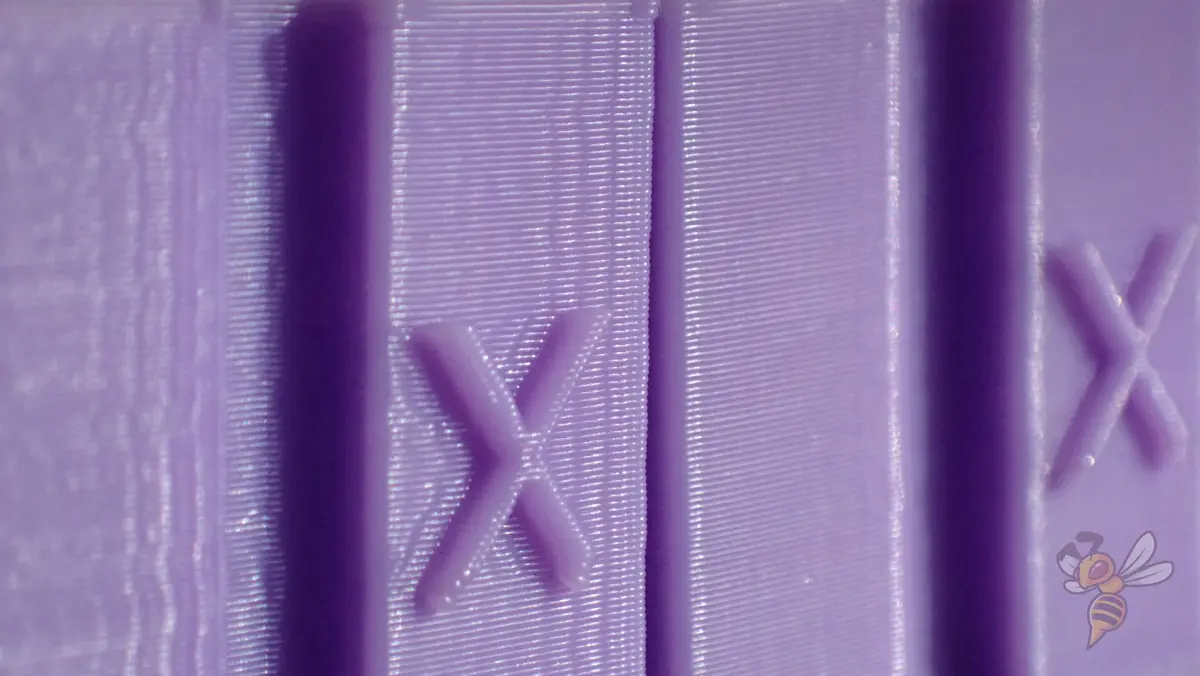
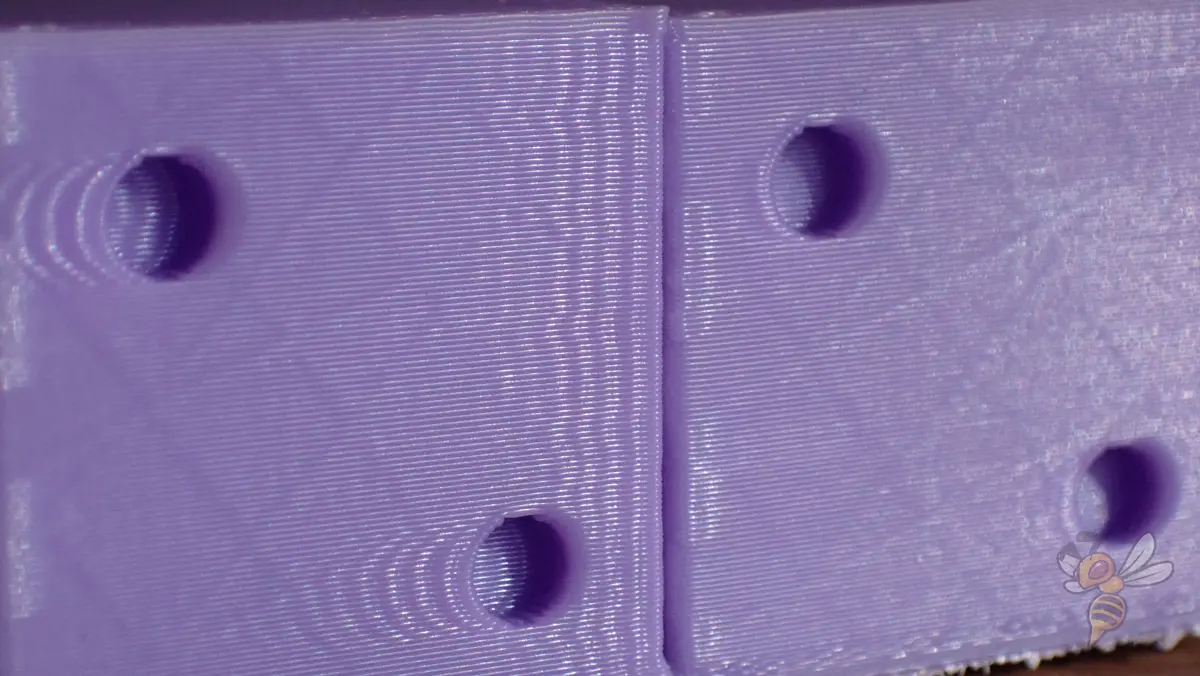
- Ringing: This defect is seen as visible ripples or waves emanating from the edges of sharp corners or abrupt changes in the print direction. The patterns typically resemble concentric circles or oscillations radiating from a point of impact and can be seen on flat vertical surfaces. They are the result of the 3D printer head’s inertia and the slight delay in its stabilization after a quick movement.
- Ghosting: Much like ringing, ghosting manifests as faint, shadow-like duplicates or echoes of a design feature, slightly offset from the original. These appear as blurry shadows or ghost images adjacent to the original detail. Ghosting is particularly noticeable around areas of high detail or sharp contrast like embossed text on the surface of a print.
Cause
Ringing and ghosting in 3D printing are defects that significantly affect print quality. These issues are caused by the mechanical vibrations of the 3D printer, often exacerbated by high print speeds, rapid direction changes, or other sudden printer movements.
Basically, the inertia of the print head and the vibrations that occur because of it at changes of movement direction are the cause of the ringing and ghosting issues.
Here’s a simple breakdown:
- Mass and Inertia: The print head has a certain weight (mass). When printing, this print head needs to move quickly in different directions. However, because of its mass, it doesn’t instantly stop or start moving. This delay in response is due to a physical property called inertia, which is the tendency of an object to resist changes in its motion.
- Vibrations and Deviations: When the print head changes direction rapidly, particularly at high speeds or at sharp turns, it overshoots or doesn’t follow the path precisely. This causes vibrations, making the print head move slightly back and forth from where it’s supposed to be.
This vibration results in a pattern on your print that looks like waves or ripples, known as ‘ringing’ or as faint, shadowy duplicates of your print’s features, slightly offset from their intended positions, which is called ‘ghosting’.
So, to fix ghosting and ringing, you have to reduce the vibrations in the print head.
Solutions
With a systematic approach, most causes of ringing and ghosting can be effectively remedied pretty fast. This section delves into a series of practical solutions, each targeting specific causes of these issues.
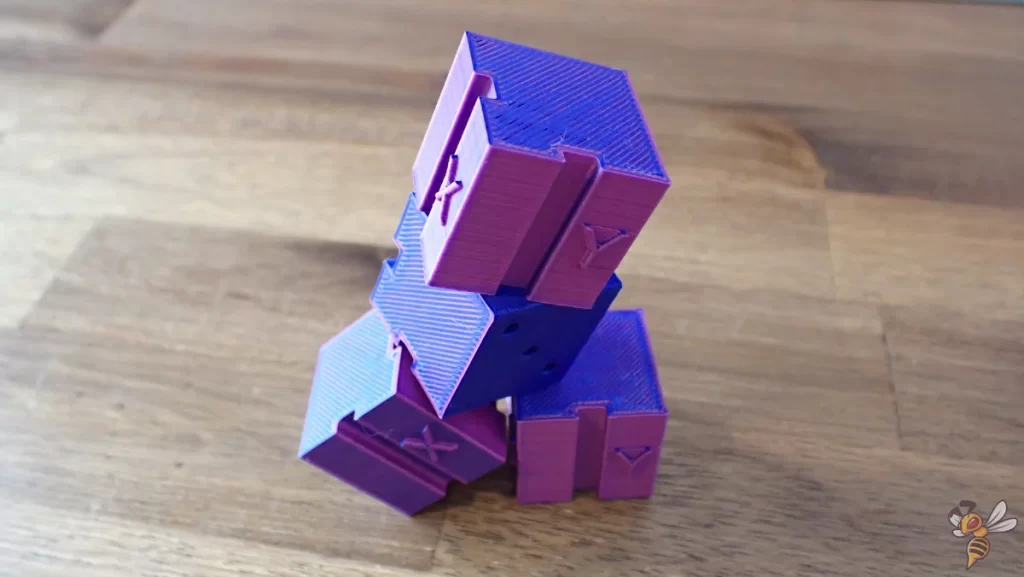
I strongly recommend printing a calibration object before and after each troubleshooting step. Select a calibration object that has features likely to show ringing and ghosting, such as sharp corners and detailed patterns.
A popular choice is a calibration cube or a test model specifically designed for speed calibration. I like this one.
This way, you can find the cause quickly without wasting too much filament in the process. Plus, you’ll need this calibration object anyway if you want to calibrate the printing speed, jerk and acceleration settings.
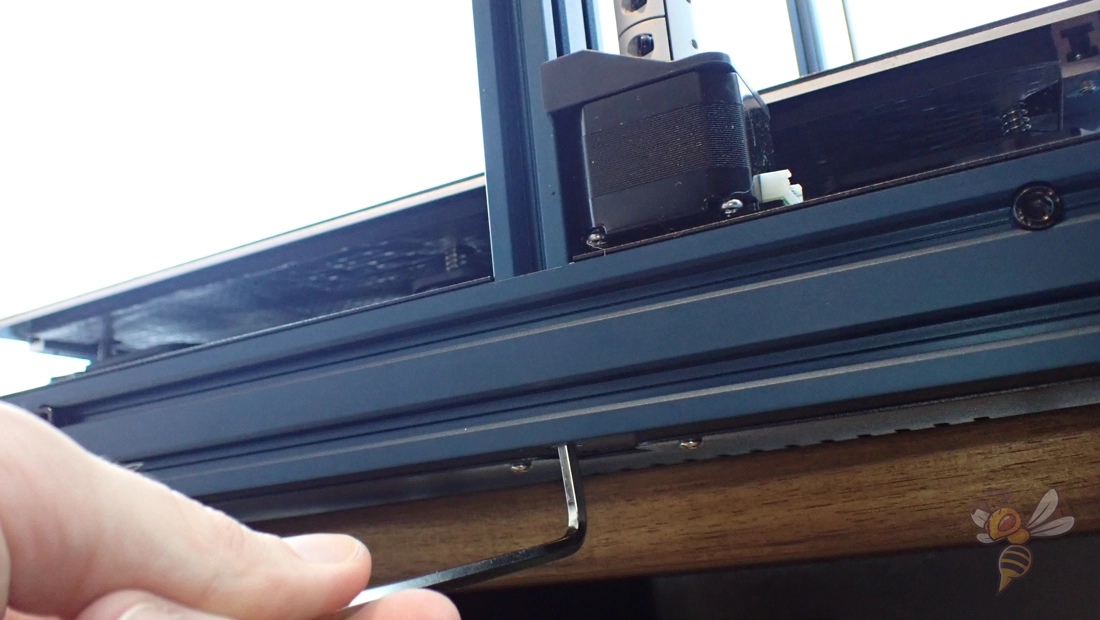
Tighten the Belts
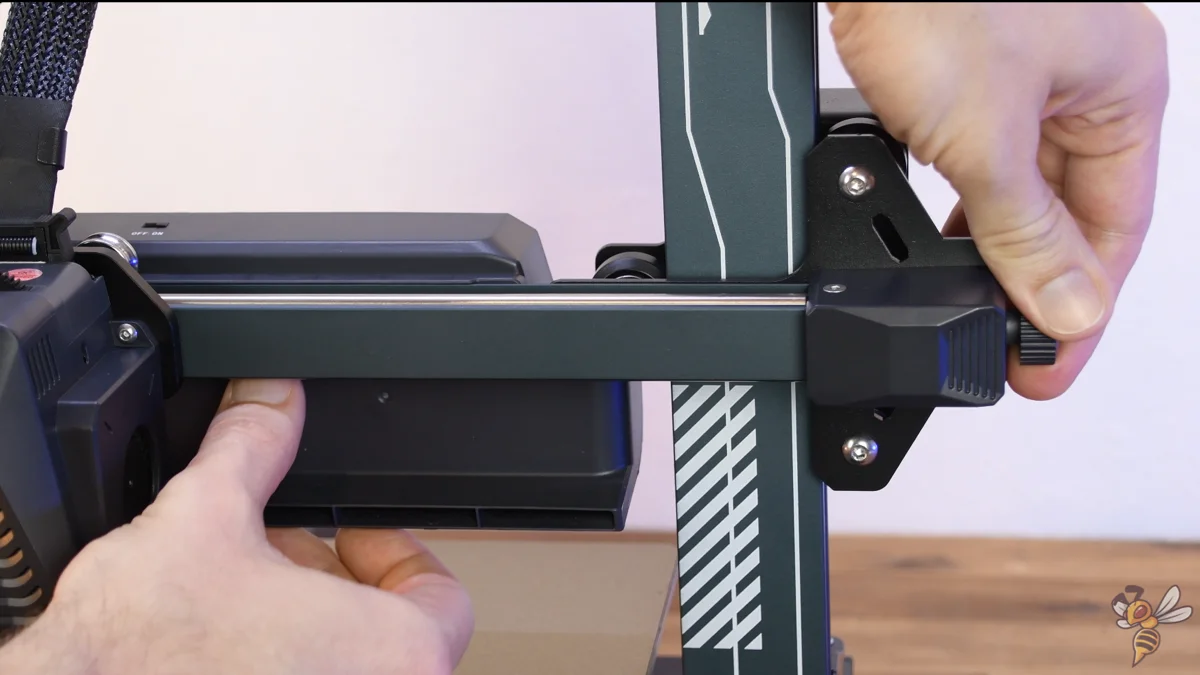
A common culprit behind ringing and ghosting in 3D printing is loose belts. These belts, responsible for the precise movement of the print head and print bed, can lose tension over time. When they’re not adequately tight, they contribute to slight wobbles and inaccuracies in movement, manifesting as ringing or ghosting in your prints.
To address this, a simple belt tension adjustment can do the trick. Periodically check for loose belts of both the X and Y-axis belts on your 3D printer. They should be tight enough to avoid slack, but not so tight that they strain the motor bearings.
But the belt tensioning procedure varies from printer to printer. Most of the newer ones have belt tensioners at the ends of each belt on the respective axis. That way, you don’t have to deconstruct the whole axis to tighten a loose belt.
Remember, the goal is to achieve a balance where the belts are taut enough to ensure smooth and precise movements without over-tightening. But excessive belt tension can lead to wear and other mechanical issues. A correctly tensioned belt makes a high-pitched sound when you flick it with your finger.
Reduce the Printing Speed
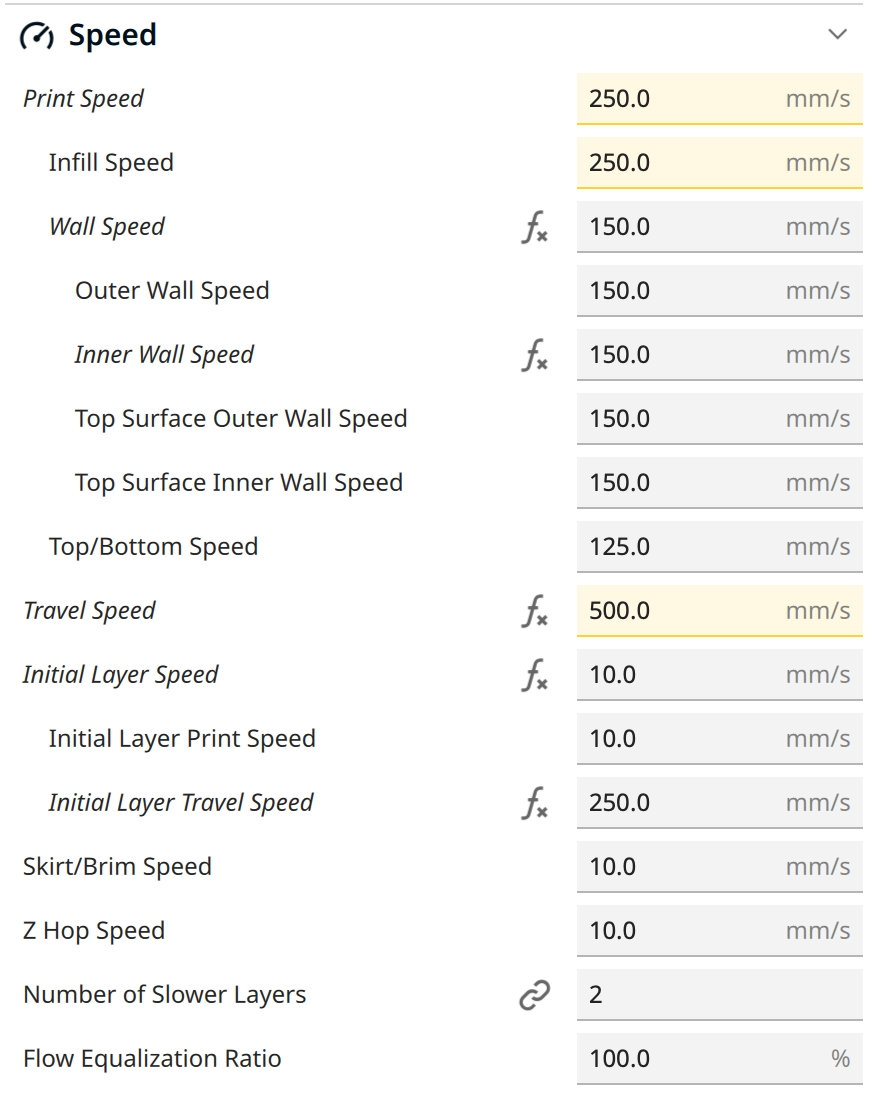
A key factor in reducing ringing and ghosting in 3D printing is adjusting the printing speed. Through my experience, I already knew about the importance of the print speed with this issue, but it is encouraging that the scientific study “Relation between 3D Printer Printhead Positioning Rate and Detail Quality” by Ekaterina E. Kopets and colleagues also supports this view (link to study).
I bought this study, so you don’t have to, and can (not surprisingly) confirm that the results show that a higher print speed does indeed affect the quality of prints and can cause ringing/ghosting.
A higher print speed leads to an increase in vibration, which in turn causes ringing or ghosting in prints. At slower print speeds, these effects are significantly reduced. This means that reducing the speed has a direct and positive impact on print quality, especially in terms of ringing and ghosting.
Calibrating the speed is a good way to print as fast as possible without ringing or ghosting. The process involves using a calibration object and methodically adjusting the speed. Here’s how you can do it:
- Initial Print Settings: Start with your usual print settings or the average print speed recommended for your 3D printer. It’s important to have a baseline to compare the results against. Make sure other factors like temperature and layer height are consistent.
- Decrease Speed Gradually: After the initial print, decrease the speed by 5-10% for the next print. Observe the results closely.
- Compare and Analyze: Examine each printed object for signs of ringing and ghosting. Pay special attention to the areas around sharp corners and details. Look for improvements or the persistence of defects as you reduce the speed.
- Find the Optimal Speed: Continue this process of printing and reducing speed until you notice a significant reduction or elimination of ringing and ghosting. This speed is your optimal print speed for high-quality prints without these defects.
- Save Settings: Once you’ve found the optimal speed, update your 3D printer’s slicer profile to use this speed for future prints. Remember, this speed might vary depending on the material and model complexity.
Reduce the Acceleration and Jerk Settings
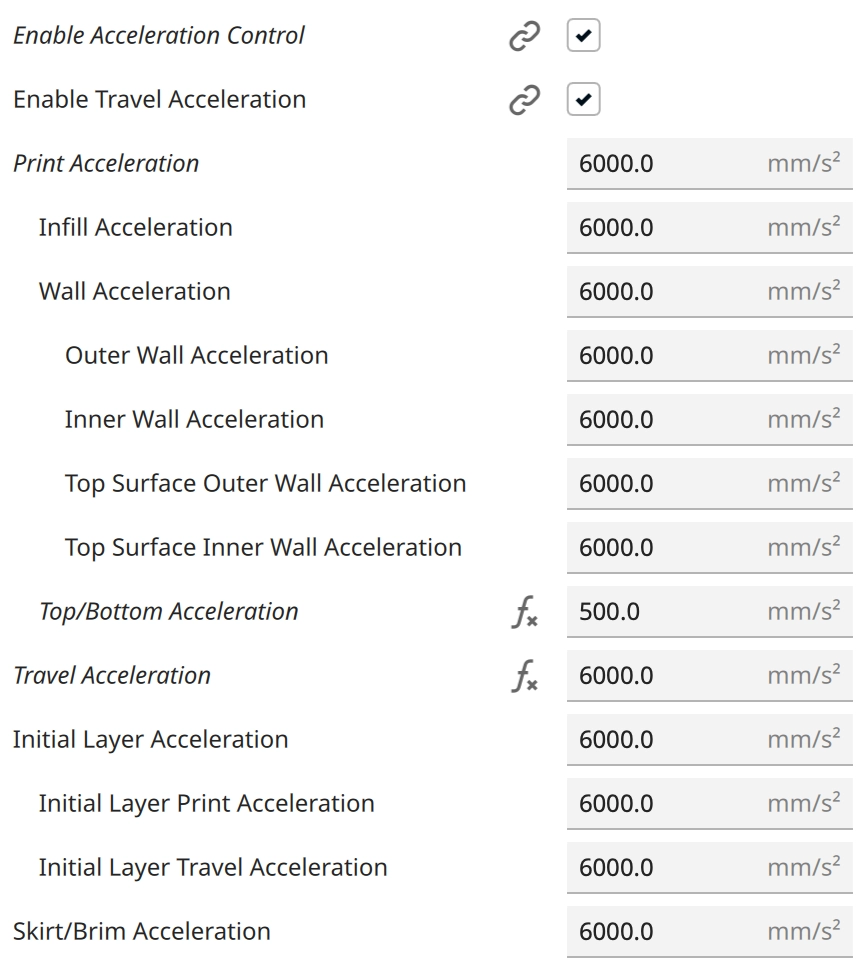
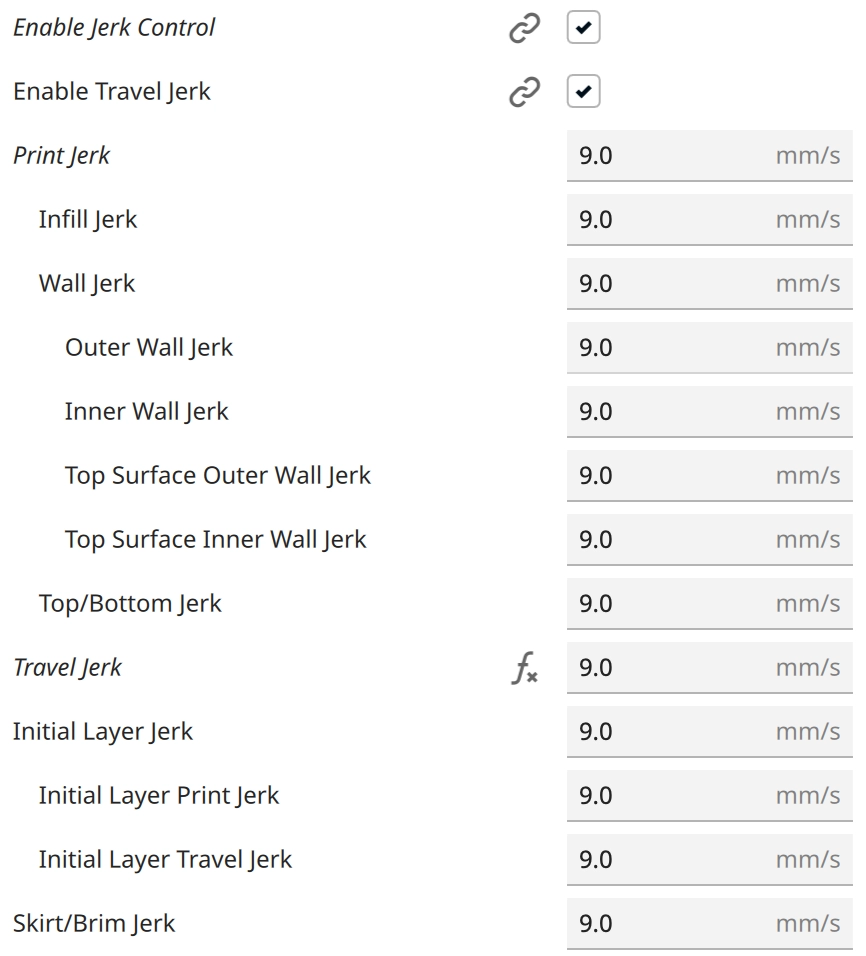
Another critical factor in minimizing ringing and ghosting in 3D printing is the adjustment of the print acceleration and jerk settings. These parameters control how quickly the 3D printer changes speed and direction, which directly impacts the level of vibration and instability during printing.
- Acceleration Settings: This setting dictates how quickly the 3D printer reaches its set speed. When acceleration is too high, it causes the 3D printer to start and stop abruptly, leading to increased vibrations. These vibrations can result in the appearance of ringing in your prints. By lowering the acceleration, you allow the 3D printer to ease into and out of movements more smoothly, significantly reducing the risk of these defects.
- Jerk Settings: In the context of 3D printing, ‘jerk’ refers to the speed at which the 3D printer can change direction without gradually slowing down first. High jerk settings can cause sudden movements, exacerbating vibrations and leading to ghosting. By reducing the jerk setting, the 3D printer transitions more gently between movements, thereby diminishing the likelihood of ghosting.
In my experience, fine-tuning these settings can have a profound impact on print quality. It’s a process of trial and error to find the sweet spot where the jerk and acceleration settings are optimized for your specific 3D printer and the object being printed. I like to use this acceleration tower model to adjust jerk and acceleration settings.
It’s important to start with small adjustments to the acceleration and jerk settings, observing the changes in surface quality, and continue tweaking until you achieve the desired results. Remember, each 3D printer model may respond differently to these adjustments, so patience and careful experimentation are key.
Tip: If your 3D printer’s slicer profile does not have acceleration and jerk settings and you have to define them yourself, just use typical acceleration values from other 3D printers with a similar structure. Go from there and calibrate them as needed.
Tighten the Screws of the Frame
Over time, the screws on the 3D printer’s frame can loosen due to the constant motion and vibrations of the 3D printer, leading to slight frame movements at every turn of the print head, leading to even more vibrations, ringing and ghosting.
Just tighten these screws now and then, or if you notice increased ringing and ghosting problems.
It’s a simple yet effective solution that can make a significant difference in print quality.
Improve Vibration Dampening
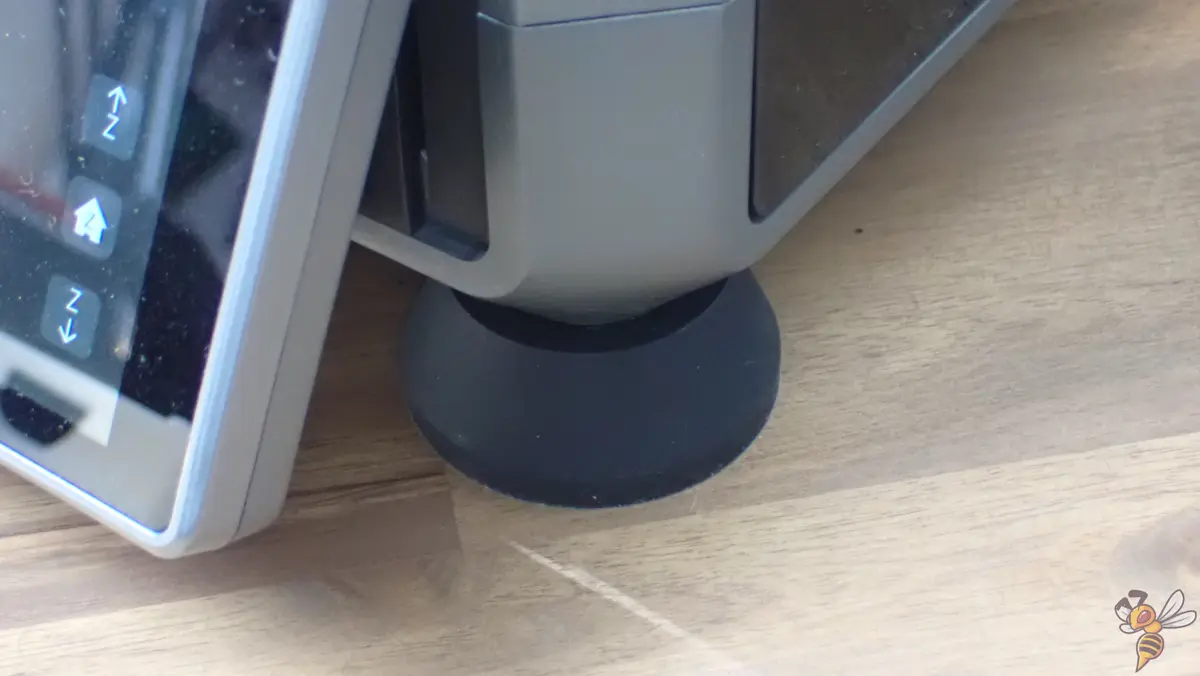
Vibration dampening is another effective measure in reducing ringing and ghosting in 3D printing. When a 3D printer operates, especially at high print speeds or with rapid directional changes, it can generate significant vibrations. These vibrations can travel through the 3D printer’s frame, causing the print head to oscillate and leading to the print defects we recognize as ringing and ghosting.
Improving vibration dampening involves making modifications to the 3D printer setup to absorb or minimize these vibrations.
- Use a Stable Base: The foundation on which your 3D printer stands can greatly affect its stability. A heavy, solid table can provide a more stable base compared to a lightweight or unstable surface.
- Use Vibration Dampener Feet: There are specialized vibration dampeners available for 3D printers. These can be placed under the 3D printer’s feet or between components prone to vibration (like these*). They work by absorbing the energy from the vibrations, preventing it from translating into movement of the print head.
- Use a Rubber Mat: In some of my own setups, I’ve found that even simple modifications, like placing a rubber mat or foam padding* under the 3D printer, can noticeably reduce vibrations. Even better: place a concrete slab under the rubber mat.
Reduce the Weight on the Print Head
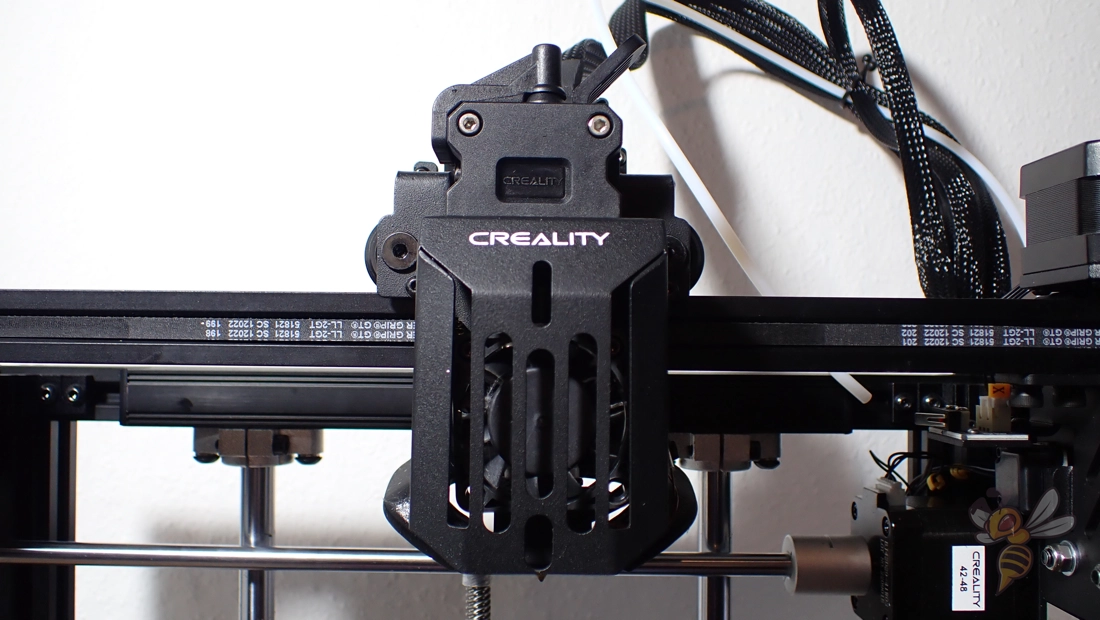
A heavier print head can amplify vibrations during rapid movements, leading to more pronounced ringing and ghosting. Reducing this weight can therefore play a crucial role in avoiding ringing and ghosting.
One approach to reduce the weight is by using lighter components in the print head assembly. One quick measure is to just remove the hood of the print head. Typically, it’s just an aesthetic design feature with no structural function.
That said, if your 3D printer manufacturer designed the hood to act as a heatsink (cooling down the hot end), then you shouldn’t remove it.
Another option is to use a Bowden extruder setup, which moves the heavy extruder motor and filament spool away from the print head. But this is a major modification, and may not be practical for all 3D printers. Also, you’ll lose the ability to print with flexible filament.
Enhance the Structural Rigidity of the 3D Printer
A more rigid frame reduces the amount of flex and vibration during printing, directly impacting the amount of ringing and ghosting.
- Frame Reinforcements: Adding braces or reinforcements to the 3D printer’s frame can significantly increase its stability. This is particularly effective for 3D printers with open or less sturdy frames. Look for areas where the frame shows the most movement or flex, and reinforce them.
- Tightening Connections: Regularly check and tighten all screws and connections. Loose components can lead to additional vibrations and instability.
Check and Upgrade Stepper Motor Damping
One often overlooked aspect of minimizing ringing and ghosting in your 3D prints is the damping of stepper motors. The vibrations generated by stepper motors during operation can significantly contribute to these print defects.
To mitigate this, it’s essential to first check the current state of your stepper motor damping. Inspect if there’s any excessive movement or vibration in the motors while printing. If you notice considerable vibrations, upgrading to better-quality dampers or adding stepper motor dampers* if none are present could be a game-changer.
These dampers act as a buffer between the motor and the 3D printer frame, absorbing vibrations and providing a smoother operation. This upgrade not only reduces ringing and ghosting but can also enhance the overall surface quality and prolong the lifespan of your 3D printer by reducing mechanical stress.
FAQ – Frequently Asked Questions
What is the easiest way to reduce ringing and ghosting in my prints?
Start by reducing your print speed and ensuring all components of your 3D printer are tight and secure. These are often the most straightforward and effective first steps.
How often should I calibrate my 3D printer?
Calibration should be done whenever you notice a decline in quality or after making significant changes to your 3D printer or the materials you use. You can find a detailed guide on 3D printer calibration here: 3D Printer Calibration: Step-by-Step to Perfect Results
Can software updates impact the surface quality?
Yes, firmware and software updates can affect how your 3D printer operates. Always check for updates and read the changelogs for any adjustments that might impact surface quality.
Is it necessary to upgrade parts of my 3D printer to reduce ringing and ghosting?
While upgrades can help, they are not always necessary. Simple adjustments and maintenance can often significantly improve quality.
Will changing the filament type affect ringing and ghosting?
No, the filament type has no effect on how much 3D printer vibrations occur and therefore do not influence ringing or ghosting.
Conclusion
In conclusion, addressing ringing and ghosting in 3D printing is about understanding and mitigating the vibrations created during the printing process.
By systematically applying the solutions discussed, such as proper calibration, speed adjustments, checking the belt tension and structural enhancements, you can significantly improve the quality of your prints.
Disclosure: This website is the property of Martin Lütkemeyer and is operated by Martin Lütkemeyer. Martin Lütkemeyer is a member of the Amazon Services LLC and other Affiliate Programs. These are affiliate advertising programs designed to enable websites to earn advertising revenue through advertising and linking to Amazon.com and others. Links marked with * are affiliate links.
