
- Wet Filament: Prevention, Symptoms & Drying - July 18, 2024
- Sovol SV08 – Best PrusaSlicer Settings & Profile - June 26, 2024
- Sovol SV08 – Best Orca Slicer Settings & Profile - June 26, 2024
Disclosure: Links marked with * are Affiliate Links. I earn from qualifying purchases if you decide to make a purchase through these links – at no additional cost for you!
The Creality CR-10 Smart Pro is a great 3D printer with a large print volume, a PEI print bed and many smart features. But what are the best Cura settings for it?
In this article you will learn how to set up your Cura profile for the Creality CR-10 Smart Pro.
| PLA | ABS | TPU | PETG | |
|---|---|---|---|---|
| Print temperature | 195 °C | 230 °C | 215-225 °C | 220-245 °C |
| Print bed temperature | 55 °C | 80 °C | 55-60 °C | 60-70 °C |
| Print speed | 50 mm/s | 50 mm/s | 20-30 mm/s | 50 mm/s |
| Retraction | 1 mm at 40 mm/s | 1 mm at 50 mm/s | 1.0-1.2 mm at 50 mm/s | 0.8-1.0 mm at 40 mm/s |
| Cooling | 100 % | 0% + enclosure | 100 % | 100 % |
Table of Contents:
Creating a Cura Profile for the Creality CR-10 Smart Pro

A printer profile in Cura is a set of specific printer settings that you can use to print a 3D model. These settings include the type of filament, print bed temperature, print speed, and more.
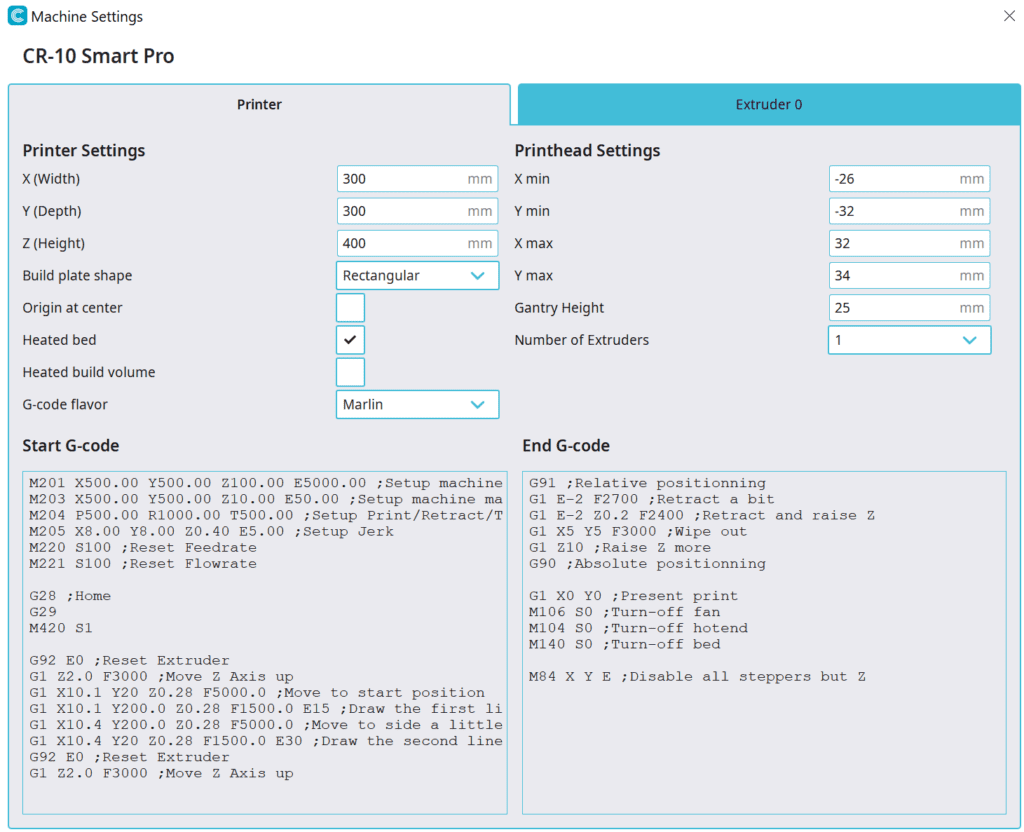
However, there is no predefined profile for the Creality CR-10 Smart Pro in Cura. You have to create your own. In addition to the print settings, you must also define the machine parameters, i.e. the print volume, how many extruders it has, and things like that. To do this, go to “Custom FFF printer” in the selection window for adding a new 3D printer and create a blank profile with the name “Creality CR-10 Smart Pro”.
In the screenshot above you can see the machine parameters that I have specified for my Creality CR-10 Smart Pro. With this, you have already checked off the machine parameters for your Cura profile checklist.
After you have created the new profile, Cura enters default values in the print settings. Here you have to adjust the most important settings to the Creality CR-10 Smart Pro and calibrate the most important ones.
You can find more information on how to create a 3D printer profile in Cura and what you need to pay attention to in this article: How to Create a Custom 3D Printer Profile in Cura
PLA Settings at a Glance
There are a few important things to consider when printing with PLA. Temperature is key – you need to find the right point where the filament flows well but doesn’t cause stringing or other print defects. The right print speed is also important, but retraction is usually one of the most important settings.
If the retraction is not set correctly, it can cause a number of printing problems. Most notably, it can cause the filament to be pulled out of the extruder and create a stringing effect. It is important to set the retraction distance and speed correctly to avoid this problem. The best way to do this is to calibrate the retraction – more on this later.
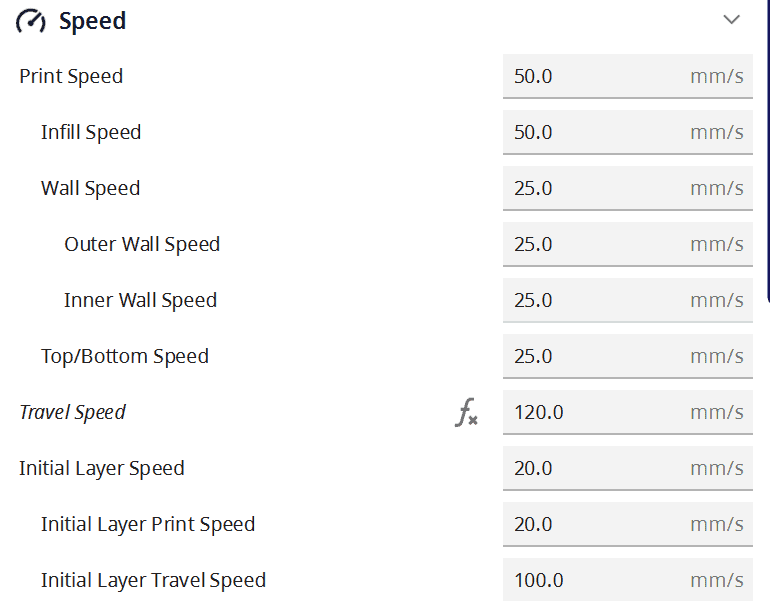
In terms of print speed, the Creality CR-10 Smart Pro is comparable to most other FDM printers and prints PLA best in the 40-60mm/s range. I have always had good results with 50 mm/s. However, thanks to the Sprite Pro extruder, even higher print speeds can theoretically be achieved as it is very lightweight. Printing errors such as ghosting caused by vibrations during movement only occur at higher speeds than with 3D printers with heavier extruders.
These are the correct Cura settings for the Creality CR-10 Smart Pro for PLA:
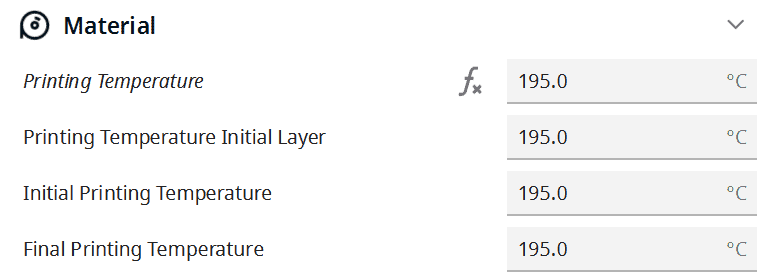
- Print temperature: 195 °C
- Print bed temperature: 55 °C
- Printing speed: 50 mm/s
- Retraction: 1 mm at 40 mm/s
- Cooling: 100%
- First layer: 0% cooling, 100% extrusion width, 100% layer height
ABS Settings at a Glance
ABS filament is a popular choice for printing 3D objects because it delivers high-quality results and is durable. However, there are a few things to keep in mind when printing with ABS. The most important feature of ABS is that it warps when it cools down, and in the worst-case scenario, cracks can occur.
One way to combat the problem of warping when printing with ABS is to use a 3D printer enclosure. An enclosure helps to keep the ambient temperature around the print constant, which can reduce the risk of warping.
With the Creality CR-10 Smart Pro, however, it becomes difficult to find a suitable enclosure due to its size. The best option here would be the “tent” from Creality itself (click here* to get to the product, and here for my review of it). The CR-10 Smart Pro fits into the large version of it. Before printing you have to turn on the print bed some time before printing and close the tent. Then the inside warms up and creates a good ambient temperature for printing with ABS.
Another problem with using ABS is sometimes that the print bed adhesion may not be good. However, with the PEI print bed of the CR-10 Smart Pro and the right temperature, nothing should really go wrong. If it does, the 3D printing adhesive Magigoo would be the perfect solution.
These are the correct Cura settings for the Creality CR-10 Smart Pro for ABS:
- Print temperature: 230 °C
- Print bed temperature: 80 °C
- Printing speed: 50 mm/s
- Retraction: 1 mm at 50 mm/s
- Cooling: 0% + enclosure
- First layer: 0% cooling, 100% extrusion width, 100% layer height
TPU Settings at a Glance
When printing with TPU, it is important to set the temperature of the print bed and the hotend correctly. If the temperature is too low, the TPU will not adhere properly to the print bed. If the temperature is too high, the TPU may deform or cause stringing.
The Creality CR-10 Smart Pro features a direct drive extruder, the Sprite Pro Extruder to be exact. This extruder is ideal for TPU. Unlike a Bowden extruder, the extruder sits directly above the nozzle in the print head. This means that the flexible filament has to travel a shorter distance to the nozzle and cannot easily compensate for extrusion and retraction movements with its flexibility.
Print bed adhesion of TPU can be a challenge. However, with the CR-10 Smart Pro, I had no problems at all, as the PEI print bed produces very good adhesion for TPU at the right temperature.
These are the correct Cura settings for the Creality CR-10 Smart Pro for TPU:
- Print temperature: 215-225 °C
- Print bed temperature: 55-60 °C
- Printing speed: 20-30 mm/s
- Retraction: 1.0-1.2 mm at 50 mm/s
- Cooling: 100%
- First layer: 0% cooling, 150% extrusion width, 150% layer height
PETG Settings at a Glance
With PETG there is one thing in particular that you have to pay attention to: PETG stringing. PETG is perfectly suited for 3D printing. It combines many of the good properties of PLA and ABS. It is relatively easy to print and is more durable than PLA. However, stringing is often a real problem.
The Sprite Pro extruder of the CR-10 Smart Pro can be calibrated relatively well in this respect. Besides the print temperature, the retraction is one of the most important values to prevent stringing. As long as the filament is not wet, you should be able to eliminate stringing fairly quickly.
The values given here are only the values that have worked well for me. Since there are minor differences even between 3D printers of the same model and the filaments of different manufacturers sometimes differ greatly from each other, the values below offer you “only” a good starting point from which you can make further optimizations. Later in this article, you will learn how to calibrate the retraction and other important print settings on your Creality CR-10 Smart Pro.
These are the correct Cura settings for the Creality CR-10 Smart Pro for PETG :
- Print temperature: 220-245 °C
- Print bed temperature: 60-70 °C
- Printing speed: 50 mm/s
- Retraction: 0.8-1.0 mm at 40 mm/s
- Cooling: 100%
- First layer: 0% cooling, 100% extrusion width, 100% layer height
How to Import the Creality CR-10 Smart Pro Profile from Creality Slicer into Cura
Creality Slicer and Cura are both slicing software programs that prepare 3D models for printing. Creality Slicer is a program designed specifically for Creality 3D printers, while Cura is a general-purpose slicer that can be used with a variety of 3D printers.
However, the differences between Cura and Creality Slicer are minor. The user interfaces are basically identical and so is the operation. The only two major differences are that Cura gets new features earlier than Creality Slicer. However, since Creality Slicer is designed specifically for Creality 3D printers, it has standard profiles for Creality 3D printers much earlier.
Because the user interfaces are basically identical, you can also import the profile from Creality Slicer into Cura relatively easily. The many options are also divided into the machine settings and the print settings. Just copy the values and paste them into Cura in a new “Custom FFF printer” profile.
Best Cura Settings for the Creality CR-10 Smart Pro
Now that you’ve seen the individual settings for the filaments and how to create a profile for your Creality CR-10 Smart Pro, let’s go into detail about the different print settings.
Print Temperature
If the print temperature is set too low, the filament will not adhere properly to the print bed, the print may warp, or holes may appear. However, if the print temperature is set too high, the filament will become too fluid and leak uncontrollably between extrusion movements. Therefore, it is important to set the print temperature correctly for each type of filament used.
The Creality CR-10 Smart Pro extruder can reach a temperature of up to 300 °C. This allows the use of a wide range of filaments, including of course the standard filaments PLA, ABS, TPU and PETG.
Many 3D printers that are supposed to be good for PETG only have a PTFE heat break between the nozzle and the extruder. PTFE starts to degrade at 240°C and needs to be replaced very often if you print with PETG frequently. Fortunately, this is not the case with the Creality CR-10 Smart Pro, which can print up to 300 °C and uses a full metal extruder.
The best printing temperatures for the Creality CR-10 Smart Pro in Cura:
- PLA: 195 °C
- ABS: 230 °C
- TPU: 215-225 °C
- PETG: 220-245 °C
Print Bed Temperature

If the print bed temperature is not properly adjusted, print bed adhesion can suffer or result in an elephant foot. In short, with an elephant foot, the print bed temperature is too high, causing the filament of the first layer to be too liquid and deform under the weight of the upper layers.
The Creality CR-10 Smart Pro has a print bed that can reach temperatures of up to 100 °C. This is absolutely sufficient for most filaments. In addition, the adhesion on the PEI print bed is so good that you have a lot of leeway when setting the print bed temperature and do not have to search long for a good value.
The best print bed temperatures for the Creality CR-10 Smart Pro in Cura:
- PLA: 55 °C
- ABS: 80 °C
- TPU: 55-60 °C
- PETG: 60-70 °C
Print Speed
The Creality CR-10 Smart Pro uses common print speeds ranging from 30 to 60 mm/s. For PLA and ABS you are at the upper end of this range, for TPU and PETG at the lower end.
An incorrectly set print speed can severely affect the quality of the 3D print result. If the speed is too low, the print will take forever. If the speed is too high, the filament cannot keep up with the extruder and a wide variety of errors will occur.
With flexible filaments it is particularly important to set the printing speed too slow rather than too fast. Due to the flexibility of the material, these filaments can compensate for extrusion movements. This would lead to uneven surfaces and extrusion errors. But even with rigid filaments such as PLA or ABS, the speed must not be set too high, otherwise vibrations can occur, which in turn leads to ghosting.
The best printing speed for the Creality CR-10 Smart Pro in Cura:
- PLA: 50 mm/s
- ABS: 50 mm/s
- TPU: 20-30 mm/s
- PETG: 50 mm/s
Layer Height
The layer height of a 3D print affects its quality because it determines how thick the individual layers of the print are. A lower layer height results in thinner layers, while a higher layer height results in thicker layers.
The Creality CR-10 Smart Pro can print layers as thin as 0.05mm, resulting in thinner layers and higher quality prints.
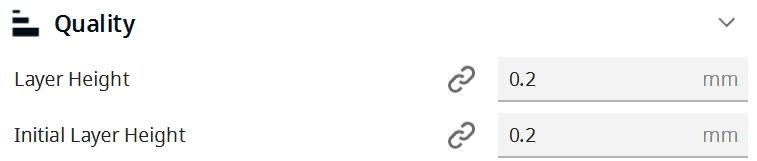
When printing decorative objects, it is important to choose a layer height that gives good results and is still relatively fast to print. A layer height of 0.1-0.2 mm is a good starting point for most decorative prints, as the layers are thin enough to produce high quality prints without taking too long to print.
For robust objects, such as mechanical parts, a layer height of 0.2-0.5 mm is recommended. At this thickness, the layers are stable enough to withstand handling and normal wear. In addition, the focus here is on function rather than appearance, making thicker layers even more attractive due to their faster print time.
The best layer thicknesses for the Creality CR-10 Smart Pro in Cura:
- Decorative objects: 0.08-0.12 mm
- Standard: 0.16-0.20 mm
- Coarse, fast prints: 0.24-0.28 mm
Flow Rate
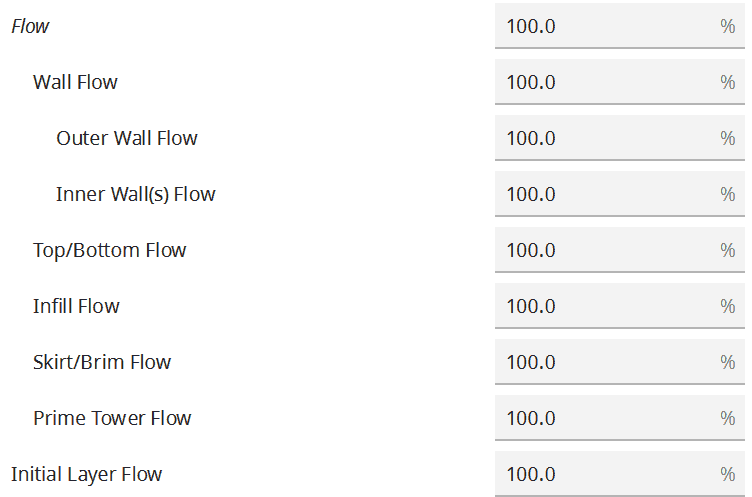
If the flow rate is not set correctly, the filament may not extrude evenly and cause problems with the quality of the print. So it’s important to make sure the flow rate is set correctly to get the best results from your 3D printer.
If the flow rate is set too high, over-extrusion with errors such as stringing or blobs may occur. If the flow rate is set too low, under-extrusion with holes or cracks will occur. Flow rate is one of the settings that should be calibrated for each 3D printer filament combination – more on that later.
When you increase the flow rate of your 3D printer, you are essentially instructing the printer to push more filament through the hot end at a higher rate. This can help improve print bed adhesion by creating a stronger bond between the filament and the print bed. A higher flow rate for the first layer increases print bed adhesion.
The best flow rate for the Creality CR-10 Smart Pro in Cura:
- Default value: 100%
- For over-extrusion: 90% to 99
- For under-extrusion: 101% to 110%.
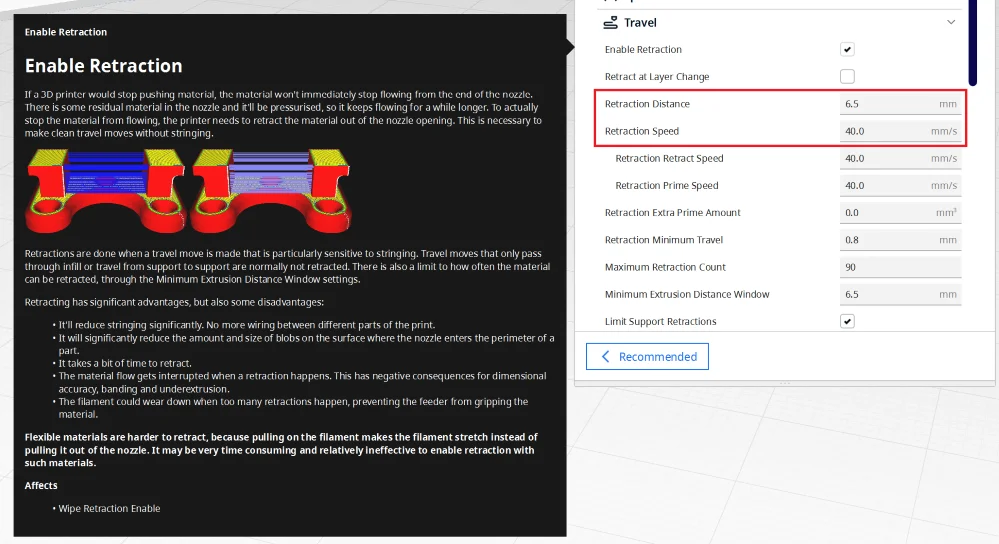
Retraction
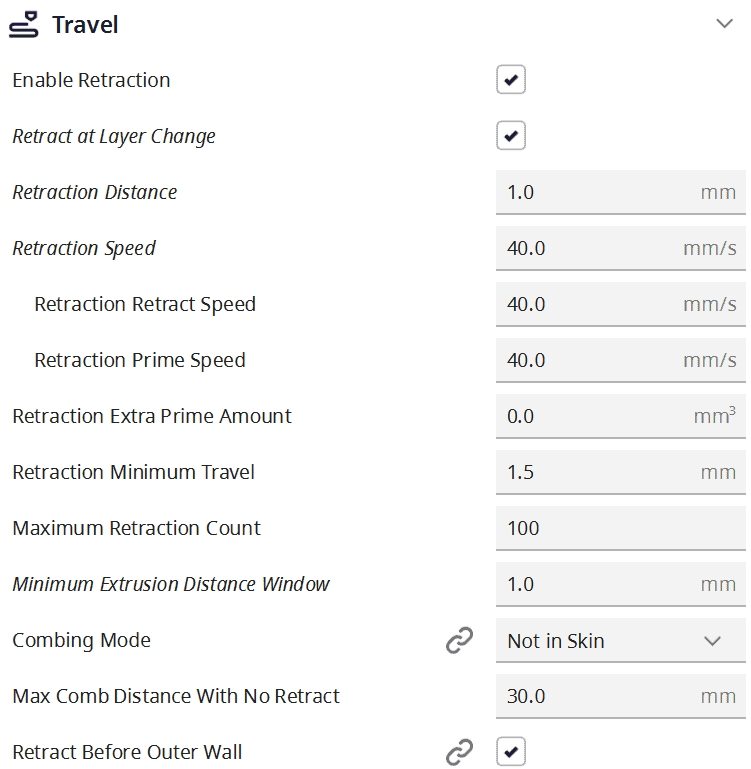
An incorrectly set retraction distance can cause great damage to the 3D printing result. If the retraction distance is too long, the filament can be pulled into the extruder nozzle and cause a jam. If the retraction distance is too short, the filament will flow out of the nozzle when the nozzle is between two extrusions.
A common problem that can occur in 3D printing is stringing. It occurs when the filament drips out of the nozzle, creating a stringy effect. This can cause problems in the final print as the surface becomes unclean. To fix stringing, retraction is one of the most important settings.
The best retraction settings for the Creality CR-10 Smart Pro in Cura:
- PLA: 1 mm at 40 mm/s
- ABS: 1 mm at 50 mm/s
- TPU: 1.0-1.2 mm at 50 mm/s
- PETG: 0.8-1.0 mm at 40 mm/s
Infill
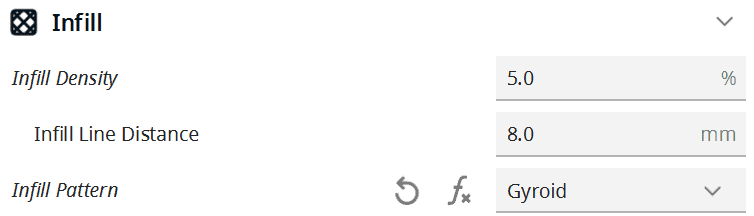
An incorrectly set infill density can cause the object to be less stable and less durable. If the infill is too low, the object becomes weak and fragile. If the infill density is too high, the object becomes heavy and expensive. In addition, printing time increases significantly with high densities.
Finding the right balance of fill is important to get the best results from your object while saving as much filament and time as possible.
There are two characteristics of infill: pattern and density. The infill pattern refers to the way the printer deposits the infill filaments in the cross section of your print. Some common patterns are lines, cubes, or gyroids.
High stability (for stable objects):
- Cube
- Cube subsection
- Octet
- Gyroid
Medium stability (for standard objects):
- Grid
- Triangles
- Tri-Hexagonal
Low stability (for decorative objects):
- Lines
- Zigzag
- Lightning
When it comes to determining the best infill density for 3D printing, there are a few things you need to consider. The first is the type of object you want to print. If you’re printing a standard object that doesn’t need to be particularly stable, a lower fill density will probably suffice.
If you are printing an object that needs to be very strong and stable, such as a gear or a load-bearing element of your cosplay armor, you will need to use a higher fill density.
The best infill density for the Creality CR-10 Smart Pro in Cura:
- Decorative objects: 0-15%
- Standard objects: 15-50%
- Stable objects: 50-100%
First Layer
The first layer of a 3D print is extremely important as it forms the basis for the rest of the print. If the first layer is not done correctly, the print can fail or produce poor results. That’s why it’s important that you take the time to set up the first layer with the correct settings and profiles.
One way to increase the print bed adhesion of the first layer in 3D printing is to use a lower initial print speed. This will create a stronger bond between the print and the print bed. Also, you can try increasing the print bed temperature or using a heated bed to improve adhesion.
These are the best Cura settings for the first layer on the Creality CR-10 Smart Pro:
- Layer thickness: 100-200% of normal layer thickness (higher values to increase print bed adhesion)
- Line width: 100-200% of normal line width (higher values to increase print bed adhesion)
- Print temperature: Same as the rest of the object or 5-10 °C higher for better print bed adhesion.
- Print speed: 50% of the normal print speed (i.e. 25 mm/s with a normal print speed of 50 mm/s)
- Flow rate: 100-110% (higher values in case of poor print bed adhesion)
How to Calibrate the Creality CR-10 Smart Pro
Calibrating a 3D printer is important because it ensures that the printer prints accurately. If the printer is not calibrated properly, the prints will be inaccurate and may not be usable.
The most important print settings that should be calibrated are the print temperature, flow rate and retraction. They have the greatest impact on quality and prevent the most errors when properly calibrated.
For the calibration, you need suitable calibration objects. You can find them on most portals that offer digital models for 3D printing. Thingiverse is one of the most popular of these portals. I like to use the Calibration Shapes plugin in Cura.

Read the full calibration guide:
3D Printer Calibration: Step-by-Step to Perfect Results
TIP: Learn how to calibrate your 3D printer to get perfect results every time in my 3D printing course: FDM 3D Printing: The Comprehensive Course from A to Z
(The course teaches everything you need to know for FDM 3D printing in over 60 lessons. The course will get beginners up to my level in no time!)
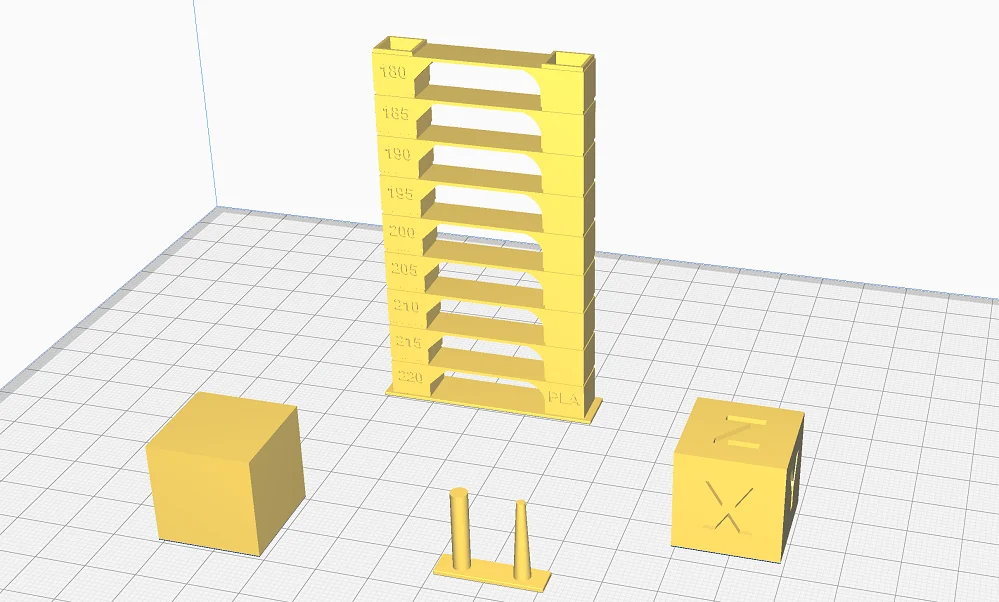
How to Calibrate the Print Temperature
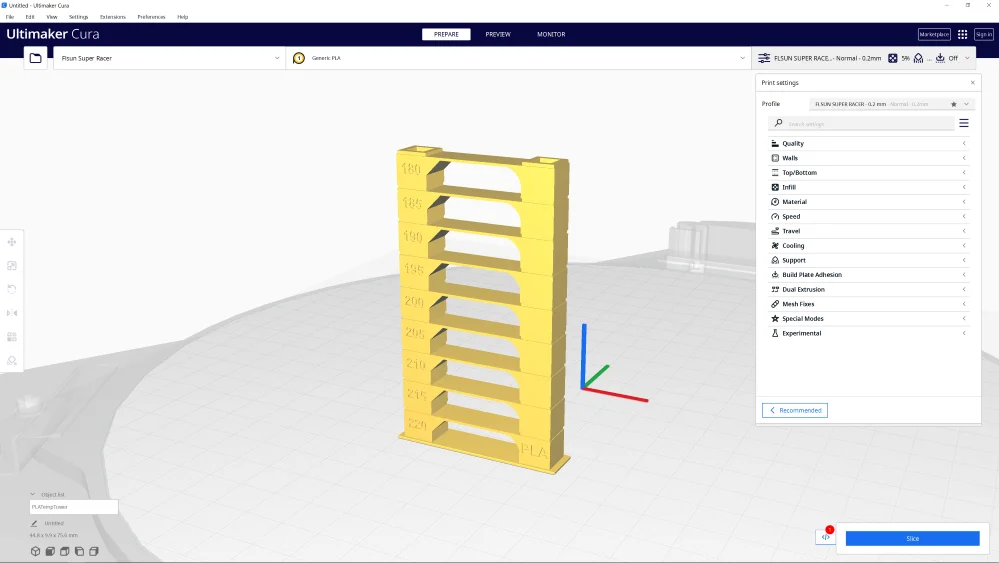
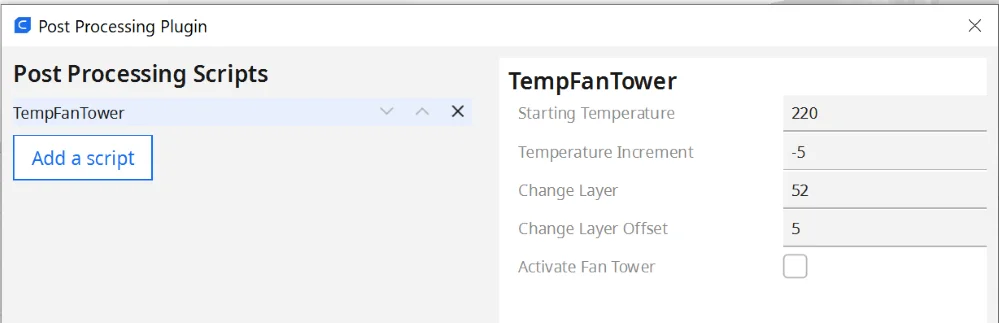
The best way to calibrate the print temperature of a 3D printer is to use a temperature tower. To calibrate the print temperature with a temperature tower, you only need the object and a script in Cura.
The pre-made script in Cura changes the temperature for each floor of the tower. So you can see directly after printing which printing temperature is best.
How to Calibrate the Flow Rate
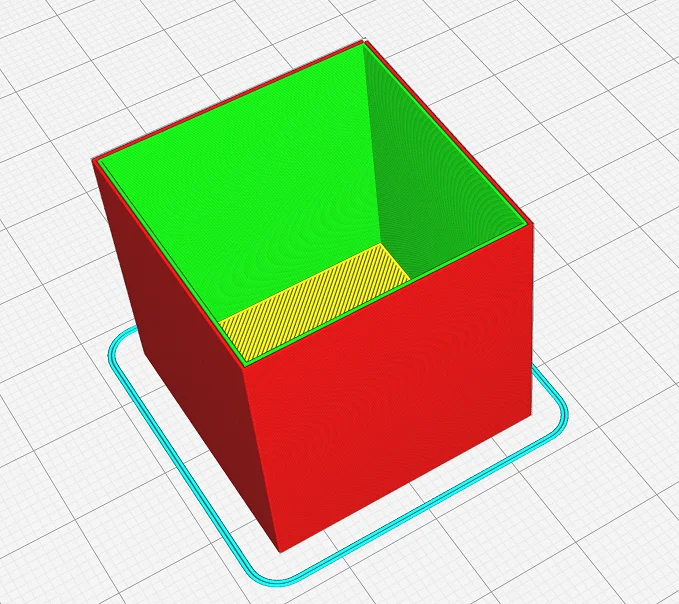

To calibrate the flow rate of a 3D printer, you need to measure the real wall thickness and compare it to the theoretical wall thickness in the slicer. If they differ, you need to adjust the flow rate in Cura accordingly.
The easiest way to do this, in my opinion, is to print a cube without infill and top layers. It becomes hollow and you can easily measure the wall thickness after printing with a caliper.
With a little trial and error or math, you’ll come up with the right values for the flow rate very quickly.
How to Calibrate the Retraction
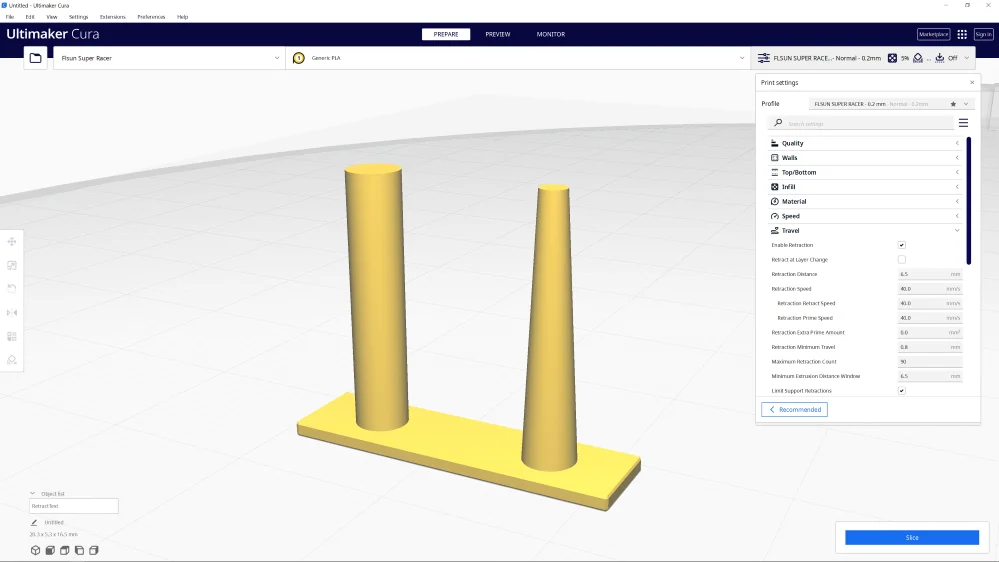
To calibrate the retraction of a 3D printer, you need an object that provokes stringing. Generally, these objects have multiple columns. If the retraction is not set correctly, threads will appear between these columns.
I prefer to use objects that are printed within a few minutes for the calibration of the retraction. This way I can find the right settings very quickly and use as little filament as possible.
Conclusion
The Creality CR-10 Smart Pro is a great 3D printer that can be calibrated to produce high-quality prints. With the Cura settings found in this article, you can improve the quality and repeatability of your prints. Have fun printing!
Disclosure: This website is the property of Martin Lütkemeyer and is operated by Martin Lütkemeyer. Martin Lütkemeyer is a member of the Amazon Services LLC and other Affiliate Programs. These are affiliate advertising programs designed to enable websites to earn advertising revenue through advertising and linking to Amazon.com and others. Links marked with * are affiliate links.
