
- Wet Filament: Prevention, Symptoms & Drying - July 18, 2024
- Sovol SV08 – Best PrusaSlicer Settings & Profile - June 26, 2024
- Sovol SV08 – Best Orca Slicer Settings & Profile - June 26, 2024
Disclosure: Links marked with * are Affiliate Links. I earn from qualifying purchases if you decide to make a purchase through these links – at no additional cost for you!
My first contact with a Sprite extruder from Creality was with the Ender 3 S1. In this 3D printer, the Sprite extruder is installed as standard. The Ender 3 S1 Pro* also has a Sprite extruder, but it is made entirely of metal to support even higher temperatures.
The Sprite Extruder Pro Kit* is suitable for all 3D printers of the Ender 3 series and the CR-10 Smart Pro. The extruder can process materials up to 300 °C and is ideal for flexible filaments.
Find out what makes the Sprite Extruder so special, how to install it, and whether it’s worth its price in this detailed test and review.
Check Price at:
Table of Contents:
- 1 Key Takeaways
- 2 Who Should Buy the Creality Sprite Extruder?
- 3 Advantages & Disadvantages > Creality Sprite Extruder Review
- 4 Technical Specifications > Creality Sprite Extruder Review
- 5 What is the Creality Sprite Extruder and How Does it Work?
- 6 Creality Sprite Extruder Installation
- 7 Creality Sprite Extruder Features
- 8 Which 3D Printers is the Sprite Extruder Compatible with?
- 9 Is the Sprite Extruder Compatible with a BL-Touch or CR-Touch?
- 10 Conclusion > Creality Sprite Extruder Review
Key Takeaways
- Extremely compact and lightweight
- Perfect upgrade for Ender 3 series 3D printers and the CR-10 Smart Pro
- Dual gear system for precise extrusion
- Very good heat distribution
Who Should Buy the Creality Sprite Extruder?
The Creality Sprite extruder is perfect for anyone who owns a 3D printer from the Ender 3 series (except the Ender 3 S1 Pro, which already has this extruder installed as standard) or the CR-10 Smart Pro. The extruder is a very good upgrade and allows you to print many different materials.
Advantages & Disadvantages
> Creality Sprite Extruder Review
PRO:
- Extremely light and thus no vibrations even at high speeds
- Perfect for flexible filaments
- Up to 300 °C
- Easy installation
- Adjustable tension
CON:
- Only compatible with selected Creality 3D printers
Technical Specifications
> Creality Sprite Extruder Review
- Gear ratio: 3.5:1
- Extrusion force: up to 80 N (depending on the filament)
- Drive system: Dual Gear
- Max. Temperature: 300 °C
- Size: 195 x 130 x 75.5 mm
- Weight: 575 g
- Max. retraction: 3 mm
- Filaments: 1.75 mm PLA, ABS, PA, PC, TPU
- Compatibility: Ender 3, Ender 3 Pro, Ender 3 Max, Ender 3 V2, Ender 3 S1, Ender 3 S1 Pro, CR-10 Smart Pro
What is the Creality Sprite Extruder and How Does it Work?
The Creality Sprite extruder is a direct drive extruder. The extruder is one of the most important parts of any 3D printer. With a direct drive extruder, the extruder sits directly in the print head and guides the filament directly to the nozzle where it is melted and extruded.
These are the two main advantages of a direct drive extruder over a Bowden extruder:
- More accurate extrusion
- Better suited for flexible filaments
In classic Bowden extruders, the mechanism that guides the filament to the nozzle is located far away from the print head. In most Bowden systems the extruder sits on the X-axis on which the print head moves. From the extruder, the filament is fed through a long tube to the print head and into the nozzle. And this is exactly the advantage of direct drive extruders.
Because the Bowden tube cannot have exactly the same inner diameter as the outer diameter of the filament, the filament can wiggle back and forth a bit in the tube. The result of this freedom of movement in the tube is that a Bowden extruder cannot extrude the filament as precisely as a direct drive extruder.
The freedom of movement of the filament in a Bowden tube also means that flexible filament has more opportunity to get tangled. With a direct drive extruder, this cannot happen at all, as the extruder sits directly above the nozzle and immediately pushes it into the melt zone.
For these two reasons, Creality’s Sprite extruder is not only very accurate but also great for flexible filaments.
Creality Sprite Extruder Installation
The Creality Sprite Extruder Pro Kit* includes almost everything you need for the installation. All you need are some tools. The first step in installing the Sprite Extruder is, of course, to remove the old extruder from the X-axis and disconnect the cables from the motherboard.
After that, follow these steps to install the Sprite Extruder:
Step #1: Mount the rear panel with the carriage on the x-axis. You can either detach one side of the x-axis from the frame and slide the carriage onto it or, which is probably easier, unscrew the lower wheel from the carriage and screw it back on after inserting it.
Step #2: Install the timing belt onto the carriage. The belt should be taut so that it makes a bright sound when you flick it with your finger. You should also not over tension it or it may break.
Step #3: Now the modular character of the extruder comes into play. You can simply hang the extruder on the carriage and screw it on comfortably. In this way, you can later place other modules on the carriage if you wish.
Step #4: Now you need to connect the cables. One end goes into the extruder, the rest goes into the motherboard. But don’t worry – the cables are very well marked and the instructions show you exactly where to plug them in.
Step #5: Now you need to tell the 3D printer that it has a new extruder. You do this by changing the Esteps in the menu. The value for the Sprite Extruder Pro is 424.9. If you can’t enter this value in the menu, you have to create a text file with a small G-Code command. How this works is explained very well in the manual.
Step #6: Since at least the Z-offset has changed due to the installation of the new extruder, you must now level the print bed again.
Creality Sprite Extruder Features
You can see that Creality wanted to further optimize an already existing technology with the Sprite extruder. And they have succeeded very well. Below you will find the individual features that contribute to the Sprite Extruder being so popular and how it delivers such excellent results.
Low Weight
One of the most important features of the extruder is its light weight. Early, heavier direct drive extruders often caused vibration at higher print speeds. This promotes print defects like ringing or ghosting.
The art of developing direct drive extruders is to make them as light as possible. Often the quality suffers because cheap and light components are used. This is not the case with the Sprite extruder for the most part. Only the fans could be a bit better, otherwise the construction is very minimalistic and has almost no housing parts.
The individual components are directly connected to each other to save as much weight as possible. Due to the low weight, high printing speeds are also possible with high print quality at the same time.
All-Metal: Up to 300 °C Printing Temperature
In the Sprite extruder, all components between the extruder and the nozzle are made of metal. This allows it to reach temperatures of up to 300 °C.
The heating block is made of aluminum alloy and allows to reach the printing temperature quickly to melt the filament as soon as possible.
A titanium throat is located between the cooling block and the heating block. It has a low thermal conductivity, is very robust and only needs to be replaced extremely rarely.
The cooling block is made of high-quality aluminum and fits perfectly to the rear part of the titanium throat, so that the temperature can be dissipated as quickly as possible. The heat does not reach the upper parts of the extruder, so the nozzle or extruder will never clog due to high melting filament – even at high temperatures.
High Extrusion Force
The gear ratio of the Sprite extruder is 3.5:1 and generates an extrusion force of up to 80 Newton. This gear ratio makes it possible to extrude the filament very precisely.
Dual Gear System
With the Dual Gear System, two gears drive the filament through the extruder. Other extruders often have only one active gear and a passive roller without teeth. With the two gears, the extruder has more control over the filament and can move it more precisely.
Adjustable Tension
The two gears press on the filament with a certain force. This force can be too high or too low for certain filaments. To adjust the force, there is a screw on the side of the extruder.
Efficient Cooling
The cooling of the extruder and the filament above the heat barrier is very minimalistic but very effective. The aluminum heat sink draws the temperature from the titanium throat very quickly and distributes it in the room.
The two fans for the extruder itself and for the exiting filament are cleverly mounted so that they require as few mounting parts as possible to keep the weight down.
I’ve been using the Sprite extruder for a long time now and haven’t had to replace the fans yet. If you want a whisper-quiet 3D printer, you might need to upgrade here.
Modular Design
The Sprite Extruder is designed to be easily removable. This is not only helpful during assembly, you can also quickly install another module. All you have to do is loosen a few screws and then you can easily lever the extruder out of the X-axis carriage.
Which 3D Printers is the Sprite Extruder Compatible with?
The Creality Sprite extruder is compatible with all 3D printers of the Ender 3 series and the CR-10 Smart Pro. It is therefore a perfect upgrade for any of these 3D printers and allows you to process flexible filaments and reach very high printing temperatures.
Is the Sprite Extruder Compatible with a BL-Touch or CR-Touch?
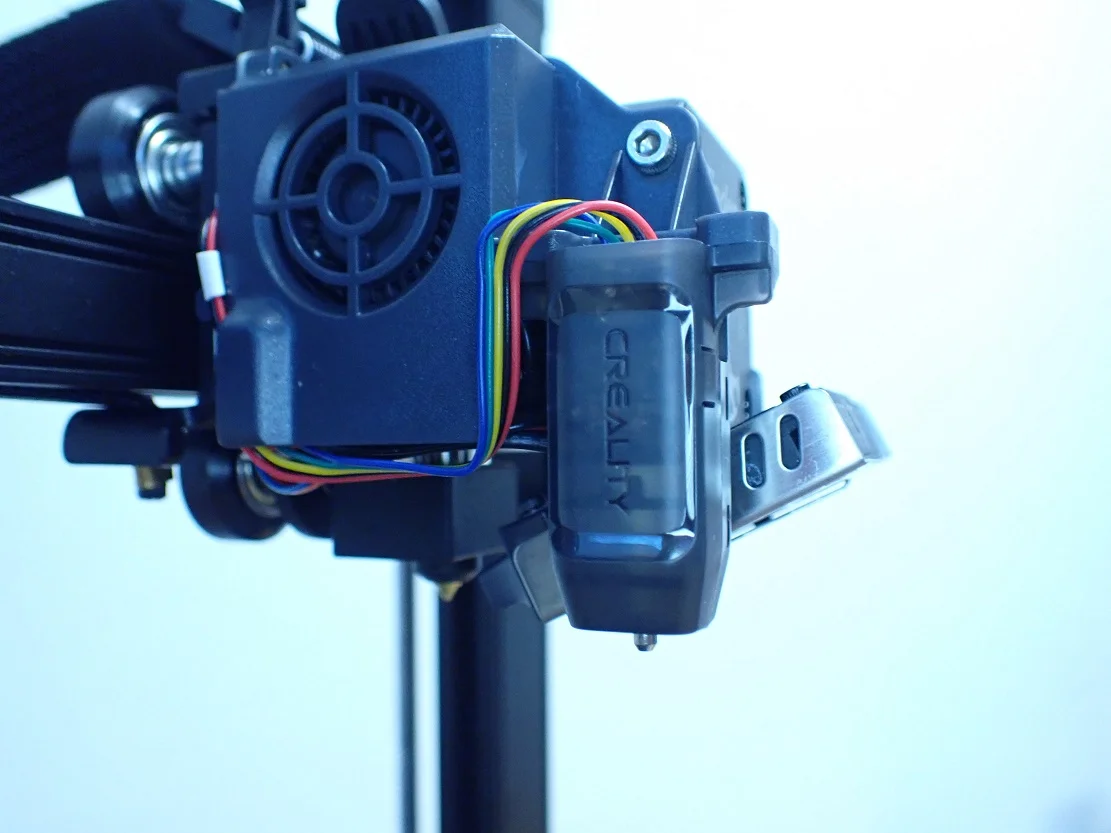
On the side of the Sprite extruder is a Mount for a leveling sensor. Therefore it is very easy to upgrade with a BL Touch or CR Touch. On the circuit board of the extruder, there is also a slot for the sensor and in the cable harness, there is a corresponding cable with a label ready to be plugged in the motherboard.
I would recommend the CR Touch for the Sprite extruder, as it is designed specifically for Creality 3D printers and is more accurate than the BL Touch. It also has a longer lifespan and fits the design of the extruder.
If you’re interested in the CR Touch, you can read this detailed review of it.
Conclusion
> Creality Sprite Extruder Review
Creality’s Sprite extruder* is becoming increasingly popular and is now one of the standard upgrades to Creality’s most popular 3D printers. The extruder is so well engineered that installation doesn’t involve much tinkering, but is fairly simple and straightforward. So you can assemble and use the Sprite extruder even if you’re not a tech whiz and just want to improve your 3D printing results.
Check Price at:
Disclosure: This website is the property of Martin Lütkemeyer and is operated by Martin Lütkemeyer. Martin Lütkemeyer is a member of the Amazon Services LLC and other Affiliate Programs. These are affiliate advertising programs designed to enable websites to earn advertising revenue through advertising and linking to Amazon.com and others. Links marked with * are affiliate links.
