
- Wet Filament: Prevention, Symptoms & Drying - July 18, 2024
- Sovol SV08 – Best PrusaSlicer Settings & Profile - June 26, 2024
- Sovol SV08 – Best Orca Slicer Settings & Profile - June 26, 2024
Disclosure: Links marked with * are Affiliate Links. I earn from qualifying purchases if you decide to make a purchase through these links – at no additional cost for you!
The first layer of any 3D print is critical for print bed adhesion and bottom surface quality.
Especially the line width, flow rate, layer thickness and horizontal expansion of the first layer are decisive for successful print bed adhesion and good surface quality.
Find out which values are best for each option, what they do, and how else you can increase print bed adhesion in this detailed guide to the first layer in Cura.
Table of Contents:
Cura Initial Layer – Line Width
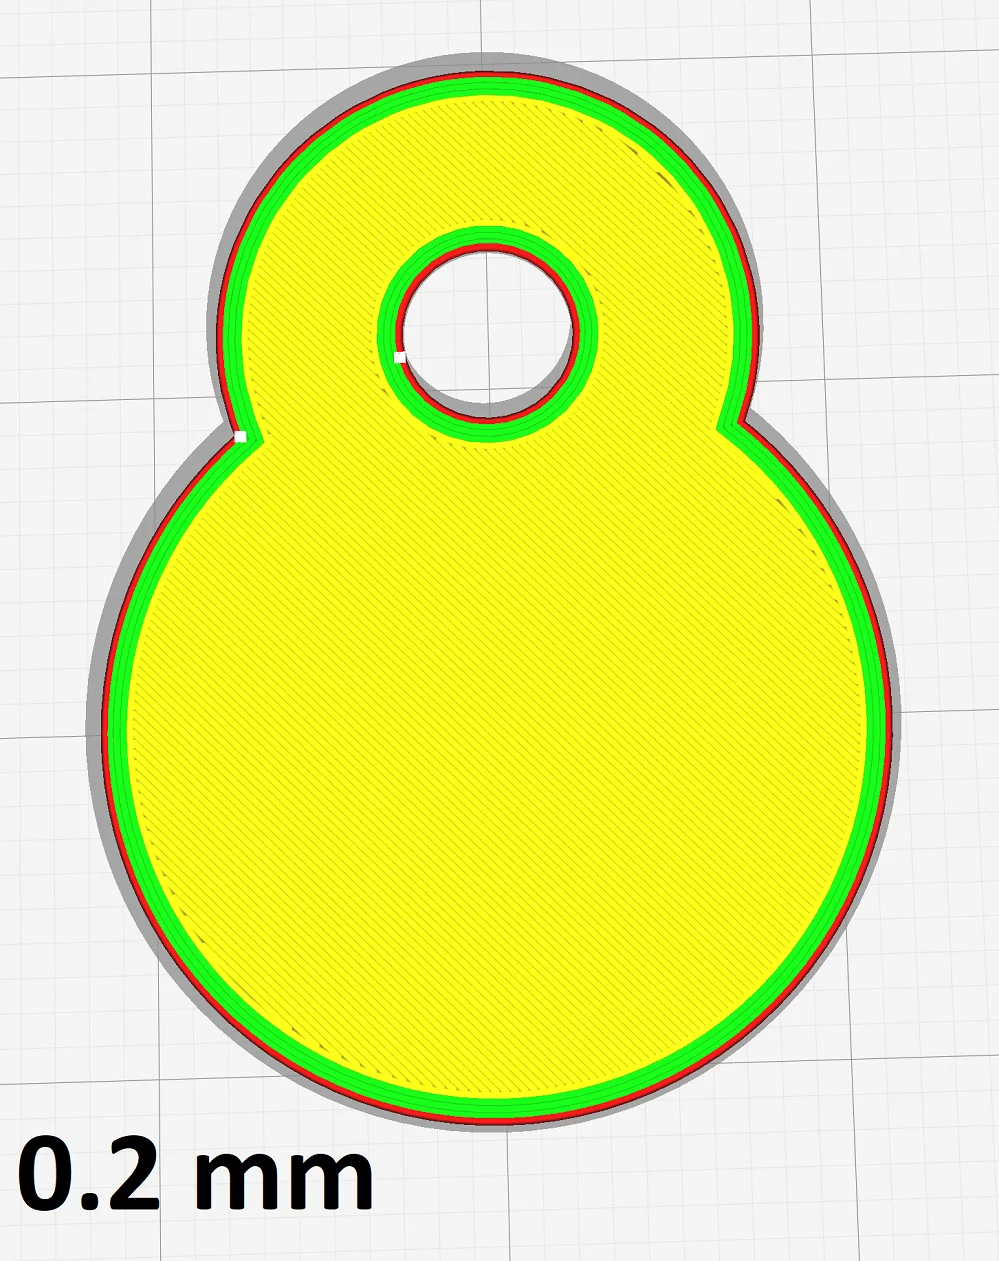
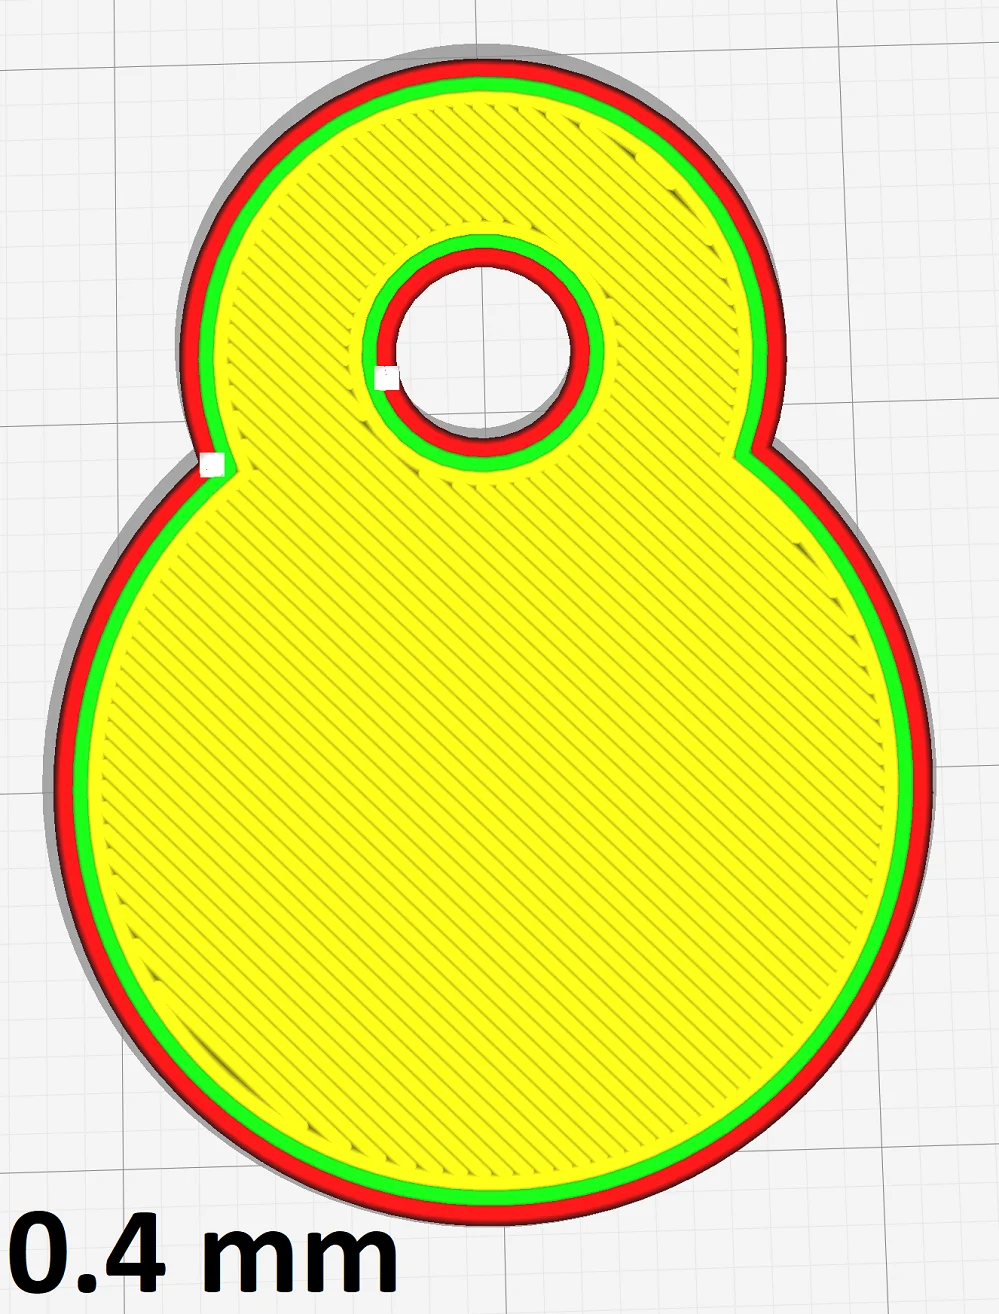
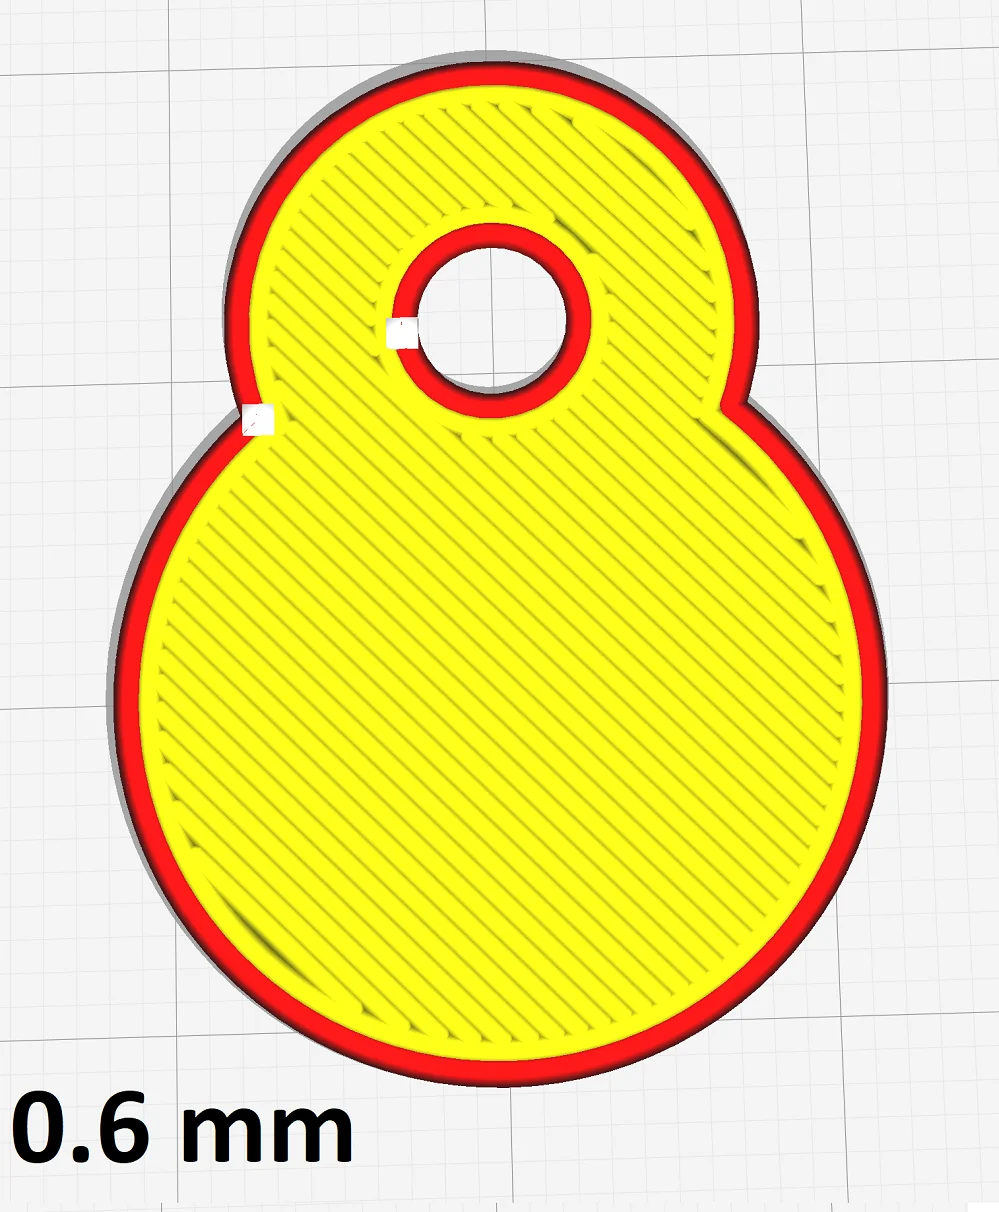
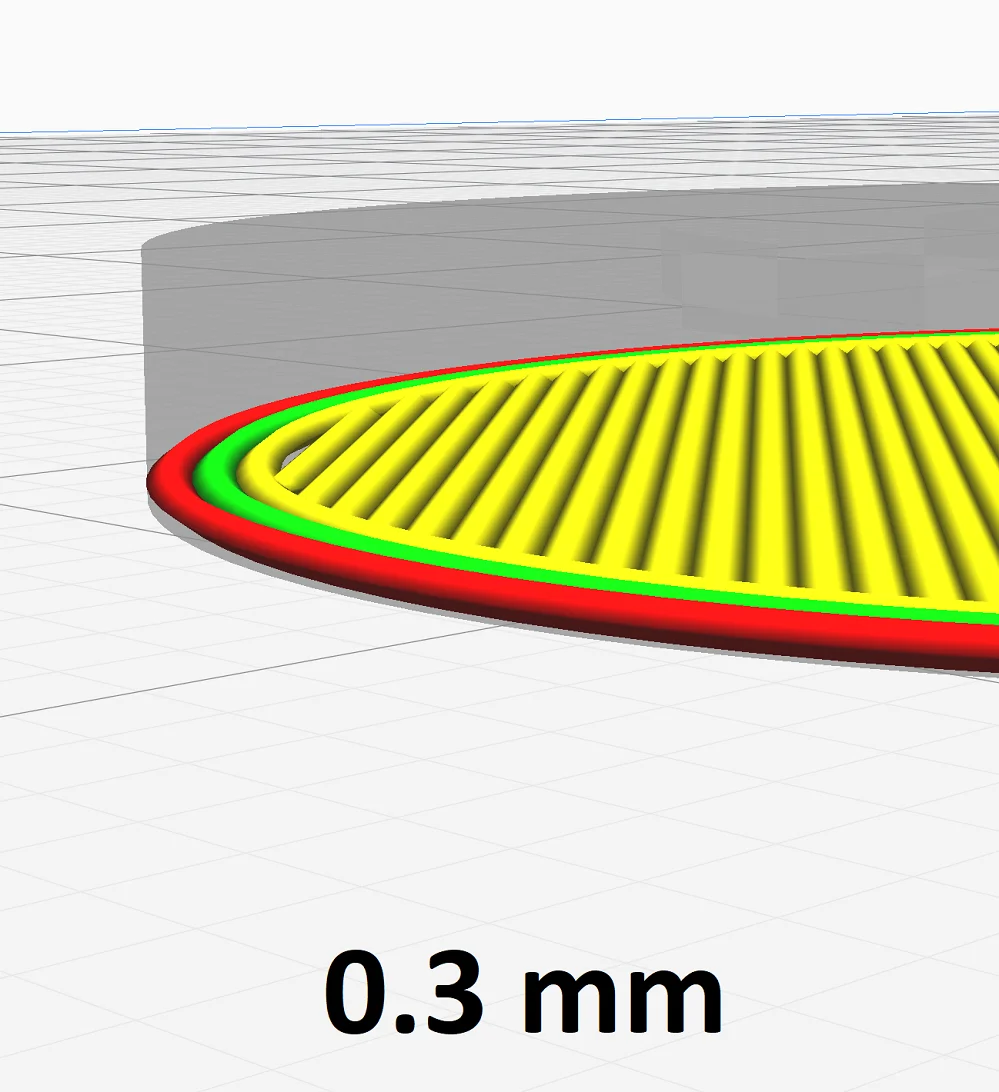
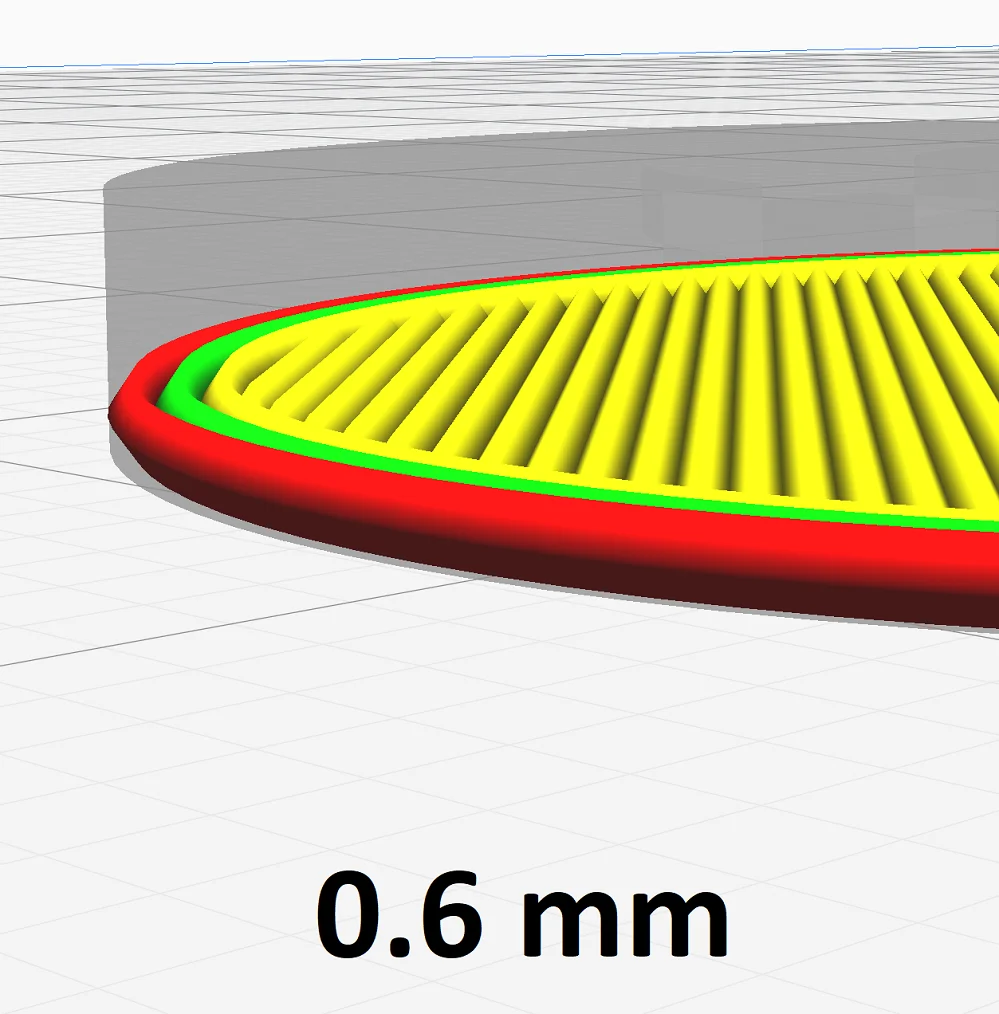
The line width of the first layer is very important for print bed adhesion. If it is too small, there will be poor adhesion. But it can’t be too large either, otherwise you will lose details or there will be irregularities in the extrusion.
For the normal extrusion width, values between 100% and 140% of the nozzle diameter are recommended. With a 0.4 mm diameter nozzle, you can print line widths from 0.24 mm to 0.8 mm as a maximum.
The line width of the first layer is not based on the diameter of the nozzle, but on the line width you use for the rest of the model. If the difference is too great, the transition from the first layer to the subsequent layers will be very visible.
2 = Extrusion Width / Line Width
The line width of the first layer is normally the same as for the rest of the object. To increase the print bed adhesion, the line width of the first layer can be set to 120% or higher (e.g.: 0.36 mm with a normal line width of 0.3 mm).
The larger the line width, the more filament comes out of the nozzle onto the print bed. The larger mass of liquid filament takes longer to solidify. This gives it more time to form an adhesive bond with the surface of the print bed.
The second effect that creates greater print bed adhesion is the fact that the nozzle presses the filament more strongly onto the print bed while maintaining the same layer thickness. The higher pressure results in better print bed adhesion. The necessary flow rate of the filament is calculated automatically by Cura.
Summary:
- A higher line width results in better print bed adhesion
- Default: 100% of the normal line width
- For better adhesion: ≥ 120% of the normal line width
Cura Initial Layer – Flow
The flow rate of the first layer is often confused with the line width of the first layer, or the difference is often not clear.
Changing the line width of the first layer changes the distance between the lines and the line width. Changing the flow rate of the first layer does not change the distance of the lines to each other but only influences the line width, because more or less filament is extruded per second.
Increasing the flow rate of the first layer will cause over-extrusion which can often increase print bed adhesion. However, you should be careful not to set the flow rate too high, otherwise you can very quickly get an elephant’s foot (a too thick first layer).
The flow rate of the first layer is always 100% for well calibrated 3D printers. To improve poor print bed adhesion, the first layer flow rate can be set to 105% or more to get thicker lines at the same line spacing.
In my experience, higher flow rates of the first layer are only necessary for print bed surfaces that offer poor adhesion. Also with some auxiliaries such as Blue Tape, a higher flow rate may be appropriate to make a better bond with the rough surface.
However, for some surfaces, a higher flow rate is not only good to increase adhesion, it can also improve the surface. Sometimes the surface of the first layer is not very smooth and homogeneous. With a higher flow rate, there is more material that can flow into these small crevices. This can create mirror-like surfaces (especially on glass beds).
Summary:
- A higher flow rate of the first layer improves print bed adhesion
- Default: 100% of the normal flow rate
- For better adhesion: ≥ 105% of normal flow rate (highly dependent on filament and print bed).
Cura Initial Layer – Layer Thickness
The layer thickness is decisive for the accuracy of the printed object. The smaller the layer thickness, the more details are preserved. The greater the layer thickness, the more the individual layers become visible.
The smallest possible layer thickness is therefore the goal for most objects where optics are important. However, this does not necessarily apply to the first layer.
If you have a very good print bed adhesion, the thickness of the first layer can be the same as in the rest of the object. To increase the print bed adhesion, you can increase the layer thickness.
The longer the filament remains liquid before it solidifies on the print bed, the better the adhesion. The higher the layer thickness, the bigger the total volume of the filament line, which makes the filament more thermally inert and slower to solidify. This sounds a bit complicated at first glance, but it has a similar effect to an increased printing temperature, which can also lead to better print bed adhesion.
The layer thickness of the first layer is normally 100% of the normal layer thickness. To increase the print bed adhesion, it can be increased to over 120% of the normal layer thickness.
Besides the slower solidification of the filament, there is another effect that increases print bed adhesion when you print a thicker first layer. If your print bed is not perfectly leveled, curved or otherwise uneven, thicker first layers can compensate for small irregularities.
Summary:
- A thicker first layer provides better print bed adhesion
- Standard: 100% of the normal layer thickness
- For better adhesion: ≥ 120% of the normal layer thickness.
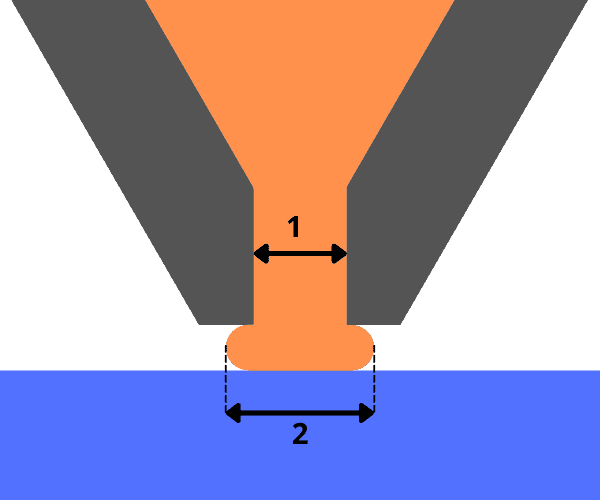
Cura Initial Layer – Horizontal Expansion
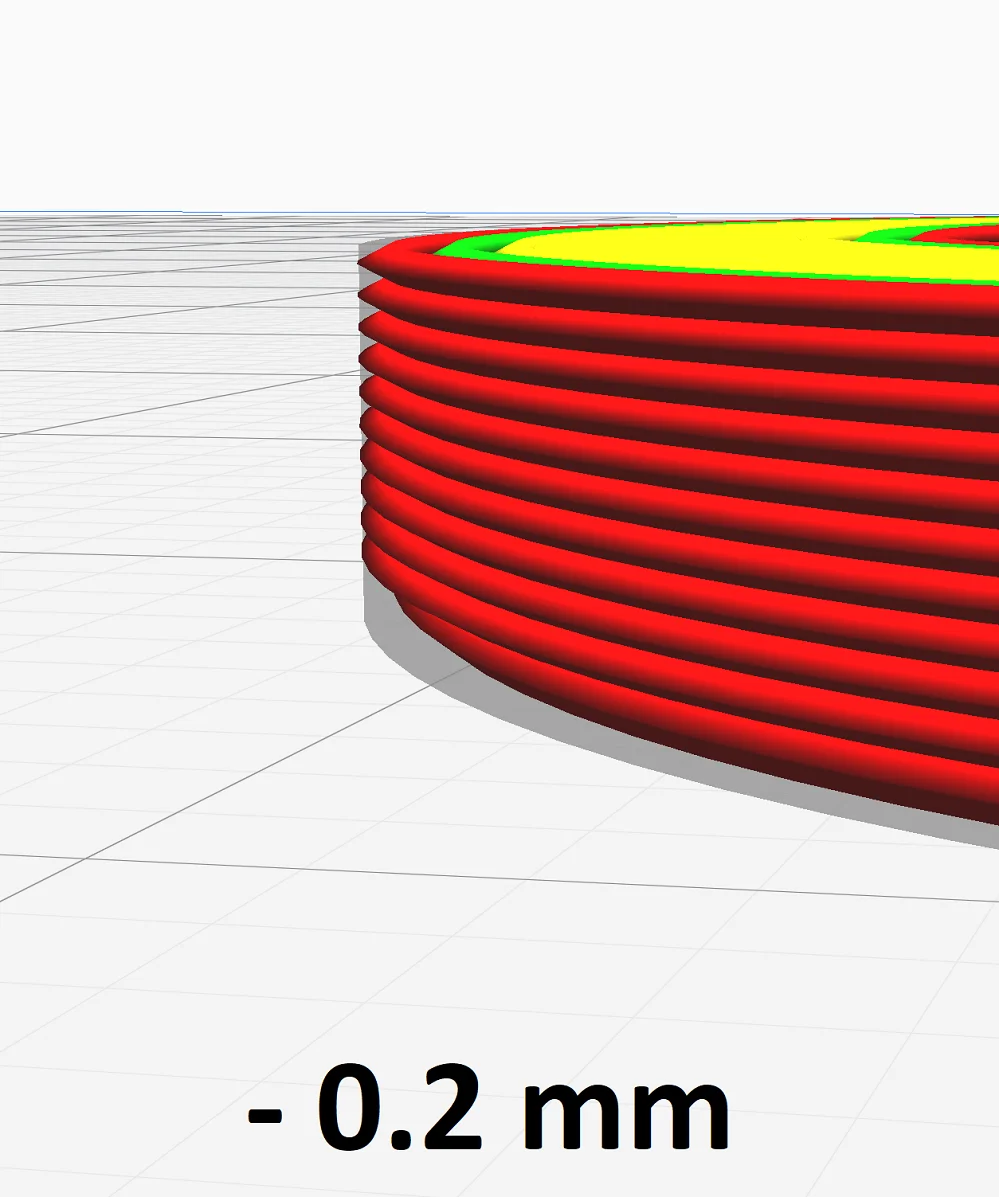
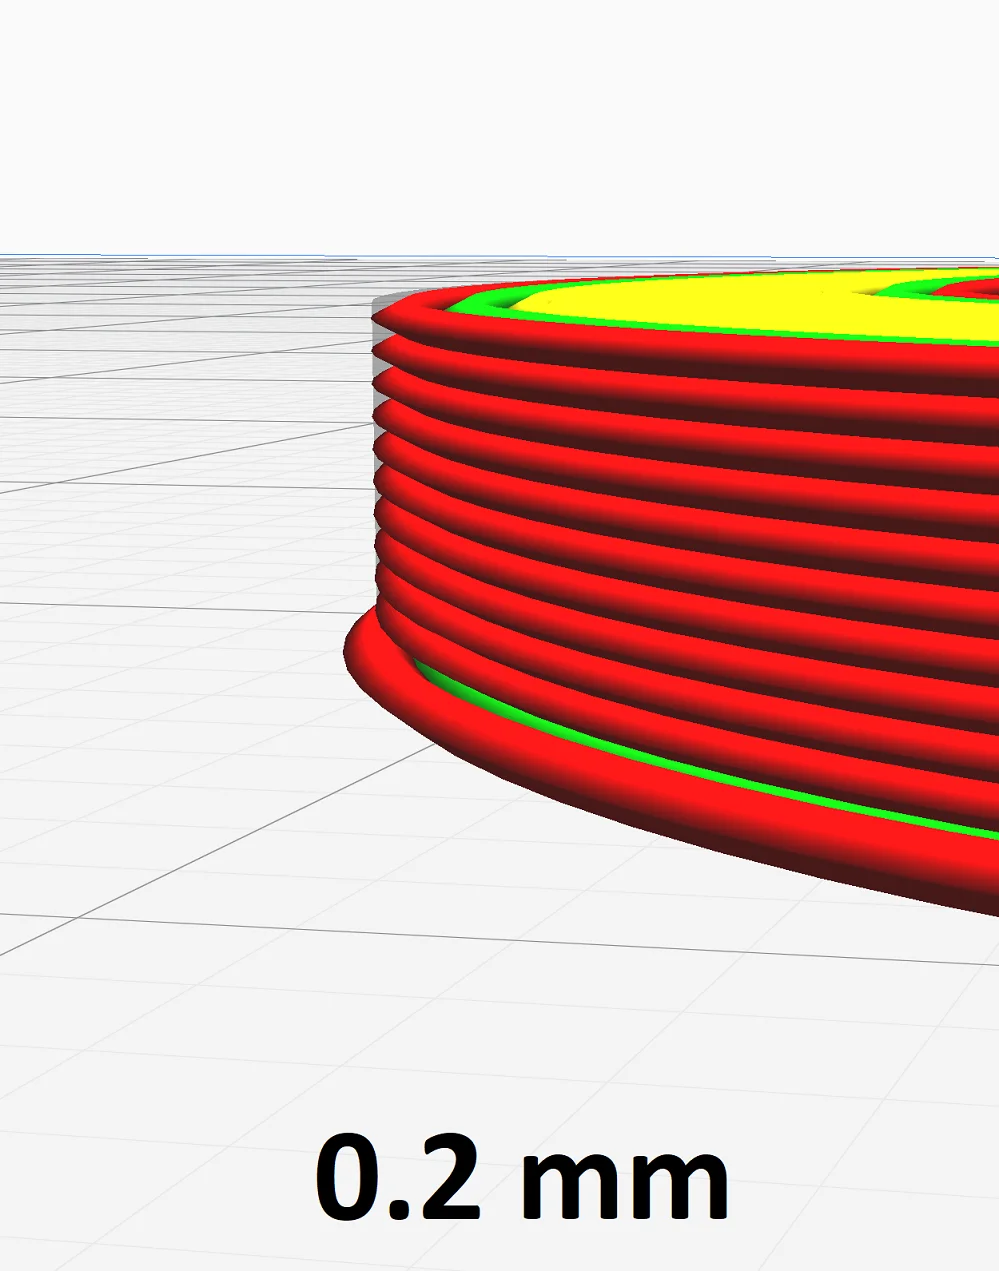
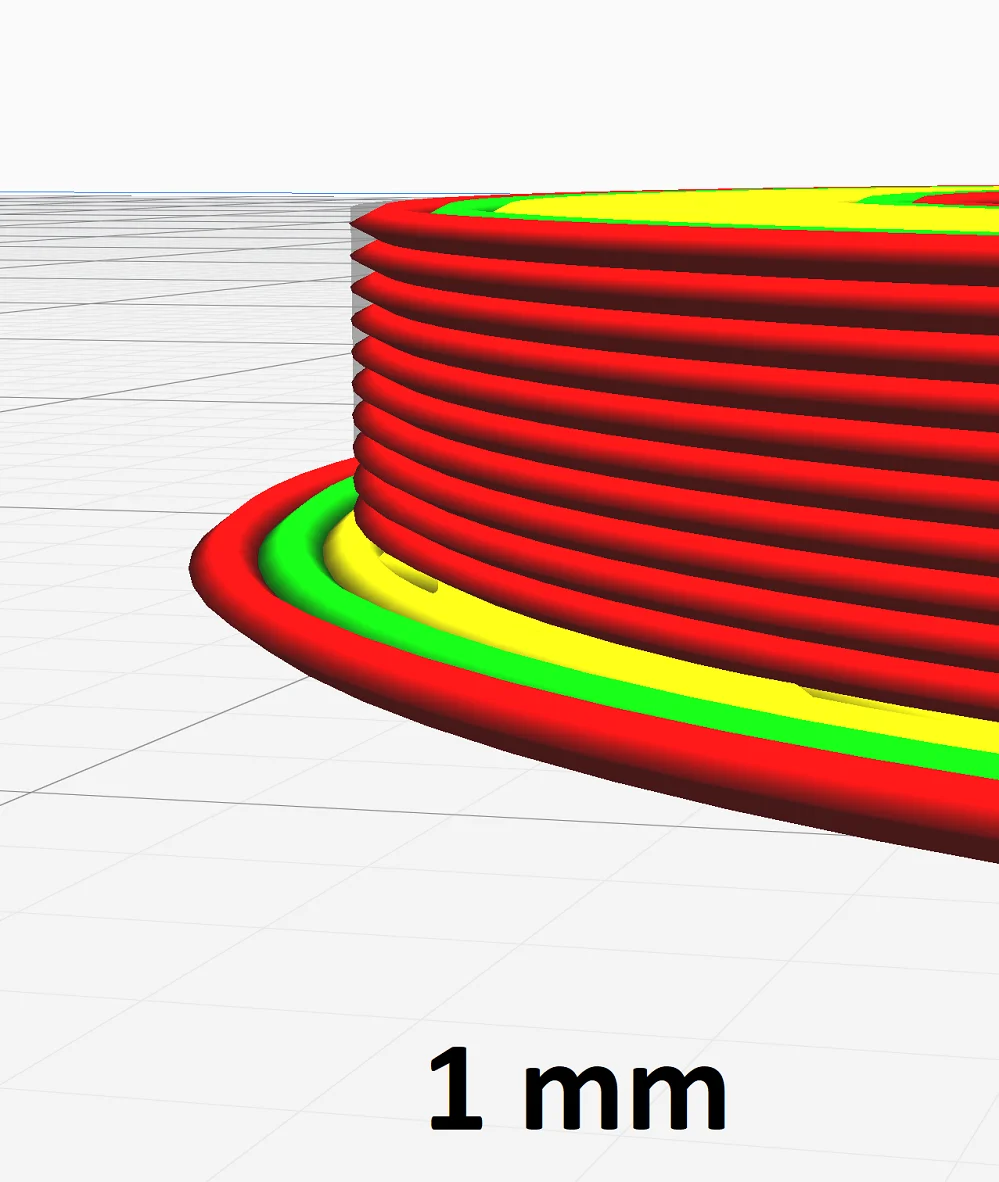
The horizontal expansion exists for the whole object and only for the first layer. The horizontal expansion scales the object evenly in the XY direction. The line width, layer thickness and flow rate remain the same.
The classic use case of this option is dimensional inaccuracies between the 3D model and the printed object. For example, if you print a cube with an edge length of 10 mm and it measures only 9.5 x 9.5 x 10 mm (X x Y x Z) in the XY direction, you can compensate for this with the horizontal expansions to get the desired 10 mm.
Here you can read the full guide:
Cura Horizontal Expansion – A Better Way of Calibrating
However, it is rare that such dimensional inaccuracies affect only the first layer. The horizontal expansion makes sense for the first layer only to compensate for over- or under-extrusion. The classic case is an over-extrusion or elephant foot of the first layer. In this case, there is too much material in the first layer, making it wider than the layers above it. If you enter negative values for the horizontal expansion of the first layer, you can counteract this defect.
However, horizontal expansion of the first layer is only a solution in absolute emergencies. All the other options described here are better suited to increasing print bed adhesion. However, print bed adhesion can also be improved in other ways.
Summary:
- Scales the first layer evenly in X/Y direction
- Standard: 0 mm
- Against under-extrusion: positive values (start at 50% of the line width).
- Against over-extrusion/elephant foot: negative values (start at 50% of the line width)
How to Increase Print Bed Adhesion
If you are looking for the ideal settings for the first layer of your 3D print, you seem to have problems with the default settings. Poor print bed adhesion is a likely cause.
With a perfect print bed adhesion, the default settings for the first layer in Cura are absolutely sufficient. But how do you get a good print bed adhesion? There are several ways:
Leveling the print bed: Correct leveling of the print bed is not only critical for print bed adhesion, it also prevents various other printing errors. If the distance between the nozzle and the print bed is not adjusted accurately, the nozzle may be too far away from the print bed everywhere or only partially, which means that the filament is not pressed onto the print bed with sufficient force. Then it will only be placed on the surface and will not be able to form an adherent bond with the surface.
If you want to know how to perfectly level your print bed, here is a detailed guide: 3D Printer Print Bed Leveling | Manual & Automatic
Reduce the printing speed of the first layer: Another measure to increase the print bed adhesion is to reduce the printing speed of the first layers. Then the filament has more time to bond with the print bed, resulting in better print bed adhesion.
Normal print speeds are in the range of 40-60 mm/s. For the first layer, it should be only 20-30 mm/s.
Increase the print temperature of the first layer: Another important parameter for the filament to have good adhesion to the print bed is its temperature. The higher the print temperature, the more fluid the filament. When the filament is more liquid, the contact area between the print bed and the filament becomes larger, resulting in increased adhesion.
However, the temperature must not be too high either, or you could end up with an elephant foot. If you have problems with print bed adhesion, increasing the print temperature by 10-15 °C could help.
Print bed temperature of the first layer: Good print bed adhesion is also largely determined by the temperature of the print surface. If it is too cold, the filament will solidify too quickly and will not be able to bond to the print bed. Always make sure that you use the correct temperature for the filament you are using.
Glue & Tape: There are also various tools with which you can improve the print bed adhesion. These include Blue Tape, an adhesive tape with a somewhat rough surface, and Magigoo, a special adhesive for 3D printers. I myself am a big fan of Magigoo – especially for very delicate first layers I often use this glue to get along without auxiliary prints.
Use auxiliary prints: Auxiliary prints such as brims or rafts are used to increase the surface area of the first layer to improve print bed adhesion. They also help to avoid warping.
With these tips, you should be able to achieve good print bed adhesion. If you still can’t get a good print bed adhesion, you should consider using a different surface. I myself am a big fan of magnetic, flexible PEI surfaces*.
Here is the complete article on print bed adhesion: 3D Print Not Sticking to the Bed: How to Fix it Step-by-Step
Disclosure: This website is the property of Martin Lütkemeyer and is operated by Martin Lütkemeyer. Martin Lütkemeyer is a member of the Amazon Services LLC and other Affiliate Programs. These are affiliate advertising programs designed to enable websites to earn advertising revenue through advertising and linking to Amazon.com and others. Links marked with * are affiliate links.
