
- Wet Filament: Prevention, Symptoms & Drying - July 18, 2024
- Sovol SV08 – Best PrusaSlicer Settings & Profile - June 26, 2024
- Sovol SV08 – Best Orca Slicer Settings & Profile - June 26, 2024
Disclosure: Links marked with * are Affiliate Links. I earn from qualifying purchases if you decide to make a purchase through these links – at no additional cost for you!
With the Aries*, Voxelab brings a budget 3D printer with premium features to the market of hobby 3D printing. The design focuses on the most essential features that achieve high print quality and ease of use. It is slightly more expensive than the Aquila from Voxelab*, but its performance makes it extremely good value for money.
The Voxelab Aries has an open print volume of 200 x 200 x 200 mm, can process standard filaments such as PLA, TPU and PETG and receive print files via WiFi using the VoxelMaker Slicer. Its cube-like design gives it high stability and layer thicknesses of up to 0.1 mm.
In this practical test, I checked whether the Voxelab Aries not only looks good, but also keeps its promises. At the end of the review, I’ll show you my test prints which prove that it achieves perfect results even without calibration!

Check Price at:
Table of Contents:
- 1 Key Takeaways
- 2 Who Should Buy the Voxelab Aries?
- 3 Advantages & Disadvantages Voxelab Aries
- 4 Scope of Delivery Voxelab Aries
- 5 Technical Specifications Voxelab Aries
- 6 Setup Voxelab Aries
- 7 Design Voxelab Aries
- 8 Features Voxelab Aries
- 8.1 Cube Design
- 8.2 Double Z-axis
- 8.3 4.3” Color Touch Screen
- 8.4 Filament Change
- 8.5 WiFI Connectivity
- 8.6 VoxelMaker Slicer
- 8.7 Single Gear Extruder
- 8.8 Filament Sensor
- 8.9 PTFE Lined Hot End & Cooling
- 8.10 Brass Bearings on X-axis
- 8.11 32-bit Board with Silent Stepper Motors
- 8.12 Glass Bed
- 8.13 Supported Print Bed Leveling
- 8.14 Resume Print
- 8.15 Mean Well Power Supply
- 9 Heating Times Voxelab Aries
- 10 Noise Level Voxelab Aries
- 11 Print Quality Voxelab Aries
- 12 Conclusion Voxelab Aries
- 13 Similar 3D Printers
Key Takeaways
- Cube-like design for maximum stability
- Double Z-axis to minimize vibrations
- Layer thicknesses of up to 0.1 mm
- 200 x 200 x 200 mm print volume
- PLA, PETG, TPU (ABS only conditionally possible)
- High user friendliness
- Very reliable
- Perfect printing results without calibration – “Plug & Play”
Who Should Buy the Voxelab Aries?
Due to the simple operation and the good price-performance ratio, the Voxelab Aries is very well suited for beginners. The Aries is also well suited for advanced users because of its high reliability and high-quality workmanship.
For tinkering, this 3D printer is rather less suitable, since it is already a well-thought-out printer.
Advantages & Disadvantages
Voxelab Aries
PRO:
- High reliability
- Very good standard profiles in VoxelMaker slicer
- Stable construction
- Simple operation
- Nice design
- Textured glass bed
- Double Z-axis
CON:
- Not very quiet (approx. 50 dB)
- Closed-source firmware
- Difficult access to filament and extruder on the back side
Check Price at:
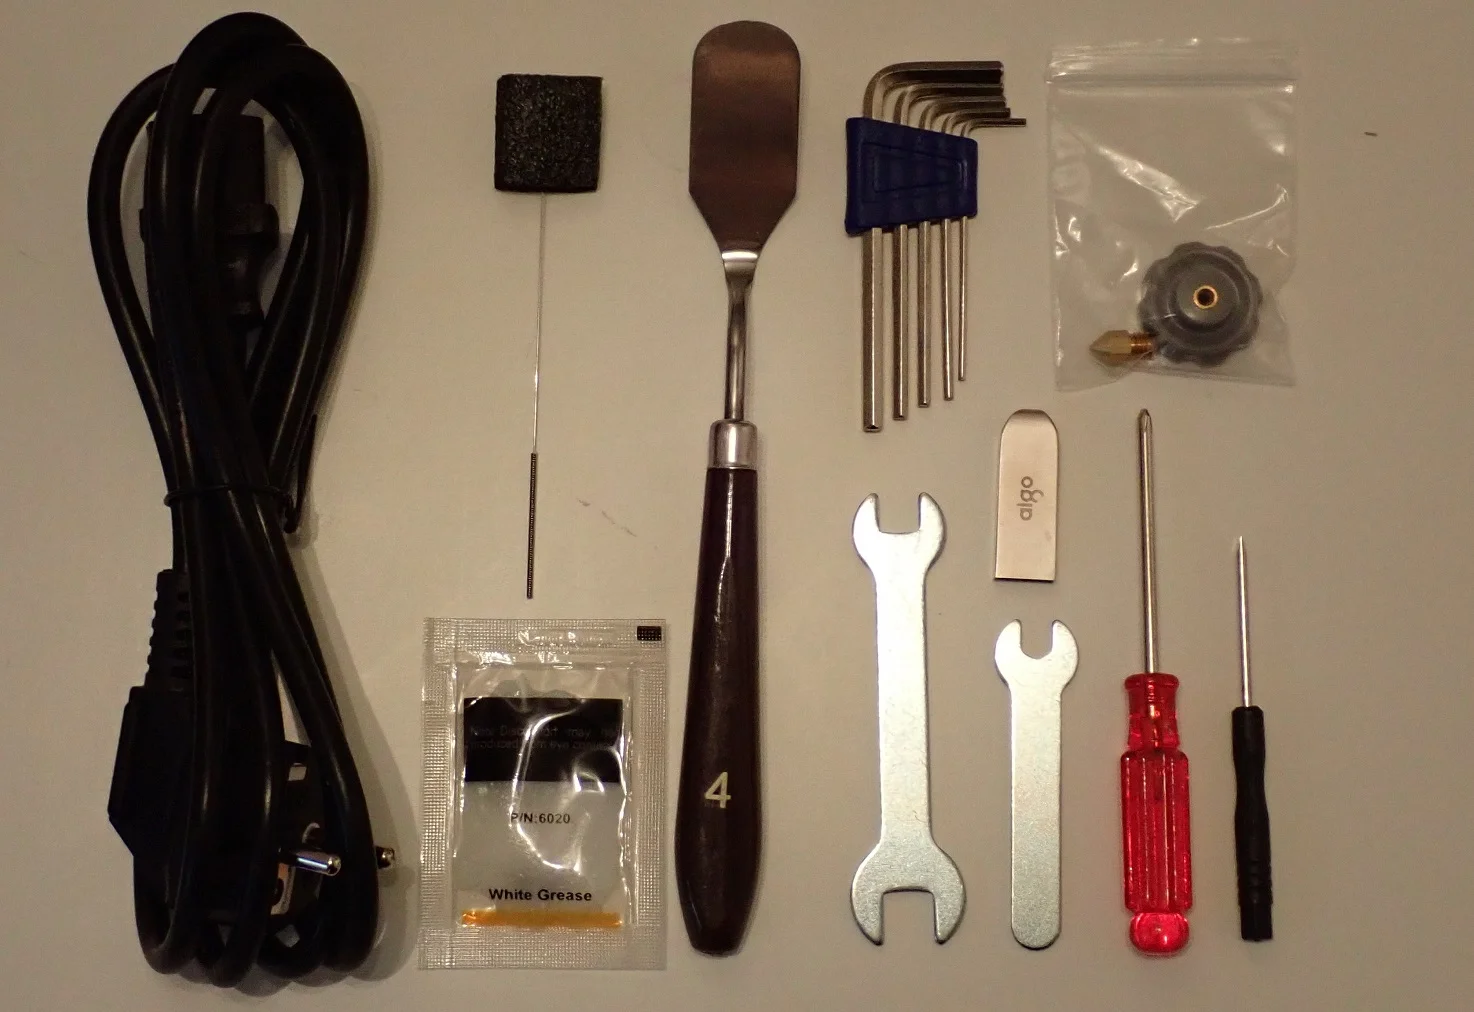
Scope of Delivery
Voxelab Aries
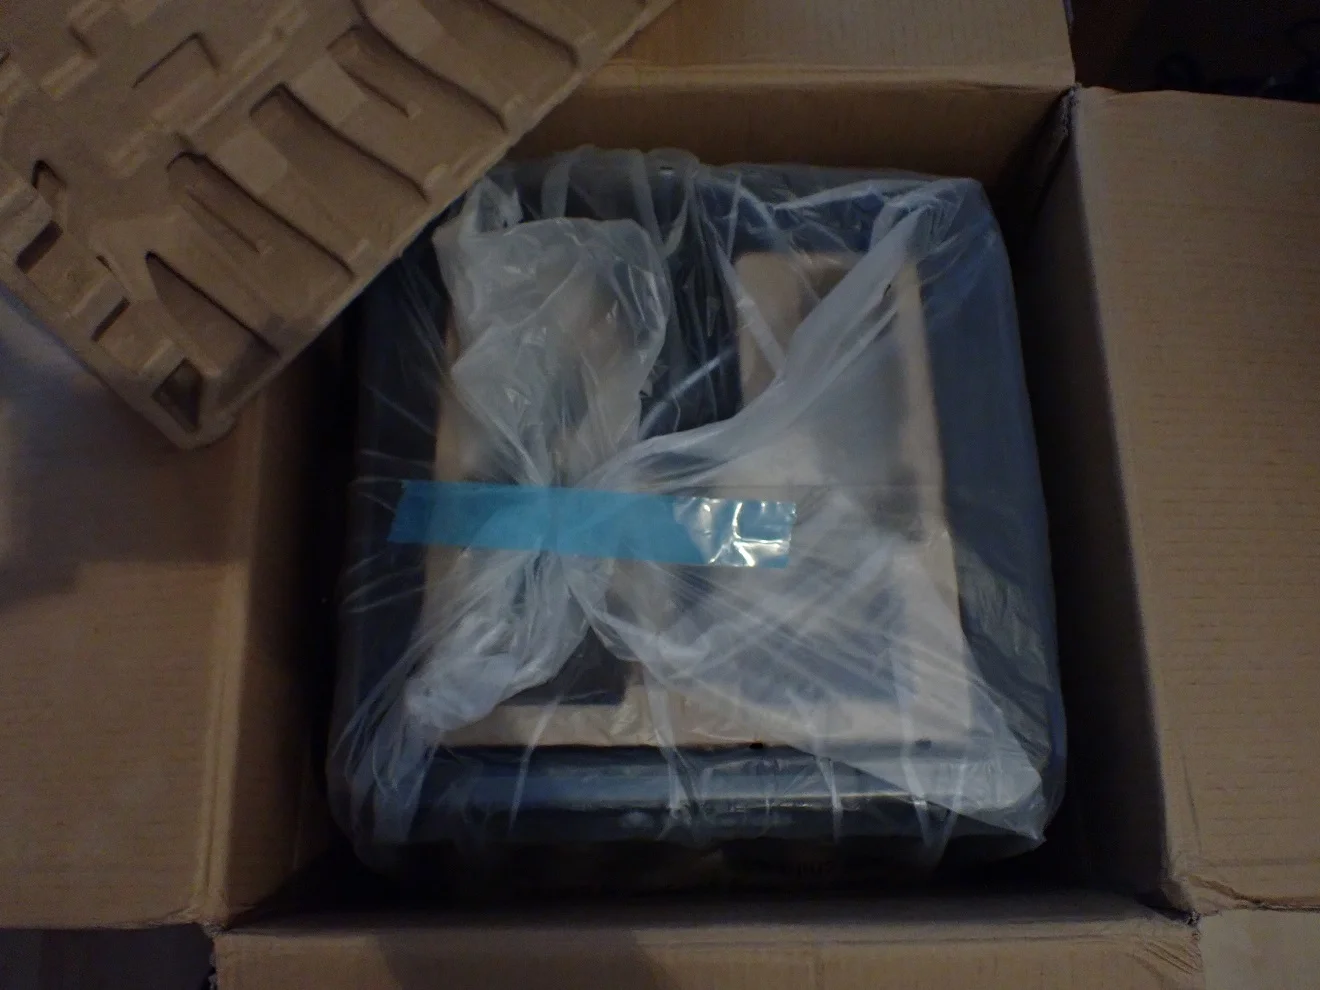
While the Voxelab Aries is very sturdy in itself, it is also very well secured from transport damage. Unlike most other 3D printers, the inside of the package is not made with styrofoam or foam, but with molded cardboard.
This is much more environmentally friendly than styrofoam and is also easy to recycle.
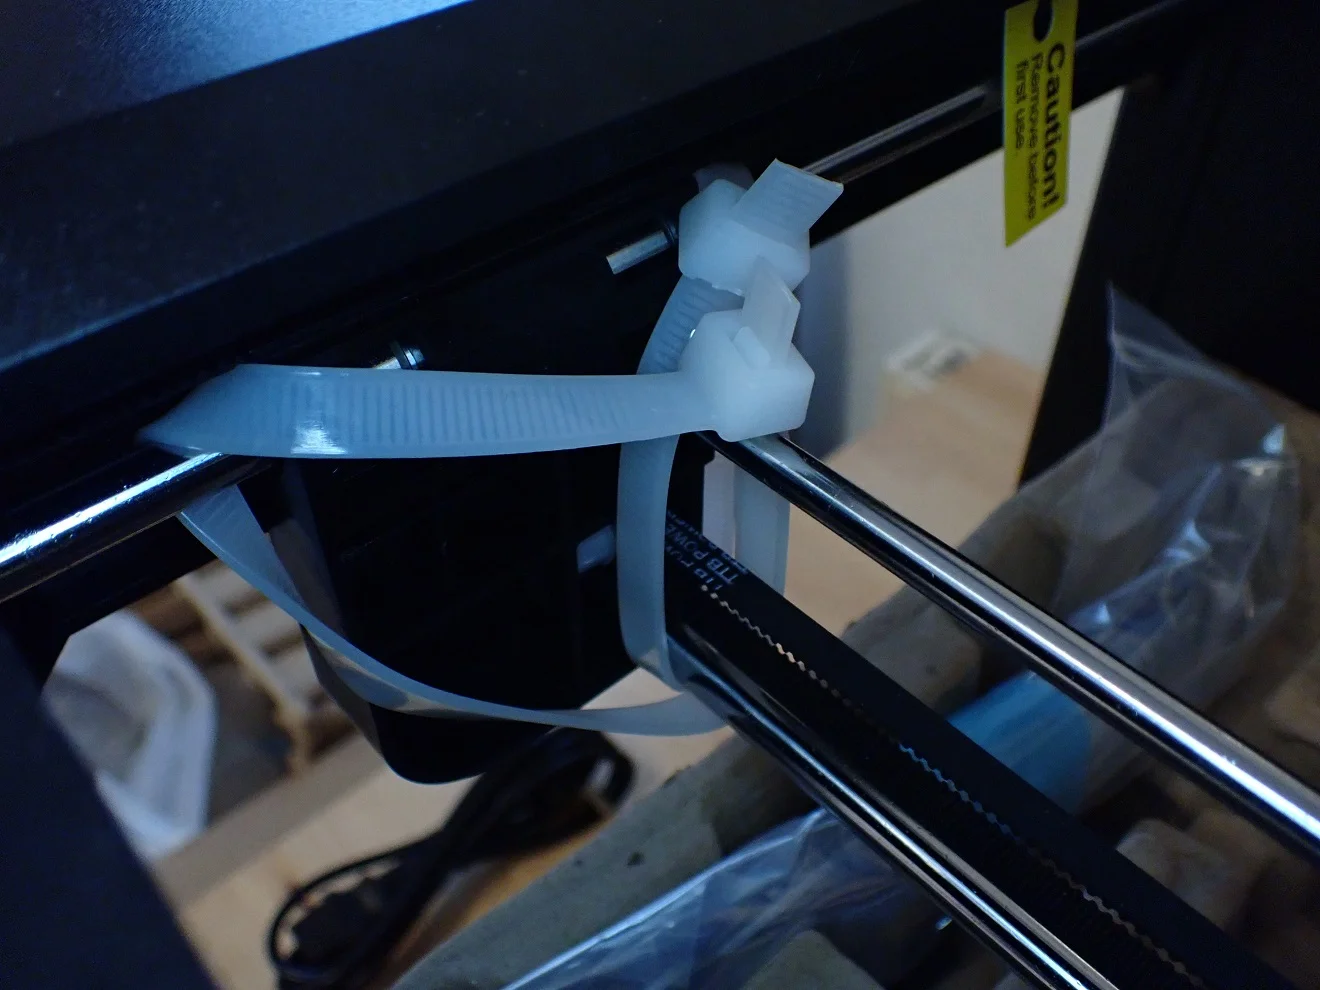
All moving parts of the 3D printer, e.g. the print head and the axes, are secured with thick cable ties. Thus, all moving components are immovable and cannot be damaged during transport.
Those cable ties that are not directly visible (e.g. on the timing belts) are marked with small flags so that you cannot miss them.
Everything is included to start directly with your first test prints:
- The pre-assembled printer
- Glass print bed
- Power cable
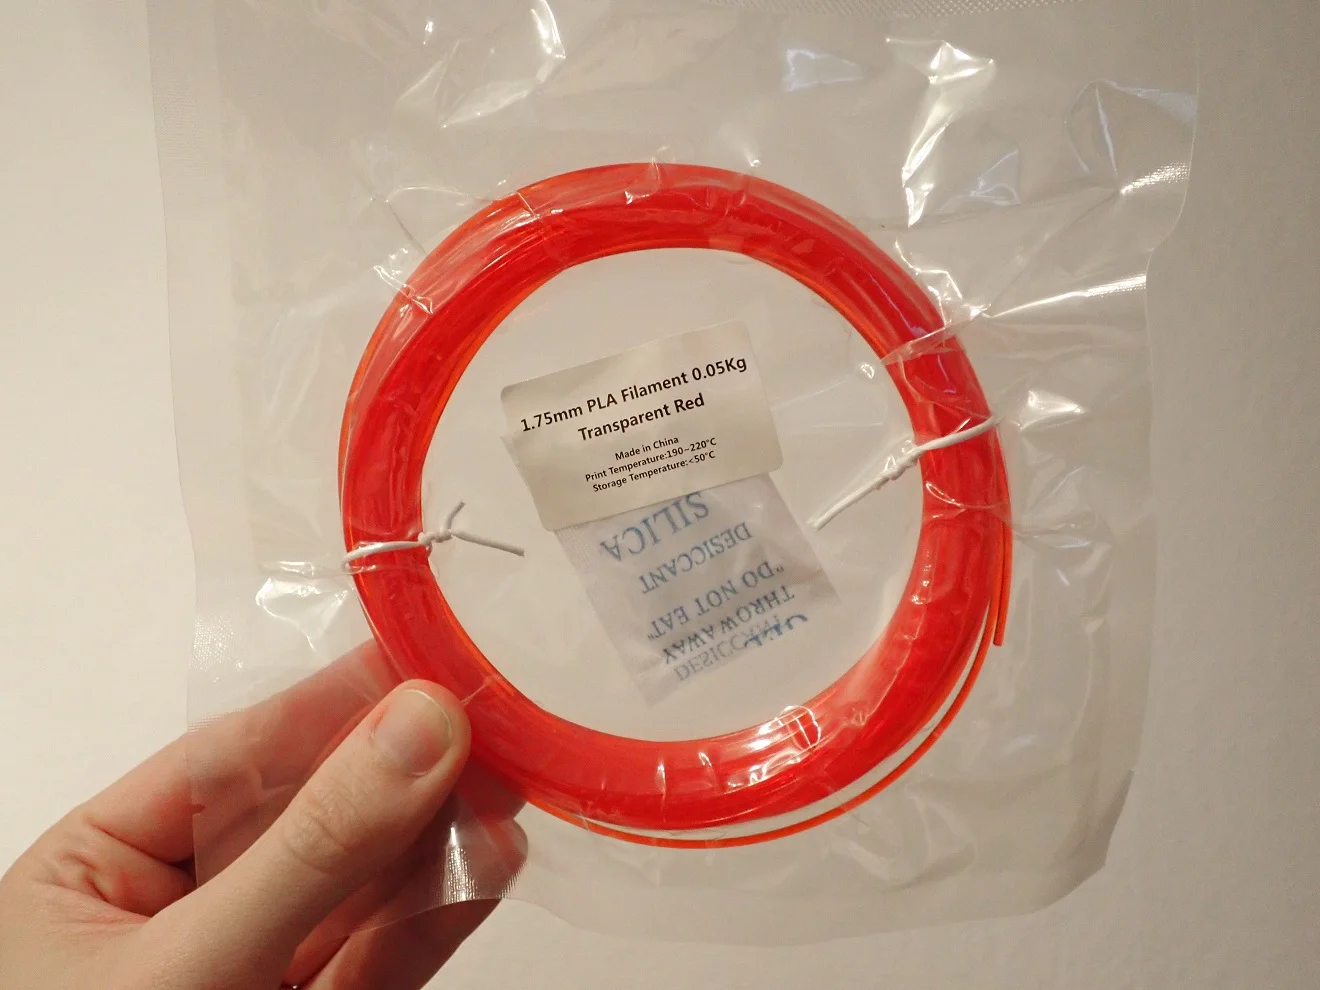
- Some filament
- Operating instructions
- Filament holder
- Replacement nozzle
- Tools
- USB flash drive:
- Test models
- VoxelMaker Slicer
- Operating instructions
- Assembly video
The included filament is only enough for a few test prints. It is therefore advisable to buy more filament if you should buy this printer. I myself have worked a lot and without problems with ERYONE PLA on this printer.
Technical Specifications
Voxelab Aries
DEVICE:
- Technology: FDM
- Power: 350 W
- Display: 4.3” color touch screen
PRINT:
- Print volume: 200 x 200 x 200 mm
- Nozzles quantity: 1
- Layer thickness: 0.1 – 0.4 mm
- Nozzle diameter: 0.4 mm
- XY resolution: ± 0.2 mm
- Filament diameter: 1.75 mm
- Filament types: PLA, ABS, PETG
- Max. print bed temperature: 110 °C
- Max. printing temperature: 250 °C
- Print speed: max. 180 mm/s, normal 50 – 80 mm/s
- Resume Print Function: Yes
- Filament Sensor: Yes
SOFTWARE:
- File format: STL, OBJ, AMF, 3MF, FPP, BMP, PNG, JPG, JPEG
- Connectivity: USB, WiFi, own memory
- Slicer: Cura, VoxelMaker, Simplyfy3D
- Language: Chinese, English
- Operating system: Windows 7/10, MacOs
Setup
Voxelab Aries
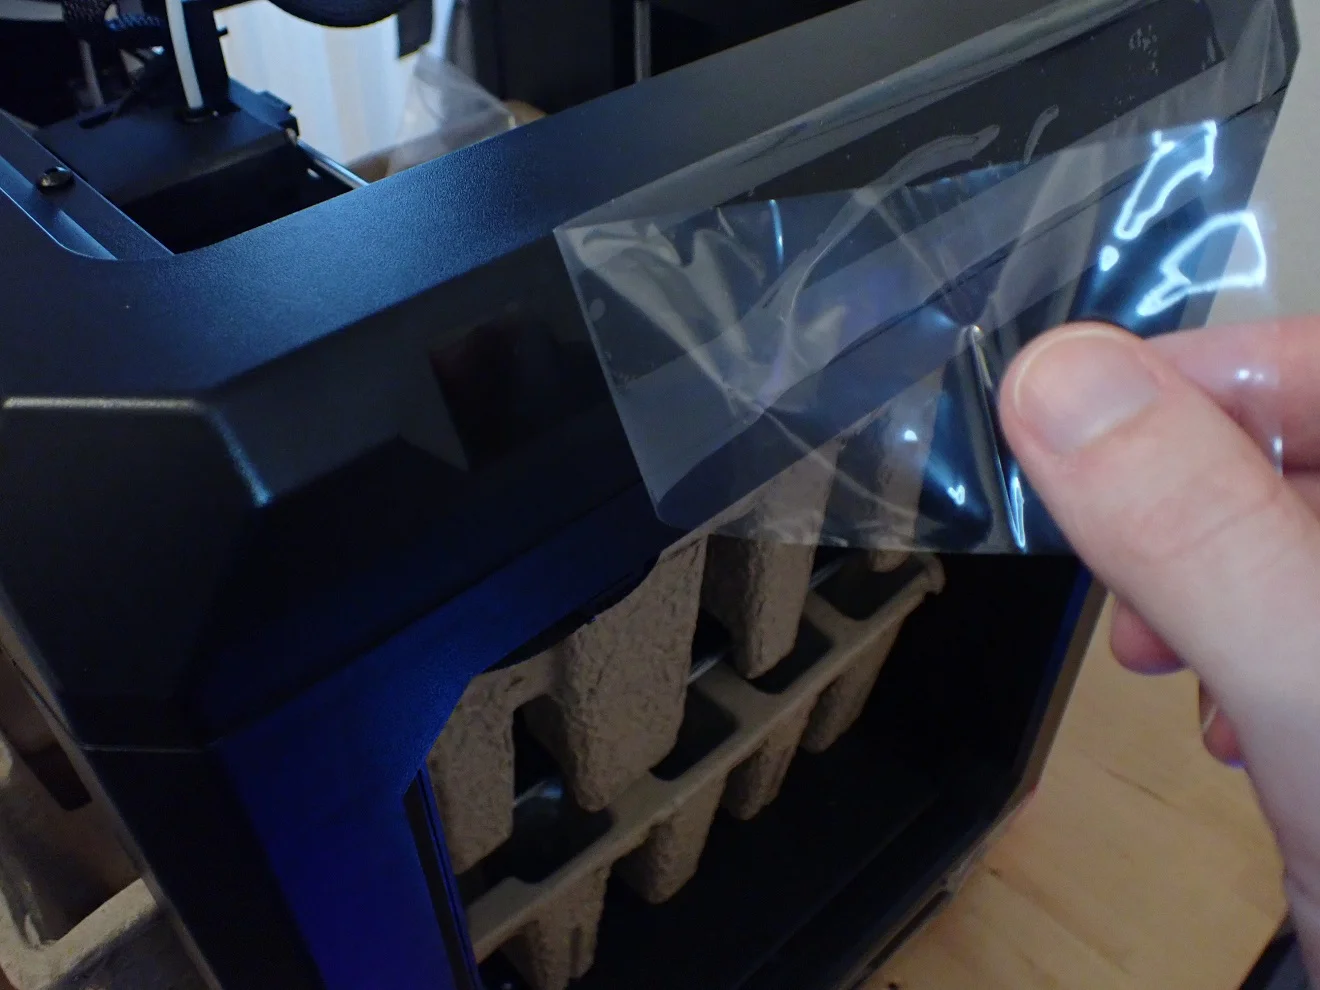
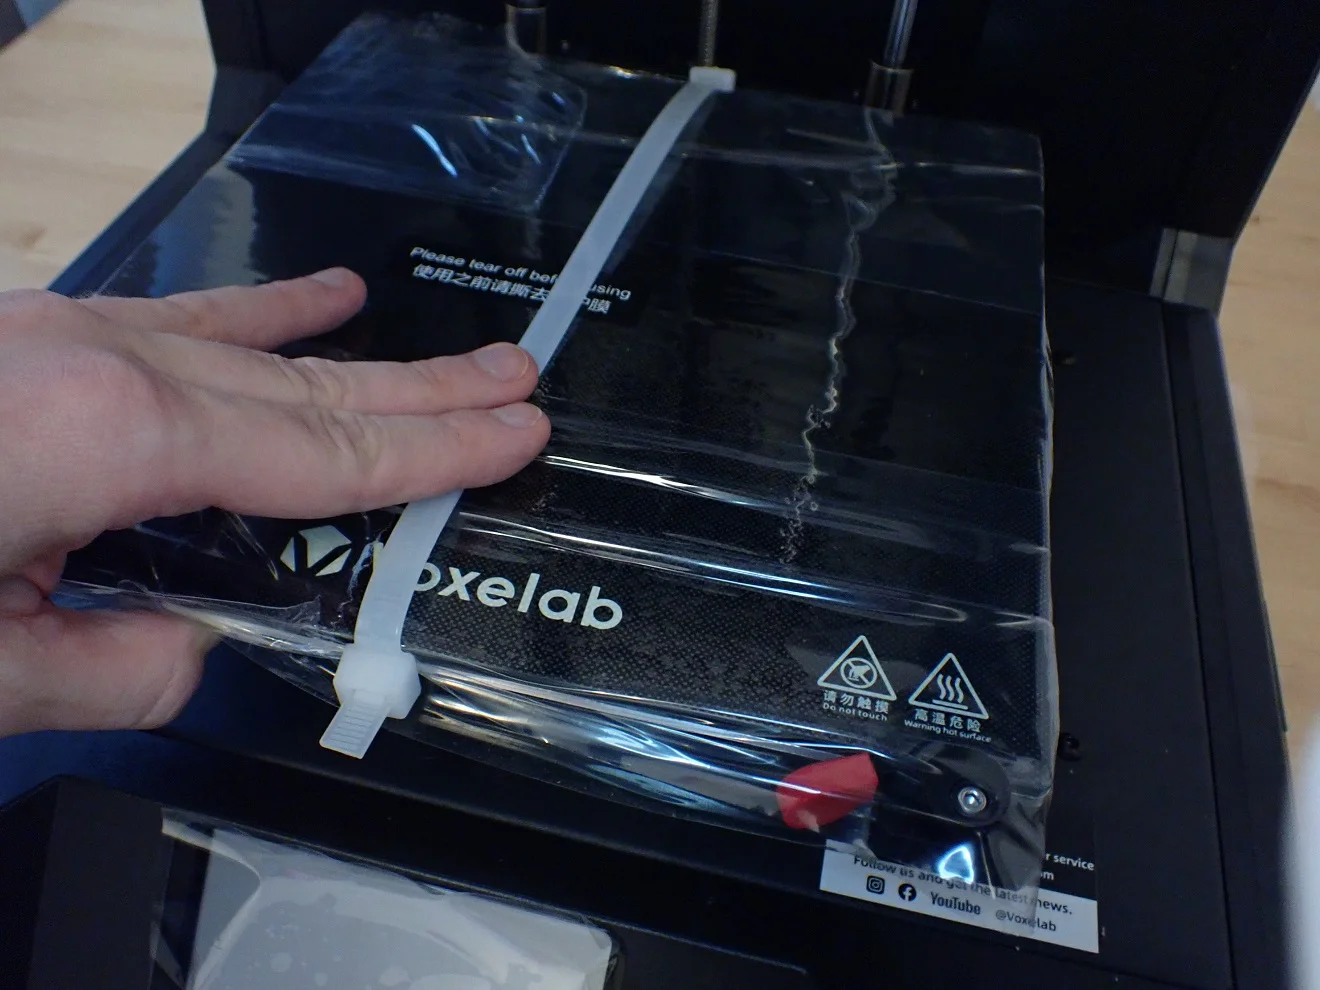
The setup of the Voxelab Aries is comparatively easy, as it is already almost completely pre-assembled. You only have to mount the glass bed and the filament holder, level the print bed and load the filament.
Glass Bed

The glass bed is included separately and must be mounted before your first test prints. The assembly is very easy because it only has to be pushed onto the printing plate and tightened with the two levers.
The fact that you can remove the glass bed so easily gives you the possibility to remove your finished prints more easily and to clean the print bed comfortably.
Filament Holder
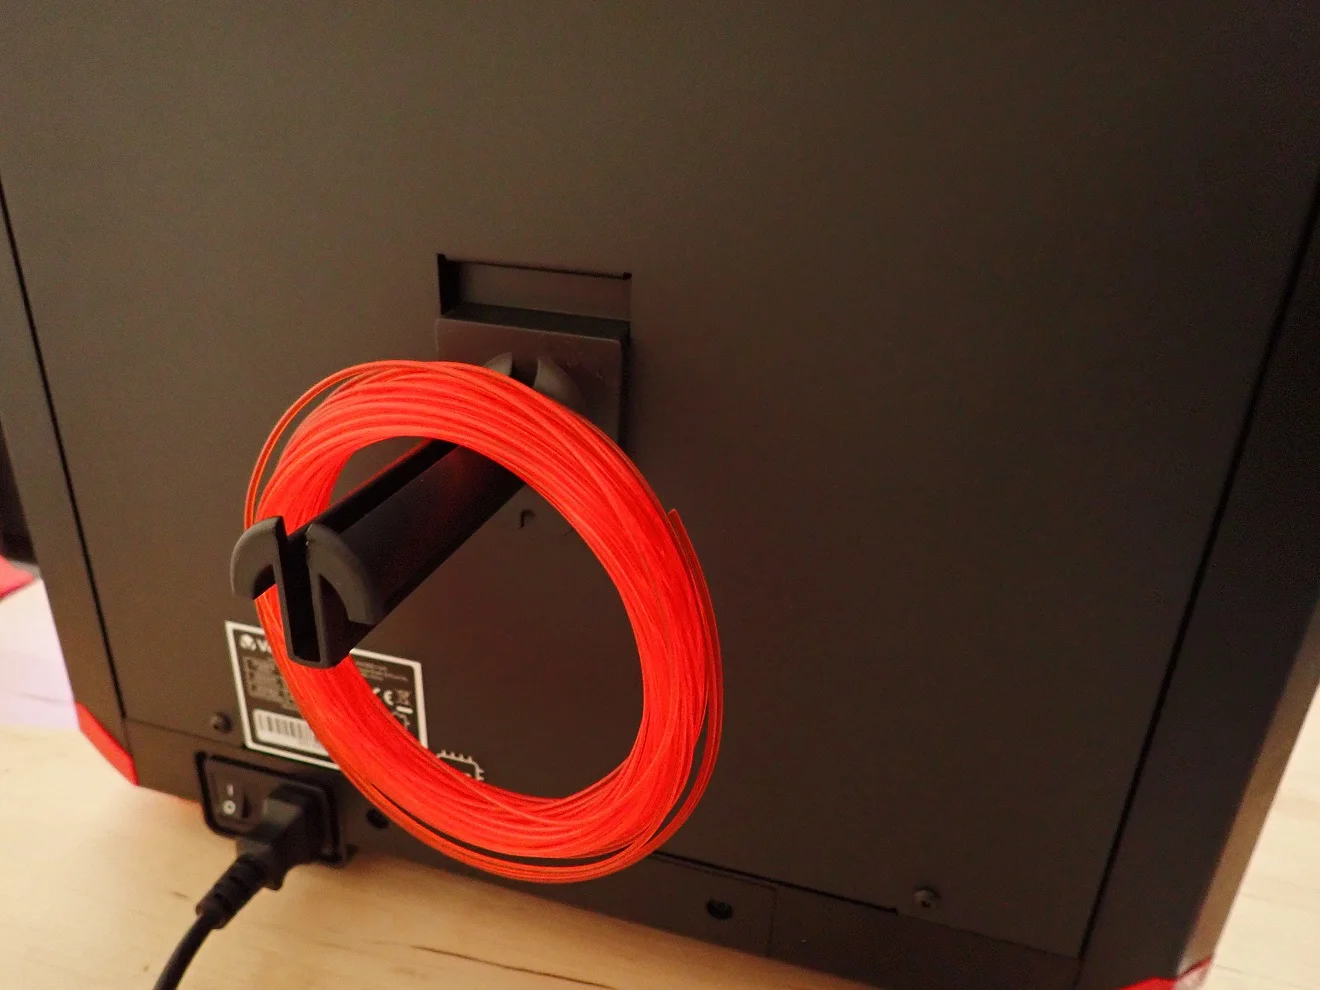
Mounting the filament holder is similarly simple. It is hung on the back of the 3D printer in the rear wall. You don’t have to tighten any screws or anything else, gravity holds it in place.
The filament holder is placed so that the filament from a standard roll can be inserted directly into the extruder. This way there are no twists in the filament and it can’t get tangled anywhere.
Print Bed Leveling
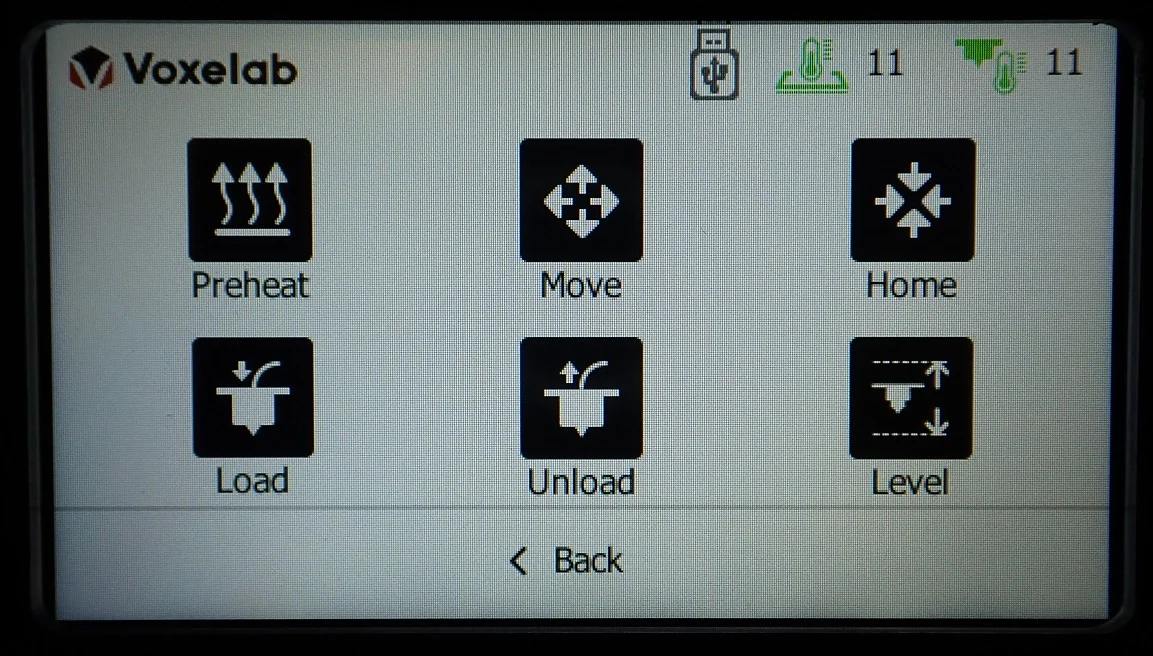
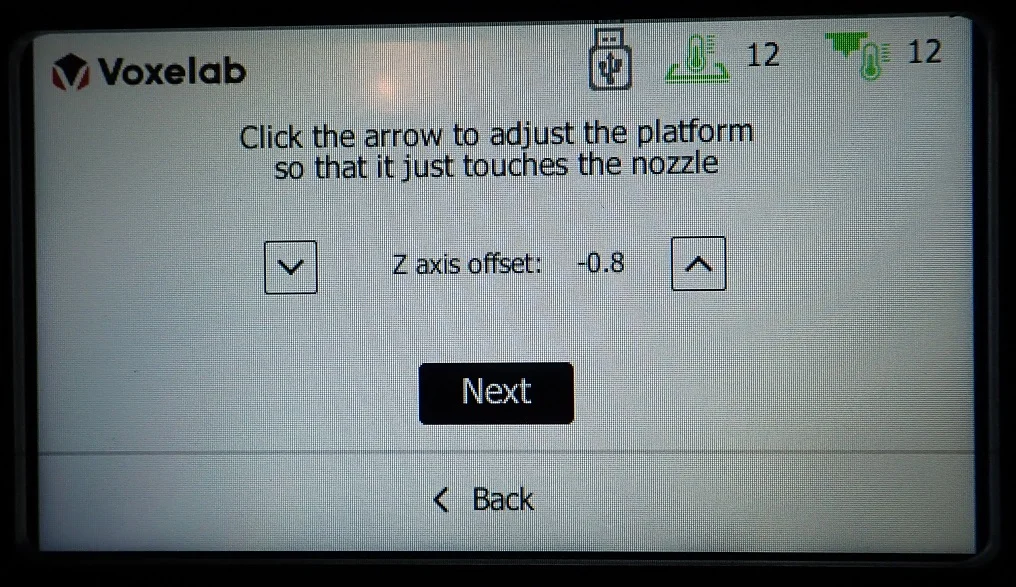
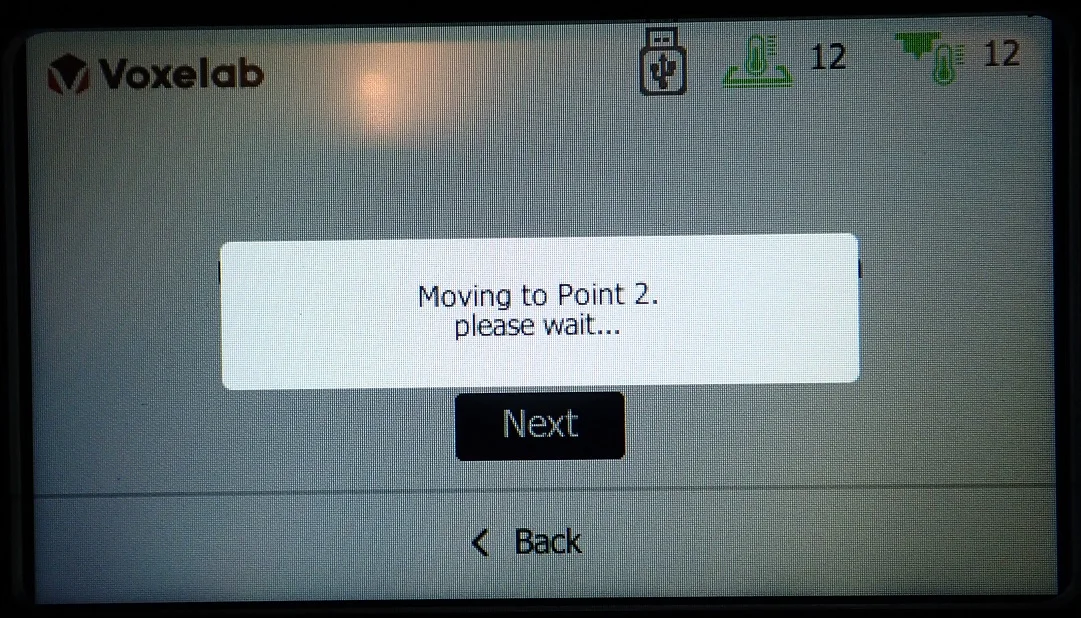
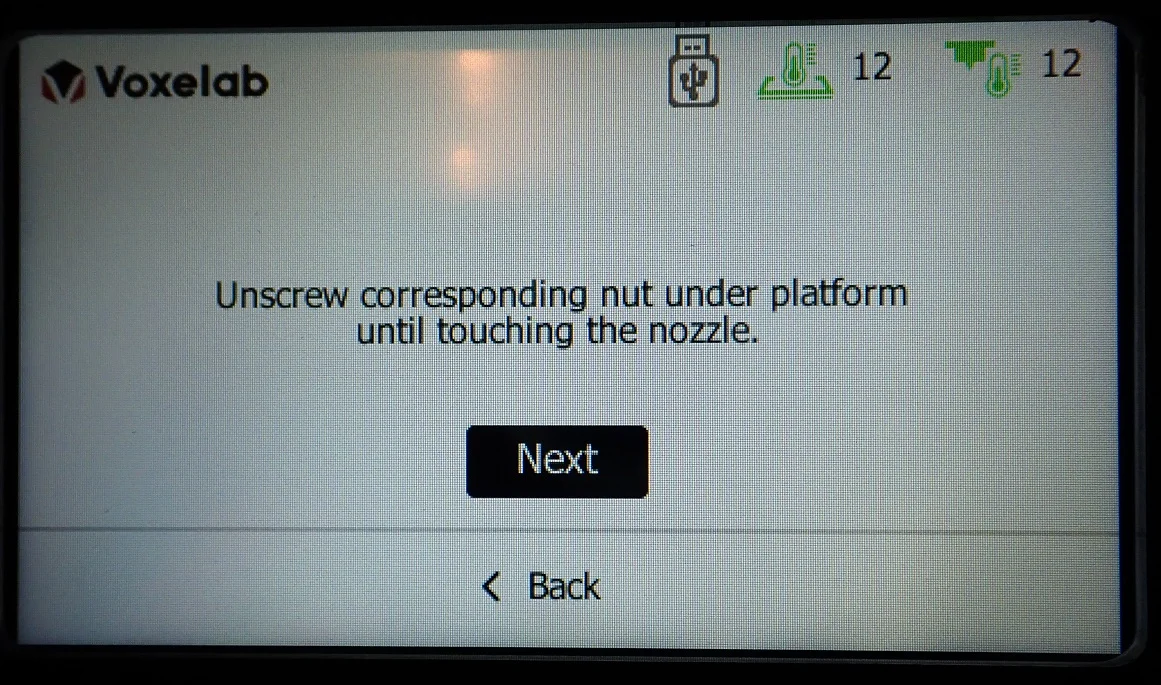
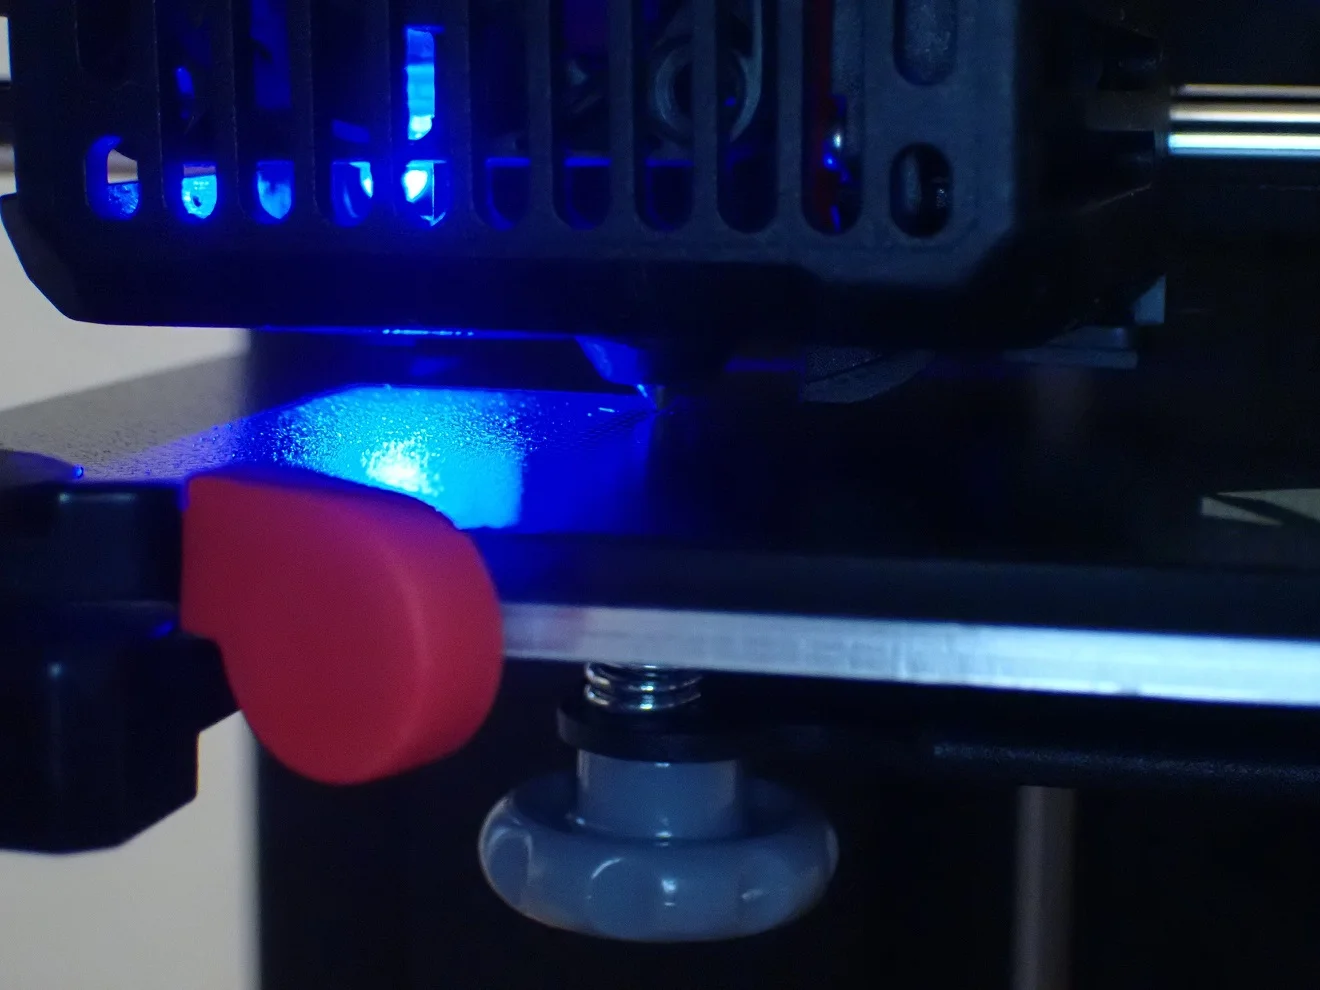
The leveling of the print bed is carried out at three points with the knobs on the underside of the print plate. The leveling is also supported via the menu. The rear point is the Z-offset which you set via the menu and the two points in front are set via the knobs.
The only tool you need for leveling is a piece of paper with a thickness of about 0.1 mm.
The knobs on the bottom of the printing plate have a rubber coating, which makes them very comfortable to use. You can adjust the height of the print bed exactly.
By leveling at 3 points and a check in the middle, the leveling is done quickly. Since the construction of the 3D printer is very stable, the print bed leveling also lasts a long time. After dozens of hours of operation, I had to level the print bed only once in total.
Filament Loading
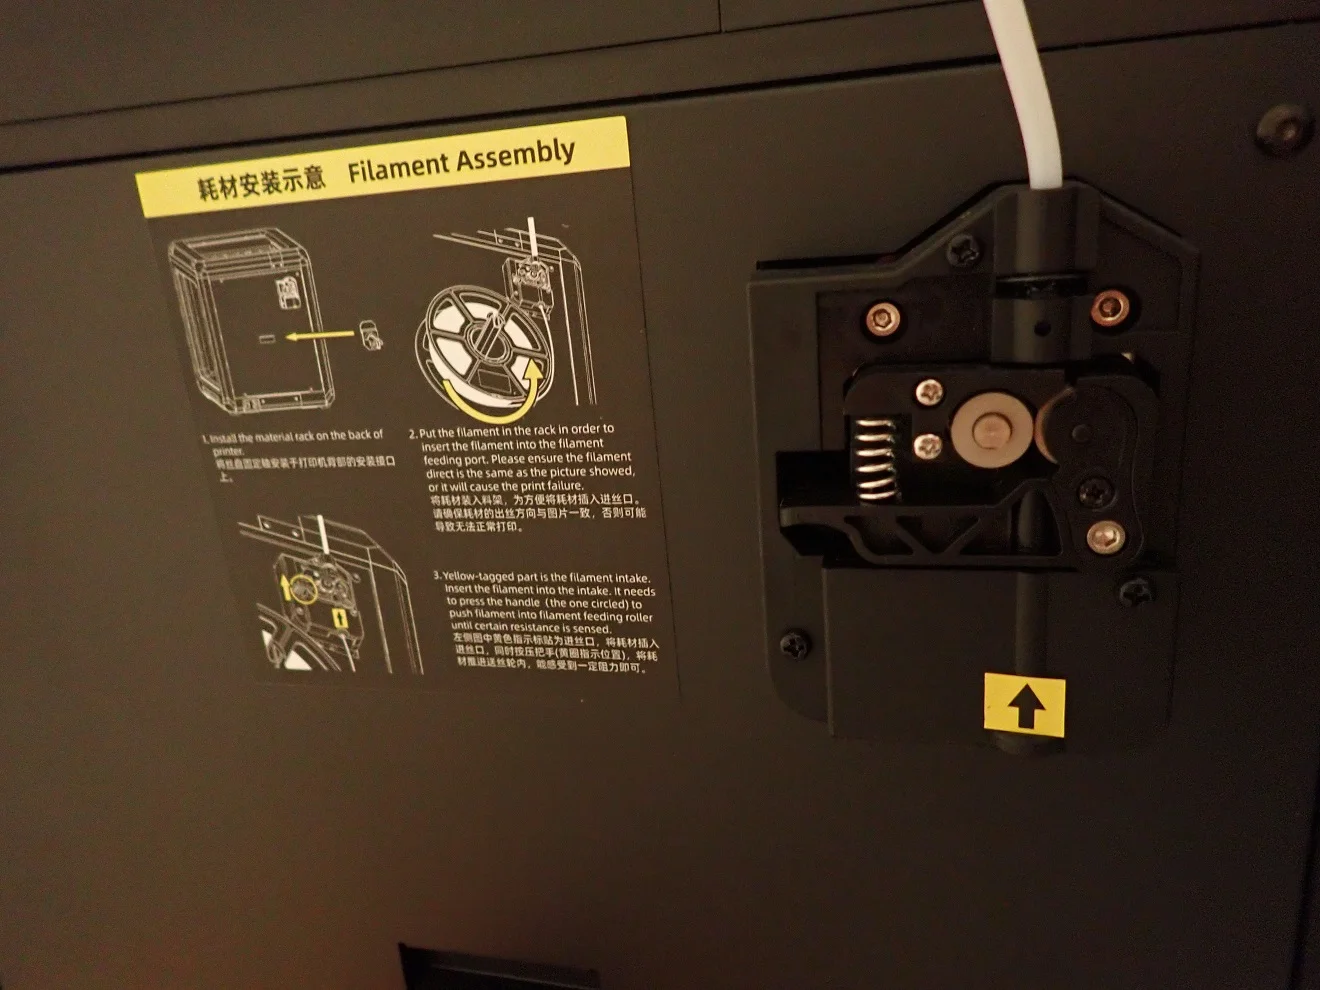

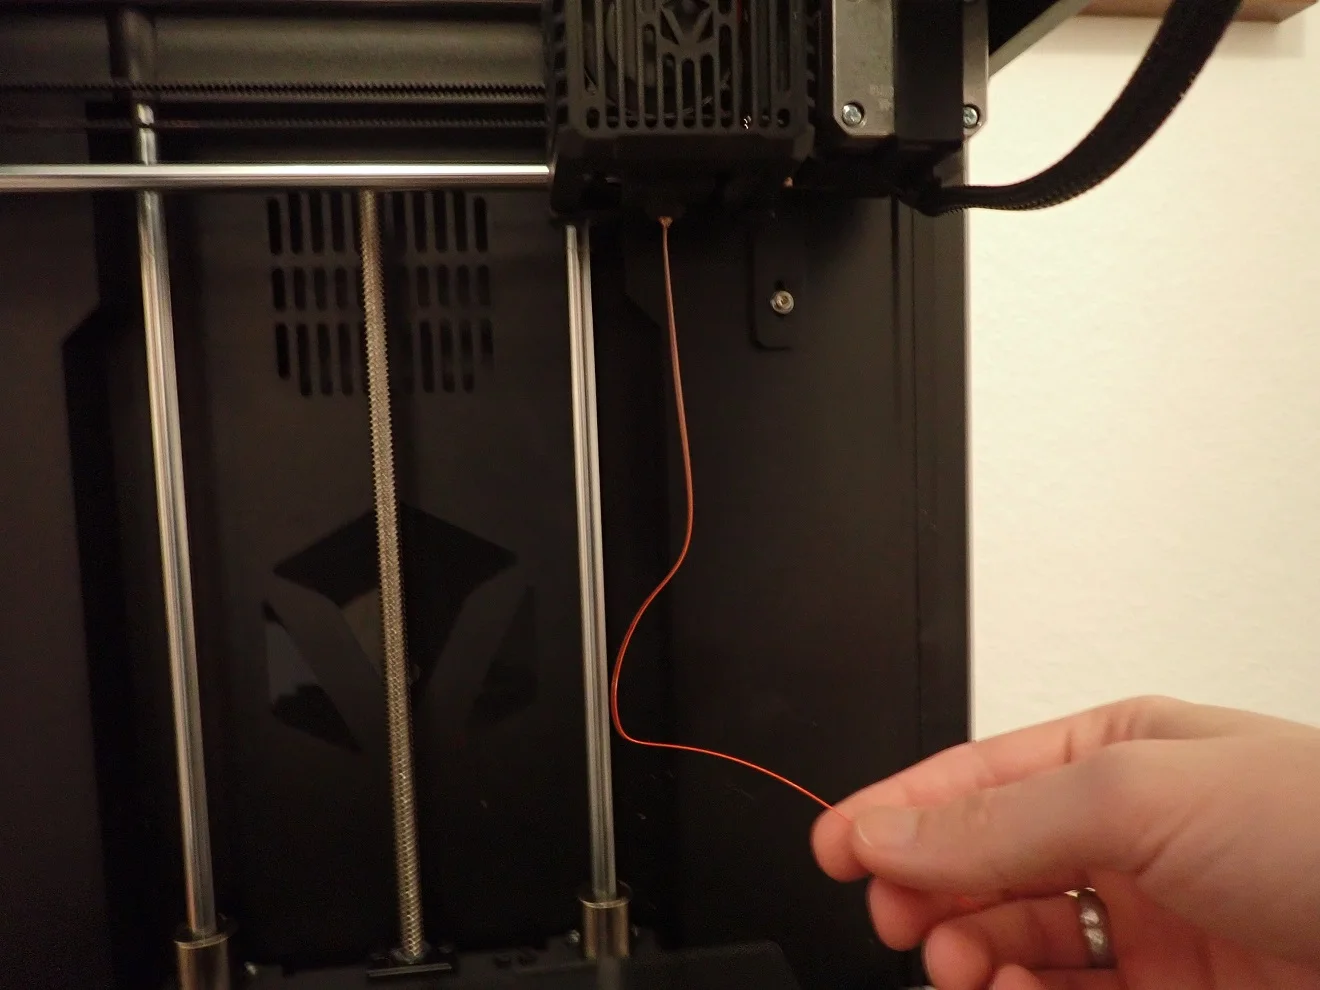
The loading of the filament is also supported via the menu. The Voxelab Aries heats up the nozzle at the push of a button until the filament can be extruded. Once it has reached the temperature, it extrudes the filament until it comes out of the nozzle.
Depending on where you set up the printer, loading the filament by hand is faster. The extruder sits on the back of the device and is very easy to decouple. Still a handy feature though!
Design
Voxelab Aries
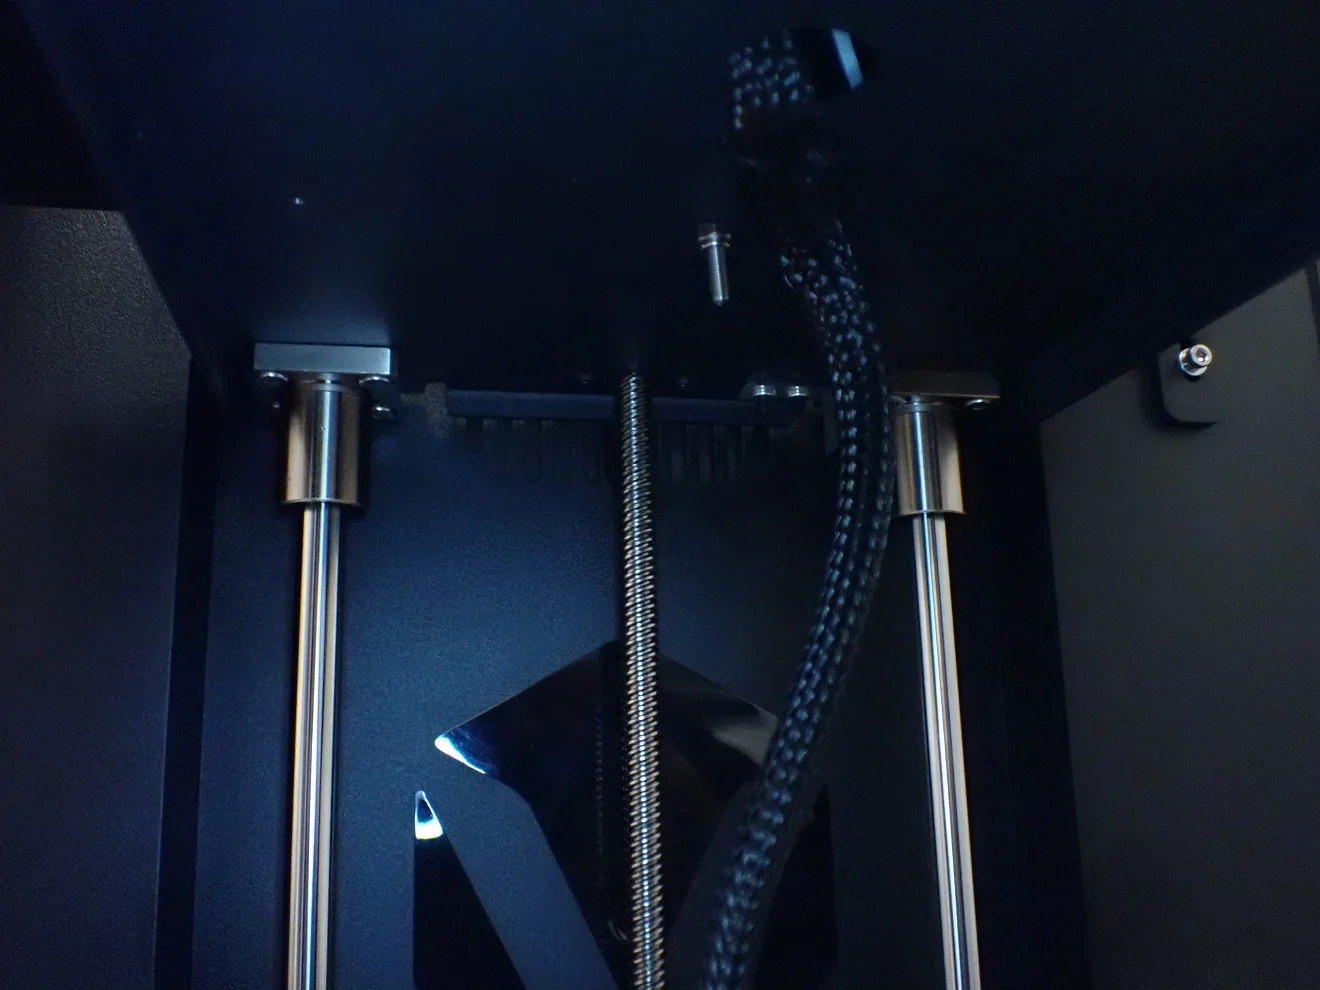
The main design feature of the Voxelab Aries* is the cube-like construction. This allows for a very stable operation.
The print bed is moved by a stepper motor, but stabilized by 2 vertical rods on the Z-axis. At the top of the printer, two toothed belts move the printhead.
The timing belts are very well adjusted and have the correct tension. I could not detect any vibrations even at very fast printing speeds.
On the back of the printer are the extruder, the filament holder and the power plug. On the front is the touch screen and the USB port.
If you want to print with filaments that need a stable ambient temperature (like ABS), you could cover the sides of the Aries quite easily, as all surfaces are very smooth.
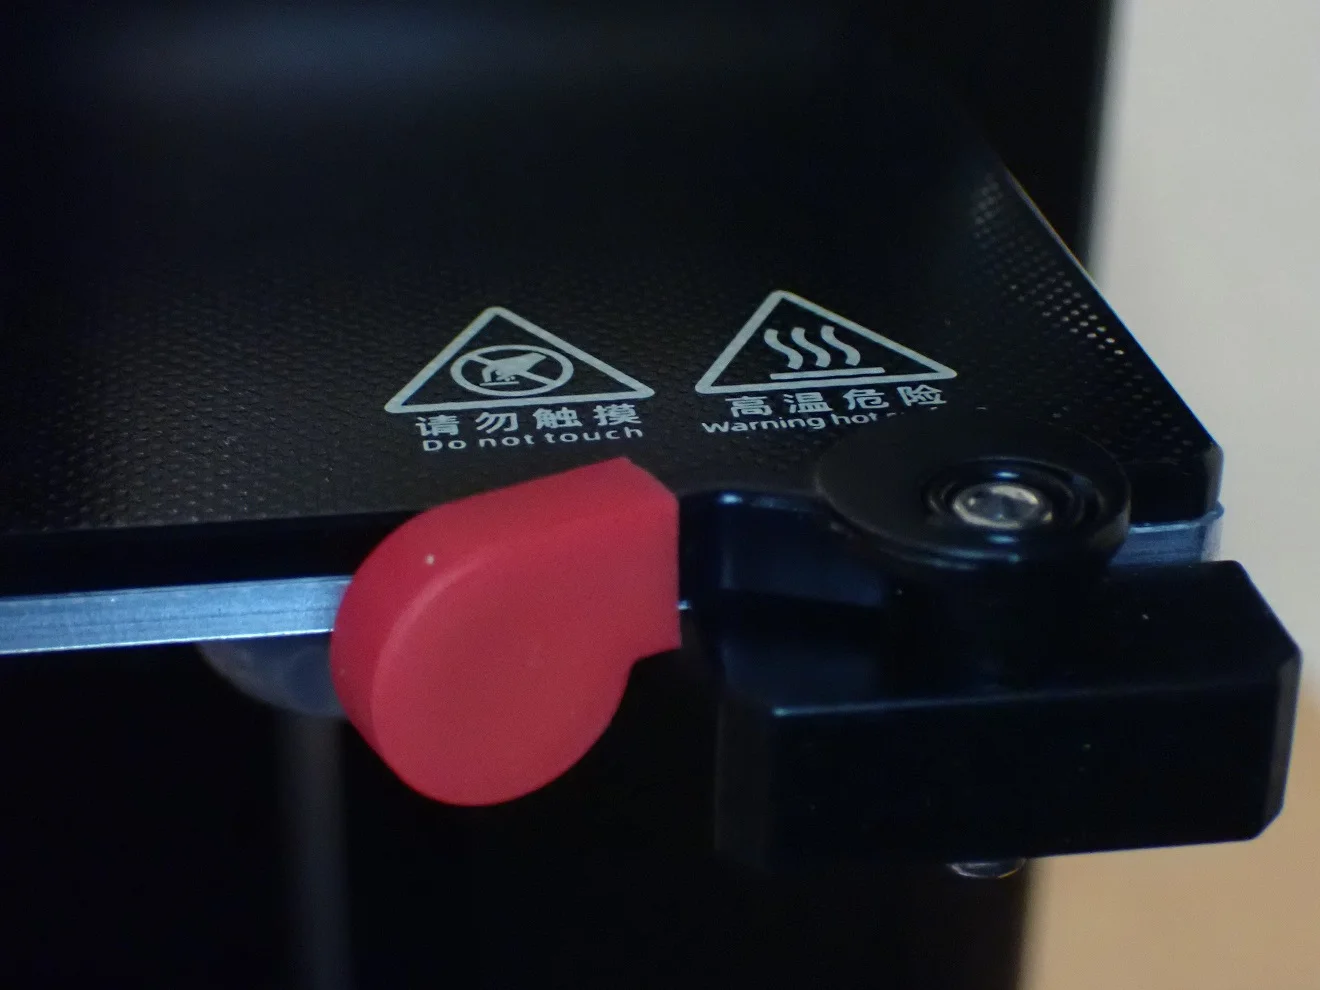
The Aries has rubber feet on all four corners to minimize vibration. They are kept in a bright red to give a strong contrast to the plain black of the case together with the printing bed levers.
Overall, the design is not only functional, but it also looks very stylish and gives a justified impression of high quality.
Features
Voxelab Aries
Cube Design
In the Voxelab Aries, the print bed moves up and down on the Z-axis. The print head is moved on the XY plane via the stepper motors and toothed belts in the upper frame of the cube design.
Due to the solid construction, the Aries can achieve very high accuracy and stability.
The design is very reminiscent of other 3D printers designed for exotic filaments that require a stable ambient temperature, such as the Qidi X-Max.
However, the creation of stable environmental conditions was not the intention of the design, but the stability and also the sleek appearance.
If you still want to print filaments like ABS with the Aries, you could easily seal the sides with aluminum foil or acrylic sheets.
Double Z-axis

The Z-axis is not really double, but there are two guide rods on which it is stabilized.
An actual double Z-axis with two stepper motors on two sides only becomes necessary with larger printing plates to ensure the necessary stability and freedom from vibration.
4.3” Color Touch Screen
Without a professional operation, the stylish exterior would be in vain. However, the 4.3’’ color touchscreen delivers exactly this feeling of high quality and user orientation.
It’s large enough to clearly display all the controls and responds very quickly and accurately to your finger. It also doesn’t darken or change colors when you look at it from the side.
The interesting thing about this touchscreen is that it can access an internal memory of 8GB. It also needs this when you want to send models to it via Wi-Fi. But even if you print models from your USB stick, it copies the file to the internal memory to make it available even if the USB stick is not in the 3D printer.
When starting the 3D printer, it makes a sound similar to starting Windows or other operating systems. It also notifies you with a beep when the 3D printing is finished or it has reached the preset temperature during preheating. If these sounds annoy you, you can turn them off via the menu.
You can also set the WiFi connection and the lighting via the menu.
There is also a menu for preheating. Here you can set the desired temperature of the print bed and the nozzle individually. Unfortunately, there are no preset profiles for different filament types. By default, the normal temperatures for PLA are used.
Filament Change
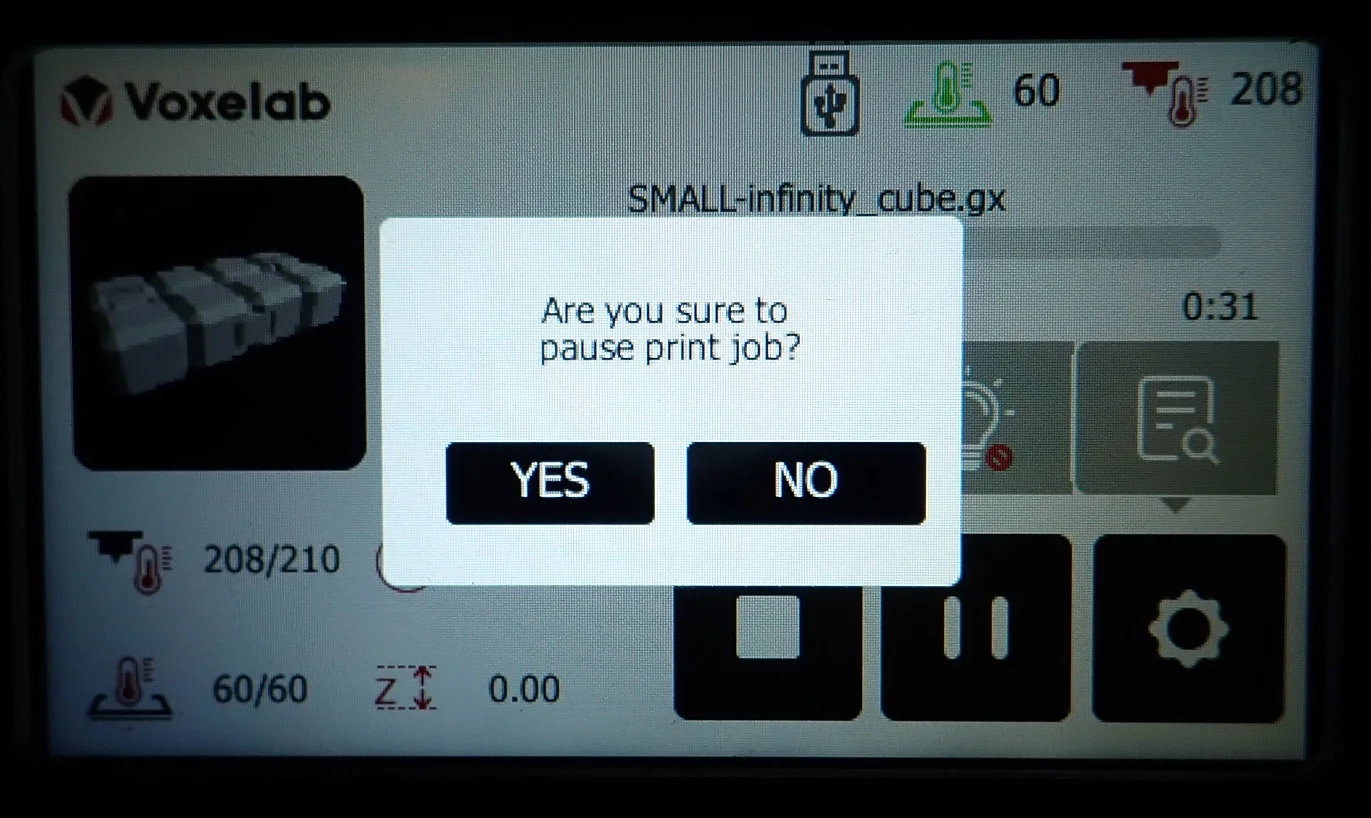
During printing, you can change the print settings and the lighting. You can also pause for a filament change.
However, this pause is not possible at a certain layer as with the script in Cura, but happens exactly when you press the button and confirm. As soon as you have done this, the printhead and the print bed will move to the home position.
Then the nozzle is preheated to the standard temperature of the filament. After 1 to 2 minutes, the new filament is then pulled in and extruded. The print head then moves to its last position and continues printing.
The only drawback to this feature is that it does not include retraction. So you have to remove the extruded material from the nozzle while the print head returns to its original position to avoid printing errors or unsightly blobs of excess material.
WiFI Connectivity
A very rare feature among budget 3D printers is wireless connectivity. The Aries searches for available wireless networks and can connect to them.
You can then send the finished print files to the 3D printer via the VoxelMaker Slicer and have them printed. The files are stored on the internal memory (8GB).
At the moment, however, connectivity via WiFi is only limited to the VoxelMaker slicer and is not supported by other slicers such as Cura.
VoxelMaker Slicer

Voxelab’s slicer, VoxelMaker, is included on the USB stick. It’s not as comprehensive as my go-to slicer Cura, but it has extremely good default profiles for the Aries.
When I test a new 3D printer with Cura, I usually have to do various calibrations (calibration of the extrusion, retraction, etc.). But with the preset profiles in VoxelMaker, this was not necessary at all. All test prints and all subsequent prints were printed perfectly without calibration!
The VoxelMaker is very well suited for beginners, as it explains the individual settings in a very understandable and simple way and offers good default settings.
VoxelMaker also has popular modes like spiral vase mode, Rafts, Brims and Skirts.
The output files are in .gx format, which gives you a thumbnail for the files.
These small pictures are displayed on the touch screen of the 3D printer, so that you can see which model you have in front of you, as well as the name.
Single Gear Extruder
The single-gear extruder is based on proven technology and is not very special. I’m curious whether it eventually wears out as it is sometimes common with cheap devices. So far I could not see any signs of wear.
Due to the minimalistic design and space-saving construction of the 3D printer, the filament holder and extruder have ended up on the back. This can be quite inconvenient if you have very little space available and find it difficult to get to the back of the 3D printer.
Otherwise, it is also possible to control the extruder using the filament load and unload function via the menu.
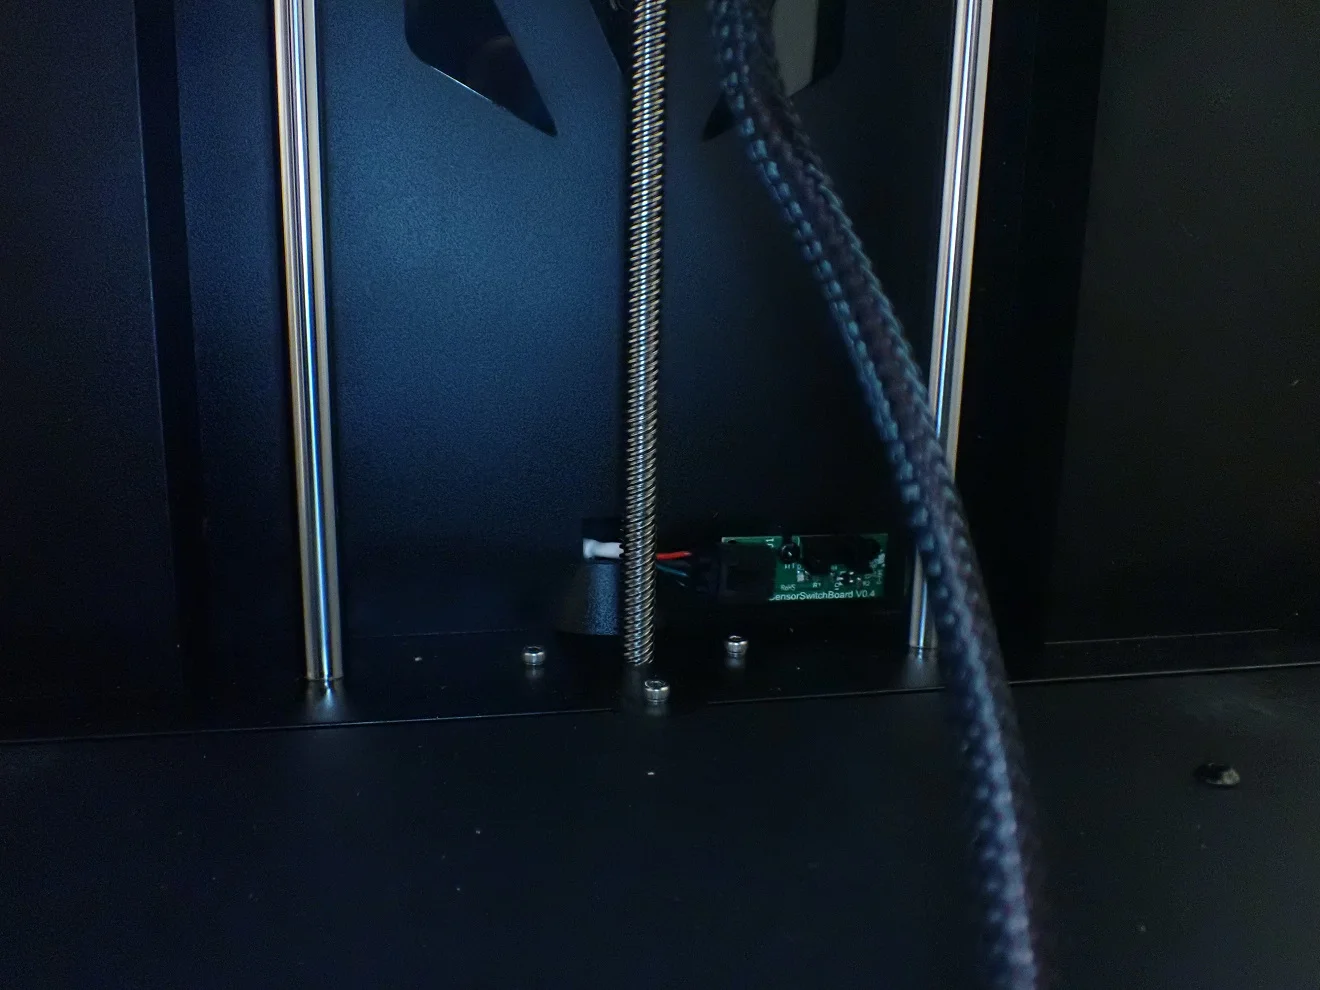
Filament Sensor
In front of the extruder is a filament sensor, which detects whether filament is loaded or not. So you can be sure that the print is canceled as soon as your filament is used up. You can then reload new filament and continue printing.
If you don’t want to use the filament sensor, you can turn it off in the menu.
PTFE Lined Hot End & Cooling

The Aries hot end used by Voxelab has a PTFE tube that limits the maximum printing temperature to about 240 °C. This temperature is sufficient for the most important standard filaments such as PLA, ABS and PETG.
If you were to aim for temperatures above 240°C, the PTFE tubing would begin to melt, causing toxic gases and clogging of the nozzle.
Two 4010 fans are installed for cooling. They cool the nozzle and the printed part. The fans are not exactly the quietest, but more about that below in the noise level measurement.
The parts fan gave me a bit of a headache after the first few test prints from the USB stick. Where the files provided on the USB stick were sliced perfectly, my first test prints were unfortunately sliced in such a way that the cooling started right at the beginning of the first layer.
This resulted in extremely poor print bed adhesion, which I was able to identify very quickly. In VoxelMaker you can define the height at which the part fan can be switched on. After that, printing even complex and filigree first layers was no longer a problem.
I have also experimented a bit with ABS. The problem with the hotend fans is that they also release some air down even when the parts fan is not activated. This inadvertently cools the ABS a bit and doesn’t stick to the print bed at all, and if it did stick it would warp a lot.
Brass Bearings on X-axis
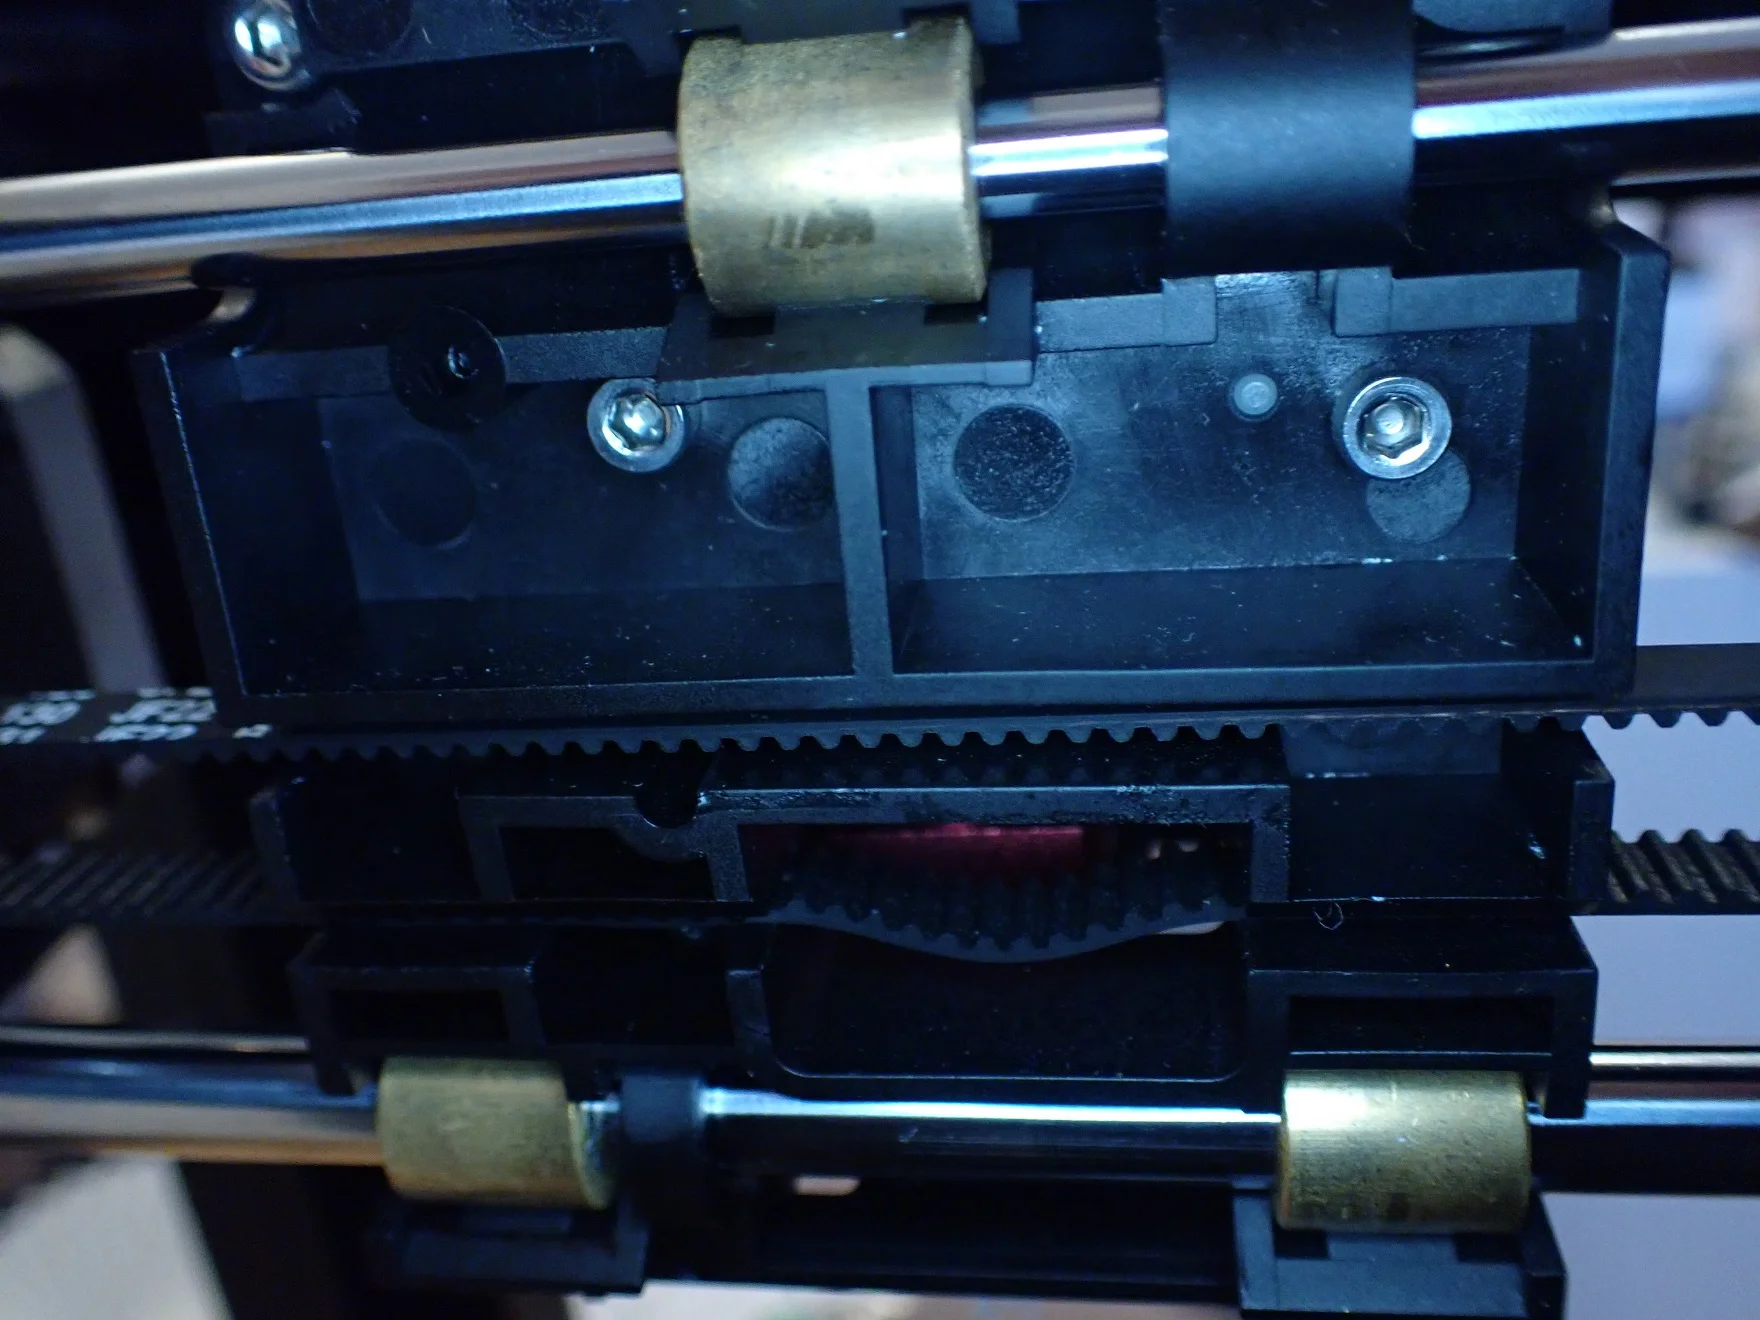
The printhead is mounted on the X-axis with 3 brass bearings on 2 horizontal struts. This makes the movement very smooth and there are no vibrations. Probably these special bearings are installed here, because it is the place that often leads to problems with cheap 3D printers after some time.
If the bearings should wear out, vibrations occur which directly affect the print result. I have the 3D printer now quite a long time in operation and could not yet notice any abrasion or other signs of wear.
32-bit Board with Silent Stepper Motors
Just like the power supply, the motherboard is located in the bottom part of the Voxelab Aries. Silent stepper motors are also installed here, which are particularly quiet in operation.
The installed motherboard is cooled by its own fan. However, the air circulation is not really well done, but is apparently good enough to keep everything running.
Glass Bed
The print bed adhesion on the textured glass bed is really excellent. After I had solved the problem with the ventilation (the parts fan should only run after a certain height, otherwise the first layer does not adhere), the print bed adhesion was perfect and there were no misprints.
The glass bed can be easily clamped and unclamped via two levers on the front. This allows you to clean it easily.
The home position of the print plate is at the bottom. The optical Z-end stop is also installed there. The advantage of this is that it is much easier to remove the finished print, as the distance between the print bed and the print head is then at a maximum. The disadvantage is that it takes longer to move to the home position.
Supported Print Bed Leveling
Print bed leveling is manual but is supported by the menu and only needs to be performed at three points.
With many budget 3D printers, you have to adjust all four corners with screws or knobs, which can be extremely frustrating until all corners are adjusted correctly.
With the Voxelab Aries, this is much more cleverly solved. You determine the rear point via the menu as Z-Offset and the two front points are adjusted via the very easy-to-turn rotary screws.
With this clever leveling strategy, you usually only need one pass to get the print bed perfectly set. Out of habit, I repeated the whole process again. But that was not necessary.
The leveling also lasts a very long time – I haven’t had to repeat the leveling during all my prints so far.
Resume Print
The 3D printer has the resume print function. It remembers the position at which it had to stop printing due to a power failure. As soon as the power comes back on, it starts printing again at exactly the same point.
Since the stepper motors do not engage in the event of a power failure, the print bed automatically moves downwards. This is not a big deal, however, because the print bed and the Nozzle have to heat up again. If all positions were frozen, the object’s location on the Nozzle would melt and deform.
Mean Well Power Supply
Mean Well power supplies have now established themselves as premium components for 3D printers. Fortunately, Voxelab has also chosen them for the Aries.
As usual, the internal cooling is very good. But it has to be, because the bottom of the 3D printer, where all the electronics are installed, does not have very good air circulation. This means that the fans of the power supply are actually always running during printing.
Heating Times
Voxelab Aries
The heat-up times for the hotend and print bed are fast enough but nothing special.
Print bed heat-up times:
- 60 °C: 2 minutes and 20 seconds
- 100 °C: 5 minutes and 15 seconds
Hotend heating times:
- 200 °C: 1 minute and 15 seconds
- 240 °C: 1 minute and 50 seconds
Noise Level
Voxelab Aries
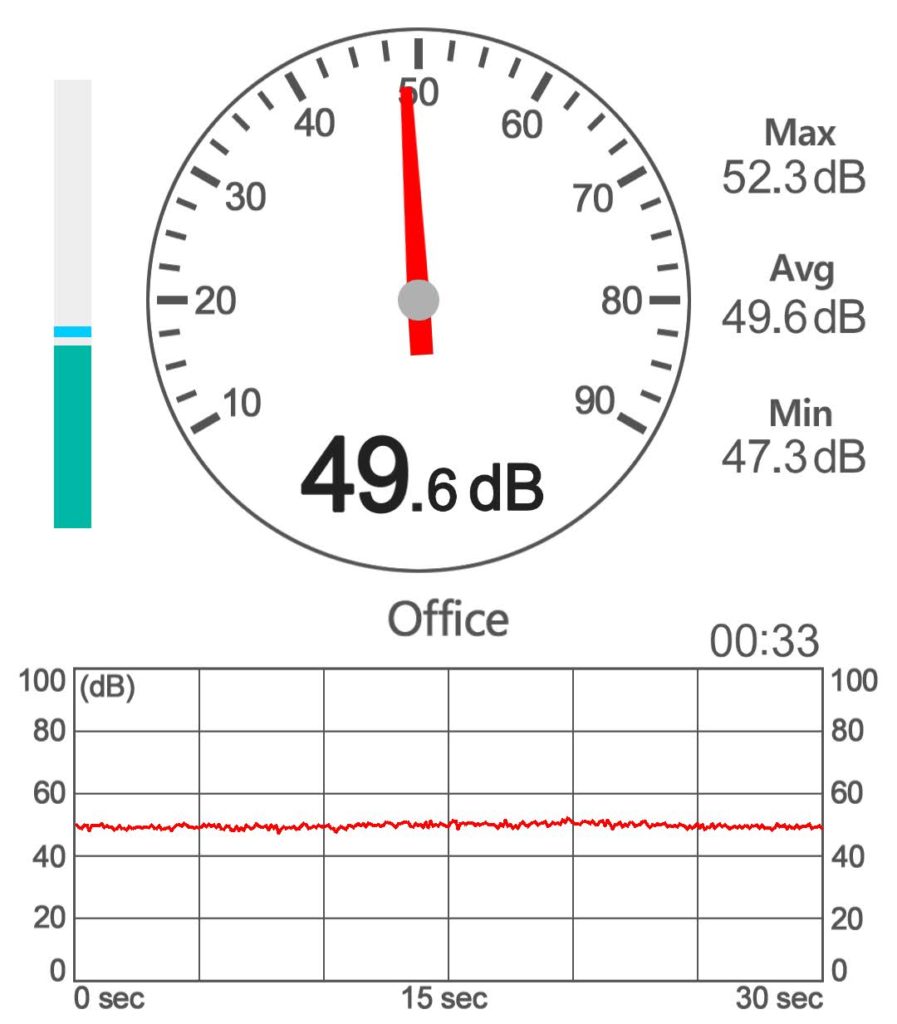
During printing, the Voxelab Aries has a volume of about 50 decibels. This is quite a normal value for 3D printers, but could be much lower if special fans were installed.
This rather high noise level is one of the negative aspects of this 3D printer and could be improved with inexpensive upgrades.
Check Price at:
Print Quality
Voxelab Aries
The print quality of the Voxelab Aries is comparable to other FDM printers in this price segment with layer thicknesses up to 0.1 mm. However, the standard profiles in the VoxelMaker slicer are optimized so that even 0.18 mm looks very good. Stringing, over- or under-extrusion did not occur.
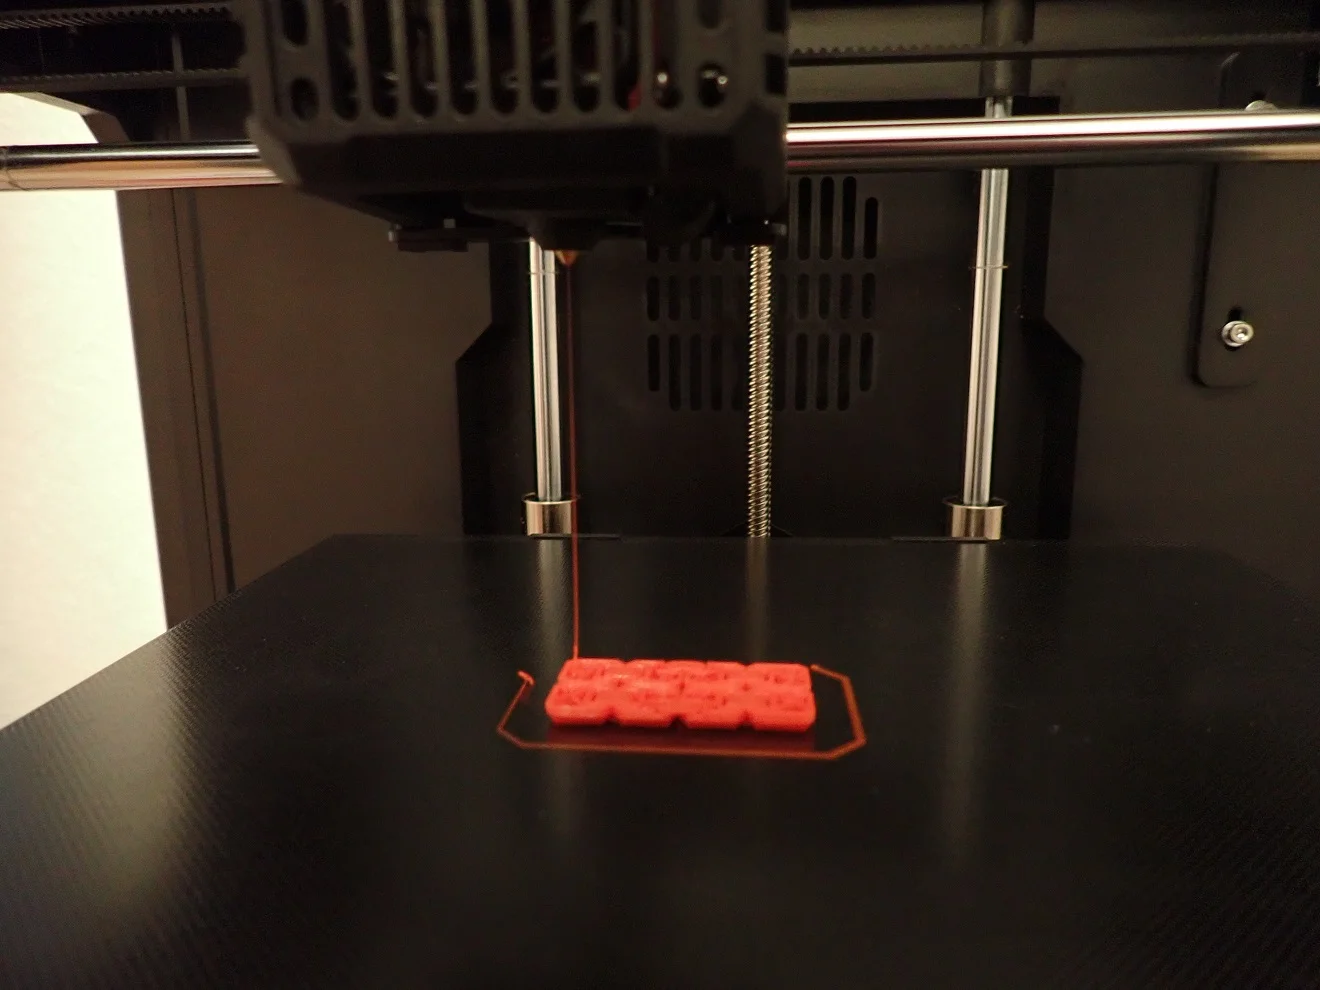
First, I used the files from the USB stick without slicing them again first. As it turned out, these files were perfectly matched to the Aries. The print bed adhesion was ideal, there was no stringing or other printing errors.
But when I wanted to start the first self-sliced print I was a bit frustrated, because the print bed adhesion didn’t work at all. After some trial and error I noticed that the cooling was activated by default in VoxelMaker Slicer from the beginning…
For PLA this is the death sentence for a good adhesion of the first layer. After changing this setting and only turning on the cooling after the first few layers, there were no problems printing my test objects.
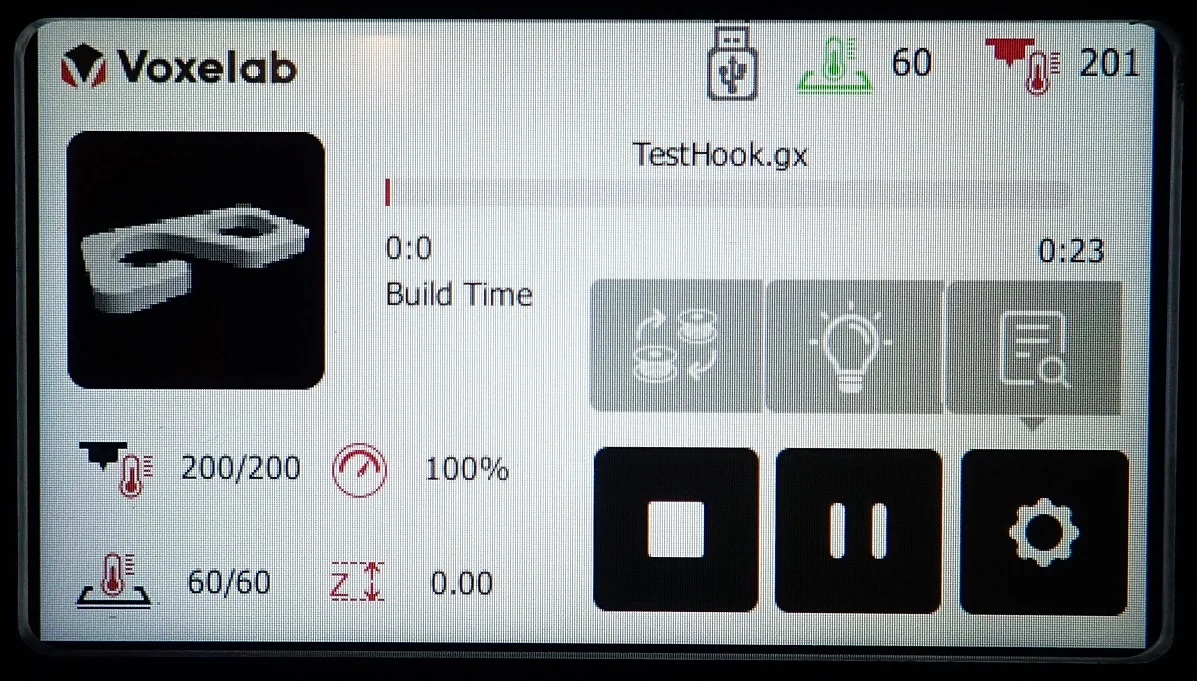
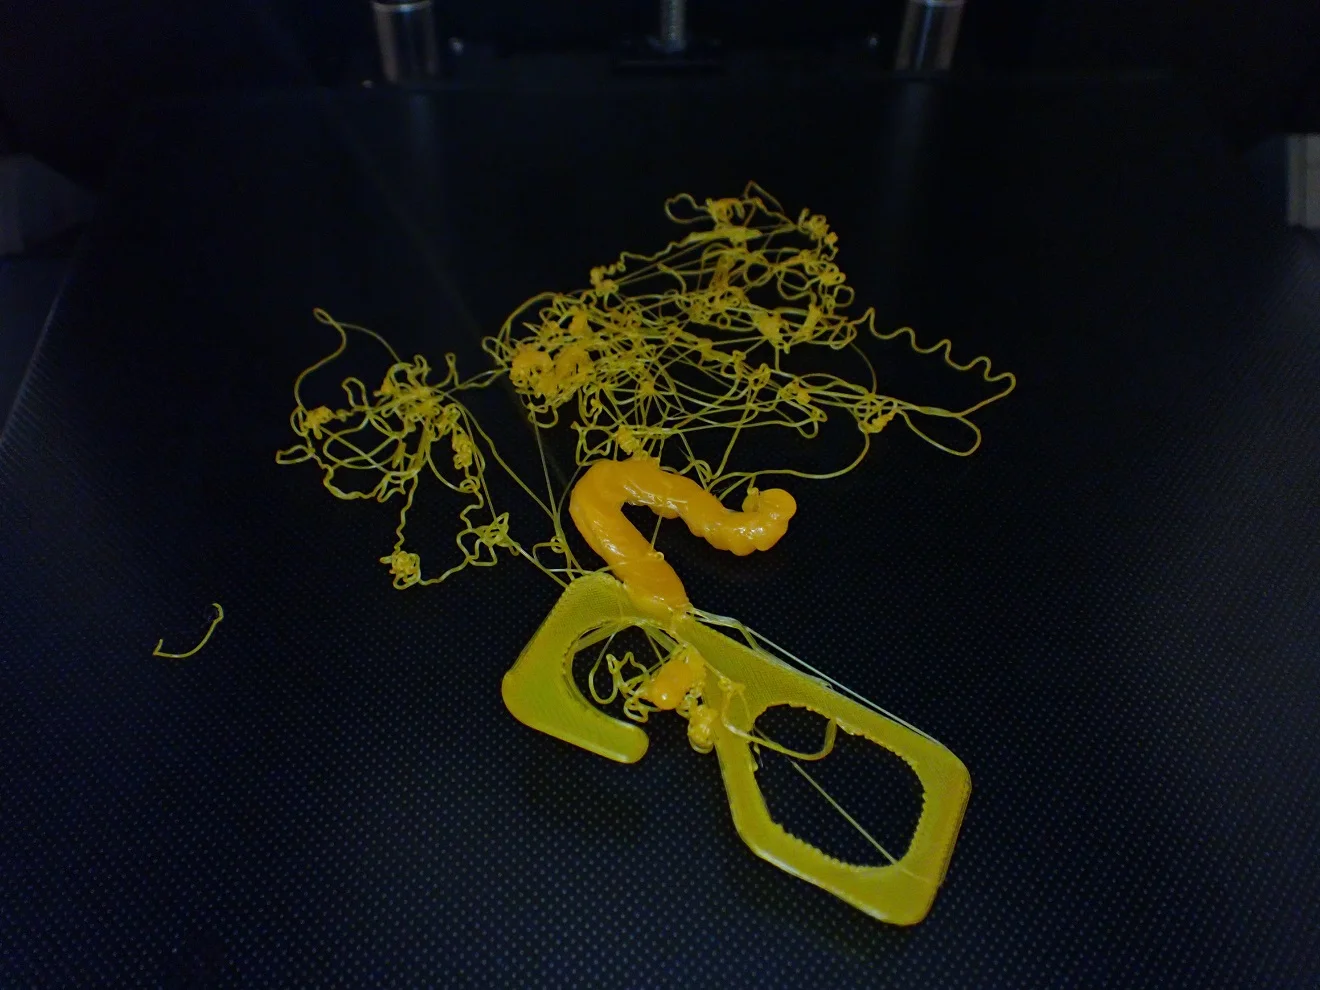
Test Hook
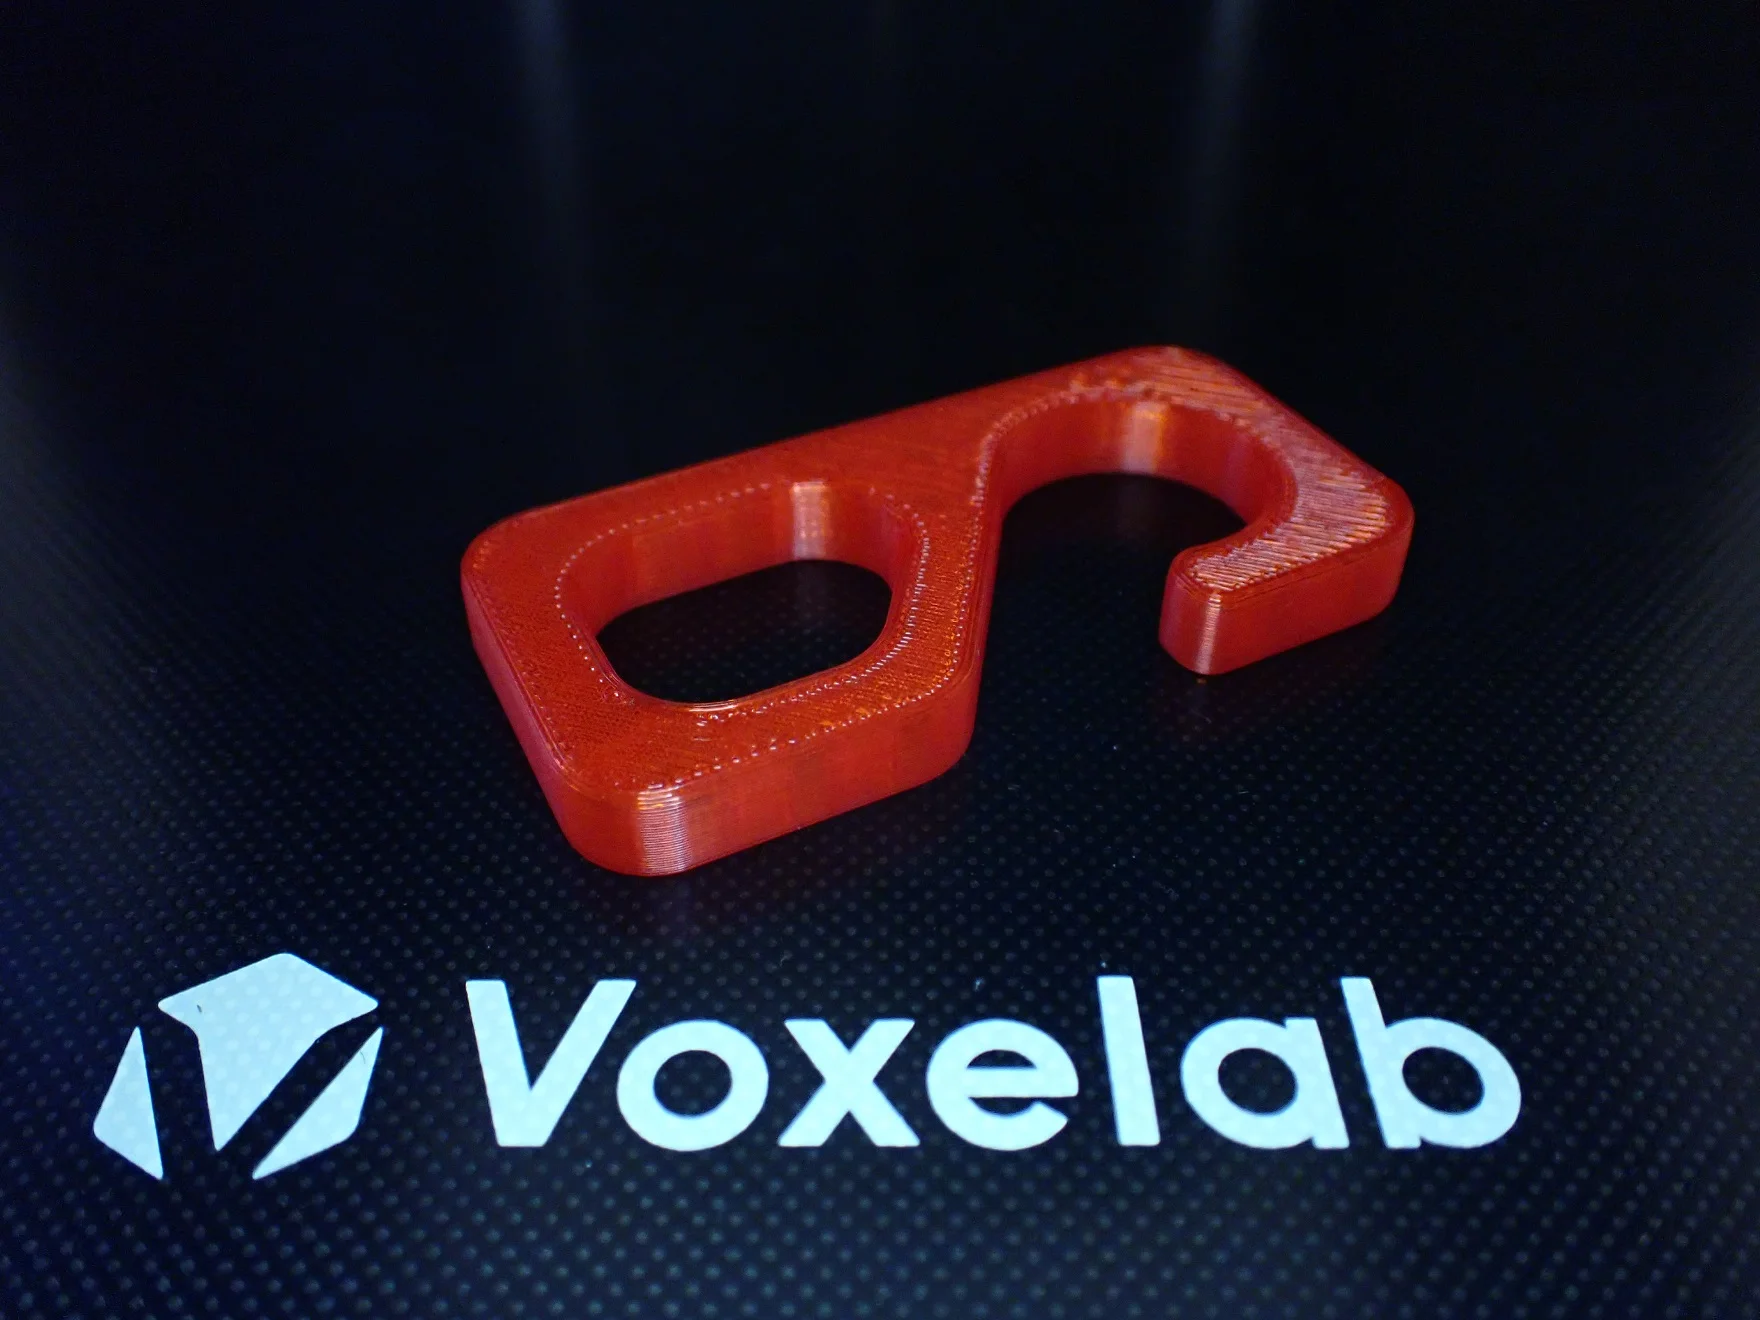
This hook is the standard form to test the stability of filaments or different infill patterns. It was available on the USB stick and could be printed immediately.
The printing went smoothly and worked right the first time. The result is really good. The only drawback to this model are the visible Z-seams.
Geometric Shapes
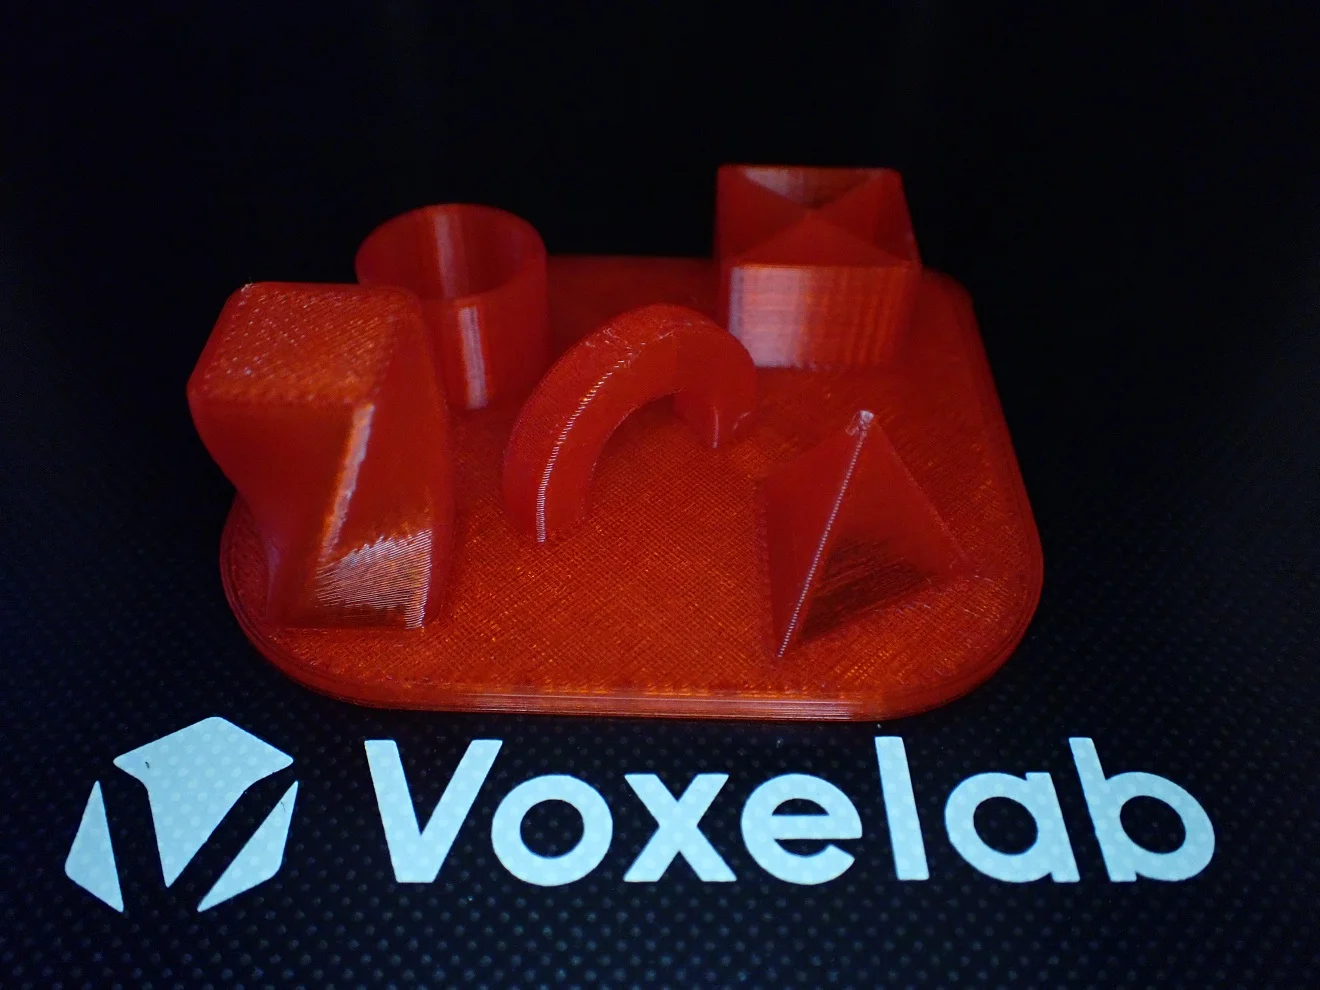
Next, I printed the geometric shapes that were also included on the USB stick. Here the bridging behavior, stringing and extrusion are tested.
I was very surprised at how little stringing was produced and as a result canceled my planned retraction test and extruder calibration!
Gears
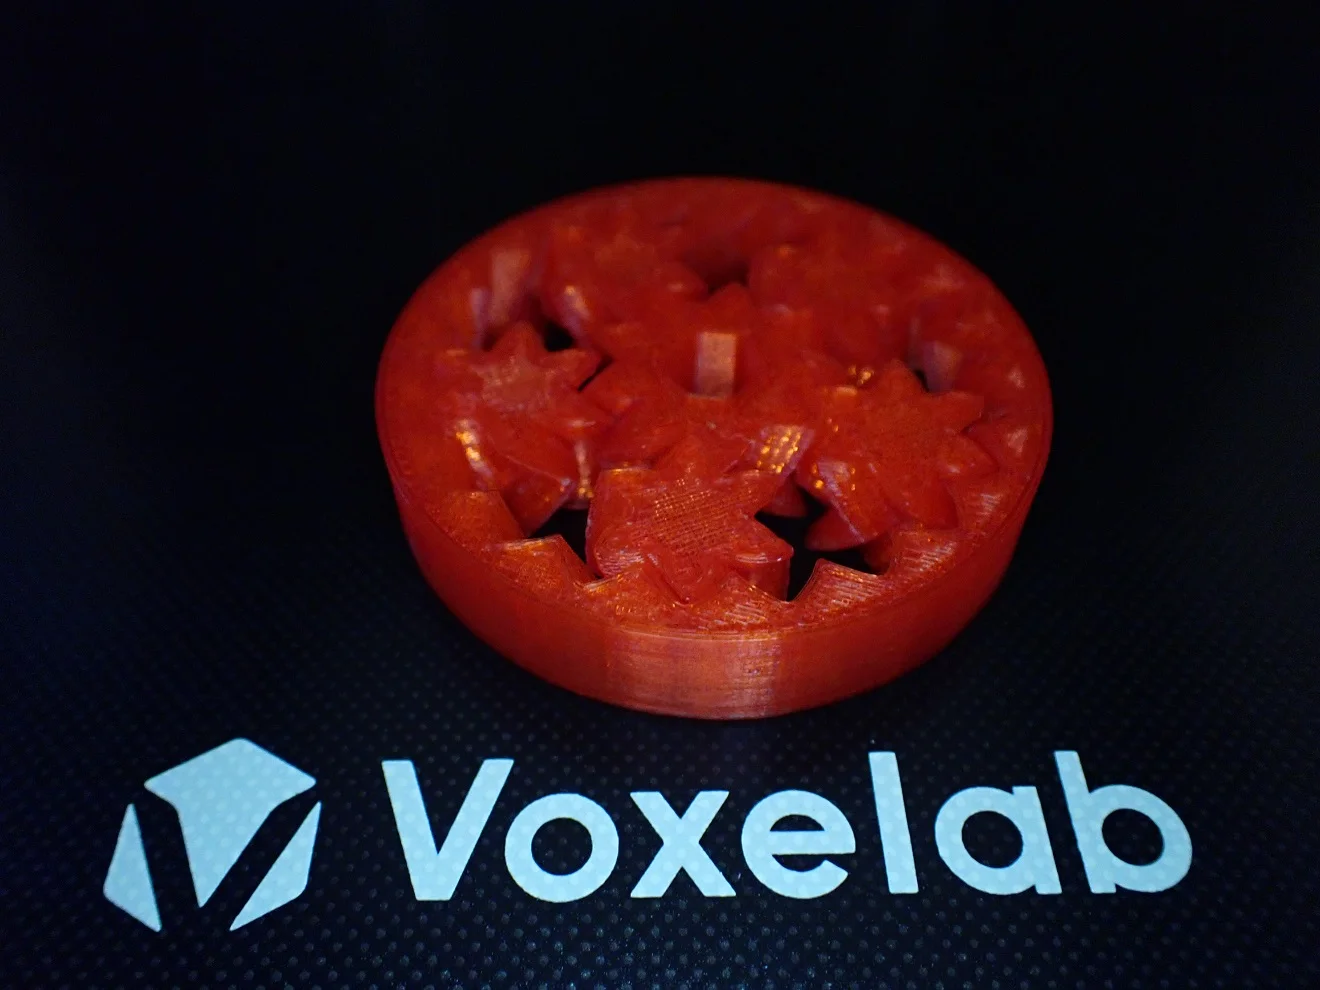
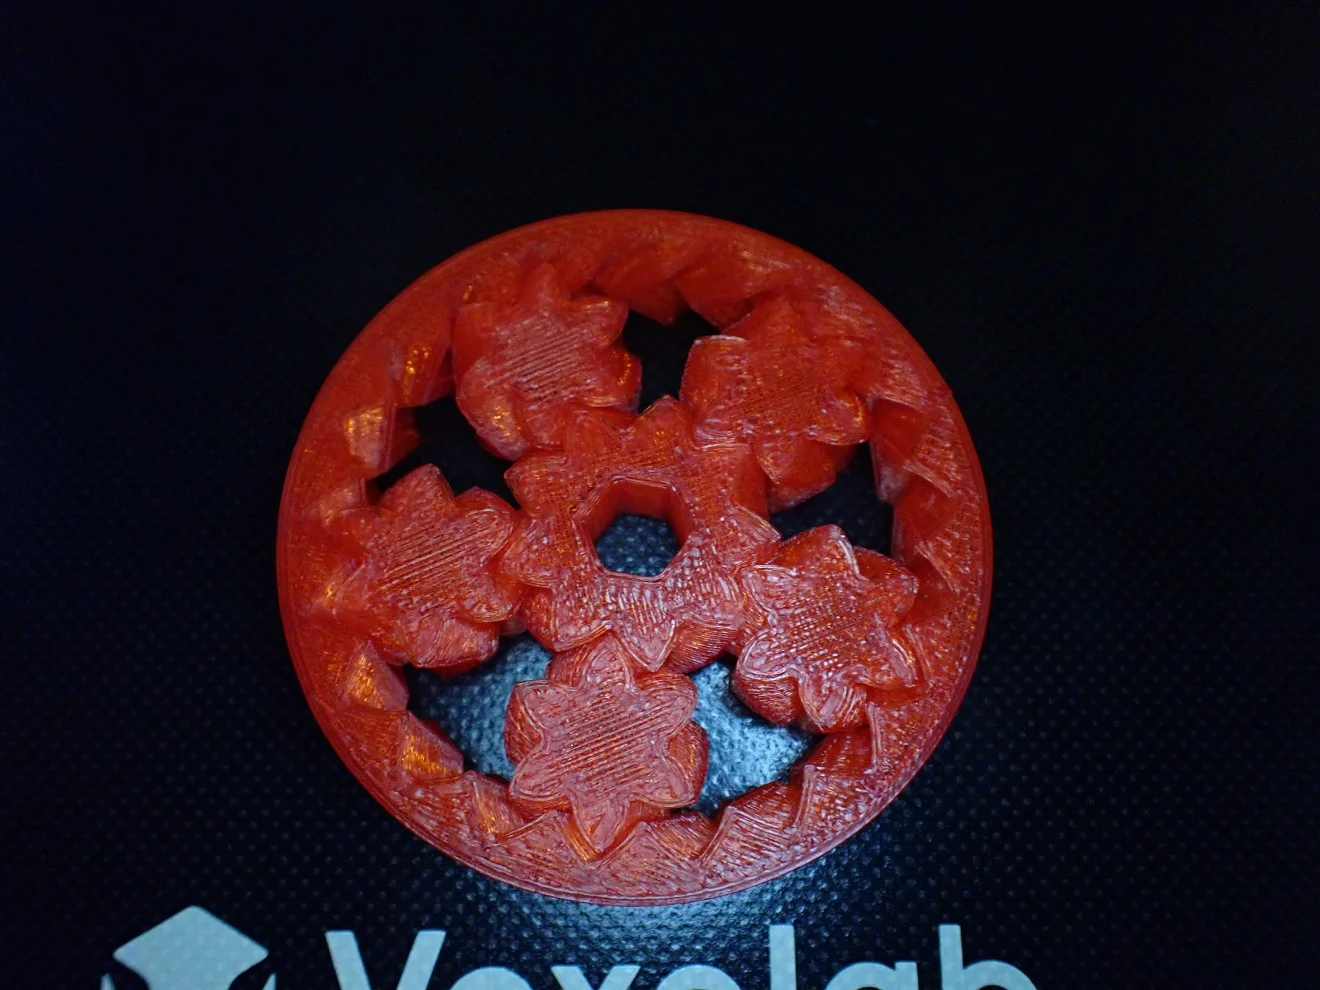
After the geometric shapes, I was quite confident and that the last model from the USB stick would be printed flawlessly. This model consists of a total of six gears that are printed inside each other.
Such 3D prints are always cool, as they are not possible with other manufacturing processes. The geometry of the gears prevents their removal without completely destroying the object.
The result is again flawless and the gears could be moved smoothly without any postprocessing. Since the extrusion was already so perfectly adjusted, there were no zits or other obstacles that affected the movement of the gears.
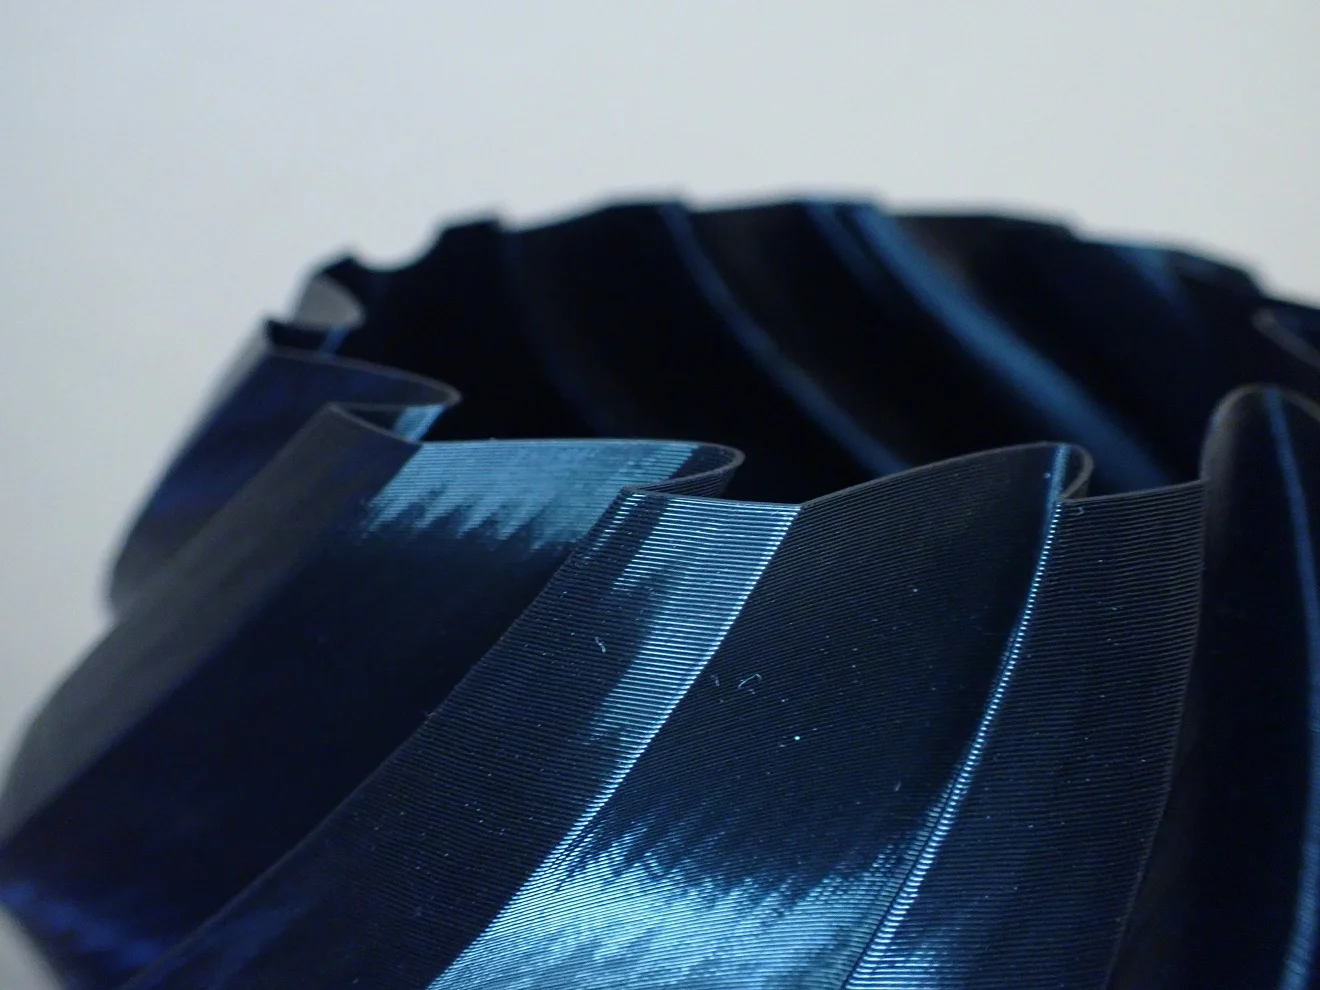
Twisted Vase
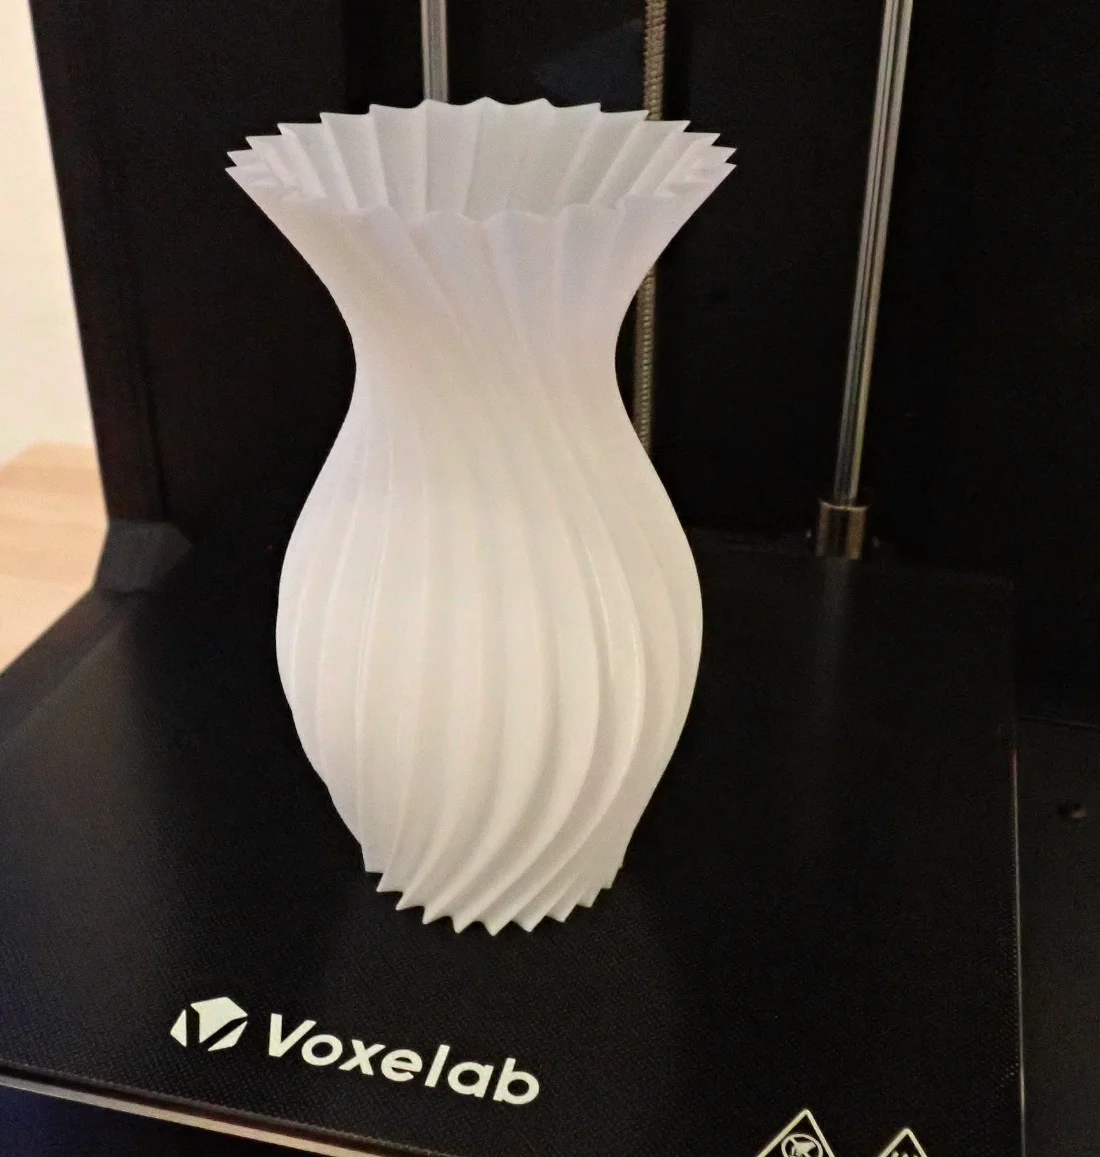
After I had solved the problem described above with the cooling of the first layers, I took a closer look at the VoxelMaker slicer. I noticed that there is also a spiral vase mode like in Cura.
I tried this spiral vase mode directly on the Twisted Vase (link to the model). The result is a beautiful vase with a flawless surface.
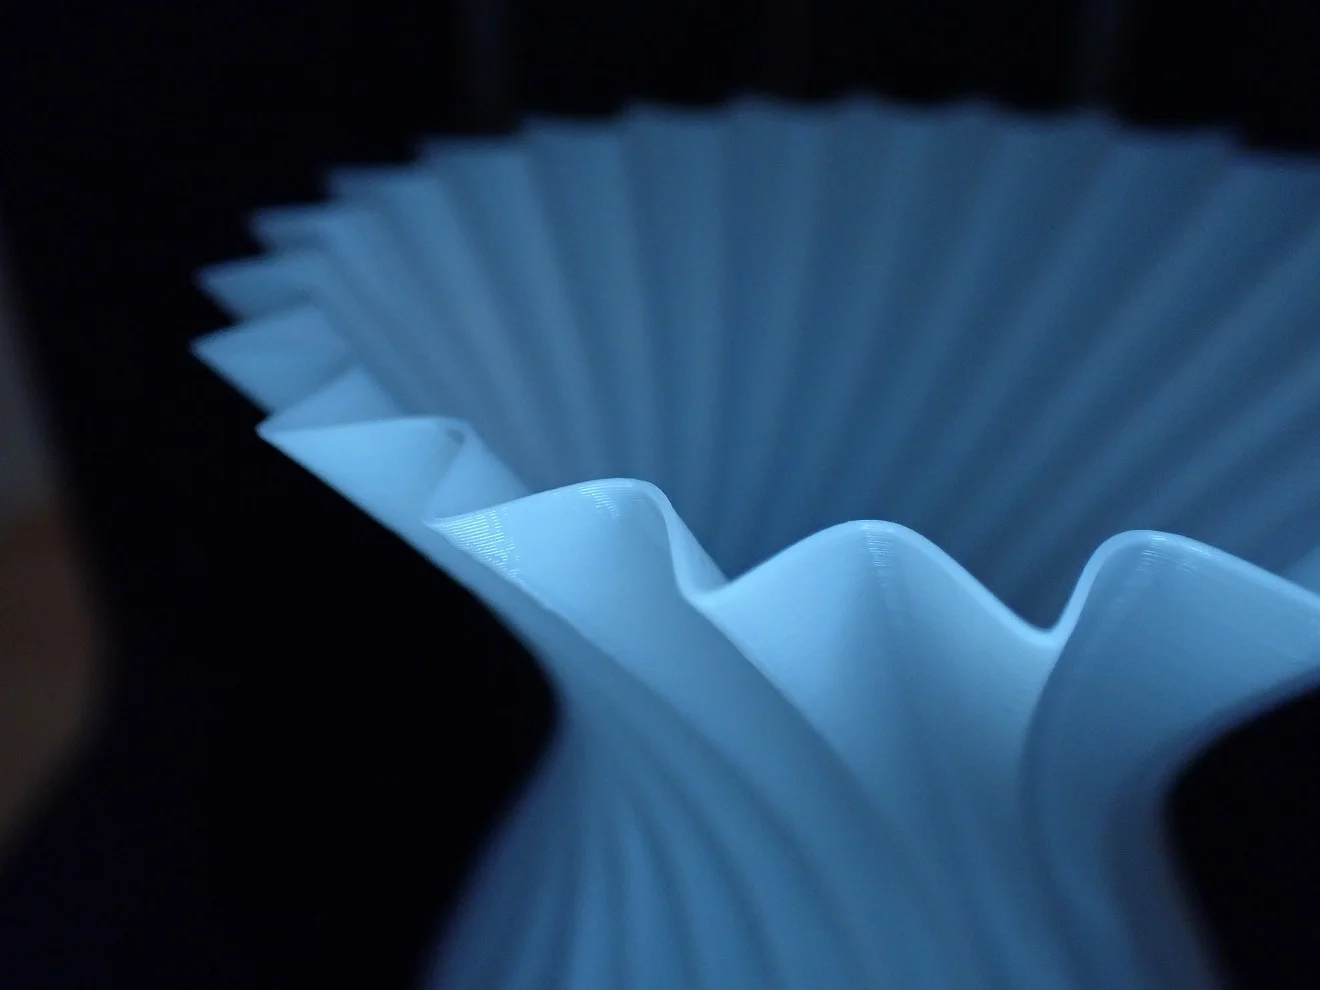
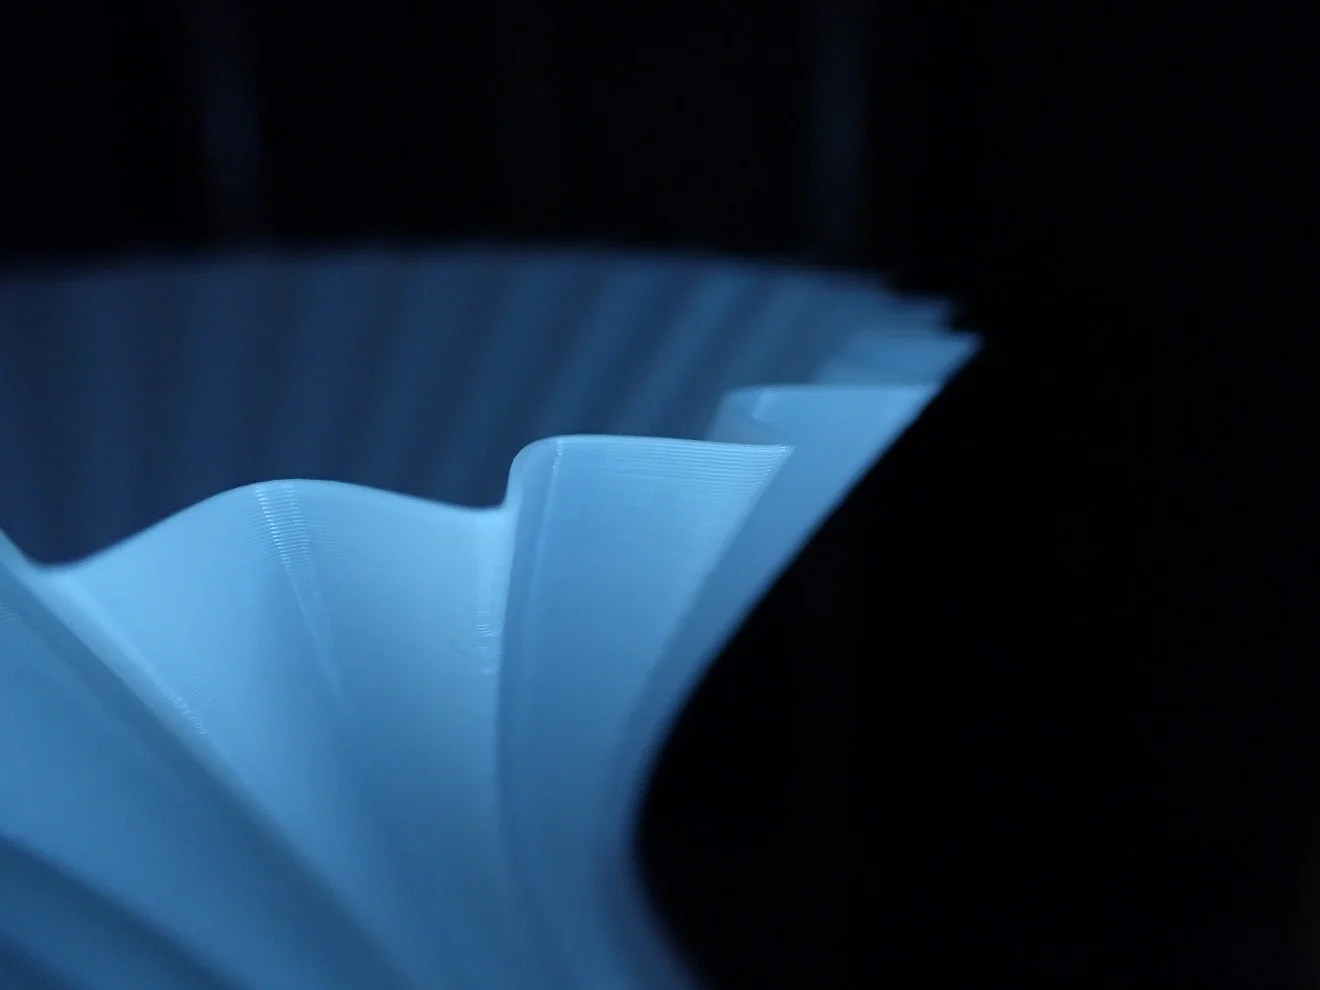
Blade Vase

After the first vase impressed me so much, I printed another one right after that and used the print volume of the Aries more. With very large vases you can see immediately if the leveling of the print bed is not perfect.
This would result in small holes or slits in the wall on one side. But although the Blade Vase is extremely wide, the surface was perfect over the entire height.
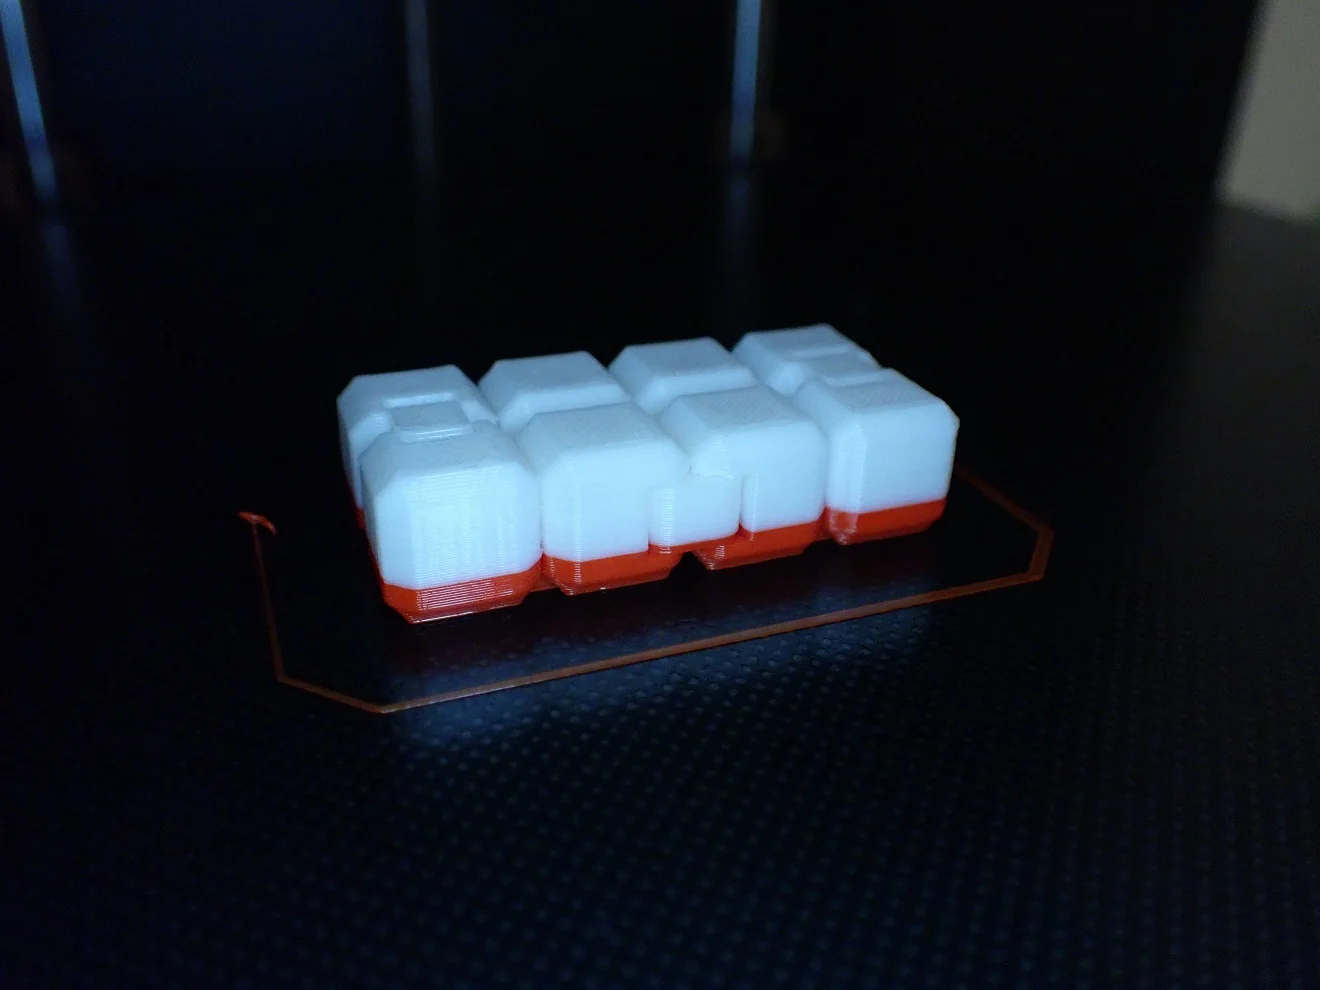
Bit Box
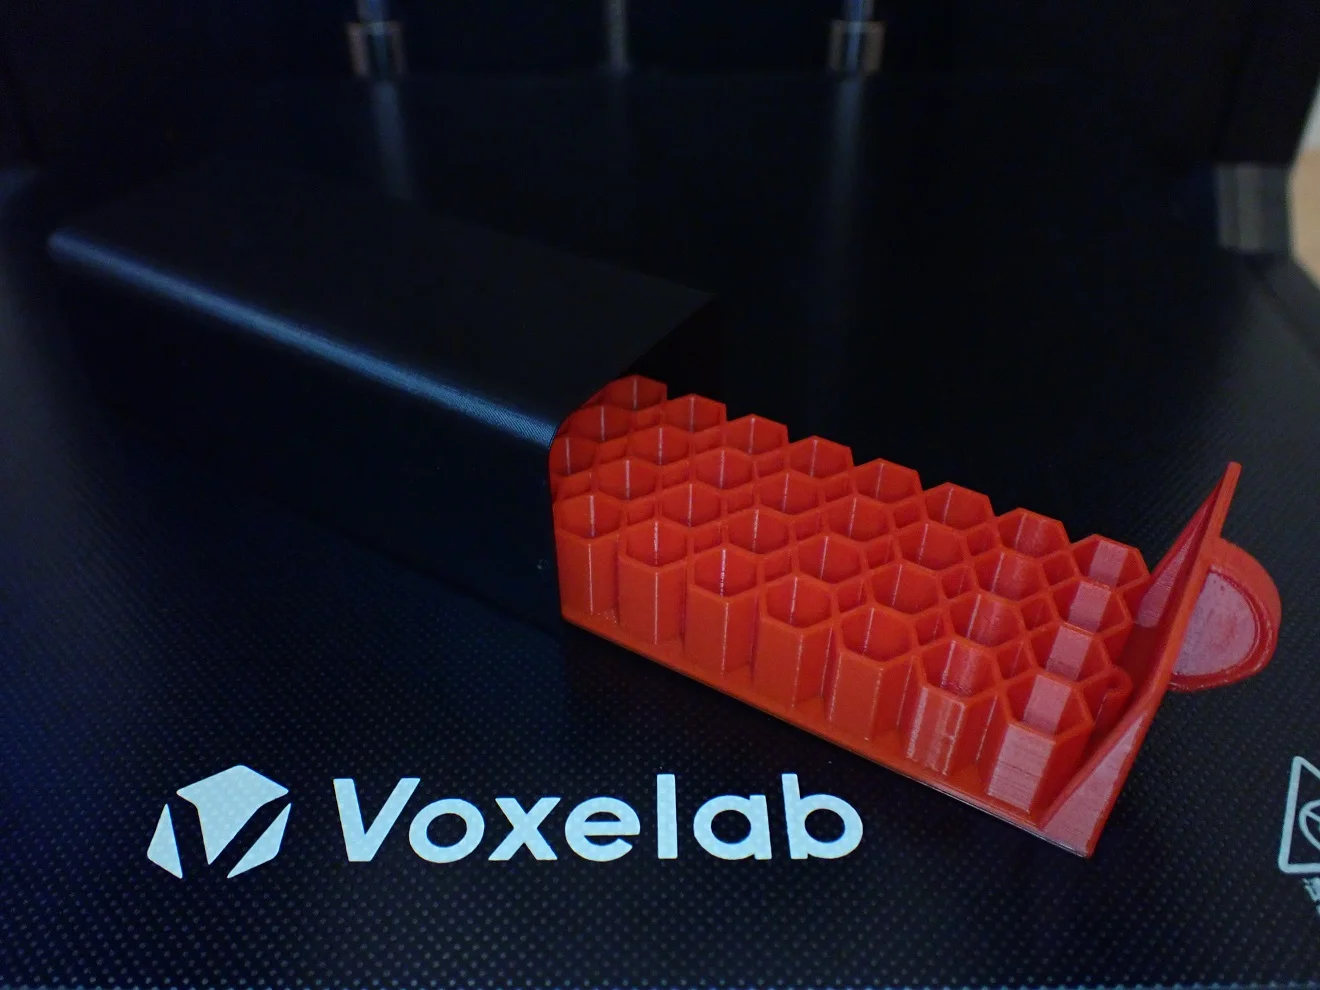
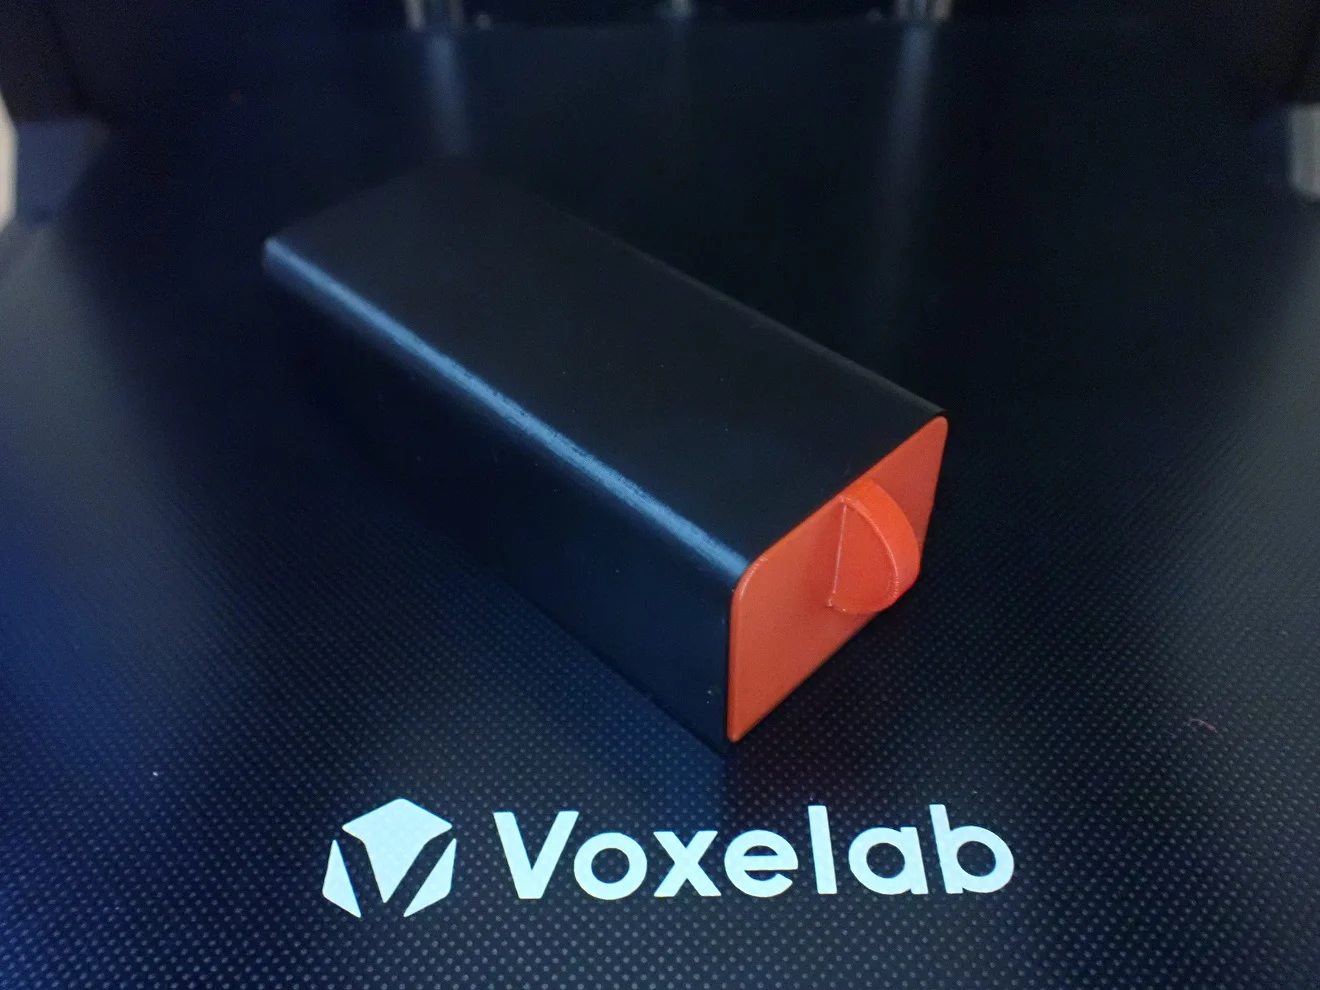
After more decorative objects I wanted to print something useful. Therefore I printed this Bit Box (link to the model).
After all, the settings were already so perfected, the preparation for printing was done within a few minutes. Download the file, load the standard profile for PLA in VoxelMaker, slice and print. Since this process was so fast I printed two!
Tentacles

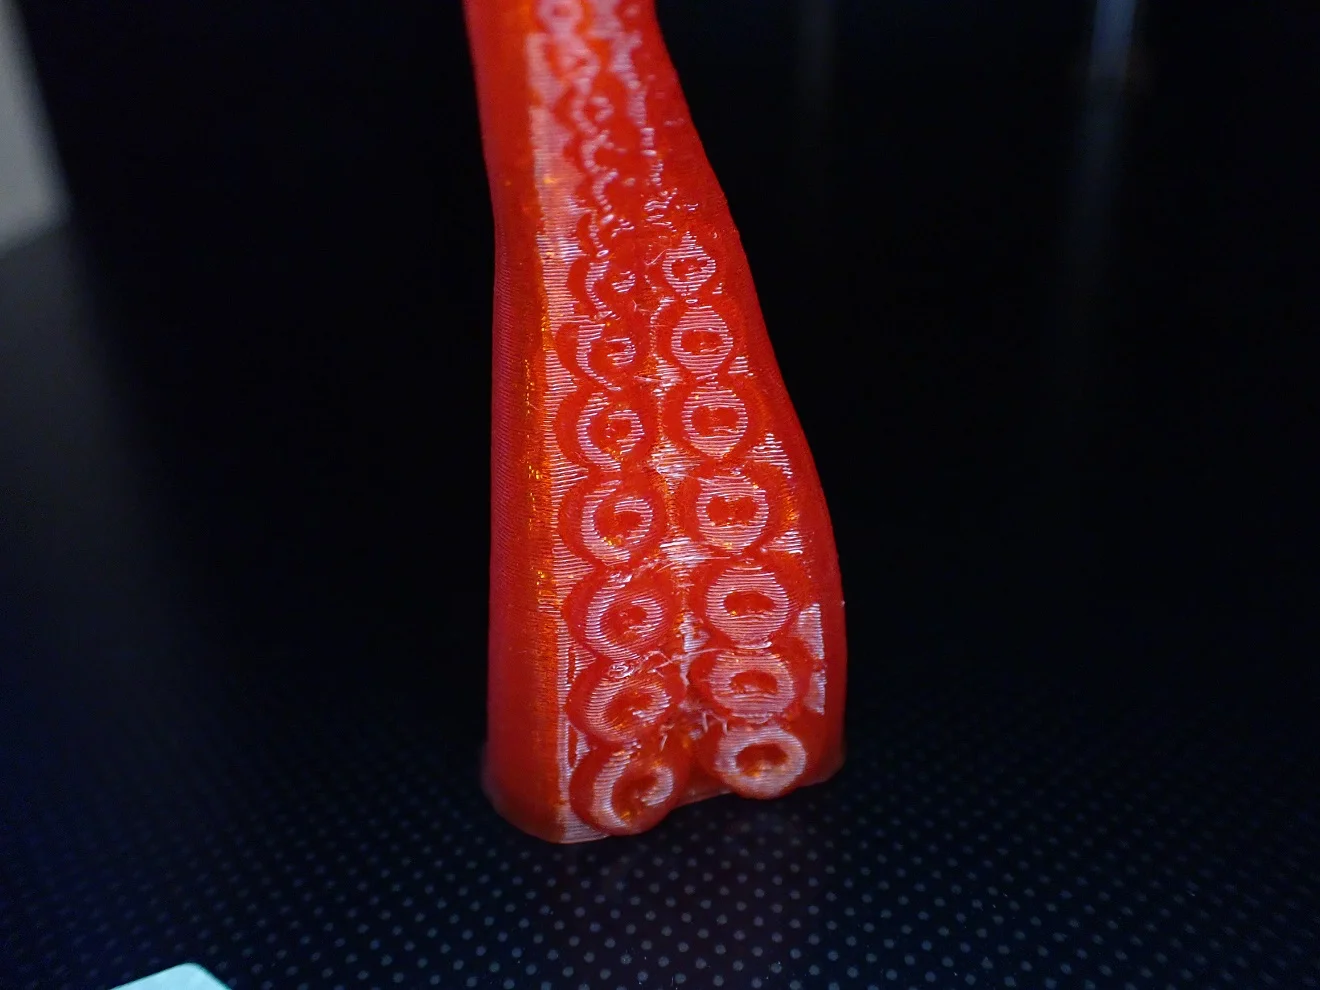
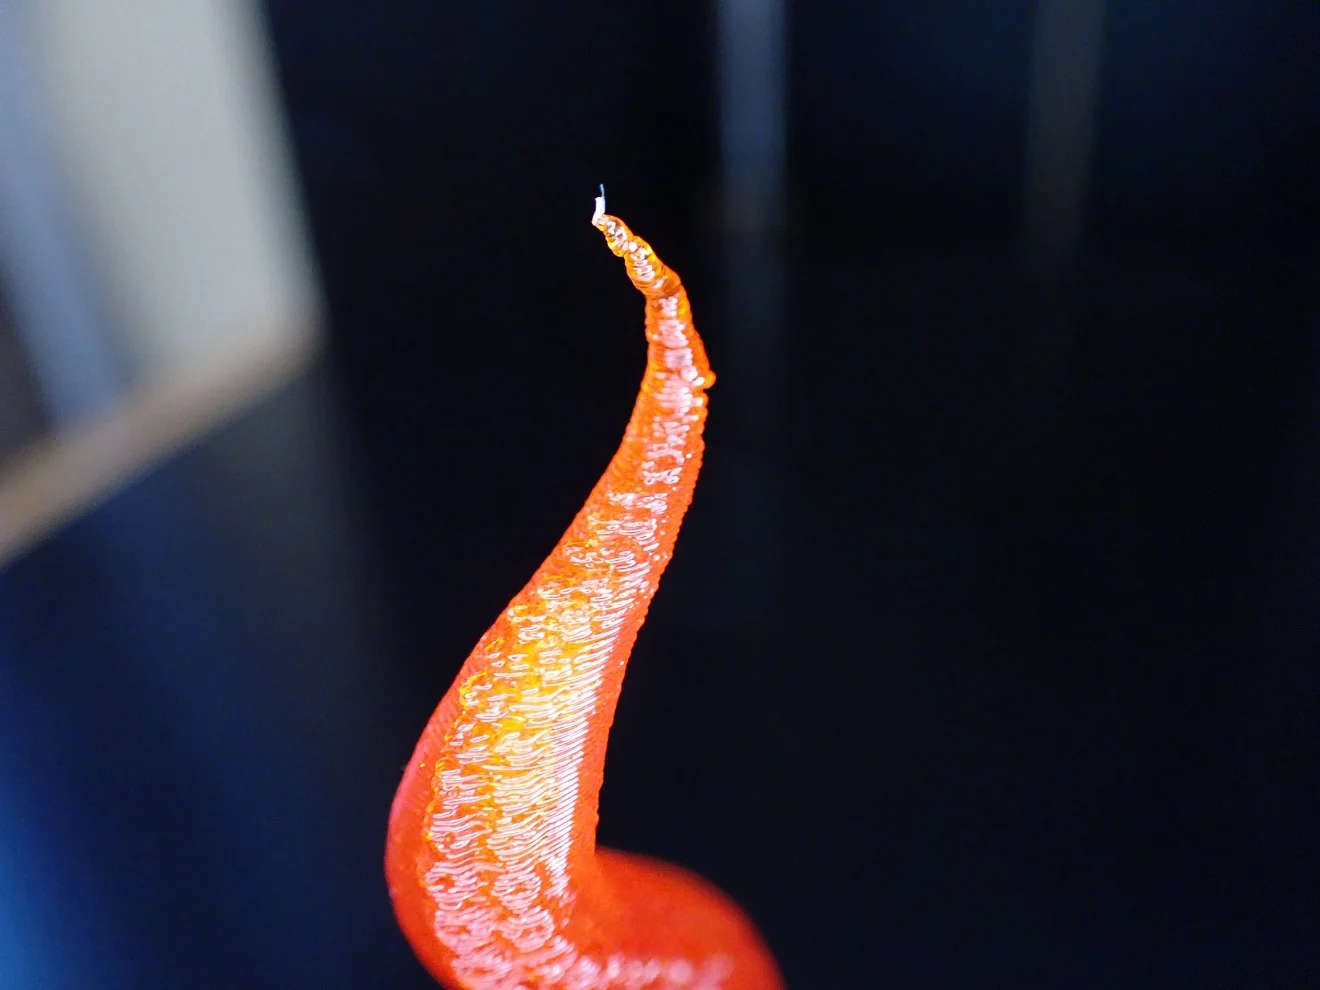
To push the Aries a bit to its limits I printed these tentacles with a layer thickness of 0,18 mm (link to the model). I wanted to test how it copes with fine details, since the previous models were rather rough in their shape.
You can clearly see that the upper tip of the tentacles is not quite as perfect as the lower part of the tentacle. But for the fact that the structure up there is in the order of the layer thickness, the result is still very good!
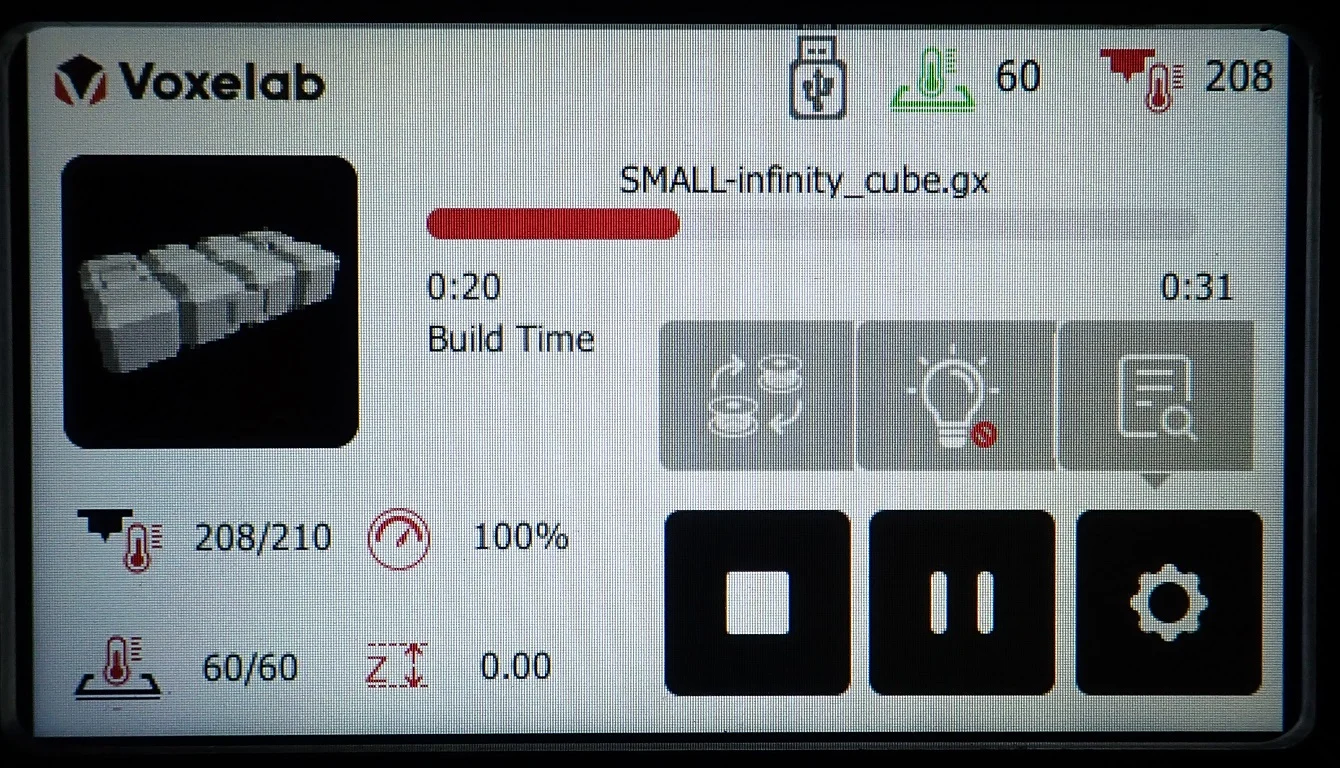
Infinity Cube
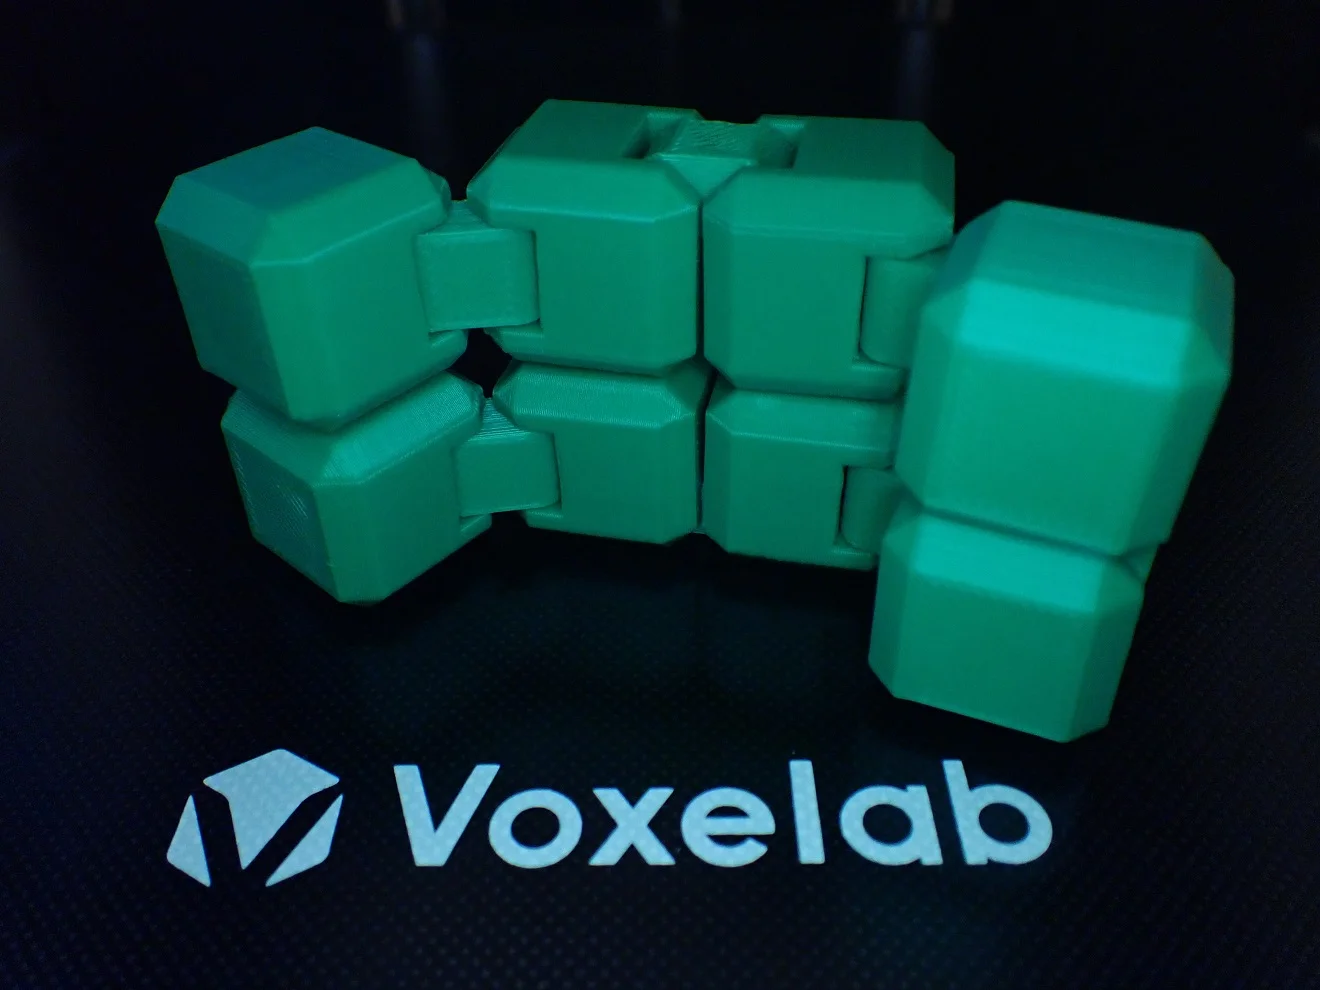
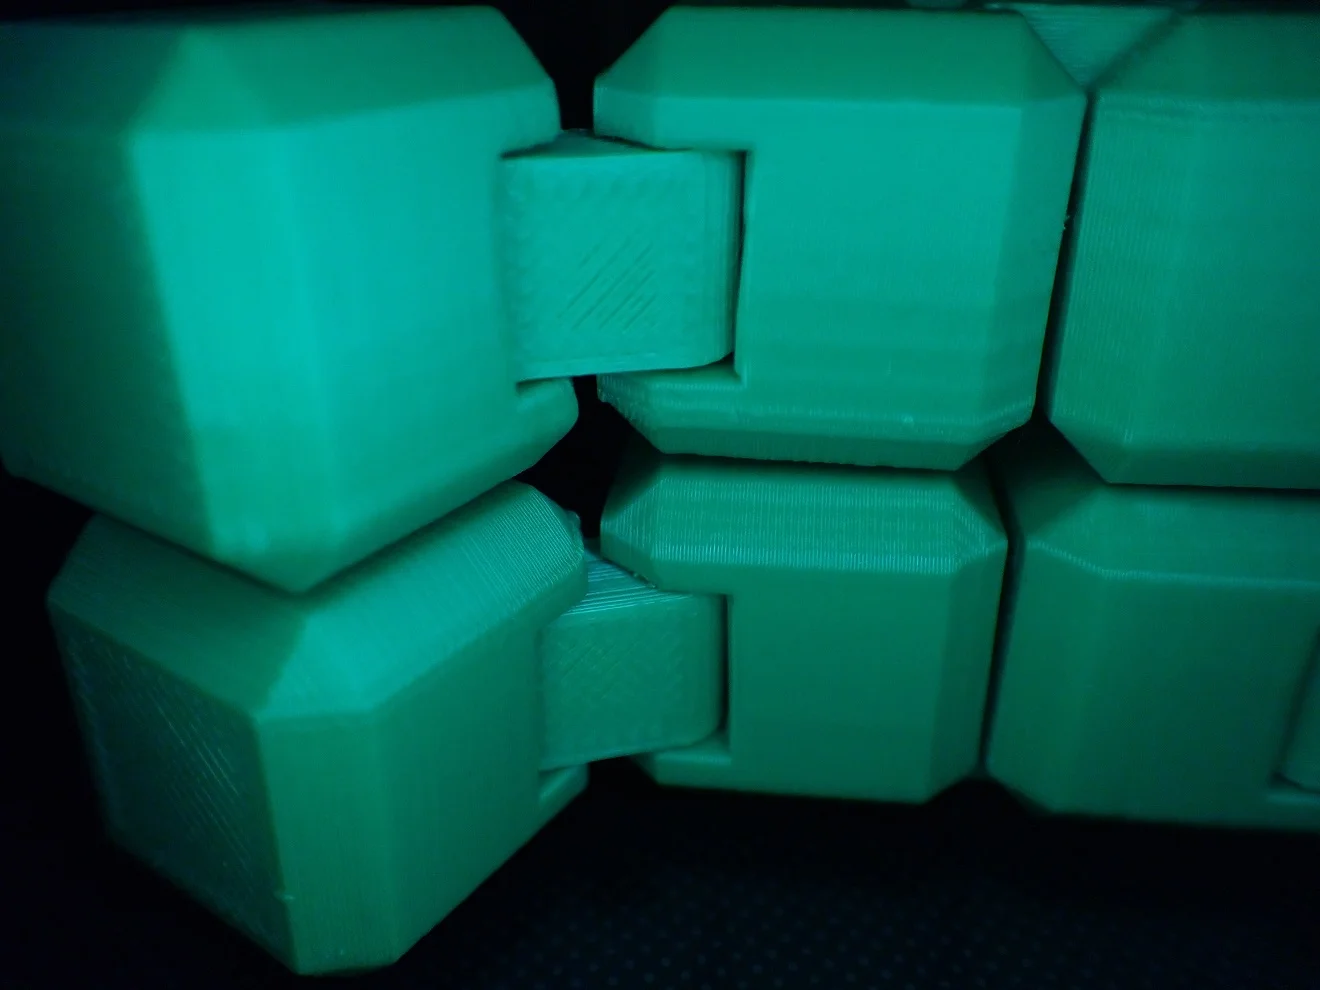
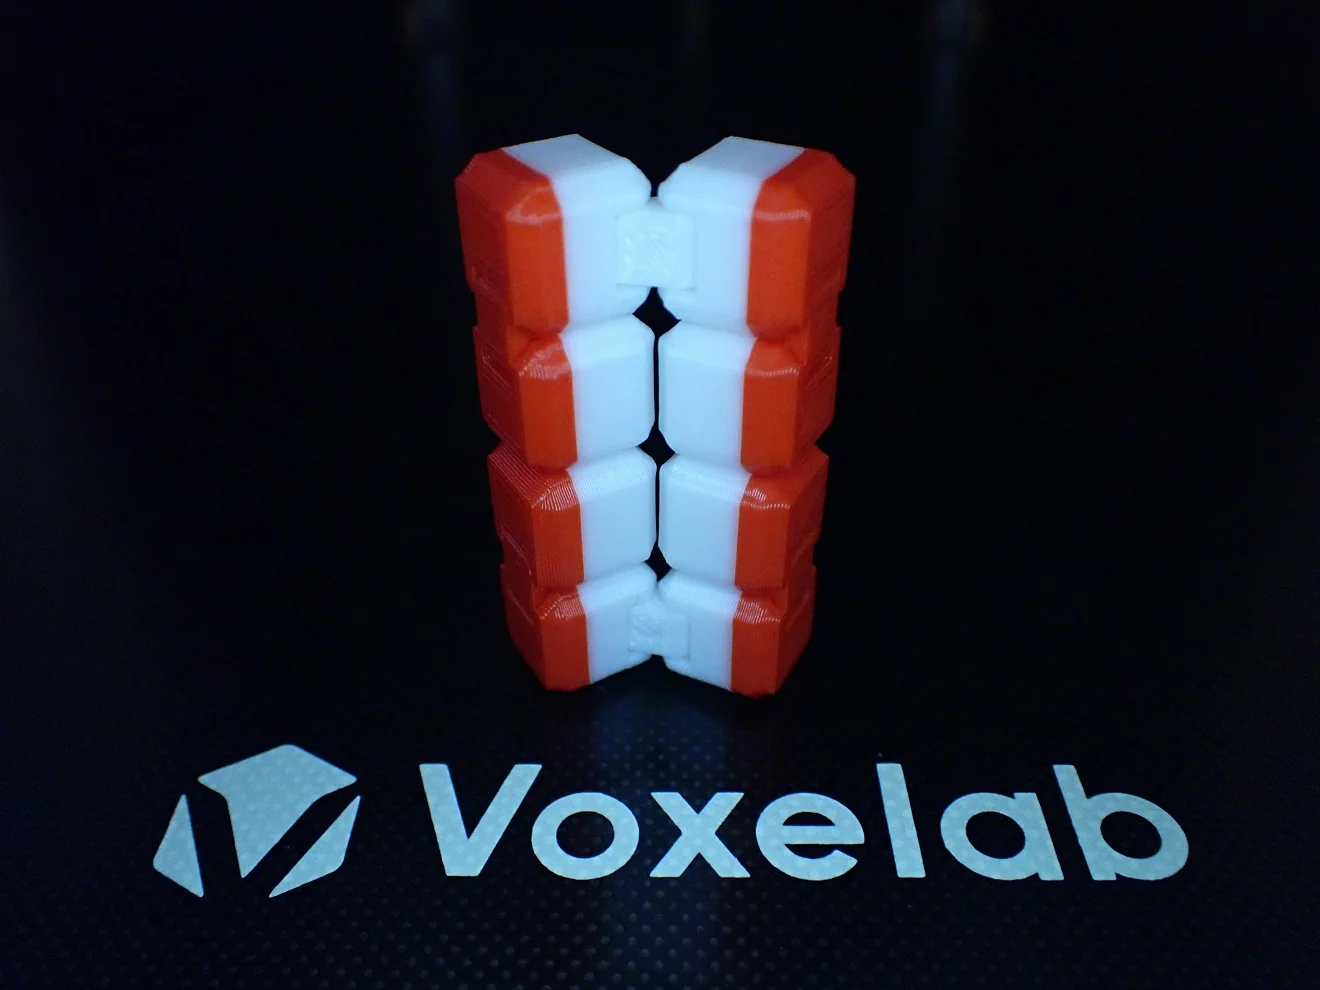
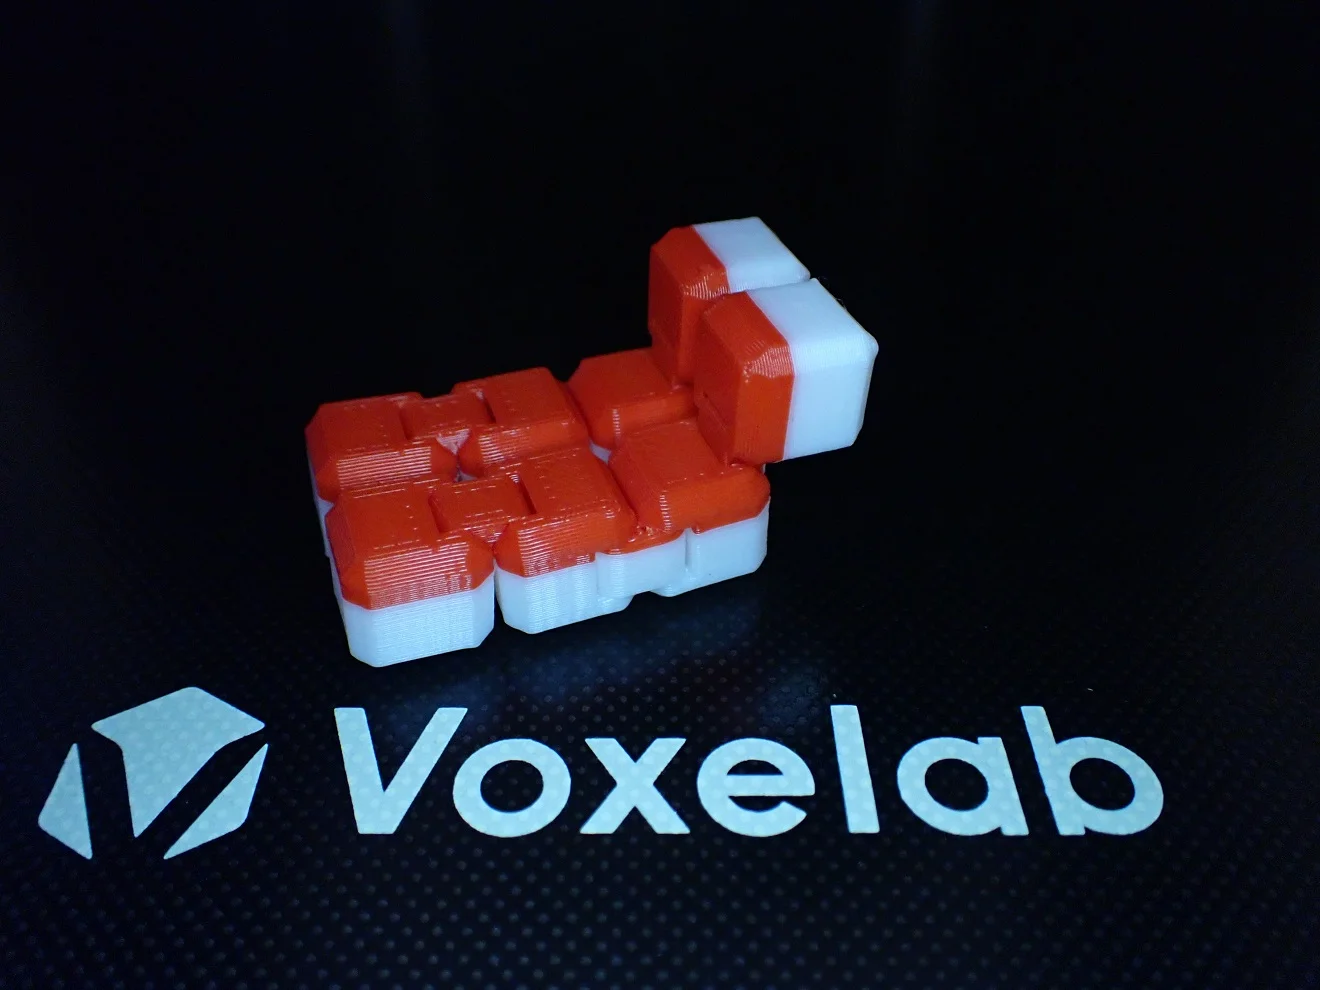
Next, I printed an object where over- or under-extrusion can cause the mechanics to stop working. This Infinity Cube (link to model) worked so well the first time that I printed it a second time.
All joints can be moved without any problems. If over-extrusion had occurred when the joints were printed, they would be sluggish or even immobile. However, this was not the case with either model.
To push the limits here as well, I scaled the model to half its size and printed it in two colors. Surprisingly, the function suffered only slightly from the scaling – the joints are a bit more difficult to move. But since the spaces between the moving parts were also scaled, this was to be expected.
Failed Prints
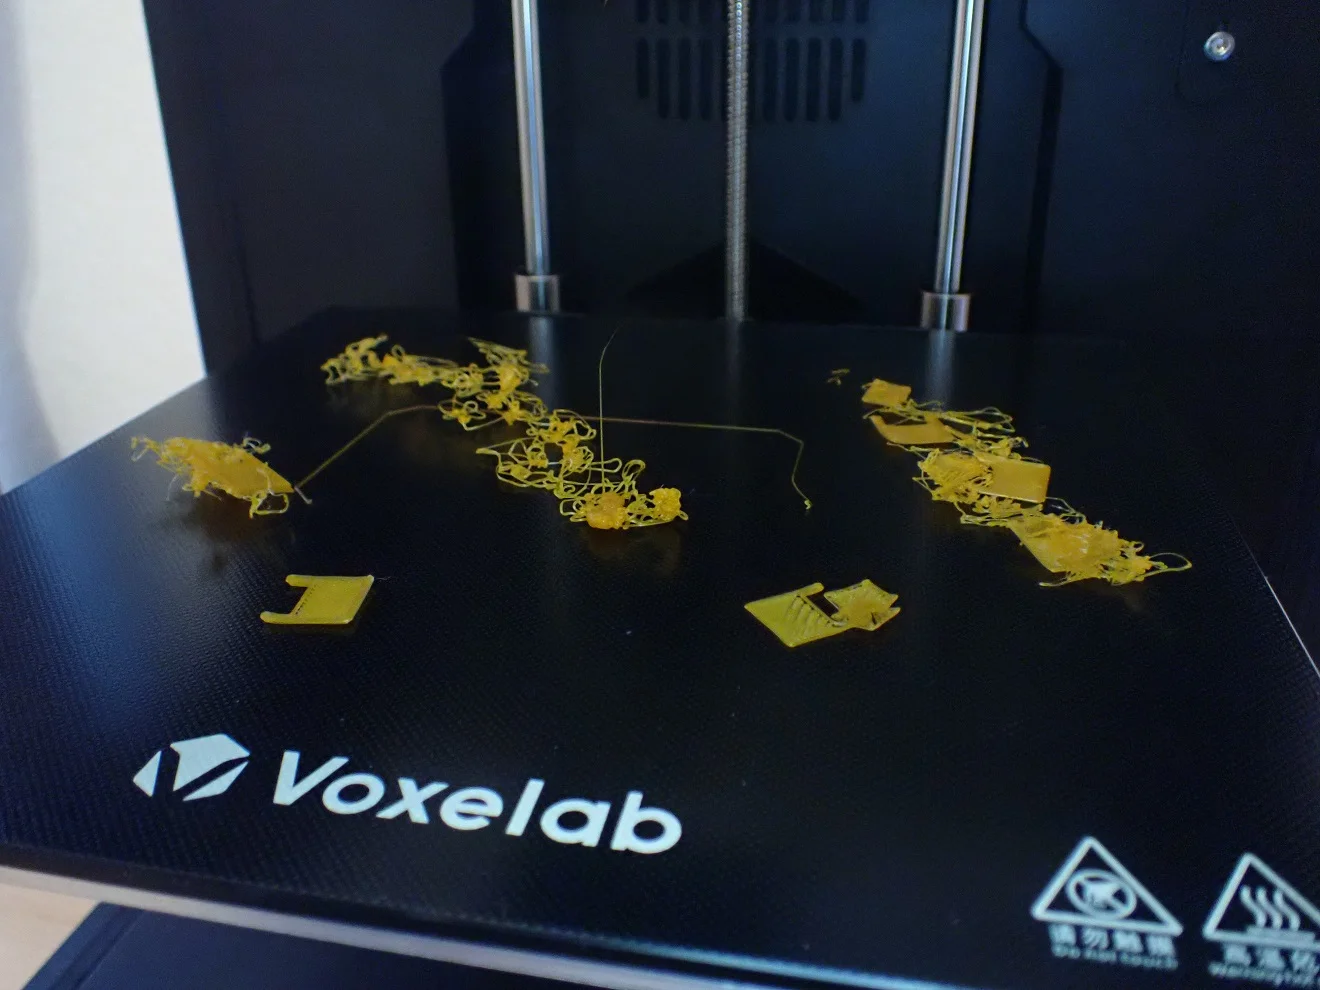
Before I found out that the part cooling in the VoxelMaker slicer is on directly by default, I produced a few misprints. By cooling the part directly, no good print bed adhesion could be achieved.
After I solved this problem and set the cooling in the slicer only from a certain height, there were no more misprints.
Conclusion
Voxelab Aries
The Voxelab Aries* really surprised me. Despite its fairly low price, it can keep up well with more expensive machines. Many features are usually found in premium devices.
Even if it “only” achieves an accuracy of 0.1 mm on paper, the extrusion in the standard profile of the VoxelMaker slicer is so well tuned that you could also think that it is only 0.05 mm. But of course, it can’t compete with the extremely high XY accuracy of resin 3D printers, but with FDM printers of the next higher price range.
The user-friendliness is also very convincing thanks to the perfect touch screen and the operating options.
The only drawback to this 3D printer is its noise level. If you’re planning on putting the Aries right next to your desk while you work, you won’t be happy, as it emits around 50 decibels while printing. This is due to the built-in fans and could theoretically be solved with better fans.
Hobbyists and modders won’t be able to do much with the Aries, as both the physical design doesn’t offer much room for upgrades, and the software isn’t open-source, so you can’t use Marlin software or anything like that. Also, the printer cannot be used with Octoprint due to the lack of a USB port.
For these reasons, I think the Aries is best for beginners who don’t want to tinker much but want to produce beautiful 3D prints right away. It is also a good choice for advanced users who want to produce without many complications.
Check Price at:
Similar 3D Printers
Flashforge Adventurer 3
The Flashforge Adventurer 3* has a sealed print volume and can therefore print more exotic filaments such as ABS. Its build space is 150 x 150 x 150 mm, it can print layer thicknesses from 0.1 – 0.4 mm and has a built-in camera to monitor the printing process.

Check Price at:
Creality Ender 5 Pro
The Creality Ender 5 Pro* has a large print volume of 220 x 220 x 300 mm and is one of the most popular 3D printers from Creality. It has all the important upgrades like the Silent Mainboard, a metal extruder and has a very good stability and accuracies of up to 0.1 mm.

Check Price at:
Twotrees SP-3
The Twotrees SP-3* is very stable due to its cube-like design and the double Z-axis, which allows it to achieve very smooth movements. Its print volume is 235 x 235 x 235 mm and it can print with accuracies of up to 0.1 mm. Its maximum printing temperature is 260 °C.

Check Price at:
Disclosure: This website is the property of Martin Lütkemeyer and is operated by Martin Lütkemeyer. Martin Lütkemeyer is a member of the Amazon Services LLC and other Affiliate Programs. These are affiliate advertising programs designed to enable websites to earn advertising revenue through advertising and linking to Amazon.com and others. Links marked with * are affiliate links.
