
- Wet Filament: Prevention, Symptoms & Drying - July 18, 2024
- Sovol SV08 – Best PrusaSlicer Settings & Profile - June 26, 2024
- Sovol SV08 – Best Orca Slicer Settings & Profile - June 26, 2024
Disclosure: Links marked with * are Affiliate Links. I earn from qualifying purchases if you decide to make a purchase through these links – at no additional cost for you!
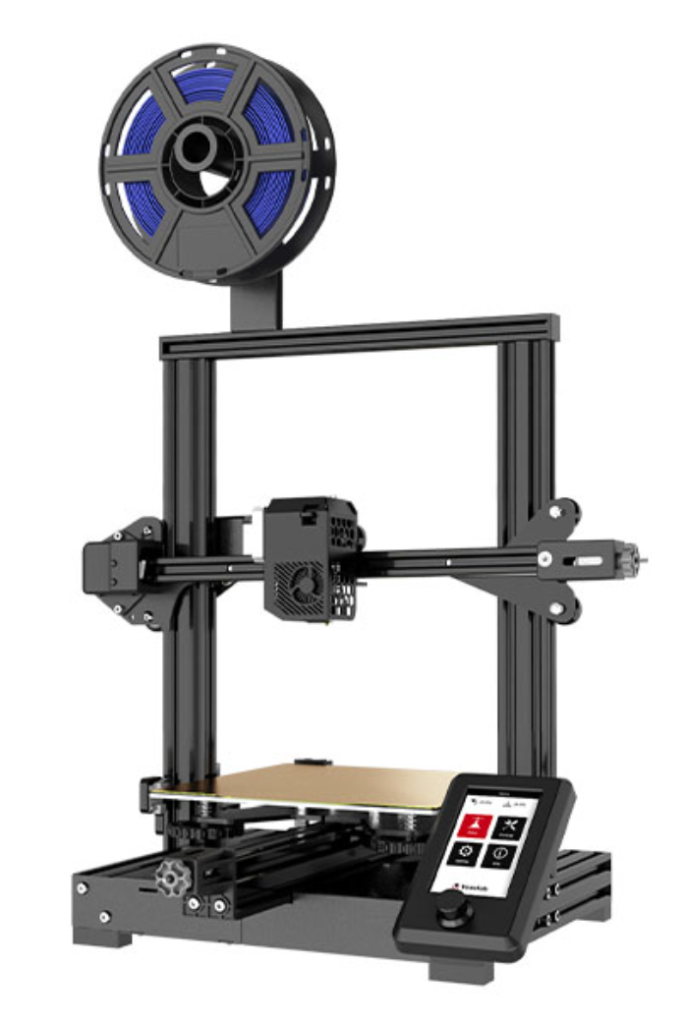
The Voxelab Aquila S2* looks like many other low-budget 3D printers. However, it has a lot of features included to improve the operation and printing results. It also supports the installation of upgrades such as an automatic print bed leveling sensor like the BL Touch or CR Touch.
The Voxelab Aquila S2 has a print volume of 220 x 220 x 240 mm, a minimum layer thickness of 0.1 mm, a direct drive extruder that can be heated up to 300 °C and a flexible magnetic print bed with very good adhesion.
In this hands-on test and detailed review, you’ll learn what kind of print quality you can expect, what features are included, and how it’s set up.
Check Price at:
Table of Contents:
- 1 Key Takeaways
- 2 Who Should Buy the Voxelab Aquila S2?
- 3 Pros & Cons > Voxelab Aquila S2 Review
- 4 Technical Specifications > Voxelab Aquila S2 Review
- 5 Scope of Delivery > Voxelab Aquila S2 Review
- 6 Setup > Voxelab Aquila S2 Review
- 7 Features > Voxelab Aquila S2 Review
- 8 Heating Times > Voxelab Aquila S2 Review
- 9 Noise Level > Voxelab Aquila S2 Review
- 10 Print Speed > Voxelab Aquila S2 Review
- 11 Operation > Voxelab Aquila S2 Review
- 12 Slicer > Voxelab Aquila S2 Review
- 13 Voxelab Aquila S2 vs. Ender 3 S1
- 14 Is the Voxelab Aquila S2 worth it?
Key Takeaways
- Nozzle up to 300 °C, print bed up to 100 °C
- Direct drive extruder (good for flexible filaments)
- 0.1 mm layer thickness
- Print bed is flexible and removable for easy release of print objects
- Manual print bed leveling
Who Should Buy the Voxelab Aquila S2?
The Voxelab Aquila S2 is ideal for beginners who want to get a good start in the hobby of 3D printing for little money. The Aquila S2 offers many features that improve the operation and printing results and is very affordable.
Pros & Cons
> Voxelab Aquila S2 Review
PRO:
- Direct drive extruder
- Flexible, magnetic print bed
- Large filament selection
- Good price-performance ratio
- Belt tensioner
- Resume print
CON:
- Manual print bed leveling
Technical Specifications
> Voxelab Aquila S2 Review
DEVICE
- Technology: FDM (Fused Deposition Modeling)
- Assembly: Partially pre-assembled
- Size: 485 x 344 x 382 mm
- Weight: 9,4 kg
- Power: 350W
PRINTING
- Print volume: 220 x 220 x 240 mm
- Layer thickness: 0.1 – 0.4 mm
- Accuracy: ± 0.2 mm
- Max. Nozzle temperature: 300 °C
- Max. Print bed temperature: 100 °C
- Extruder: Direct Drive
- Nozzle quantity: 1
- Nozzle diameter: 0.4 mm
- Filament diameter: 1.75 mm
- Filaments: PLA, ABS, PETG, TPU, PA, PC, Carbon, Wood
- Print bed material: PEI coated spring steel
- Print bed leveling: Manual
- Print speed: max. 180 mm/s, standard 30-60 mm/s
- Resume Print: Yes
SOFTWARE
- Slicer: VoxelMaker, Cura, Simplify3D
- File types: STL, OBJ, AMF
- Connectivity: USB, microSD
Scope of Delivery
> Voxelab Aquila S2 Review


The Voxelab Aquila S2* comes with almost everything you need for your first test prints. The only essential tool that is not included is a pair of pliers or a side cutter for the filament.
I have sometimes seen that 3D printer manufacturers do not include essential and very basic tools in the scope of delivery. Normally, every household has screwdrivers, side cutters and other basic tools at hand anyway. Nevertheless, it is practical to have the necessary tools directly at the 3D printer and to leave them there.
Otherwise, you will need more filament, as only a small sample of PLA filament is included.
The following items are included with the Voxelab Aquila S2:
- Pre-assembled 3D printer base with printing bed
- Frame parts
- Individual parts for the X- and Z-axis
- 4.3 inch display with rotary knob
- Screws needed
- Tools required for assembly
- Spatula for the print bed
- Micro SD adapter
- Cable ties
- Spare parts
- Instruction manual
- Filament holder
- Micro SD card:
- Test models
- Software
- Instruction manual
Setup
> Voxelab Aquila S2 Review
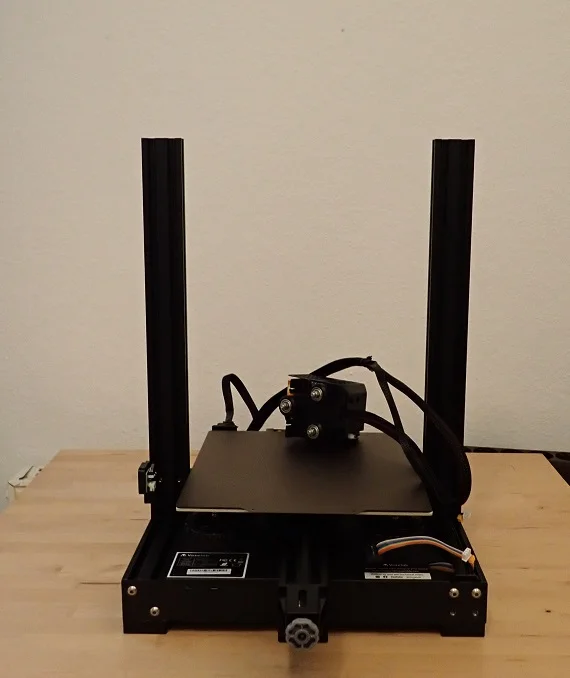
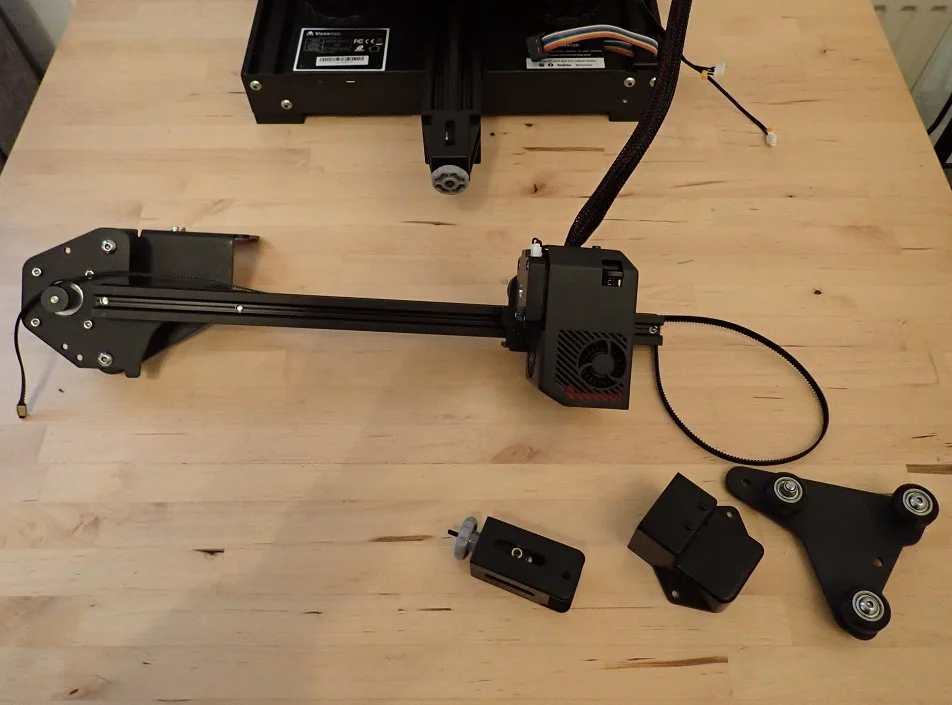

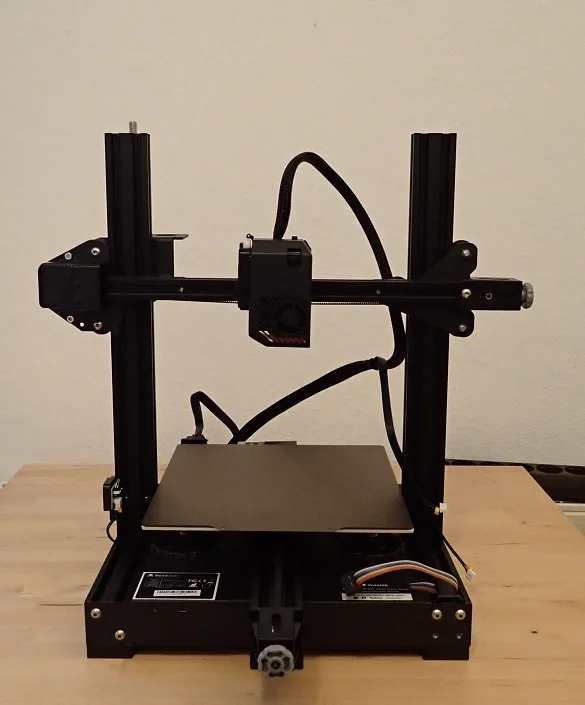

The Voxelab Aquila S2 is only partially pre-assembled. Only the 3D printer base including the print bed is pre-assembled and the direct drive extruder is already attached to the base with its cables.
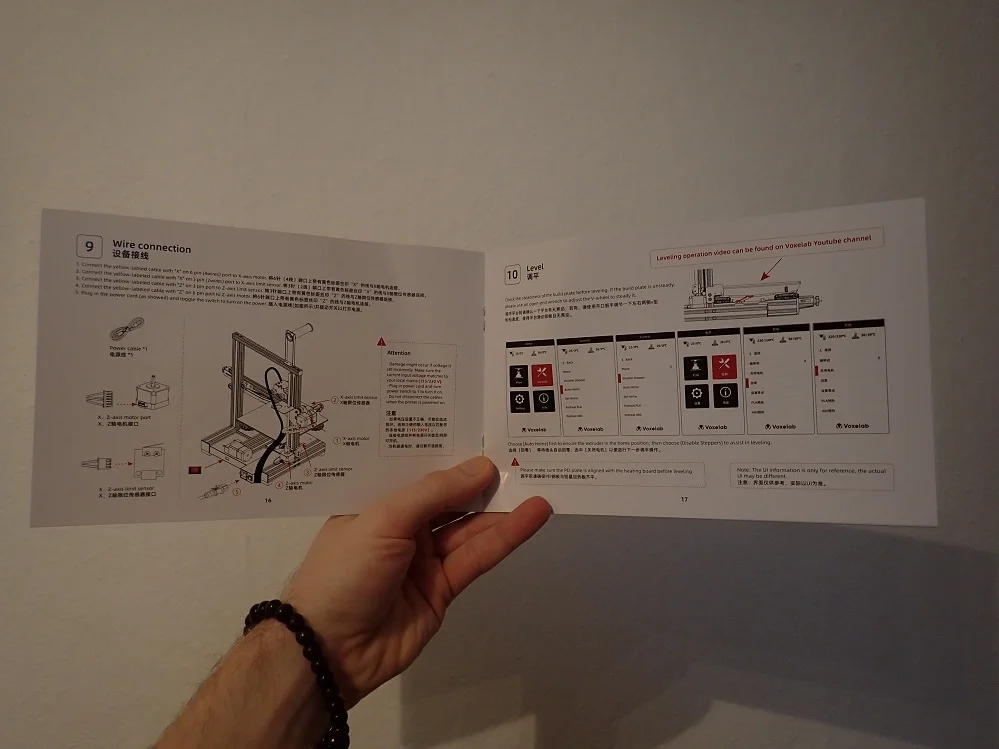
Otherwise, you have to assemble the rest of the 3D printer yourself. However, thanks to the detailed and clear instructions, this is easy and can be done within 20 to 60 minutes, depending on your experience.
Similar 3D printers, such as the Ender 3 S1, require only a few steps to assemble, as the X and Z axes are also already assembled. With the Voxelab Aquila S2, however, it takes a total of 9 steps to finish assembling the printer (10 if you count the print bed leveling).
However, most of the steps during assembly are extremely simple and mainly consist of connecting two components with screws. The only step that might take a little longer, especially for beginners, is the installation of the X-axis with the toothed belt.
A bit of technical understanding is required here and close attention to the instructions in the manual. However, tensioning the belts is simplified by the practical belt tensioners. The toothed belt should be tensioned enough to prevent slipping during printing, but not too much so that it does not tear.
Print Bed Leveling
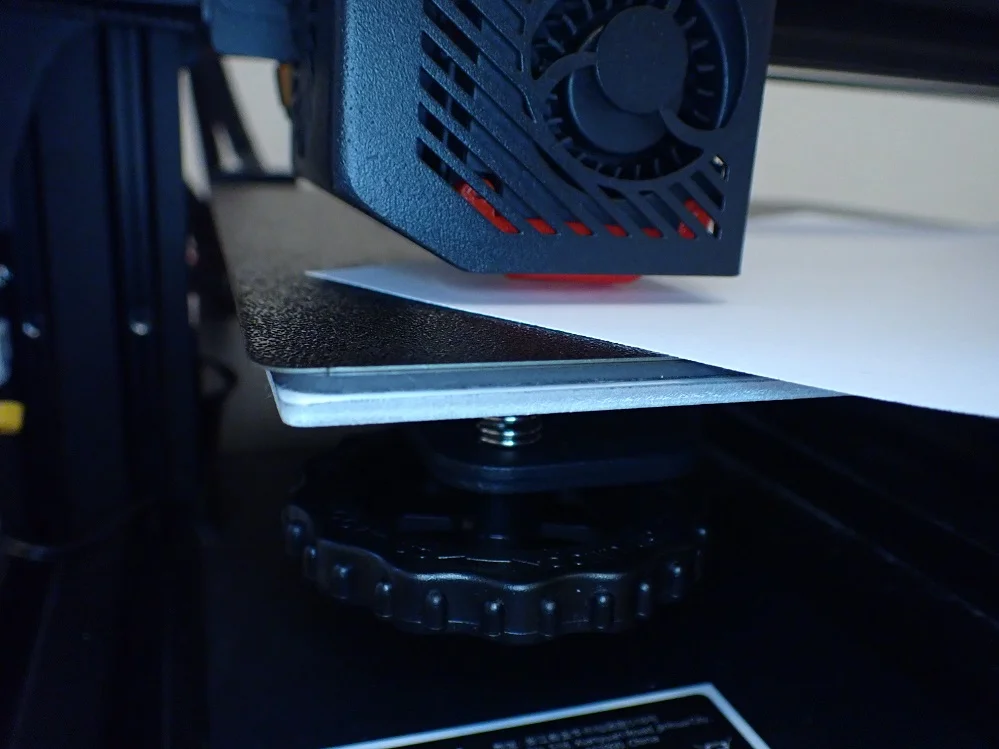

The print bed leveling is done manually on the Voxelab Aquila S2. There are four large rotary screws under the print plate to adjust the inclination of the print bed.
You must adjust the distance between the print bed and the nozzle so that you can move a piece of paper with a little friction between the print bed and the nozzle. Then the nozzle is not so close to the print bed that the first layers are too thick or no extrusion takes place, and it is also not too far away, which would lead to very poor adhesion.
During the entire test phase, I only had to level the print bed once. Even if you jerk the magnetic print bed off the printing plate after each print, the adjustment does not change. So the construction is very stable and once you have leveled the print bed, you only have to do this again after some time.
Features
> Voxelab Aquila S2 Review
Meanwhile, low-budget 3D printers resemble mid-range 3D printers or heavily upgraded 3D printers from a few years ago. Even at the low price of the Voxelab Aquila S2, you get a lot of features that make printing easy.
Direct Drive Extruder up to 300 °C
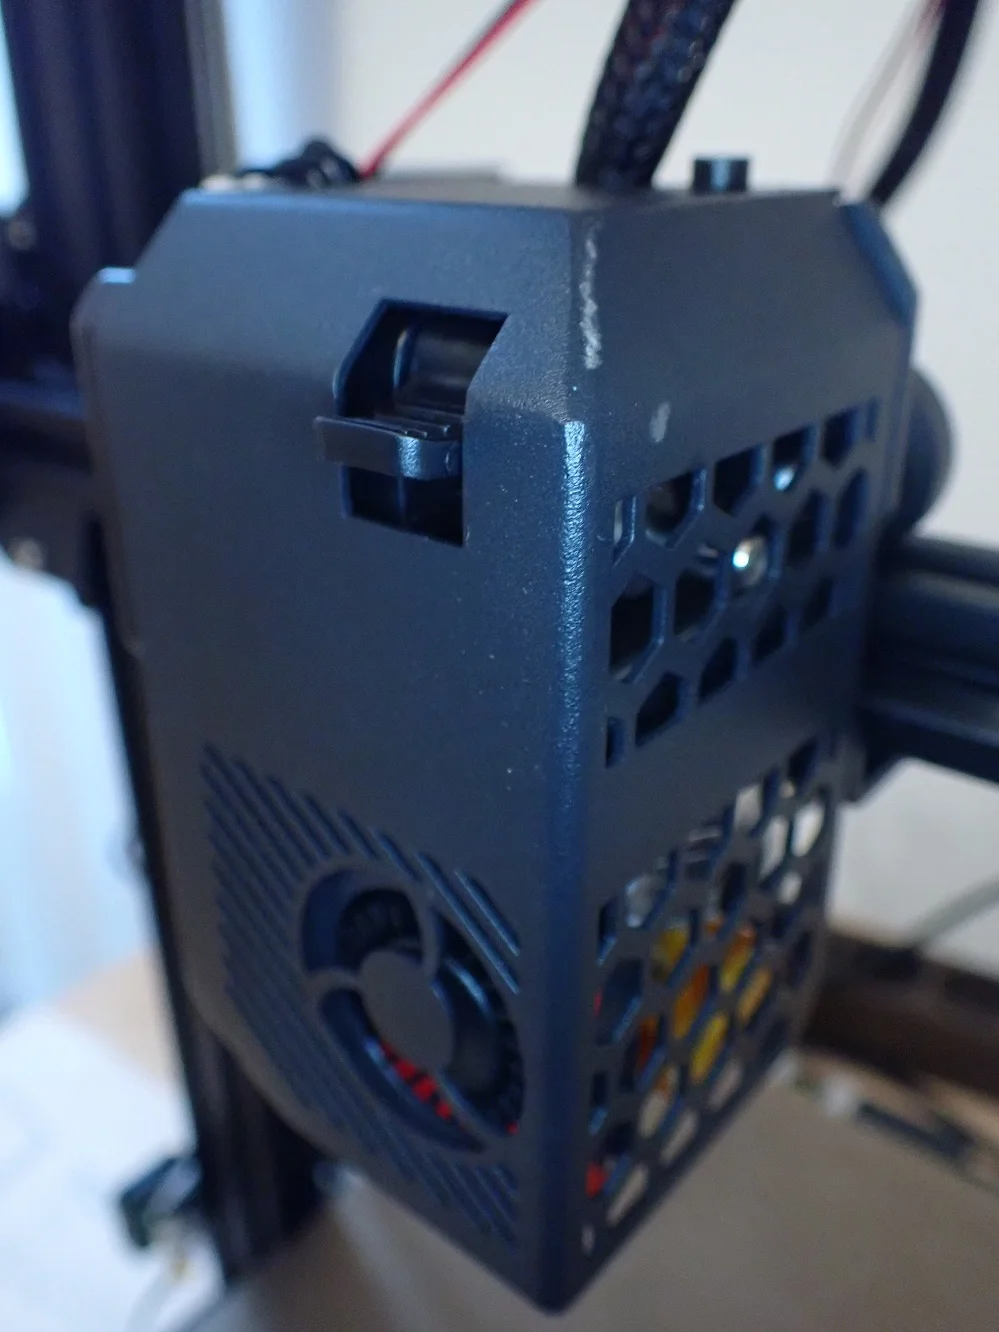

Besides the PEI print bed, the Direct Drive Extruder is the most interesting feature of the Voxelab Aquila S2.
A Direct Drive Extruder differs from an ordinary Bowden Extruder in that the filament is fed directly into the print head and the extruder sits directly above the nozzle. This makes the path from the extruder to the nozzle much shorter and allows higher accuracies and better processing of flexible filaments.
In the past, upgrading to a Direct Drive Extruder was very popular with many hobby 3D printers. In the meantime, more and more 3D printers have installed a Direct Drive Extruder as standard.
The special feature of the Direct Drive Extruder of the Voxelab Aquila S2 is that it can be heated up to 300 °C. This allows you to print even more exotic filaments like nylon* or PC*, which is quite rare for hobby 3D printers in the low price segment. To enable these high temperatures, powerful fans are installed in the print head to dissipate the heat.
Another advantage of the design is the easy exchange of the nozzle. To support the wide variety of filaments, it is sometimes necessary to replace the standard nozzle with a hardened nozzle. This is advisable for particularly abrasive materials such as carbon filament*.
These advantages make the Direct Drive Extruder the biggest selling point of the Voxelab Aquila S2*.
Flexible, Magnetic PEI Print Bed
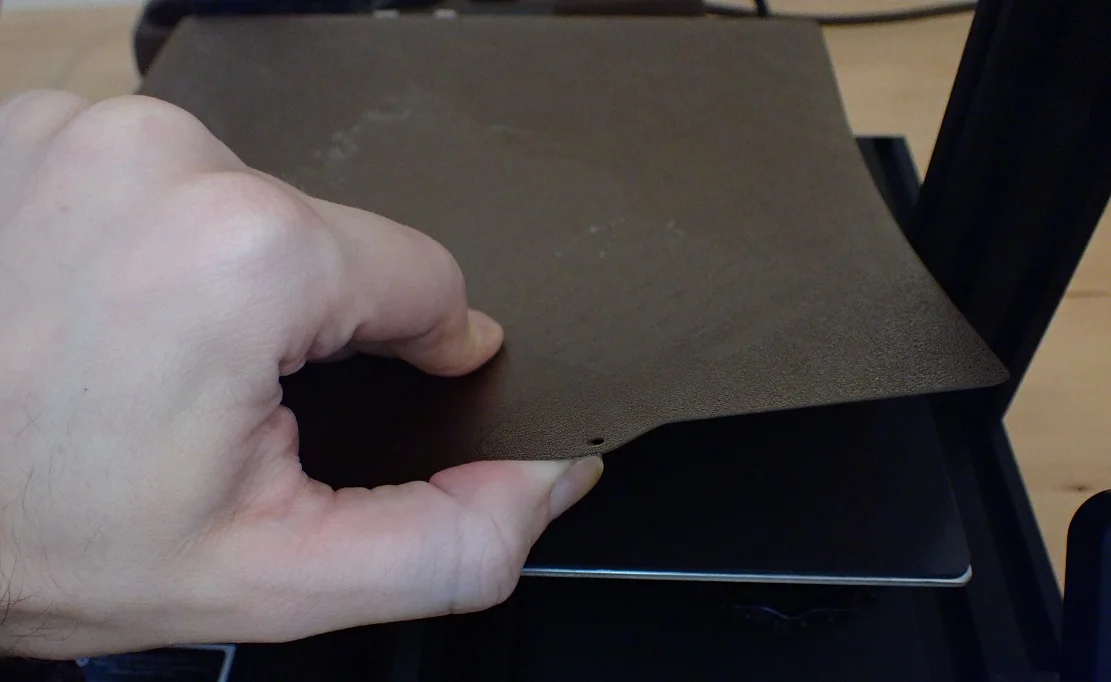
Where the Direct Drive extruder allows you to work with many different filaments, the flexible magnetic print bed with the PEI surface allows these filaments to adhere almost perfectly to the print bed as well.
In my test, I only had to use Magigoo for extremely delicate first layers. However, these were objects for which a Brim or Raft is usually recommended in order to improve print bed adhesion.
Because the print bed has a magnetic underside, you can easily remove it from the printing plate after printing. If you then bend it slightly, the print object comes off almost by itself.
Even though a spatula is included, I didn’t have to use it once to loosen the objects. They either came off the printing plate on their own by bending or with a little help from the fingernail.
Color 4.3” Display with Rotary Knob
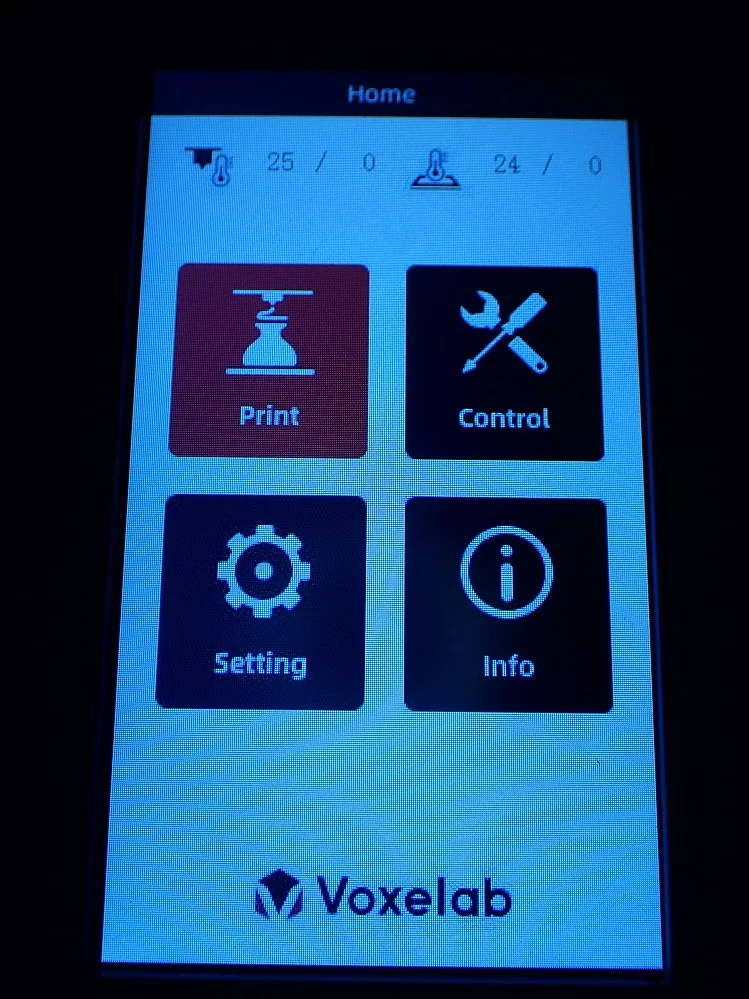
The Voxelab Aquila S2 is operated via a color 4.3” screen with a rotary knob. The fact that it is not a touchscreen is not a big deal, since the operation via the rotary knob is very fast thanks to the clear menu.
A touchscreen would be a bit faster and more pleasant to use, but would certainly also come with a price increase. For most users, the price-performance ratio of the color screen with rotary knob operation is higher than that of a touchscreen.
The menu is divided into 4 submenus:
- Control
- Setting
- Info
This makes it very easy to get to the right submenu on the first menu level and to make the right settings from there. The individual submenus are also very structured and only at the beginning I was looking for some settings in the control menu that are actually hidden in the setting menu and vice versa.
Room for Upgrades
The Voxelab Aquila S2 was designed in such a way that it is quite easy to add certain upgrades later on. The best example would be a sensor for automatic print bed leveling.
The BL-Touch or CR-Touch would be suitable for this. How these two sensors differ and which one is more accurate can be read in this article.
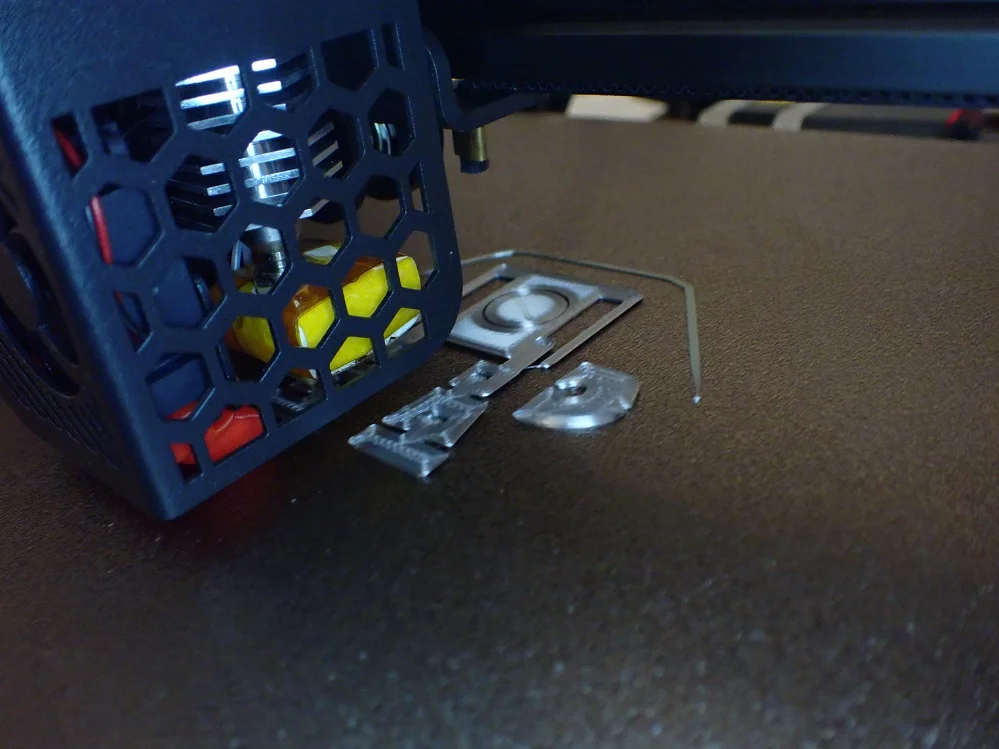
It is also very easy to access the motherboard of the 3D printer. It is located on the underside and is hidden behind a housing that is fastened with 3 screws. In the manual, there is a clear plan of the motherboard with labels for the respective slots. So you know immediately where you have to install a level sensor or a new fan, for example.
Belt Tensioner

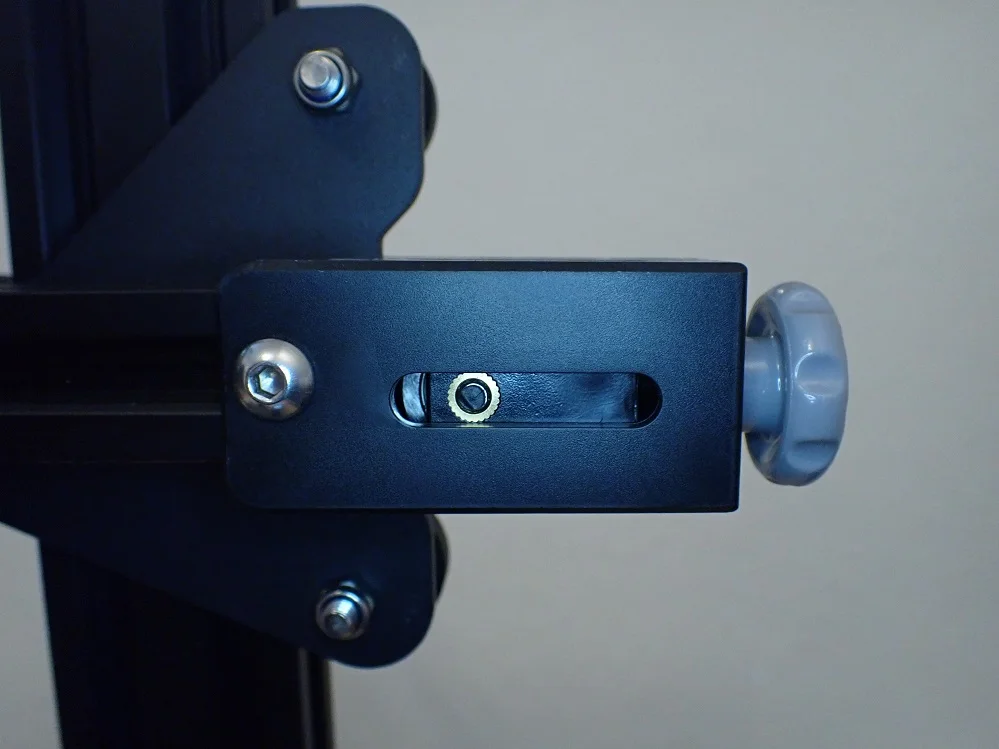
The movements of the printhead and the print bed must be smooth and without vibrations. In addition to a stable design, the correct tension of the toothed belts is also very important here.
If there are vibrations caused by too loosely tensioned timing belts, this can lead to print errors such as ghosting or ringing. However, a timing belt that is too tight can break in the long run, which is very frustrating. The timing belt is properly tensioned when it makes a high-pitched sound when you flick it with your finger.
With many low-budget 3D printers or DIY kits, you still have to manually tension the timing belts directly on the axes by removing the timing belt and reinstalling it with a higher tension. Fortunately, the Voxelab Aquila S2 has convenient toothed belt tensioners on the print bed and X-axis. These turn screws allow you to adjust the tension very easily.
On my copy, the timing belt of the print bed was already correctly adjusted. You have to install the toothed belt of the X-axis yourself during assembly and tension it using the belt tensioner.
Print Volume
The Voxelab Aquila S2 is not only very similar in design to the Ender 3 series, but its size is also comparable. With a print volume of 220 x 220 x 240 mm, it has a normal size for hobby 3D printers.
With such a print volume, you can print small and medium-sized objects in one piece and only need to print very large objects in several pieces. For most applications, this print volume is perfectly sufficient.
MicroSD
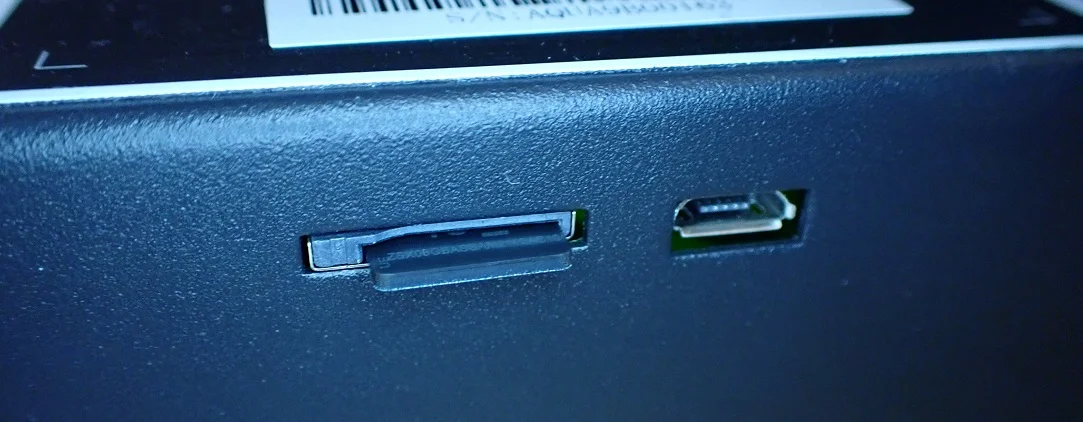
The Voxelab Aquila S2 can be fed with print files via USB or via a Micro SD card. However, I personally prefer to be able to use a regular SD card, as it is less likely to drop or get lost. The handling is simply better with a larger SD card.
Resume Print
The Resume Print is now a standard even among inexpensive 3D printers. With this function, the print is continued exactly where it was interrupted by an unforeseen power failure. The device remembers the progress of the print and continues at exactly the same point.
I tested this feature by manually disconnecting the power during printing. After I restored power, the Aquila S2 started printing at the same point where it left off.
Design
The Voxelab Aquila S2 is a classic Cartesian XYZ 3D printer. It looks very similar to the Ender 3 series from Creality and is in direct competition with the Ender 3 S1. Almost the entire printer is kept in a plain black, only certain design elements like the nozzle cooling or highlights in the menu are red.
Heating Times
> Voxelab Aquila S2 Review

The heat-up times of the Voxelab Aquila S2 are average with about 3 minutes for PLA (200 °C nozzle, 60 °C print bed). Although the nozzle is already at 200 °C after about 1.5 minutes, the print bed needs twice as long to reach its temperature.
| Time | Temp. Nozzle | Temp. Bed |
|---|---|---|
| 0:00:00 | 25 | 25 |
| 00:00:15 | 55 | 26 |
| 0:00:30 | 105 | 30 |
| 00:00:45 | 142 | 34 |
| 0:01:00 | 179 | 38 |
| 00:01:15 | 201 | 41 |
| 0:01:30 | 198 | 45 |
| 00:01:45 | 200 | 47 |
| 0:02:00 | 201 | 50 |
| 00:02:15 | 200 | 55 |
| 0:02:30 | 200 | 56 |
| 00:02:45 | 200 | 59 |
| 0:03:00 | 200 | 60 |
| 00:03:15 | 200 | 60 |
| 0:03:30 | 200 | 60 |
One advantage of heating up this 3D printer is that you can heat up the nozzle and the print bed at the same time. There are preset programs for PLA and ABS, for other filaments you have to enter the corresponding temperatures manually.
Even though with the thin magnetic print bed of the Voxelab Aquila S2 the temperature from the hot plate is quickly at the surface, I still advise as always to wait another 1-2 minutes so that the temperature on the surface of the print bed is as homogeneous as possible. Otherwise, poor print bed adhesion or warping may occur.
Noise Level
> Voxelab Aquila S2 Review
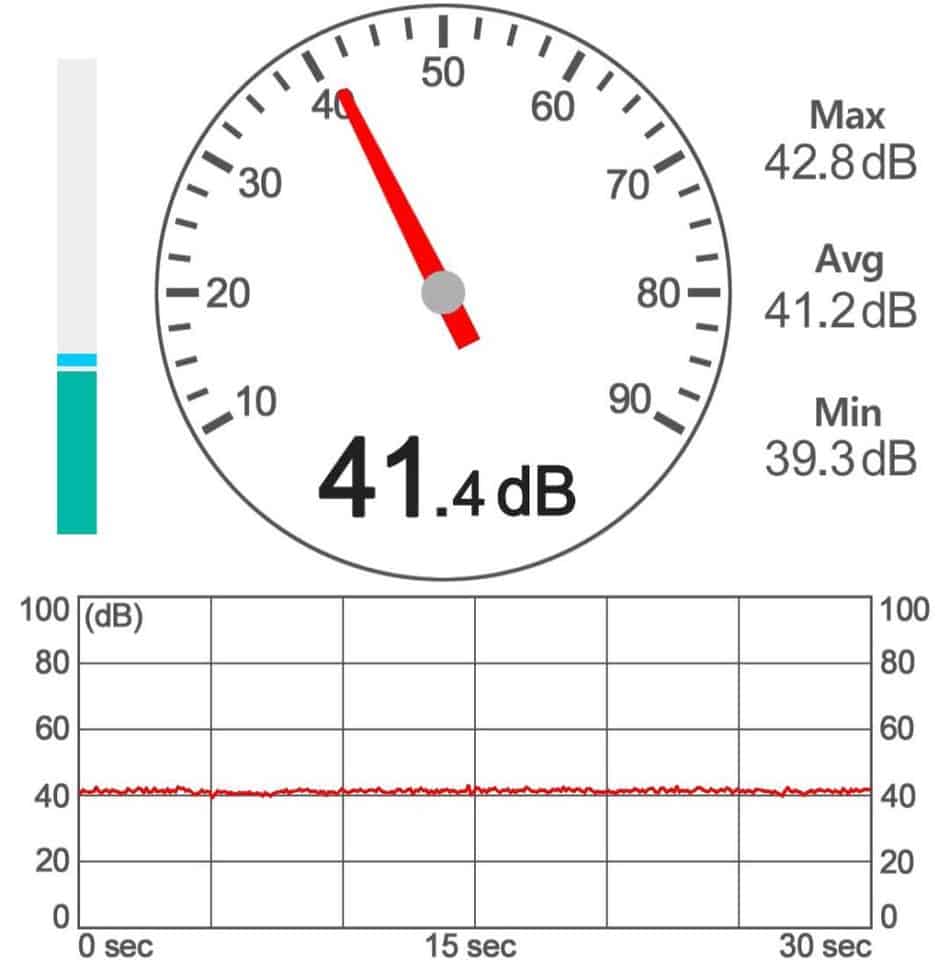
The Voxelab Aquila S2 develops a volume of approx. 41 dB during printing. This corresponds to a quiet conversation or soft radio music.
This is a very good result for a direct drive extruder. Often, direct drive extruders are optimized for their weight and only use inexpensive and much too loud fans. Fortunately, this is not the case with the Aquila S2, although improvements are of course still possible here.
The user manual contains a clear plan of the motherboard, which clearly shows where which fan has to be plugged in. This makes it easy to replace the fans with quieter ones. Be careful with the weight though – the heavier the print head is, the more likely vibrations are. So if you get a heavier fan, you should reduce the print speed to avoid vibrations.
Print Speed
> Voxelab Aquila S2 Review
The print speed of the Voxelab Aquila S2 is a maximum of 180 mm/s, but 30-60 mm/s is realistic. This is comparable to most other 3D printers in this price range.
The maximum print speed of 180 mm/s is in principle only a theoretical value. You will never use this value in reality, because printing errors often occur at such high speeds.
Especially when printing with flexible materials like TPU, you need to reduce the print speed a lot to prevent the filament from getting tangled. Thanks to the direct drive extruder, you can print flexible filaments faster without filament jams or similar errors.
Operation
> Voxelab Aquila S2 Review
UI: The Voxelab Aquila S2 is easy to operate via the 4.3″ color screen. The menu is very clearly arranged and you can quickly access all settings via the rotary knob. What would make the operation even more intuitive would be the display of small preview images in the print menu.
Print bed: The print bed of the Aquila S2 is flexible and magnetic. Adhesion is also excellent for a wide variety of materials and I only had to make the surface stickier twice with Magigoo in my tests.
The fact that the print bed can be removed makes removing the finished print object a breeze. Most of the time this is not even possible, as the print object easily detaches from the PEI surface when cold.
Slicer: Mostly I operate FDM 3D printers with Cura. However, Voxelab 3D printers can also be operated very well with VoxelMaker. The preset profiles for the individual 3D printers are very well optimized. All the test models you will find further down in this article were printed with a default profile for the Aquila S2 without making any further adjustments. There is some stringing here and there, but that could have been eliminated with a bit more calibration.
Printing: Printing itself is very easy with the Aquila S2. Because its features ensure a smooth process, very little preparation is needed to perform a successful print. Slice, load filament and start printing!
Slicer
> Voxelab Aquila S2 Review
You can use the Voxelab Aquila S2 with VoxelMaker, Cura and Simplify3D. I chose VoxelMaker because it already has very well-optimized default profiles.
A big advantage I see in this slicer are the customizable supports. With a simple click, you can determine where a single support should be set. The other settings are also very clearly presented and there is also the popular Vase Mode. Print Quality
> Voxelab Aquila S2 Review
The Voxelab Aquila S2 has a print quality of 0.1 mm. However, this specification often does not reflect the truth and there are large differences between a wide variety of 3D printers with an accuracy of 0.1 millimeter.
To test the true print quality, I printed various test models.
Test Hook from Voxelab
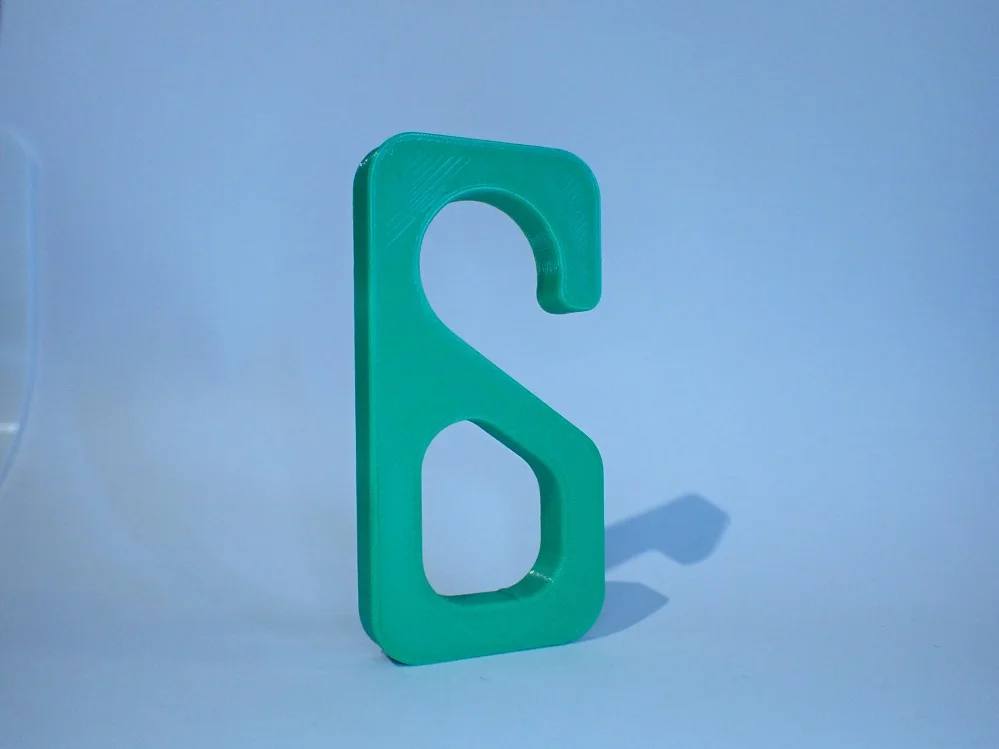

On the MicroSD card of the 3D printer was a test model for a hook. This hook is actually intended to test the mechanical strength of the filament and not the print quality.
To test the print bed adhesion and generally check if everything works properly, this model is nevertheless well suited as the first print object. As expected, the result is flawless.
Test object from Voxelab
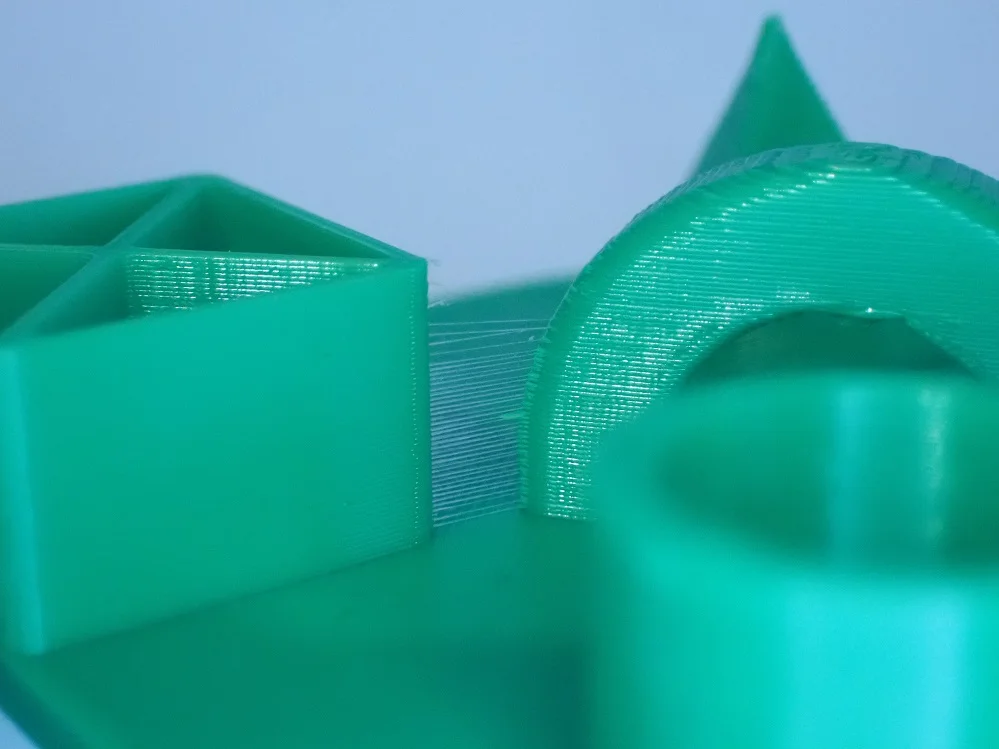
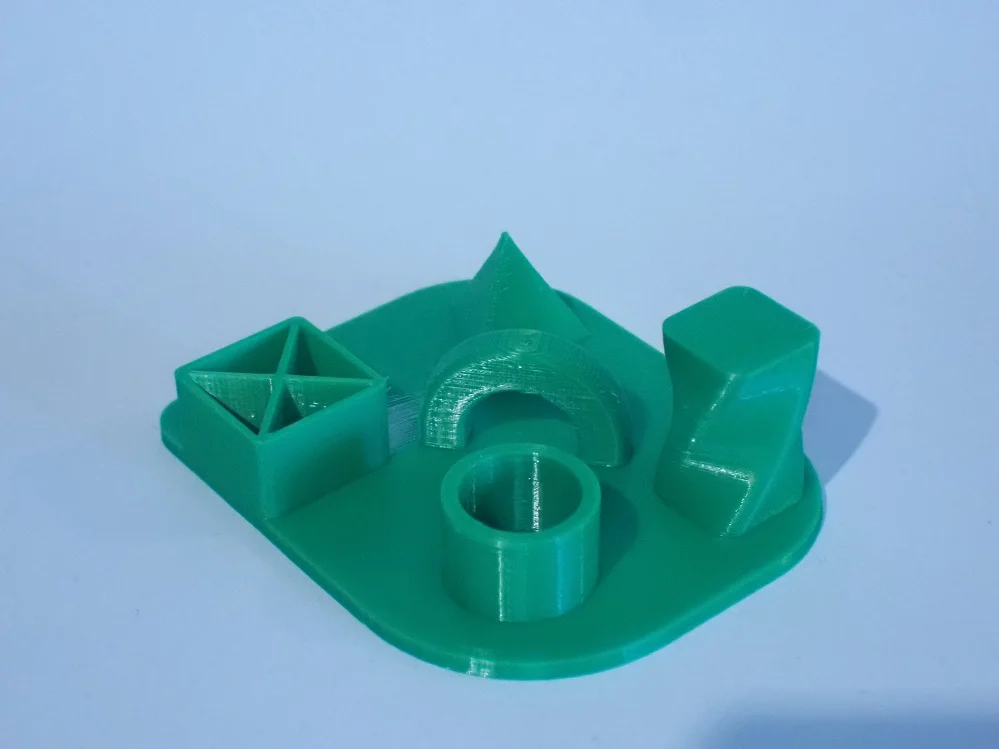
Another test object from Voxelab are these geometric shapes. Here you can already see better whether there are various printing errors or not. At one point there was slight stringing and the bridging settings were also not yet optimal.
Cub3bot
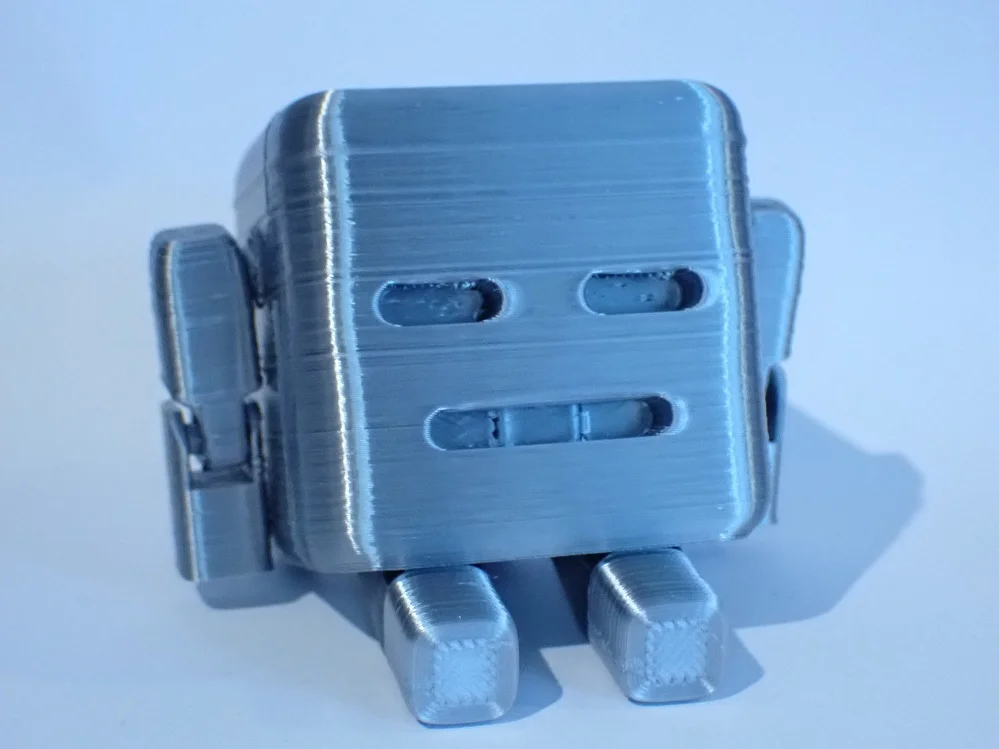
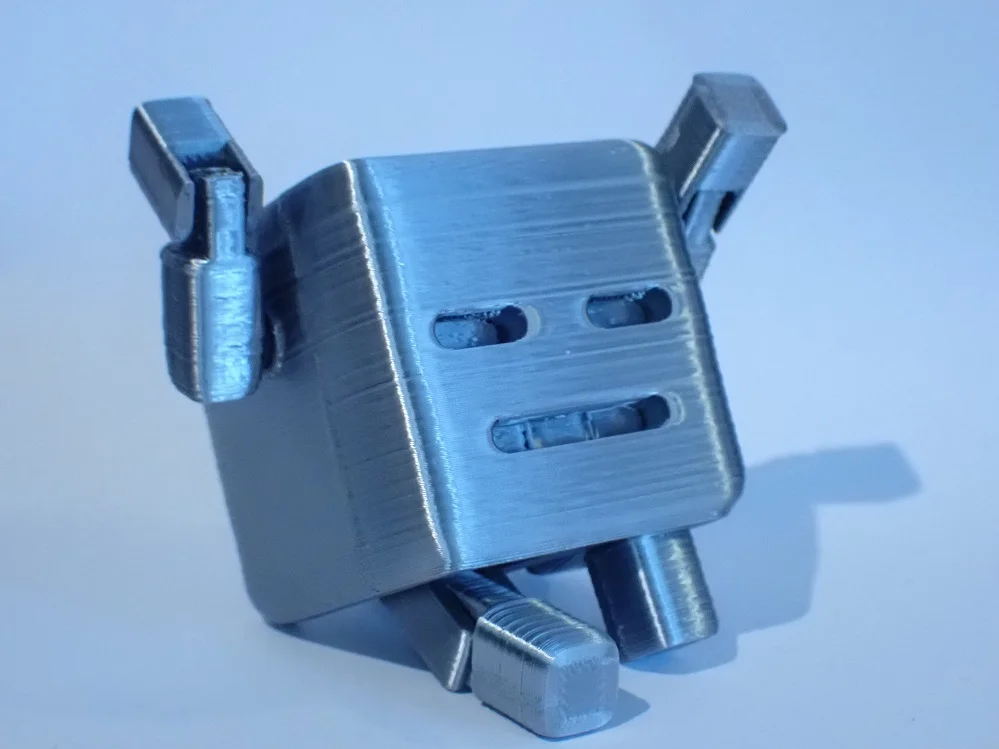
Next, I printed this Cub3bot (link to model) with silver filament. The filament reflects lightly, making it easy to see imperfections on the surface.
The horizontal lines and the inhomogeneous surface are striking. This is an indication of less than perfectly uniform extrusion and is difficult to calibrate. Otherwise, the object was printed accurately enough that all mechanical functions are given.
Maker Faire Robot
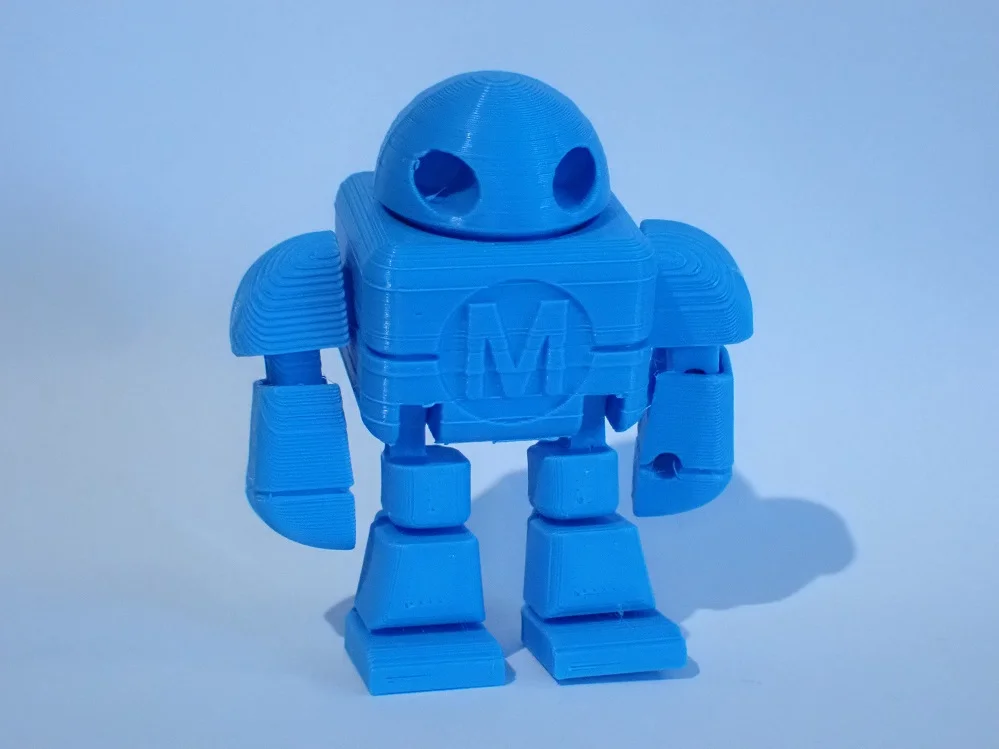
Also with this robot (link to the model) I could observe a somewhat uneven extrusion. The surfaces are not very homogeneous. Sometimes such an uneven extrusion is caused by low-quality filament with a fluctuating diameter. However, since I used a different filament this time, I can rule out this cause.
Stomp Rocket
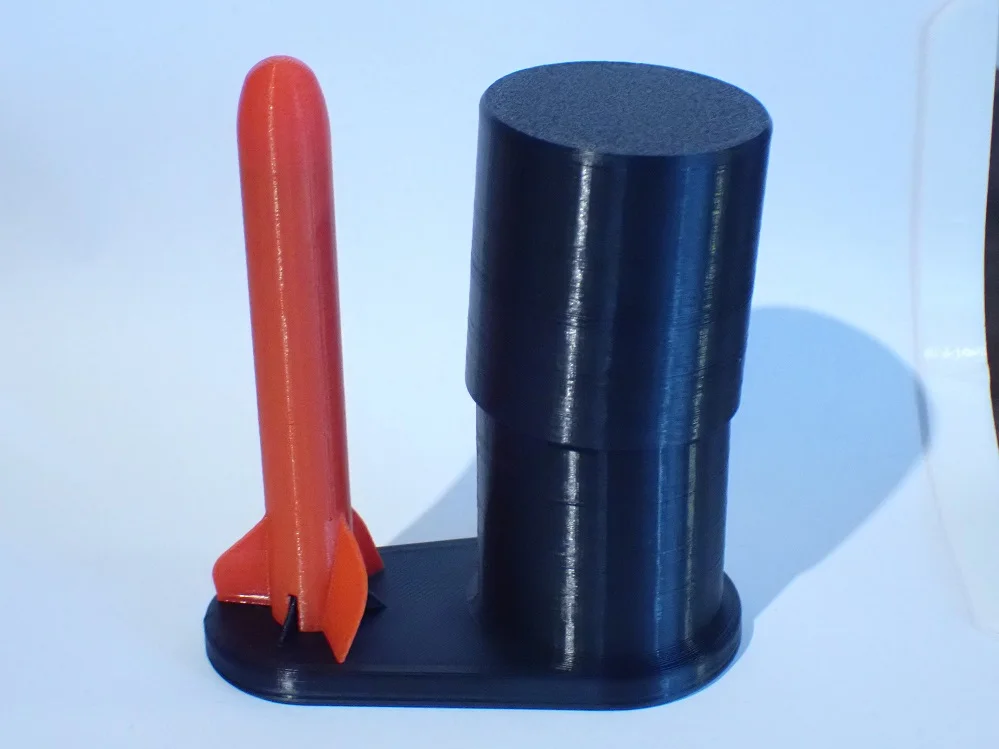
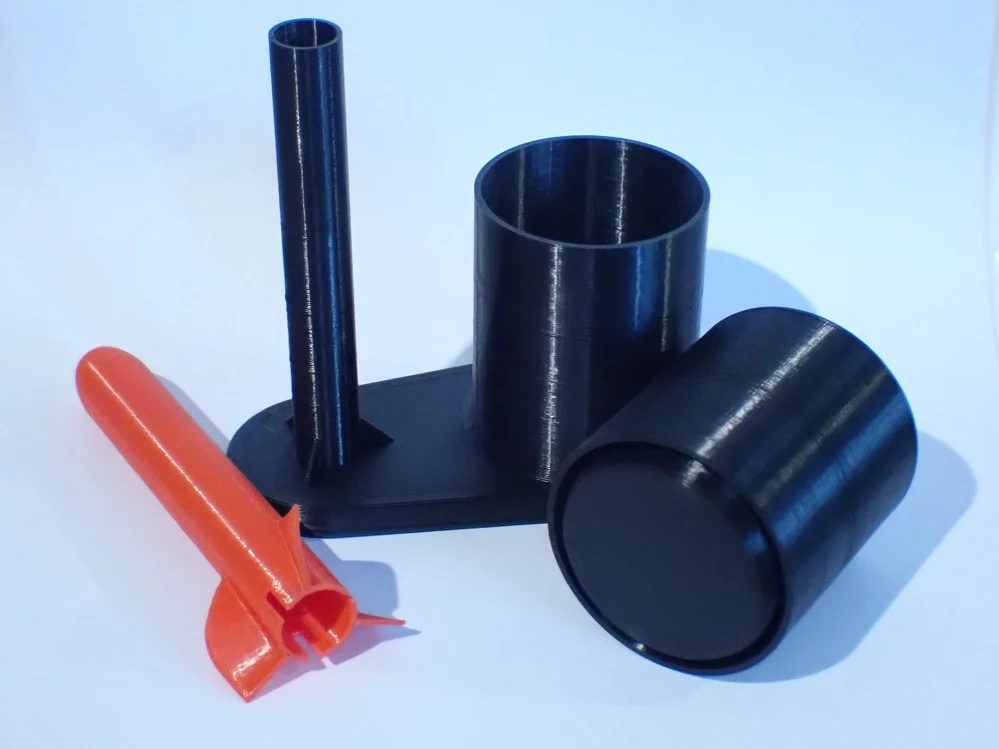
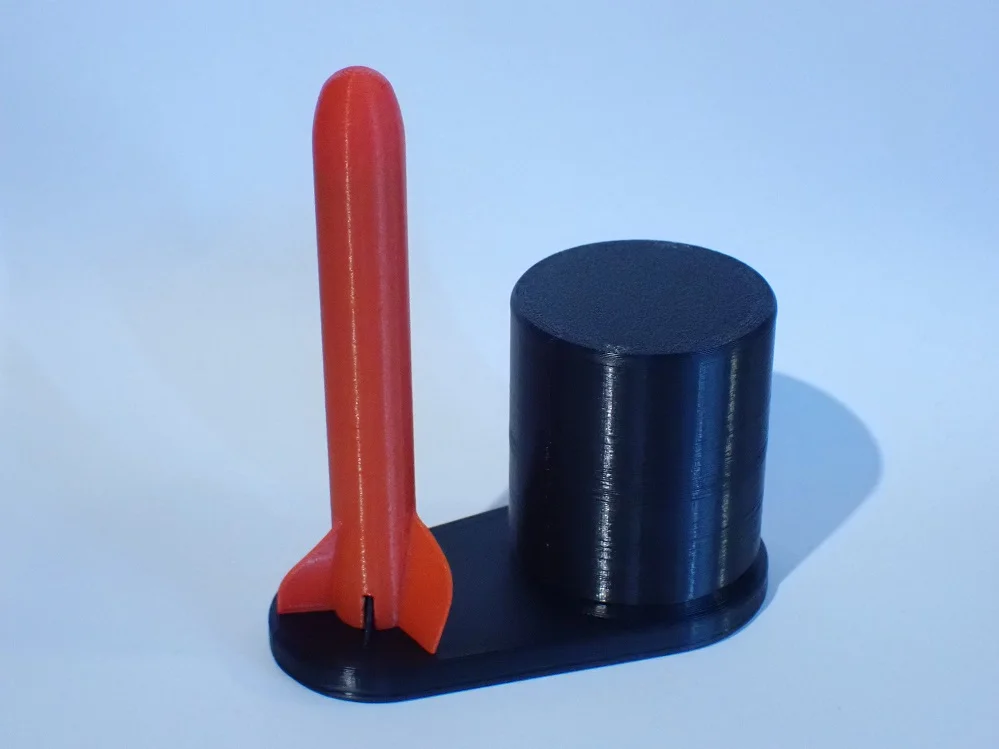
This rocket base consists of three individual parts (link to the model). In the base of the object is an air duct that leads from the rocket to the cylinder. If you press the cylinder down quickly, the air pressure causes the rocket to take off.
Despite the somewhat uneven extrusion, the mechanism works perfectly, although the tolerances are very tightly dimensioned.
Textured Vase
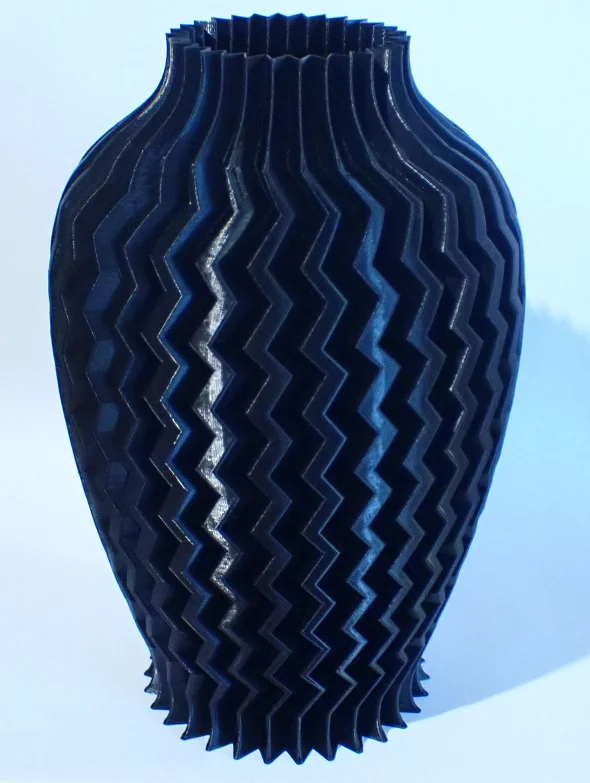
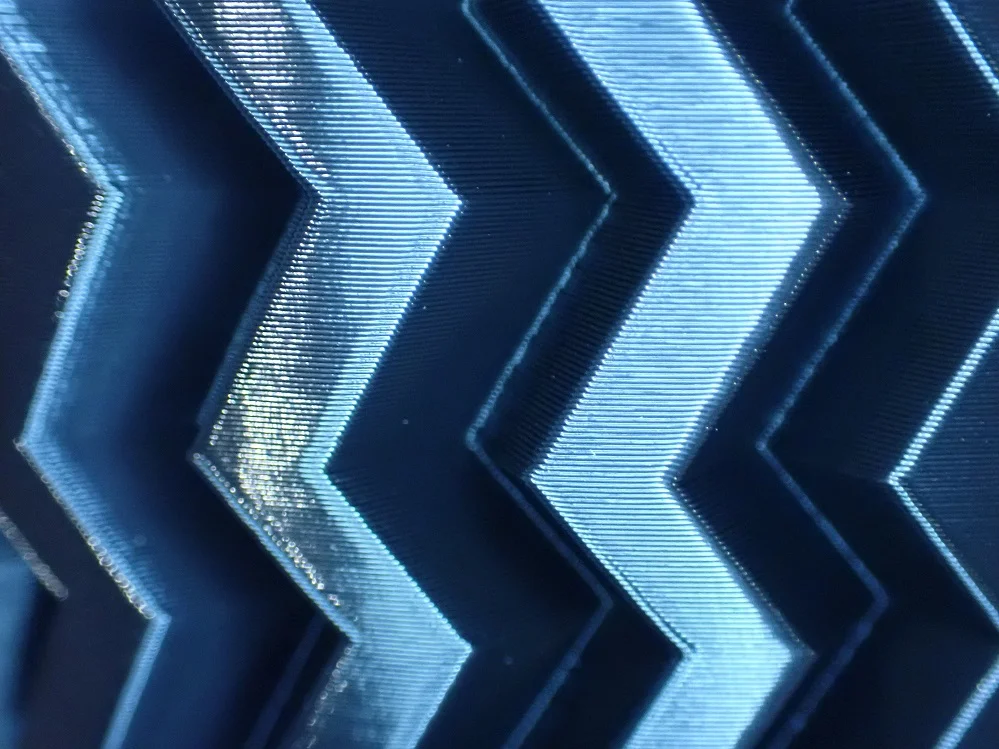

VoxelMaker Slicer also has the very popular function of printing vases. It works the same way as the vase mode in Cura or in PrusaSlicer. Unlike the other objects, the surface of this vase (link to the model) has become very smooth and even.
Voxelab Aquila S2 vs. Ender 3 S1
Check Price at:
The biggest competitor to the Aquila S2* in its price range is the Ender 3 V2. Its successor, the Ender 3 S1 is even better! A detailed review of the Ender 3 S1 can be found here.
The Ender 3 S1 has better features and is correspondingly more expensive. However, the price-performance ratio is still better. If you are looking for a comparable 3D printer with a similar price, the Ender 3 V2 is also highly recommended.
Direct Drive Extruder: Both 3D printers have a direct drive extruder. This means that the extruder sits directly above the nozzle in the print head. This allows flexible filament to change less frequently and the accuracy of the extrusion is generally higher than with Bowden extruders.
One advantage of the Aquila S2 over the Ender 3 S1 is that the nozzle can be heated up to 300 °C and not only up to 260 °C.
Automatic print bed leveling: The Ender 3 S1 has a CR Touch. The Aquila S2 must be leveled manually. The Aquila S2 can be upgraded with a sensor, but it is not included. With the automatic print bed leveling, leveling is done at the touch of a button. Manual leveling then only needs to be performed once during assembly.
Dual Z-axis: A dual Z-axis provides more stability and reduces vibrations to a minimum. The Ender 3 S1 has such a dual Z-axis, the Aquila S2 does not.
Flexible magnetic print bed: Both 3D printers have a flexible magnetic print bed that can be easily removed from the print plate after printing to easily detach the print object
This feature used to be a very popular upgrade for low-budget models and DIY kits. Now, these print bed surfaces are becoming more common, making printing even easier. The print bed adhesion is comparable for both 3D printers.
Filament Sensor: With a filament sensor, the 3D printer can independently detect whether it still has enough filament in stock or not. If there is no more filament in the sensor, the print is interrupted so that you can reload the filament.
The Ender 3 S1 has a cleverly designed filament sensor between the print head and the filament spool. The Aquila S2 does not have such a sensor.
In my eyes, such a sensor is not a big selling point, since almost all slicers give you an estimated filament consumption and you can easily estimate whether the roll has enough filament left or not.
Assembly: To keep the price low, many manufacturers try to integrate only the most difficult assembly steps into the manufacturing process and leave the rest to the customer. With the Aquila S2, the 3D printer base and print head are completely assembled. The rest you have to assemble yourself.
The Ender 3 S1 is almost completely pre-assembled and you only have to do three or four steps yourself. But it is also a bit more expensive.
As you can see, the Ender 3 S1 has more features that simplify your life and improve the print results. But it is also 50 to 75% more expensive than the Aquila S2, depending on the price range. Nevertheless, it is the direct competitor.
Extremely similar to the Aquila S2 is the Ender 3 V2 with the official Direct Drive Extruder Kit. If you are interested in this combination, you can read how to install the kit in this guide.
Check Price at:
Voxelab Aquila S2 vs. Ender 3 V2 vs. Ender 3 S1 – Table
| Aquila S2 | Ender 3 V2 | Ender 3 S1 | |
|---|---|---|---|
| Size: | 485 x 344 x 382 mm | 475 x 470 x 620 mm | 487 x 453 x 622 mm |
| Print volume: | 220 x 220 x 240 mm | 220 x 220 x 250 mm | 220 x 220 x 270 mm |
| Display: | color 4.3 inch LCD display with rotary knob | color 4.3 inch LCD display with rotary knob | color 4.3 inch LCD display with rotary knob |
| Setup: | Partially pre-assembled (> 45 min.) | Partially pre-assembled (> 45 min.) | mostly pre-assembled (~ 15 min.) |
| Extruder: | Direct Drive | Bowden | Direct Drive |
| Print bed leveling: | Manual | Manual | Automatic |
| Accuracy: | 0.1 mm | 0.1 mm | 0.1 mm |
| Min. layer thickness: | 0.1 mm | 0.1 mm | 0.05 mm |
| Nozzle: | 1 x 0.4 mm | 1 x 0.4 mm | 1 x 0.4 mm |
| Filament: | 1.75 mm (PLA, ABS, PETG,TPU, PA, PC, Carbon, Wood) | 1.75 mm (PLA, ABS, PETG, TPU) | 1.75 mm (PLA, ABS, PETG, TPU) |
| Max. Nozzle temperature: | 300 °C | 255 °C | 260 °C |
| Max. Print bed temperature: | 100 °C | 100 °C | 100 °C |
| Print speed: | 30-60 mm/s (max. 180 mm/s) | 30-60 mm/s (max. 180 mm/s) | 30-60 mm/s (max. 150 mm/s) |
| Resume Print: | Yes | Yes | Yes |
| Filament Sensor: | No | No | Yes |
| Print bed: | PEI on spring steel, flexible, magnetic | Textured glass bed | PC on spring steel, flexible, magnetic |
Is the Voxelab Aquila S2 worth it?
If you are looking for an inexpensive 3D printer that reliably delivers good results, the Voxelab Aquila S2* is the right choice for you. In direct comparison with the extremely popular Ender 3 V2, it can keep up very well and is only outperformed by its successor, the Ender 3 S1 (but it is also a bit more expensive).
Voxelab has proven to be a competent manufacturer of 3D printers in recent years. I have now tested several 3D printers from Voxelab and each one has convinced me.
The in-house slicer VoxelMaker also makes a very good impression, is easy to use and has very good preset default profiles.
Disclosure: This website is the property of Martin Lütkemeyer and is operated by Martin Lütkemeyer. Martin Lütkemeyer is a member of the Amazon Services LLC and other Affiliate Programs. These are affiliate advertising programs designed to enable websites to earn advertising revenue through advertising and linking to Amazon.com and others. Links marked with * are affiliate links.
