
- Wet Filament: Prevention, Symptoms & Drying - July 18, 2024
- Sovol SV08 – Best PrusaSlicer Settings & Profile - June 26, 2024
- Sovol SV08 – Best Orca Slicer Settings & Profile - June 26, 2024
Disclosure: Links marked with * are Affiliate Links. I earn from qualifying purchases if you decide to make a purchase through these links – at no additional cost for you!
With the spiral vase mode, sometimes just called vase mode, you can print objects with only one outer wall in PrusaSlicer. This mode is especially popular for vases. But you can also realize other objects with this mode.
Find out exactly how the spiral vase mode works, where to find it, and what settings are important in this detailed guide.
Table of Contents:
Why Should I Use the Spiral Vase Mode?
| PrusaSlicer Spiral Vase Mode
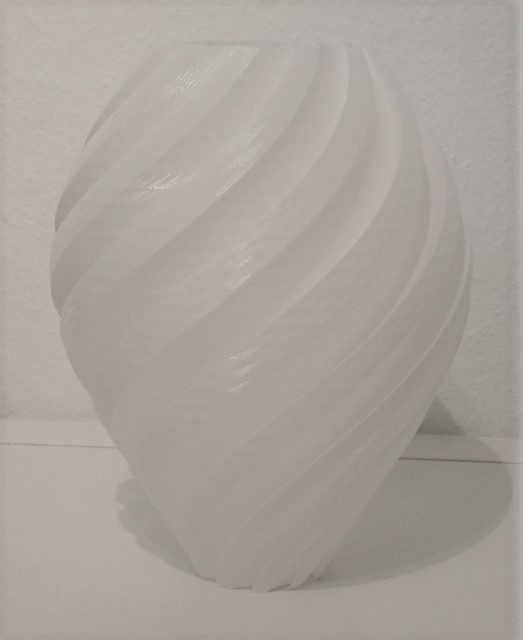
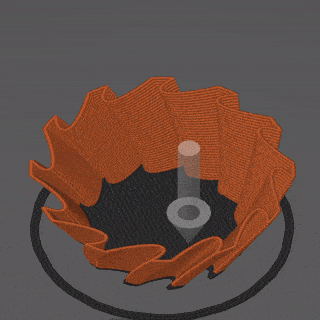
With the spiral vase mode in PrusaSlicer, objects can be printed with only one wall without infill. 3D printed vases are printed quickly and consume little filament. However, other objects such as figures, rockets or geometric objects can also be printed in spiral vase mode.
Basically, you can print any decorative object that doesn’t need to be stable in this mode. As long as it doesn’t have large overhangs, this is a good way to save time and filament. However, since the finished object has no infill, it is not that stable.
The word vase is in the name because objects that have no holes or other flaws in their shell are suitable for this mode.
You can use the spiral vase mode for all materials (PLA, ABS, etc.). Transparent materials, such as PETG, create an interesting translucent effect.
What Exactly Does the Spiral Vase Mode Do?
| PrusaSlicer Spiral Vase Mode
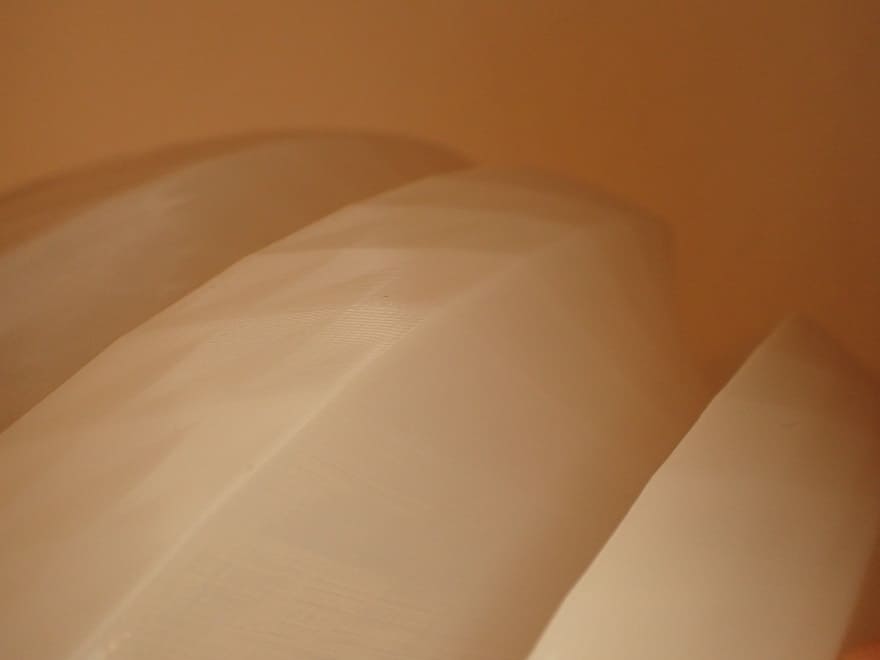
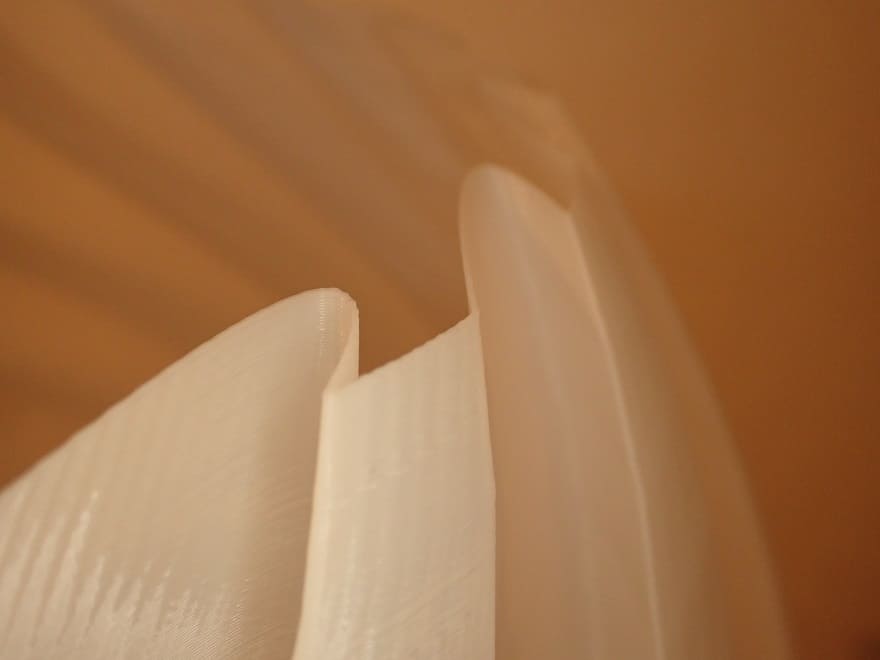
In the spiral vase mode, the nozzle continuously prints the outer contour of the object. The transition to the next layer is fluid, making the movement resemble a spiral. Unlike normal printing, this does not create a seam along the Z-axis but produces a smooth surface.
In a normal print, the print movement per layer always stops at a certain point so that the nozzle can move to the next layer. At this point, the extruder pulls the filament back a little (retraction) so that no filament accidentally gets extruded. But even if you have adjusted your extrusion settings perfectly, a slightly visible Z-seam will remain.
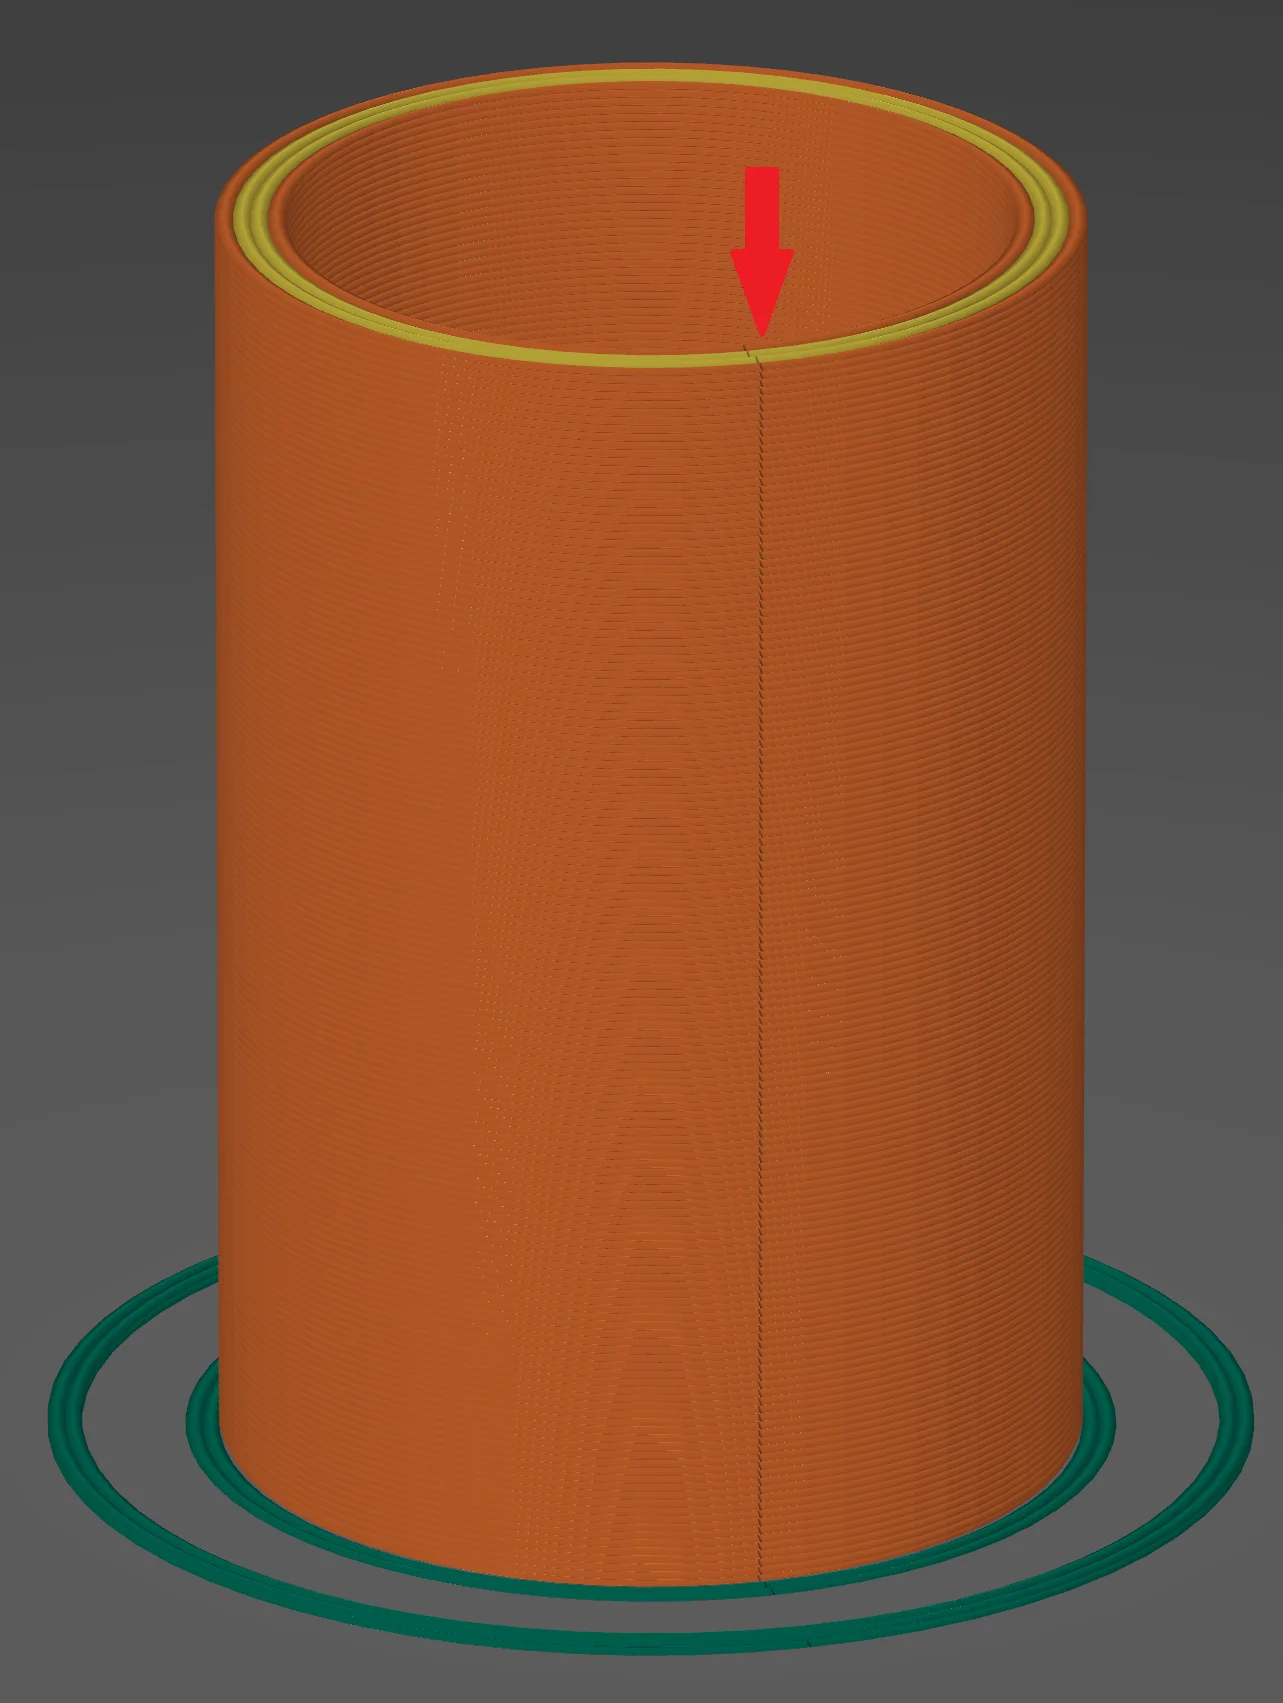
In the spiral vase mode, there is no retraction – the filament is extruded constantly until the end of the print. In the end, you can no longer distinguish the individual layers because the movement is continuous.
It is precisely this steady movement and the absence of the Z-seam that makes the spiral vase mode so special.
Plus, the smooth motion is very visually appealing. If you ever go to a 3D printer show, you’ll notice that many exhibitors have an object printed in the spiral vase mode. This is always a great way to impress a crowd!
3D printing can be difficult – especially in the beginning. Many beginners struggle with print errors, poor print bed adhesion, or don’t know how to properly set up the slicer.
That’s why I created an online course to get everyone up to my expert level and as quickly as possible.
The course covers everything you need to know about FDM 3D printing to get perfect results every time. Click the link below to learn more about the content and what to expect (and don’t worry: there are no tests! Learn at your own pace, completely stress-free).
How to Activate the Spiral Vase Mode?
| PrusaSlicer Spiral Vase Mode
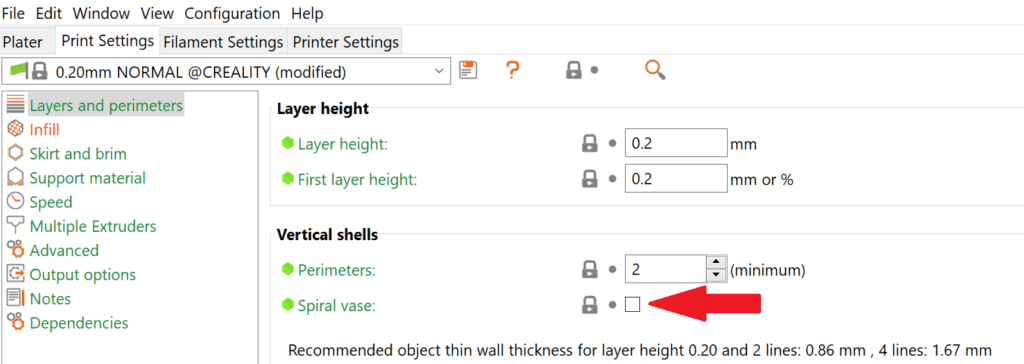
The spiral vase mode is located in the PrusaSlicer under the simple print settings. In the submenu ‘Vertical shells’ there is a checkbox that activates the spiral vase mode. After activation, some settings will be adjusted automatically.
Solid objects with a continuous outer shell are suitable for the spiral vase mode. The inner volume is removed by the spiral vase mode. Also, only one object can be printed at a time. Otherwise, continuous printing of the outer wall would not be possible.
The printing result in spiral vase mode depends strongly on the settings you make after activation.
Choosing the Right Settings
| PrusaSlicer Spiral Vase Mode
The settings are divided into two different areas:
- The settings that the PrusaSlicer automatically changes when you activate the mode.
- Other settings you can make manually for printing.
So that you know exactly what happens in the spiral vase mode and how you can adjust your print perfectly, the individual settings are listed and explained below.
Automatic Settings
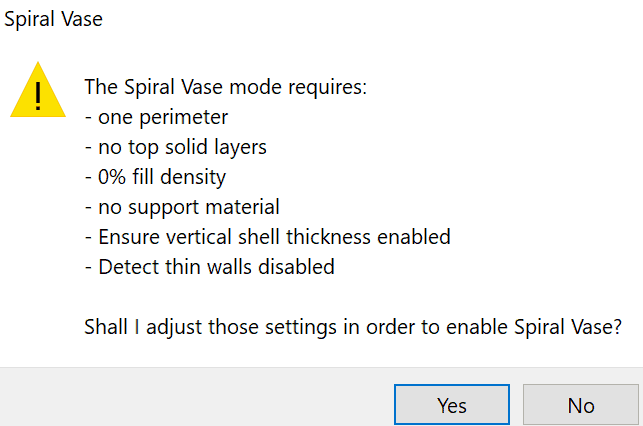
The automatic settings define the spiral vase mode. If any of these settings are not as specified, you will not be able to print continuously printed objects with only one outer wall.

One perimeter: The number of outer walls is automatically set to 1. Otherwise, the spiral vase mode would not work and would not make sense.

0% fill density: In order for the nozzle to only deal with printing the outer wall, there should be no infill. Also, if you want to print a vase with some areas that should be solid, the spiral vase mode is not suitable for that. There is no infill in vase mode.

No top solid layers: Since most objects printed in spiral vase mode are open at the top anyway, there are no top layers. Also, these layers would sag (depending on size) since there is no infill.

No support material: Just as there is no infill, there must also be no support structures. The nozzle travels continuously along the outer wall and must not wait or move somewhere else in between. Therefore, there must be no support structures.
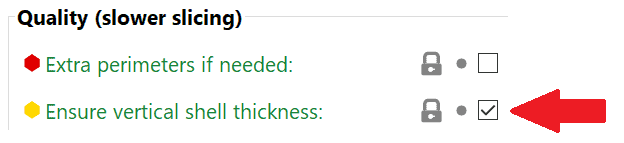
Ensure vertical shell thickness enabled: Without this setting, the vertical shell thickness will be reduced for overhanging parts of your object. This can cause holes. Therefore, this setting is automatically activated so that the outer shell does not have any flaws.
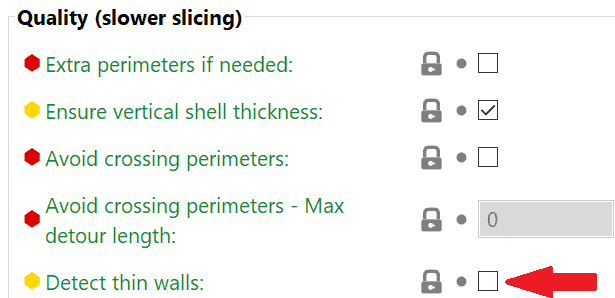
Detect thin walls disabled: In normal printing, this setting causes parts of the outer wall to be printed with only one line when there is no room for multiple lines. In the spiral vase mode, this setting makes no sense, so it is automatically disabled.
One more important note: You could enter all these automatic settings manually. But if you don’t activate the spiral vase mode, you won’t get the same result as in vase mode. The object would be printed again with single layers and a Z-seam.
Manual Settings
With the manual settings, you can make the object more stable or even waterproof. I recommend printing a small cylinder before printing the actual object. This way you waste very little time and material to find the perfect settings.

Number of bottom solid layers: With the number of bottom layers you can make the object more stable. Keep in mind that the bottom layers are not printed continuously in vase mode. So if you print a bottom that is too thick, you might end up with a Z-seam.
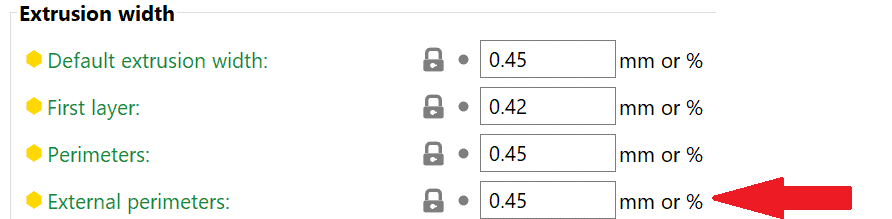
Extrusion width of the external perimeters: The width of the outer perimeter also contributes to the stability of the object. The extrusion width can be set between 100-120% of the nozzle diameter. So with a standard 0.4 mm nozzle, you can print outer walls of 0.4-0.48 mm.
However, these values are for normal prints. In vase mode, you can print even thicker walls, because you don’t care about the effects on the left and right side of the extruded filament, because there is nothing there. If you raise the temperature slightly above your standard temperature and print very slowly, you can achieve a thickness of 0.6 mm with a 0.4 mm nozzle.

Temperature: If you are working with normal extrusion widths, you can leave the temperature at the default value of your filament. If you want to increase the width, you also have to increase the temperature. If you increase the extrusion width to 0.6 mm with a 0.4 mm nozzle like in the example above, you should increase the temperature in 5 °C steps until you get the right result.

Print speed: In vase mode, you should always print slowly. The speed depends on the circumference of the object and how thick the outer walls are. The last layer must be sufficiently cooled before the nozzle prints the next layer on top. A good guideline are 25 mm/s. If you have a very large object with a large circumference, you can increase the speed to 35-40 mm/s.
As with most things in 3D printing, experimentation is required. Each of these settings depends on the material you’re using, the application, and your 3D printer.
Fortunately, in spiral vase mode, there aren’t too many settings you need to tweak. So you’ll get great results quickly!
Disclosure: This website is the property of Martin Lütkemeyer and is operated by Martin Lütkemeyer. Martin Lütkemeyer is a member of the Amazon Services LLC and other Affiliate Programs. These are affiliate advertising programs designed to enable websites to earn advertising revenue through advertising and linking to Amazon.com and others. Links marked with * are affiliate links.
