
- Wet Filament: Prevention, Symptoms & Drying - July 18, 2024
- Sovol SV08 – Best PrusaSlicer Settings & Profile - June 26, 2024
- Sovol SV08 – Best Orca Slicer Settings & Profile - June 26, 2024
Disclosure: Links marked with * are Affiliate Links. I earn from qualifying purchases if you decide to make a purchase through these links – at no additional cost for you!
The FLSUN Super Racer is an extremely fast delta 3D printer that is 2-4 times faster than normal cartesian 3D printers. However, without a proper Cura profile, this speed is of no use, as you will produce nothing but printing errors.
The default profile for the FLSUN Super Racer included in Cura is a very good start for further optimizations. The most important settings of it should be calibrated and there are a few things you have to consider for the individual filaments.
Learn how to properly configure the default profile and calibrate the most important settings in this detailed guide.
| PLA | ABS | PETG | |
|---|---|---|---|
| Printing temperature | 210-220 °C | 235-245 °C | 235-245 °C |
| Print bed temperature | 60 °C | 100 °C | 70-80 °C |
| Print speed | 100-150 mm/s | 100-150 mm/s | 100-150 mm/s |
| Retraction | 6.5 mm at 40 mm/s | 6.5 mm at 45 mm/s | 6.5 mm at 40 mm/s |
| Cooling | 100 % | 0% + enclosure | 50 % |

Calibrated Cura Profile
For optimal print quality with minimal effort, you can download my calibrated Cura profile for this 3D printer and import it directly into Cura. All settings are perfectly adapted to this printer, e.g. the accelerations, jerk, supports and the first layer.
Table of Contents:
How to Create a Profile for the FLSUN Super Racer in Cura
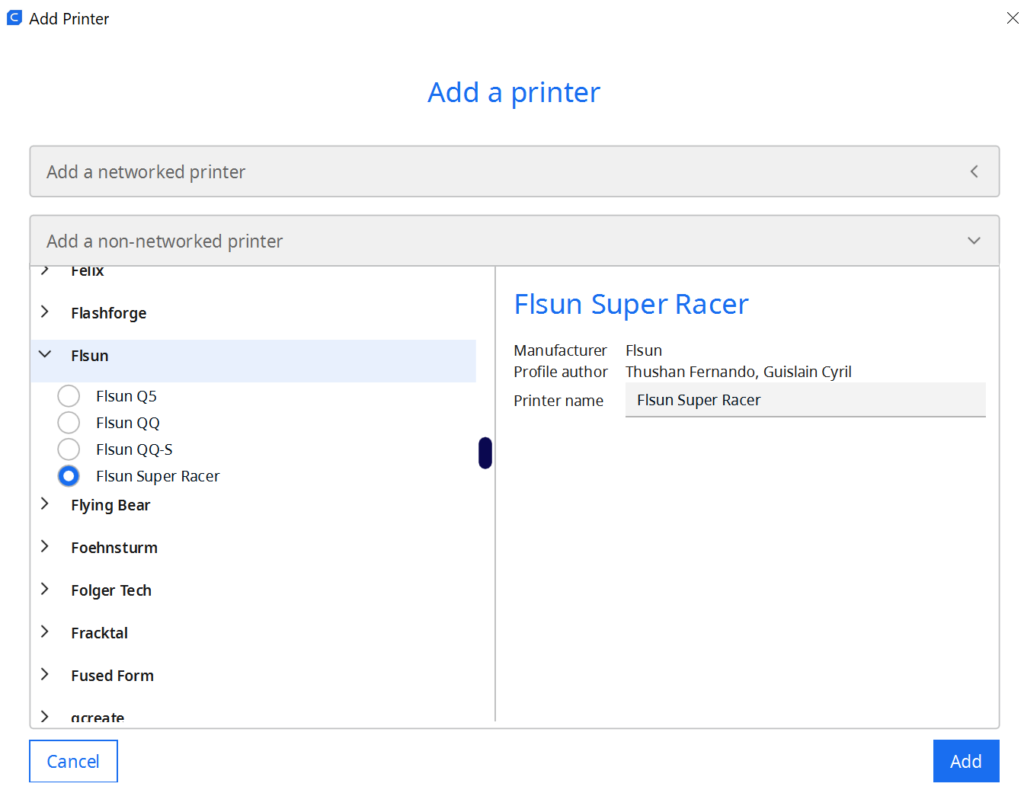
The 3D printer profile is a set of machine and print settings that tells Cura what kind of 3D printer you’re using and how you want your prints to turn out. Machine settings include things like nozzle size and printer build volume, while print settings specify things like infill density and layer height.
By tweaking these settings, you can achieve different print qualities, from fast and poor-quality prints to slow and high-quality prints. The downside is that it can be difficult to find the perfect balance of settings for your needs, but with a little trial and error you can get great results.
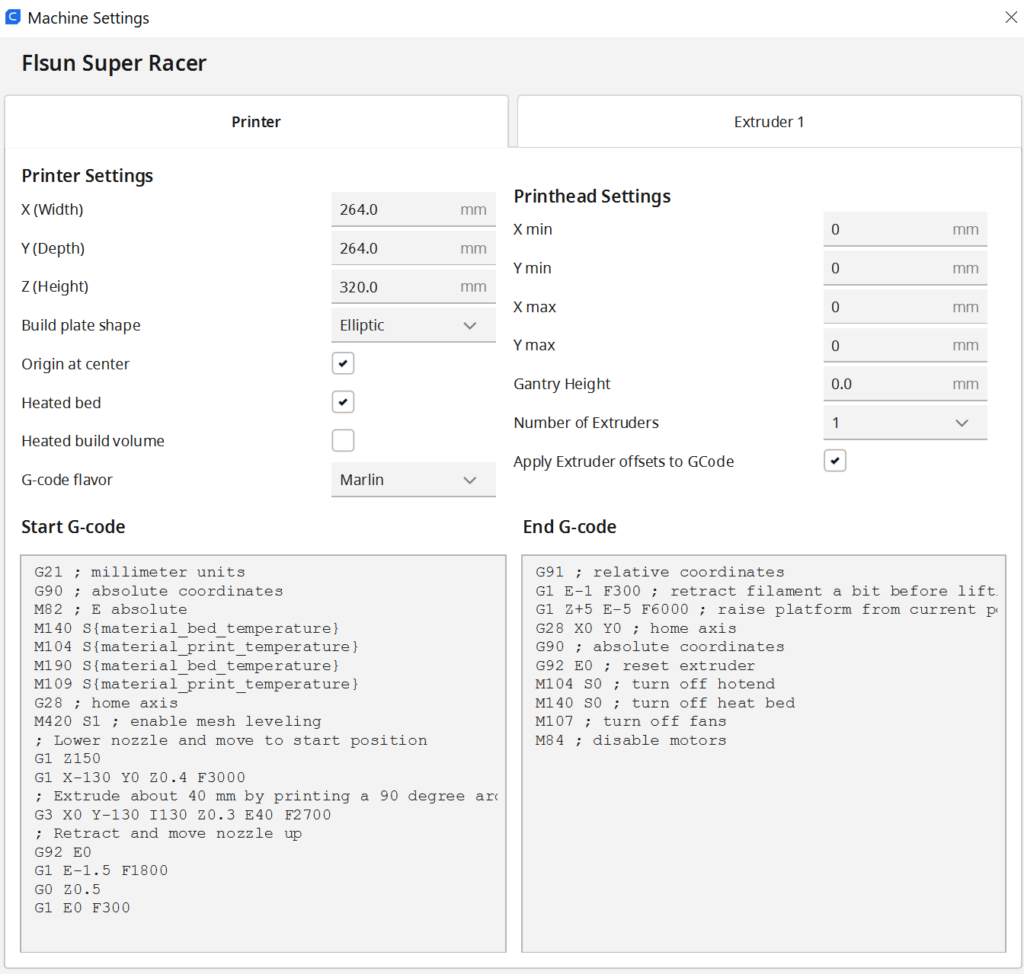
At the time of publishing this article, there is a pre-built default profile in Cura. So you don’t have to worry about which machine parameters and G-code snippets to specify. The only thing that can and should be optimized are the print settings.
The FLSUN Super Racer was actually my first Delta 3D printer as well and I was wondering if there was anything special to consider with this type of 3D printer. I have used dozens of FDM 3D printers with Cura, but I was not quite sure where the translation of the Cartesian coordinates are translated into the movements of a Delta 3D printer.
Conveniently, you don’t have to worry about this because you don’t have to set or specify it in Cura. The printer and the software will take care of this and perform the trigonometric calculations automatically.
You can find more information on how to create a 3D printer profile in Cura and what you need to pay attention to in this article: How to Create a Custom 3D Printer Profile in Cura
PLA Settings for the FLSUN Super Racer
These are the correct Cura settings for the FLSUN Super Racer for PLA:
- Printing temperature: 210-220 °C
- Print bed temperature: 60 °C
- Printing speed: 100-150 mm/s
- Retraction: 6.5 mm at 40 mm/s
- Cooling: 100%
- First layer: 5-10 mm/s, 0% cooling, 100% extrusion width, 100% layer height
PLA, or polylactic acid, is one of the most popular materials for 3D printing. It is derived from renewable resources such as corn starch or sugar cane and is biodegradable. PLA is a good choice for beginners because it is easy to print and produces high-quality results.
However, there are still a few things to consider when printing with PLA. The temperature of the nozzle and the print bed should be set correctly, because too high a temperature can lead to problems in both cases. If the temperature of the nozzle is too high, stringing can occur, if the temperature of the print bed is too high, an elephant foot can form. And these are just two examples of the effects of incorrectly set temperatures.
The print speed should also be slow enough to allow the PLA to cool and properly solidify to form a good bond with the print bed and the previous layer. Depending on what print bed surface you are using, it might pay to reduce the print speed significantly for PLA. I generally use a print speed of 5-10 mm/s for the first layer to avoid adhesion problems in the first place.
Finally, retraction determines how much PLA is pulled back into the nozzle after each extrusion. Too much retraction can cause holes in your prints or clog the nozzle. Too little retraction often leads to stringing.
ABS Settings for the FLSUN Super Racer
These are the correct Cura settings for the FLSUN Super Racer for ABS:
- Printing temperature: 235-245 °C
- Print bed temperature: 100 °C
- Printing speed: 100-150 mm/s
- Retraction: 6.5 mm at 45 mm/s
- Cooling: 0% + DIY enclosure made of plexiglass for large objects
- First layer: 5-10 mm/s, 0% cooling, 100% extrusion width, 100% layer height
3D printing with ABS filament is a popular choice thanks to its durability and mechanical properties. However, printing with ABS can be difficult and even experienced users can run into problems. To avoid problems, it is important to use a 3D printer that has the correct settings for ABS.
The extruder temperature should be between 220 and 250 degrees Celsius and the print bed temperature between 80 and 110 degrees Celsius. It is also important to establish the correct ambient temperatures in order to process the filament flawlessly. Otherwise ABS can warp, resulting in an unusable print.
Most 3D printers come without an enclosure, which can often lead to deformation if ABS cools down too quickly. If you want to prevent this, an enclosure is advisable. With the FLSUN Super Racer, this is a bit difficult, as most enclosures and tents will not fit for retrofitting. If you still want to print large objects out of ABS, you can get cheap plexiglass and seal the print volume with it.

If you only want to print small objects from ABS, an enclosure is not absolutely necessary. Most of the time a draft shield helps to protect the object from cold air currents. Either way, you should heat up the print bed at least 10 minutes before printing to ensure a good ambient temperature.
If you’re having trouble with your ABS prints not sticking to the printing plate, there are a few things you can try. First, you can increase the adhesion with adhesives like Magigoo. You can also try lowering the print speed of the first layer to give the filament more time to bond to the print bed surface. Finally, make sure the build plate is clean and free of contaminants.
TPU Settings for the FLSUN Super Racer
Unfortunately, due to its design, the Super Racer has a very long Bowden tube, which makes it almost impossible to print flexible filaments with a good print quality. If you do not have very high demands on the object, you can still try it. Otherwise, I would not recommend printing TPU with this 3D printer.
When it comes to 3D printing, there are a variety of filaments you can choose from. One type of filament that is becoming increasingly popular is TPU, which is thermoplastic polyurethane. TPU is a flexible filament, meaning it can be used to create 3D printed objects that are flexible and durable.
Because of its flexibility, it is especially important to set the print speed and retraction correctly when printing with TPU. Otherwise, the printer may clog or the print quality may be poor. However, TPU does not process equally well with all 3D printers. The best results can be achieved with a direct drive extruder – but the FLSUN Super Racer only has a Bowden extruder due to its design and is therefore only partially or not at all suitable for TPU.
As the name implies, the extruder is located directly above the nozzle in a direct drive system. This configuration has a number of advantages. Because the extruder is close to the nozzle, the filament does not have to travel a long distance before it is extruded. This reduces the risk of jams and makes it easier to control extrusion – especially with flexible filaments. Bowden extruders are also typically lighter than direct drive extruders, which can improve print quality by reducing vibration and increasing print speed.
In a Bowden extruder, the extruder is located far from the nozzle, usually permanently mounted on an axis of the printer. The filament is pushed through a long tube to the nozzle. The disadvantage here is that the flexible filament can get tangled on this long path or simply compensate for the extrusion movements due to its flexibility and they no longer arrive at the nozzle and the filament is only extruded very inaccurately.
PETG Settings for the FLSUN Super Racer
These are the correct Cura settings for the FLSUN Super Racer for PETG:
- Printing temperature: 235-245 °C
- Print bed temperature: 70-80 °C (best on PEI)
- Printing speed: 100-150 mm/s
- Retraction: 6.5 mm at 40 mm/s
- Cooling: 50%
- First layer: 5-10 mm/s, 0% cooling, 100% extrusion width, 100% layer height
PETG filament is a great option for those who want the best of both worlds when 3D printing. PETG combines the ease of printing of PLA with the durability and stability of ABS. However, there are a few things to keep in mind when printing with PETG filament.
One of the most important settings is the retraction. PETG has a strong tendency to stringing. Therefore, you need to make sure that the retraction is set correctly and preferably calibrated to prevent this. Here you can find a detailed guide on how to prevent stringing with PETG: PETG Stringing | Main Causes and Best Solutions
Also, keep in mind that PETG is a bit more difficult to post-process than other filaments. But all in all, PETG is a good choice for anyone who wants a durable and stable end product without sacrificing too much in terms of ease of printing.
Just like ABS, PETG also requires relatively high printing temperatures of 230 to 250 °C. Also you have to consider that the print bed adhesion of PETG on a glass print bed like the FLSUN Super Racer has is extremely good and sometimes even too good. To avoid damage to the glass print bed I recommend using a suitable PEI print bed. I have used this one* and had very good experiences with all filament types including PETG.
Best Cura Settings for the FLSUN Super Racer
So far you have seen the best print settings for each filament. In the following we will go into detail about the individual print settings and what you need to keep in mind for the FLSUN Super Racer.
Printing Temperature
The best printing temperatures for the FLSUN Super Racer in Cura:
- PLA: 210-220 °C
- ABS: 235-245 °C
- PETG: 235-245 °C
One of the most common problems in 3D printing is incorrect printing temperature. If the print temperature is too high, problems such as stringing can occur. This stringing occurs when molten plastic escapes from the nozzle during printing and forms unwanted threads or strings between objects.
If, on the other hand, the printing temperature is too low, holes may form in the object or the object may not adhere properly to the print bed. Poor layer adhesion can also be a problem and cause the printed objects to crack or the individual layers to peel off from each other. Therefore, it is important to carefully optimize the printing temperature to avoid these common errors.
The FLSUN Super Racer reaches a maximum printing temperature of 255 °C. This allows it to reliably print all standard filaments. At least my Super Racer tends to print the different filaments best at the upper range of the recommended temperature range of the respective filament.
Print Bed Temperature
The best print bed temperatures for the FLSUN Super Racer in Cura:
- PLA: 60 °C
- ABS: 100 °C
- PETG: 70-80 °C (best on PEI)
The print bed temperature is crucial for how well the 3D printed object adheres to the print bed of the 3D printer. The higher the temperature, the better the adhesion. However, if the temperature is too high, the result is an elephant foot, where the first layers expand and the dimensional stability deteriorates.
The sweet spot for many filaments seems to be around 60-80 °C, but this varies depending on the material. ABS, for example, likes to be printed on a surface that is around 100 °C. Conveniently, the print bed of the FLSUN Super Racer reaches exactly this temperature, allowing it to produce good print bed adhesion for ABS.
The print bed adhesion is not only dependent on the temperature. The surface is also very important for how well the filament adheres. The Super Racer has a textured glass print bed, which is fine for most filaments. However, I have equipped my printer with a PEI print bed, which provides ideal adhesion, especially for PLA and PETG.
Print Speed
The best printing speed for the FLSUN Super Racer in Cura:
- PLA: 100-150 mm/s
- ABS: 100-150 mm/s
- PETG: 100-150 mm/s
The best feature of the FLSUN Super Racer are its extremely high print speeds of up to 200 mm/s. It can reach these high print speeds due to its extremely light print head and the fascinating delta design.
As with cartesian 3D printers, however, certain print errors occur more frequently the higher the print speed. Depending on how high your print quality requirements are, you may need to dial it down a bit.
I myself have had good results at 100 to 150 mm/s, which is still 2-3 times faster than most cartesian 3D printers.
Layer Height
The best thicknesses for the FLSUN Super Racer in Cura:
- Decorative objects: 0.05-0.15 mm
- Standard: 0.20 mm
- Coarse, fast prints: 0.3 mm
If you want to achieve a smooth surface on your 3D printed objects, you should use a low layer height. This means that each layer of the object is thinner, resulting in a smoother overall finish. However, printing with thin layers takes longer than with thicker layers. So if you want to save time, you should increase the layer height. Keep in mind, however, that for decorative objects thinner layers are better suited to achieve better results.
The FLSUN Super Racer can print layer heights from 0.05 to 0.3 mm. This gives you a very wide range to choose from and you can adjust the quality to your requirements.
There is no single answer to the question of which layer height is best. The right layer height for your project depends on a number of factors, including the level of detail you need and the type of object you’re printing.
For example, if you are printing a decorative object, you should use a lower layer height to ensure a high level of detail. On the other hand, if you’re printing a prototype or an object that doesn’t need to be perfect, you can use a higher layer height and save some time.
In general, layer heights between 0.05 and 0.15 millimeters are suitable for decorative objects, while 0.2 millimeters is a good compromise for standard objects. If you value speed, you can even increase the layer height to 0.3 millimeters. Keep in mind, however, that you will be sacrificing accuracy.
Flow Rate
The best flow rate for the FLSUN Super Racer in Cura:
- Default value: 100%
- For over-extrusion: 90% to 99%
- For under-extrusion: 101% to 110%.
The flow rate indicates how much filament is extruded per time unit. In Cura, the value is independent of the print speed and is expressed as a percentage. An incorrect flow rate can result in either over- or under-extrusion.
Flow rate is one of the most important print settings you should calibrate, along with printing temperature and retraction.
Retraction
The best retraction settings for the FLSUN Super Racer in Cura:
- PLA: 6.5 mm at 40 mm/s
- ABS: 6.5 mm at 45 mm/s
- PETG: 6.5 mm at 40 mm/s
Retraction is the process of pulling the filament back into the nozzle at the end of an extrusion. This is mainly to prevent stringing, i.e. when thin hairs of plastic are left between two printed areas.
If you set the retraction wrong, it can lead to a number of problems, such as poor layer adhesion, voids, and of course stringing.
It is important that you experiment with different settings. If in doubt, start with a smaller value and gradually increase it until you get the results you want. A good starting point for further optimizations are the values below. However, it is best to calibrate the retraction, as the values can differ between different 3D printers. More on this further down in this post.
Infill
The best infill density for the FLSUN Super Racer in Cura:
- Decorative objects: 0-15%
- Standard objects: 15-50%
- Sturdy objects: 50-100%
The infill is the material that is printed inside the object. Its density can range from 0% to 100%. The infill pattern is the way the infill is arranged in the object. How the infill is set depends only on the purpose of the object and not on the 3D printer.
High stability (for stable objects):
- Cubic
- Cubic subdivision
- Octet
- Gyroid
Medium stability (for standard objects):
- Grid
- Triangles
- Tri-Hexagonal
Low stability (for decorative objects):
- Lines
- Zigzag
- Lightning
For decorative objects you can use low infill densities of 0 to 15%. For standard objects that may even have a mechanical function, 15 to 50% is advisable. If you want the object to be very stable, you can increase the density above 50% and up to 100%.
First Layer
These are the best Cura settings for the first layer on the FLSUN Super Racer:
- Layer thickness: 100-200% of normal layer thickness (higher values to increase print bed adhesion)
- Line width: 100-200% of normal line width (higher values to increase print bed adhesion)
- Print temperature: Same as the rest of the object or 5-10 °C higher for better print bed adhesion.
- Print speed: 50% of normal print speed (i.e. 25 mm/s for a normal print speed of 50 mm/s) or 5-10 mm/s for high print bed adhesion
- Flow rate: 100-110% (higher values in case of poor print bed adhesion)
If the first layer is not printed correctly or does not adhere to the print bed, the entire print is ruined. There are therefore a few settings you need to consider for the first layer to ensure a good result. Especially you can increase the print bed adhesion with a few tricks.
With higher values for layer height, line width or flow rate, the filament on the print bed gets a larger diameter and thus cools down more slowly. As a result, it bonds better with the print bed.
The first thing I do when I see poor print bed adhesion is to reduce the print speed dramatically. Especially with the glass print bed of the Super Racer this is a good idea.
How to Calibrate the Cura Settings for the FLSUN Super Racer
As already mentioned, there are a few print settings that are particularly important to ensure good print quality. These are mainly the print temperature, the flow rate and the retraction.
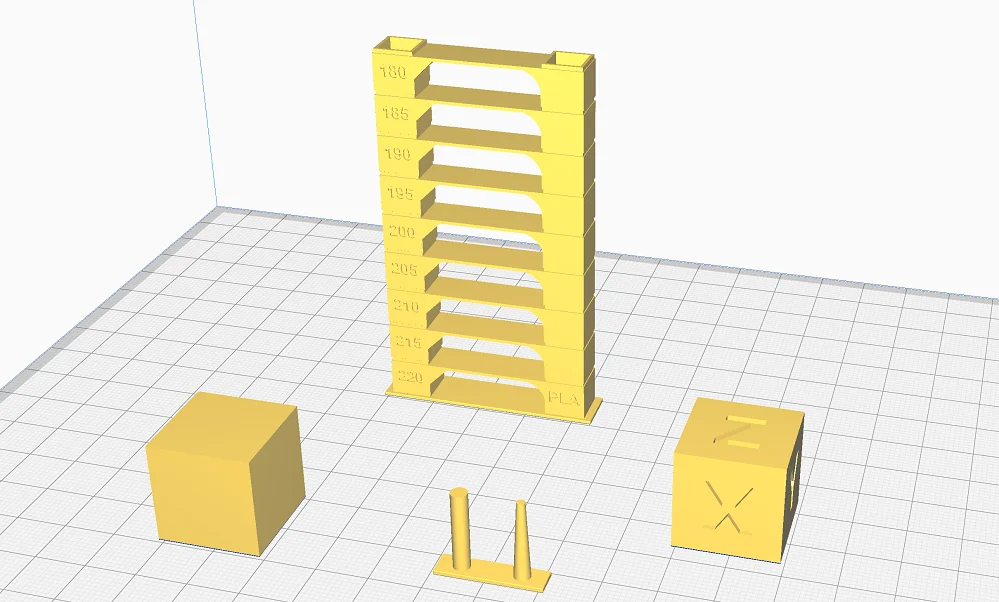
To calibrate these three settings, you print certain objects here. These objects are designed to provoke certain printing errors. This allows you to see after printing whether the new setting has led to an improvement or deterioration. This way you can slowly but surely approach the perfect value.
You can find such calibration objects on portals like Thingiverse, Cults3D or in the Calibration Shapes plugin in Cura.

Read the full calibration guide:
3D Printer Calibration: Step-by-Step to Perfect Results
How to Calibrate the Printing Temperature
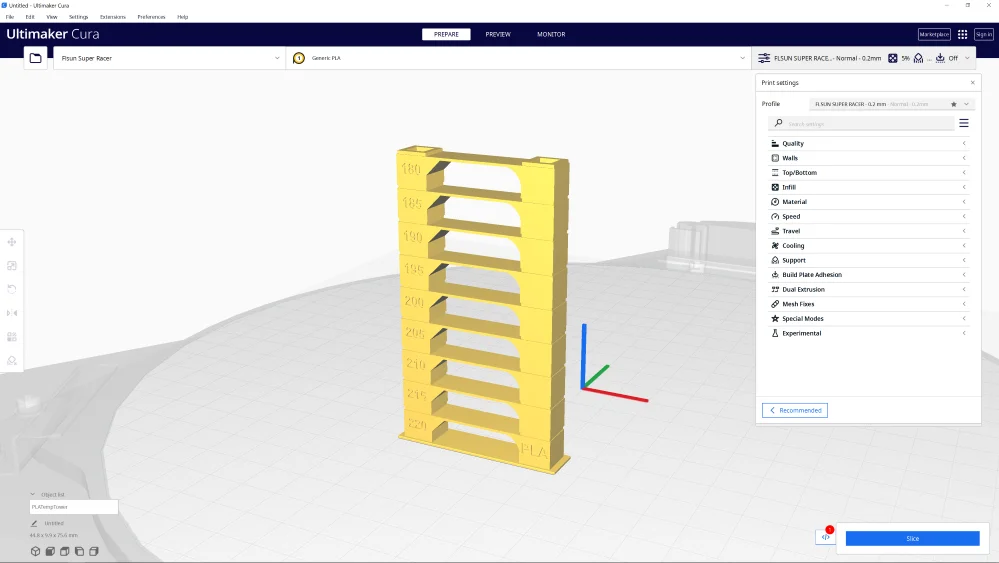
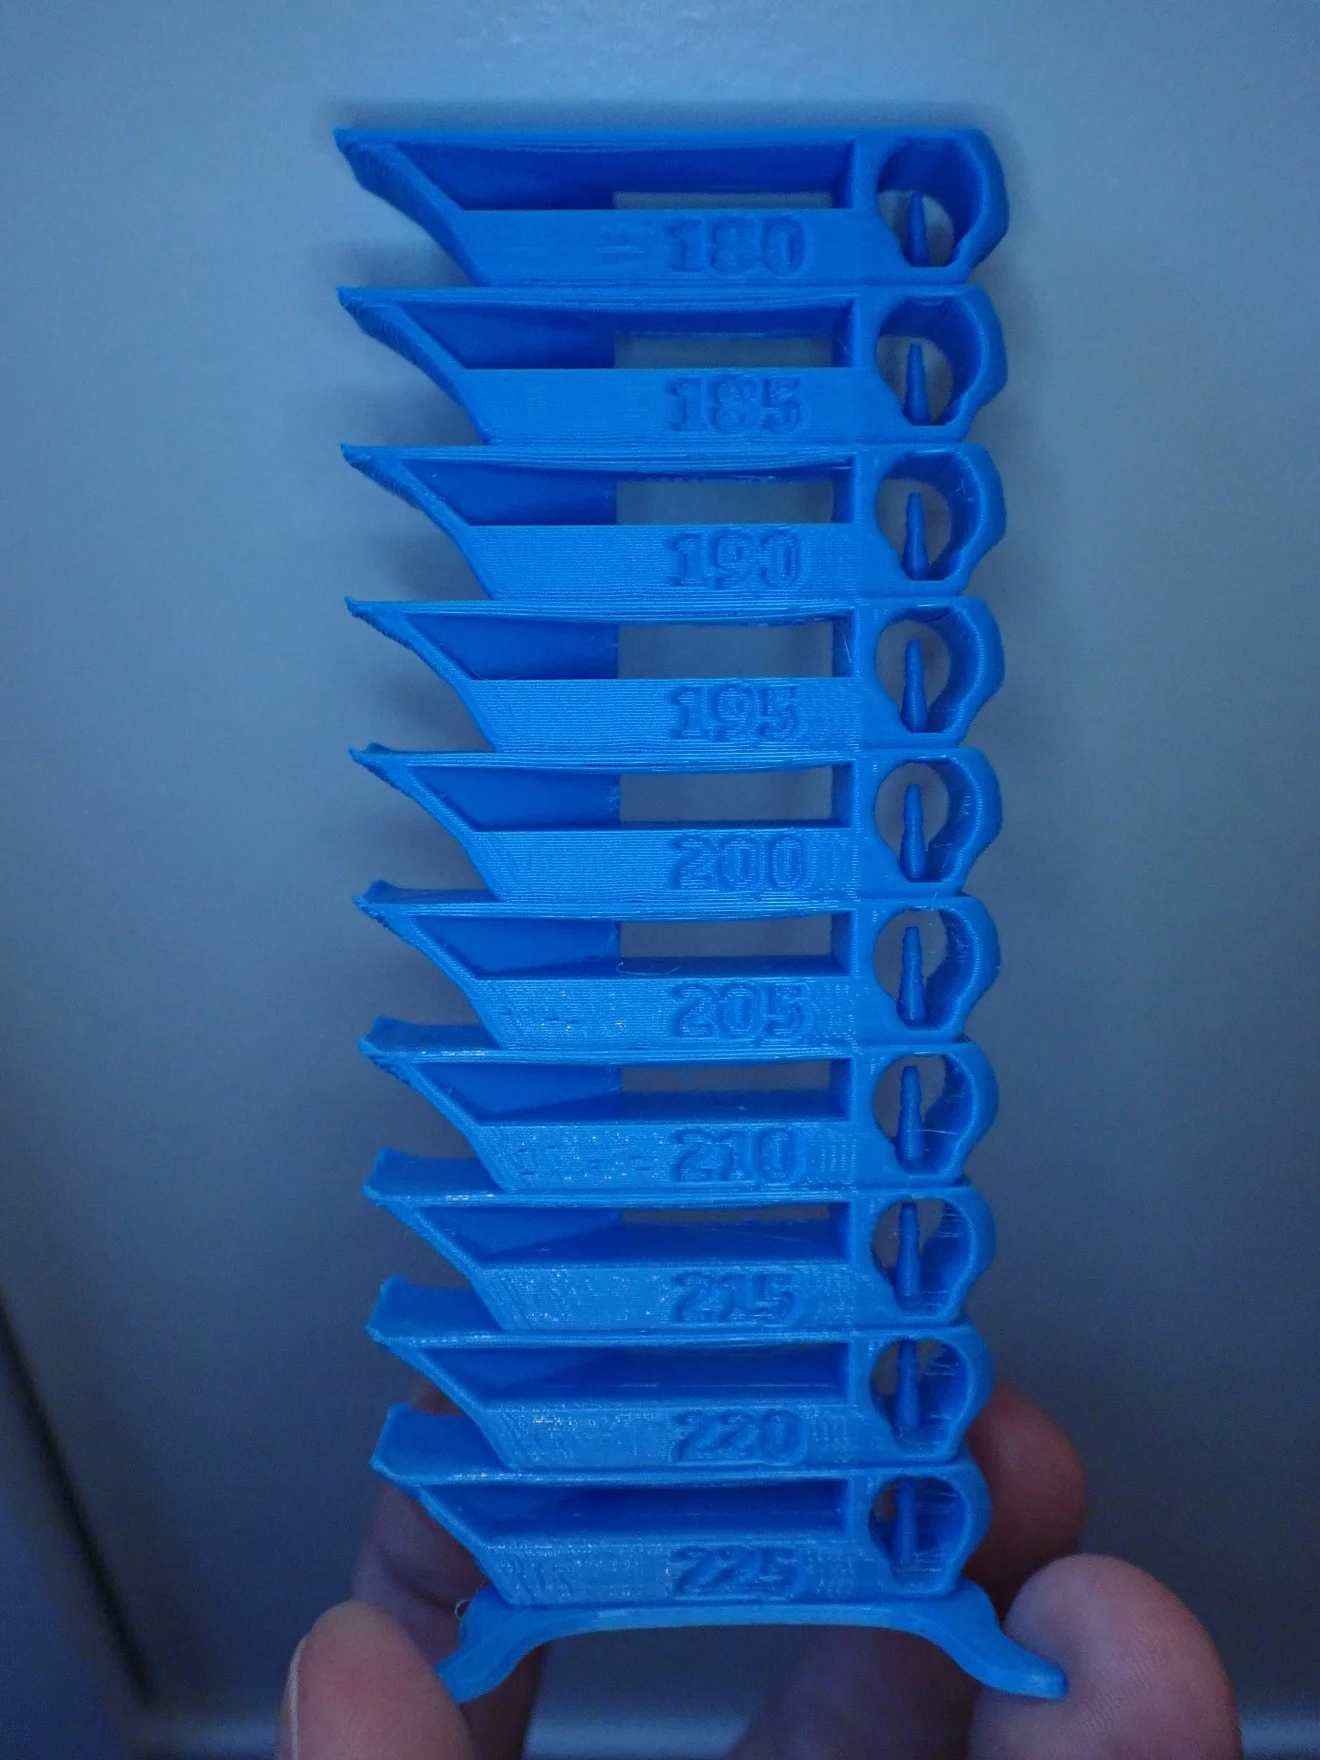
I prefer to calibrate the printing temperature with a temperature tower. This object consists of several levels of the same geometry. The shape of the individual levels provokes certain printing errors that appear at an incorrect temperature.
During printing, the temperature changes in small steps per layer. So you can see after printing at which level and temperature the best results can be achieved.
How to Calibrate the Flow Rate
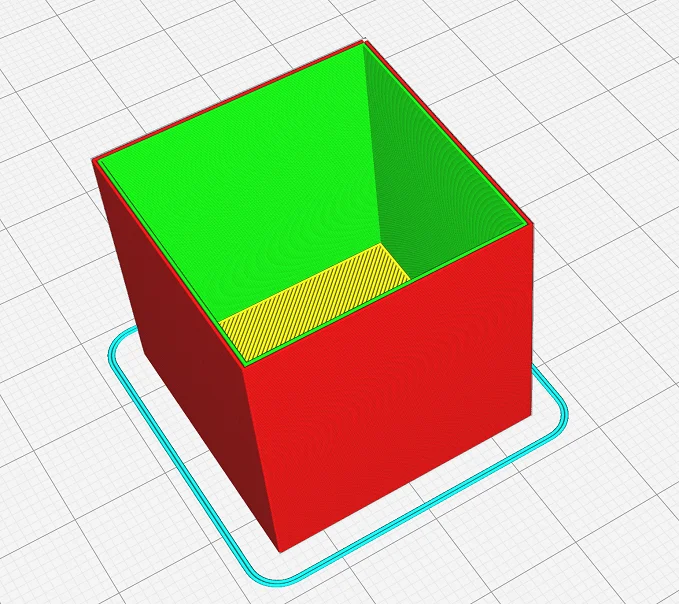
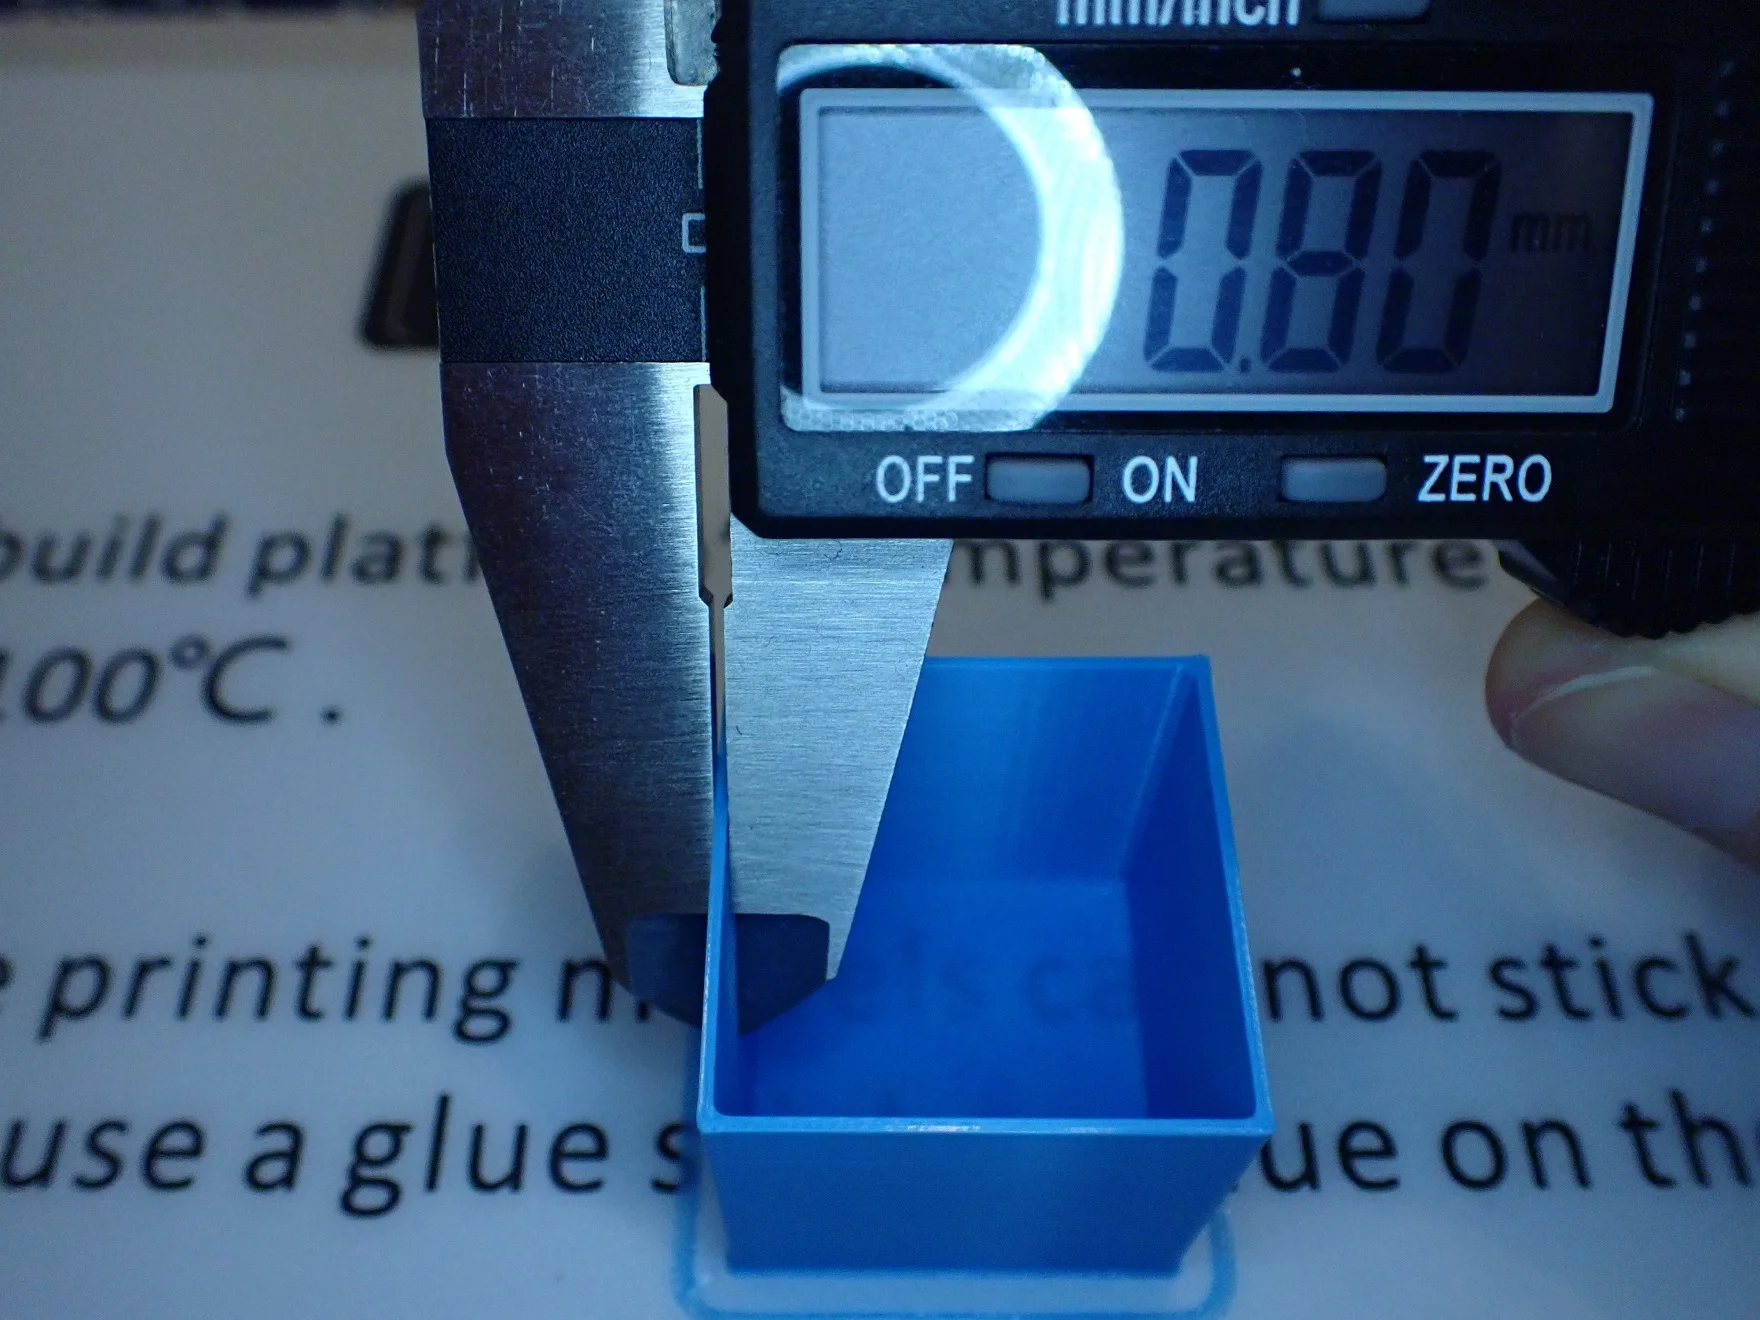
If the flow rate is set correctly, the height and width of the filament lines will be exactly the value you set in Cura. To check this it is best to print an object where you can easily measure the wall thickness after printing.
Popular for this is a hollow cube without infill and upper layers. This way you can measure the wall thickness with a caliper after printing. If the wall thickness is too thin, you have to increase the flow rate, if it is too thick, you have to decrease it.
How to Calibrate the Retraction
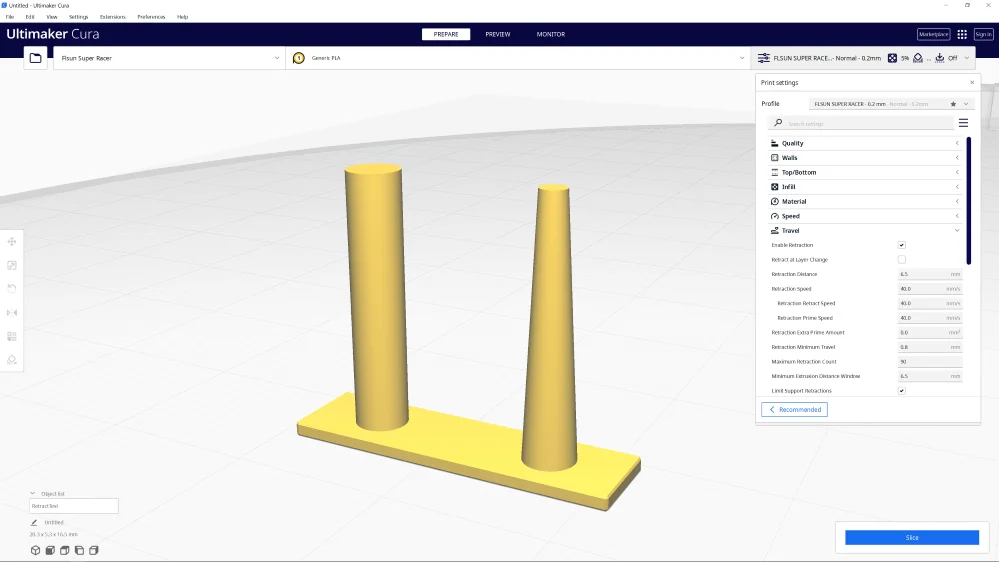
If the retraction is set incorrectly, stringing occurs particularly quickly – i.e. fine hairs are stretched between two points of the object. For this reason, an object can have a very minimalist structure for the calibration of the retraction and in principle only consist of two small columns.
If the retraction is set correctly, there will be no stringing between these columns. Most of these objects are printed within a few minutes, allowing you to quickly change the settings to find the perfect value.
The retraction consists of two values, the distance and the speed. Only change one value at a time!
Conclusion
The FLSUN Super Racer is a very good 3D printer and one of the best I have tested so far. In fact, it’s my favorite 3D printer at the moment and the one I use to make most of my timelapse videos on YouTube.
With its high speed and high accuracy, it brings the most important features you want in a 3D printer. As long as you use the right Cura settings, you can print extremely fast and accurately with your Super Racer. The values in this article should give you a good starting point. Calibrating the most important settings will perfect your results!
Have fun printing at lightning speed with the Super Racer!
Disclosure: This website is the property of Martin Lütkemeyer and is operated by Martin Lütkemeyer. Martin Lütkemeyer is a member of the Amazon Services LLC and other Affiliate Programs. These are affiliate advertising programs designed to enable websites to earn advertising revenue through advertising and linking to Amazon.com and others. Links marked with * are affiliate links.
