
- Wet Filament: Prevention, Symptoms & Drying - July 18, 2024
- Sovol SV08 – Best PrusaSlicer Settings & Profile - June 26, 2024
- Sovol SV08 – Best Orca Slicer Settings & Profile - June 26, 2024
Disclosure: Links marked with * are Affiliate Links. I earn from qualifying purchases if you decide to make a purchase through these links – at no additional cost for you!
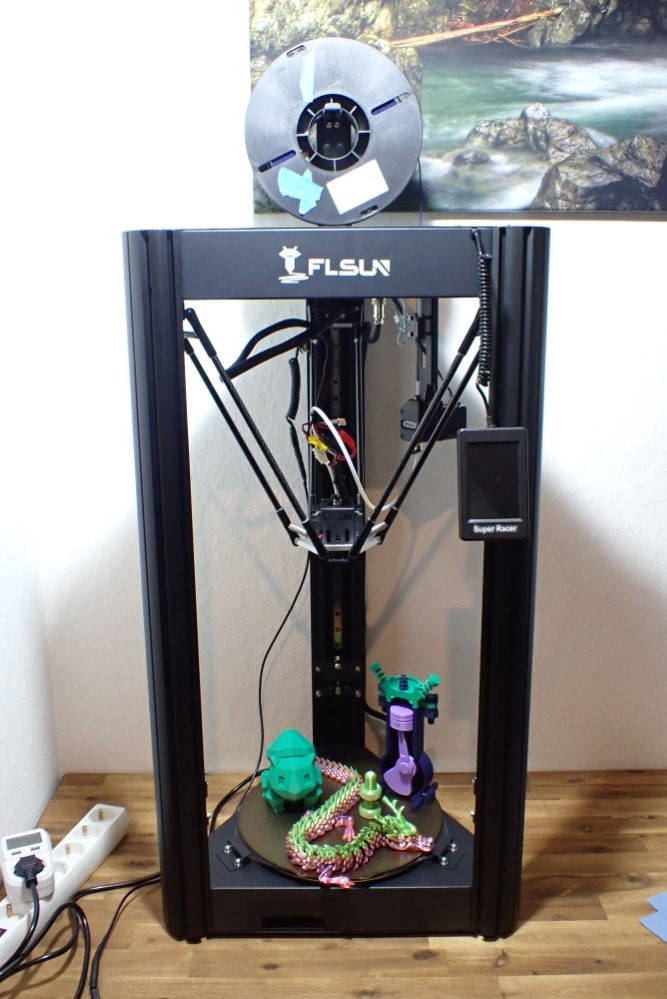
FLSUN loves Delta 3D Printers! And after this hands-on test of the FLSUN Super Racer*, it seems I’m also one of the Delta 3D printer enthusiasts…
The Super Racer is actually my first Delta 3D printer that I have tested practically. I especially wanted to know if the high printing speed is only theoretical or if it can actually be achieved without major quality losses.
In this hands-on review, I’ll introduce you to the Super Racer in detail and show you the print quality you can achieve at such high speeds.

Check Price at:
Table of Contents:
- 1 Key Takeaways
- 2 Who Should Buy the FLSUN Super Racer?
- 3 Advantages & Disadvantages > FLSUN Super Racer
- 4 Technical Specifications > FLSUN Super Racer
- 5 Scope of Delivery > FLSUN Super Racer
- 6 Setup > FLSUN Super Racer
- 7 How Does a Delta 3D Printer Work? > FLSUN Super Racer
- 8 Features > FLSUN Super Racer
- 8.1 High Printing Speed
- 8.2 Large Radial Print Volume
- 8.3 Sturdy Metal Frame
- 8.4 Automatic Print Bed Leveling
- 8.5 Glass Print Bed
- 8.6 Double Nozzle Cooling
- 8.7 Dual Gear Bowden Extruder
- 8.8 Wide Range of Connection Options
- 8.9 Detachable 3.5-inch Touch Screen
- 8.10 Built-In Tool Drawer
- 8.11 Quiet Operation
- 8.12 Automatic Filament Feeding
- 8.13 32-Bit Motherboard
- 8.14 Filament Sensor, Belt Tensioner & Resume Print
- 9 Handling > FLSUN Super Racer
- 10 Heating Times > FLSUN Super Racer
- 11 Power Consumption > FLSUN Super Racer
- 12 Slicer > FLSUN Super Racer
- 13 Print Quality > FLSUN Super Racer
- 14 Upgrades > FLSUN Super Racer
- 15 FLSUN Super Racer vs. FLSUN QQ-S Pro
- 16 FLSUN Super Racer vs. FLSUN Q5
- 17 Conclusion – Is the FLSUN Super Racer Worth It?
- 18 Similar 3D Printers
Key Takeaways
- High print speeds of 100-200 mm/s (which is 2-4 times faster than most Cartesian 3D printers)
- Relatively large print volume of ø260 x 330 mm
- Automatic print bed leveling
- Not well suited for flexible filaments (the Bowden tube between extruder and nozzle is very long)
Who Should Buy the FLSUN Super Racer?
Anyone who is looking for a reliable 3D printer for inflexible filaments and at the same time appreciates a high printing speed, is well advised with the FLSUN Super Racer. Due to the easy handling and the very good manual, it is suitable for beginners and due to its reproducible good print quality, it is also interesting for advanced users.
Advantages & Disadvantages
> FLSUN Super Racer
PRO:
- Delta design for very high printing speeds
- Automatic print bed leveling
- Stable metal frame
- Dual gear extruder
- Large print volume
- Removable touch screen
- Tools and spare parts included
- Simple (but long) assembly
- Filament sensor, belt tensioner, resume print
CON:
- No PEI print bed (would be an upgrade for some filaments like PETG)
- Micro-SD card slot on the side
- Not suitable for flexible filaments
Technical Specifications
> FLSUN Super Racer
DEVICE
- Technology: Delta FDM (Fused Deposition Modeling)
- Assembly: Partially pre-assembled, approx. 20-40 minutes
- Size: 440 x 390 x 960 mm
- Operation: Removable 3.5-inch color touch screen
PRINTING
- Extruder: Dual Gear Bowden
- Print volume: ø260 x 330 mm
- Layer height: 0.05 – 0.3 mm
- Printing speed: 150-200 mm/s
- Nozzle quantity: 1
- Nozzle diameter: 0.4 mm
- Max. nozzle temperature: 255 °C
- Max. print bed temperature: 100 °C
- Filaments: PLA, ABS, PETG
- Filament diameter: 1.75 mm
- Print bed: Textured glass print bed
- Print bed leveling: Automatic
- Resume print: Yes
- Filament sensor: Yes
SOFTWARE
- Connectivity: Micro SD card, USB, USB cable
- Slicer: Cura (recommended), Repetier-Host, Simplify3D
Check Price at:
Scope of Delivery
> FLSUN Super Racer
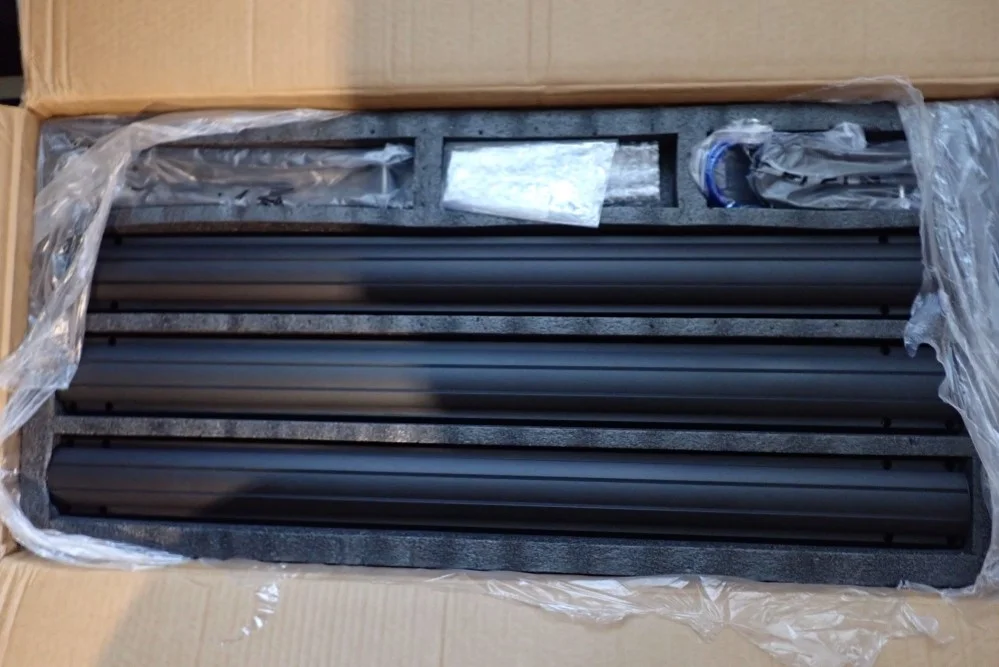
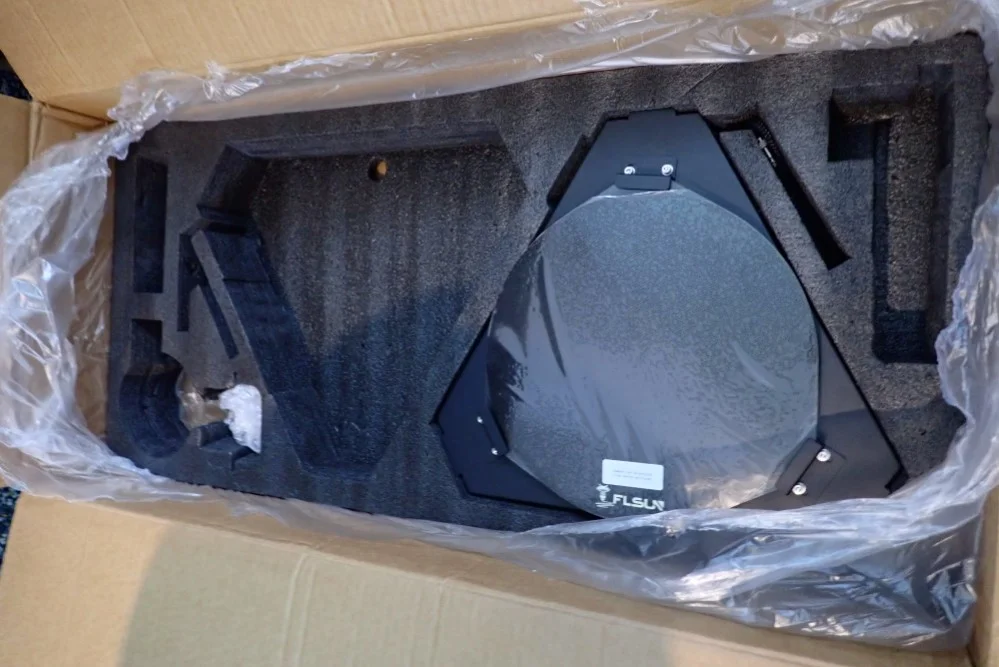
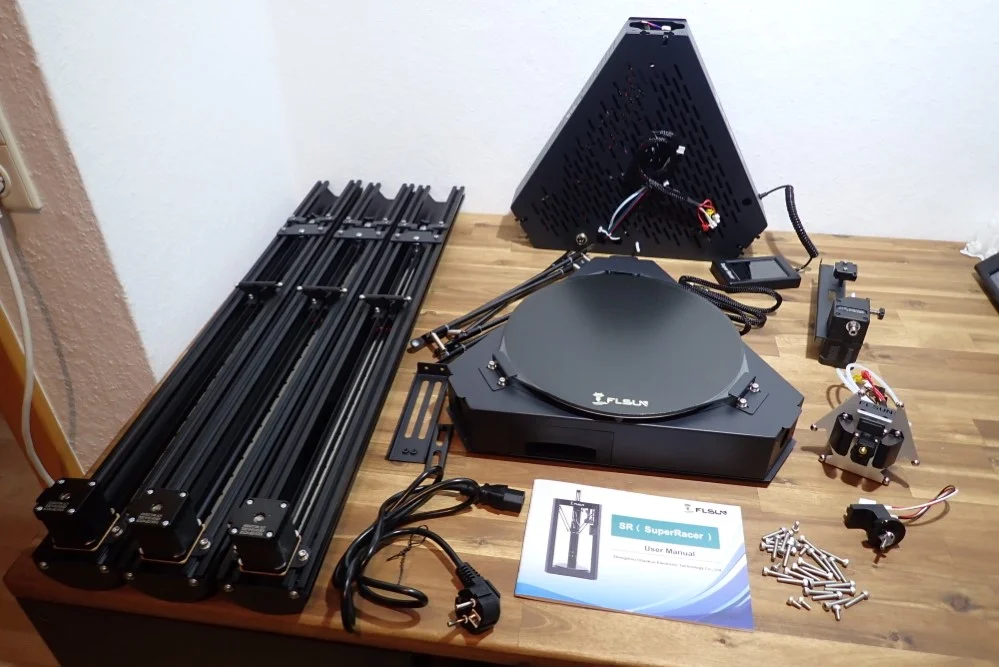
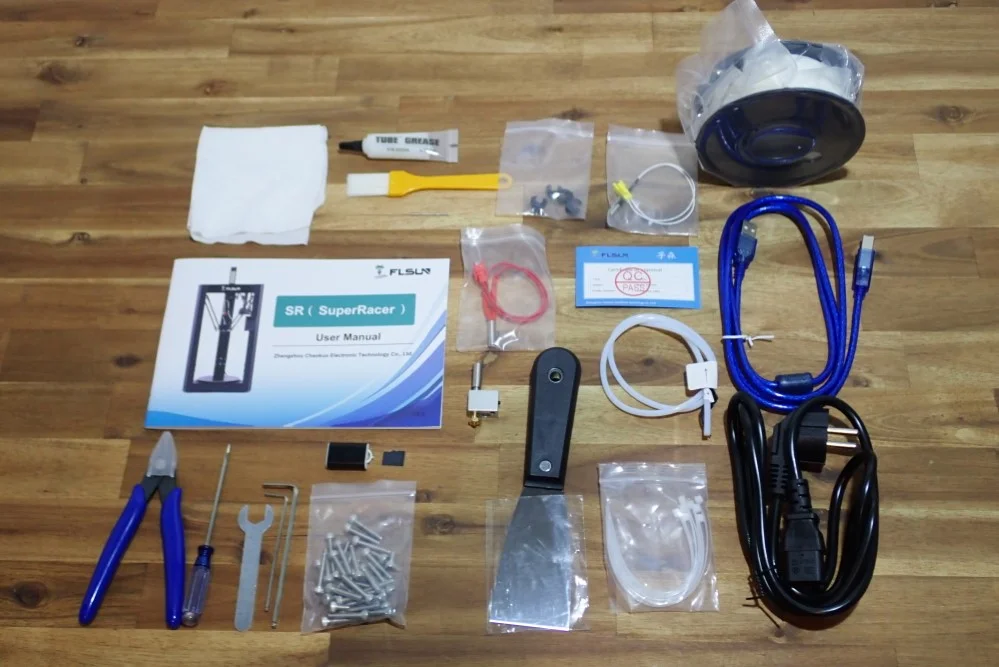
The scope of delivery of the FLSUN Super Racer includes all individual parts of the partially pre-assembled 3D printer, all tools for assembly, a side cutter for filament, a spatula for the print bed, grease with a brush for maintenance, 200 g PLA filament and a micro SD card.
The many individual parts of the printer are delivered well packed in an amazingly handy package. The bulkiest thing about the 3D printer are probably the three large frame parts. Thus, the package is very long but narrow and easy to lift. All parts are very well secured and packed inside with foam.
The included filament is definitely only enough for a few test prints. So it’s best to order more filament when you buy your 3D printer. Remember to only order inflexible filaments like PLA or ABS because the FLSUN SR only has a Bowden extruder with a very long tube. Flexible filaments would get hopelessly tangled here.
The included micro SD card contains links for useful videos, the Cura Slicer and test models. The test model is a screw and nut with complex geometry to test if everything is ok with the printer and the calibration worked (more about calibration later).
Even though Cura is included on the micro SD card, I would still recommend downloading and installing the latest version from the website. Cura is updated regularly and gets new features all the time.
Setup
> FLSUN Super Racer
The assembly of the FLSUN Super Racer takes 20 to 40 minutes. The 3D printer is partially pre-assembled. The individual parts only need to be screwed together, cables need to be connected and the print head needs to be suspended.
When I opened the package, I was a little shocked at first at how many parts are included. I have prepared myself for a lengthy and difficult assembly as with one of the old DIY kits. Fortunately, however, most parts are already pre-assembled and only need to be screwed together and connected. The instruction manual is very clear and explains each step with very good pictures.
The instruction manual explains the assembly very precisely in many steps and clear instructions with pictures. The assembly is divided as follows:
- Assembling the printer: 33 steps
- Print bed leveling: 18 steps
- Loading filament: 12 steps
- Check Z-Offset: 9 steps
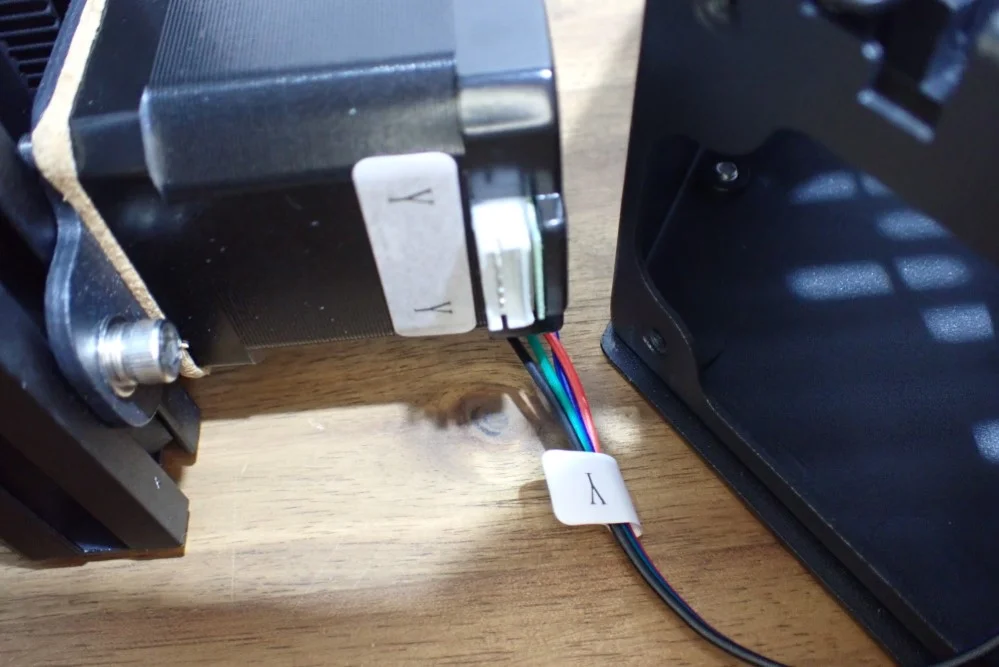
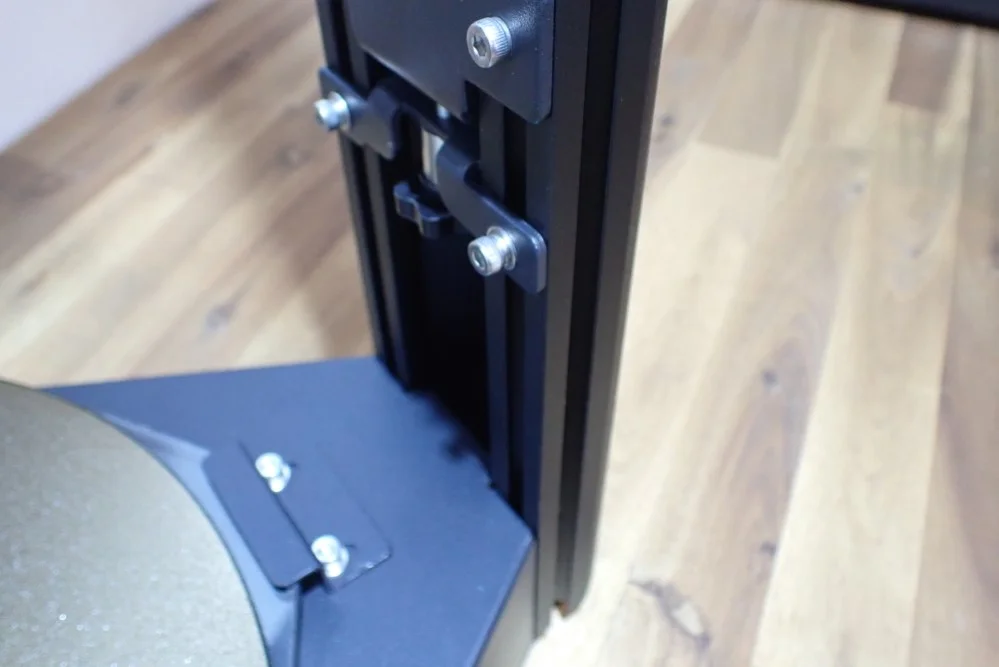
The 3D printer is assembled upside down. The top of the printer with the mainboard is placed upside down and the three frame parts (each 800 mm long!) are each screwed tightly to it with four screws. The stepper motors and belts are already pre-assembled in these frame parts. You only have to screw them on and plug in the stepper motor beforehand.
After that, the printer base is put on top or plugged in and screwed on. Under the base, which is now on top, the plate protrudes slightly on the three sides where the frame parts are located, so that it does not fall down during assembly. After that, the magnetic holder for the touchscreen is inserted into one of the frame parts and then pushed into the right position and screwed tight.
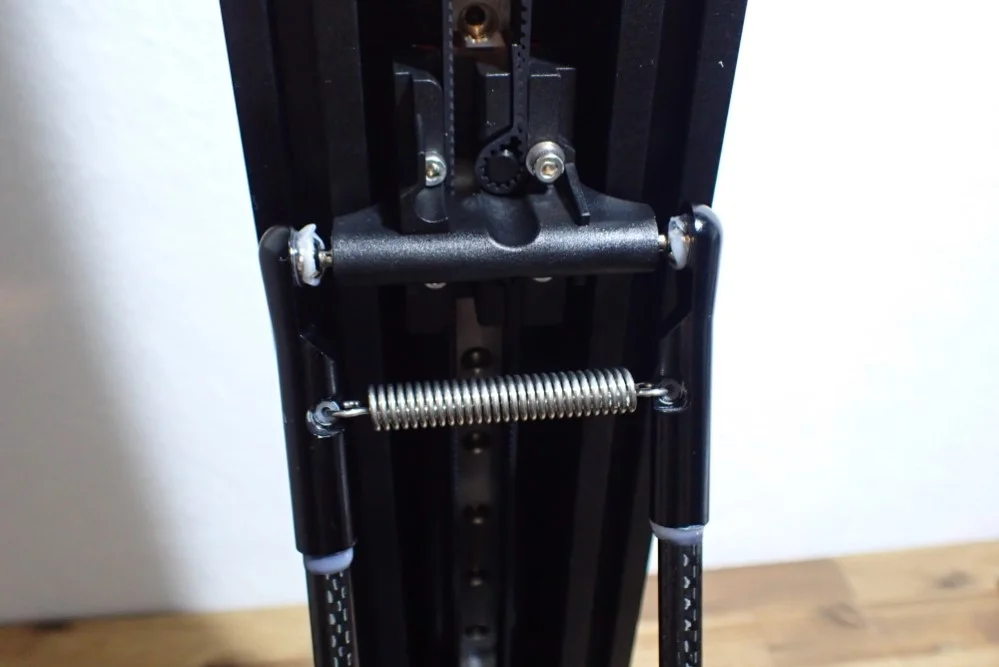
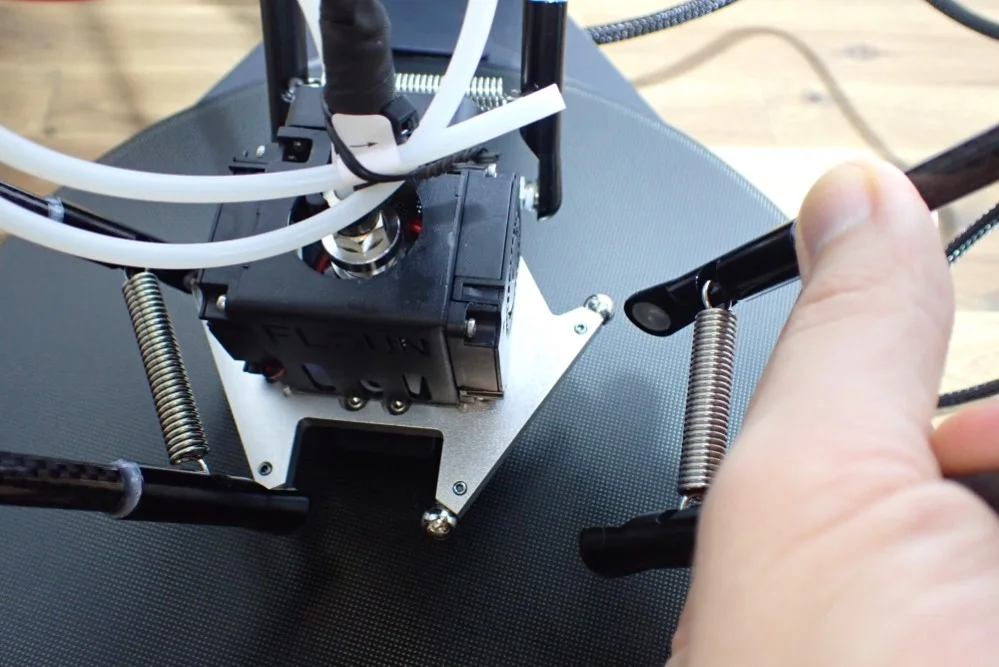
Now turn the 3D printer to the right side so that the print head can be suspended with the parallel arms on all three frame parts. The ball joints are already well greased, so you do not have to do this during assembly. After a few weeks of use, you should check if there is still enough grease and add some if necessary.
As soon as the extruder is hanging, the cables can be connected to the cable harness. The cable for the level sensor remains open for the time being. Next, the extruder is mounted and supplied with power. Now only the filament holder is left, which is mounted on top of the 3D printer with two screws.
Now the assembly is basically complete, but there is still one important step missing – the automatic print bed leveling.
Print Bed Leveling
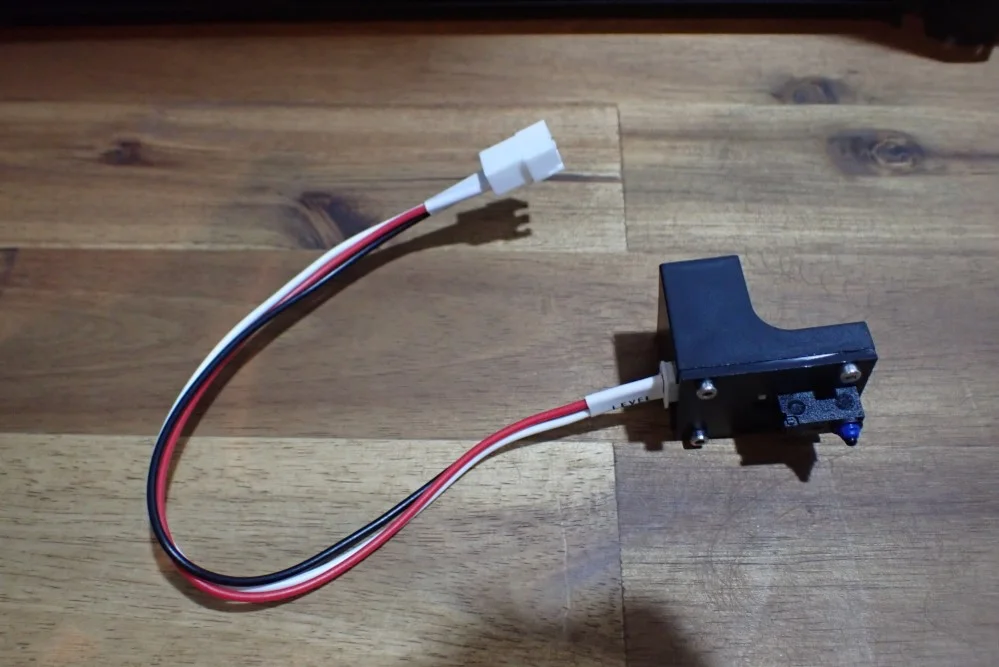
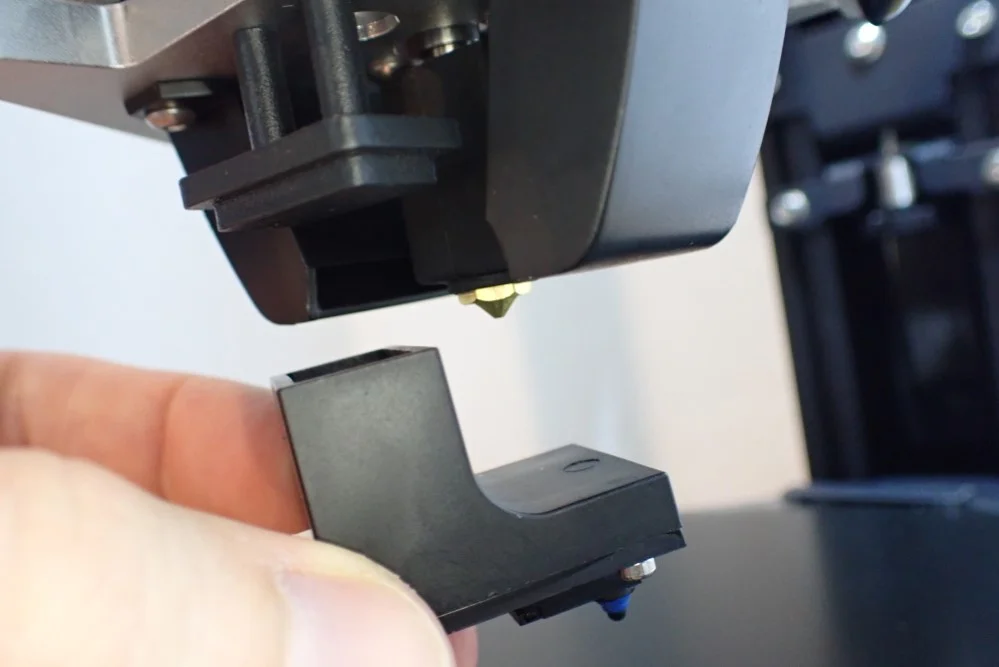
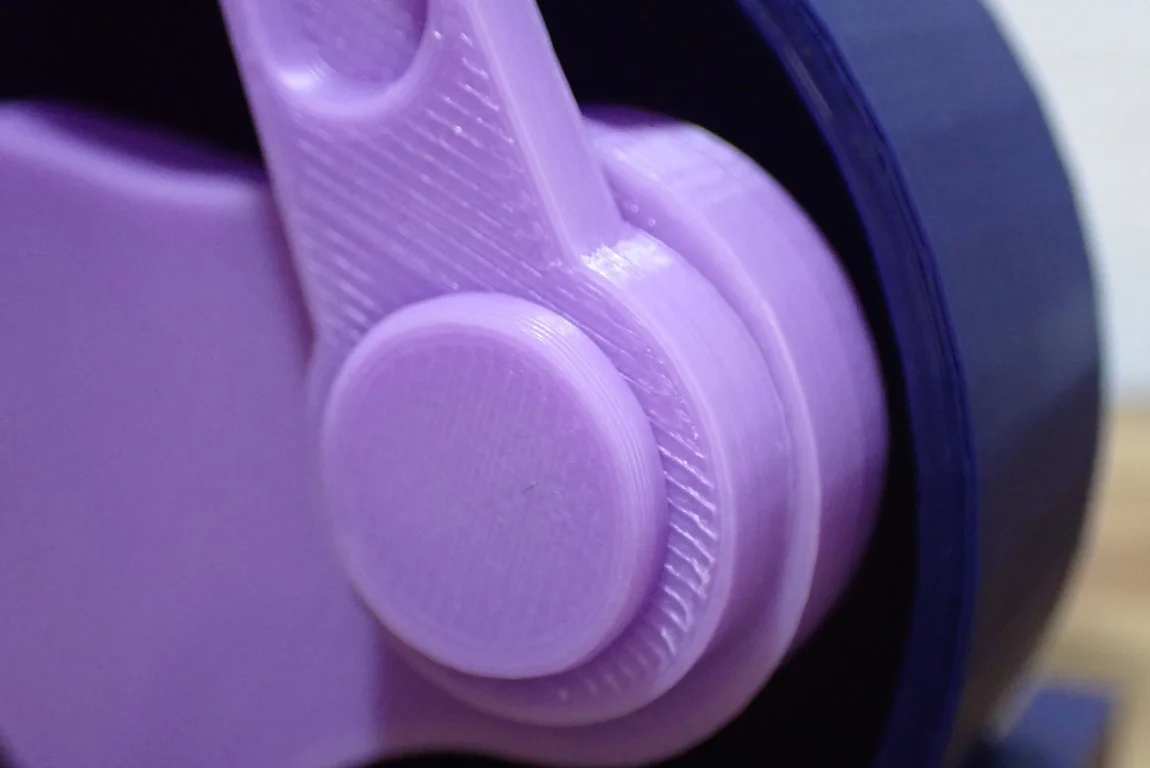
The print bed leveling of the FLSUN Super Racer is done automatically with a leveling sensor that is mounted on the print head for leveling. This sensor measures the inclination of the print bed at several points. After that, only the Z0 offset has to be adjusted manually.
I’ve never seen this kind of print bed leveling in real life. However, I must say that I find it quite clever. By mounting the sensor to the print head only for the leveling and removing it afterwards, a lot of weight is saved. With a Delta 3D printer, it’s very important that the print head is as light as possible to prevent vibrations from occurring at extremely high print speeds. This simply reduces the inertial mass of the print head. And as long as you don’t need the sensor, you can easily store it in the tool drawer in the 3D printer base.
As soon as you have mounted the sensor on the printhead, you can start the leveling via the menu. To make sure you don’t forget to mount the sensor, the menu will remind you. After you have acknowledged this warning, the leveling starts automatically and takes about 2 minutes to touch the many places on the print bed. From this data, the 3D printer calculates the inclination of the print bed, which is then automatically compensated during printing.
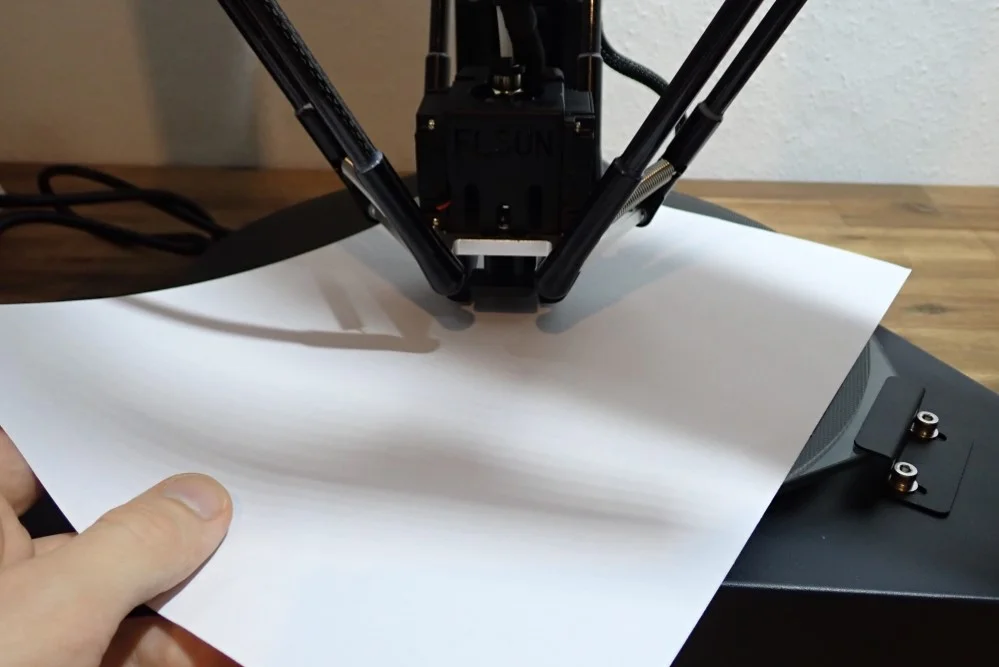
After this process is completed, remove the sensor. It is held to the print head with a magnet. After that, you only have to set the Z0 offset, i.e. the distance between the nozzle and the print bed. You can do this easily with a normal piece of paper.
The piece of paper is placed on the print bed, the process is started via the menu and the nozzle moves to the center to the stored Z0 zero position. Using the menu, you then adjust the distance in small steps so that you can only move the piece of paper back and forth between the nozzle and the print bed with a little friction. When you are satisfied with the setting, you can save the Z0 offset in the menu. This value will also be taken into account when printing.
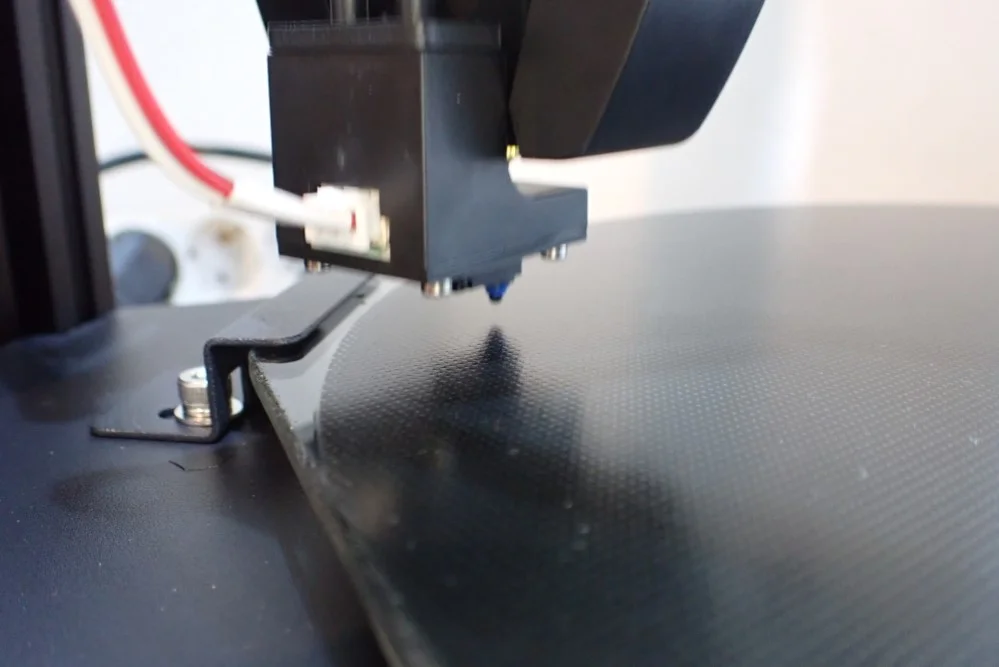
In the manual, it is recommended to verify the Z0 setting with a test print. To do this, load some filament and start the test object on the micro SD card. During the first layer, observe whether the filament is only loosely placed on the print bed or whether it is properly pressed onto it. If the nozzle is too close, the filament will be pressed too hard onto it and may not be extruded properly. As soon as you notice that the distance is correct, you can stop the print or let it continue.
Check Price at:
How Does a Delta 3D Printer Work?
> FLSUN Super Racer
Delta 3D printers are designed to realize as high printing speeds as possible. They have a cylindrical print volume and the print head is moved by three arms in this volume. The print bed does not move.
As the name of the “FLSUN Super Racer” suggests, this 3D printer is designed to outperform standard Cartesian 3D printers in terms of print speed. Most Cartesian 3D printers, such as the Ender 3 S1 or the Elegoo Neptune 3, achieve print speeds of 40-80 mm/s. The FLSUN Super Racer reaches two to three times this speed with 150-200 mm/s!
This is extremely fast as far as 3D printing is concerned. If a “normal” 3D printer, i.e. a Cartesian 3D printer, takes 5 hours to print, the FLSUN Super Racer would take less than 2.5 hours. If print time is important to you, a Delta 3D printer is probably right for you.
Seeing a Delta 3D printer in action for the first time is impressive and mesmerizing. The movements of the three arms are precisely coordinated so that the print head is always moved parallel to the print bed. This is achieved through complex trigonometric calculations, unlike Cartesian 3D printers that move back and forth on rigid rails.
The disadvantage of this way of working is that Delta 3D printers have a relatively small footprint compared to the print volume, but are very high. So you need a place for the FLSUN Super Racer that offers enough space for the 3D printer and is still low enough that you can reach the filament holder without problems.
Another disadvantage is that the print head must be as light as possible. This mostly rules out a direct drive extruder. Also, the FLSUN Super Racer has a Bowden extruder with a rather long PTFE tube between the extruder and printhead. This makes it unsuitable for processing flexible filament. The filament would simply compensate for the extrusion movements on the long way to the nozzle.
But if you mainly want to print with inflexible filaments like PLA, ABS or PETG, this extruder is best suited to bring these filaments exactly on the print bed surface.
Features
> FLSUN Super Racer
The FLSUN Super Racer not only brings the advantages of a Delta 3D printer, but it also has some very useful features that increase the ease of use and the likelihood of a successful print.
High Printing Speed

The FLSUN Super Racer reaches printing speeds of 150 to 200 mm/s. These high print speeds can be achieved by the lightweight print head which is the only moving part during printing.
Unlike Cartesian 3D printers, the FLSUN Super Racer does not need to move a large print bed in the Y-direction, the print head on the X-axis and the X-axis in the Z-direction. Therefore, the print head can move much faster without creating vibration or inaccuracies in positioning. The inertial mass that needs to be moved is simply much lower.
However, the higher the printing speed becomes, the more frequently printing errors occur (ghosting, under-extrusion, etc.). In my tests, these print errors occurred from a speed of 150 mm/s. For the best quality, I set the print speed to 100 mm/s, which is still more than twice as fast as most other 3D printers.
To achieve such high printing speeds, all moving parts of the printhead have been designed to be as light as possible. The three arms of the printhead weigh less than 200 g in total and the printhead itself less than 300 g. The three stepper motors that move the printhead are therefore sufficient to move this weight precisely and quickly.
However, depending on how well your filament adheres to the glass print bed, you may want to use a slower print speed for the first layer. Print bed adhesion is dependent on the print speed as well as the correct Z-Offset. The longer the filament has time to cool, the better the bond between it and the surface. I was able to achieve good print bed adhesion at 50 mm/s.
Large Radial Print Volume

The print volume of the FLSUN Super Racer is ø260 x 330 mm. It is cylindrical and not cube-shaped like cartesian 3D printers.
Switching from a Cartesian 3D printer to a Delta 3D printer takes some getting used to, also when it comes to the print volume. Due to the way it works and the resulting movement of the print head, the print volume is cylindrical and is only a portion of the space spanned by the three columns of the frame.
Even though the three columns of the frame are each over 800 mm long, the print volume is only 330 mm high. This is due to the three arms of the printhead that still have to move within this volume. The print head can only travel a certain distance upwards until it hits the top of the printer with these arms. Nevertheless, the print volume is large enough to print larger objects in one piece.
The Super Racer is in principle also well suited for the use of ABS filament. The only thing it lacks in order to process it reliably is a closed print volume. ABS warps when it cools uncontrollably and therefore prints best in a warm environment that is as free of cold air currents as possible.
Thanks to the design of Delta 3D printers, it is usually very easy to seal the print volume more or less airtight, just like with the Super Racer. The only thing you need are matching plexiglass plates that you attach to the frame. To prepare for printing, you then only need to preheat the printing plate to the desired temperature at least 10 minutes before printing, so that the print volume is warm enough when you start printing.
Sturdy Metal Frame

The complete frame of the FLSUN Super Racer is made of metal and is very stable due to its construction.
The frame is over 800 mm high and the filament holder is mounted on top. So you have to find a place for the Super Racer that is high enough. The frame is made of a sturdy metal profile in which the rails and belts of the Z-axles are already pre-assembled.
The entire construction makes a very solid impression. Thus, at the high printing speeds, the jerky movements of the print head should hardly cause the printer to vibrate.
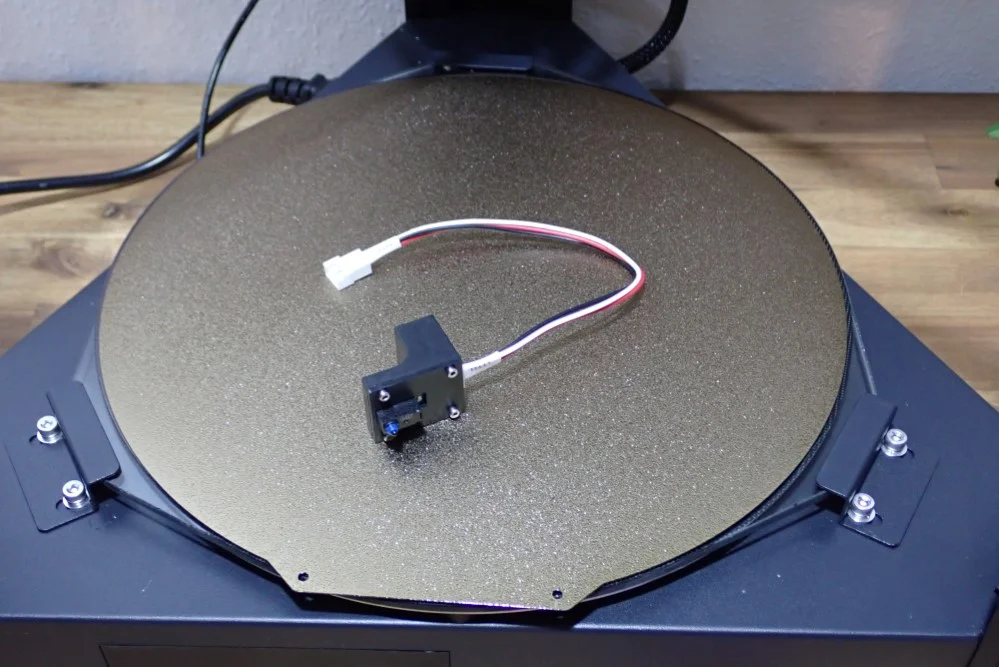
Automatic Print Bed Leveling


The FLSUN Super Racer is automatically leveled via a sensor that can be mounted on the print head with a magnet. After leveling, it is removed again. Only the Z-offset has to be calibrated manually with a piece of paper.
It is very important with Delta 3D printers to keep the weight of the print head as low as possible. Therefore, it is quite clever to make the leveling sensor modular. Every time you want to level the print bed, you have to mount the sensor and plug it into the harness. But this only takes a few seconds thanks to the magnetic connection.
The leveling itself is very simple and done at the touch of a button in the menu. The only thing you have to do afterwards is to set the Z0 offset. This is where the paper method comes into play. With the help of a normal piece of paper, you set the Z0 offset. The menu supports this process.
The piece of paper is placed on the print surface and the process is started via the menu. You then adjust the distance so that you can just move the piece of paper with some friction between the nozzle and the print bed. Then the distance should be set correctly so that the filament is not only lightly placed on the print bed and is not pressed too hard on it.
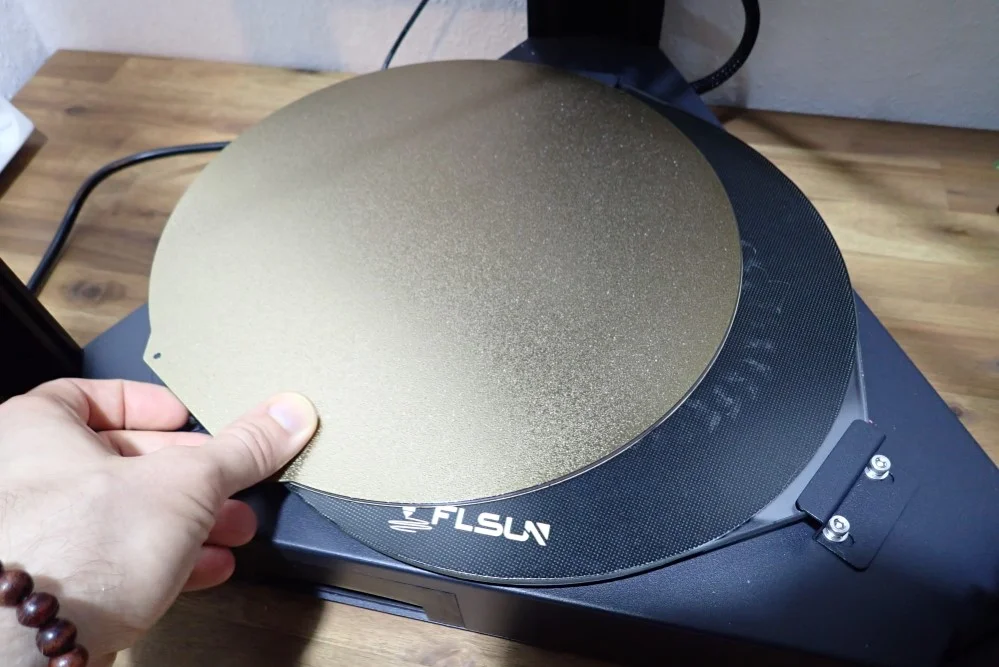
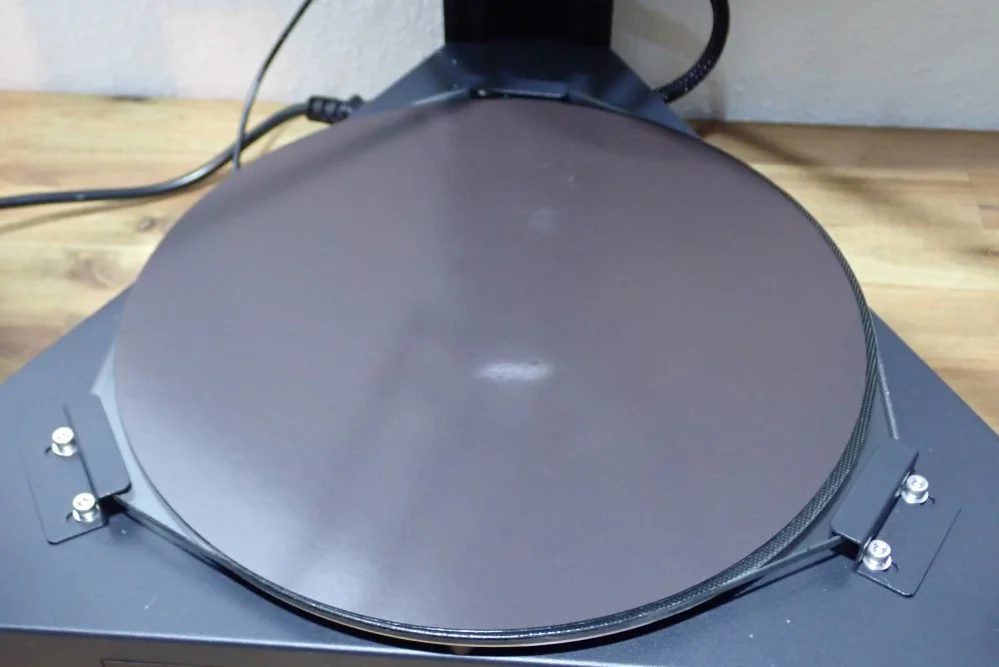
Glass Print Bed

The FLSUN Super Racer has a textured glass print bed with a diameter of 260 mm. The print bed adhesion is good for most filaments, for some filaments it is sometimes even too good, making the objects difficult to release.
In many reviews about this 3D printer, I could read complaints from users who have criticized a too poor print bed adhesion. I could not verify this in my test, because the print bed adhesion was instead good. The objects could only be removed from the completely cooled surface with a lot of force and with the included spatula. In the warm state, it was almost impossible to loosen the objects without damage.
Depending on your case, there are different solutions. If print bed adhesion is too low, you should increase the temperature slightly and/or reduce the print speed for the first layer considerably. With a properly adjusted Z0 offset and a print speed of 5 to 10 mm, the print bed adhesion should be more than sufficient. Alternatively, there are adhesives like Magigoo that provide perfect adhesion for most filaments and simply release the objects after cooling.
If you have the same problem as me, that the print bed adhesion is too good, maybe a PEI print bed would be an option. I have also installed this upgrade and am very happy with it. It fits exactly on the existing glass print bed and provides very good print bed adhesion and the flexible spring steel plate makes the objects very easy to release by bending.
→ Here you can find the PEI print bed I used*
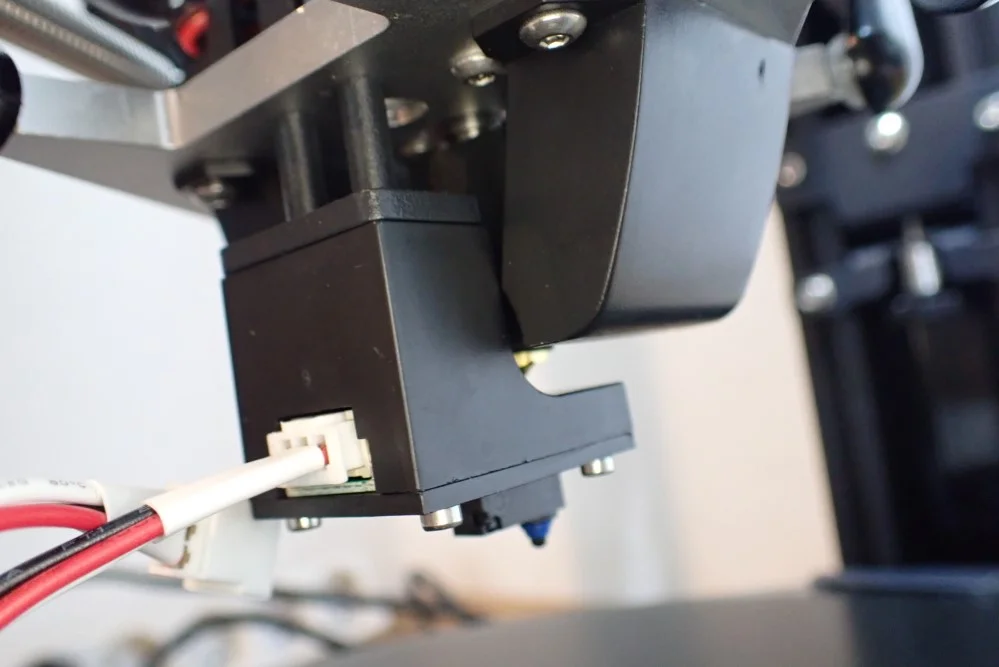
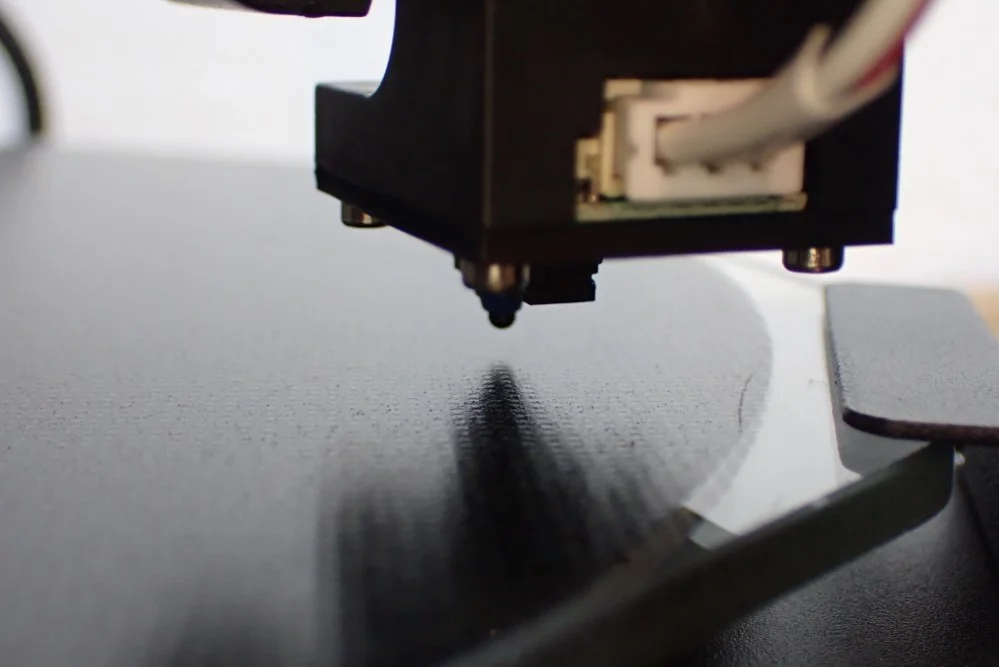
Double Nozzle Cooling
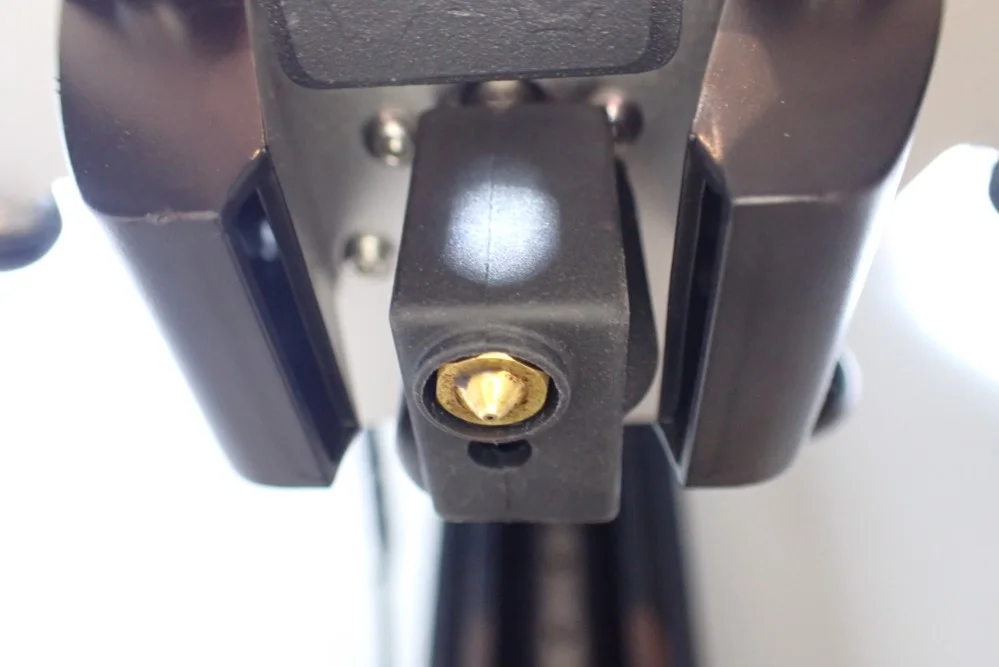
The nozzle of the FLSUN Super Racer is cooled by two fans. This is necessary at high printing speeds so that the filament can solidify quickly enough after extrusion.
The fans that were installed here are nothing special and will probably wear out after some time. With higher quality fans, you could even improve the print quality at very high print speeds. However, you have to make sure that the weight of the new fans is as low as possible.
When buying new fans, the old rule also applies that performance, quality and a low price never come at the same time, which means that good fans with a low weight will probably cost relatively much.
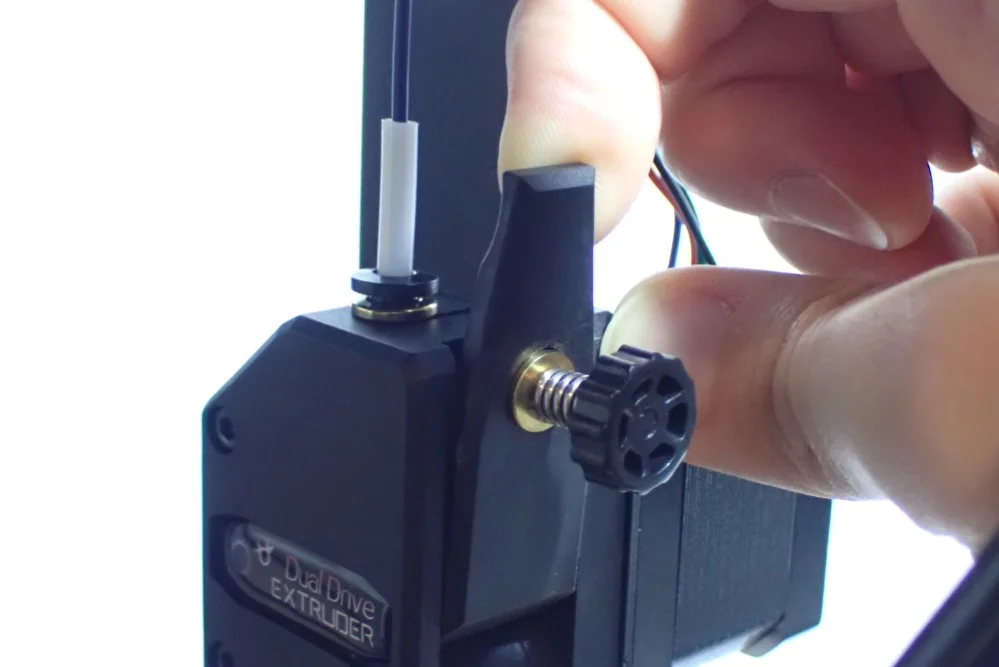
Dual Gear Bowden Extruder
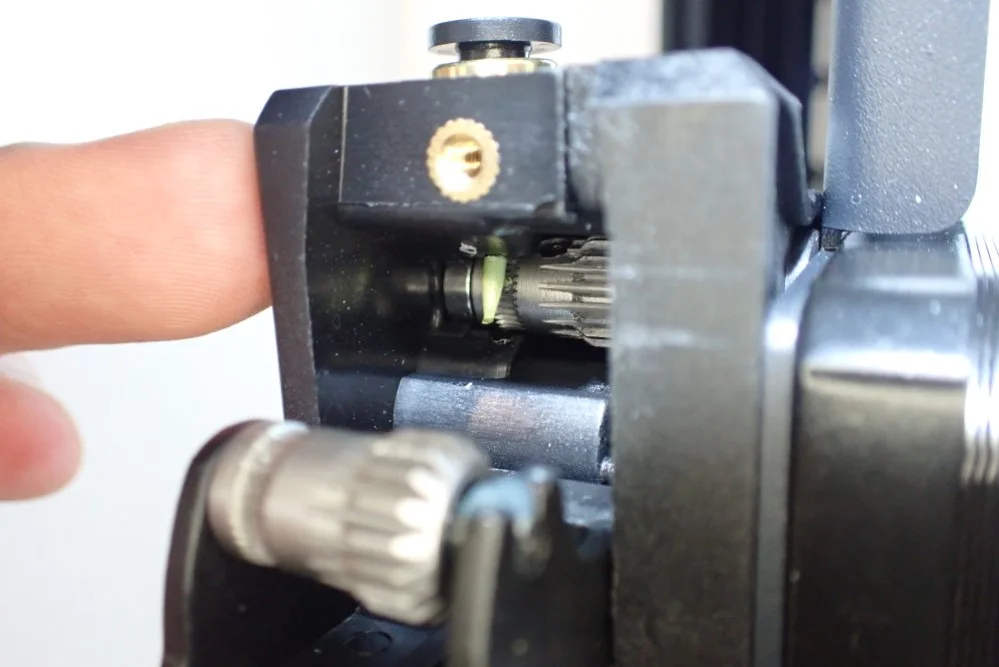
The Dual Drive Bowden Extruder of the FLSUN Super Racer is able to extrude the filament precisely and quickly, which is essential for the high printing speeds. This good control over the filament is produced by two gears.
In my opinion, the quality of the extruder could be even higher, but I have with this type of extruder in other 3D printers and already made good experiences. How the extruder behaves over a long period of operation at these high printing speeds, I can not yet estimate. But since this extruder is widely used, there are spare parts or a completely new extruder for little money. A sudden failure would then not be the end of the world, but only a short time delay.
Between the extruder and the print head is the rather long Bowden tube through which the filament is pushed. The tubing is a standard part and has mediocre tolerances. A possible upgrade would be to use a higher quality PTFE tube with tighter tolerances so that the filament has less room to move around inside. This will increase extrusion accuracy and therefore print quality.
Bowden extruders are generally not very well suited for flexible filaments. In the case of the FLSUN Super Racer, this is especially true due to the long Bowden tubing. The flexible filament would have too much mobility in the tube and could partially compensate for the movements of the extruder due to its flexibility, and the print quality would be greatly reduced. This would lead to extrusion problems like holes or blobs. For rigid filaments like PLA, ABS and PETG, however, the extruder is perfectly suited.
Wide Range of Connection Options
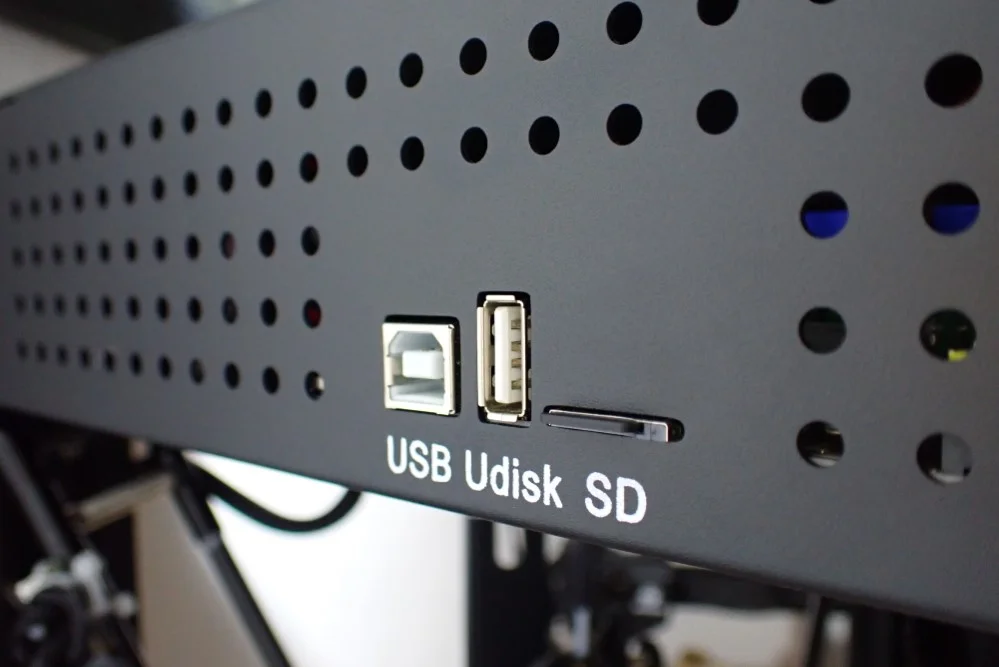
The FLSUN Super Racer has several connection options to feed it with files and monitor it. It has a Micro SD card slot, a USB Type B slot for a USB cable and a USB Type A slot for a USB stick.
The Super Racer comes with a micro SD card and a USB cable for connection to a PC or Raspberry Pi. The only problem with the connections is that they are positioned on the left side of the 3D printer. While this is fine for the USB cable for the PC connection, it is a bit awkward for the Micro SD card slot. So depending on where you have placed your 3D printer, it might be difficult to get to the micro SD card.
Detachable 3.5-inch Touch Screen
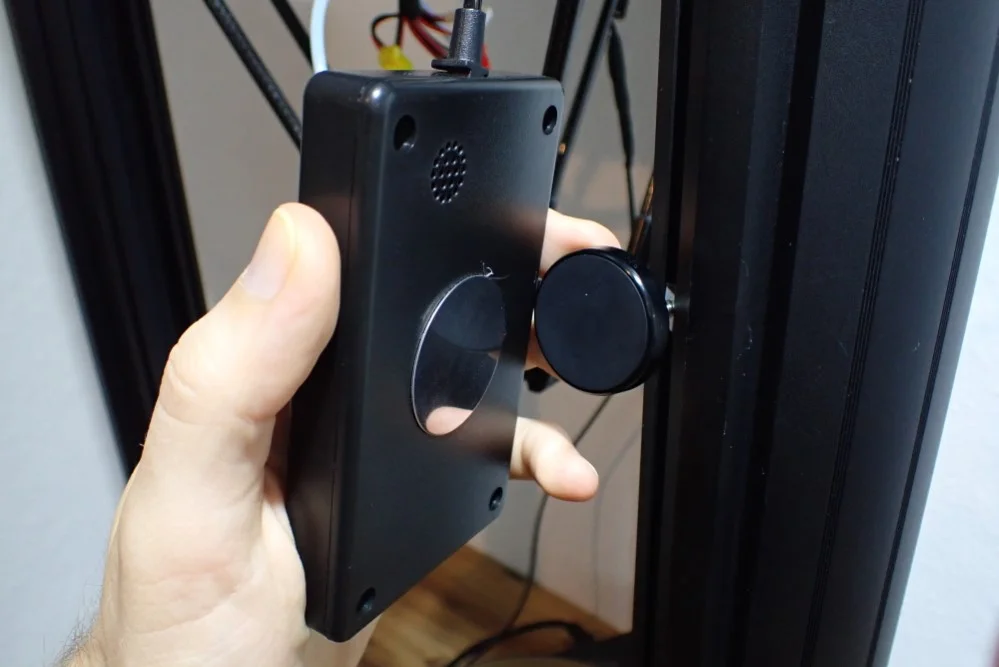
The 3.5-inch touchscreen of the FLSUN Super Racer is connected to the 3D printer with a spring cable. It is removable and only attached to the frame via a magnet. The menu is very clear and easy to understand even without a manual.
The frame of the Super Racer is very high at over 800 mm. No matter if the touchscreen would be fixed at the bottom or at the top of the 3D printer, for some users it would be exactly the wrong position. Therefore, I find this flexible solution perfect for the Super Racer. Even if you have the printer set up on a table and are sitting in front of it, you can simply remove the display and pull it towards you and operate the printer comfortably.
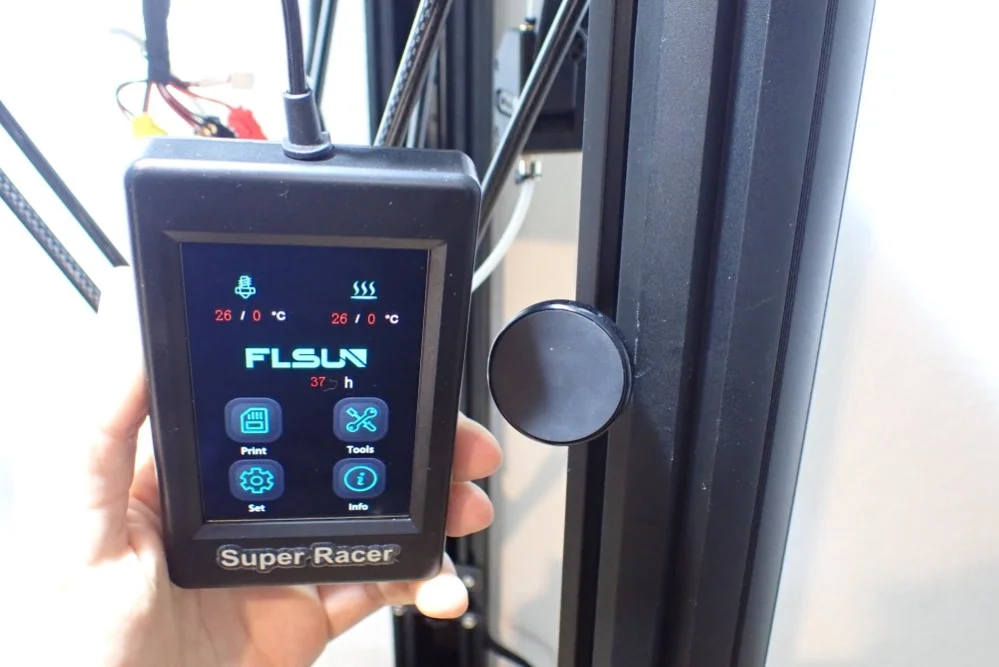
While the entire menu is explained in detail in the user manual, it is immediately intuitive even without the manual. It’s laid out in a way that makes sense, and for more difficult menu options like auto print bed leveling, the menu tells you what to do. These are the individual menus:
- Home Menu:
- Current and set temperatures for the nozzle and the print bed
- Absolute print time of the printer
- Buttons for submenus: “Print”, “Tools”, “Set” and “Info”.
- Print menu:
- Selection of the individual print files
- During printing, various settings such as an adjustment of the Z0 offset, the temperature or the fan speed can be made.
- Tools menu:
- Heating (there are predefined modes for PLA and ABS)
- Manual extrusion
- Change filament
- Move axes
- Automatic leveling
- Language settings
- Set Menu:
- Deactivate stepper motors
- Setting the fan speed
- Restore factory settings
- Info Menu:
- This displays information about the current firmware version and the 3D printer model.
Built-In Tool Drawer
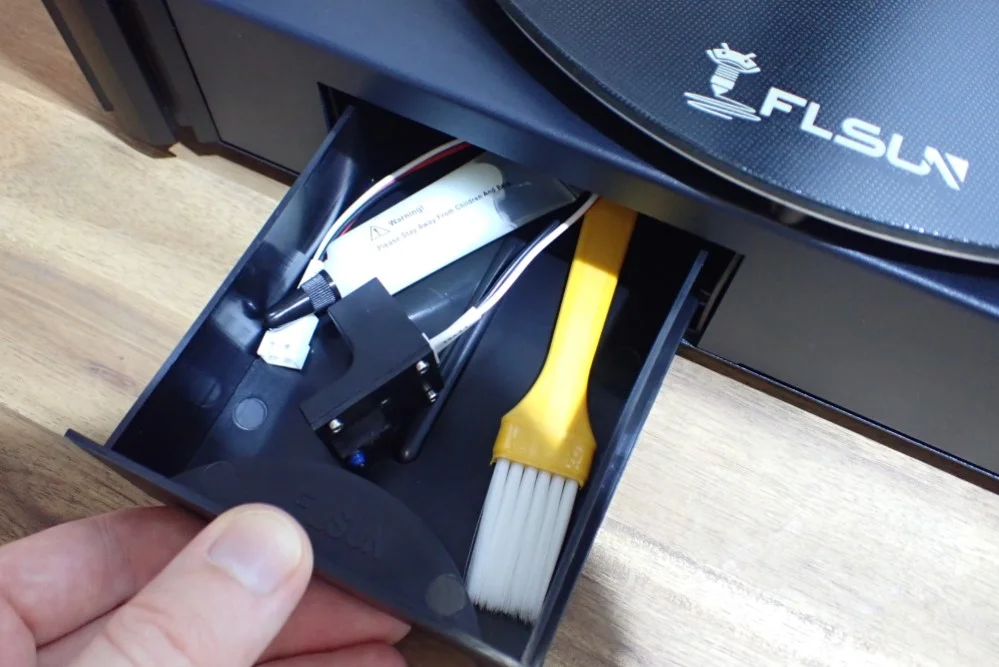
In the base of the FLSUN Super Racer is a pull-out tool drawer. There is space for everything that is needed for the operation and maintenance of the 3D printer.
Besides all the tools, there is also room for the sensor for the automatic print bed leveling. With this tool drawer, you can keep the surroundings of the 3D printer tidy.
Quiet Operation
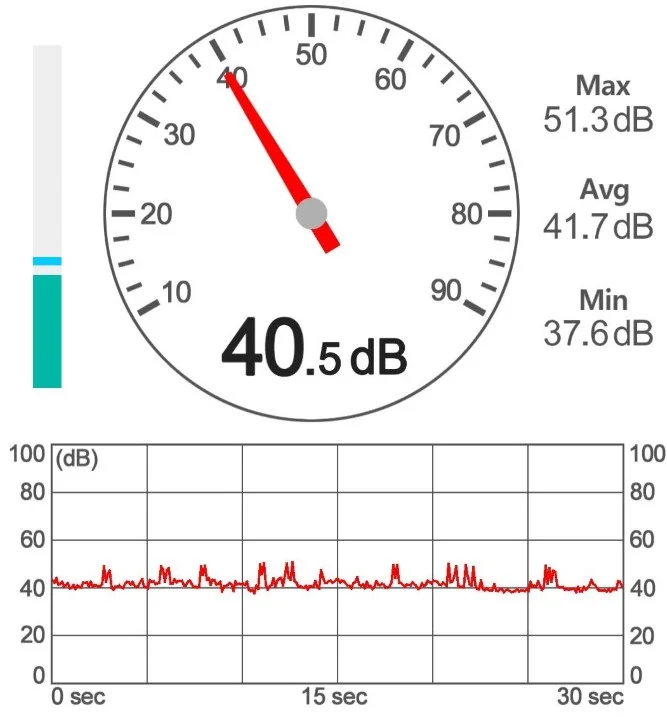
The FLSUN Super Racer has an average volume of 42 decibels with peaks of over 50 decibels. This is comparable to a quiet conversation or soft music.
The spikes you can see in the diagram come from the extruder. With every retraction movement, this noise is generated. The rest of the noise comes mainly from the two fans in the print head that continuously cool the filament as it comes out of the nozzle.
Automatic Filament Feeding
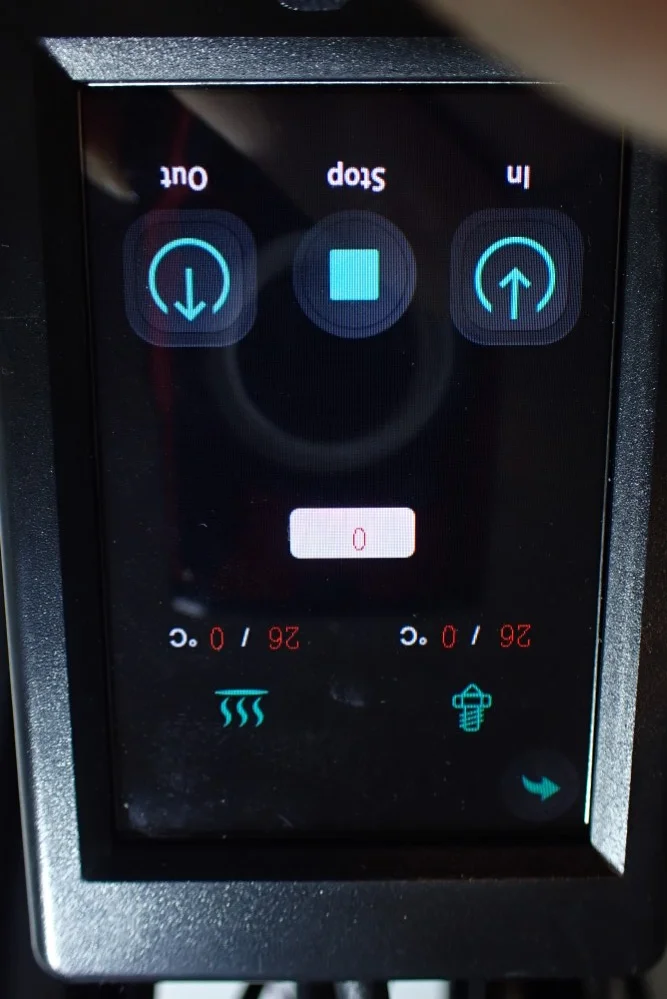
Loading and changing the filament is supported via the menu of the FLSUN Super Racer. There the Nozzle can be heated up to the melting temperature of the filament and pushed over the extruder to the Nozzle by pressing a button.
Normally I find this function quite superfluous because I otherwise preheat via the preheat menu to the temperature of the filament and by decoupling the extruder and manually pushing the filament to the nozzle. However, with this long Bowden tube, it is quite nice to have the filament fed automatically.
32-Bit Motherboard
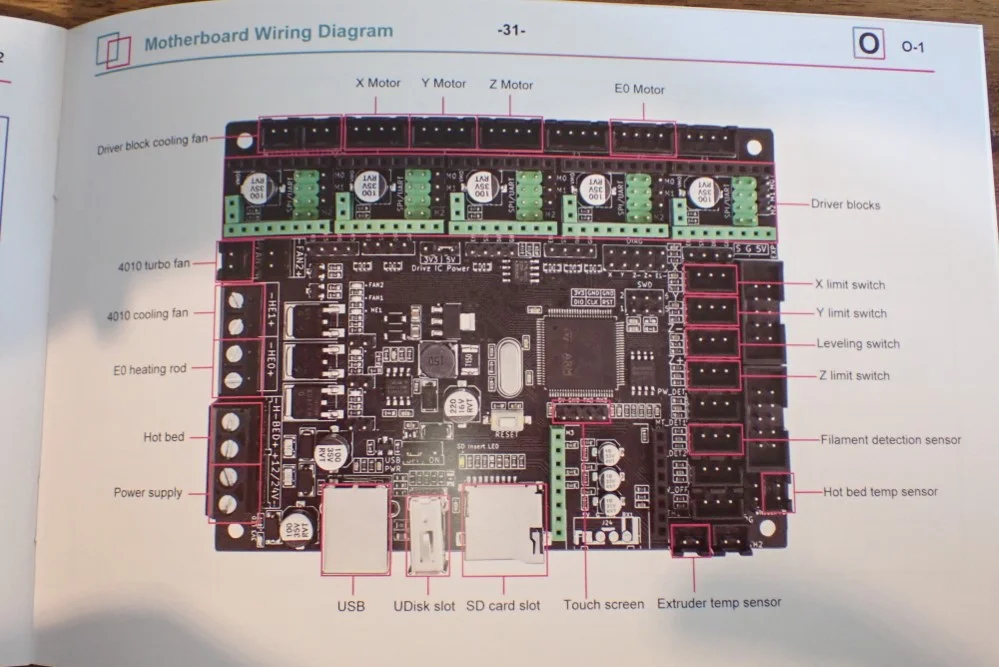
The FLSUN Super Racer features a 32-bit 168M processor and a motherboard with TMC2209 silent stepper motor drivers.
If you want to change or add components, the motherboard schematic is explained in detail in the manual. Fortunately, the quiet stepper motor drivers do not contribute to the noise and are not audible. The motherboard’s cooling fan is also much quieter than the fans in the print head or the extruder.
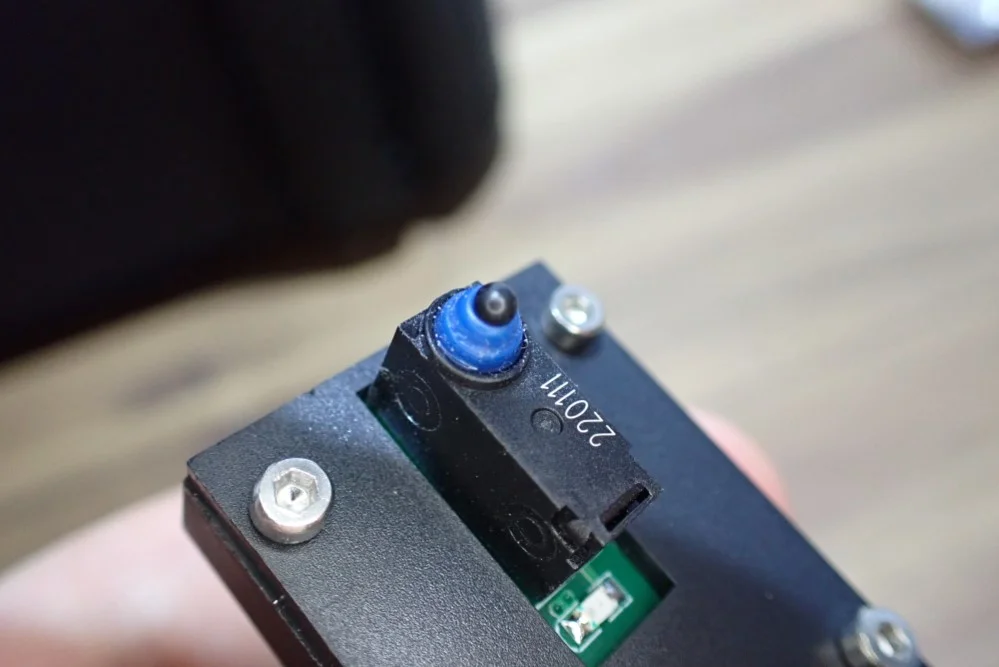
Filament Sensor, Belt Tensioner & Resume Print
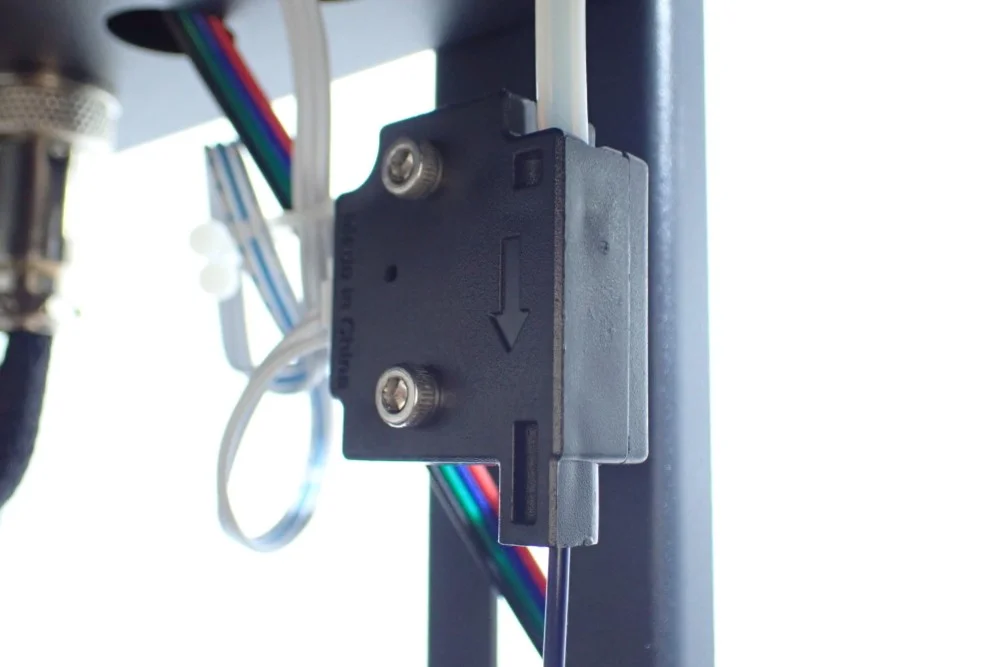
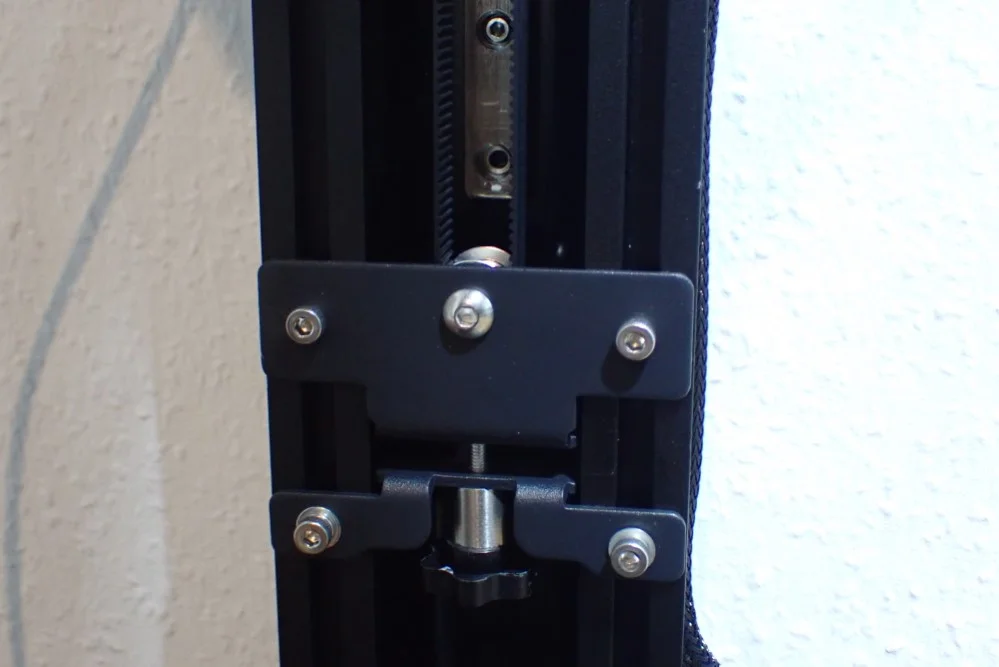
A small filament sensor is installed in front of the extruder of the FLSUN Super Racer, the belts of the three Z-axes can be easily tensioned via belt tensioners and the resume print feature secures the print in case of an unforeseen power failure.
These three features are nothing special and are therefore listed here at the end. Every 3D printer on the market today that is not a brutally spartan DIY kit has these features.
Check Price at:
Handling
> FLSUN Super Racer
Operation: The operation of the FLSUN Super Racer is one of the best I have seen in a 3D printer thanks to the removable touch screen. The fact that the 3D printer is so high and the touchscreen as well, improves the ergonomics, especially if you like to work standing up. The menu itself is also very well structured and the touchscreen responds accurately to your inputs. When operating the FLSUN Super Racer, you have the feeling that you are operating a high-quality device.
Print bed: The print bed of the FLSUN Super Racer cannot be removed. It can sometimes be a bit awkward to remove the finished print object from it. It is important to let the glass print bed cool down, otherwise it is almost impossible to remove the object without damage.
As you can guess from these lines, I had the problem that the print bed adhesion is too strong, rather than too weak. In many other opinions on the Internet about this printer, I have often read that users had problems with the print bed adhesion. If you have problems with this too, you should reduce the print speed of the first layer a lot (5-10 mm/s = very strong adhesion) and recalibrate the Z0 offset. Otherwise, adhesives like Magigoo or another print bed surface like PEI* can help.
Printing: After you get used to how cool it looks when a Delta 3D printer is doing its job, you’ll also be pleased with the print quality pretty quickly. Printing itself is also very pleasant, as there is a very good default profile in Cura. Basically, all you have to do is slice the files, insert the micro SD card into the printer and start printing. There are a few things you can do to optimize the results, but the print quality right out of the box is very good.
The user interface also adds to the smooth and enjoyable experience. The 3D printer is really high quality and doesn’t have any annoying traits like cheap DIY printers where you tinker more than you actually print.
Slicer: The FLSUN Super Racer is compatible with many slicers. I myself have used it with Cura, on the micro SD card is also a version of it included. The practical thing about Cura is that this slicer is very popular and there is already a well-set default profile for the FLSUN Super Racer. However, if you want to further optimize your results, you should calibrate the most important settings – more on this later.
Heating Times
> FLSUN Super Racer
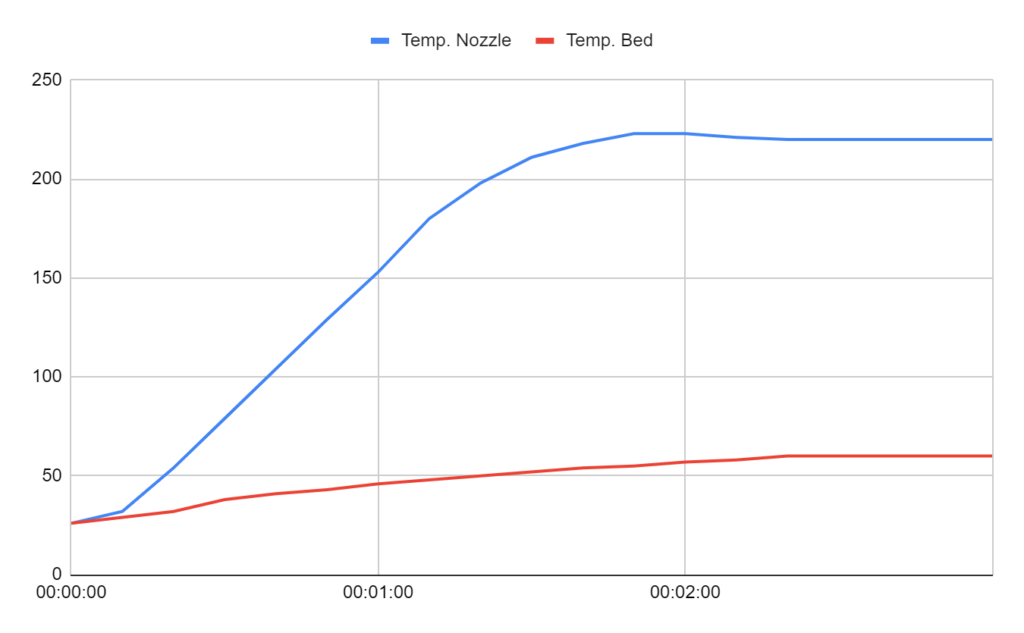
The Nozzle of the FLSUN Super Racer is heated up to 220 °C within about 2 minutes. The print bed needs about 2.5 minutes for 60 °C.
These are relatively good values for the print volume or the print bed area. With similarly large square print bed areas, the heating time with a glass print bed is usually significantly higher. The Super Racer apparently benefits from the round shape of the print bed and does not have to heat up the usually superfluous corners.
Nevertheless, I would wait a little longer with a glass print bed before you start printing, so that the temperature can distribute evenly. Usually, it takes a little longer until the temperature is homogeneously distributed in the thick glass.
Power Consumption
> FLSUN Super Racer
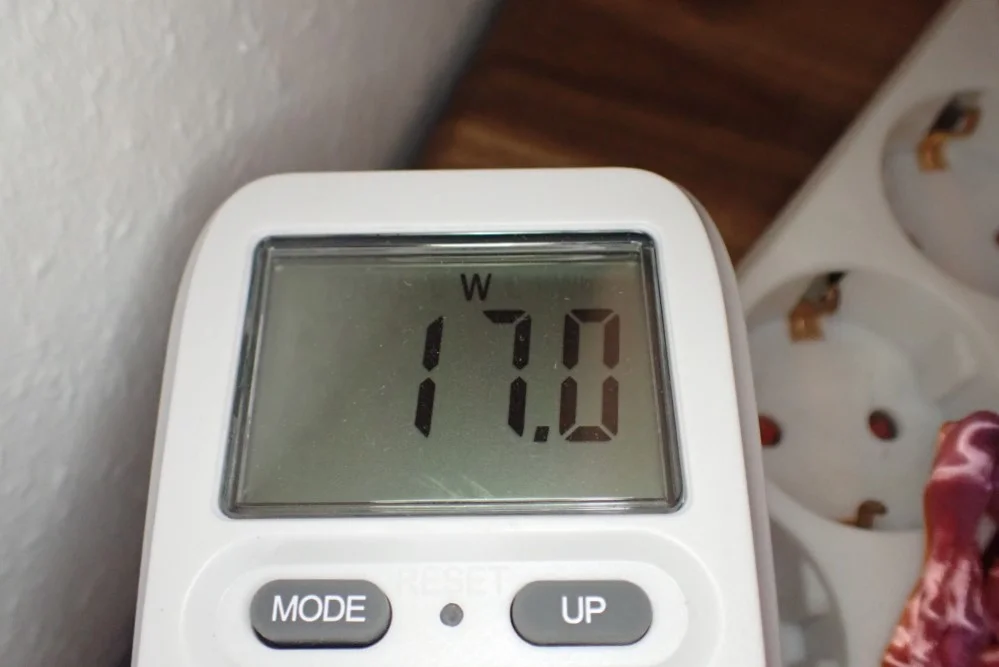
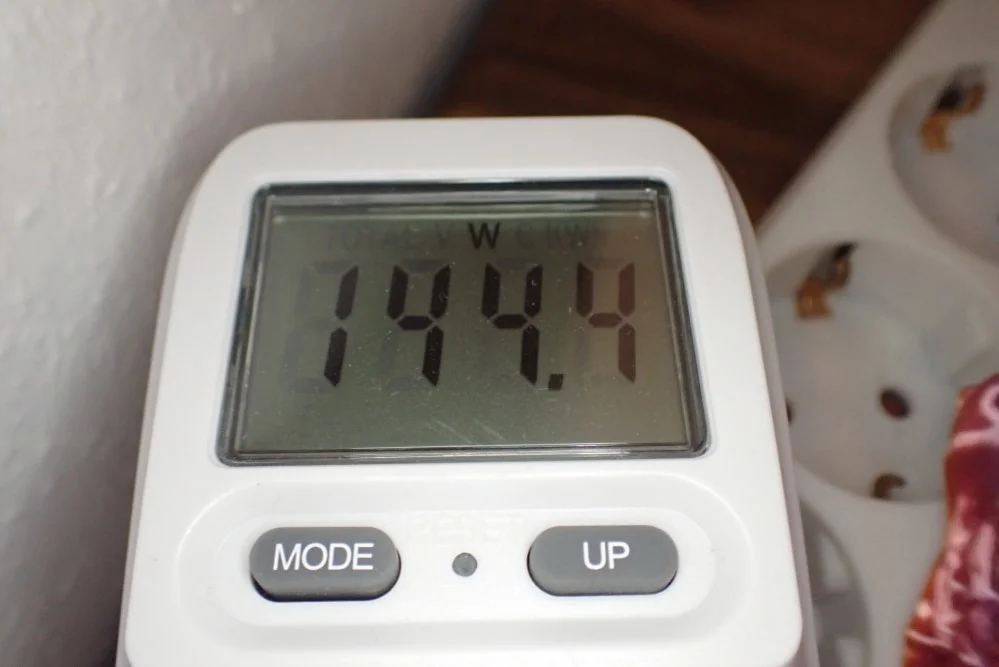
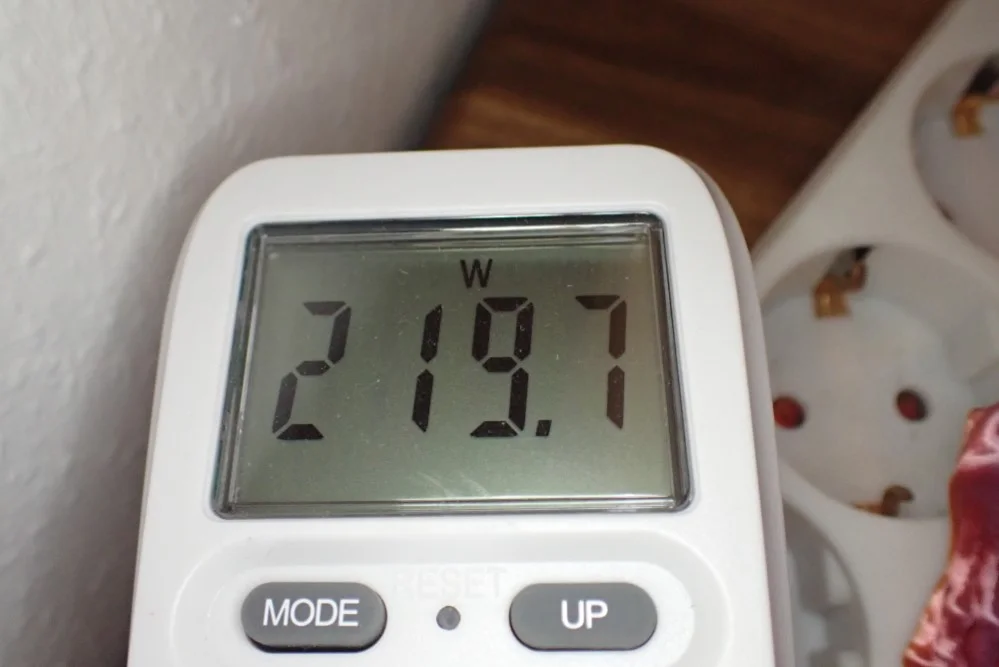
In standby mode, the FLSUN Super Racer consumes up to 17 watts. During the heating phase, it requires over 220 watts to bring the nozzle and the print bed up to temperature. During printing, it requires between 120 and 150 watts.
These are relatively typical values and comparable with Cartesian 3D printers with a similar print volume. So you don’t have any disadvantages due to the delta principle.
Slicer
> FLSUN Super Racer
The FLSUN Super Racer is compatible with several slicers. Among them also Cura and Repetier Host.
I used the Super Racer with Cura. There is already a very good standard profile in Cura which you can use directly after assembly to print your own objects.
However, it is recommended to calibrate the most important settings to optimize the printing results. With every new printer, I calibrate at least the print temperature, the flow rate and the retraction. To get the most out of the FLSUN Super Racer I also tested up to which print speed I can go.
If you want to use the same print settings that I got great results with, and what to look for with the different filaments, you can check out this post: Best Cura Settings & Profile for the FLSUN Super Racer
How to Calibrate the Print Temperature with the FLSUN Super Racer
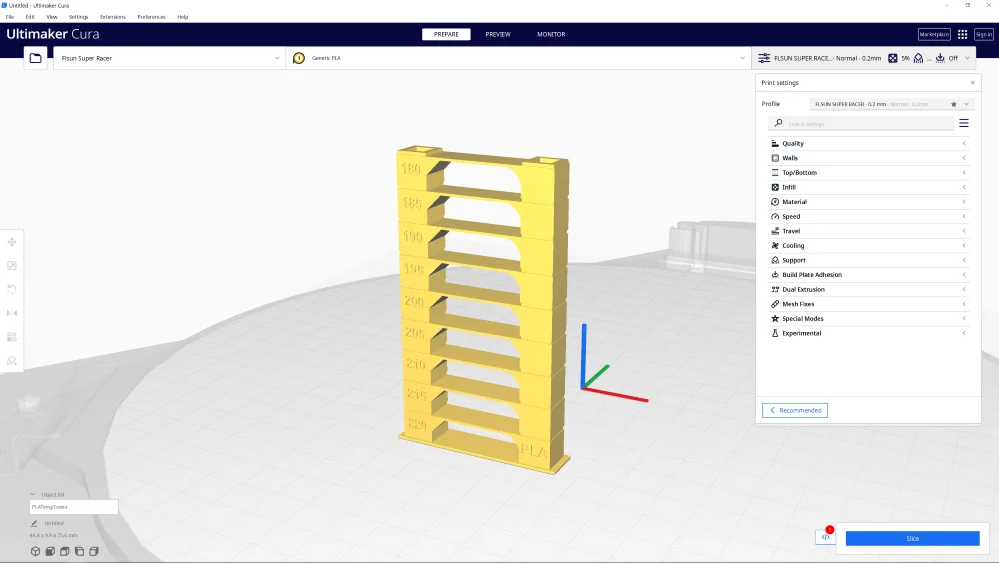
The best way to calibrate the printing temperature is to use a temperature tower. These objects consist of several levels with a geometry that provokes various printing errors. After printing, the perfect printing temperature can be easily read off the best level.
You can find such temperature towers on portals like Thingiverse. But there is also a plugin in Cura, the “Calibration Shapes Plugin”, which contains various calibration objects. There is also a very good temperature tower to choose from.
No matter which temperature tower you choose, you will need to add a script to Cura at the end to change the temperature per layer. You can find the scripts in the menu bar of Cura under “Extension” → “Post Processing” → “Modify G-Code”. In the menu that opens you can choose between different scripts. For the temperature tower, you can set the start temperature, the change of temperature per level of the tower, after how many layers the temperature should be changed and how high the base of the tower should be skipped.
Once the tower is printed, you can see the perfect temperature. The best temperature is in the level where the fewest printing errors occurred.
How to Calibrate the Flow Rate with the FLSUN Super Racer
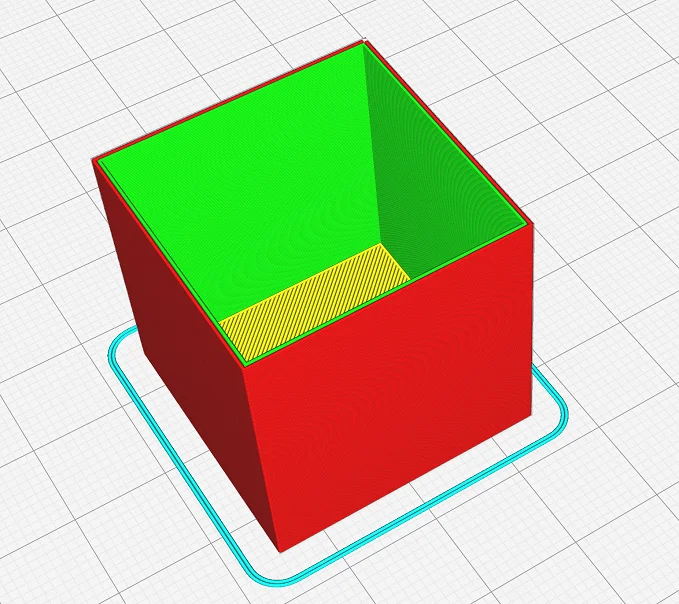
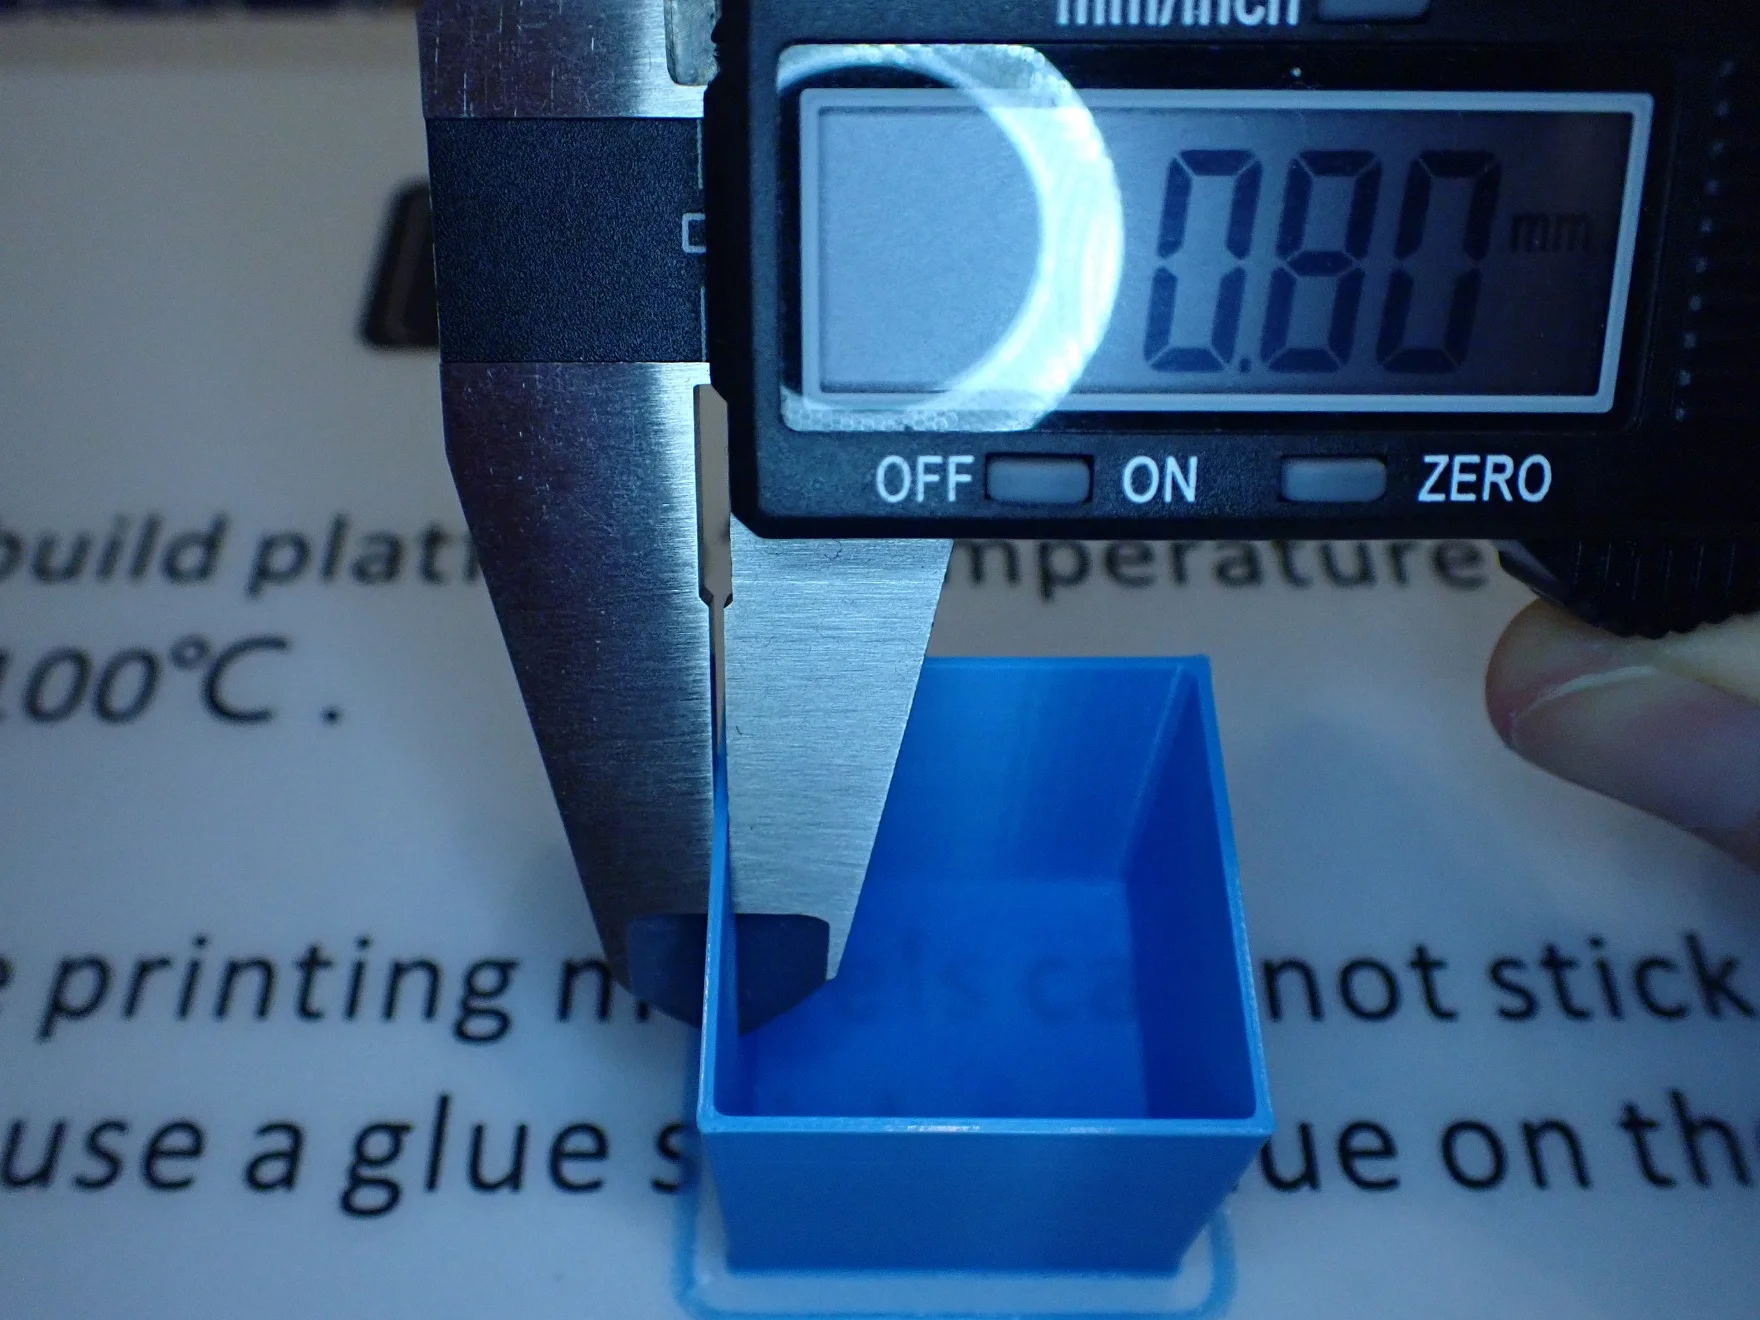
The flow rate can be calibrated on a 3D printer by comparing the specified wall thickness in the slicer and the actual wall thickness of the printed object. The best way to do this is with a hollow cube without infill or top layers.
After printing, you can measure the wall thickness of the cube and compare it with the theoretical value from the slicer. If the real wall thickness is higher than the one in the slicer, you have to decrease the flow rate, if it is smaller, you have to increase the flow rate.
You should only ever change the value of the flow rate by a few percent and then test the effects again. Of course, you can also use a little math to calculate the perfect value directly after the first print.
How to Calibrate the Retraction with the FLSUN Super Racer
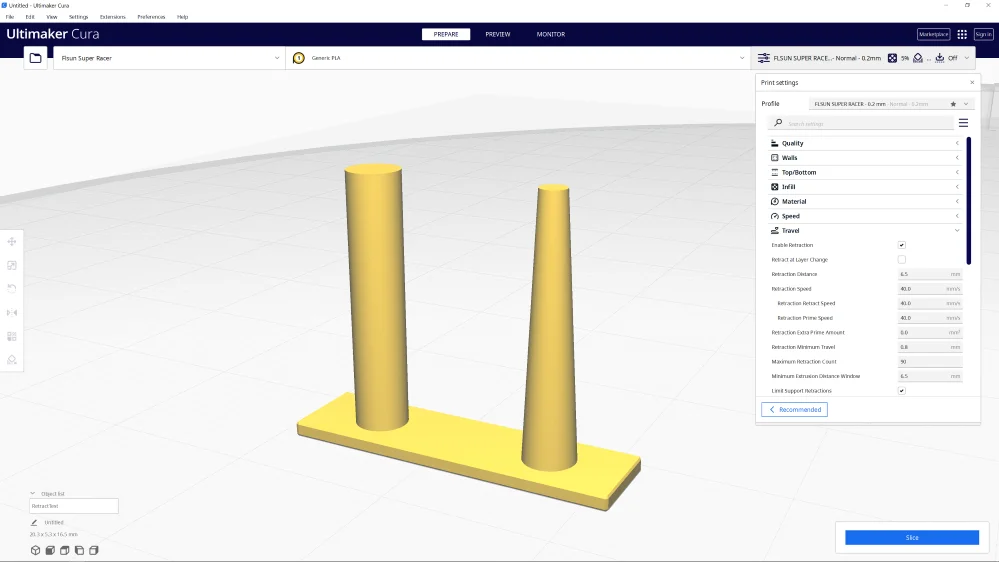
There are many objects to calibrate the retraction. The best objects to calibrate are those with multiple columns between which the printhead must travel. If the retraction is not set correctly, weak extrusion errors like stringing will occur.
There are a lot of test objects for the retraction. I prefer to use the minimalistic design from the Calibration Shapes plugin in Cura. The object consists of only two small columns and is printed within a few minutes. This way I can optimize the two most important retraction settings, the retraction distance and the speed, many times in a row.
Many printing errors like stringing depend on different print settings. You may not find the perfect print temperature or retraction on the first pass. Sometimes you need several passes through the different settings until you find the right value. For example, if the print temperature is too high, you can’t find the perfect retraction, just the optimal value for that temperature. Then after you recalibrate the print temperature, the ideal value for retraction may have shifted. However, I have never experienced needing more than two passes for each setting to find the optimal values.
How to Calibrate the Print Speed with the FLSUN Super Racer

To calibrate the print speed, you can print an object at different print speeds in succession and compare the results. Print errors such as ghosting should become more common as the print speed increases.
Simple calibration objects such as an XYZ Cube or the classic 3D Benchy are well suited for this test. The higher the speed is set, the more often ghosting or other printing errors occur.
I have found that slight ghosting can appear from a speed of 100 mm/s and becomes more pronounced from 150 mm/s onwards. However, the maximum print speed of 200 mm is quite possible with a greater slice height for objects with less detail. Especially with a well calibrated slicer profile with acceleration control to avoid vibrations.
Check Price at:
Print Quality
> FLSUN Super Racer
The FLSUN Super Racer has a very good print quality with layer heights from 0.05 to 0.3 mm. The surface quality is very good and reproducible.
To test the print quality, I printed objects with different requirements after calibration. First, I printed the test object on the supplied micro SD card. Then I wanted to test the surface quality on an object with many smooth surfaces, then I printed a complex print-in-place object and finally a mechanical part with many moving parts.
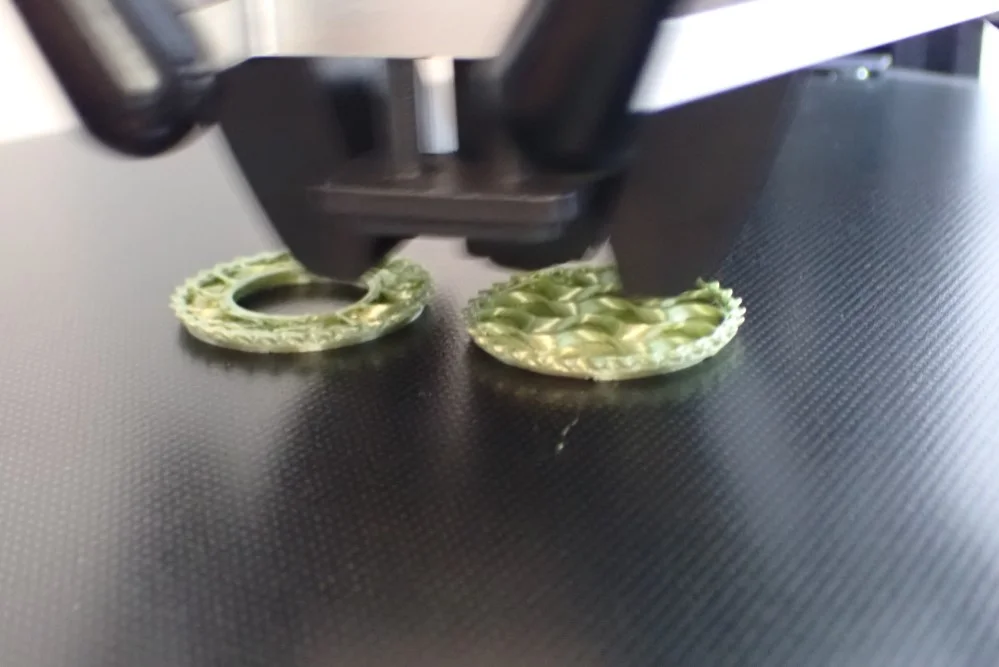
Screw and Nut
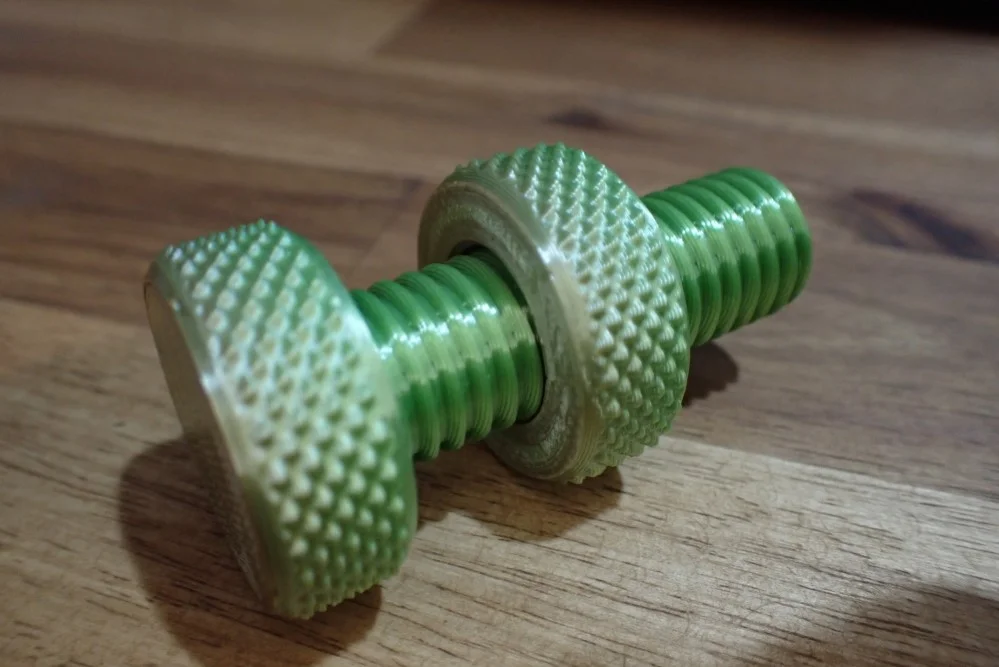
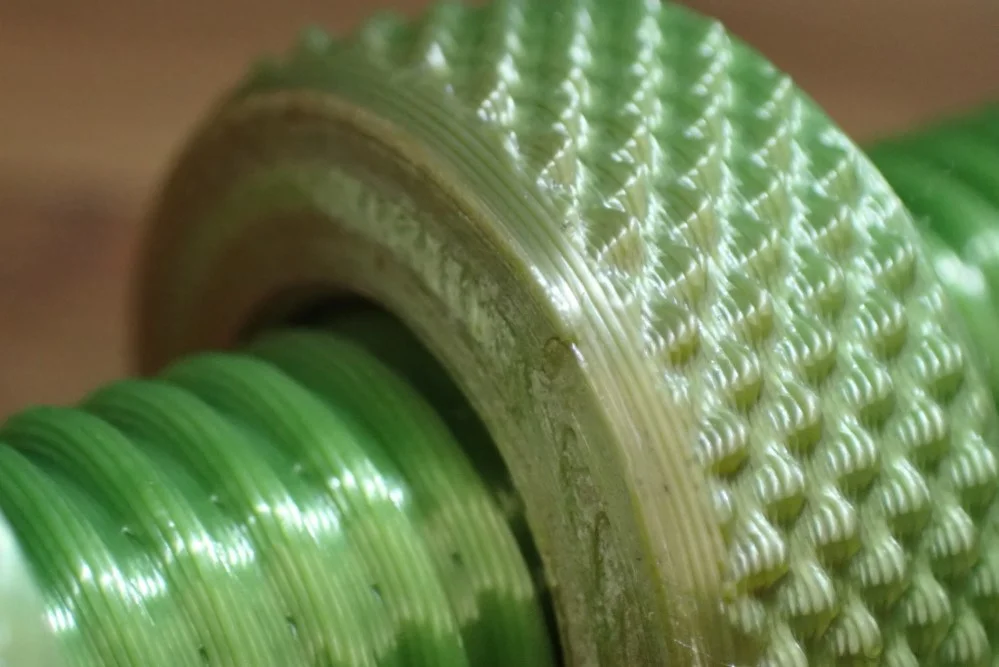
The test object on the Micro SD card was already sliced by FLSUN and only had to be started. The screw with the corresponding nut was printed flawlessly. Apparently the extrusion is well calibrated, because I could screw the nut without problems.
Low-Poly Bulbasaur
With this low-poly Bulbasaur (link to object) I wanted to know how the Super Racer copes with straight surfaces and sharp edges. Especially at such a high printing speed with fast direction changes, the lateral accelerations can lead to printing errors.
However, this was not the case and I am very happy with the print quality. Now I could progress to more complicated objects.
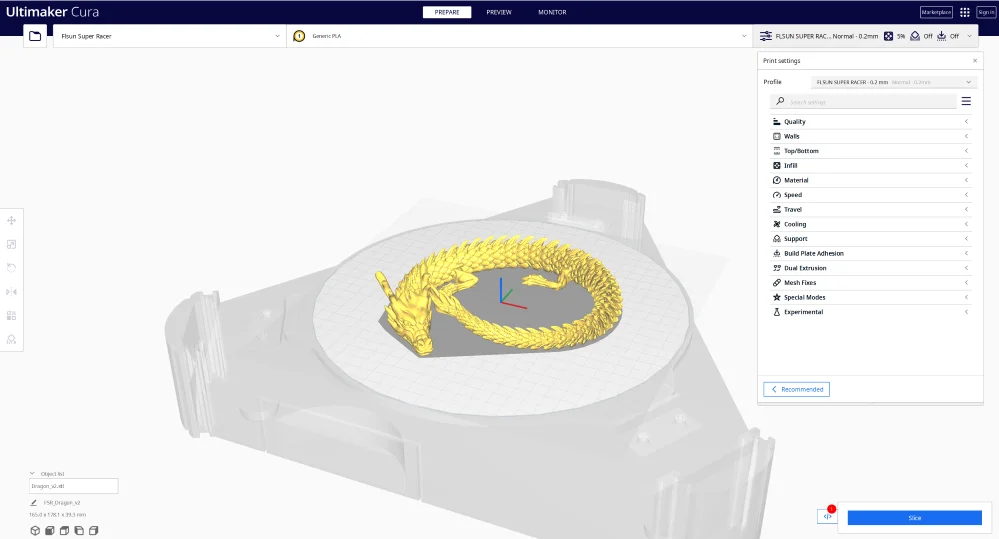
Articulated Dragon
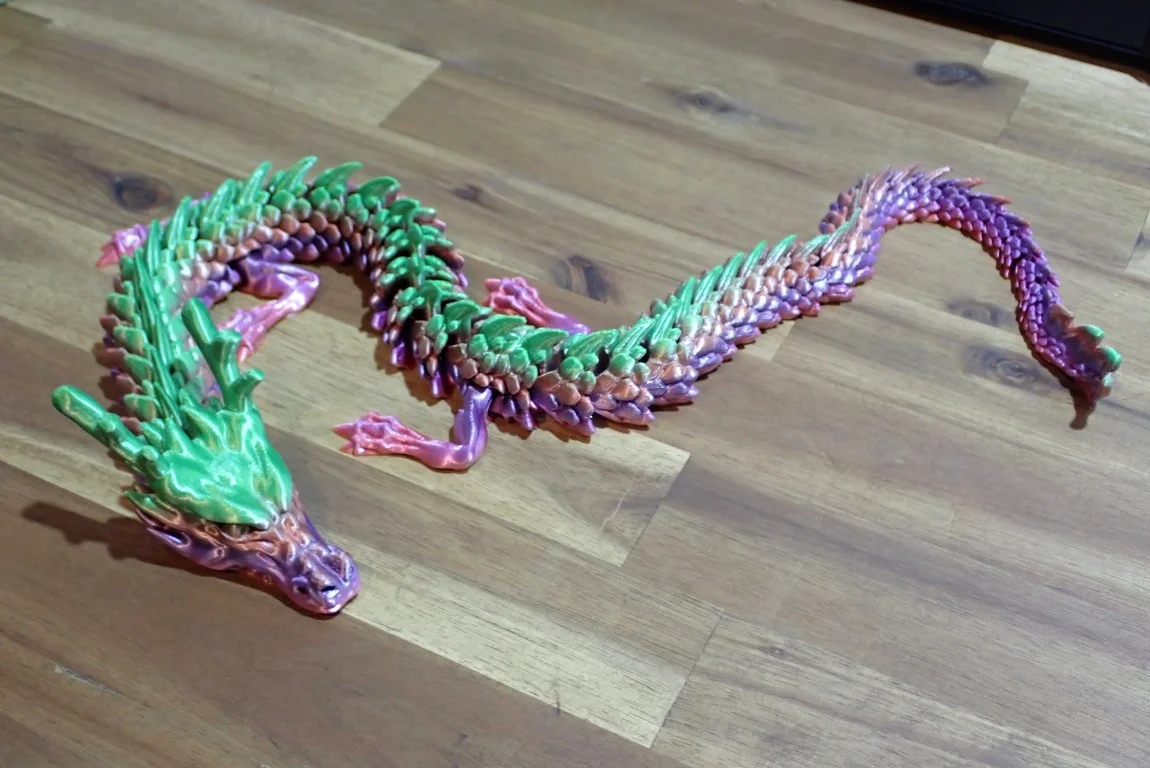
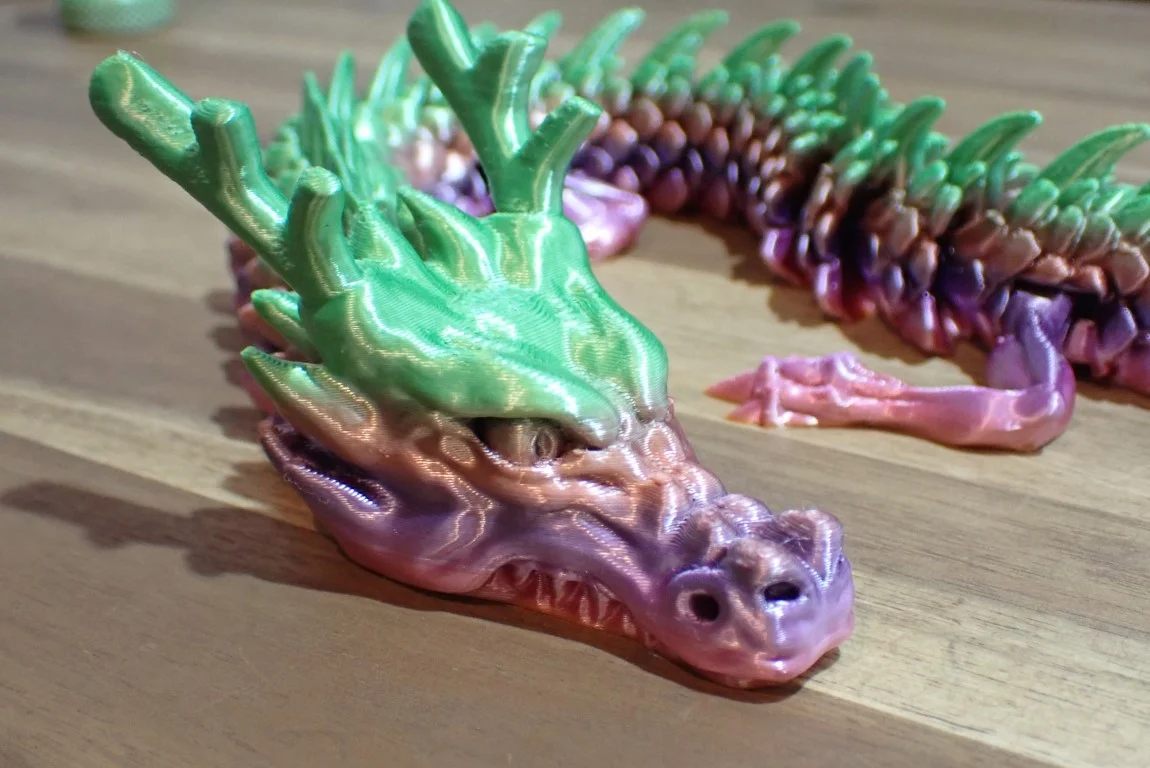
This very detailed Articulated Dragon (link to object) should put the Super Racer to the test. I left the print speed at 150 mm/s to test how it copes with so many retraction movements at such a high print speed. The result is really very good, but there is some stringing here and there, which was easy to remove with the finger without leaving any residue on the object.
Combustion Engine
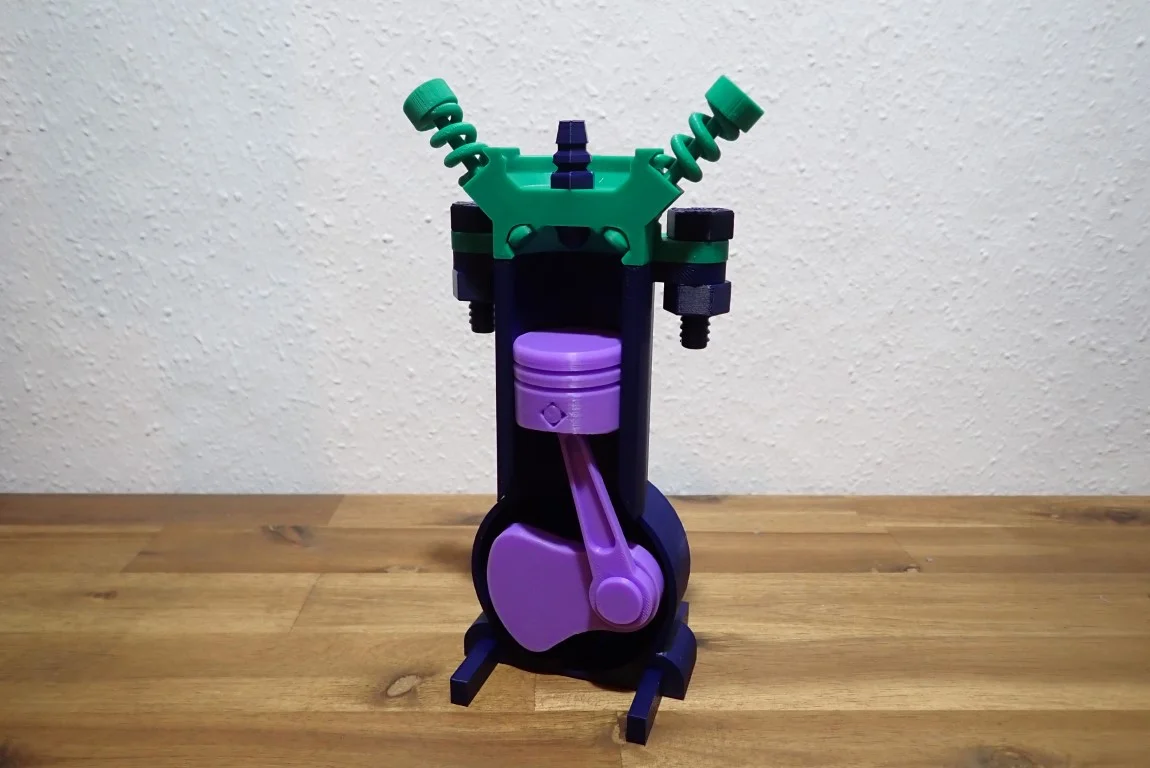
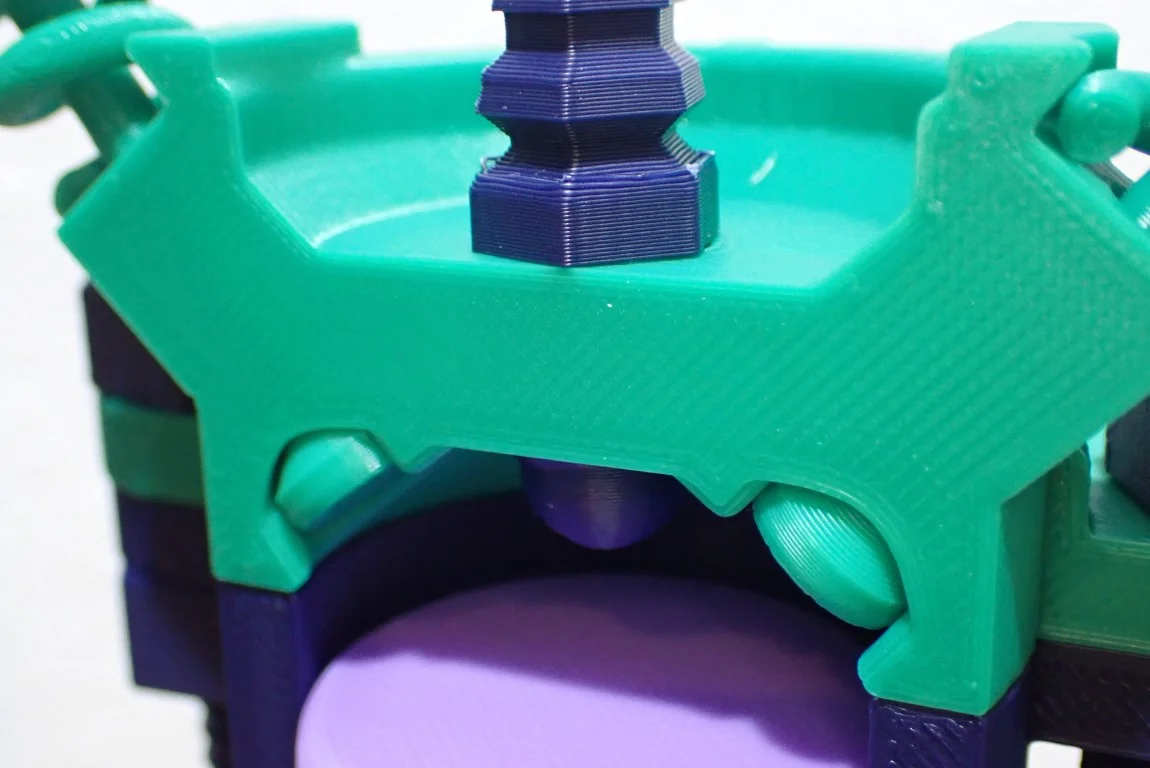
Finally, I printed this Combustion Engine (link to object). It has a lot of moving parts that need to be printed accurately enough to plug into each other. Also, even a slight elephant foot (a too wide first layer) would be directly noticeable here.
Apart from a few residues from supports, the result was very good. All parts fit together without rework and move smoothly.
Upgrades
> FLSUN Super Racer
The performance of the FLSUN Super Racer is already very good. But you can still adapt it to your needs or even optimize it with various upgrades.
Magnetic PEI Print Bed

Many users have problems with the glass print bed of the FLSUN Super Racer. Mostly it is because the print bed adhesion is too bad. Maybe FLSUN has already addressed the problem, because I had exactly the opposite – the print bed adhesion was much too strong and I could hardly remove the objects from the print bed.
Whichever of these two problems you have, a magnetic PEI print bed will help. Right now I see print bed surfaces with a PEI coating that are also flexible and magnetic as the best option for filament 3D printers. Conveniently, such a print bed is available for purchase as an upgrade for the FLSUN Super Racer (click here for the product I tested*).
The assembly is done very quickly and the print bed adhesion is really good. After the print is completed, you can easily detach the surface together with the print object from the magnetic printing plate. By simply bending the PEI surface, the print object comes off almost by itself without any damage.
The only disadvantage of PEI surfaces compared to a glass print bed is that the underside of the print object is not so nice and smooth but has a slight texturing. I personally don’t care what the bottom of the object looks like, but if you prefer a smooth surface, you can either optimize the adhesion to the glass print bed or use sandpaper.
Bi-Metal Heat Break

Check Price at:
The heat break of the FLSUN Super Racer is lined with PTFE. PTFE begins to dissolve at 240 °C. So if you often print at this limit, it is a good idea to replace the Heat Break with a bi-metal version.
With such a heat break you can also print at temperatures of 250 °C or higher. This gives you the possibility to print with even different filaments than before. Another advantage of this heat break is that no slit can occur between it and the nozzle. This prevents the nozzle from clogging there.
Unlike the PEI print bed, however, it is somewhat more complex and difficult to replace a heat break. But you should not shy away from it, because the exchange is not too difficult. If you are a little unsure, you should remember exactly where which part was and which screw was used for which hole. The best way to do this is with photos.
Better Fans for the Hotend

Check Price at:
As mentioned above when introducing this feature, the two fans in the print head are a bit weak. If you have the slicer profile well under control and the print quality is good, you can increase the print speed even more with better fans.
Dual 5015 radial fans with a high output are ideal for this. These ones are perfect for that*.
The suggested fans are relatively expensive compared to other fans for 3D printers, but the quality definitely pays off with the FLSUN Super Racer. Cheaper fans would wear out quickly over time due to the rapid back and forth movement of the print head.
Volcano Hotend

Check Price at:
With the hotend, they also tried to save as much weight as possible. The installed “Volcano Hotend” is smaller than the original. Thus, it is a few grams lighter, but will not be able to keep the temperature as homogeneous as a larger hotend.
In my opinion, the print speed would not suffer by installing a larger Volcano hotend to improve the print quality.
Improved PTFE Tube

Check Price at:
The relatively long PTFE tube from the extruder to the printhead has only moderately good tolerances, which gives the filament some room to move around inside. By allowing the filament to move around a bit inside the tube, some of the extrusion and retraction movements are slightly compensated. To make this movement more accurate, you can replace the PTFE tube with a better one.
With this PTFE tube from Capricorn* I have already made very good experiences with other 3D printers. The tolerances are very tight, so the filament has just enough space to move back and forth.
Closed Print Volume
A closed print volume helps you when processing ABS. This filament requires constant, homogeneous high ambient temperatures so that it does not contract uncontrollably or form cracks during printing.
With Delta 3D printers, however, it is relatively easy to seal the print volume airtight compared to Cartesian 3D printers. The build space is completely enclosed by the three struts of the frame and can be sealed relatively quickly and cheaply with Plexiglas and some tape.
To prepare for printing with ABS, you just need to close the build space and heat the print bed to the desired temperature at least ten minutes beforehand. This way the print volume heats up quickly and the ambient temperature is ready for printing with ABS.
FLSUN Super Racer vs. FLSUN QQ-S Pro

Check Price at:
The FLSUN Super Racer and the FLSUN QQ-S Pro* differ only in a few details – apart from the printing speed and the printing temperature. The FLSUN Super Racer prints about twice as fast as the FLSUN QQ-S Pro, but the latter can print at up to 270°C.
Print volume: The print volumes of both 3D printers are almost identical. The FLSUN QQ-S Pro has a print volume of ø260 x 320 mm, the FLSUN Super Racer of ø260 x 330 mm. So you can print slightly higher objects with the Super Racer. Both print volumes are cylindrical, as the print bed surface is round. This is due to the way Delta 3D printers work.
Print speed: The FLSUN Super Racer is designed for high speeds. It reaches print speeds of 150 to 200 mm/s. The FLSUN QQ-S Pro, on the other hand, prints at about the same speed as Cartesian 3D printers, i.e. 30 to 60 mm/s.
Print bed leveling: The print bed leveling is identical for both 3D printers. As soon as the leveling is to be started, a sensor with a magnetic holder is attached to the print head. The automatic print bed leveling is then started via the menu.
Print bed surface: The print bed surface is also the same for both 3D printers. It consists of textured glass and offers good adhesion for many filaments.
Print temperature: The FLSUN QQ-S Pro can reach a maximum temperature of 270 °C and can therefore process more filament types than the FLSUN Super Racer. The Super Racer can only print up to 255 °C, but I wouldn’t recommend printing often above 240 °C because of the PTFE heat break. Above this temperature, the PTFE Heat Break wears out and releases toxic gases.
Operation: The FLSUN QQ-S Pro is also operated via a touchscreen, but this is embedded in the base of the 3D printer. With the FLSUN Super Racer, the operation is somewhat more comfortable with the removable display.
CONCLUSION: The price of the FLSUN Super Racer is usually about 25 to 35% higher than that of the FLSUN QQ-S Pro. In my eyes, however, the investment is definitely worth it due to the higher printing speed, the better operation and the more stable design. If you need the high print temperature, I would still recommend the FLSUN Super Racer and then replace the heat break with a bi-metal heat break.
FLSUN Super Racer vs. FLSUN Q5

Check Price at:
The FLSUN Q5* is less expensive, has a smaller print volume, lower print speeds but higher print temperatures than the FLSUN Super Racer.
Print volume: The print volume of the FLSUN Q5 is ø200 x 200 mm. With the FLSUN Super Racer with its ø260 x 330 mm print volume, you can print larger objects in one piece. The frame is also more stable and heavier, making the entire device larger.
Print speed: The FLSUN Super Racer is also ahead in terms of print speed. It reaches 150 to 200 mm/s, while the FLSUN Q5 only reaches 70 to 120 mm. Compared to Cartesian 3D printers, this is also very fast, but it cannot keep up with the Super Racer.
Print bed leveling: Again, the print bed leveling is identical for both 3D printers. Both 3D printers have a separate sensor that is mounted for the leveling process. The connection is practically done with a magnet within seconds. Thus, the 3D printers save a lot of weight in their print heads and can thus achieve a higher printing speed.
Print bed surface: Here, too, both 3D printers are similar. Both have a textured glass print bed. If you use a slow print speed for the first layer, the print bed adhesion for most filaments is very good, sometimes even too good.
Print temperature: The FLSUN Q5 reaches higher values than the FLSUN Super Racer for both the print temperature and the print bed temperature. It can print up to a maximum of 270 °C, the print bed reaches 110 °C. In comparison, the FLSUN Super Racer only reaches 255 °C and 100 °C respectively.
Operation: The operation is also much more pleasant here with the Super Racer than with the cheaper FLSUN Q5. The magnetically detachable touchscreen is very practical and the menu is very intuitively designed and pretty to look at.
CONCLUSION: The FLSUN Q5 is considerably cheaper than the FLSUN Super Racer. The only advantage here, besides the price, is the higher print temperatures. If these are not important to you, the Super Racer surpasses the Q5 in every respect.
Conclusion – Is the FLSUN Super Racer Worth It?
I have tested many 3D printers and the FLSUN Super Racer* is definitely one of the best. For me, with the PEI print bed upgrade*, it is just about perfect for non-flexible filaments.
For PLA the results are already very good without much calibration effort. The print bed adhesion of my copy was also excellent for PLA, sometimes even too good. But even with more demanding filaments such as ABS or PETG, the print bed adhesion is good enough if you work with very slow print speeds in the first layer.
The many advantages result with the fair price in a very good price-performance ratio, with which I would recommend this 3D printer to anyone who does not want to work with flexible filaments and the print volume is sufficient. Especially through the high print speeds, it literally outpaces most Cartesian 3D printers with a comparable print volume.
Check Price at:
Similar 3D Printers
FLSUN QQ-S Pro
The FLSUN QQ-S Pro* is a delta 3D printer with a print volume of ø260 x 320 mm, automatic print bed leveling and a print speed of 30 to 60 mm/s.
Check Price at:
FLSUN Q5
The FLSUN Q5* is a delta 3D printer with a high printing speed of up to 120 mm/s. Its print volume is ø200 x 200 mm and the leveling is done automatically at 27 points on the print bed.
Check Price at:
Disclosure: This website is the property of Martin Lütkemeyer and is operated by Martin Lütkemeyer. Martin Lütkemeyer is a member of the Amazon Services LLC and other Affiliate Programs. These are affiliate advertising programs designed to enable websites to earn advertising revenue through advertising and linking to Amazon.com and others. Links marked with * are affiliate links.
