
- Wet Filament: Prevention, Symptoms & Drying - July 18, 2024
- Sovol SV08 – Best PrusaSlicer Settings & Profile - June 26, 2024
- Sovol SV08 – Best Orca Slicer Settings & Profile - June 26, 2024
Disclosure: Links marked with * are Affiliate Links. I earn from qualifying purchases if you decide to make a purchase through these links – at no additional cost for you!
The Ender-5 S1 is a cube-shaped 3D printer that achieves high print speeds of over 100 mm/s with its sturdy construction and “Sprite” direct drive extruder.
The art of 3D printing is to achieve a good print quality even at such high printing speeds – and this is only possible with the right slicer settings!
To get the best Cura settings for the Ender-5 S1, you need to create an empty profile in Cura and define the machine settings. After that, you can adjust the print settings to the respective filament and 3D printer.
In this article, you will learn which machine settings the Ender-5 S1 requires and which print settings have to be set for the most popular filaments in Cura.
At the end of the article, you will learn how to calibrate the most important settings to get perfect results.
| PLA | ABS | TPU | PETG | |
|---|---|---|---|---|
| Printing temperature | 205 °C | 260 °C | 215 °C | 230 °C |
| Print bed temperature | 60 °C | 90 °C | 70 °C | 70 °C |
| Print speed | 120 mm/s | 120 mm/s | 40 mm/s | 60 mm/s |
| Retraction | 0.8 mm at 30 mm/s | 0.8 mm at 30-40 mm/s | 1.6 mm at 30 mm/s | 0.8-1.0 mm at 30-45 mm/s |
| Cooling | 100% | 0% + enclosure | 100% | 50-100% |

Calibrated Cura Profile
For optimal print quality with minimal effort, you can download my calibrated Cura profile for this 3D printer and import it directly into Cura. All settings are perfectly adapted to this printer, e.g. the accelerations, jerk, supports and the first layer.
Table of Contents:
How to Create a Cura Profile for the Ender-5 S1
The easiest way to create a good Cura profile for the Ender-5 S1 is to create a blank profile and adjust the machine settings and print settings accordingly.
The 3D printer profile in Cura is composed of the machine settings and the print settings.
The machine settings define the size of the print volume, the print head and what the 3D printer should do at the beginning and end of each print job. Errors here can lead to collisions.
The print settings depend on the filament used, the extruder and the print bed of the 3D printer. They are therefore individually different for each 3D printer. In addition, the application of the object also plays a role in the selection of certain settings (for example, the infill).
These are the steps to create a profile in Cura for the Ender-5 S1:
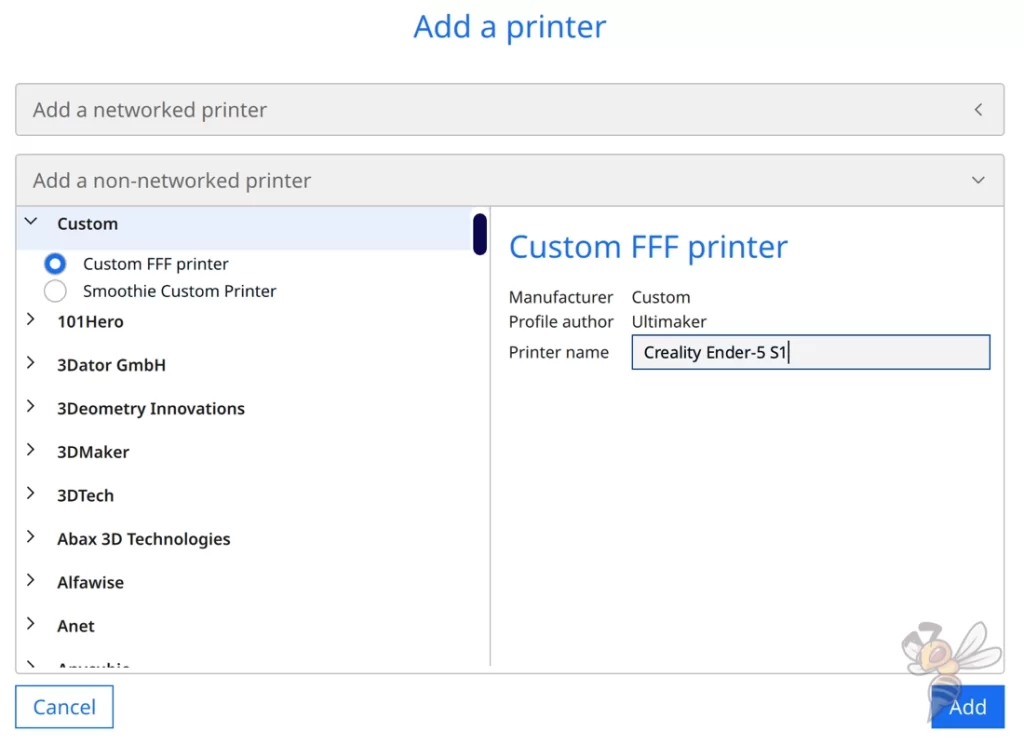
- Go to “Settings” > “Printers” > “Add Printer” via the menu bar.
- Select “Custom” and then “Custom FFF printer” from the list of all manufacturers.
- Name the new 3D printer “Ender-5 S1”.
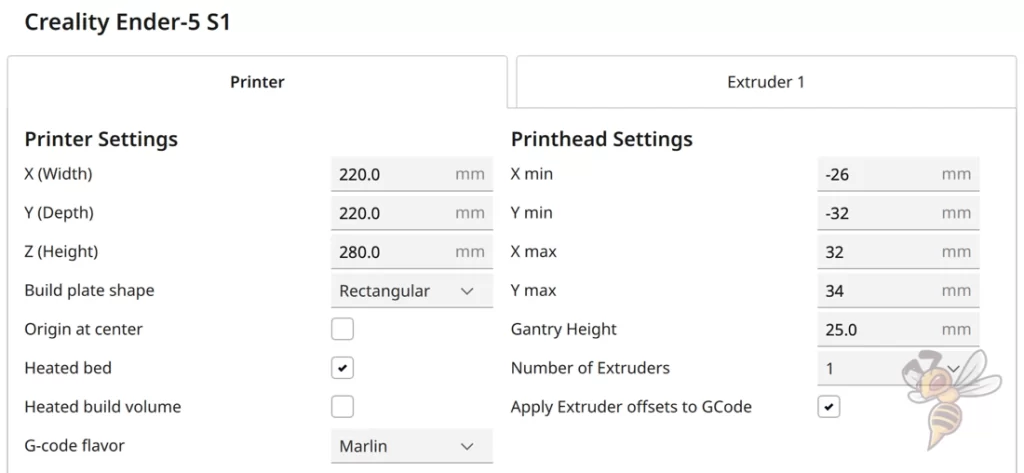
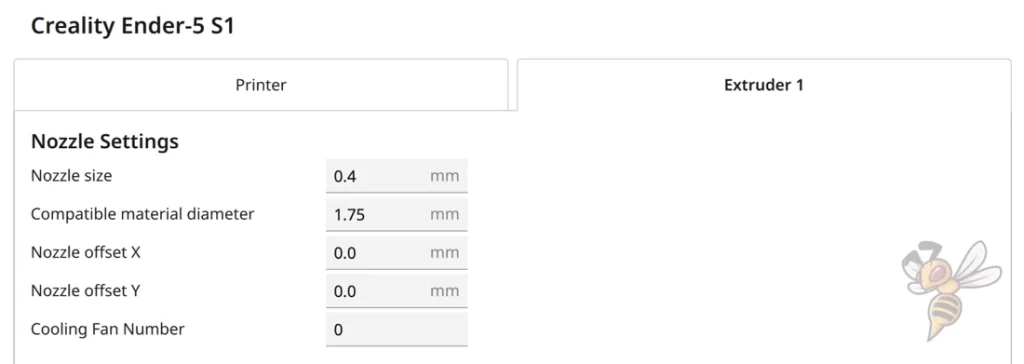
- Define the machine settings as shown in the screenshot.
- Define the Start and End G-code as shown below.
- Cura will automatically create different print settings with default values after confirmation.
- Enter the recommended print settings for each filament from this article.
- Start test print and optimize/calibrate print settings.
In the machine settings, in addition to the geometric data of the 3D printer, you also define two G-code snippets that are attached to the front and back of each job.
With this G-code, you can command the 3D printer to move to the home position before each print or to stimulate the extrusion by two lines on the side of the 3D print (similar to a skirt).
Start G-code:
- M140 S60
- M105
- M190 S60
- M104 S205
- M105
- M109 S205
- M82 ;absolute extrusion mode
- G28 ;Home
- G92 E0 ;Reset extruder
- G1 Z2.0 F3000 ;Move Z Axis up
- G1 X10.1 Y20 Z0.28 F5000.0 ;Move to start position
- G1 X10.1 Y200.0 Z0.28 F1500.0 E15 ;Draw the first line
- G1 X10.4 Y200.0 Z0.28 F5000.0 ;Move to side a little
- G1 X10.4 Y20 Z0.28 F1500.0 E30 ;Draw the second line
- G92 E0 ;Reset extruder
- G1 Z2.0 F3000 ;Move Z Axis up
End G-code:
- G91 ;Relative positioning
- G1 E-2 F2700 ;Retract a bit
- G1 E-2 Z0.2 F2400 ;Retract and raise Z
- G1 X5 Y5 F3000 ;Wipe out
- G1 Z10 ;Raise Z more
- G90 ;Absolute positioning
- G1 XO YO ;Present print
- M106 SO ;Turn-off fan
- M104 SO ;Turn-off hotend
- M140 SO ;Turn-off bed
- M84 X Y E ;Disable all steppers but Z
After you have defined the machine settings and added the 3D printer, Cura will automatically create different print settings with different layer thicknesses. The values in these profiles are default values and usually do not fit the Ender-5 S1 at all.
The best way to find the perfect print settings is to use the guidelines given in this article as a starting point for further optimization.
In most cases, the values given here will already bring good results, but you can only achieve perfect results with a calibration. More about this later in this article.
You can find more information on how to create a 3D printer profile in Cura and what you need to pay attention to in this article: How to Create a Custom 3D Printer Profile in Cura
PLA Settings
These are the correct Cura settings for the Ender-5 S1 for PLA:
- Print temperature: 205 °C
- Print bed temperature: 60 °C
- Printing speed: 120 mm/s
- Retraction: 0.8 mm at 30 mm/s
- Cooling: 100%
- First layer: 5-10 mm/s, 0% cooling, 100% extrusion width, 100% layer height
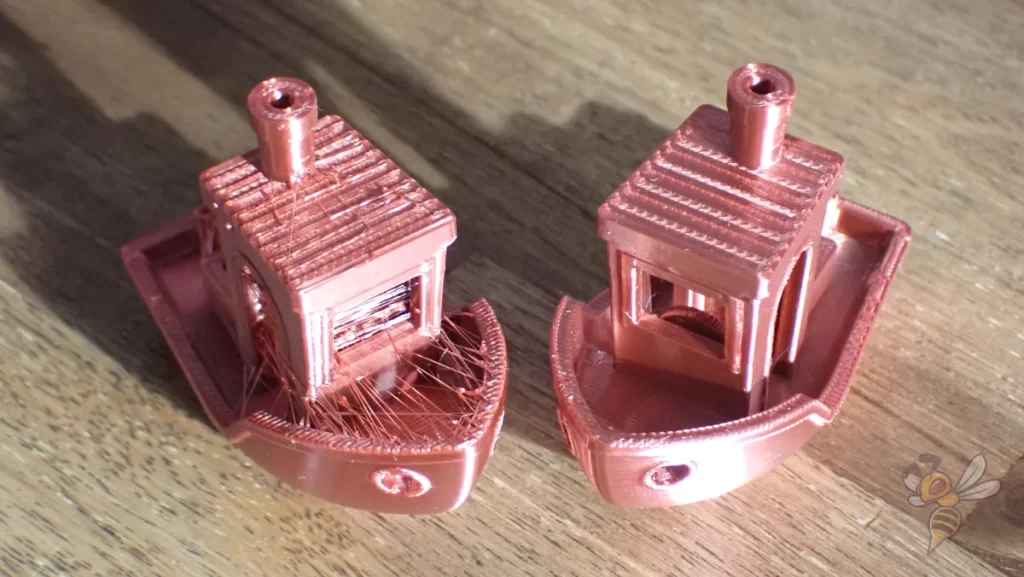
Even though PLA is the easiest filament to print, printing errors can occur quickly if you use the wrong Cura settings. Especially the print temperature and the retraction are important to achieve good results.
With the Ender-5 S1, a printing temperature of 205 °C has been proven for PLA. However, since individual filaments vary from manufacturer to manufacturer, you should experiment and calibrate to find the perfect value.
The same applies to retraction. 0.8 mm at 30 mm/s is an optimal reference value for the Ender-5 S1. However, these values may not be perfect for the PLA filament you are using. Small changes can have a big impact. Especially printing errors like stringing are strongly influenced by the retraction.
Thanks to the flexible and coated print bed surface, PLA adheres perfectly to the Ender-5 S1. So, you don’t have to try too much with the print bed temperature until you find the right value.
Usually, you only need to set the 60 °C and you will already get a good and print bed adhesion. If not, you should check if the z-offset is set correctly. If you still have problems with print bed adhesion, you can have a look at this article: 3D Print Not Sticking to the Bed: How to Fix it Step-by-Step
ABS Settings
ABS is more difficult to process than PLA. It is more prone to some print defects and when printing large objects from ABS you need a suitable enclosure so that the object does not warp and detach from the print bed during cooling.
If you are interested in printing ABS with the Ender-5 S1, I can only recommend the 3D printer tent from Creality. With it, you can build up a homogeneous and warm ambient temperature inside the tent, so that ABS stays evenly warm and does not warp.
Of course, ABS also requires different temperatures than PLA. Both the print temperature and the print bed temperature are significantly higher, but this is not a problem for the Ender-5 S1.
With retraction, you have to experiment a bit more with ABS than with PLA. The best values for the retraction speed are between 30 and 40 mm/s.
TPU Settings
These are the correct Cura settings for the Ender-5 S1 for TPU:
- Print temperature: 215 °C
- Print bed temperature: 70 °C
- Printing speed: 40 mm/s
- Retraction: 1.6 mm at 30 mm/s
- Cooling: 100%
- First layer: 5-10 mm/s, 0% cooling, 100% extrusion width, 100% layer height
TPU is a flexible filament. Therefore, it requires greatly different values from rigid filaments for all settings that move the filament.
This is because the flexible filament compensates for part of the force acting on the filament. And the higher the acceleration forces are, the stronger this compensation becomes. This means that the printing speed in particular must be lowered and the retraction deviates greatly from other filaments.
This is also the reason flexible filaments such as TPU cannot or can hardly be printed with a Bowden extruder. Unlike a direct drive extruder like the one in the Ender-5 S1, the filament has to travel a very long distance from the extruder to the nozzle with a Bowden extruder. Thereby, the extrusion movements of the extruder can be compensated much more, which leads to printing errors like stringing or blobs.
PETG Settings
These are the correct Cura settings for the Ender-5 S1 for PETG:
- Print temperature: 230 °C
- Print bed temperature: 70 °C
- Printing speed: 120 mm/s
- Retraction: 0.8-1.0 mm at 30-45 mm/s
- Cooling: 60%
- First layer: 5-10 mm/s, 0% cooling, 100% extrusion width, 100% layer height
PETG is also one of the most popular filaments in 3D printing. This is mainly because it is almost as easy to print as PLA, but brings much better mechanical properties with it. The finished object printed from PETG is much more resilient.
The problem with PETG is that it tends to string strongly. In addition to the correct printing temperature, retraction is therefore the most important setting for PETG.
With the Ender-5 S1, 0.8 to 1.0 mm at 30 to 45 mm/s have proven to be good starting values. However, with a high probability, you will still notice some stringing with these settings. Therefore, especially with retraction and PETG, it is important that you calibrate the retraction accurately – more on this later.
If you are looking for more information on PETG Stringing, you should take a look at this article: PETG Stringing | Main Causes and Best Solutions
Best Cura Settings for the Ender-5 S1
We’ll go over the individual Cura settings for the Ender-5 S1 in this section, and then I’ll show you how to calibrate the most important settings to get perfect results.
Print Temperature
The best print temperatures for the Ender-5 S1 in Cura:
- PLA: 205 °C
- ABS: 260 °C
- TPU: 215 °C
- PETG: 230 °C
The correct printing temperature is essential to achieve good results. The extruder of the Ender-5 S1 works very precisely, which makes it relatively easy to find the right setting.
However, if the print temperature is too low, you can run into problems with under-extrusion or poor print bed adhesion. If it’s too high, the filament will be too fluid, quickly leading to stringing or other over-extrusion phenomena.
The above values are for most filaments a good starting point for further optimization. But you should also pay attention to what the manufacturer recommends for a temperature. Typically, the perfect temperature is in between.
Print Bed Temperature
The best print bed temperatures for the Ender-5 S1 in Cura:
- PLA: 60 °C
- ABS: 90 °C
- TPU: 70 °C
- PETG: 70 °C
The print bed temperature is used to create a good print bed adhesion. If the print bed temperature is set too low, the adhesion may be too weak and the object will lift off the print bed.
However, you must not set it too high. Otherwise, the filament remains too liquid and widens artificially. This phenomenon is called elephant foot.
If you have problems with the print bed adhesion even though the print bed temperature is set relatively high, you can try to use an adhesive like Magigoo or calibrate the z-offset again.
The print bed of the Ender-5 S1 can reach a maximum temperature of 110 °C. This is sufficient for all standard filaments and also provides the right temperature for most exotic filaments.
Print Speed
The best printing speed for the Ender-5 S1 in Cura:
- PLA: 120 mm/s
- ABS: 120 mm/s
- TPU: 40 mm/s
- PETG: 120 mm/s
The Ender-5 S1 achieves unusually high print speeds for a Cartesian 3D printer. Normally, the print speeds of such 3D printers are in the range of 40 to 60 mm/s. Thanks to its very stable design, the Ender-5 S1 can achieve these high print speeds without generating any vibrations.
With other 3D printers, such a high print speed would cause strong vibrations in the print head, which would be reflected on the print object as ringing or ghosting.
The only exception are flexible filaments. With these filaments, it is also important to choose a slow printing speed for the Ender-5 S1. Otherwise, the flexible filament would compensate the movements of the extruder too much, which would lead to various printing errors.
Generally, with all 3D printers, a slower print speed produces better print quality. Of course, this also applies to the Ender-5 S1. If you see certain print errors like ringing or ghosting, you should reduce the print speed, even with rigid filaments. In my tests, I have produced good results with print speeds of 100 to 120 mm/s.
Layer Height
The best layer heights for the Ender-5 S1 in Cura:
- Decorative objects: 0.1 mm
- Standard: 0.2 mm
- Coarse, fast prints: 0.3 mm
The only component that affects the layer height of the Ender-5 S1 is the nozzle. Since the layer height ranges from 25% to 75% of the nozzle diameter, you can change the possible layer heights by using a different nozzle.
The Ender-5 S1 comes with a 0.4 mm Nozzle, which allows you to achieve layer heights from 0.1 to 0.3 mm.
The smaller the layer height, the finer the result. The disadvantage is that the printing time increases the smaller the layer height is. So if you aren’t concerned about the appearance and you are only printing a prototype or a part with a mechanical function, thicker layers are preferable.
Flow ate
The best flow rate for the Ender-5 S1 in Cura:
- Default value: 100%
- For over-extrusion: 90% to 99
- For under-extrusion: 101% to 110%.
The flow rate is normally always 100%. However, sometimes you need to set different values to get perfect results.
With the flow rate, you determine how much filament is extruded per second. This gives you a large influence on the extrusion behavior.
If you still see print errors caused by either under-extrusion or over-extrusion after a calibration, you can directly improve them with the flow rate.
Since the flow rate has such a big influence on the result, you have to be cautious here because even small changes have big effects. Therefore, the flow rate is also one of the settings that must be calibrated.
Retraction
The best retraction settings for the Ender-5 S1 in Cura:
- PLA: 0.8 mm at 30 mm/s
- ABS: 0.8 mm at 30-40 mm/s
- TPU: 1.6 mm at 30 mm/s
- PETG: 0.8-1.0 mm at 30-45 mm/s
Retraction is one of the most important settings in 3D printing. It determines how much filament is pulled back into the nozzle at what speed between each extrusion.
If the filament were not pulled back into the nozzle, it would simply come out uncontrollably, leaving fine strings or blobs. To avoid these printing errors, the correct settings are essential.
The values given above are good guidelines for the individual filaments. However, since there can be large differences between the manufacturers of the filaments and the retraction is so sensitive, a calibration is always recommended.
Basically, you try to adjust the retraction distance and the retraction speed in small steps so that you detect less and less print errors and thus approach the perfect value in small steps.
How and with what you can best perform this calibration, you can read further down in this article.
Infill
The best infill density for the Ender-5 S1 in Cura:
- Decorative objects: 0-15%
- Standard objects: 15-50%
- Stable objects: 50-100%
The structure inside a 3D print is called infill. It is divided into the density and the pattern. Both have an influence on the final stability of the object.
For the density you should aim for values between 0 and 15% for decorative objects, by default 15 to 50% is reasonable and for very stable objects you can use up to 100%, which prints a solid object.
But besides the density, the pattern also has an influence on the stability. However, some of them, especially the patterns for high stability, take a little longer to print, so the same pattern is not always useful.
High stability (for stable objects):
- Cubic
- Cubic subdivision
- Octet
- Gyroid
Medium stability (for standard objects):
- Grid
- Triangles
- Tri-Hexagonal
Low stability (for decorative objects):
- Lines
- Zigzag
- Lightning
First Layer
These are the best Cura settings for the first layer on the Ender-5 S1:
- Layer height: 100-200% of normal layer height (higher values to increase print bed adhesion)
- Line width: 100-200% of normal line width (higher values to increase print bed adhesion)
- Print temperature: Same as the rest of the object, or 5-10 °C higher for better print bed adhesion.
- Print speed: 50% of normal print speed (i.e. 25 mm/s for a normal print speed of 50 mm/s) or 5-10 mm/s for high print bed adhesion
- Flow rate: 100-110% (higher values in case of poor print bed adhesion)
There are many ways to increase print bed adhesion. With the above settings, you can increase the adhesion with Cura.
In most cases, however, you will not need to use any of these methods, as the print bed of the Ender-5 S1 provides excellent adhesion for most filaments.
If you still have problems with print bed adhesion, my first tip would be to reduce the print speed to 5 to 10 mm/s for the first layer. This is usually enough to increase adhesion sufficiently. Usually, this is enough to increase the adhesion sufficiently.

3D printing can be difficult – especially in the beginning. Many beginners struggle with print errors, poor print bed adhesion, or don’t know how to properly set up the slicer.
That’s why I created an online course to get everyone up to my expert level and as quickly as possible.
The course covers everything you need to know about FDM 3D printing to get perfect results every time. Click the link below to learn more about the content and what to expect (and don’t worry: there are no tests! Learn at your own pace, completely stress-free).
How to Calibrate the Cura Settings for the Ender-5 S1
If you have created a Cura profile with the machine settings and the print settings from this article, you will be able to achieve good results with your Ender-5 S1. However, there is a high probability that these results will only be “good” and not “perfect”.
To get perfect results, you need to calibrate the most important print settings carefully. To calibrate these settings, you need the right objects. You can find objects to calibrate these settings on portals like Thingiverse, but the Calibration Shapes plugin in Cura is also very handy for this.
The most essential settings you should calibrate are the print temperature, flow rate and retraction.
One of the biggest sources of frustration in 3D printing is calibration. This is mainly because most settings are somewhat dependent on each other. So, it’s perfectly normal if you have to calibrate the settings several times in a row to get perfect results.

Read the full calibration guide:
3D Printer Calibration: Step-by-Step to Perfect Results
How to Calibrate the Print Temperature
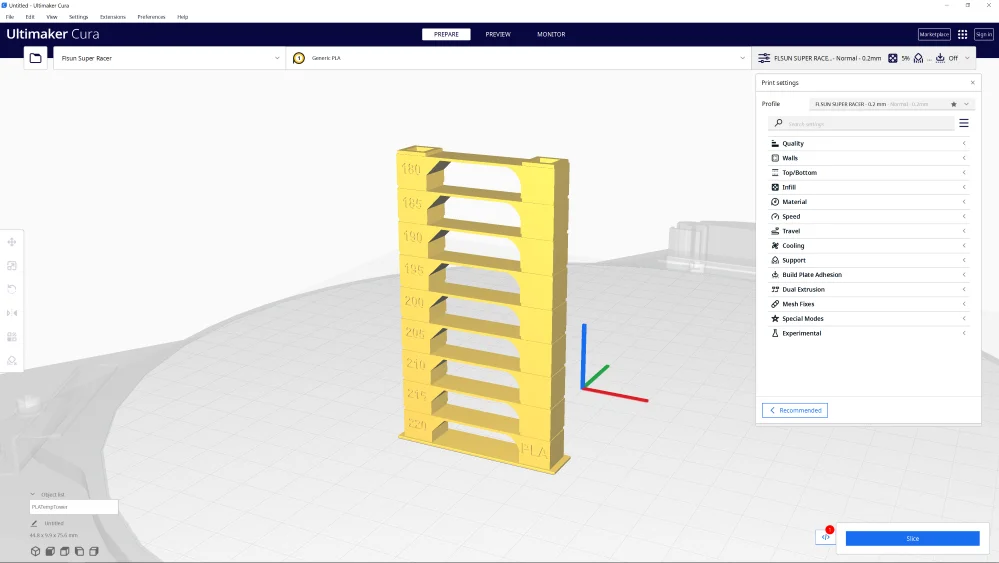
To calibrate the print temperature, temperature towers are popular. These objects consist of multiple levels of the same geometry. The individual levels are created to promote certain printing errors, such as stringing or sagging.
The individual layers are printed at different temperatures so that you can see after printing at which temperature the fewest errors occur.
How to Calibrate the Flow Rate
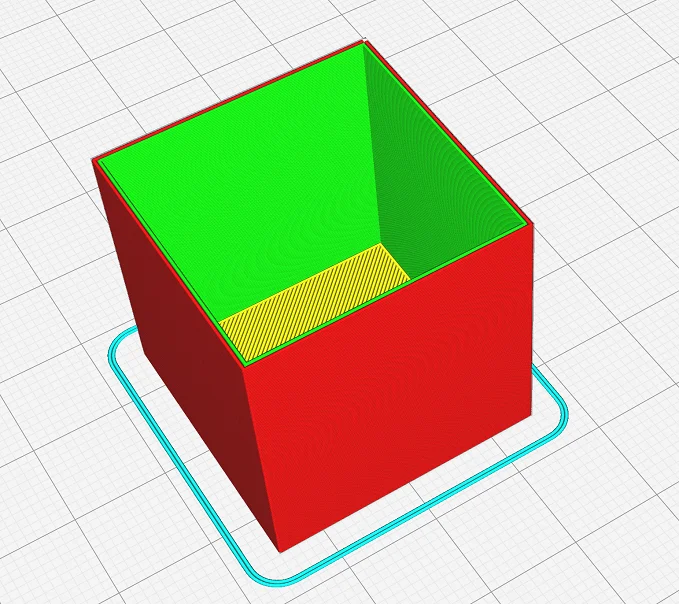
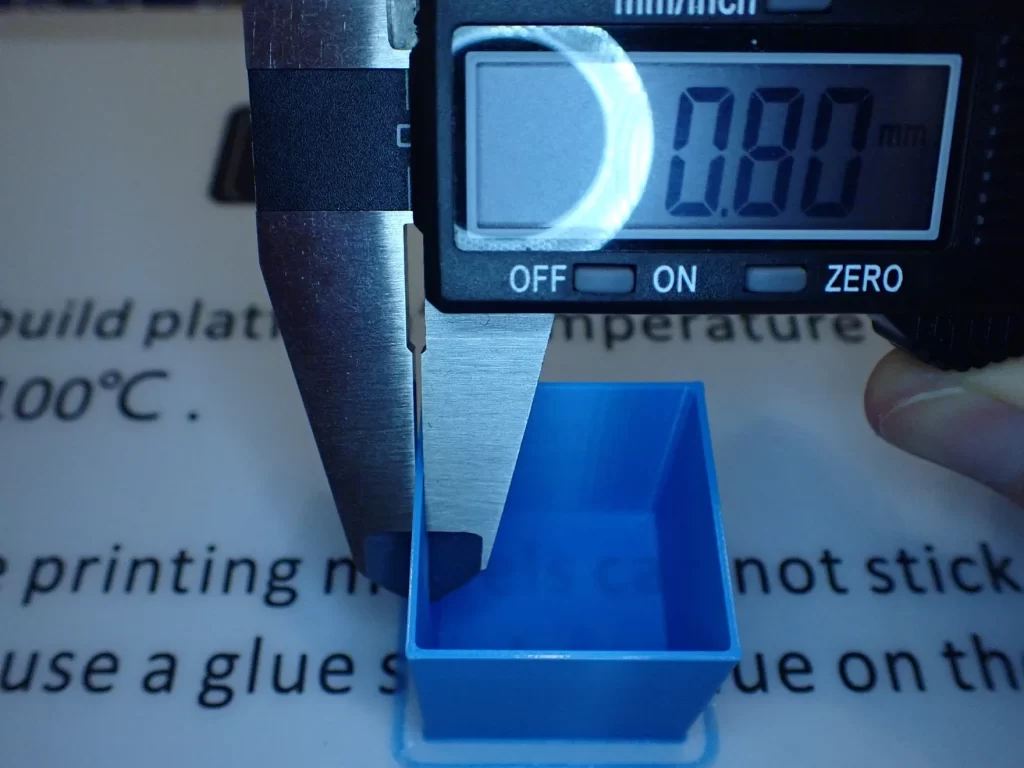
When calibrating the flow rate, you check whether the extruder is extruding as much filament as it should. You can do this in two different ways.
The first option would be to mark the filament in front of the extruder at a certain distance, extrude a certain length of filament, and then measure the actual extruded length.
The other way is to print a hollow cube with no top layers and compare the actual wall thickness to that in the slicer.
This way, you can calibrate the flow rate to match reality with the theoretical settings in Cura.
How to Calibrate the Retraction
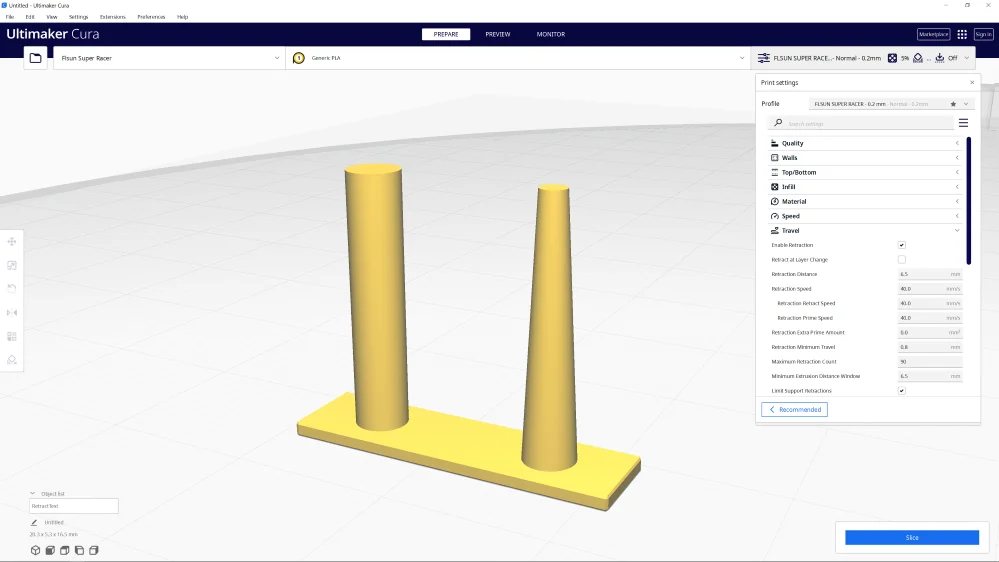
Calibrating the retraction is one of the most important things you can do for optimal results. When calibrating, you pay attention to how the stringing behavior changes when you change the retraction distance and retraction speed.
So, you can approach the perfect values in small steps by comparing the results before and after the change.
There are numerous geometries that can be used as calibration objects, the best ones are those that are printed quickly and consume little filament. This way you can speed up the calibrations.
Conclusion
The Ender-5 S1 is an excellent 3D printer that can deliver perfect results even at high print speeds. But even the best hardware cannot compensate for bad slicer settings.
With the Cura settings for the Ender-5 S1 in this article, you have good guidelines that will give you good results. To get the best out of your Ender-5 S1, you will need to calibrate the most important settings as described.
Once you’ve done that, though, you’ll have a lot of fun 3D printing!
Disclosure: This website is the property of Martin Lütkemeyer and is operated by Martin Lütkemeyer. Martin Lütkemeyer is a member of the Amazon Services LLC and other Affiliate Programs. These are affiliate advertising programs designed to enable websites to earn advertising revenue through advertising and linking to Amazon.com and others. Links marked with * are affiliate links.
