
- Wet Filament: Prevention, Symptoms & Drying - July 18, 2024
- Sovol SV08 – Best PrusaSlicer Settings & Profile - June 26, 2024
- Sovol SV08 – Best Orca Slicer Settings & Profile - June 26, 2024
Disclosure: Links marked with * are Affiliate Links. I earn from qualifying purchases if you decide to make a purchase through these links – at no additional cost for you!
The Elegoo Neptune 3* seems to be the perfect 3D printer for beginners. It has many features that are popular upgrades in other low-budget 3D printers and are already included in the low price here.
In this hands-on review, I took a closer look at it so you can make the right buying decision.
There is already a new version, the Neptune 4. This new version comes with Klipper as firmware and an innovative layer ventilation, which together allow a high speed of 250 mm/s,

Check Price at:
Table of Contents:
- 1 Key Takeaways
- 2 Who Should Buy the Elegoo Neptune 3?
- 3 Advantages & Disadvantages > Elegoo Neptune 3
- 4 Technical Specifications > Elegoo Neptune 3
- 5 Scope of Delivery > Elegoo Neptune 3
- 6 Setup > Elegoo Neptune 3
- 7 Features > Elegoo Neptune 3
- 7.1 Automatic Print Bed Leveling
- 7.2 Double-Gear Bowden Extruder
- 7.3 Supports PLA/ABS/TPU/PETG
- 7.4 Magnetic, Flexible Print Bed
- 7.5 4.3-Inch Detachable Touch Screen
- 7.6 Automatic Filament Feeding and Removal
- 7.7 Filament Sensor
- 7.8 Resume Print
- 7.9 Easy Setup
- 7.10 32-Bit Silent Motherboard
- 7.11 Belt Tensioner
- 8 Operation > Elegoo Neptune 3
- 9 Heating Times > Elegoo Neptune 3
- 10 Noise Levels > Elegoo Neptune 3
- 11 Power Consumption > Elegoo Neptune 3
- 12 Print Speed > Elegoo Neptune 3
- 13 Slicer > Elegoo Neptune 3
- 14 Print Quality – Practical Test > Elegoo Neptune 3
- 15 Is the Elegoo Neptune 3 Worth It?
- 16 Similar 3D Printers
Key Takeaways
- Perfect printer for beginners
- Very good price-performance ratio
- Premium Features: Automatic print bed levelling & PEI print bed
Who Should Buy the Elegoo Neptune 3?
The Elegoo Neptune 3 is the perfect beginner 3D printer. It is very affordable and has features that are usually only found in more expensive devices. The entry into 3D printing is very easy with this 3D printer.
(Tip: the higher price of the Neptune 3 Pro is worth it!)
Advantages & Disadvantages
> Elegoo Neptune 3
PRO:
- Automatic print bed levelling
- Very good print bed adhesion
- Double gear Bowden extruder
- Removable display
- Mostly pre-assembled
- Compact
CON:
- No direct drive extruder
Technical Specifications
> Elegoo Neptune 3
DEVICE
- Technology: FDM (Fused Deposition Modeling)
- Size: 442 x 452 x 530 mm
- Weight: 8,1 kg
- Print volume: 220 x 220 x 280 mm
- Accuracy: ± 0.1 mm
- Nozzle: 1 x 0.4 mm
- Print speed: 30-180 mm/s (40-60 mm/s is standard)
- Maximum nozzle temperature: 260 °C
- Maximum print bed temperature: 100 °C
- Print bed: Flexible, magnetic and PEI coated
- Print bed levelling: Automatic
- Resume Print: Yes
- Filament Sensor: Yes
- Camera: No
SOFTWARE
- Slicer: Cura, Elegoo Cura
- Connectivity: Micro SD card
Check Price at:
Scope of Delivery
> Elegoo Neptune 3
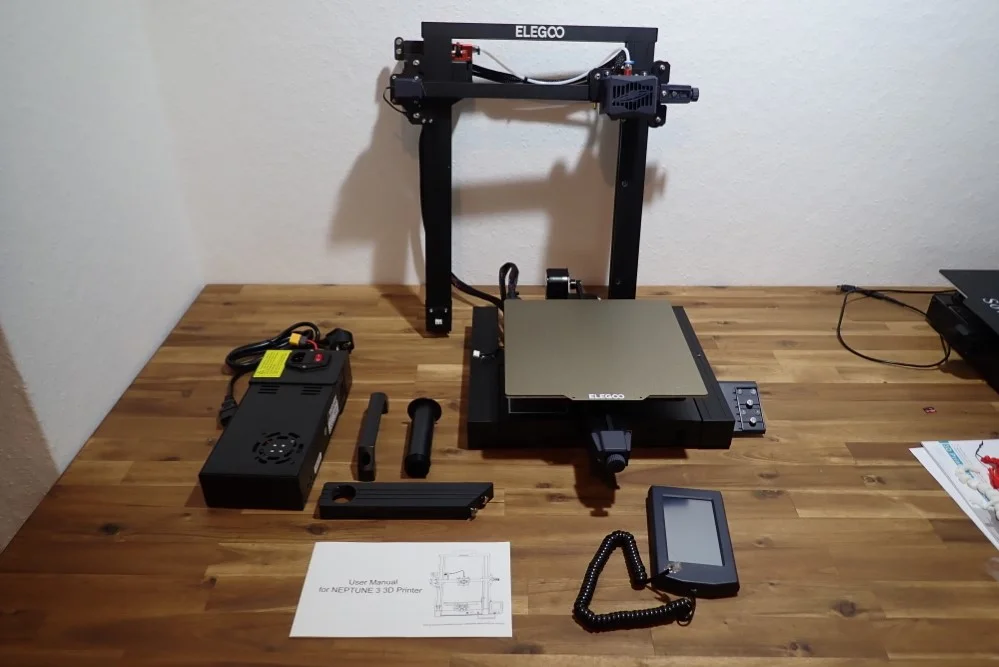
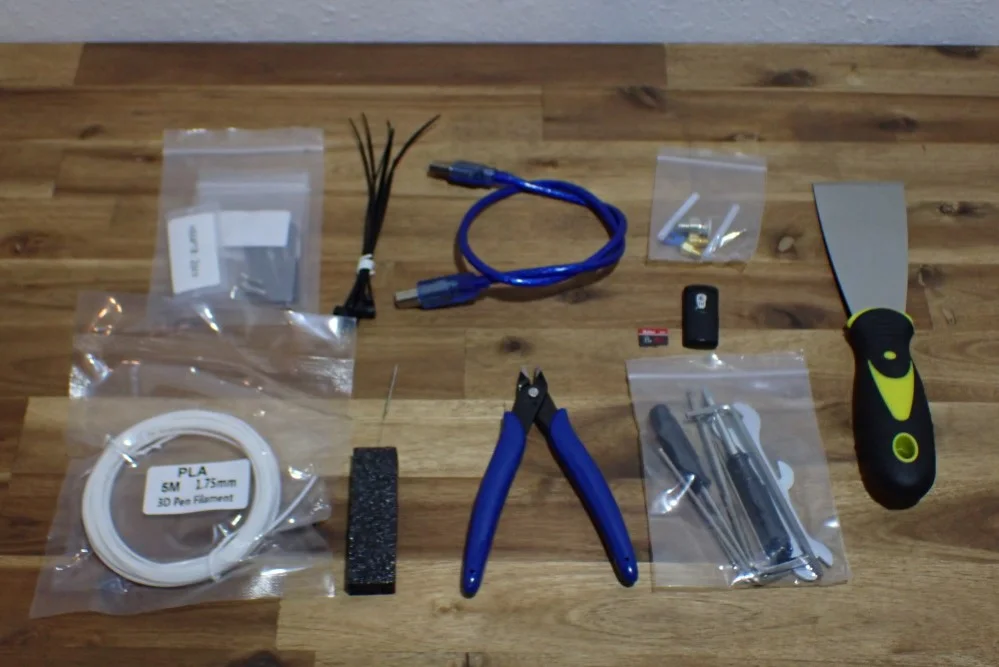
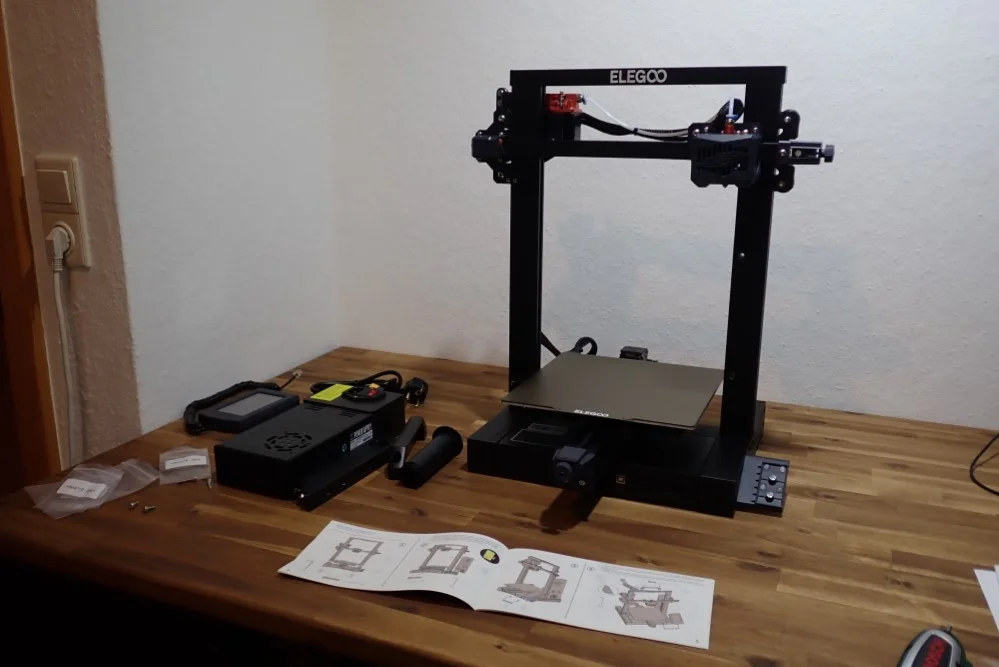
The scope of delivery of the Elegoo Neptune 3 includes everything for the assembly and for a first test print.
You don’t need any additional tools for the assembly and there is a small amount of PLA filament included. But the amount is just enough that you can make 1-2 small test prints with it. So you should buy more filament directly at the time of purchase.
Here are all parts of the scope of delivery of the Neptune 3:
- Preassembled printer parts
- Wrenches
- Screwdrivers
- Allen keys
- Cable ties
- USB cable
- Power cable
- Spare parts
- Spatula
- Filament pliers
- USB Micro SD adapter
- Micro SD card with digital instruction manual, slicer, USB driver, test models and an assembly instruction video
Setup
> Elegoo Neptune 3
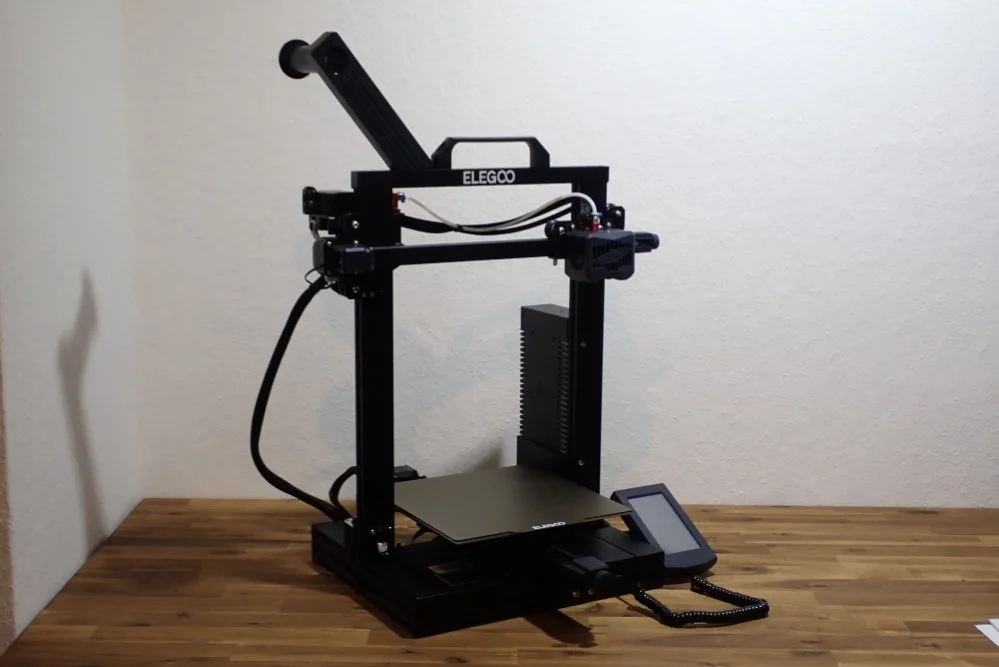
Since the Elegoo Neptune 3 comes partially pre-assembled, the assembly consists of only a few steps and is done within 10 to 20 minutes.
The first step is to mount the frame with the pre-assembled X-axis and the print head to the 3D printer base. For this, you need 4 screws (two per side), which you screw from below through the base into the frame. Next, attach the power supply to the frame. After that, you only need to mount the display and the filament holder.
Because the Elegoo Neptune 3 is so small and light, it is also easy to store. To make this even easier, there is a practical handle at the top of the frame. It is screwed to the frame in two places.
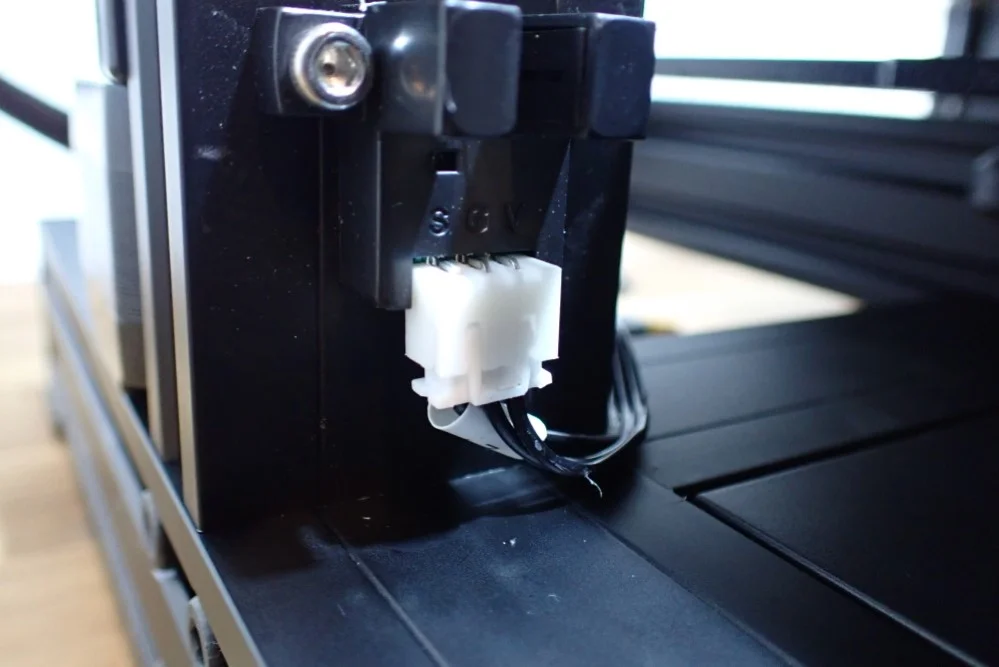
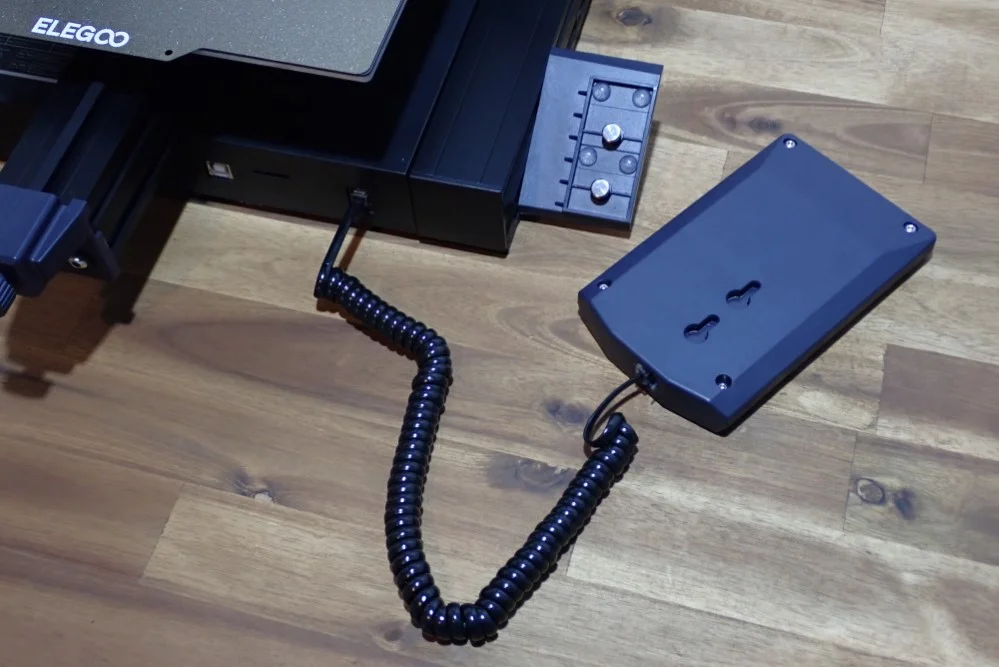
Finally, you only have to connect the cables of the individual modules with each other. They are labeled with shrink tubes so that you cannot connect them incorrectly.
The complete assembly is explained with easy-to-follow pictures and text in the manual. There are also tips if the print bed or the X-axis should sit loosely on the rail.
Check Price at:
Features
> Elegoo Neptune 3
The Elegoo Neptune 3 has more features than you would expect at its price. Especially the automatic print bed leveling and the PEI print bed stand out here.
Automatic Print Bed Leveling
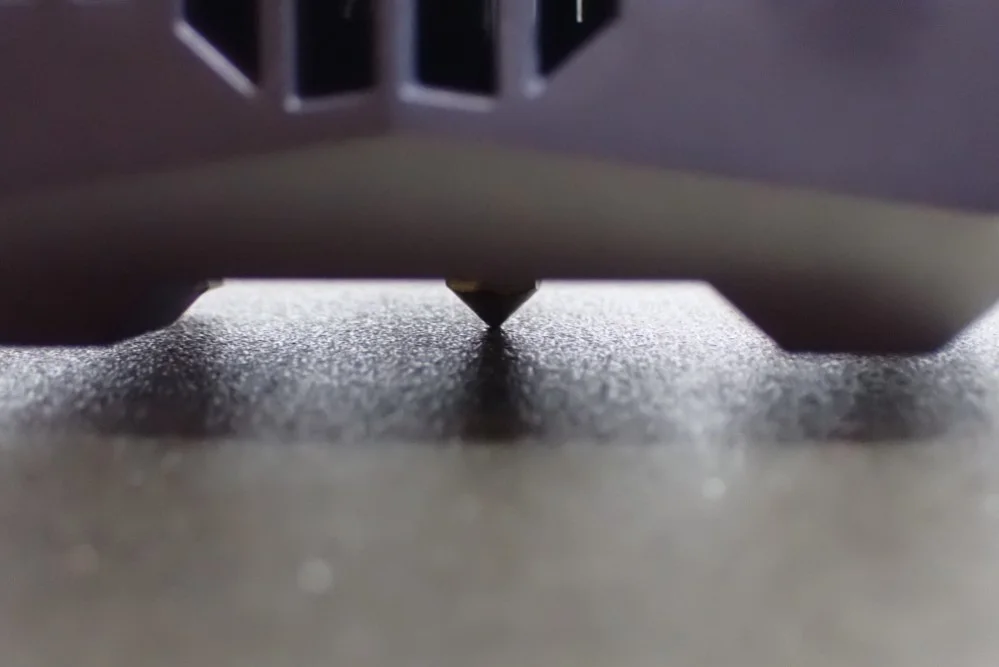
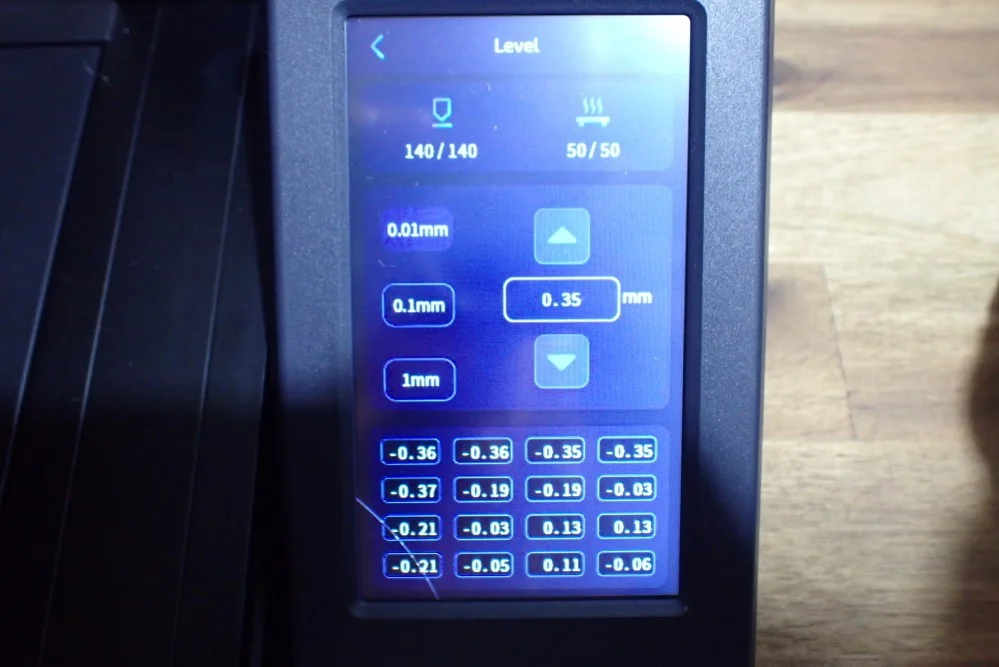
The print bed of the Elegoo Neptune 3 has no rotary screws for manual leveling. The leveling is done automatically at 16 points by a strain gauge pressure sensor in the print head. Only the Z0 position has to be calibrated once in the middle with a piece of paper.
The strain gauge pressure sensor in the print head of the Elegoo Neptune 3 automatically scans 16 points on the print bed during levelling to compensate for inclination during printing. Since the print bed is mounted immovably and there are no screws on the bottom, no large tilts can occur. The small inclinations can be completely compensated by the automatic leveling.
As the Elegoo Neptune 3 is likely to be bought mainly by beginners, this is a brilliant feature. Newbies often have difficulties with manual print bed levelling with the paper method in 4-5 places. This way you only need to press one button and calibrate the Z0 position afterward.
The Z0 position is adjusted with a piece of paper. The principle is the same as with manual print bed leveling. You need to place a piece of paper between the nozzle and the print bed and adjust the distance so that there is some friction when you move the piece of paper. If the nozzle is too close to the print bed, the first layer will be squeezed hard and become too wide. If the distance is too large, the filament may not adhere properly to the print bed, as it is only placed on the print bed and not pressed.
Double-Gear Bowden Extruder
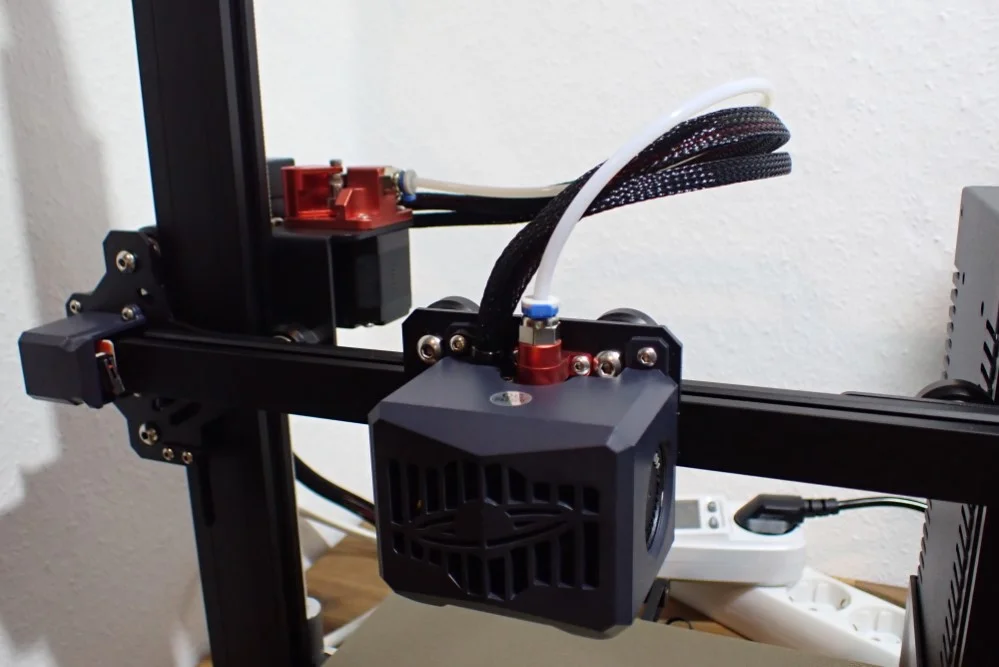

The Elegoo Neptune 3 has a “Double Gear Metal Bowden Extruder”. Due to its two gears it can transport the filament very precisely to the print head, which has a positive effect on the print quality. The tension on the filament can be easily adjusted via a screw.
Bowden extruders are a popular choice for 3D printers because they offer a more compact design. This is achieved by having the extruder (i.e. filament drive) located away from the print head on the X-axis. This allows for a lighter print head weight and enables faster print speeds.
Heavy direct drive extruders can cause vibrations that result in printing errors. These vibrations can be caused by the weight of the extruder or motor, or by the interaction between the extruder and the frame of the printer. These vibrations can cause problems such as poor layer adhesion, ringing/ghosting, and even skipped steps in the printing process.
Although most direct drive extruders are now light enough to eliminate vibration, higher print speeds can still be achieved with Bowden extruders thanks to their light weight.
Supports PLA/ABS/TPU/PETG
The Elegoo Neptune 3 with its Bowden extruder is suitable for printing with PLA, ABS and PETG filaments. Flexible filaments like TPU are also possible, but can (quite rarely) get tangled in the Bowden tube.
PLA: The Neptune 3 is perfectly suited for PLA. Its Bowden extruder can feed it precisely to the nozzle and the adhesion to the print bed is ideal. I haven’t had to use a raft or adhesives like Magigoo or Blue Tape on any of my prints. Since the Neptune 3 is mainly interesting for beginners, it’s also a good thing that PLA can be printed perfectly on this printer.
ABS: Thanks to the high temperatures that the printer and the print bed can reach, you can also print ABS with the Neptune 3. I have successfully printed a test print with ABS, but for larger prints, you will need to ensure a warm and homogeneous ambient temperature. ABS tends to shrink a lot during cooling, which can lead to warping and cracks in the object. You can achieve a warm and homogeneous ambient temperature by using a 3D printer tent or a draft shield.
PETG: As long as a 3D printer reaches the necessary temperatures and the filament is dry enough, it can also print PETG. The Neptune 3 takes care of the former and you can make the latter with proper storage or a filament dryer. PETG is highly hygroscopic and absorbs water from the surrounding air. This leads to stringing and can destroy your print.
TPU: Theoretically, the Neptune 3 can also print TPU. The result will probably also be passable – I have not tried it myself. The problem could be that the flexible filament can get tangled in the Bowden tube between the extruder and the print head. Also, the distance is so long that the filament can contract and stretch due to the extrusion movements, resulting in inaccurate extrusion. My tip for TPU with a Bowden extruder is to set the print speed very slow and use the same values for print speed and movement speed.
Magnetic, Flexible Print Bed
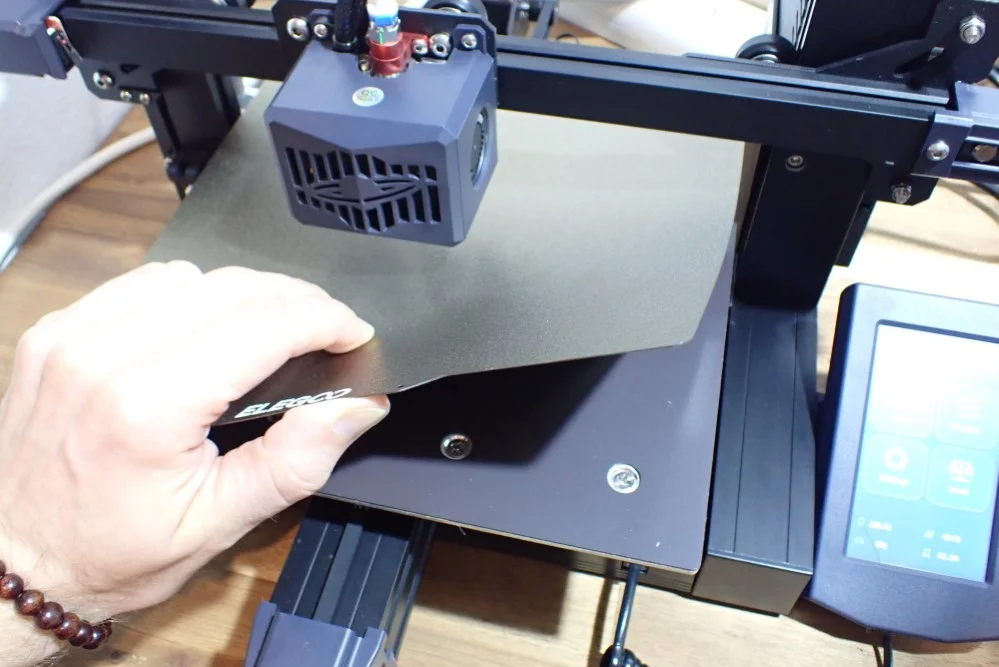
The Elegoo Neptune 3 has a magnetic print bed with a PEI coating. This allows it to be easily removed and bent after printing to remove the print object. The coating creates a very good adhesion and has proven itself for various filament types.
A PEI print bed is a printing surface used in 3D printers. It consists of a magnetic spring steel plate with a PEI layer on top. The PEI helps the filament stick to the bed and prevents it from warping. The result is better prints with less warping.
Many low-budget 3D printers have cheap, poorly adhering print bed surfaces. With such printers, I regularly have to increase the print bed adhesion artificially with adhesives like Magigoo or with Blue Tape. A PEI surface is therefore a very popular upgrade for such 3D printers. The fact that the Neptune 3 has a magnetic PEI print bed despite the low price is a very big advantage.
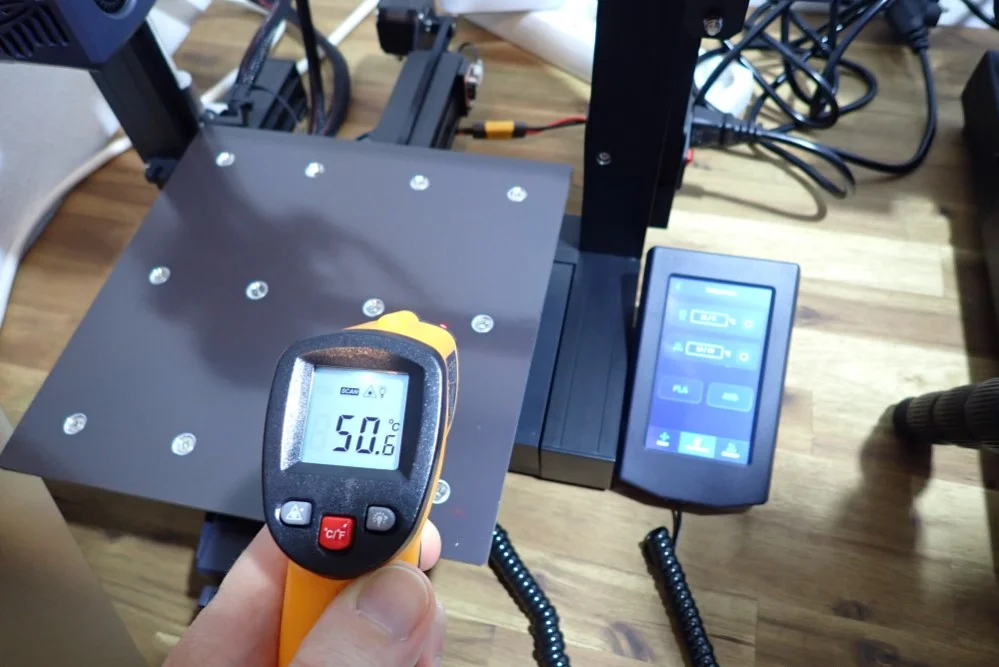
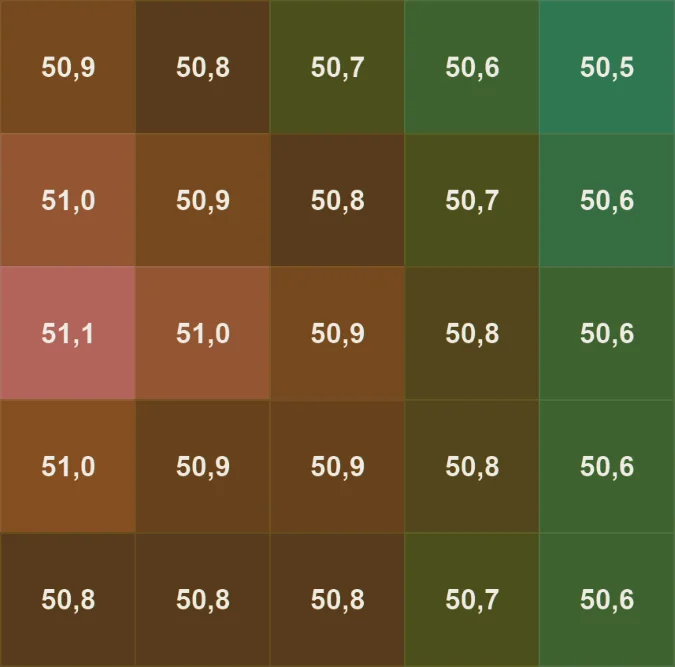
In addition to the coating itself, the homogeneity of the temperature of the print bed is also a decisive factor for print bed adhesion. If the print bed does not have the same temperature everywhere, parts of the object may adhere less well to it. To test this, I measured the temperature of the print at 25 locations with a non-contact thermometer called a pyrometer.
Since the PEI surface is very reflective, I only measured the magnetic plate underneath to get meaningful values. Overall, the print bed is homogeneous enough to have no problems with the print bed adhesion. Even ABS should have no problems with this.
4.3-Inch Detachable Touch Screen
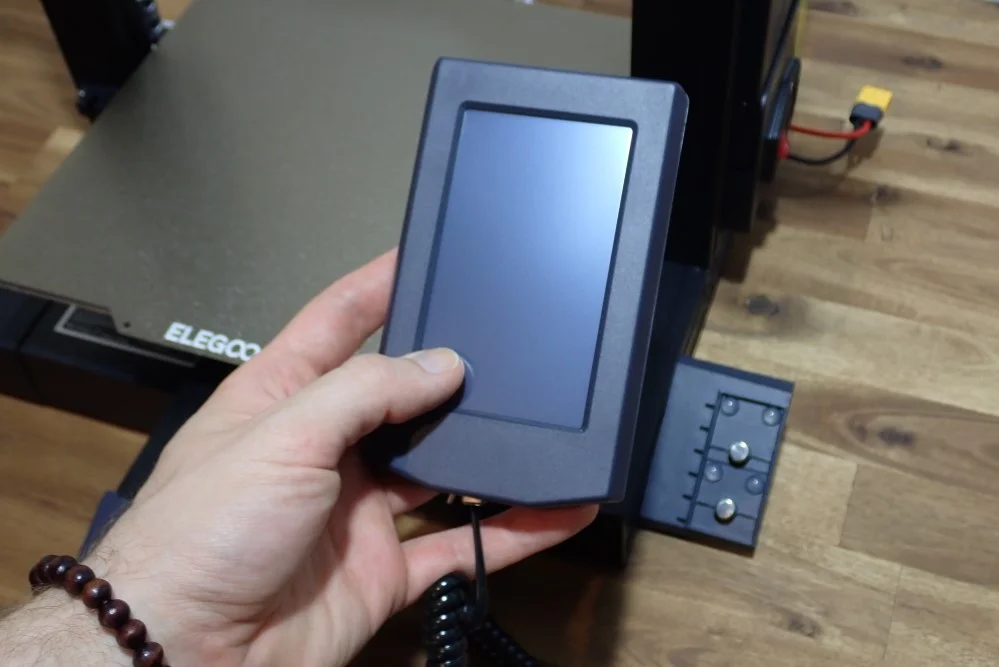
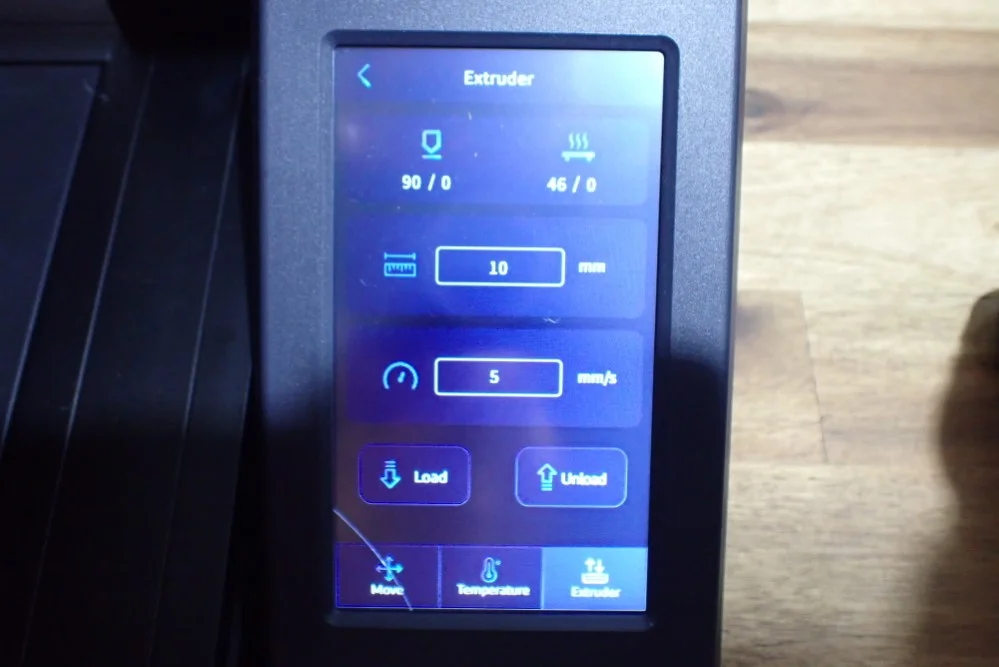
The 4.3-inch touchscreen of the Elegoo Neptune 3 can be removed from the printer and is then only connected with a cable. The menu is very clear and intuitive to understand. It contains all the important settings that you can reach with just a few clicks.
The menu is divided as follows:
- Print: Here you can see the individual print files and start printing.
- Prepare: Here you can move the axes, set the temperature and change the filament.
- Settings: In this menu you will find various settings such as manually entering the temperature, disabling the motors (so you can move the print head and print bed by hand), the language settings and other options.
- Leveling: This starts the automatic print bed leveling.
While the ability to detach the touchscreen from the 3D printer doesn’t do much for me personally, since the 3D printer is on a workbench that’s within easy reach, I can imagine it being useful in some situations. Especially if you want to get familiar with all the functions at the beginning and sit down in front of the 3D printer, it is more practical to hold the menu in your hands like a smartphone.
Automatic Filament Feeding and Removal
With the Elegoo Neptune 3, the filament can be loaded and changed either manually or automatically via the menu. The parameters for this can also be defined in the menu, i.e. the speed and distance of the extruder movement.
However, I myself always change and load the filament manually and hardly ever use this submenu. Nevertheless, it can be quite handy if you have difficulty accessing the extruder. To load or change the filament manually you have to remove the tension on the filament via a lever on the extruder. So it can be more comfortable to save the filament quickly and then feed it via the menu to the print head.
Filament Sensor
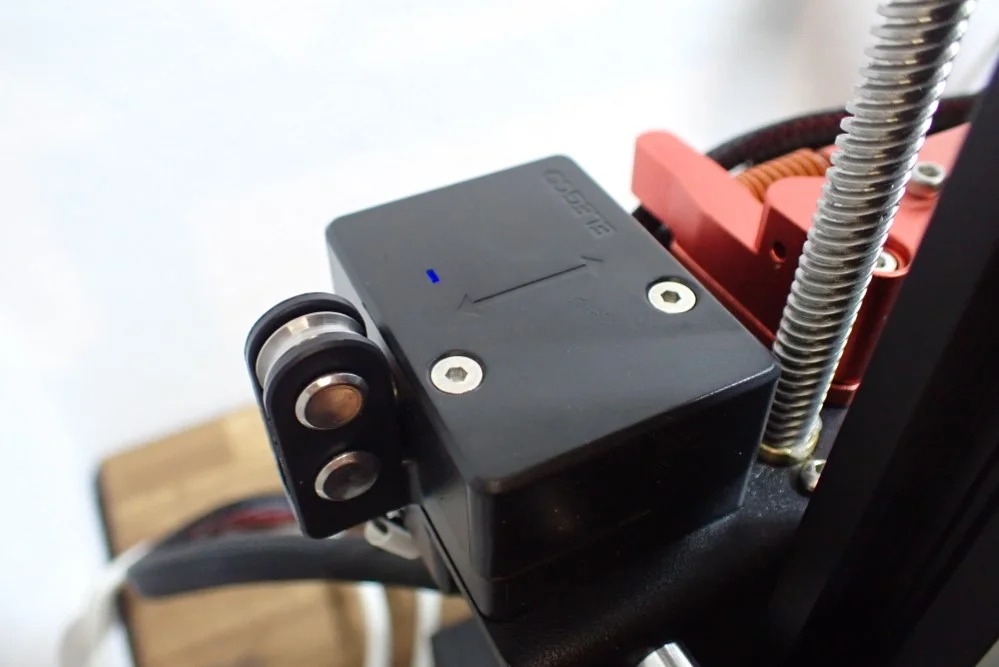
The Elegoo Neptune 3 has a filament sensor that sits directly in front of the extruder. It detects if filament is present or not and pauses the print if the filament is running low.
A 3D printer with a filament sensor can detect when the filament is running low. So you don’t have to waste time and filament printing only to find that your printer runs out of filament in the middle of a print job.
As soon as the filament sensor detects no more filament, the sensor pauses the print so you can change the filament. The only thing that the filament change might leave on your print object at the end is a small blob on the outer edge if the print was unfortunate enough to be paused on a wall. If the print was paused in the infill, you probably won’t see that the filament ran out in between (unless of course, you use a different filament color).
Resume Print
The Resume Print feature of the Elegoo Neptune 3 resumes printing after it has been unexpectedly interrupted by a power failure.
This feature is now available with every newly released 3D printer. As soon as the power supply is no longer supplied with power, the printer quickly saves the print progress before it shuts down. As soon as it is supplied with power again, it continues printing exactly at the point where it was interrupted.
Easy Setup
The Elegoo Neptune 3 is partially pre-assembled and can be assembled within 10-20 minutes. All the necessary tools needed for assembly and a good manual are included.
To save on production costs, many low-budget 3D printers come to your home as a kit. Despite its low price, the Neptune 3 is mostly pre-assembled and only needs to be put together.
I finished the assembly in about 10 minutes, but have also made photos in between. During the assembly no mistakes can happen, so even beginners should have no problems with it.
32-Bit Silent Motherboard

The Neptune 3 from Elegoo has a 32-bit motherboard with silent stepper motor drivers. So there is no annoying loud beeping with every movement of the stepper motors.
Therefore, the loudest noises do not come from the motherboard, but from the fans on the print head and the power supply. If you want to upgrade the Neptune 3 with electronic upgrades, there is a clear diagram of the motherboard with all connectors in the manual.
Belt Tensioner
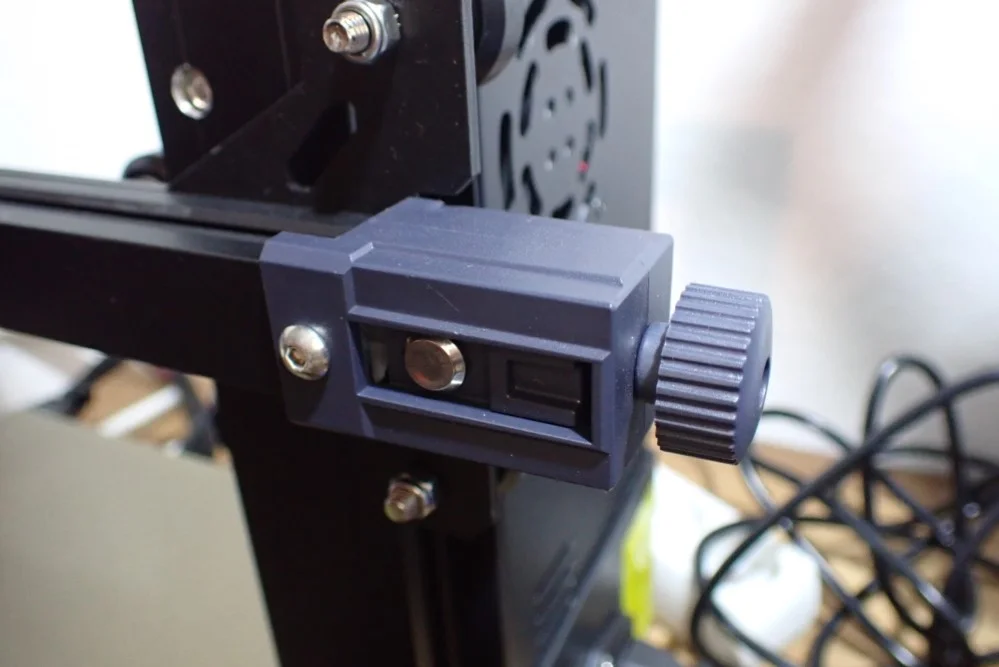
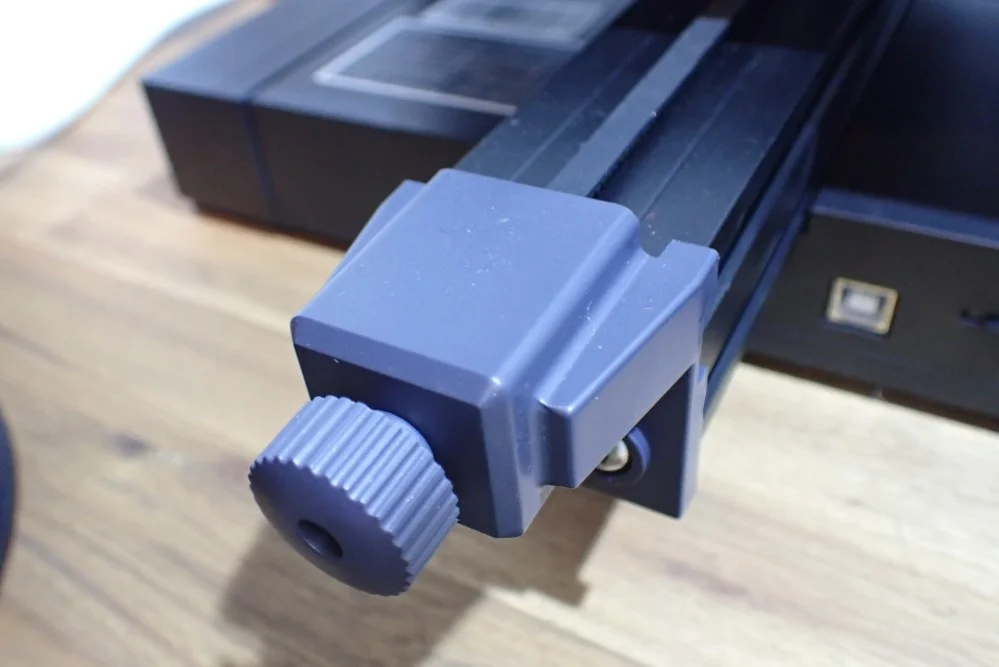
The tension of the belts can be easily adjusted via a rotary screw on each of the X and Y axes of the Neptune 3.
Proper belt tension for a 3D printer is important to achieve the best print quality. If the belts are too tight, they can wear out the bearings and pulleys. If they are too loose, the printer cannot move accurately and the prints will be inaccurate.
You have found the right tension when the belts start to make a high-pitched sound when you flick them with your finger like a guitar string.
Check Price at:
Operation
> Elegoo Neptune 3
User interface: The operation via the touchscreen is very comfortable. With some cheap 3D printers, the touchscreen is often not well calibrated and is either too sensitive or you have to touch it more often until it perceives the touch as a click. However, the Neptune 3’s touchscreen responds accurately to your input and feels almost like a smartphone – especially when you hold it in your hand.
Printing: Printing is a breeze with the Neptune 3. The filament is loaded automatically, the print bed is also automatically leveled and the print quality is consistent and repeatable.
Print bed adhesion: The print bed adhesion of the PEI print bed is ideal for most filaments. In all my test prints I had no problems with adhesion and did not have to resort to adhesives like Magigoo.
Heating Times
> Elegoo Neptune 3
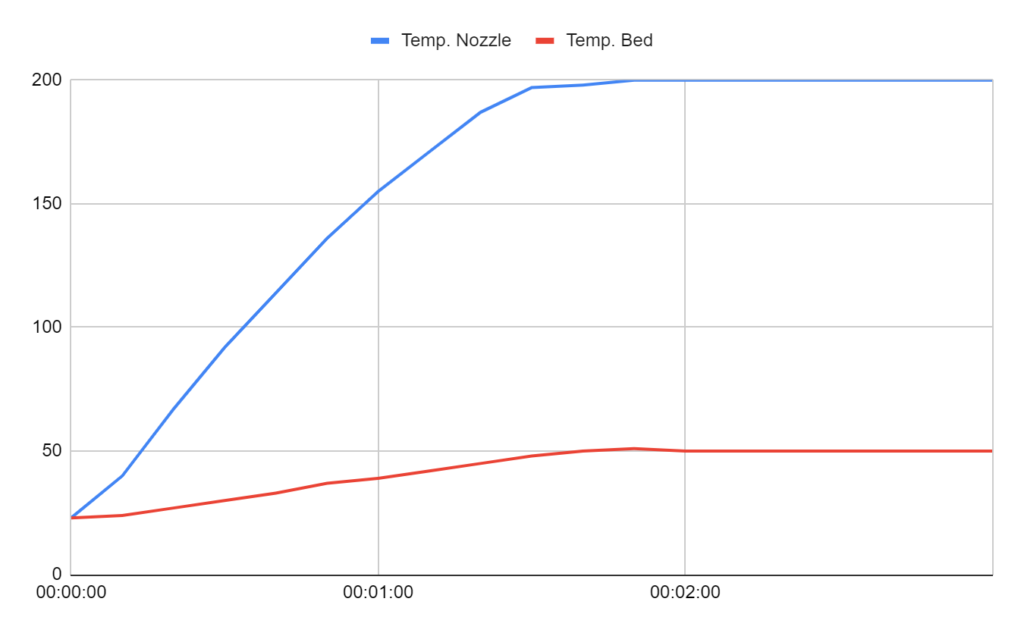
In the touchscreen menu, there are predefined temperatures for PLA and ABS. To test the heating times I used the mode for PLA with the temperatures of 200 °C for the nozzle and 50 °C for the print bed. The Neptune 3 only needed 2 minutes to reach both temperatures stably. This is quite fast and mainly due to the small print bed.
Noise Levels
> Elegoo Neptune 3

According to Elegoo, the noise level of the Neptune 3 is below 50 decibels. I measured this myself and can confirm that the highest measured value is just under 50 decibels. On average, it is only 39 decibels loud, which is equivalent to a quiet conversation.
Power Consumption
> Elegoo Neptune 3
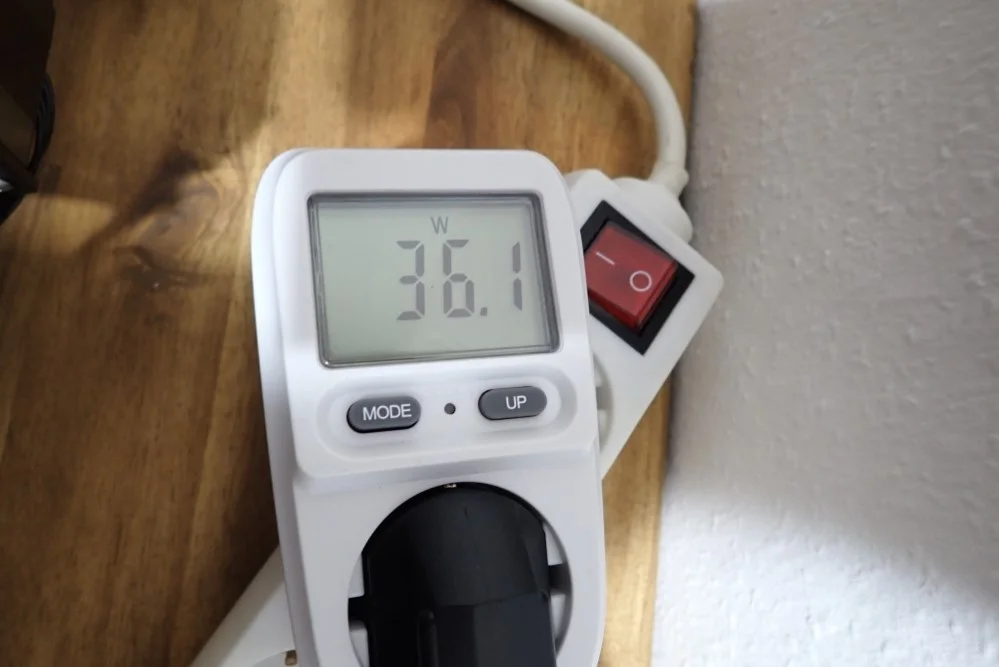
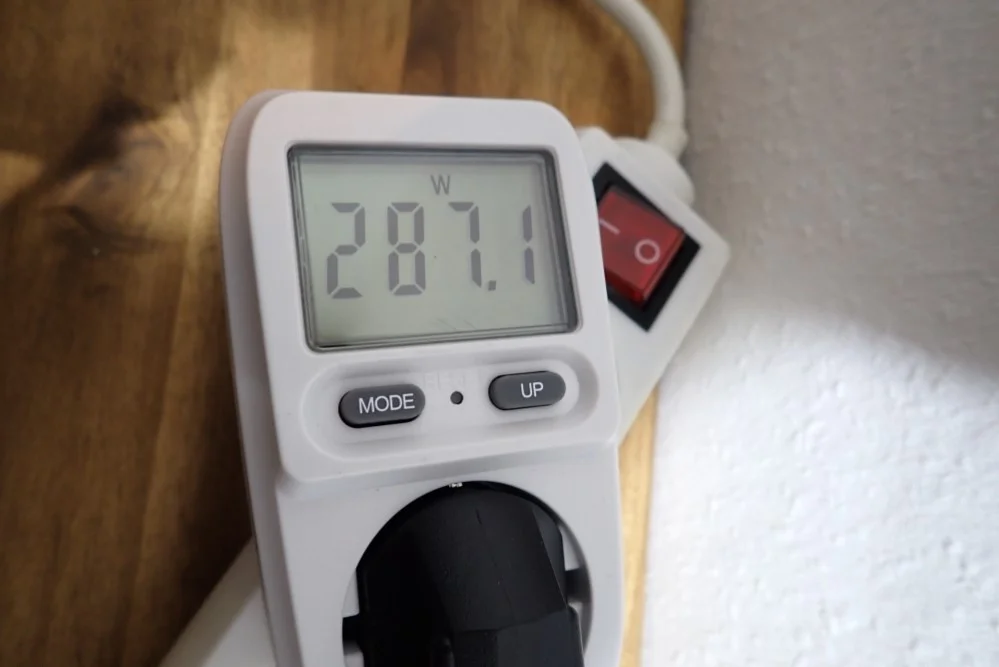
The Neptune 3’s power consumption is relatively low. During printing, it averages 30 to 40 watts. Only when it has to heat up the nozzle or the print bed in between, it reaches up to 300 watts for a short time.
Print Speed
> Elegoo Neptune 3
Due to the relatively light print head, the Elegoo Neptune 3 achieves high print speeds. But even though the technical specifications state a maximum print speed of 180 mm/s, 40-60 mm/s is much more realistic. This high stated print speed is rather an indication of the movement speed. You should print much slower, otherwise you will get strong inaccuracies in the print.
Slicer
> Elegoo Neptune 3
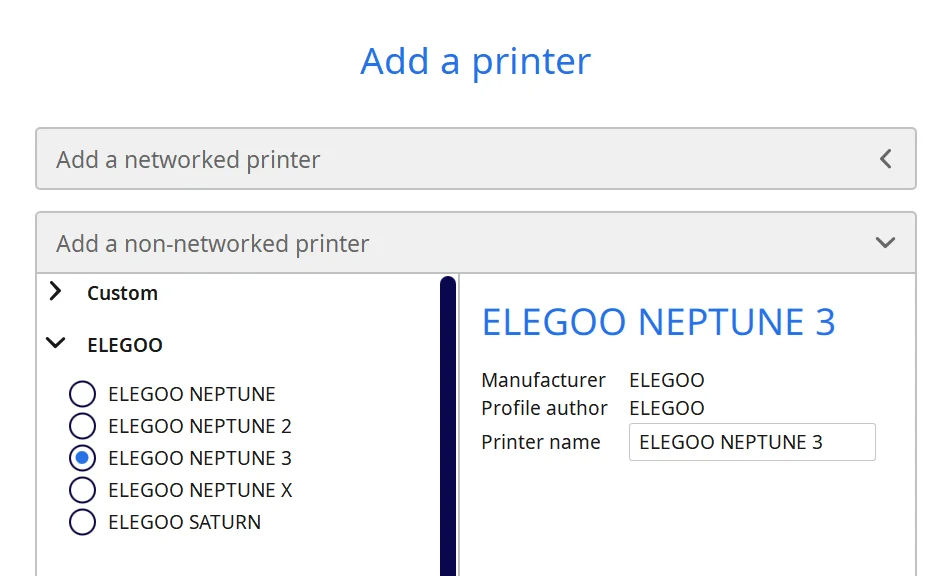
The Elegoo Neptune is compatible with Cura and the Elegoo Cura clone.
The Elegoo Cura slicer is a slicer specifically designed for use with Elegoo 3D printers. It is based on the open-source slicer Cura but has been modified a bit. Almost all settings are identical to Cura, only the user interface has been modified a bit.
In the Elegoo Cura Slicer, there is also a predefined standard profile for the Neptune 3, so you can start printing directly. If you prefer to work with Cura, you can simply copy the settings from the profile in the Elegoo Cura Slicer and paste them into a new Cura profile.
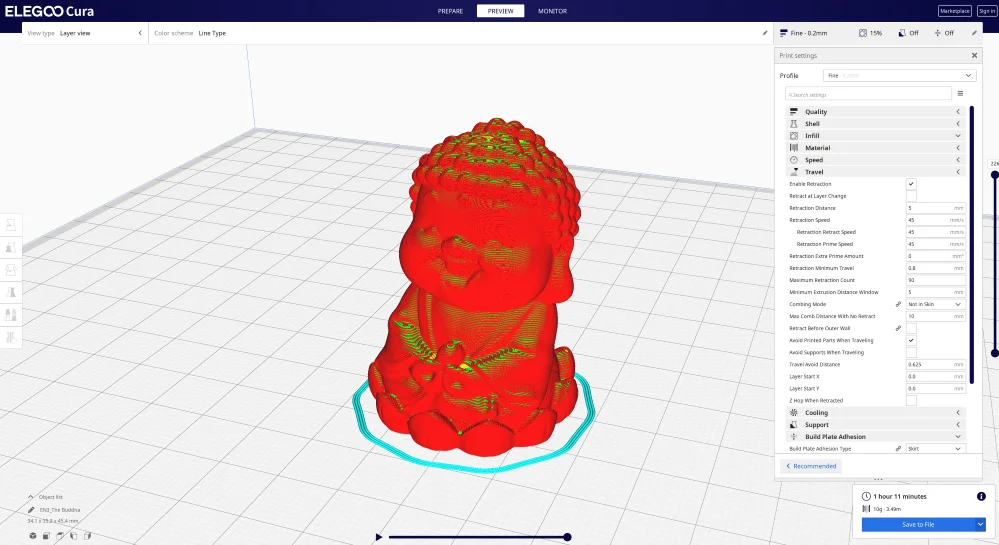
Print Quality – Practical Test
> Elegoo Neptune 3
I printed a few test objects to see how the Elegoo Neptune 3 performed. The results were good overall, especially for PLA. In addition to PLA, I also tried PETG and ABS.
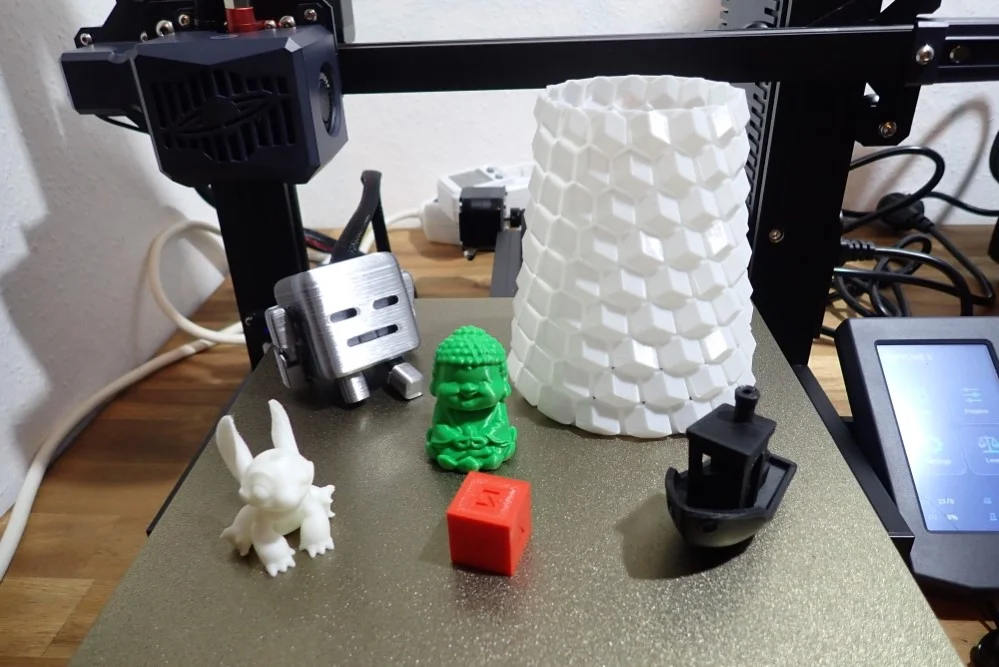
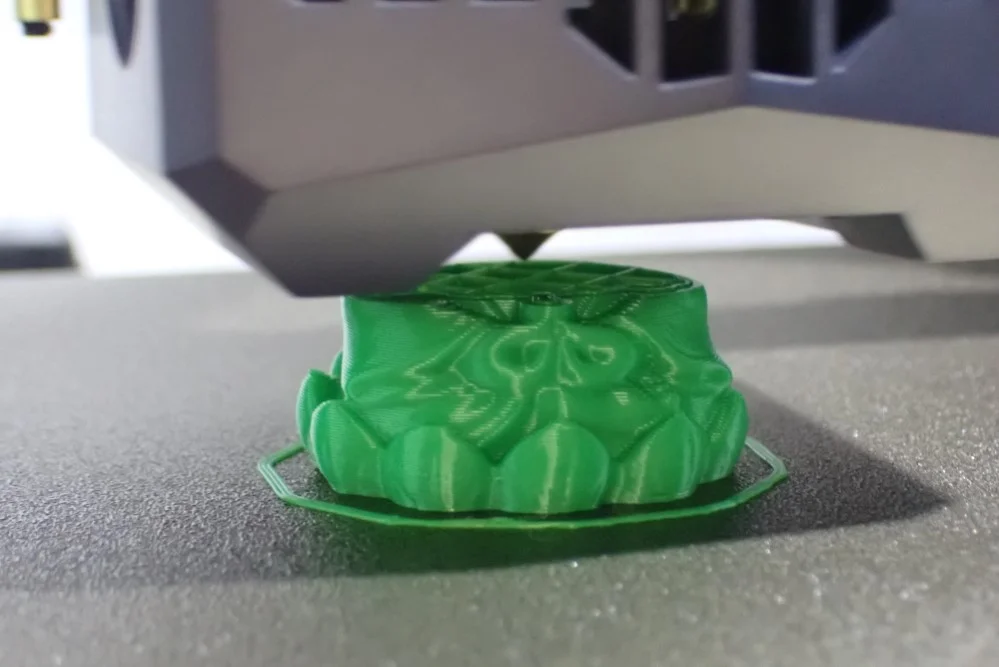
Buddha

This was the test object which was on the Micro SD card. It was already sliced and just needed to be started. I used green PLA filament from Eryone. The result is very good and all details are very well pronounced.
XYZ Cube
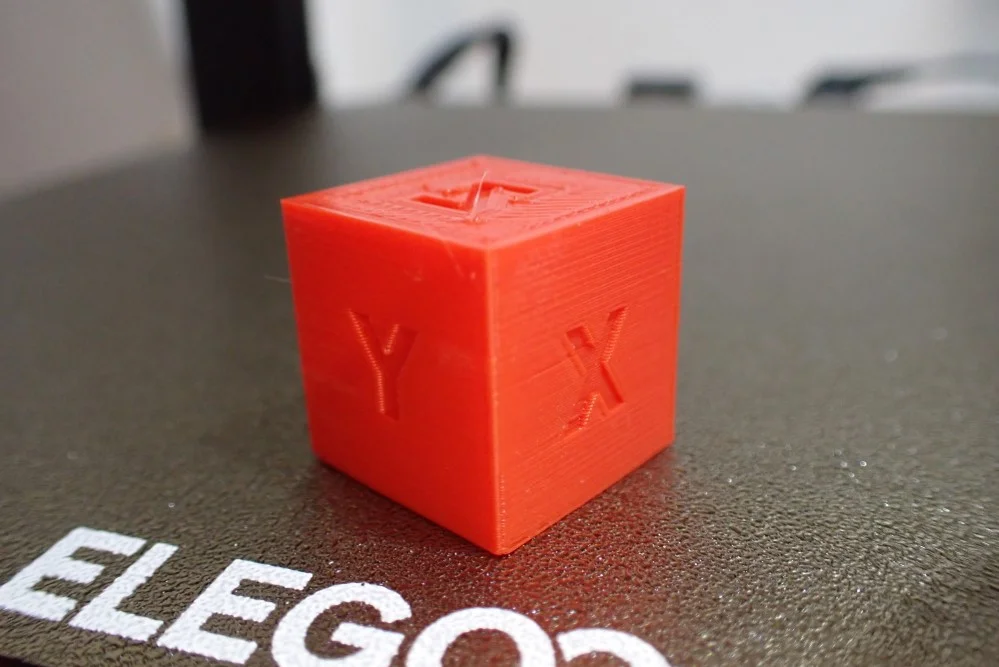
After printing the pre-made Buddha, I wanted to try out the standard profile from the slicer myself. I did this with the help of the XYZ calibration cube.
The result was pretty good, so I could progress to more complex models and other materials.
3D Benchy
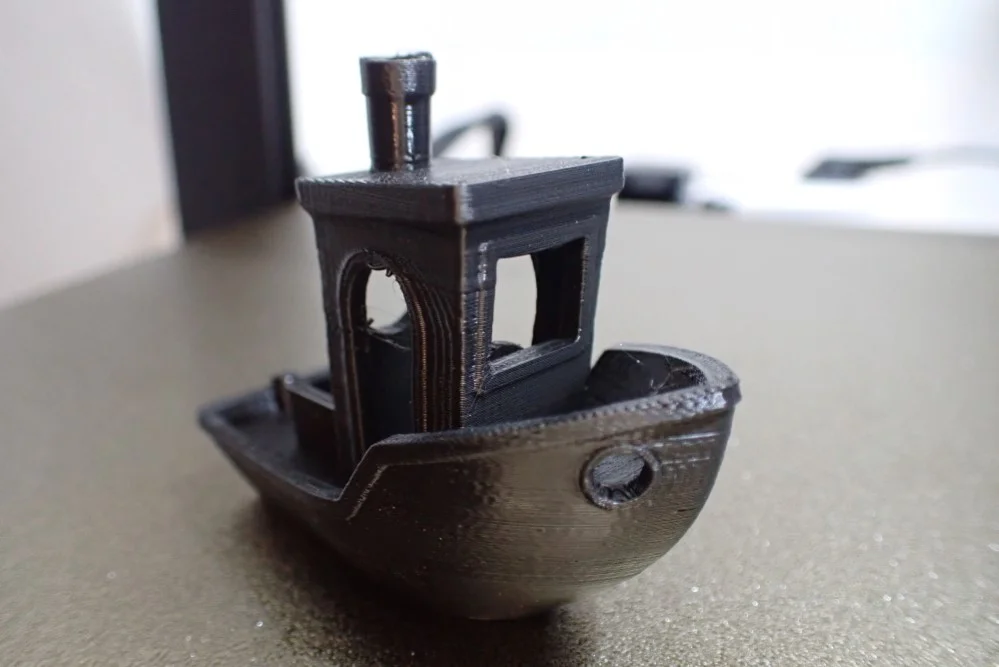
After I knew after the first print that the Neptune 3 can print very well with PLA, I also wanted to try ABS. Since the nozzle and the print bed can reach the necessary temperatures and the print bed offers a very good adhesion, a small 3D Benchy made of ABS should work. And it did.
However, if you intend to print larger models with the Neptune 3 in ABS, I would advise you to use an enclosure to keep the ambient temperature of the object evenly high so that it does not warp during printing.
Stitch
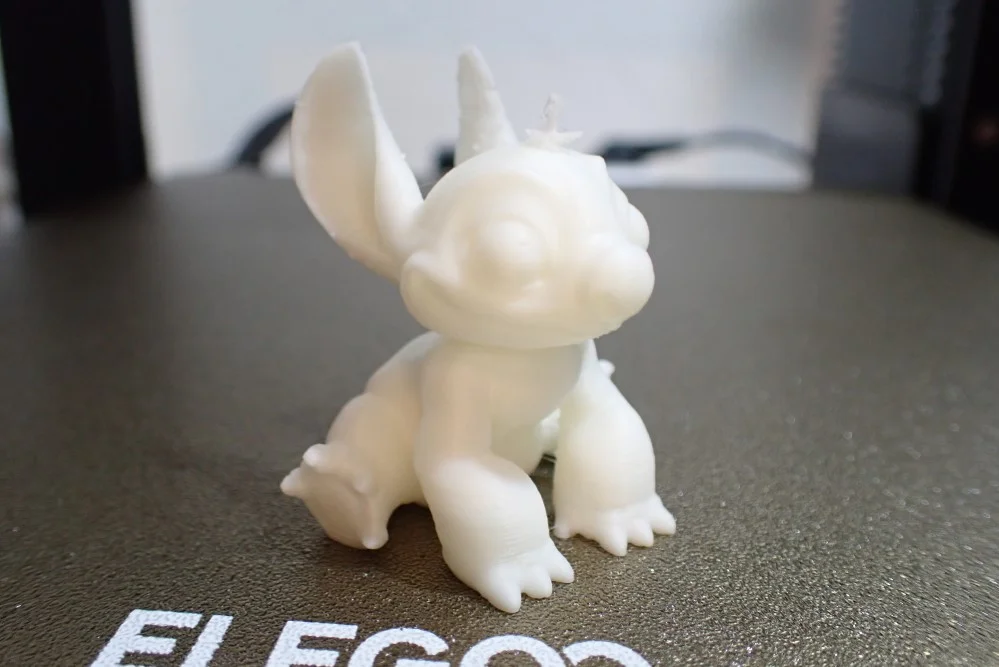
From white PLA I printed Stitch which offers a lot of details and round surfaces. I was especially surprised about the face and the area between the arms and legs. Actually, I would have expected that between them would appear much more stringing. This was not the case here at all and the round surfaces were printed flawlessly.
Only at the ears, there was partly some under extrusion. Probably I have to calibrate here the print temperature and the retraction again on the used filament.
Cub3bot
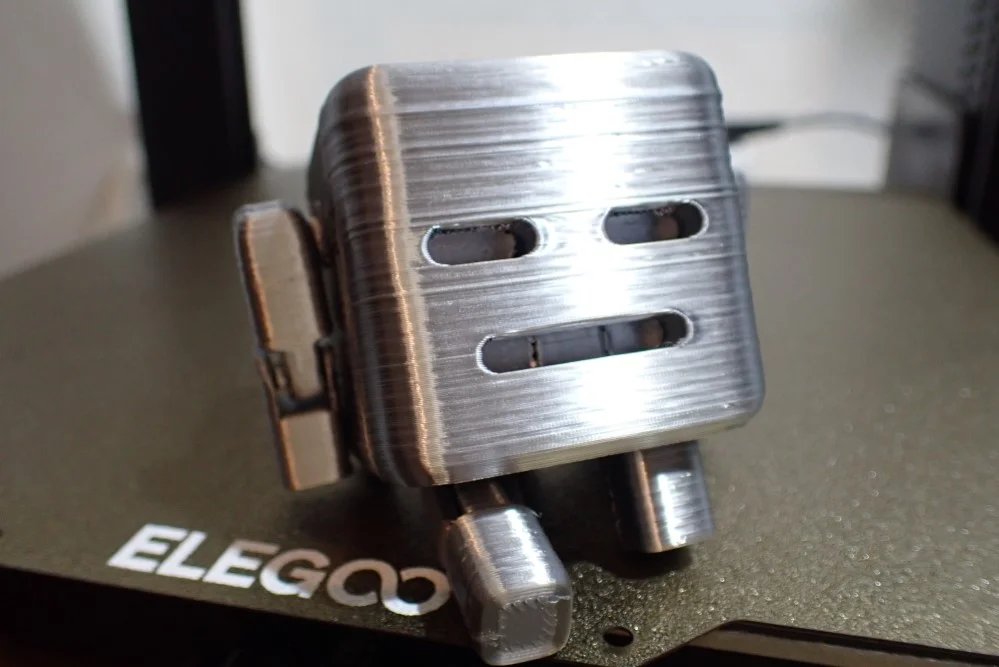
This Cub3bot I have printed from silver PLA. The print quality is mostly okay, but there is some Z-banding, but I attribute this to an inhomogeneous filament and not to the 3D printer. Such results I had with this filament also with other 3D printers that otherwise print perfectly.
Conical Honeycomb Vase
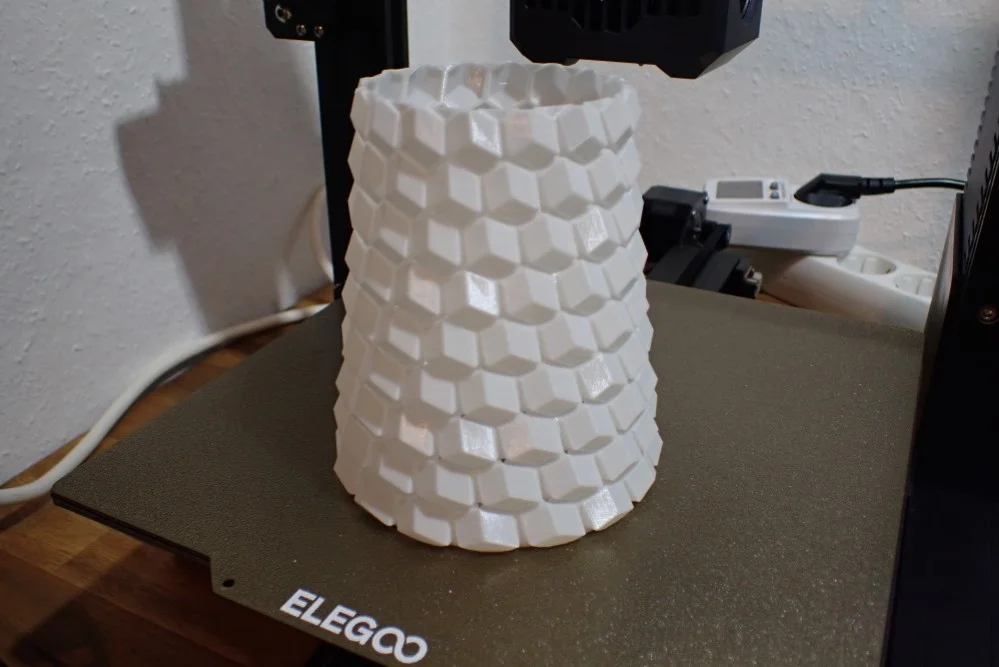
Of course, I also wanted to try out the vase mode with the Neptune 3. I also wanted to test PETG. The result is this Conical Honeycomb Vase made of white PETG.
Is the Elegoo Neptune 3 Worth It?
The Elegoo Neptune 3* is worthwhile for anyone who is looking for a cheap entry-level 3D printer with features that are usually only available in more expensive devices. It is the ideal 3D printer for beginners and is ideal for PLA.
There is now also the Neptune 3 Pro. The Pro variant has some features that make it much better than the basic version. Click here for a detailed review of the Neptune 3 Pro.
Check Price at:
Similar 3D Printers
Anycubic Kobra
The Anycubic Kobra is an affordable entry-level 3D printer with a flexible PEI print bed, automatic print bed leveling and a print volume of 220 x 220 x 250 mm.

Check Price at:
Creality Ender 3 V2
The Ender 3 V2 is an extremely popular entry-level 3D printer with manual print bed leveling, a glass print bed and a print volume of 220 x 220 x 250 mm.

Check Price at:
Disclosure: This website is the property of Martin Lütkemeyer and is operated by Martin Lütkemeyer. Martin Lütkemeyer is a member of the Amazon Services LLC and other Affiliate Programs. These are affiliate advertising programs designed to enable websites to earn advertising revenue through advertising and linking to Amazon.com and others. Links marked with * are affiliate links.
