
- Wet Filament: Prevention, Symptoms & Drying - July 18, 2024
- Sovol SV08 – Best PrusaSlicer Settings & Profile - June 26, 2024
- Sovol SV08 – Best Orca Slicer Settings & Profile - June 26, 2024
Disclosure: Links marked with * are Affiliate Links. I earn from qualifying purchases if you decide to make a purchase through these links – at no additional cost for you!
The Elegoo Neptune 3 is one of the best 3D printers for beginners. However, as with so many other 3D printers, there is no pre-built default profile for the Neptune 3 in Cura (at least not at the time of this writing). In order to get good results with this 3D printer, you need to have good settings.
For the Elegoo Neptune 3, the easiest way is to copy the default profile from the Elegoo Cura clone and add it to Cura. To get the best results, the most important settings need to be calibrated.
How you do all this, which settings work well on the Elegoo Neptune 3 and how you can calibrate them, you will learn in this article. First of all, here is a small overview table.
| PLA | ABS | TPU | PETG | |
|---|---|---|---|---|
| Printing temperature | 205 °C | 235 °C | 225 °C | 250 °C |
| Print bed temperature | 60 °C | 90°C | 60 °C | 60 °C |
| Print speed | 50 mm/s | 50 mm/s | 30 mm/s | 50 mm/s |
| Retraction | 5 mm at 45 mm/s | 5 mm at 40 mm/s | 4 mm at 35 mm/s | 4 mm at 45 mm/s |
| Cooling | 100 % | 0% + enclosure | 100 % | 50-100 % |

Calibrated Cura Profile
For optimal print quality with minimal effort, you can download my calibrated Cura profile for this 3D printer and import it directly into Cura. All settings are perfectly adapted to this printer, e.g. the accelerations, jerk, supports and the first layer.
Table of Contents:
How to Create a Profile for the Elegoo Neptune 3 in Cura
The settings specified in a 3D printer profile in Cura determine the print quality of a 3D printer. The profile contains both the machine settings and the print settings. Changing these settings can result in better prints, but it is important to know what each setting does in order to make the best changes.
Before we get into the details of the print settings, you need to create a profile in Cura for the Elegoo Neptune 3. As mentioned above, you can copy the profile from Elegoo Cura Slicer to Cura. And by copy, I really mean literally copy & paste.
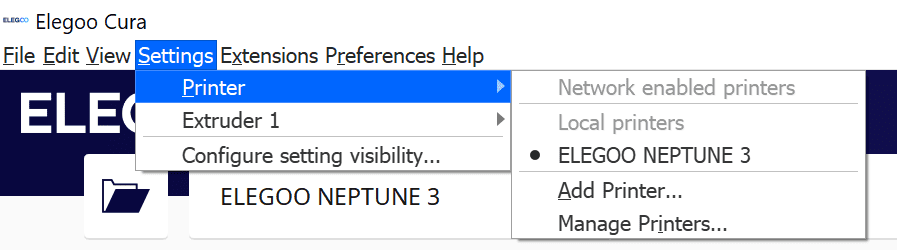
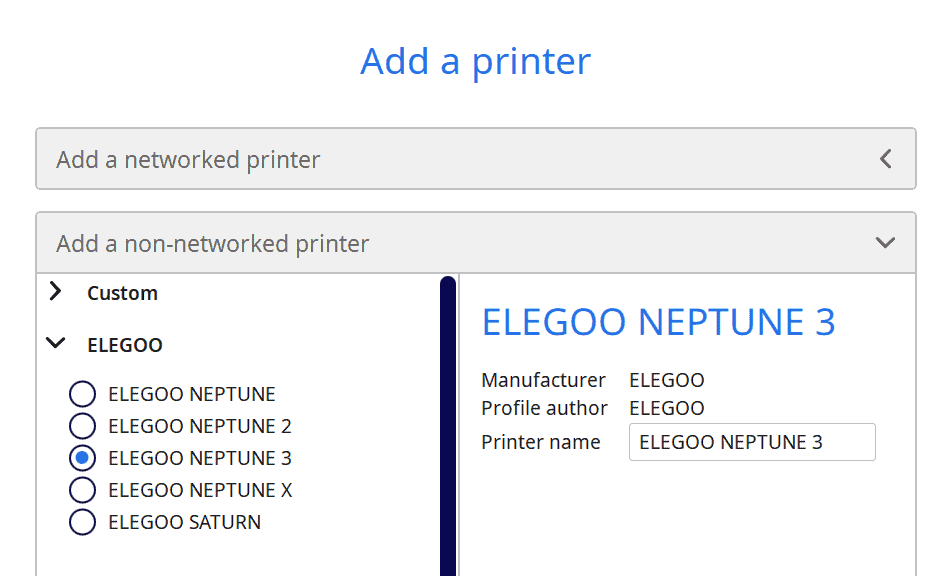
The Elegoo Cura Slicer is basically structured in the same way as Cura. Via the menu bar you can add a new 3D printer via “Settings” → “Printer” → “Add Printer…”. In the menu that opens, you can then select the Elegoo Neptune 3 from the list and load the default profile.
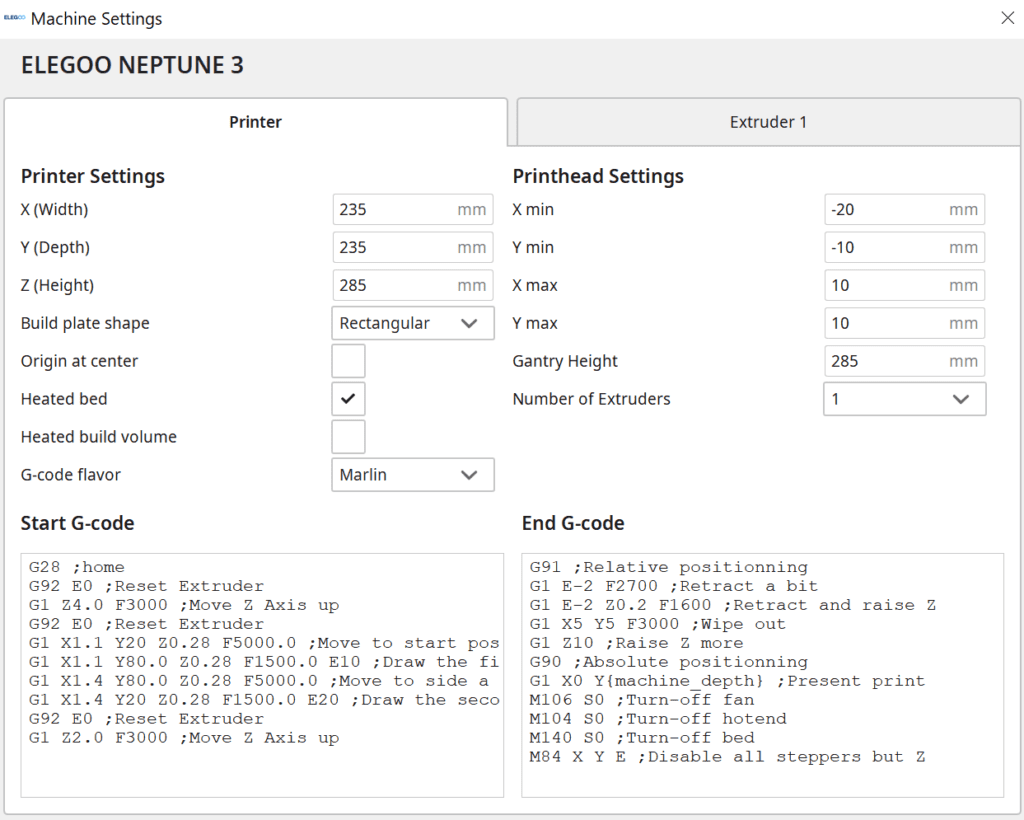
This will open the machine settings, which you can paste into a blank 3D printer profile in Cura. Don’t forget the second page with the extruder settings.
You can do the same for the print settings. While you can also export the profile and import it into Cura, this is sometimes a bit error-prone. It’s usually easier to just copy and paste the values, even if it takes a few minutes longer.
You can find more information on how to create a 3D printer profile in Cura and what you need to pay attention to in this article: How to Create a Custom 3D Printer Profile in Cura
PLA Settings at a Glance
These are the correct Cura settings for the Elegoo Neptune 3 for PLA:
- Printing temperature: 205 °C
- Print bed temperature: 60 °C
- Printing speed: 50 mm/s
- Retraction: 5 mm at 45 mm/s
- Cooling: 100%
- First layer: 5-10 mm/s, 0% cooling, 100% extrusion width, 100% layer height
Printing with PLA filament is considered easy compared to other materials. PLA has a lower melting temperature and therefore doesn’t need as much heat to print. PLA is also less prone to warping, so you don’t have to worry as much about temperature control.
However, there are a few things you need to consider when printing with PLA. Both print speed and retraction settings play a role in the final print quality. If the print speed is too high, the PLA may not have time to cool properly and may not adhere well to the print bed or previously printed layers.
If the retraction settings are wrong, stringing will occur. That’s why it’s important to find the right balance for your printer. With a little trial and error, you should be able to produce high-quality prints with PLA filament.
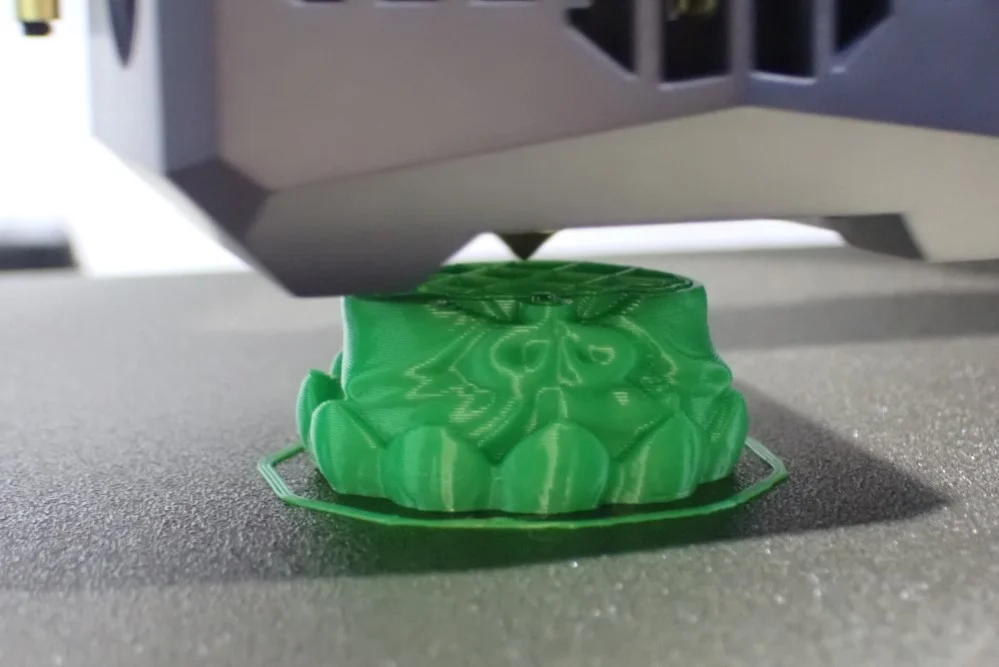
One of the good things about the Elegoo Neptune 3 is that it comes with a PEI print bed. Due to the flexibility of the print bed, it is not only easier to remove the object after printing, but also the print bed adhesion for PLA is very good due to the coating. Especially if you use slow printing speeds, you don’t need any adhesives or other tools for filigree first layers.
ABS Settings at a Glance
ABS (Acrylonitrile Butadiene Styrene) is one of the most popular filaments thanks to its stability and mechanical properties. However, ABS can be difficult to print as it is highly prone to warping. Therefore, it is important to choose a 3D printer that has been optimized for printing with ABS filament.
Some of the most important features of such 3D printers are a heated print bed and an enclosure. The print bed of the Elegoo Neptune 3 reaches an impressive 100 °C. This allows you to create a very good print bed adhesion for ABS. The only catch is that it has an open print volume. But that is normal in this price range and can easily be upgraded with a tent. Creality has a very good 3D printer tent that should fit the Elegoo Neptune 3 perfectly. I tested it in this article.
With a print volume closed in this way, the ABS filament has a homogeneous and warm ambient temperature. This prevents it from warping during printing. ABS shrinks during cooling and can form cracks if this happens too fast. Therefore, especially for large objects, it is important to keep these ambient temperatures stable until printing is complete and then slowly reduce the temperatures.
TPU Settings at a Glance
These are the correct Cura settings for the Elegoo Neptune 3 for TPU:
- Printing temperature: 225 °C
- Print bed temperature: 60 °C
- Printing speed: 30 mm/s
- Retraction: 4 mm at 35 mm/s
- Cooling: 100%
- First layer: 5-10 mm/s, 0% cooling, 100% extrusion width, 100% layer height
Flexible filaments like TPU are becoming increasingly popular for 3D printing. However, printing with these materials can be difficult. This is because it is especially important to set the print speed and retraction correctly to achieve high print quality and avoid clogging.
But not all 3D printers are equally well suited for flexible filaments. Generally, the best results are achieved with a direct drive extruder. If you use a Bowden extruder like the Elegoo Neptune 3 has for TPU, clogging and extrusion inaccuracies may be more common.
The flexible filament compensates somewhat for the movements of the extruder through its flexibility. The longer the distance between the extruder and the nozzle, the greater the negative effects. You will be able to print TPU relatively well with the Elegoo Neptune 3, but printing errors such as stringing or blobs will be difficult to control.
PETG Settings at a Glance
These are the correct Cura settings for the Elegoo Neptune 3 for PETG:
- Printing temperature: 250 °C
- Print bed temperature: 60 °C
- Printing speed: 50 mm/s
- Retraction: 4 mm at 45 mm/s
- Cooling: 50-100%
- First layer: 5-10 mm/s, 0% cooling, 100% extrusion width, 100% layer height
PETG is a type of 3D printer filament that combines the best properties of PLA and ABS. It is relatively easy to print and very durable and stable in its printed state. Many entry-level 3D printers are not able to process PETG well. Most of the time, they don’t have an extruder that can reach such high temperatures. Since the Elegoo Neptune 3 reaches a maximum printing temperature of 260 °C, it is very well suited for PETG. However, there are some things to consider when printing with PETG filament.
For example, the setting for retraction is very important, as PETG has a strong tendency to string (→ PETG Stringing Guide). It is also important to use a heated print bed when printing with PETG to avoid warping and improve the overall quality of the print.
Finally, it should be noted that PETG is more difficult to sand and postprocess than other filament types. With these considerations in mind, PETG is an excellent choice for a variety of 3D printing applications.
Best Cura Settings for the Elegoo Neptune 3
Printing Temperature
The best printing temperatures for the Elegoo Neptune 3 in Cura:
- PLA: 205 °C
- ABS: 235 °C
- TPU: 225 °C
- PETG: 250 °C
One of the most common problems in 3D printing is an incorrectly set printing temperature. If the temperature is too high, problems such as stringing can occur. If the temperature is too low, holes or poor adhesion of the print bed or layers can occur. The key to successful 3D printing is finding the sweet spot for your printer and material.
The Elegoo Neptune 3 reaches printing temperatures of up to 260 °C. This means that it can process all standard filaments. In my experience, the temperature setting on the Neptune 3 is very accurate and reproducible. Once you find the right print temperature for the filament, you never have to touch the settings again.
Print Bed Temperature
The best print bed temperatures for the Elegoo Neptune 3 in Cura:
- PLA: 60 °C
- ABS: 90 °C
- TPU: 60 °C
- PETG: 60 °C
The print bed temperature is crucial for how well the 3D printed object adheres to the print bed of the 3D printer. The higher the temperature, the better the adhesion. However, if the temperature is too high, an elephant foot occurs, where the first layers expand and the dimensional accuracy deteriorates.
That’s why it’s important to find the perfect balance when setting the temperature of your print bed. If you’re printing with PLA filament, a good starting point is around 60°C. However, every 3D printer is different, so it’s important to experiment to find what works best for your machine.
Due to the PEI coating of the print bed, it does not take too long until you have found the right print bed temperature. The above guideline values are usually already sufficient. The PEI print bed creates a very good print bed adhesion for most filaments and it is rarely necessary to use additives such as Magigoo or other adhesives.
Print Speed
The best printing speed for the Elegoo Neptune 3 in Cura:
- PLA: 50 mm/s
- ABS: 50 mm/s
- TPU: 30 mm/s
- PETG: 50 mm/s
The Elegoo Neptune 3 reaches a maximum printing speed of 180 mm/s – at least theoretically. However, you will not achieve good results with this high speed. Realistic print speeds are between 40 and 60 mm/s. With 50 mm/s you will get good results with most filaments. Only for flexible filaments should you reduce the speed further to improve accuracy.
If you only want to print objects where accuracy is secondary and time is more important to you, you can go for the very high print speeds. Due to the Bowden extruder, the print head is very light and vibrations caused by high speeds only occur very late. So you can achieve good results with the Neptune 3 even at relatively high printing speeds.
Layer Height
The best layer height for the Elegoo Neptune 3 in Cura:
- Decorative objects: 0.06-0.15 mm
- Standard: 0.2 mm
- Coarse, fast prints: 0.3-0.6 mm
The layer height is an important setting in 3D printing. It determines the thickness of the individual filament layers that are applied. A lower layer height results in a smoother surface, but the printing process also takes longer. This is because the printer has to make more passes to build up the layers.
For functional objects that do not need to look smooth, it often makes sense to increase the layer height to save time. For decorative objects, on the other hand, thinner layers are more suitable. They give the object a more polished appearance.
The standard profile of the Elegoo Cura slicer includes predefined print settings from 0.06 to 0.6 mm. But even if you are interested in very thin layers, I would definitely advise you to start with a layer thickness of 0.2 mm and optimize from there.
Flow Rate
The best flow rate for the Elegoo Neptune 3 in Cura:
- Default value: 100%
- For over-extrusion: 90% to 99
- For under-extrusion: 101% to 110%.
The flow rate determines how much filament is extruded per unit of time. Normally, this value is 100% for every 3D printer. However, if the extruder extrudes more or less than it should, you can adjust the amount of filament here. You can also use the flow rate to improve the dimensional accuracy of your object – more on this later in the calibration.
If you have problems with print bed adhesion, you can improve it by increasing the flow rate of the first layer. If you increase the flow rate slightly for the first layer only, the diameter of the filament lines will increase, causing them to cool down more slowly and create a better adhesion to the print bed. You should only do small changes here, however, or you will quickly create an elephant foot.
Retraction
The best retraction settings for the Elegoo Neptune 3 in Cura:
- PLA: 5 mm at 45 mm/s
- ABS: 5 mm at 40 mm/s
- TPU: 4 mm at 35 mm/s
- PETG: 4 mm at 45 mm/s
The “Double Gear Metal Bowden Extruder” of the Elegoo Neptune 3 transports the filament very precisely to the nozzle. With inflexible filaments, this allows for very high accuracies and smallest layer heights. It is also relatively easy to calibrate the retraction with this extruder, as it works very reproducibly and reliably.
It is not too difficult to prevent printing errors like stringing with the Neptune 3. Only with flexible filaments, it will be almost impossible to find the perfect retraction setting. The flexibility of the filament compensates for some of the retraction movement. This causes the filament to remain at the tip of the nozzle fractions of a second longer and can cause uncontrolled extrusion and stringing. This effect is proportional to the distance between the extruder and the nozzle. Therefore, Bowden extruders are only suitable for flexible filaments to a limited extent or not at all.
Infill
The best infill density for the Elegoo Neptune 3 in Cura:
- Decorative objects: 0-15%
- Standard objects: 15-50%
- Stable objects: 50-100%
The infill density is completely independent of the 3D printer. It doesn’t matter if you are using a beginner 3D printer or a high-end 3D printer. How much filament should be printed inside the object is only determined by the purpose of the object to be printed. The more it has to endure in the end, the more infill it needs.
The infill pattern is also determined by the application. For decorative objects, patterns that can be printed quickly are suitable. If you need high stability, patterns that create high stability are more suitable. This will save you some filament and printing time.
High stability (for stable objects):
- Cubic
- Cubic subdivision
- Octet
- Gyroid
Medium stability (for standard objects):
- Grid
- Triangles
- Tri-Hexagonal
Low stability (for decorative objects):
- Lines
- Zigzag
- Lightning
First Layer
These are the best Cura settings for the first layer on the Elegoo Neptune 3:
- Layer height: 100-200% of normal layer height (higher values to increase print bed adhesion)
- Line width: 100-200% of normal line width (higher values to increase print bed adhesion)
- Print temperature: Same as the rest of the object or 5-10 °C higher for better print bed adhesion.
- Print speed: 50% of the normal print speed (i.e. 25 mm/s for a normal print speed of 50 mm/s) or 5-10 mm/s for high print bed adhesion
- Flow rate: 100-110% (higher values in case of poor print bed adhesion)
The first layer is the most important of all. Printing errors that occur here usually run through the entire object. The first layer also determines the print bed adhesion.
You can improve print bed adhesion through many settings. Most of them are aimed at increasing the time the filament has to cool down. The slower the filament cools, the better it will bond to the print bed surface.
How to Calibrate the Cura Settings for the Elegoo Neptune 3
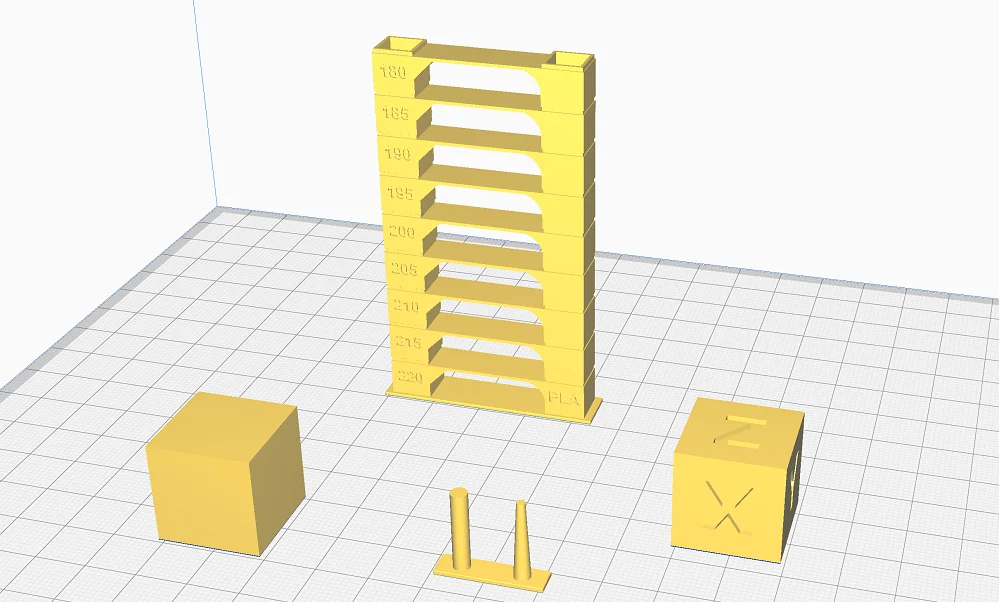
Calibrating the print temperature, flow rate and retraction of your Elegoo Neptune 3 will help prevent print errors and generally produce better print results. There are many calibration objects available on websites like Thingiverse or in the Calibration Shapes plugin in Cura.

Read the full calibration guide:
3D Printer Calibration: Step-by-Step to Perfect Results
Calibrating the Printing Temperature


A temperature tower is very practical for calibrating the printing temperature. It consists of several levels, which provoke various printing errors. These layers are printed via a script with different temperatures. This way you can see directly after printing at which temperature your Neptune 3 produces the best results with the respective filament.
Calibrating the Flow Rate
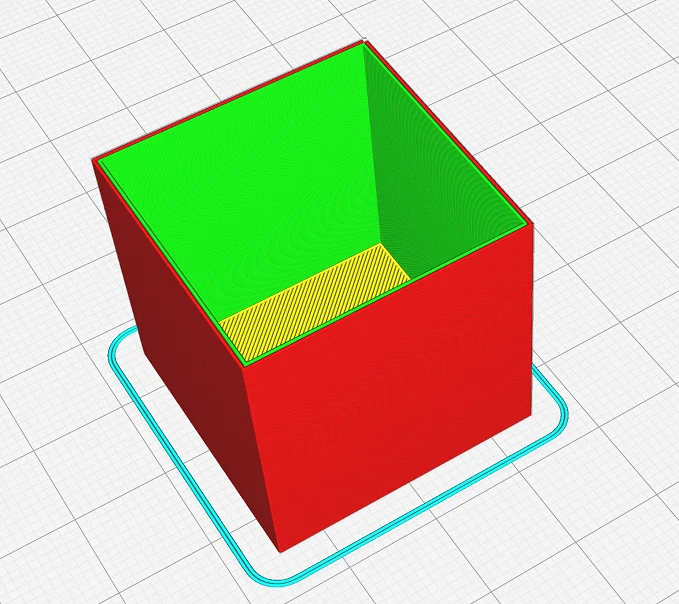

If the flow rate is not set correctly, there may be various printing errors caused by over- or under-extrusion. You can calibrate it by comparing the actual line width with the one in the slicer.
I myself usually print a cube without infill and without top layers for this, so that I can measure the wall thickness with a caliper after printing. Depending on whether the walls are thinner or thicker than the theoretical value in the slicer, the flow rate has to be adjusted.
Calibrating the Retraction
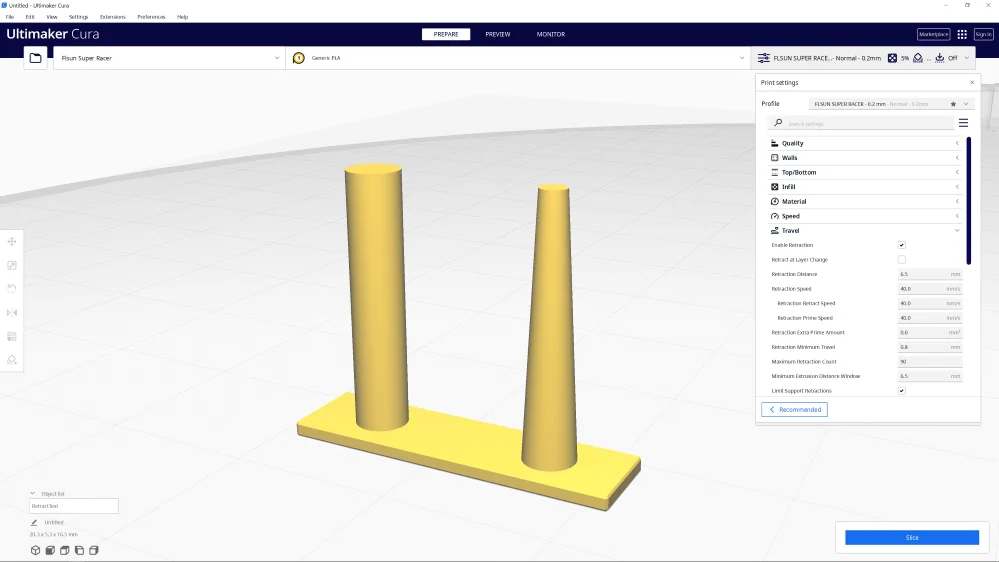
Incorrect retraction settings are one of the main causes of printing errors. Many of the most common printing errors, such as stringing, can be avoided by calibrating the retraction.
Stringing is also used for retraction calibration. Most calibration objects for retraction consist of at least two columns between which stringing can occur. The calibration object for retraction in the Calibration Shapes plugin is particularly small and efficient to print. Adjust the settings for the retraction distance and speed in small steps and approach the optimal value step by step.
Conclusion
A 3D printer can only deliver good results if its settings are matched to the respective filament. Through this article, you have good guidelines for the Cura settings for your Elegoo Neptune 3 and can optimize them from there.
Disclosure: This website is the property of Martin Lütkemeyer and is operated by Martin Lütkemeyer. Martin Lütkemeyer is a member of the Amazon Services LLC and other Affiliate Programs. These are affiliate advertising programs designed to enable websites to earn advertising revenue through advertising and linking to Amazon.com and others. Links marked with * are affiliate links.
