
- Wet Filament: Prevention, Symptoms & Drying - July 18, 2024
- Sovol SV08 – Best PrusaSlicer Settings & Profile - June 26, 2024
- Sovol SV08 – Best Orca Slicer Settings & Profile - June 26, 2024
Disclosure: Links marked with * are Affiliate Links. I earn from qualifying purchases if you decide to make a purchase through these links – at no additional cost for you!
The Elegoo Neptune 3 Pro* is the improved version of the Neptune 3 and completes this series next to the Neptune 3 Plus.
In this article, I’ll show you how the Neptune 3 Pro performs in a practical test. In addition to assembly and operation, I’ll also introduce you to its features and demonstrate its print quality with PLA, PETG and TPU.
Besides the many features that improve performance, the Neptune 3 Pro also has those that make it more pleasant to use. These definitely include the flexible print bed, LED lighting and automatic bed leveling.

Check Price at:
PRO:
- Detachable 4.3-inch color touch screen
- Direct drive extruder
- PEI-coated print bed
- Automatic leveling at 36 points
- LED lighting
CON:
- If you want to tinker, this 3D printer is not for you, as all the upgrades that make sense are already included.
Who should buy the Neptune 3 Pro?
With its many features that not only simplify operation but also improve print quality, the Neptune 3 Pro is suitable for both beginners and advanced users. It is suitable for anyone who wants to achieve good print quality immediately without having to do a lot of troubleshooting.
Table of Contents:
Technical Specifications
- Technology: FDM
- Operation: 4.3″ color touch screen, detachable
- Extruder: Direct drive extruder
- Print temperature: max. 260 °C
- Print bed temperature: max. 100 °C
- Print volume: 225 × 225 × 280 mm
- Print bed material: PEI-coated spring steel, magnetic, flexible
- Print bed leveling: Automatic at 36 points
- Print speed: Maximum 180 mm/s, standard 60 mm/s
- Nozzle: 1 × 0.4 mm (+ 2 spare nozzles)
- Print accuracy: ± 0.1 mm
- Layer height: 0.05 to 0.35 mm
- Filament: 1.75 mm PLA, ABS, PETG, TPU, etc.
- Filament sensor: Yes
- Resume print: Yes
- LED lighting: Yes
- File transfer: MicroSD card, LAN
- Slicer: Cura
Scope of Delivery
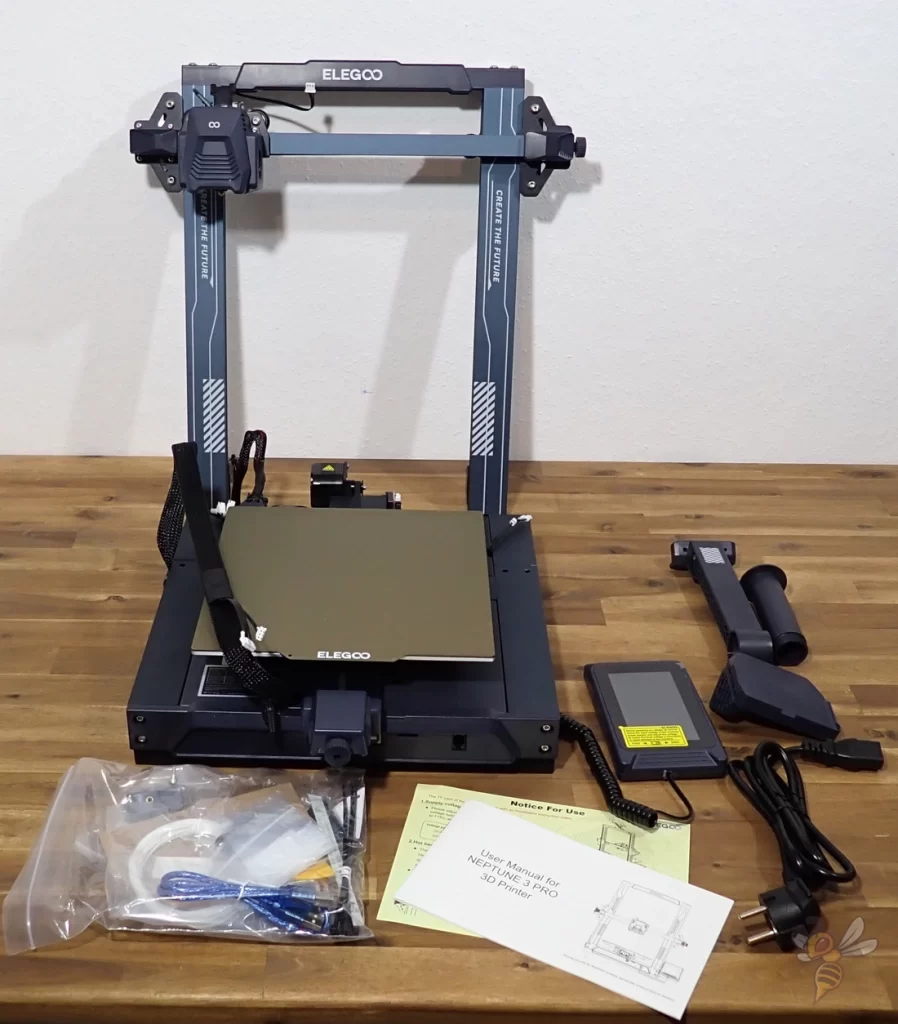
Everything is included in the scope of delivery of the Neptune 3 Pro to start with the first test prints. The necessary tools for the assembly are also included. There are also spare parts and comprehensive documentation on the included MicroSD card.
Here are all the components of the scope of delivery:
- MicroSD to USB Adapter
- MicroSD card with user manual, software, models and a tutorial video
- Tools for assembly
- Spatula for the print bed
- Side cutter for the filament
- Spare parts
- LAN cable
You can either supply the 3D printer with files via the microSD card, or connect it directly to your computer with the included LAN cable. Using the direct connection, you can send the finished files directly to the 3D printer via the slicer and thus also monitor it.
The included tools are sufficient to quickly perform the few steps of assembly. However, it is worth using a cordless screwdriver for the longer screws.
The scope of delivery is very sensibly sized, although you will probably never use the spatula. The print bed is flexible, making it easy to remove objects.
The included filament is only a small PLA sample. So if you want to continue printing, you should get more filament directly. Since the Neptune 3 Pro reaches high temperatures and has a direct drive extruder, the selection of filaments is considerable.
If you are new to 3D printing, you should definitely continue printing with PLA first, as it is the easiest filament. I have tested the Neptune 3 Pro with ERYONE PLA and had good experiences.
Assembly


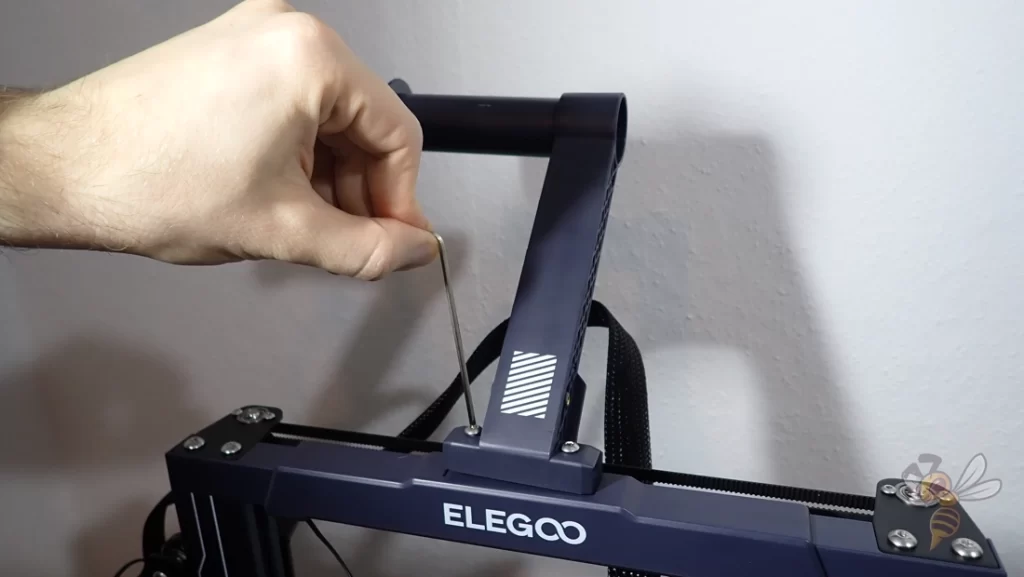
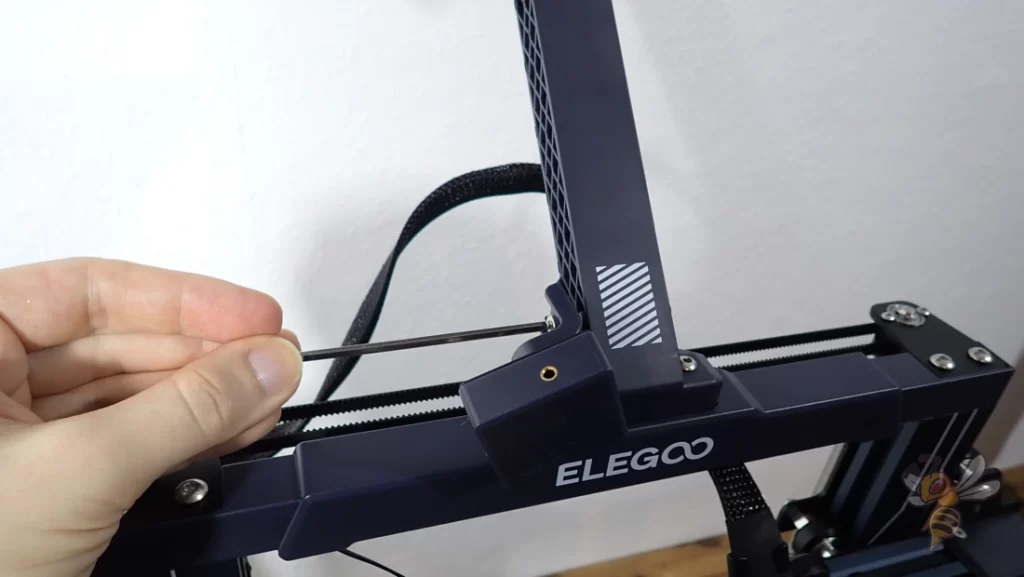
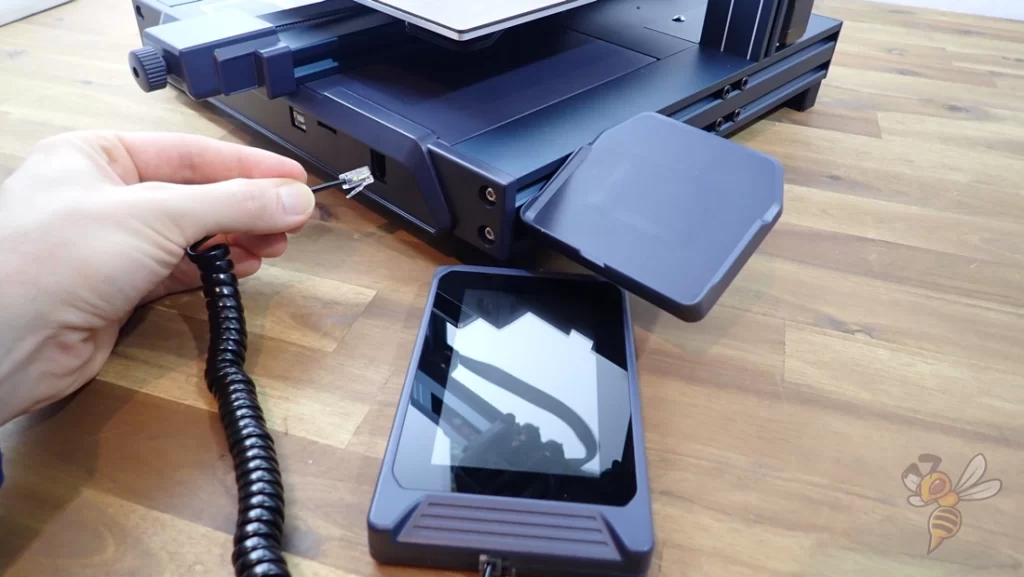
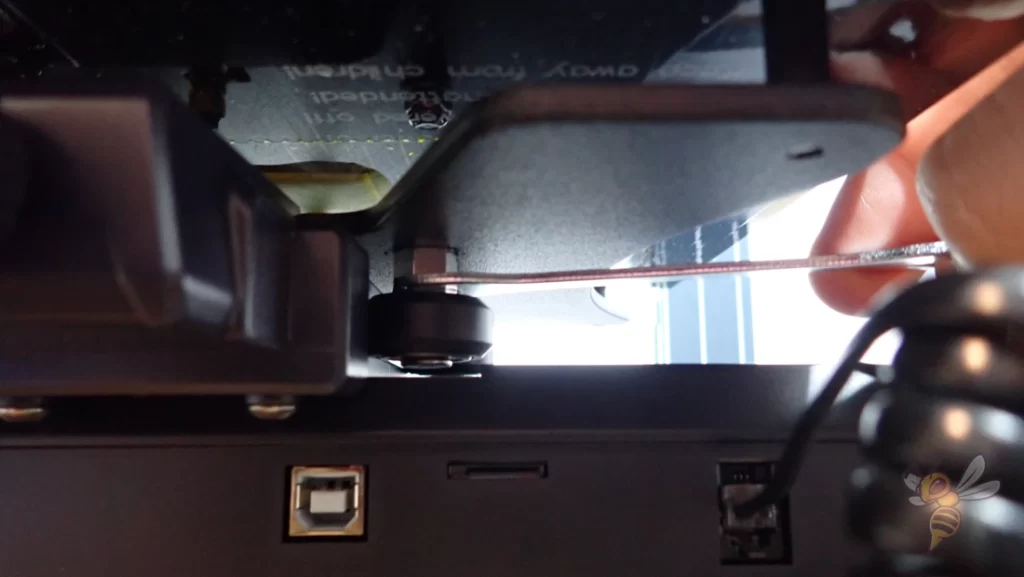
The assembly of the Elegoo Neptune 3 Pro is simple and should be completed within 10 to 20 minutes. The process consists of only a few steps, which are described in detail in the enclosed instruction manual.
The exact steps for assembly are:
- Attach frame/gantry to base
- Attach filament holder and filament sensor
- Mount the screen
- Connect cables
- Level the print bed
If the print head or print bed wobble, a final optional step is to tighten the eccentric nuts on the wheels. The tool required for this is also included in the scope of delivery. This step is also explained in the user manual.
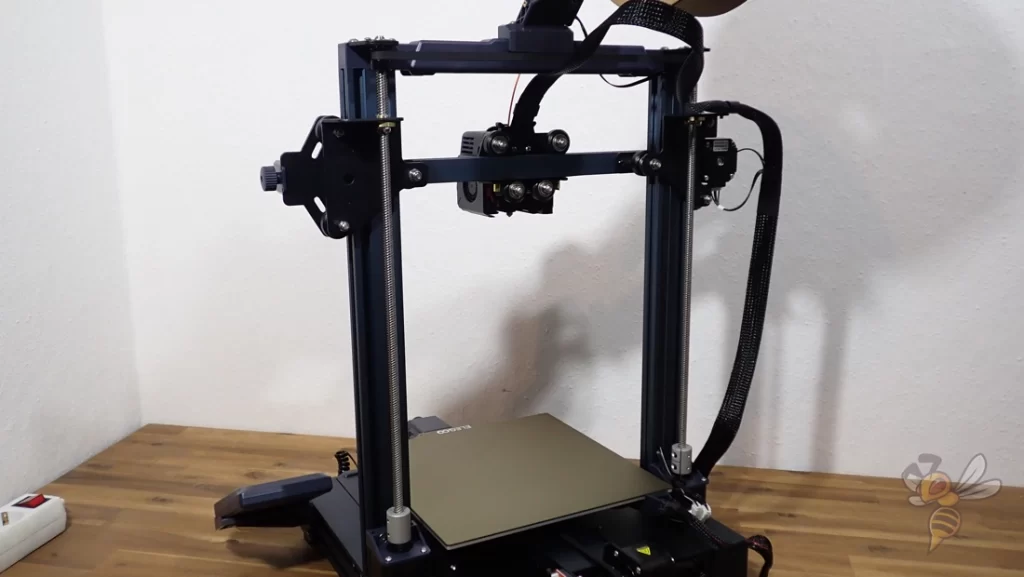
Design
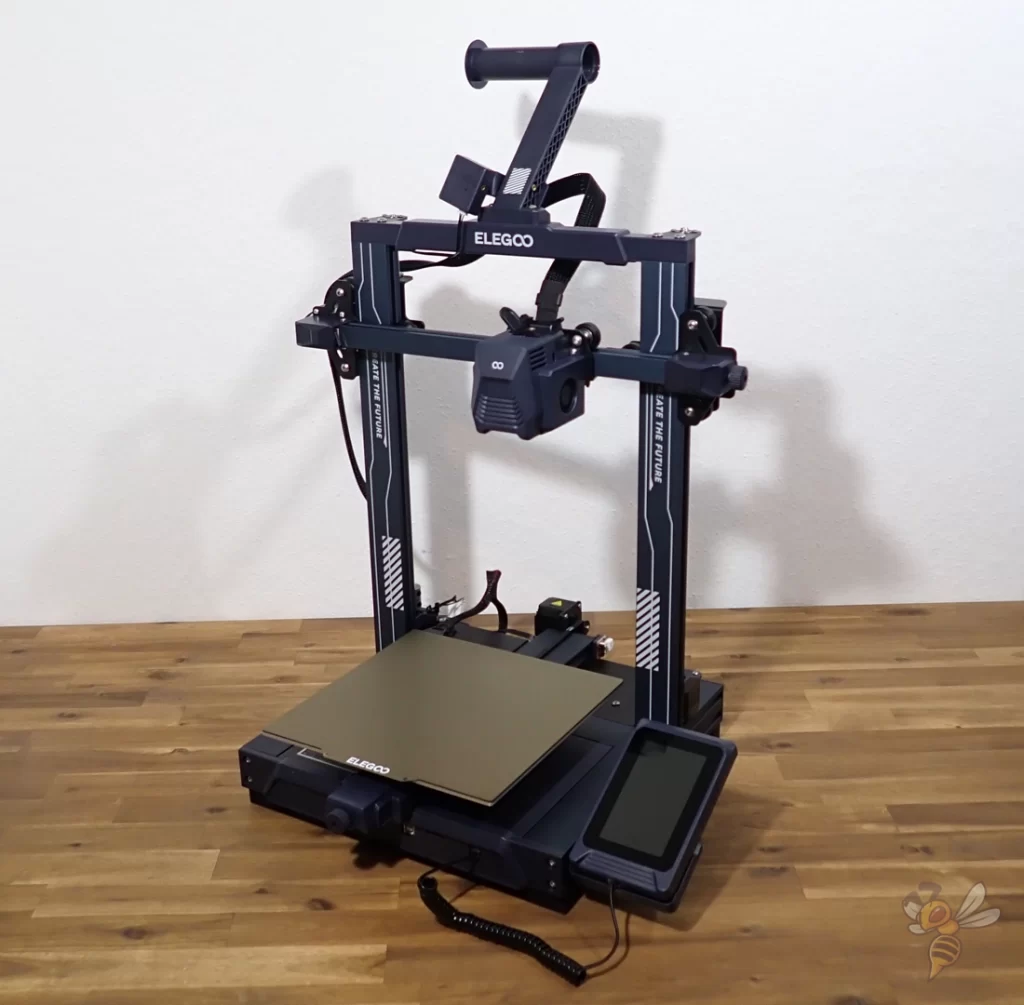
The Neptune 3 Pro is equipped with all the useful features that improve not only the print quality, but also the operations. If printing is more important to you than upgrading or tinkering with the machine, the Neptune 3 Pro is the 3D printer for you.
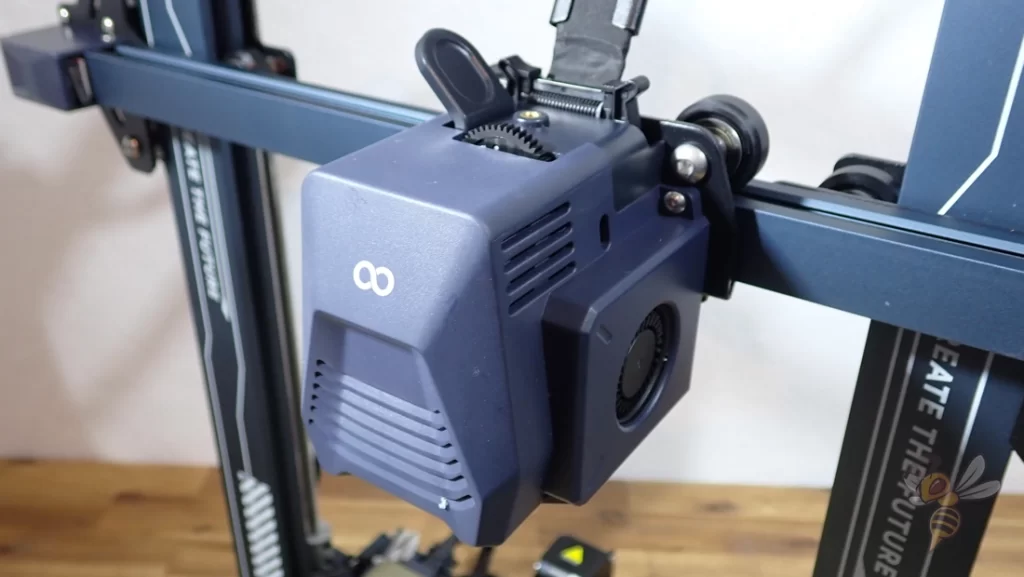
One of the best features is definitely the direct drive extruder, which is built directly into the print head. It has excellent control over the filament and allows you to work with flexible filaments like TPU. Unlike a Bowden extruder, the path of the filament between the extruder and the nozzle is very short, minimizing inaccuracies caused by flexible filament (read more on that topic in this article).
The Elegoo Neptune 3 Pro has a dual gear extruder. The name comes from the fact that the extruder feeds the filament with two gears. This gives a good control over the filament. This not only increases the accuracy, it also improves the processing of flexible filament.
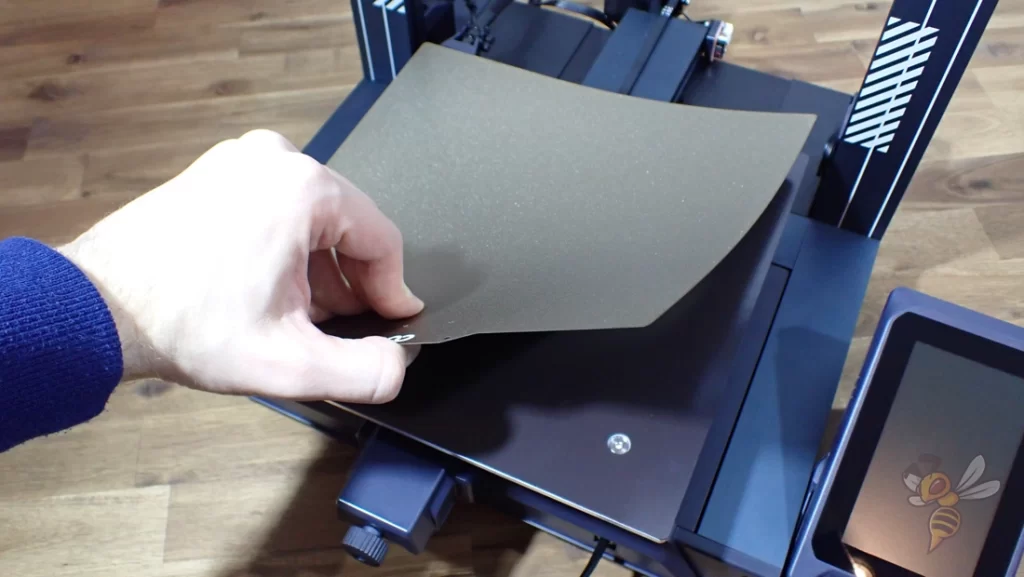
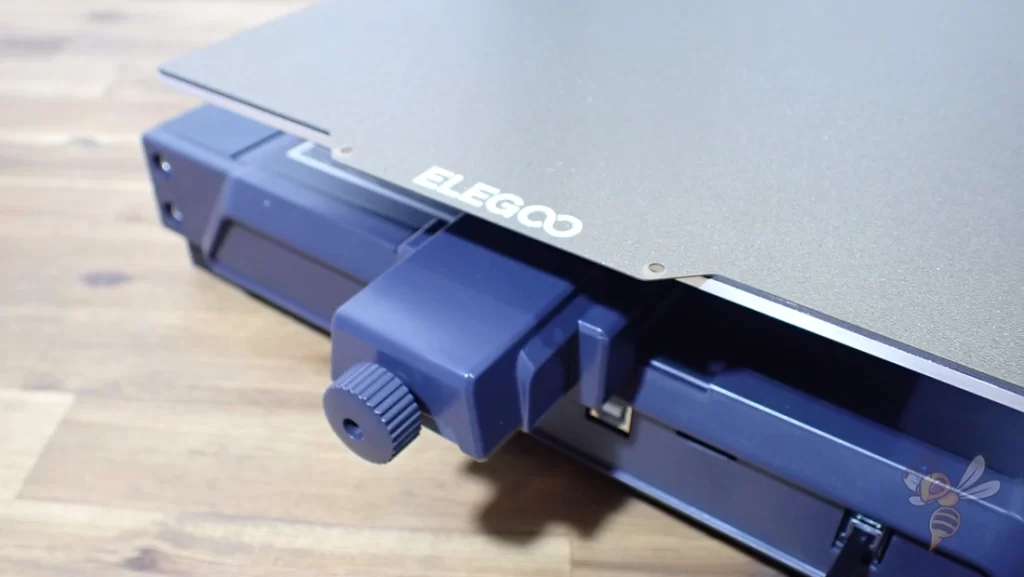
The print bed consists of a flexible spring steel supported on a magnetic plate. The surface is coated with PEI, which ensures a good print bed adhesion for all standard filaments.
Because the print bed is flexible, the printed parts are easy to detach from the print bed after printing. As soon as the objects and the print bed have cooled down, the object comes off almost by itself and if not, then after bending the print bed.
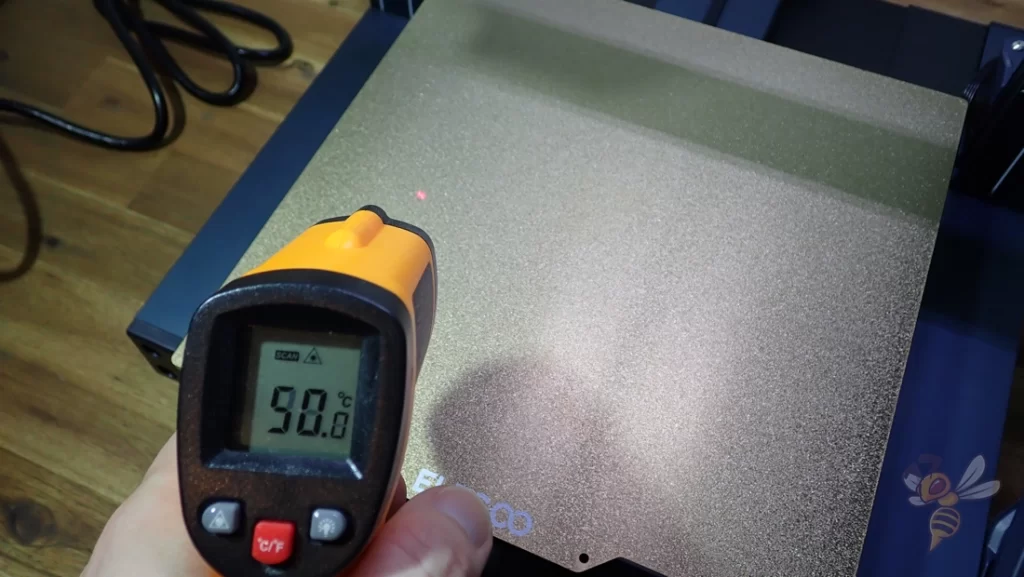
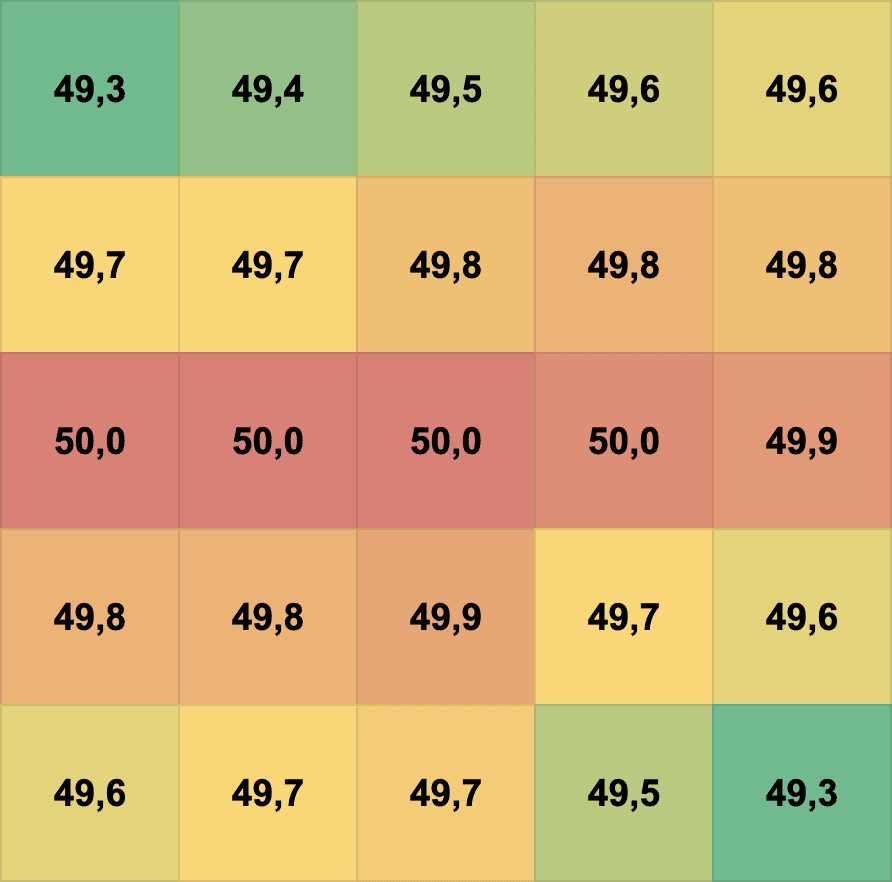
The temperature homogeneity of the print bed is surprisingly good. I measured the temperature of the print bed with a non-contact thermometer at 25 points. The largest deviation between the maximum and minimum is less than 1 °C. This is really excellent compared to other 3D printers.
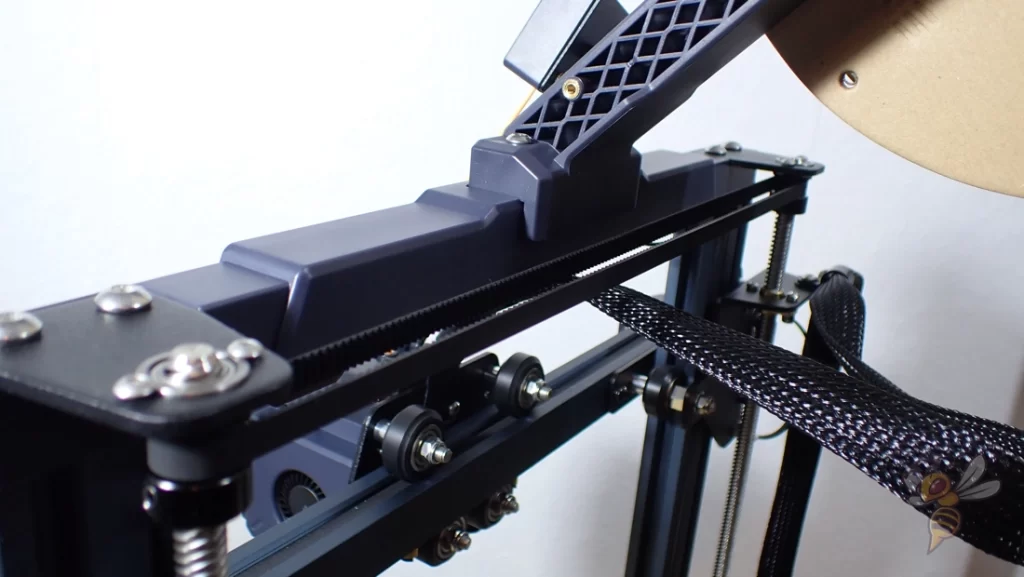
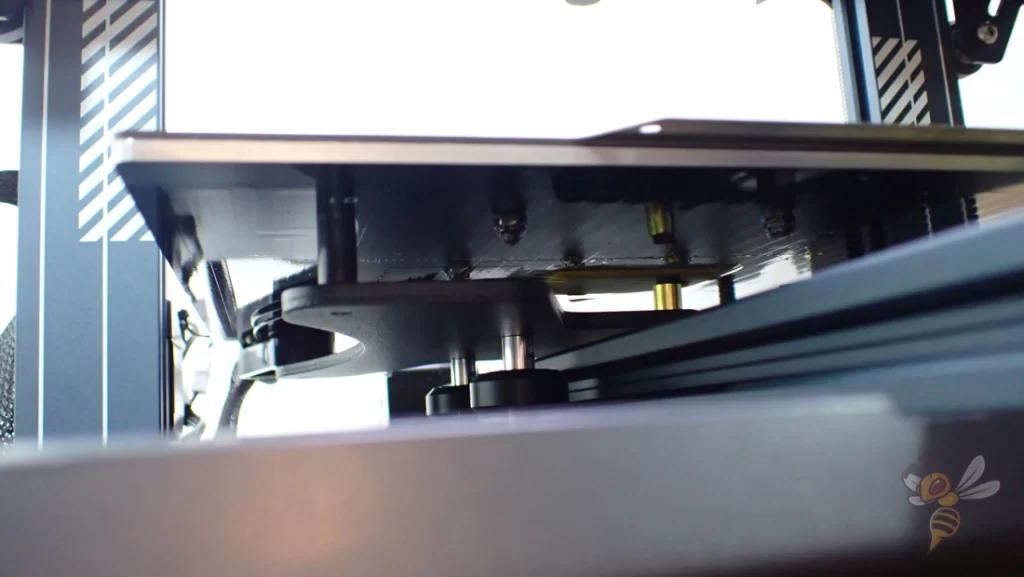
A double z-axis is usually only found on larger 3D printers. However, a double-driven z-axis is also useful for devices with a small print volume. The fact that the x-axis is driven on both sides increases not only the stability, but also the accuracy.
Another advantage of the double z-axis is that it enables higher printing speeds. The increased stability results in less vibration, which becomes more pronounced at higher printing speeds.
However, the movement in the z-direction is not only improved by the double z-axis, the individual z-axes are also connected to each other at the upper end of the frame by a toothed belt. This ensures that they always run synchronously.
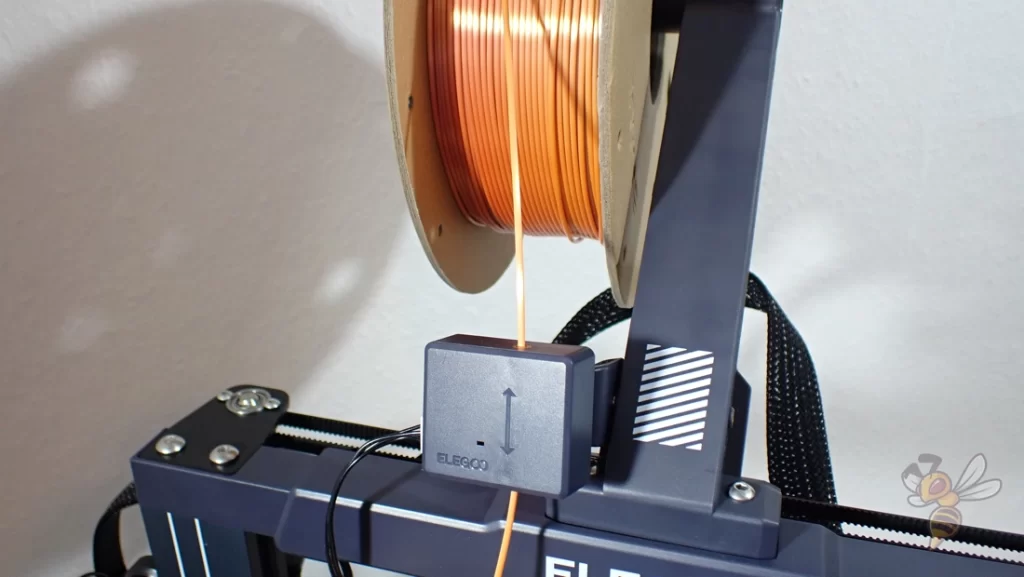
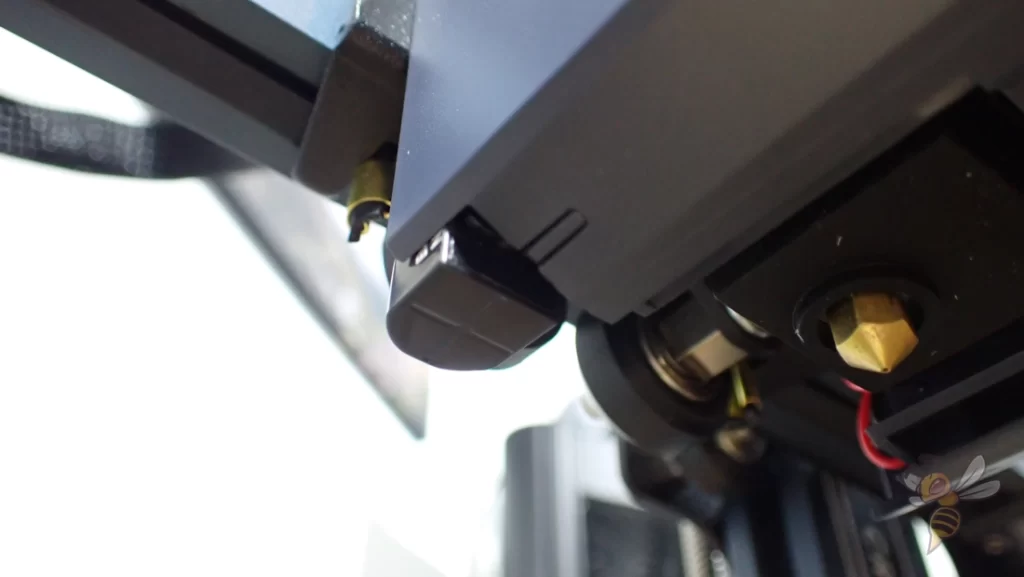
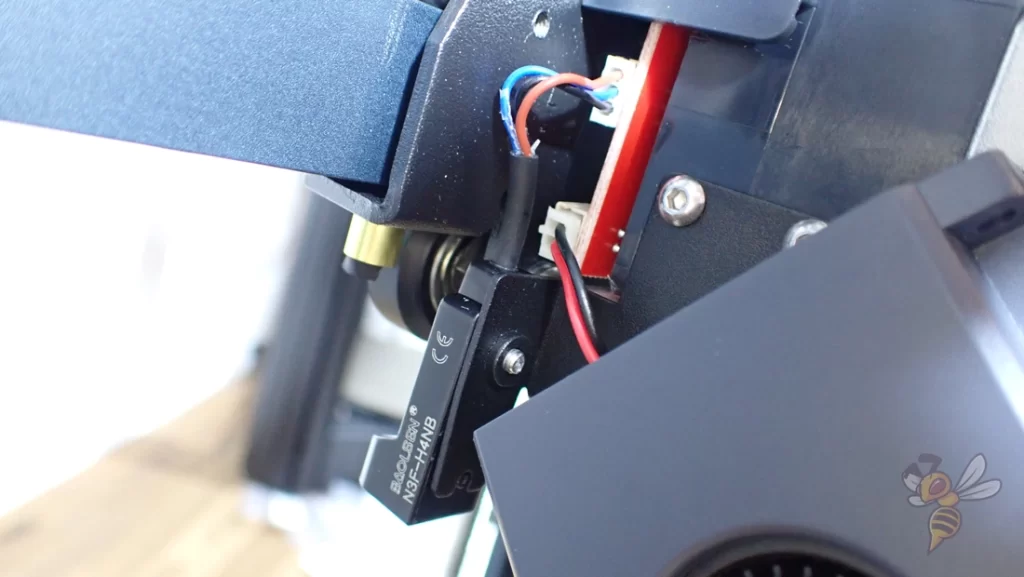
With a direct drive extruder, there is often not enough space in the print head for a filament sensor. Such a sensor would only lead to increased weight in the print head, which decreases the accuracy.
Therefore, the filament sensor of the Neptune 3 Pro is mounted free-swinging directly under the filament holder. In addition to its function as a filament sensor, its position also ensures that the filament is reliably guided to the print head and cannot get tangled.
The filament sensor stops printing as soon as it no longer detects filament. This is very practical in two situations:
- If the filament is brittle and breaks during printing, the 3D printer will pause printing so you can reload the filament.
- You do not need to know exactly whether the filament on the spool is still sufficient before printing. If the filament is empty, the printer automatically pauses the print. You can then easily load new filament and continue printing.
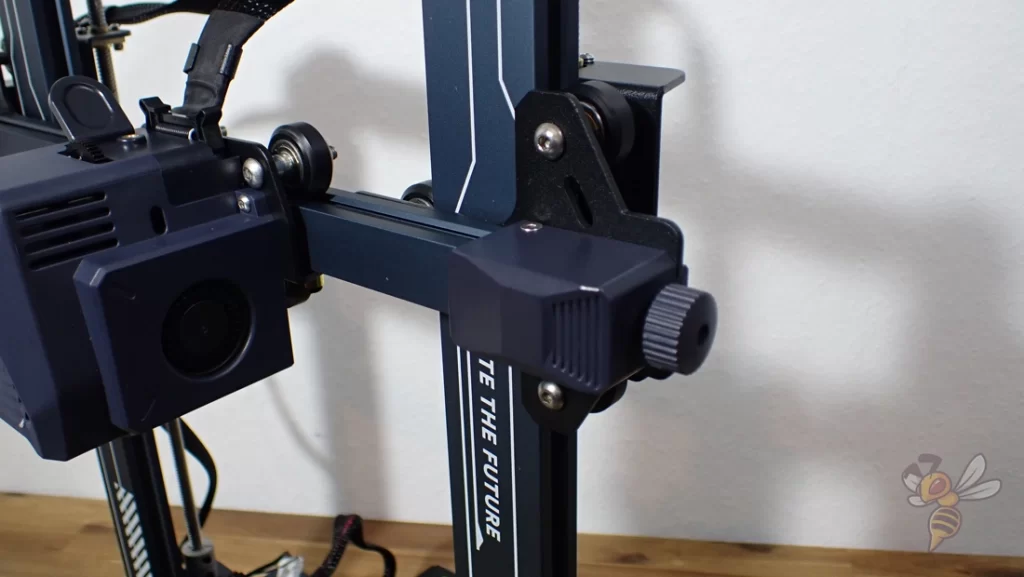
A toothed belt tensioner is installed on the x- and y-axis. Nowadays, this feature is available in almost all new 3D printers, but I still find it very practical. Without such a toothed belt tensioner, you have to half-disassemble the respective axis, tension the toothed belt and then reassemble it. With the belt tensioner, you only have to turn the wheel. Especially after assembly, it can often be the case that the timing belt tension is too weak.
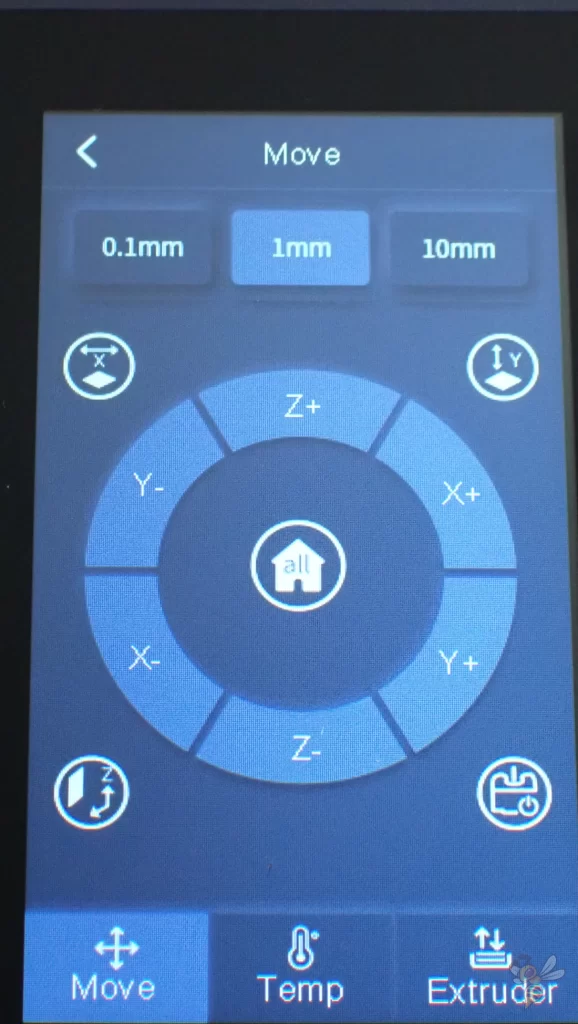
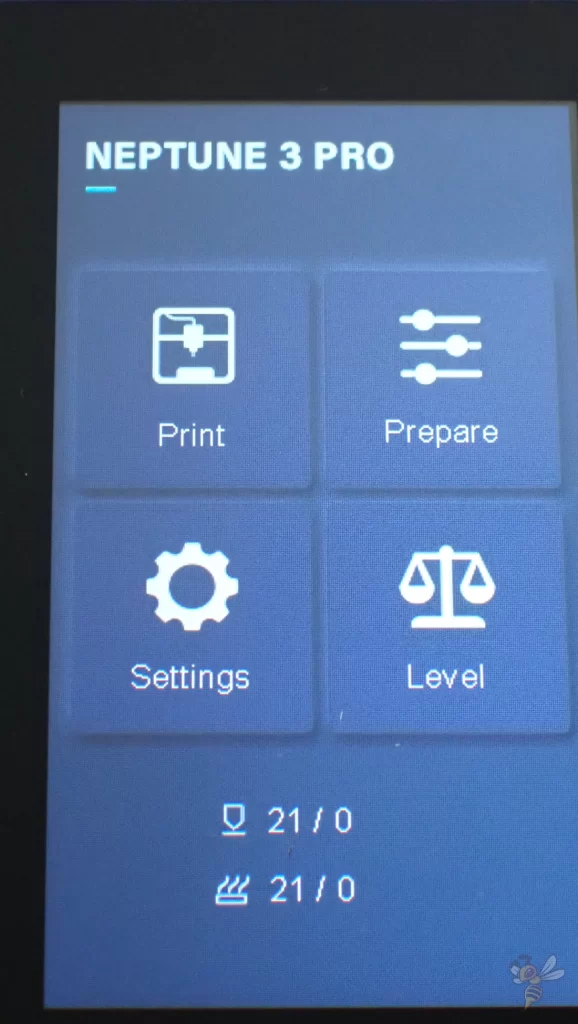
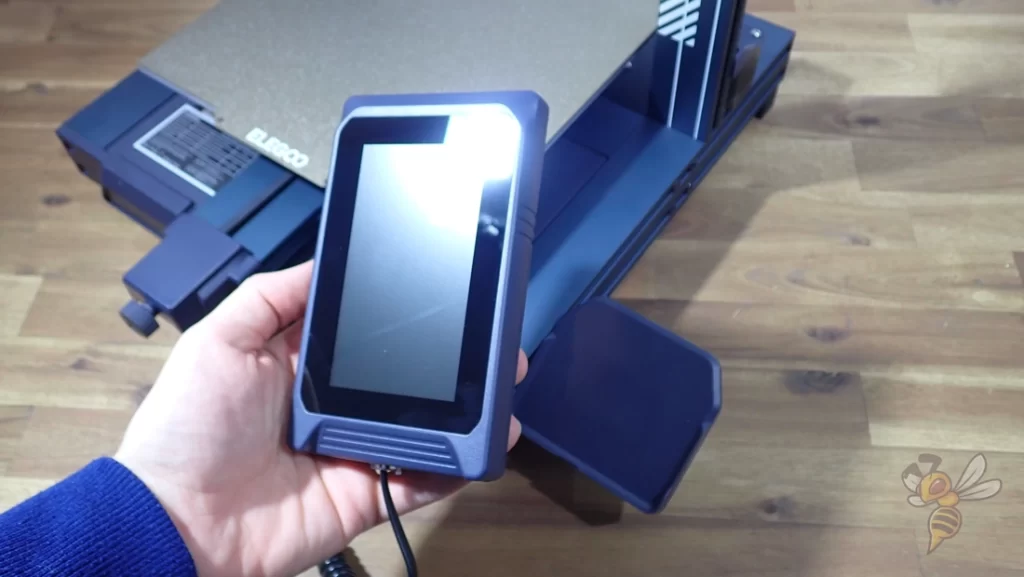
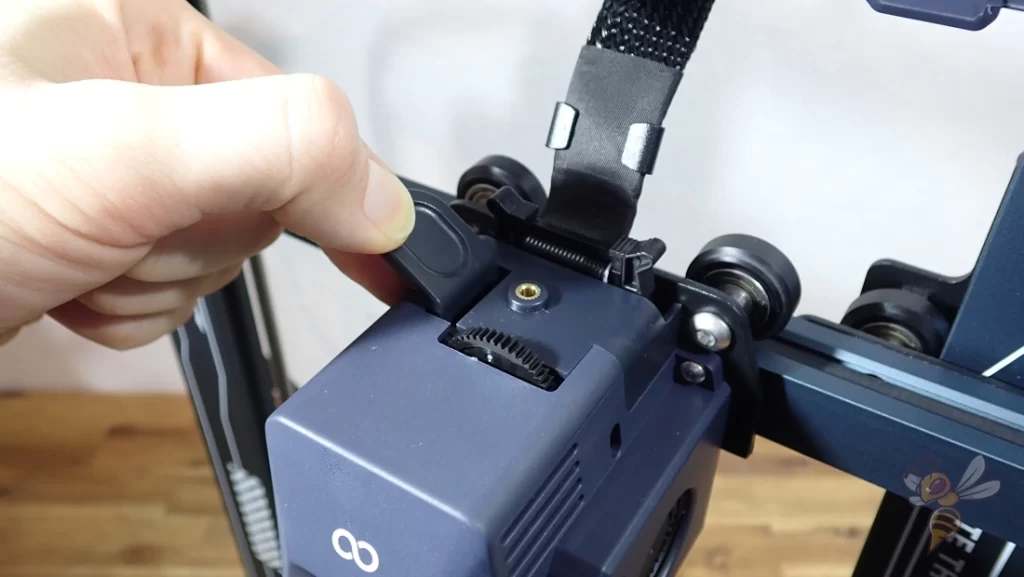
The 4.3-inch color screen of the Neptune 3 Pro is fixed via a magnet. Thus, it can be operated comfortably in the hand like a smartphone. The menu is clear and intuitive, as you would expect from Elegoo. The touchscreen reacts precisely to your touches and you can find all important settings with a few clicks.
Check Price at:
Print Bed Leveling
The print head of the Neptune 3 Pro is equipped with a sensor that can measure its distance to the print bed. This allows the print bed to be automatically leveled.
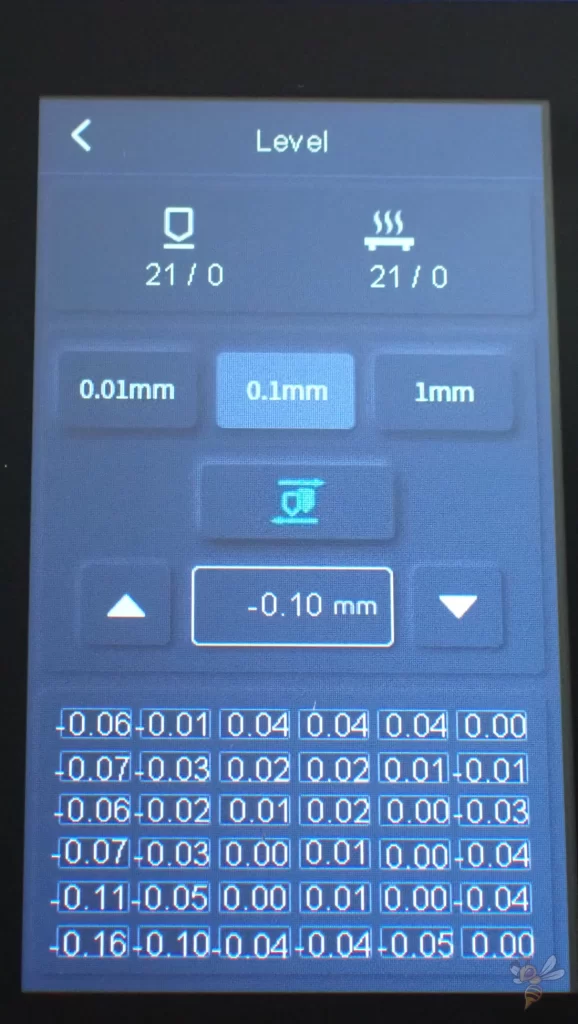
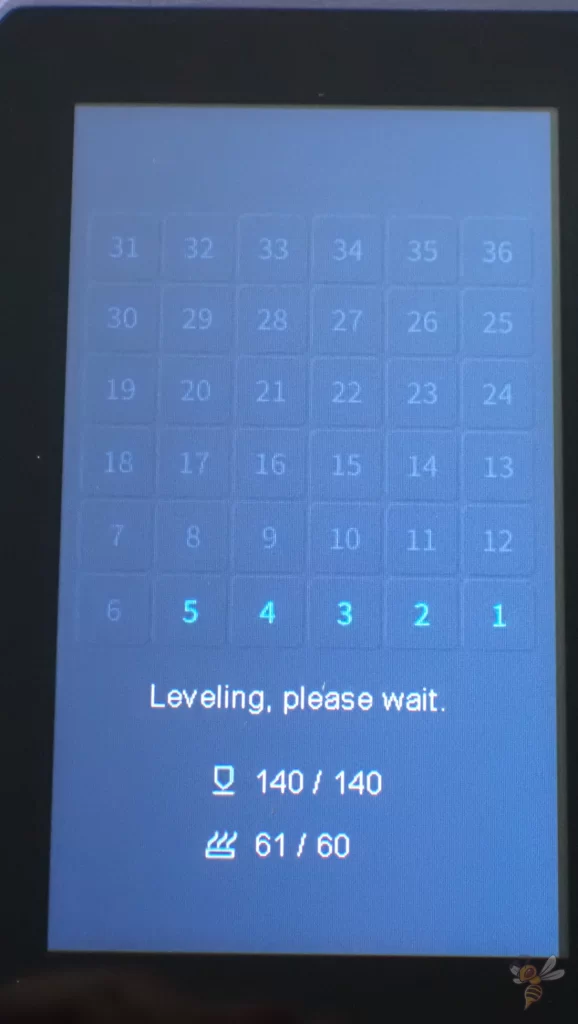
The menu starts a process in which the print head automatically scans 36 locations on the print bed and measures the distance between the nozzle and the print bed. From this data, the 3D printer calculates the inclination of the print bed, which is automatically compensated during printing.
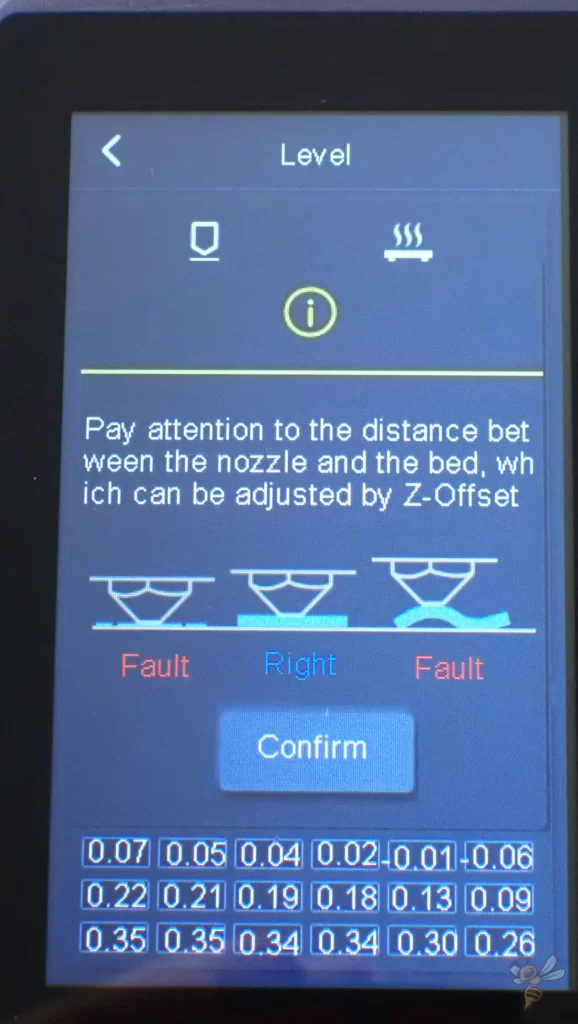
Since the print bed does not have any screws to adjust the inclination, the print bed leveling of the Neptune 3 Pro is actually completely automatic. The only thing you have to do manually afterward is to adjust the z-offset, i.e. the distance of the nozzle to the print bed once globally.
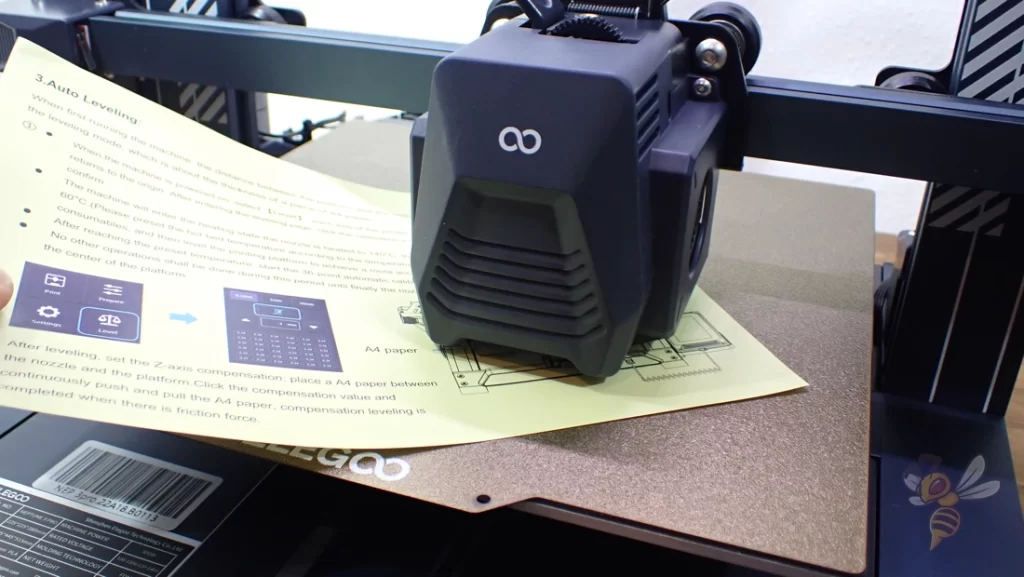
You do this with the widely used paper method, which is also explained in detail in the manual. In principle, you adjust the distance between the nozzle and the print bed so that you can still move a piece of paper between them with a little friction.
Since the print bed is fixed and cannot be adjusted by turning screws, leveling lasts a very long time.
Slicer
I have operated the Neptune 3 Pro with Cura. On the MicroSD card is also the Cura clone from Elegoo. In this slicer, you will find a default profile for the Neptune 3 Pro.
Typically, Cura default profiles are only available after several weeks or months after the release of a new 3D printer, sometimes not at all. Therefore, it is very convenient that Cura and the Elegoo slicer are extremely similar and the settings can be easily copied. This gives you a good starting point and you can continue to optimize from there.
There are few differences between the two slicers. Cura has new features earlier, Elegoo slicer always takes some time to introduce these new features.
The other big difference is that Elegoo Slicer automatically generates thumbnails. This allows you to see on the screen of the Neptune 3 Pro, which object is currently printing. In Cura, you need to install a suitable plugin to be able to use this functionality.
The settings in the predefined profile in Elegoo Slicer are already a good starting point. However, since every 3D printer and filament combination is unique (manufacturing tolerances, material batches, etc.), it is always a good idea to calibrate the most important settings such as print temperature and retraction. This is the only way to achieve perfect results without printing errors such as stringing.
Filament Loading
When loading filament, you have to feed it through the filament sensor to the extruder. Unlike many other extruders, the filament will not tangle inside the extruder.
So you don’t have to bend the filament in a certain direction and sharpen it so that it doesn’t get stuck on an edge inside the extruder.
To push the filament up to and through the nozzle, you need to heat the nozzle to the appropriate temperature for the filament. There are pre-set temperatures for PLA, ABS, PETG and TPU in the menu.
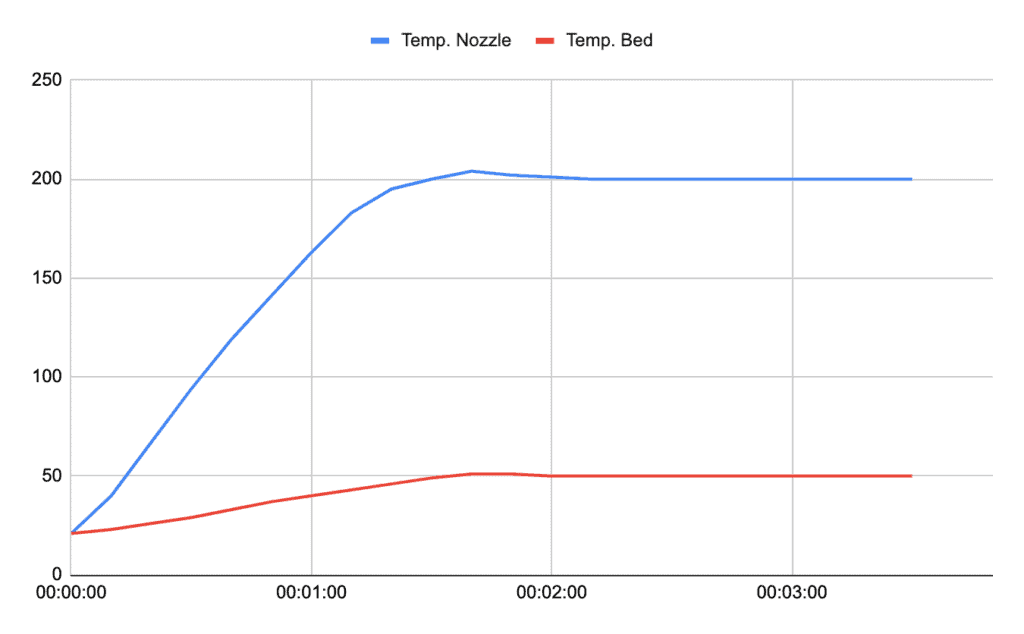
The heating times of the nozzle and the print bed are good compared to other 3D printers. The Neptune 3 Pro reaches typical PLA temperatures of 200 °C for the nozzle and 50 °C for the print bed within about 2 minutes.
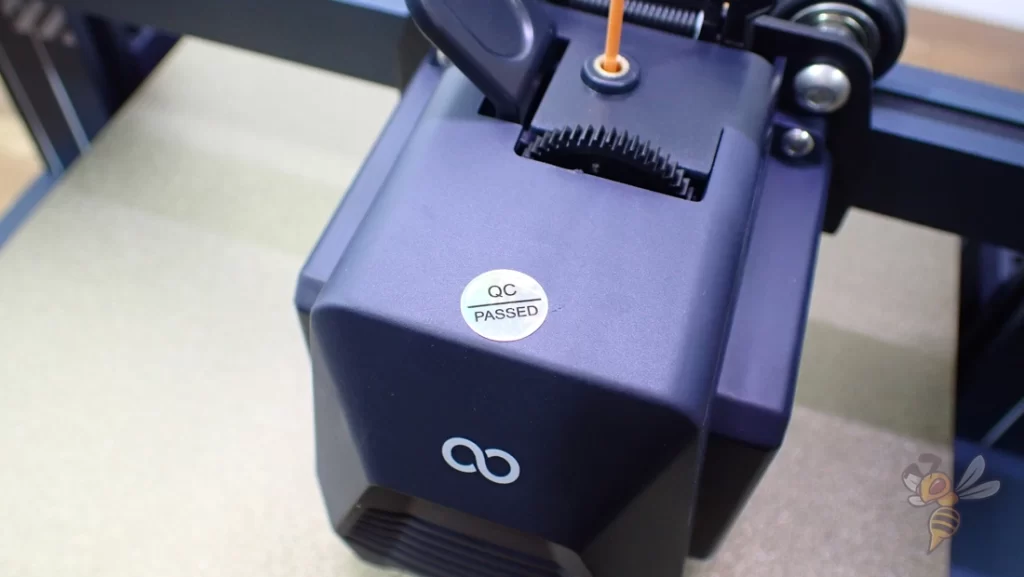
When loading filament for the first time, I noticed that there was still filament residue in the nozzle. Elegoo obviously tests their 3D printers in their quality assurance. A good sign!
Printing
The Neptune 3 Pro really prints very accurately and reliably. The first test print went ideally and also the calibration went smoothly and quickly. It was not difficult to find the perfect settings, as the extruder controls the filament extremely precisely.
The accuracy of the Neptune 3 Pro is 0.1 mm.
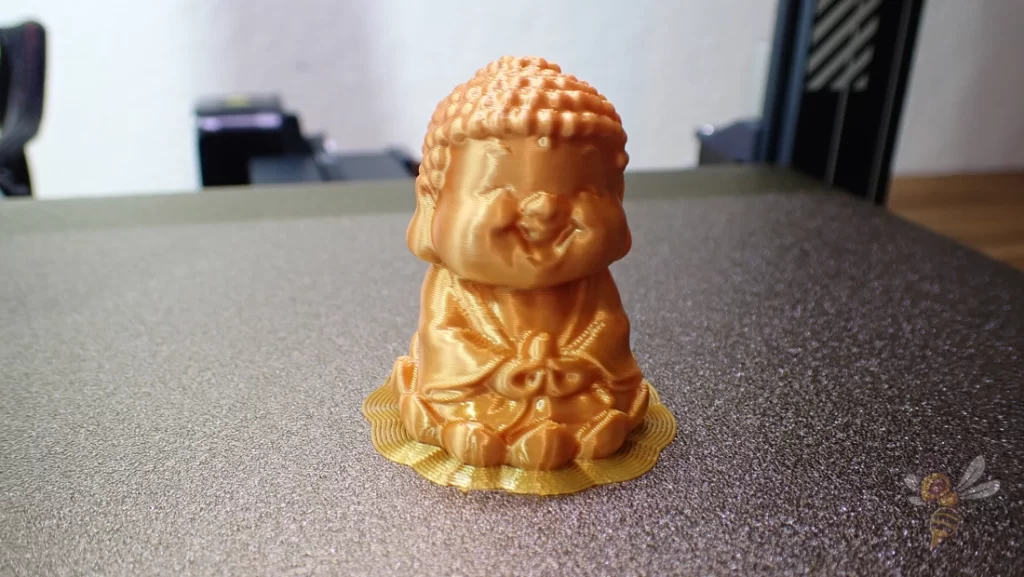
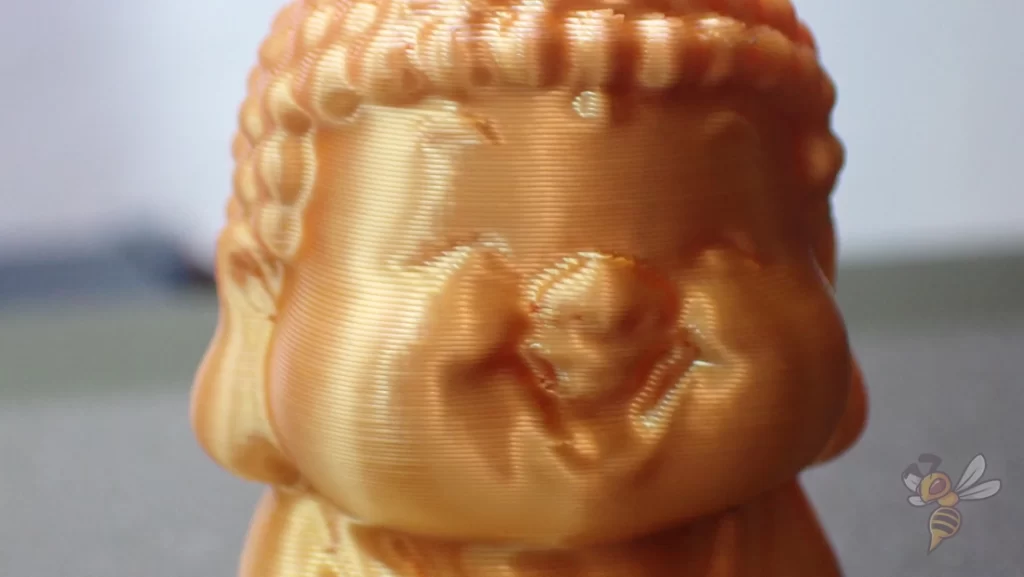
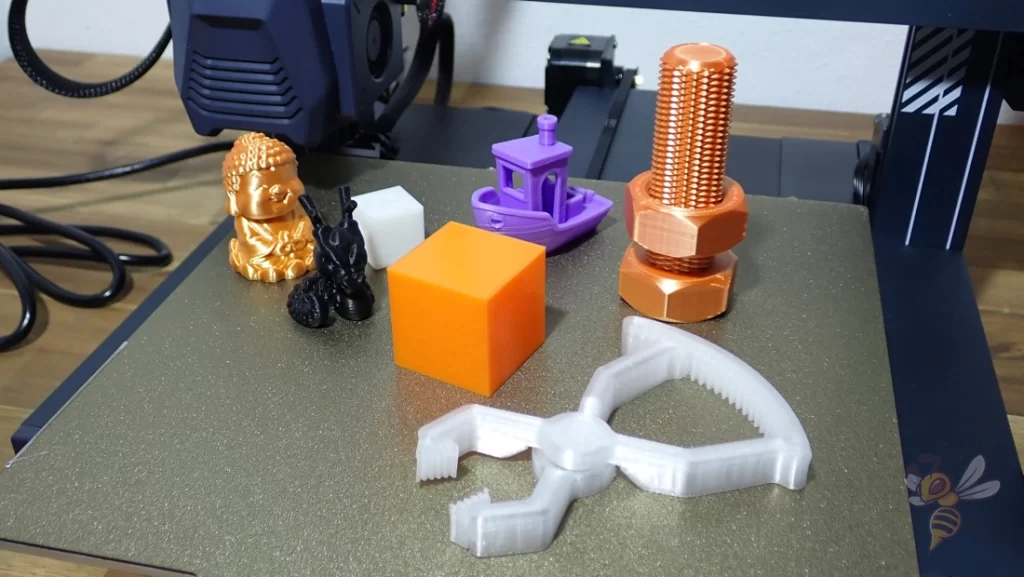
The first test print was the Buddha included on the MicroSD card. For this, I used rainbow PLA filament from Eryone.
The already finished G-Code files in the scope of delivery are mostly perfectly adjusted to the 3D printer by the manufacturer. To reproduce this quality and to adjust the settings so that the print quality is the same for the following objects is the real art.
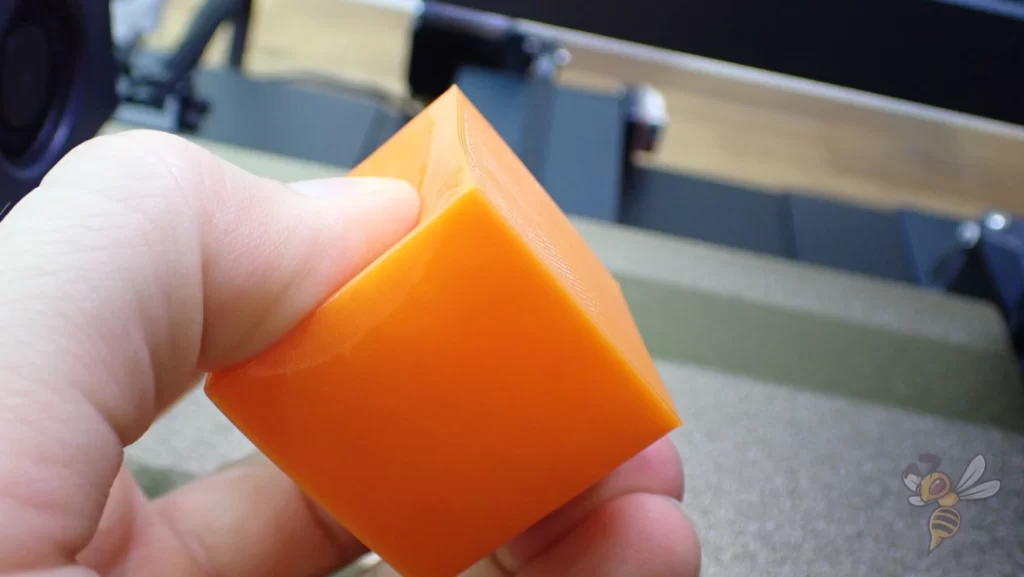
Therefore, the next objects served the calibrations of the most important settings. In addition to various smaller test objects, I also printed the XYZ calibration cube, Cali Dragon and 3D Benchy. These objects are also made of PLA.
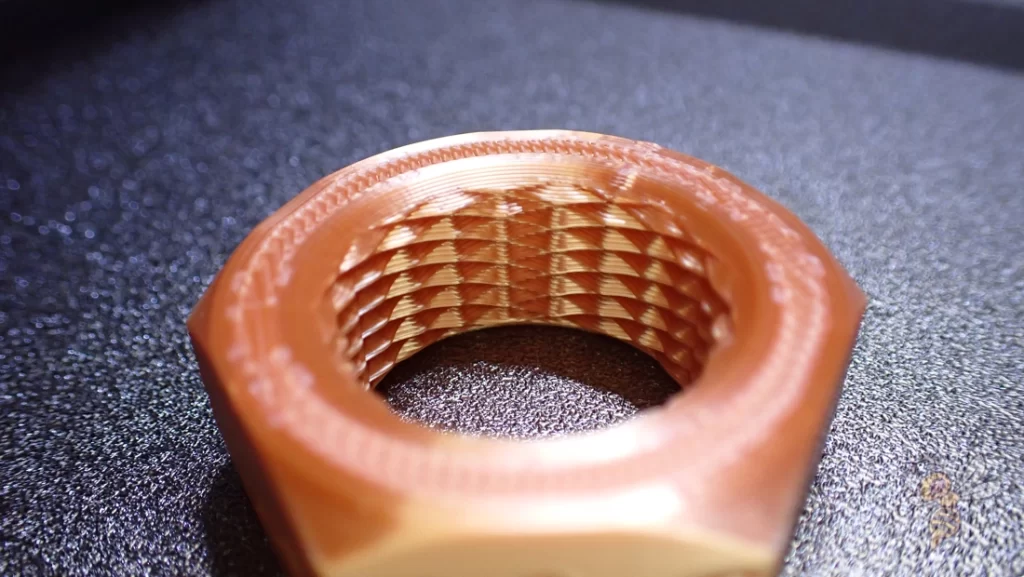
To test the precision of the Neptune 3 Pro, I printed a screw and matching nut from PLA after calibration. Objects with more complex mechanical functions are ideal for testing 3D printer positioning accuracy. Moreover, printing errors would quickly cause the mechanical function to fail.
The result is perfect and the nut can be turned completely smoothly over the thread.
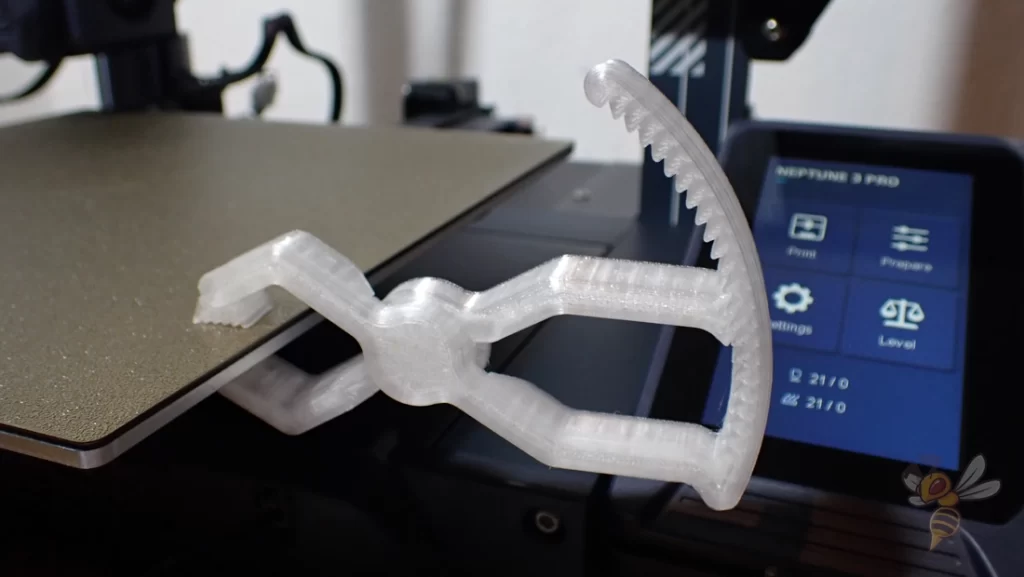
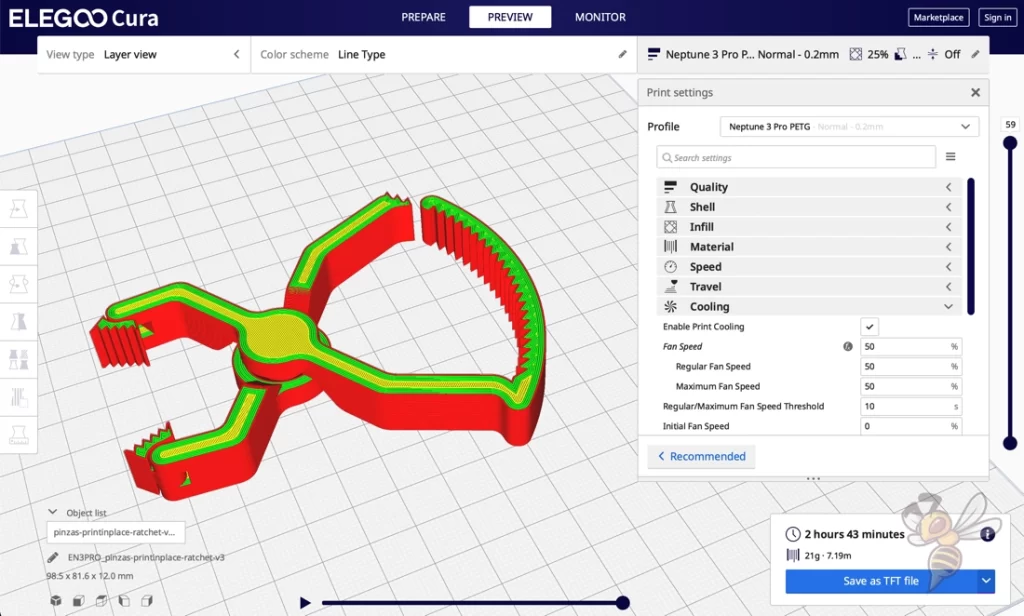
I also calibrated the settings for PETG. A clamp served as a test object. It was printed almost perfectly. Some stringing sometimes cannot be avoided with PETG.
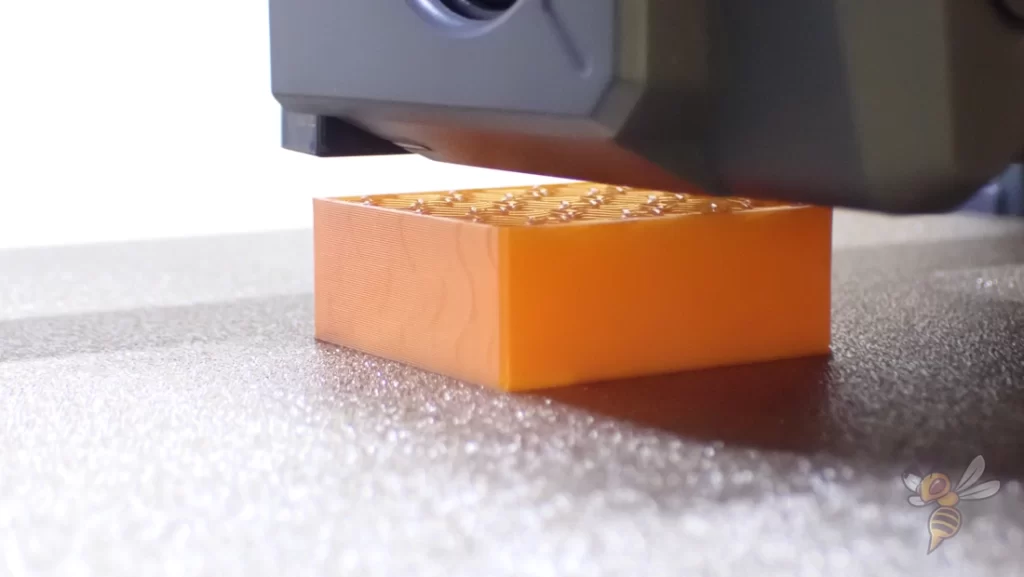
Since the Neptune 3 Pro is great for TPU or other flexible filaments due to its direct drive extruder, I printed another simple cube of TPU with Gyroid Infill pattern.
The quality is also excellent here and the model illustrates the flexibility of TPU optimally.
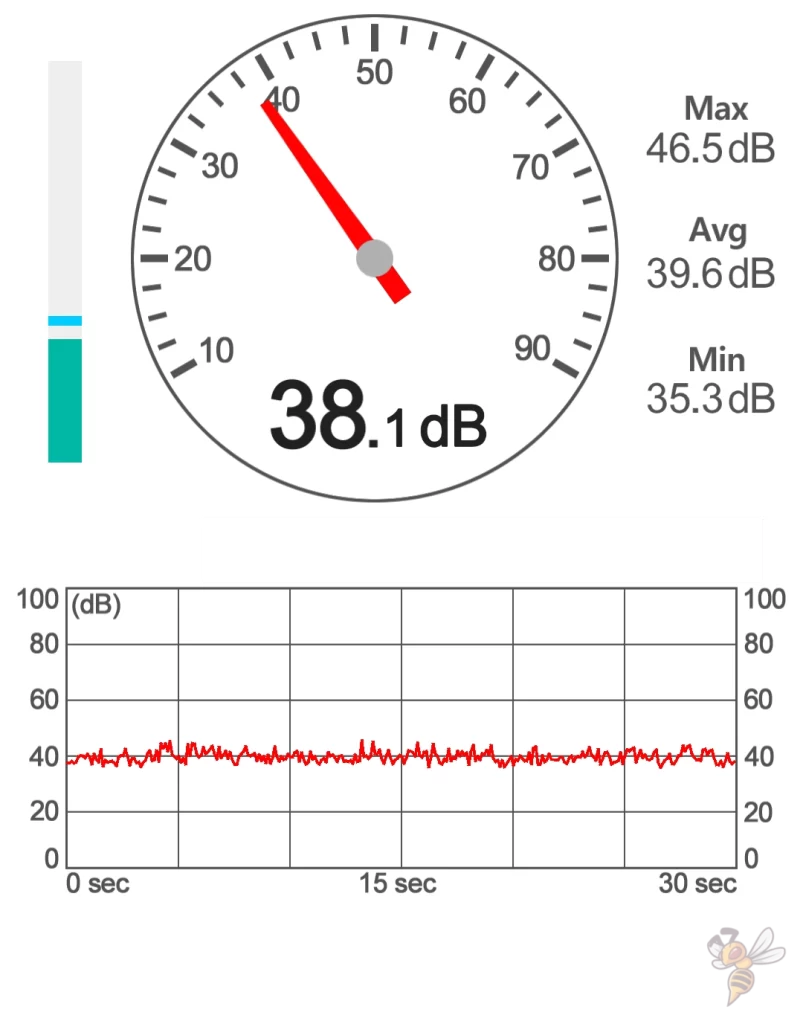
I measured the noise level of the Neptune 3 Pro during these test prints. From a distance of 20 to 30 cm, the volume is only about 40 decibels on average. This is really quiet compared to other 3D printers. A volume of 40 decibels is roughly equivalent to soft whispering or soft music.
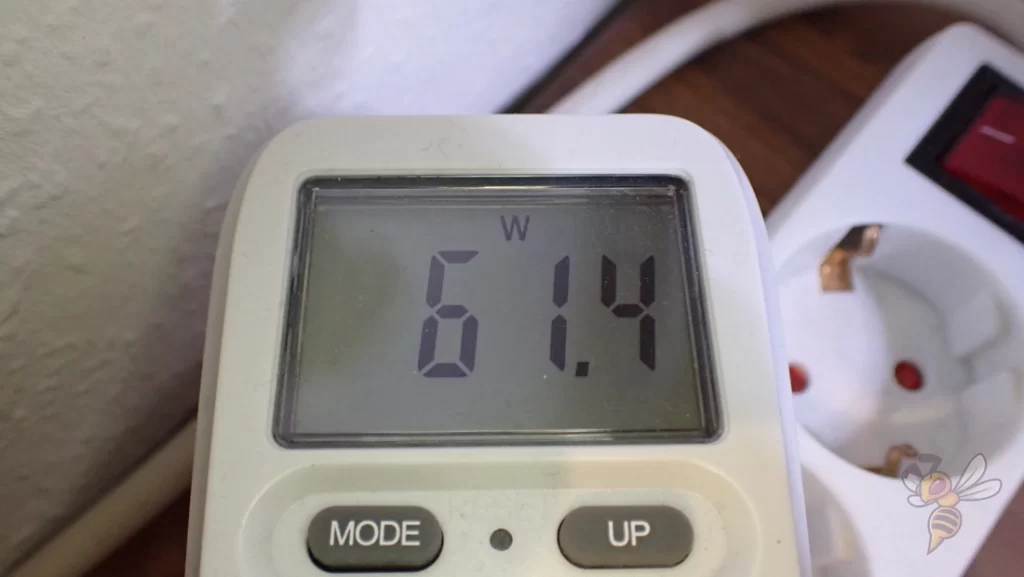
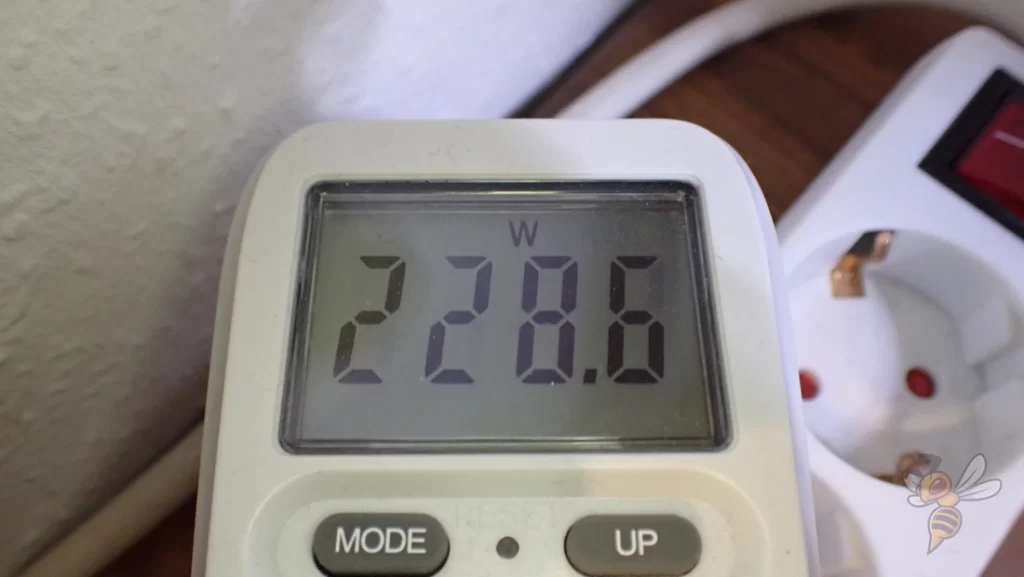
The power consumption of the Neptune 3 Pro is around 60 to 70 watts during printing and can increase to over 300 watts when heating up. Compared to other 3D printers of this size, this is normal.
Neptune 3 Pro vs. Ender 3 S1 Pro

Check Price at:
The two 3D printers Elegoo Neptune 3 Pro and the Creality Ender 3 S1 Pro* are very similar. The two most significant differences are that the Ender 3 S1 Pro can be operated with Klipper via the Sonic Pad and it reaches higher temperatures.
| Neptune 3 Pro | Ender-3 S1 Pro | |
|---|---|---|
| Klipper integration? | No | Yes, with the Sonic Pad from Creality. |
| Print volume | 225 × 225 × 280 mm | 220 × 220 × 270 mm |
| Max. hotend temperature | 260 °C | 300 °C |
| Max. print bed temperature | 100 °C | 110 °C |
| Extruder | Direct drive | Direct drive |
| Display | 4.3-inch color & removable touch screen | 4.3-inch color touch screen |
| Driven Z-axes | 2 | 2 |
| Print bed | PEI-coated spring steel | PC-coated spring steel |
| Leveling | Automatic | Automatic |
| LED strip | Yes | Yes |
| Filament sensor | Yes | Yes |
| Resume print | Yes | Yes |
| Belt tensioner | Yes | Yes |
| Tool drawer | No | Yes |
Similarities: In terms of key features, the two 3D printers are very similar. They both have a flexible print bed, a direct drive extruder, automatic print bed leveling and comparable printer volumes. Most of the “Quality of Life” features are also identical (LED bar, filament sensor, resume print and belt tensioner).
Klipper Integration: Klipper is a firmware that allows you to achieve faster print speeds with fewer print errors. Creality has released the Sonic Pad, an upgrade for all of their 3D printers. In my test I was able to print a 3D Benchy at over 200 mm/s free of print errors!
Temperatures: The Ender 3 S1 Pro has a hotend made entirely of metal. The Neptune 3 Pro still uses a PTFE tube that can withstand a maximum of 260 °C. So if you need the 300 °C or frequently print at over 240 °C, for example with PETG, the Ender 3 S1 Pro would be better suited for you.
Is the Neptune 3 Pro Worth it?
It is rare that I find so little to criticize in a test of a 3D printer. It’s really hard to find any negative points with the Neptune 3 Pro*.
Check Price at:
Basically, it comes down to whether you like to tinker or if the printed result is more important to you. If you like the challenge of 3D printing problems and you like to upgrade your 3D printer or print new upgrades yourself, you’re in the wrong place with the Neptune 3 Pro (an Ender 3 V2 would be more appropriate).
In fact, the Neptune 3 Pro is so well-equipped and prints so accurately and reliably that it almost feels like a plug-and-play product. So if you’re looking for a 3D printer that will give you smooth, good results out of the box, look no further than the Neptune 3 Pro!
Disclosure: This website is the property of Martin Lütkemeyer and is operated by Martin Lütkemeyer. Martin Lütkemeyer is a member of the Amazon Services LLC and other Affiliate Programs. These are affiliate advertising programs designed to enable websites to earn advertising revenue through advertising and linking to Amazon.com and others. Links marked with * are affiliate links.
