- Wet Filament: Prevention, Symptoms & Drying - July 18, 2024
- Sovol SV08 – Best PrusaSlicer Settings & Profile - June 26, 2024
- Sovol SV08 – Best Orca Slicer Settings & Profile - June 26, 2024
Disclosure: Links marked with * are Affiliate Links. I earn from qualifying purchases if you decide to make a purchase through these links – at no additional cost for you!
The Neptune 3 Plus from Elegoo is an almost perfect large format 3D printer. But to get a perfect print quality, you also need to choose the right settings in Cura.
The correct Cura settings for the Neptune 3 Plus are included in the Elegoo Cura Slicer. They can be copied or exported and pasted into Cura. However, for perfect results, some settings need to be calibrated.
How to define the correct settings in Cura, which machine settings you need and how to calibrate the most important settings, I will show you in this detailed guide.
| PLA | ABS | TPU | PETG | |
|---|---|---|---|---|
| Printing temperature | 210-220 °C | 250-260 °C | 215-220 °C | 225-235 °C |
| Print bed temperature | 60-65 °C | 90-95 °C | 60-70 °C | 65-75 °C |
| Print speed | 60 mm/s | 60 mm/s | 30 mm/s | 50 mm/s |
| Retraction | 2.5 mm at 20 mm/s | 2.5-3.0 mm at 20-30 mm/s | 3.0-4.0 mm at 20-30 mm/s | 2.5-3.0 mm at 20-25 mm/s |
| Cooling | 100% | 0% + enclosure | 100% | 50-100% |
Table of Contents:
How to Create a Profile for the Neptune 3 Plus in Cura
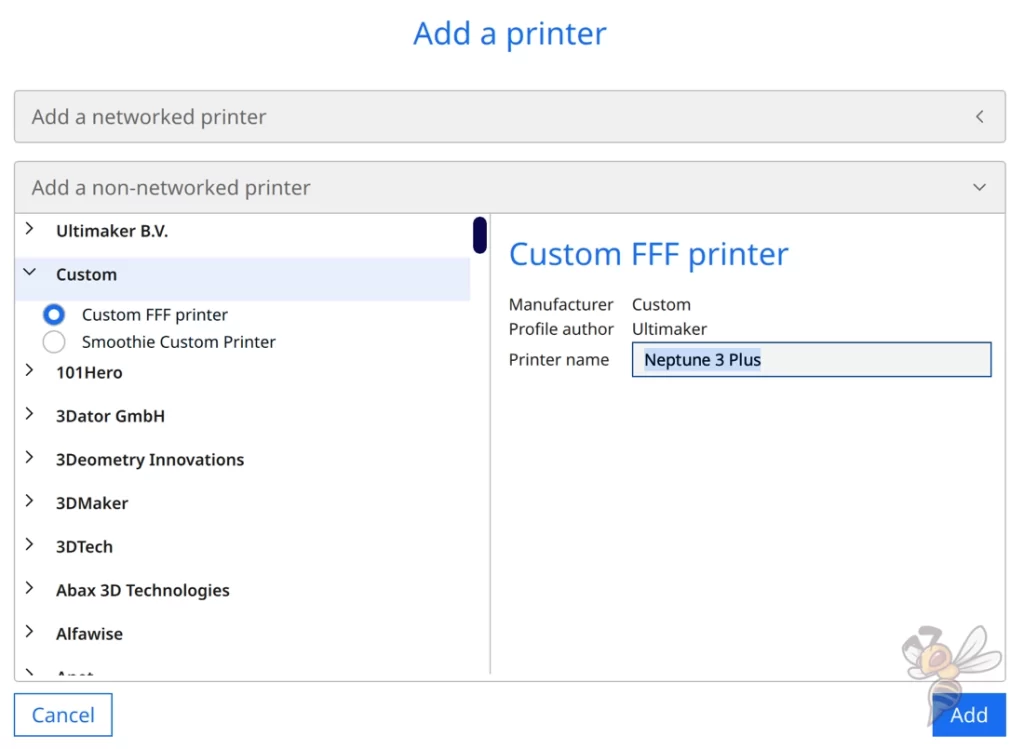
To create a new profile for the Neptune 3 Plus in Cura, create a blank profile, add the correct machine settings, and adjust the print settings for the specific filament and extruder.
To create a new profile, click on “Settings” > “Printer” > “Add printer …” in the menu bar at the top.
A dropdown menu will open where you can select different manufacturers and their printers. It may be that at the time you are reading this article, there is already a pre-built profile in Cura for the Neptune 3 Plus. However, at the time of this 3D printer’s release, and for several weeks and months thereafter, there was none.
Therefore, in this case, select “Custom” > “Custom FFF Printer“. Name the new 3D printer “Neptune 3 Plus“.
After clicking “Add” the machine settings open where you define, among other things, the size of the print volume and what the 3D printer should do at the beginning and end of each job.
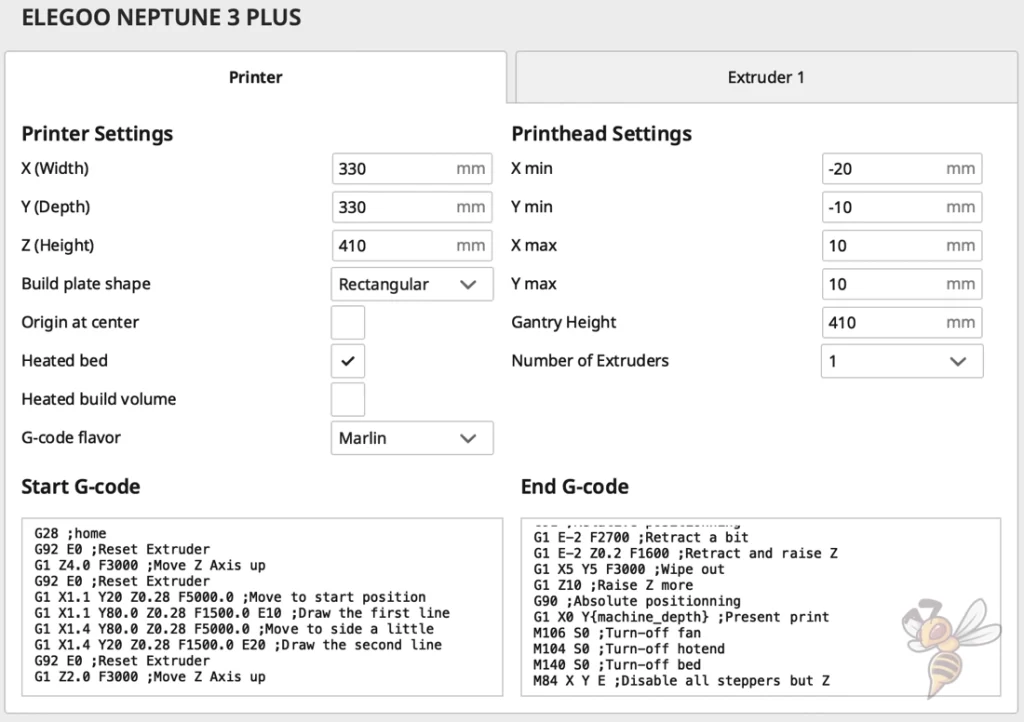
The G-code snippets you define at the bottom of the machine settings, for example, cause the print head to move to the home position and print a line on the edge of the print bed before the actual object to stimulate extrusion and strip off excess material (similar to a skirt).
Here are the respective G-codes:
Start G-code:
- G28 ;home
- G92 E0 ;Reset extruder
- G1 Z4.0 F3000 ;Move Z Axis up
- G92 E0 ;Reset extruder
- G1 X1.1 Y20 Z0.28 F5000.0 ;Move to start position
- G1 X1.1 Y80.0 Z0.28 F1500.0 E10 ;Draw the first line
- G1 X1.4 Y80.0 Z0.28 F5000.0 ;Move to side a little
- G1 X1.4 Y20 Z0.28 F1500.0 E20 ;Draw the second line
- G92 E0 ;Reset extruder
- G1 Z2.0 F3000 ;Move Z Axis up
End G-code:
- G91 ;Relative positioning
- G1 E-2 F2700 ;Retract a bit
- G1 E-2 Z0.2 F1600 ;Retract and raise Z
- G1 X5 Y5 F3000 ;Wipe out
- G1 Z10 ;Raise Z more
- G90 ;Absolute positioning
- G1 X0 Y{machine_depth} ;Present print
- M106 S0 ;Turn-off fan
- M104 S0 ;Turn-off hotend
- M140 S0 ;Turn-off bed
- M84 X Y E ;Disable all steppers but Z
If you have defined the machine settings as described above and then close them, several profiles with different layer heights will be created.
However, in many places only default values are entered here, with which you will not achieve sufficient results with the Neptune 3 Plus. In addition, they must be adjusted to the respective filament type used. Which settings are best suited for the Neptune 3 Plus and how to calibrate them is part of this article.
You can find more information on how to create a 3D printer profile in Cura and what you need to pay attention to in this article: How to Create a Custom 3D Printer Profile in Cura
PLA Settings
These are the correct Cura settings for the Neptune 3 Plus for PLA:
- Print temperature: 210-220 °C
- Print bed temperature: 60-65 °C
- Print speed: 60 mm/s
- Retraction: 2.5 mm at 20 mm/s
- Cooling: 100%
- First layer: 5-10 mm/s, 0% cooling, 100% extrusion width, 100% layer height
PLA is one of the most popular filaments in 3D printing. This is mainly because it is cheap and easy to process.
Every 3D printer on the market can process PLA. However, there are a few things you need to keep in mind to achieve perfect results.
First, it is important to set the correct printing temperature. If the printing temperature is too high, printing errors such as stringing or even blobs can occur. But too low a print temperature can also lead to inaccuracies and other under-extrusion phenomena.
A good starting value for the printing temperature is between 210 and 220 °C for PLA with the Neptune 3 Plus. Also note the manufacturer’s recommended printing temperature for your filament.
What you don’t have to worry about with Neptune 3 Plus and PLA is the print bed adhesion. So, it’s not all that significant what temperature you choose for the print bed. It’s best to start with the default value of 60 °C.
If you level the print bed properly and reduce the print speed for the first layer, you will get perfect print bed adhesion.
The retraction of the Neptune 3 Plus is 2.5 mm at a retraction speed of 20 mm/s for PLA. This value must be calibrated in any case for the filament used.
You will learn how to do this later in this article. Even two PLA filaments from different manufacturers can differ so much that you have to use different retraction values.
ABS Settings
ABS is stronger and more durable than PLA. Therefore, it is very popular for mechanical applications. However, it is significantly more difficult to process this filament.
On the one hand, it is more difficult to find the right printing temperatures and on the other hand, the ambient temperature must remain warm and constant during printing. Otherwise, the ABS filament can warp or detach from the print bed during printing.
For smaller objects that are only a few centimeters high, this effect is often so small that you can start the print without special measures. Otherwise, you need a suitable 3D printer enclosure to keep the temperature in the print volume homogeneously warm.
The print bed adhesion of ABS is good on PEI, but can be improved. As a first measure, you should reduce the print speed for the first layer. This will give the liquid filament more time to bond to the print bed surface.
If that doesn’t work, you can also use an adhesive like Magigoo. Otherwise, you can also check out the individual methods for improving print bed adhesion in this article.
TPU Settings
These are the correct Cura settings for the Neptune 3 Plus for TPU:
- Print temperature: 215-220 °C
- Print bed temperature: 60-70 °C
- Printing speed: 30 mm/s
- Retraction: 3.0-4.0 mm at 20-30 mm/s
- Cooling: 100%
- First layer: 5-10 mm/s, 0% cooling, 100% extrusion width, 100% layer height
Since the Neptune 3 Plus is equipped with a direct drive extruder, it can process flexible filaments such as TPU excellently.
The difference between a direct drive extruder and a Bowden extruder is that the distance between the extruder and the hot nozzle is much shorter in a direct drive extruder.
The extruder pushes the filament forward. A flexible filament can compensate for some of this movement, resulting in inaccuracies in the extrusion. The longer the distance between the extruder and the nozzle, the more the filament can compensate. Therefore, it is often almost impossible to print flexible filament error-free with a Bowden extruder.
This is why the most important adjustment for TPU is the retraction. You will have to calibrate the retraction much longer than with PLA or other rigid filaments.
PETG Settings
These are the correct Cura settings for the Neptune 3 Plus for PETG:
- Print temperature: 225-235 °C
- Print bed temperature: 65-75 °C
- Printing speed: 50 mm/s
- Retraction: 2.5-3.0 mm at 20-25 mm/s
- Cooling: 50-100%
- First layer: 5-10 mm/s, 0% cooling, 100% extrusion width, 100% layer height
PETG is also very popular next to ABS for mechanical or outdoor applications. It is easier to print than ABS and still has a very high stability and strength.
The problem with PETG, however, is that it is very prone to stringing. The printing temperature and retraction must be precisely adjusted here in order to print without errors.
For retraction, you can take your PLA settings and tweak from there. I would definitely recommend an accurate calibration if you would like to work with PETG. You will learn how to do this later in this article.
In addition, the cooling rate varies between different PETG filaments. Some need a lot of cooling so that they do not create strings, but others only need 50%.
The print bed of the Neptune 3 Plus is also optimally suited for PETG. However, with some types of PETG you may have to help a little.
Best Cura Settings for the Neptune 3 Plus
Print Temperature
The best print temperatures for the Neptune 3 Plus in Cura:
- PLA: 210-220 °C
- ABS: 250-260 °C
- TPU: 215-220 °C
- PETG: 225-235 °C
If you do not set the temperature of the hotend correctly, various printing errors can occur. If the temperature is too high, the filament will leak out uncontrollably because it is too liquid. Stringing occurs. If the values are too low, holes may appear or the adhesion of the layer may suffer.
The values given in this article are good guidelines for the Neptune 3 Plus for the individual filaments. You should also pay attention to the manufacturer’s specifications, which are usually printed on the filament spool.
The hotend of the Neptune 3 Plus reaches a maximum temperature of 260 °C. This allows you to process all standard filaments and many of the more exotic materials.
The print temperature is one of the most important settings. Therefore, it is essential to calibrate it for each filament to get the best results.
Print Bed Temperature
The best print bed temperatures for the Neptune 3 Plus in Cura:
- PLA: 60-65 °C
- ABS: 90-95 °C
- TPU: 60-70 °C
- PETG: 65-75 °C
The print bed temperature is critical for the print bed adhesion. If it is too low, the adhesion is too poor and the object may come off the print bed partially or completely. However, if the temperature is too high, you will create an elephant foot.
In my practical test of the Neptune 3 Plus, I measured the print bed temperature and its homogeneity. The distribution of the temperature is very uniform, even though the print bed is so large. However, the absolute temperature is a few degrees lower than the value entered in the menu.
So, you can set up to five degrees higher to get to the recommended values. Keep an eye on the temperature to see if an elephant foot forms. If so, you’ll need to lower the temperature again and use other methods to improve print bed adhesion.
Print Speed
The best print speed for the Neptune 3 Plus in Cura:
- PLA: 60 mm/s
- ABS: 60 mm/s
- TPU: 30 mm/s
- PETG: 50 mm/s
The optimal print speed depends on what kind of extruder you use and how good the quality should be. In principle, you set the print speed so high that no printing errors, such as ringing or ghosting appear.
Such printing errors are caused by vibrations of the print head. The heavier the print head, the faster such vibrations are generated. Therefore, it is usually the case that 3D printers with heavy direct drive extruders can print more slowly than those with a light Bowden extruder.
Since the Neptune 3 Plus has a mid-sized print head with a direct drive extruder, its print speed is also at relatively normal levels for Cartesian 3D printers.
The above guidelines should give you good results with each filament. With flexible filaments like TPU, be aware that the print speed should be significantly slower than with other filaments.
Layer Height
The best layer heights for the Neptune 3 Plus in Cura:
- Decorative objects: 0.08-0.12 mm
- Standard: 0.16-0.20 mm
- Coarse, fast prints: 0.24-0.28 mm
The layer height you can use depends mainly on which nozzle you use and how accurate the 3D printer’s extruder is.
With the included 0.4 mm nozzle and the precise direct drive extruder of the Neptune 3 Plus, you can achieve layer heights of 0.05 mm. However, I would recommend you start at 0.08 mm and use 0.3 mm at the highest.
The thinner the layers, the finer the surface. The disadvantage, however, is that the printing time increases proportionally. Finer prints take much longer than coarse ones.
So, depending on the purpose you have in mind for your object, you should choose the right layer height to save you printing time. If your object will only have a mechanical use, a higher layer height would be suitable.
Flow Rate
The best flow rate for the Neptune 3 Plus in Cura:
- Default value: 100%
- For over-extrusion: 90% to 99%
- For under-extrusion: 101% to 110%.
The flow rate is always 100% by default. Only if you cannot control over-extrusion or under-extrusion, you can solve the problem with the flow rate.
The flow rate determines how much filament is extruded per second. Changing the flow rate does not change the print time, but the printed lines will be thicker with a higher flow rate or thinner with a lower flow rate.
Since the flow rate has such a large effect on the print result, it is one of the settings that should be calibrated.
Retraction
The best retraction settings for the Neptune 3 Plus in Cura:
- PLA: 2.5 mm at 20 mm/s
- ABS: 2.5-3.0 mm at 20-30 mm/s
- TPU: 3.0-4.0 mm at 20-30 mm/s
- PETG: 2.5-3.0 mm at 20-25 mm/s
Retraction is one of the most important settings in 3D printing. It is highly dependent on what kind of extruder the 3D printer uses and is different for each 3D printer and also for each filament.
The Neptune 3 Plus has a direct drive extruder where the retraction distances are relatively short. The retraction speeds are also in the lower range when compared to other extruders.
Only a well-adjusted retraction can avoid printing errors like stringing. Next to print temperature, retraction is the most essential setting you should calibrate for optimal results.
Infill
The best infill density for the Neptune 3 Plus in Cura:
- Decorative objects: 0-15%
- Standard objects: 15-50%
- Stable objects: 50-100%
How stable the printed object will be is not only determined by the filament, you can also adjust the stability to a high degree by the infill to your desired requirements.
The denser the filament is inside the object, the more stable the object becomes. Therefore, higher densities are suitable for mechanically used objects and lower densities for decorative purposes.
But you can not only specify the density when infilling, the pattern also has an influence on the printing time and stability.
High stability (for stable objects):
- Cubic
- Cubic subdivision
- Octet
- Gyroid
Medium stability (for standard objects):
- Grid
- Triangles
- Tri-Hexagon
Low stability (for decorative objects):
- Lines
- Zigzag
- Lightning
First Layer
These are the best Cura settings for the first layer on the Neptune 3 Plus:
- Layer height: 100-200% of normal layer height (higher values to increase print bed adhesion)
- Line width: 100-200% of normal line width (higher values to increase print bed adhesion)
- Print temperature: Same as the rest of the object, or 5-10 °C higher for better print bed adhesion.
- Print speed: 50% of normal print speed (i.e. 25 mm/s for a normal print speed of 50 mm/s) or 5-10 mm/s for high print bed adhesion
- Flow rate: 100-110% (higher values in case of poor print bed adhesion)
The first layer is the most important in 3D printing. The Neptune 3 Plus has a PEI print bed that provides excellent print bed adhesion for most filaments. If the object shifts during printing or the filament does not adhere to the print bed in the first place, there are a few methods to increase adhesion.
With the values listed above, you can increase the print bed adhesion with Cura. Especially useful is a lower print speed for the first layer. If you want to try other methods, you can also have a look at this article: 3D Print Does Not Stick to the Bed: All Solutions Step-by-Step
How to Calibrate the Cura Settings for the Neptune 3 Plus
How to Calibrate the Print Temperature
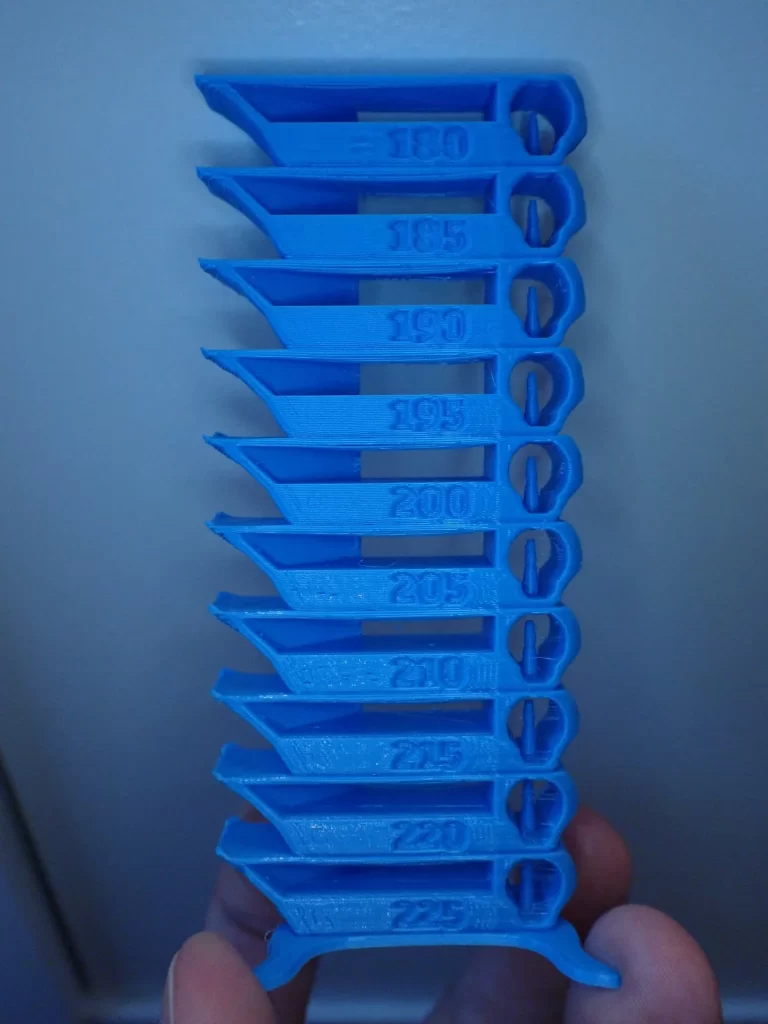
To find the optimal values for the printing temperature, you can print a suitable object at different temperatures to gradually approach the optimal value.
But there are also so-called temperature towers, where you can determine the correct temperature with only one print. They consist of several levels of the same geometry. The individual levels are printed at different temperatures. So, you can see immediately after printing which temperature you should use.
Read the full calibration guide:
3D Printer Calibration: Step-by-Step to Perfect Results
How to Calibrate the Flow Rate
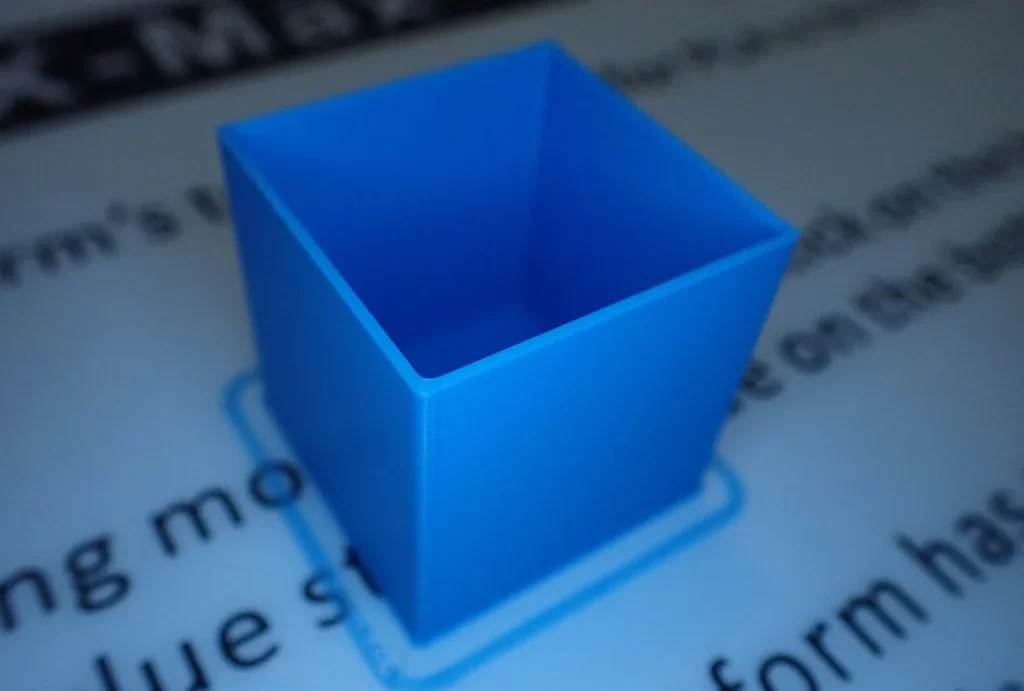
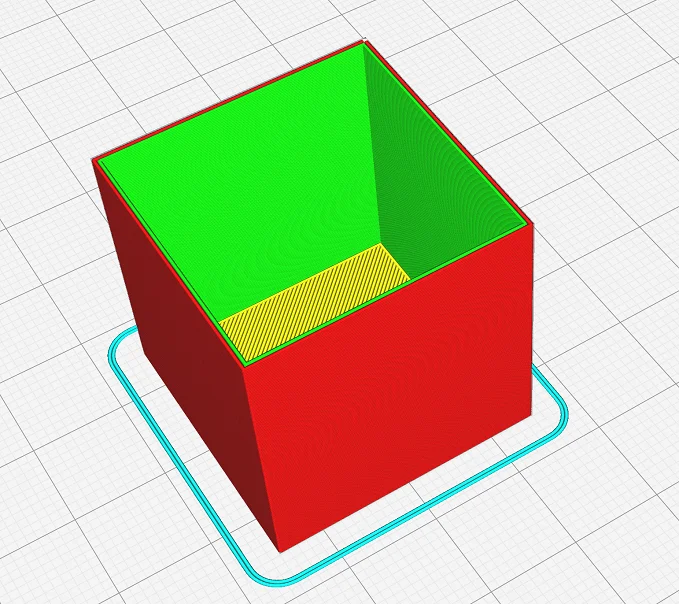
When calibrating the flow rate, you match the real line width with the theoretical one in Cura. I usually use an open cube with two to three wall lines for this.
After printing, I can use a caliper gauge to measure the wall thickness and compare it to the theoretical value. If the real wall thickness is too large, I can reduce the flow rate to make it equal to the theoretical value.
Generally, you need several passes for this calibration until you have found the right value.
Normally, the flow rate should only be a few percent off the default value of 100%. If not, you should check your other settings again, as there is probably an error here.
How to Calibrate the Retraction
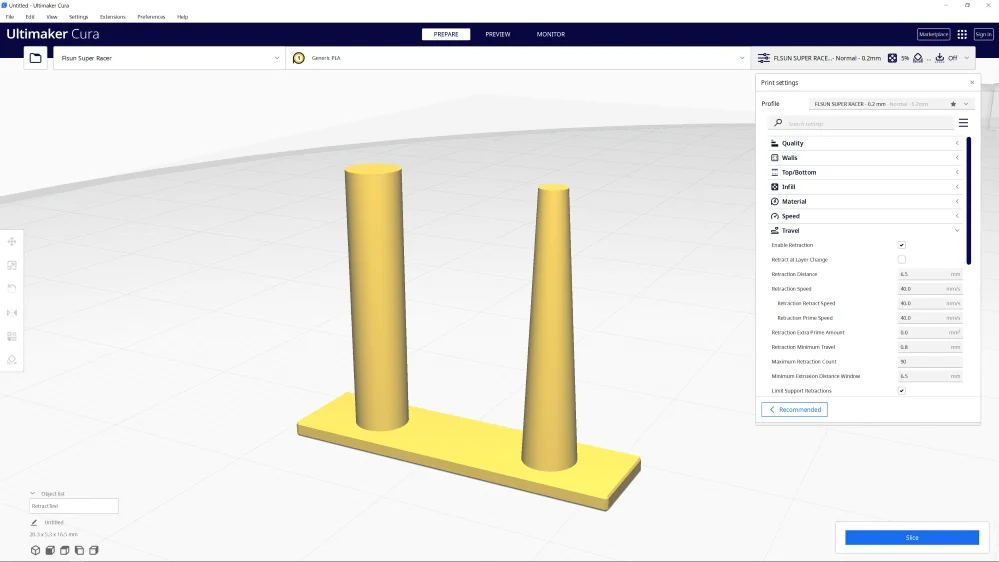
For the retraction, you mainly have to calibrate the retraction distance and the retraction speed. There are many other retraction settings in Cura, but these two values are the most important.
I prefer to calibrate retraction with a small object that has at least two columns. Such an object is printed within a few minutes and provokes stringing – the first and most obvious error caused by incorrect retraction settings.
Adjust the retraction settings in small steps and reprint the object to gradually approach the perfect values.
Conclusion
With the values from this article and the machine settings, you should be able to create a good profile for the Neptune 3 Plus in Cura.
Keep in mind that these values are only guidelines and you need to optimize them for your 3D printer and the filament you are using.
You will probably get good results without optimization, but for perfect results, a calibration is absolutely necessary.
Disclosure: This website is the property of Martin Lütkemeyer and is operated by Martin Lütkemeyer. Martin Lütkemeyer is a member of the Amazon Services LLC and other Affiliate Programs. These are affiliate advertising programs designed to enable websites to earn advertising revenue through advertising and linking to Amazon.com and others. Links marked with * are affiliate links.

