
- Wet Filament: Prevention, Symptoms & Drying - July 18, 2024
- Sovol SV08 – Best PrusaSlicer Settings & Profile - June 26, 2024
- Sovol SV08 – Best Orca Slicer Settings & Profile - June 26, 2024
Disclosure: Links marked with * are Affiliate Links. I earn from qualifying purchases if you decide to make a purchase through these links – at no additional cost for you!
The Mingda Magician Max is a popular large format 3D printer that delivers excellent and repeatable results with the right Cura profile. With the right Cura settings, you will be able to produce high quality objects flawlessly with this 3D printer.
It is true that there is a default profile for the Mingda Magician Max in Cura. However, it is best to load this profile for the machine settings, import the print settings on the SD card and calibrate the most important settings.
Find out how to do all this and which settings are best for different filaments in this detailed article on the best Cura settings for the Mingda Magician Max.
| PLA | ABS | TPU | PETG | |
|---|---|---|---|---|
| Printing temperature | 190-200 °C | 220-230 °C | 210-220 °C | 225-245 °C |
| Print bed temperature | 60 °C | 90 °C | 60 °C | 60-70 °C |
| Print speed | 50 mm/s | 50 mm/s | 30 mm/s | 50 mm/s |
| Retraction | 2 mm at 60 mm/s | 2.5 mm at 60 mm/s | 3 mm at 60 mm/s | 1.8-2.0 mm at 60 mm/s |
| Cooling | 100 % | 0% + enclosure | 100 % | 50 % |
Table of Contents:
How to Create a Cura Profile for the Magician Max
When you add a 3D printer to Cura, you have to create a profile for it. This profile contains all the machine settings and print settings that determine print quality. Machine settings include things like build volume, nozzle size, and filament diameter. Print settings include things like infill density, layer height, and temperatures for the nozzle and print bed.
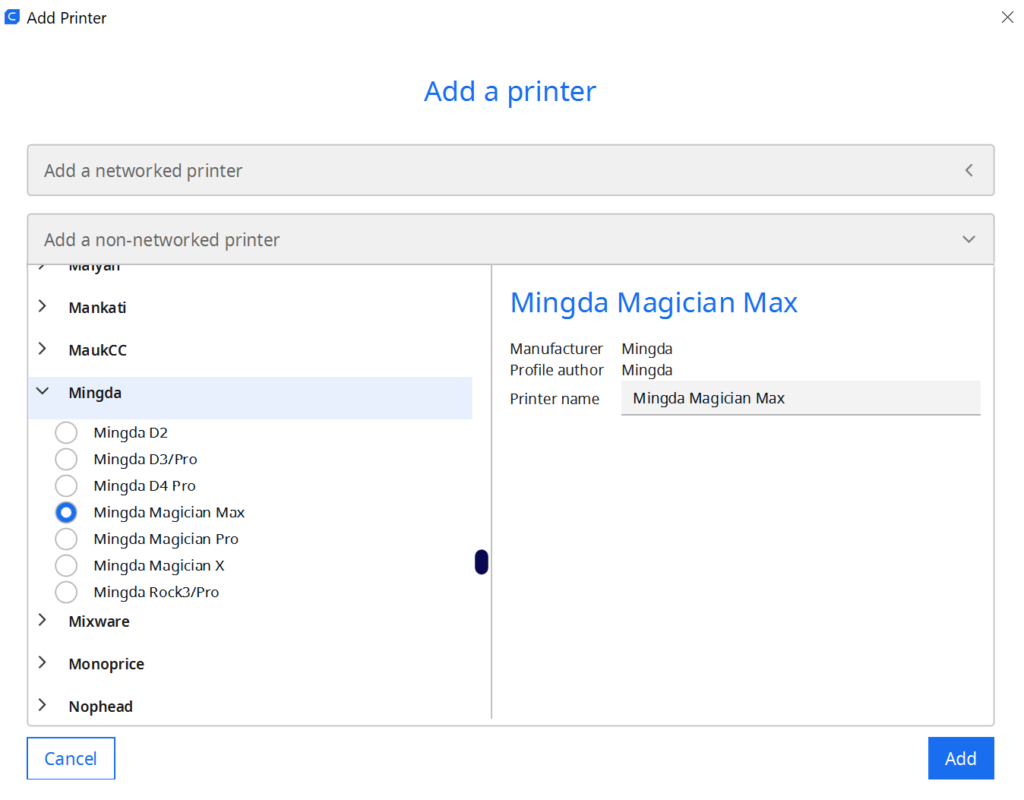
A new profile for the Magician Max can be added in Cura via the menu bar: “Settings” > “Printer” > “Add Printer…”. In the menu that opens, the Magician Max can be selected and added under Mingda.
After adding, the machine settings for the 3D printer open. These are already set correctly and you do not need to change anything here. By default, Cura then creates several profiles for the print settings with different qualities from 0.06 to 0.6 mm.
However, these print settings are sometimes not very well matched to the 3D printer and require optimization and calibration. Especially the settings for the retraction do not fit the direct drive extruder. But the retraction is also one of the print settings that should be calibrated. How you calibrate the retraction and other important settings you will learn at the end of this article after we have looked at the individual settings.
You can find more information on how to create a 3D printer profile in Cura and what you need to pay attention to in this article: How to Create a Custom 3D Printer Profile in Cura
PLA Settings at a Glance
These are the correct Cura settings for the Magician Max for PLA:
- Printing temperature: 190-200 °C
- Print bed temperature: 60 °C
- Printing speed: 50 mm/s
- Retraction: 2 mm at 60 mm/s
- Cooling: 100%
- First layer: 5-10 mm/s, 0% cooling, 100% extrusion width, 100% layer height
PLA, or polylactic acid, is one of the most popular 3D printer filaments on the market. It is made from renewable resources such as corn starch or sugar cane, making it environmentally friendly. PLA is also relatively easy to print, making it a good choice for beginners. Learn all about PLA filament in this article.
However, there are a few things you need to keep in mind to get the best results. The PLA filament needs to be heated to the right temperature so that it flows properly and adheres to the print bed. The print speed and retraction settings can also affect the final print quality. If you pay attention to these factors, you can produce high-quality prints with your PLA filament.
Since PLA is the easiest material to print and any type of extruder can handle the material, the print bed adhesion is the main issue besides the right temperatures and retraction settings. The glass print bed of the Magician Max offers a relatively good print bed adhesion for PLA. In my experience, however, the adhesion is sometimes not good enough for particularly small PLA parts.
To increase the print bed adhesion you should first reduce the print speed for the first layer to 5 to 10 mm/s. If that didn’t help you should use glue like Magigoo. Magigoo is a kind of glue stick that I tested in this article. Otherwise, you can also use a raft.
ABS Settings at a Glance
These are the correct Cura settings for the Magician Max for ABS:
- Printing temperature: 220-230 °C
- Print bed temperature: 90 °C
- Printing speed: 50 mm/s
- Retraction: 2.5 mm at 60 mm/s
- Cooling: 0% + enclosure
- First layer: 5-10 mm/s, 0% cooling, 100% extrusion width, 100% layer height
ABS is a very popular 3D printer filament thanks to its properties. ABS is very tough after printing and is well suited for mechanical applications. In this ABS Guide you will find everything you need to know about this filament.
However, a 3D printer needs certain features to be able to process the filament without errors. For example, a 3D printer must have a heated build platform to prevent deformation and ensure that the ABS adheres properly to the build platform. In addition, the extruder must reach the necessary temperatures to allow the filament to flow smoothly.
And for larger ABS objects it is important to ensure a homogeneously warm ambient temperature. The best way to achieve this for the Magician Max is with a 3D printer “tent”. This one from Creality fits well for the Magician Max.
With a slow print speed for the first layer, you should not have any major problems with print bed adhesion with the Magician Max. If you do, ABS Slurry can be used (this guide shows how to make and use it). However, if the adhesion becomes too strong and it is difficult to remove the object after printing, the combination with Blue Tape is a good idea.
TPU Settings at a Glance
These are the correct Cura settings for the Magician Max for TPU:
- Printing temperature: 210-220 °C
- Print bed temperature: 60 °C
- Printing speed: 30 mm/s
- Retraction: 3 mm at 60 mm/s
- Cooling: 100%
- First layer: 5-10 mm/s, 0% cooling, 100% extrusion width, 100% layer height
Some filaments, like TPU, are more flexible than others, which can make them more difficult to print with. Therefore, it’s important to pay close attention to print speed and retraction settings when printing with TPU. A flexible filament like TPU is more likely to clog than a stiffer filament, so it’s important to set the print speed and retraction correctly to avoid problems.
Flexible filaments are also not suitable for every 3D printer. The best results are usually achieved with a direct drive extruder. Since the Magician Max has such a direct drive extruder (and even a very good one), you will be able to achieve very good results with TPU.
The main difference between a Bowden extruder and a direct drive extruder is the distance the filament has to travel between the extruder and the nozzle. In a direct drive extruder, the extruder is directly above the nozzle. This means that the filament has to travel a shorter distance, which can be helpful if you’re printing with materials that tend to clog (like TPU). However, direct drive extruders are often heavier than Bowden extruders and print at slightly lower speeds to avoid vibrations.
Bowden extruders consist of an extruder that is far away from the nozzle and a tube that connects the two components. This design is lighter and cheaper than a direct drive extruder, but it means that the filament has to travel a longer distance, which can be a problem with flexible filaments.
While the Magician Max’s direct drive extruder is well suited for TPU, you must be careful not to use too high of a print speed. Otherwise, the flexible filament could compensate for the extrusion movements due to the flexibility, which can lead to inaccuracies.
PETG Settings at a Glance
These are the correct Cura settings for the Magician Max for PETG:
- Printing temperature: 225-245 °C
- Print bed temperature: 60-70 °C
- Printing speed: 50 mm/s
- Retraction: 1.8-2 mm at 60 mm/s
- Cooling: 50%
- First layer: 5-10 mm/s, 0% cooling, 100% extrusion width, 100% layer height
PETG is a filament that combines many of the best features of PLA and ABS. It is easy to print and produces very strong and stable end products. However, there are a few things to consider when printing with PETG. For example, retraction settings are important because PETG has a strong tendency to string.
Stringing is one of the most common problems with 3D printers. Stringing occurs when the filament gets caught on the nozzle and is pulled to the next layer or part of the object, leaving a thin plastic string.
There are a number of factors that can lead to stringing. In the case of PETG, an incorrect print temperature or retraction setting is particularly responsible for stringing. It is best to calibrate these two settings – more on this later.
However, the above values are a good start for further optimizations. If you can’t get the stringing completely under control, you can try a few other tricks to reduce it. For example, you can reduce the movements without extrusion or increase the speed of these movements to give the filament even less chance to pull threads.
Lastly, cooling is important with PETG. With some PETG filaments, it is ok to leave the cooling at 100%. However, this can often lead to cracks or other print defects. With most PETG filaments I have done well with 50% cooling. Sometimes it is necessary to turn it off completely to avoid such printing errors. But you don’t need a closed print volume like with ABS – only too much cooling or cold air currents can be disturbing with PETG.
Best Cura Settings for the Magician Max
Now that you have a rough overview of which print settings for which filament lead to good results with the Magician Max, we will now go into detail about the individual settings.
Since every 3D printer is slightly different, uses a different extruder or a different print bed, these settings can sometimes differ greatly from each other. Even with 3D printers of the same model, there may be slight differences, so you can interpret the given values as rough guidelines. With my Magician Max they led to good results.
Printing Temperature
The best printing temperatures for the Magician Max in Cura:
- PLA: 190-200 °C
- ABS: 220-230 °C
- TPU: 210-220 °C
- PETG: 225-245 °C
The Magician Max reaches printing temperatures of 260 °C. This means that it can process all common standard filaments without any problems. It is often the case with hobby 3D printers that they have a PTFE heatbreak between the nozzle and the extruder. However, since PTFE slowly dissolves above 240 °C and even emits toxic gases, such 3D printers are often not suitable for certain filaments such as PETG. This is not the case with the Magician Max – you can print at such high temperatures without hesitation.
The print temperature is one of the most important print settings of any 3D printer. If it is set incorrectly, this can lead to various printing errors. Examples are stringing or blobs at too high temperatures or bad layer adhesion at too low temperatures. Therefore, some trial and error is always necessary to find the perfect print temperature.
If you have problems with print bed adhesion, you can set the print temperature for the first layer slightly higher than for the following layers. This will keep the filament hotter on the print bed for longer and allow it to bond better to the print bed.
Print Bed Temperature
The best print bed temperatures for the Magician Max in Cura:
- PLA: 60 °C
- ABS: 90 °C
- TPU: 60 °C
- PETG: 60-70 °C
For your object to stick to the print bed, the bed must be warm enough. If the temperature is too low, your object will deform and detach from the bed. But if the temperature is too high, you’ll end up with an elephant’s foot – the first layer will widen. So you have to find the right balance.
Fortunately, it is much easier to find the correct value for the print bed temperature than for the printing temperature. Calibration is not necessary here, as the values that are given above usually work.
The Magician Max can reach a maximum print bed temperature of 110 °C, which makes it suitable for a lot of filaments. The only drawback with its large print bed is that the homogeneity of the temperature distribution is not quite as good. In my practical test of the Magician Max, I measured the temperature at several points on the print bed. The deviations are sometimes quite large and could lead to problems with large objects. But I couldn’t find such problems in my test and in case of doubt you can always increase the print bed adhesion by other methods.
Printing Speed
The best printing speed for the Magician Max in Cura:
- PLA: 50 mm/s
- ABS: 50 mm/s
- TPU: 30 mm/s
- PETG: 50 mm/s
Due to the relatively large direct drive extruder, the Magician Max only reaches moderate print speeds of 40 to 60 mm/s. For most filaments, I have done well with 50 mm/s. With TPU, however, you should reduce the print speed even further to increase accuracy and avoid stringing.
If you are looking for an extremely fast 3D printer, you can also check out my hands-on review of the FLSUN Super Racer. This Delta 3D printer reaches very high speeds of 100 to 200 mm/s, which is 2-4 times faster than the Magician Max!
Layer Height
The best layer heights for the Magician Max in Cura:
- Decorative objects: 0.1-0.15 mm
- Standard: 0.2 mm
- Coarse, fast prints: 0.3-0.6 mm
Because the Magician Max has a very reproducible extrusion, it also achieves high accuracy. Layer heights of 0.1 mm are easy for this 3D printer. With well-calibrated print settings, you can reduce the layer height even further.
If you are printing mainly decorative objects, the Magician Max is a good choice – especially if you want to print large objects. If you want to save some printing time, you can also increase the layer height. For standard objects, 0.2 mm is best, for coarse and faster prints you can increase the layer height even more.
Flow Rate
The best flow rate for the Magician Max in Cura:
- Default value: 100%
- For over-extrusion: 90% to 99
- For under-extrusion: 101% to 110%.
Ideally, the flow rate should not deviate from 100%. But if you notice over- or under-extrusion and can’t get it under control with the other print settings, adjusting the flow rate may be just the thing to combat it. Therefore, the flow rate is also one of the print settings that should be calibrated in any case.
You can also increase the flow rate for the first layer only to create a stronger print bed adhesion. Be careful not to make the first layer too thick so you don’t artificially create an elephant foot.
Retraction
The best retraction settings for the Magician Max in Cura:
- PLA: 2 mm at 60 mm/s
- ABS: 2.5 mm at 60 mm/s
- TPU: 3 mm at 60 mm/s
- PETG: 1.8-2 mm at 60 mm/s
The retraction settings depend on the extruder used. The retraction distance is much shorter for direct drive extruders than for Bowden extruders. With the Magician Max, values of 2-3 mm for the retraction distance have proven themselves. These values are very different from the values given in the standard Cura profile. This is relatively unusual and underlines the urgency of calibration for this setting.
If the retraction is not set correctly, stringing is the first error that appears. If the values are very suboptimal, then there will be cracks or blobs, depending on the direction in which the values are set incorrectly. If the retraction distance and the retraction speed are set perfectly, you will get the best printing results.
Infill
The best infill density for the Magician Max in Cura:
- Decorative objects: 0-15%
- Standard objects: 15-50%
- Sturdy objects: 50-100%
Depending on the purpose of your print object, a different infill density is appropriate. If the object has only a decorative purpose, densities from 0 to 15% are appropriate. This will save you a lot of time and filament.
For standard objects, I use about 20% and even more depending on the application. If the object or a part of the object should serve a mechanical purpose, you should fill the object or this part with 50 to 100% infill.
In addition to the density, the pattern of the infill also influences the stability of the object.
High stability (for sturdy objects):
- Cubic
- Cubic Subdivision
- Octet
- Gyroid
Medium stability (for standard objects):
- Grid
- Triangles
- Tri-Hexagon
Low stability (for decorative objects):
- Lines
- Zigzag
- Lightning
First Layer
These are the best Cura settings for the first layer on the Magician Max:
- Layer height: 100-200% of normal layer height (higher values to increase print bed adhesion)
- Line width: 100-200% of normal line width (higher values to increase print bed adhesion)
- Print temperature: Same as the rest of the object or 5-10 °C higher for better print bed adhesion.
- Print speed: 50% of normal print speed (i.e. 25 mm/s for a normal print speed of 50 mm/s) or 5-10 mm/s for high print bed adhesion
- Flow rate: 100-110% (higher values in case of poor print bed adhesion)
There are many changes you can make to the first layer of your 3D print to increase print bed adhesion. Each of the methods shown above is aimed at increasing the time it takes for the filament to cool. The longer the filament stays warm, the better it can bond to the bed.
As far as prioritizing these methods, I personally start by decreasing the print speed and then increasing the layer height as needed.
How to Calibrate the Cura Settings for the Magician Max
The most important print settings for the Magician Max are the print temperature, the flow rate and the retraction. You should calibrate these three settings when you use the 3D printer for the first time and even if you have used the values from this article. They can also differ between different filaments of the same type.
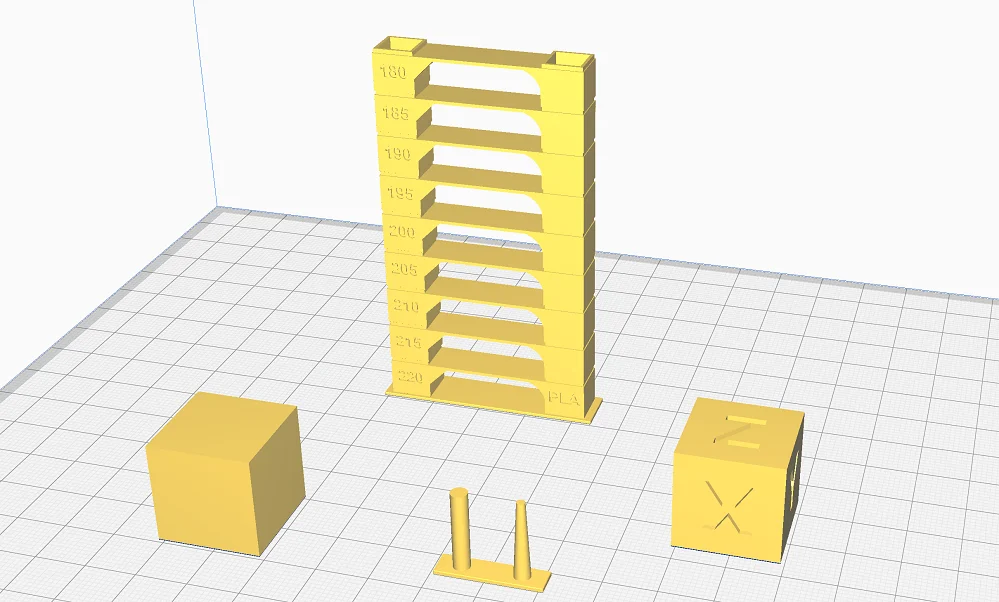
To calibrate these three settings you can use certain calibration objects. You can find these objects on portals like Thingiverse or in the Calibration Shapes plugin in Cura.

Read the full calibration guide:
3D Printer Calibration: Step-by-Step to Perfect Results
How to Calibrate the Printing Temperature of the Magician Max
I prefer to calibrate the print temperature with a temperature tower. This is an object that consists of several levels. Each level is printed at a different temperature. So you can see at the end at which temperature the best results were achieved.
How to Calibrate the Flow Rate of the Magician Max
To calibrate the flow rate, compare the line width you set in the slicer with the real line width printed by your 3D printer. I prefer to use a hollow cube with two outer walls and no top layers. This way I can easily measure the wall thickness with a caliper after printing.
If the measured value (divided by the number of walls) does not match the value in the slicer, I need to adjust the flow rate up or down a bit.
Caution: The flow rate is coupled with other print settings such as the print temperature. Therefore, a change in one of these print settings may slightly affect the other. You may therefore need to repeat the calibration of these print settings more than once to find the perfect values – especially if large adjustments are necessary.
How to Calibrate the Retraction of the Magician Max
With a properly calibrated retraction, you can weed out many of the most common printing errors like stringing. Fortunately, calibrating these print settings is relatively easy. My favorite way to do this is to use the two small columns from the Calibration Shapes plugin in Cura. This object prints within a few minutes and the stringing phenomenon is immediately apparent with the wrong settings.
Conclusion
Finding the right Cura settings is often not that easy. Especially beginners are often overwhelmed with the many settings in Cura and do not know which of them are important and which are not.
In this article, you have seen a very good basis for your Cura profile for the Magician Max. However, it is important that you make further optimizations from these values if you are not yet completely satisfied with the results.
Since different filaments of the same type may require different print settings, it is unlikely that the values given here will work perfectly for you. However, as you have hopefully seen, calibrating these settings is not too difficult, so it won’t take you long to achieve perfect printing results!
Disclosure: This website is the property of Martin Lütkemeyer and is operated by Martin Lütkemeyer. Martin Lütkemeyer is a member of the Amazon Services LLC and other Affiliate Programs. These are affiliate advertising programs designed to enable websites to earn advertising revenue through advertising and linking to Amazon.com and others. Links marked with * are affiliate links.
