
- Wet Filament: Prevention, Symptoms & Drying - July 18, 2024
- Sovol SV08 – Best PrusaSlicer Settings & Profile - June 26, 2024
- Sovol SV08 – Best Orca Slicer Settings & Profile - June 26, 2024
Disclosure: Links marked with * are Affiliate Links. I earn from qualifying purchases if you decide to make a purchase through these links – at no additional cost for you!
While the Elegoo Neptune 3 Pro is a perfect entry-level 3D printer and also worthwhile for professionals, perfect print quality cannot be achieved without the right slicer settings.
To find the correct Cura settings for the Neptune 3 Pro, the settings can be copied from the Elegoo Slicer. Besides the machine settings, the print temperature and the retraction are essential. For perfect results, the most important settings should be calibrated.
In this article, you will find the best Cura settings for the Neptune 3 Pro. They are based on my extensive test and should give you a good start. I’ll also show you how to calibrate the most essential settings to produce perfect results without printing errors in this article.
| PLA | ABS | TPU | PETG | |
|---|---|---|---|---|
| Printing temperature | 200 °C | 250 °C | 215 °C | 230 °C |
| Print bed temperature | 60 °C | 90 °C | 60 °C | 60 °C |
| Print speed | 60 mm/s | 60 mm/s | 30 mm/s | 50 mm/s |
| Retraction | 2.5 mm at 20 mm/s | 2.5-3.0 mm at 20-30 mm/s | 3.5 mm at 25 mm/s | 2.5 mm at 20 mm/s |
| Cooling | 100% | 0% + enclosure | 100% | 50-100% |

Calibrated Cura Profile
For optimal print quality with minimal effort, you can download my calibrated Cura profile for this 3D printer and import it directly into Cura. All settings are perfectly adapted to this printer, e.g. the accelerations, jerk, supports and the first layer.
Table of Contents:
How to Create a Cura Profile for the Neptune 3 Pro
The settings for a 3D printer in Cura are divided between the machine settings and the actual print settings.
The machine settings describe the hardware of the 3D printer, i.e., among other things, the dimensions of its print volume or the print head.
The print settings contain specific settings that have to be adjusted for the respective 3D printer and the filament used. These include, for example, the print temperature, the layer height or the retraction.
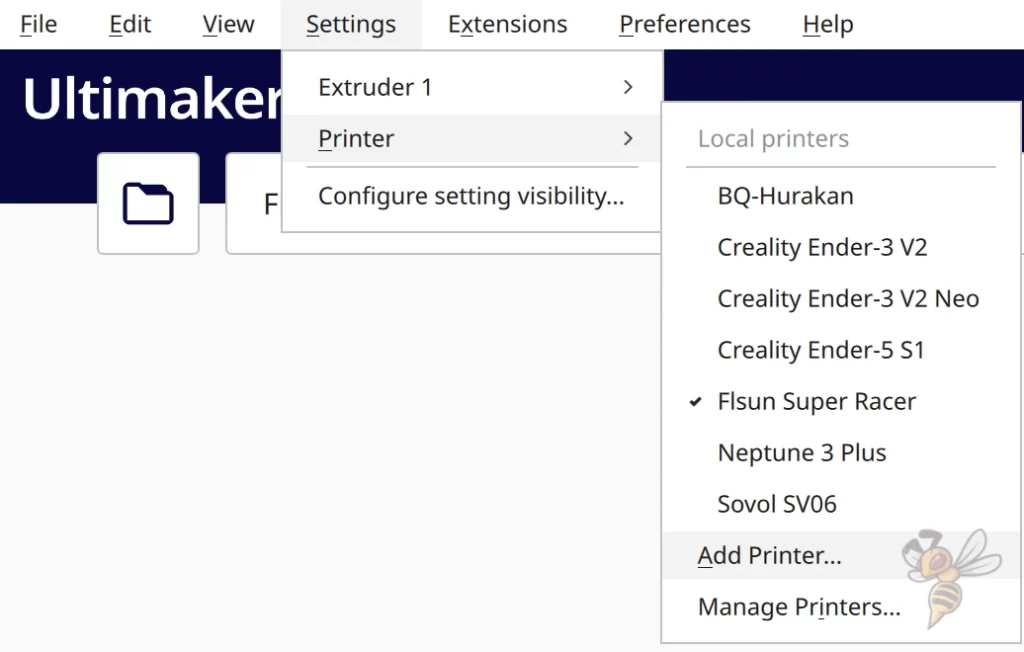
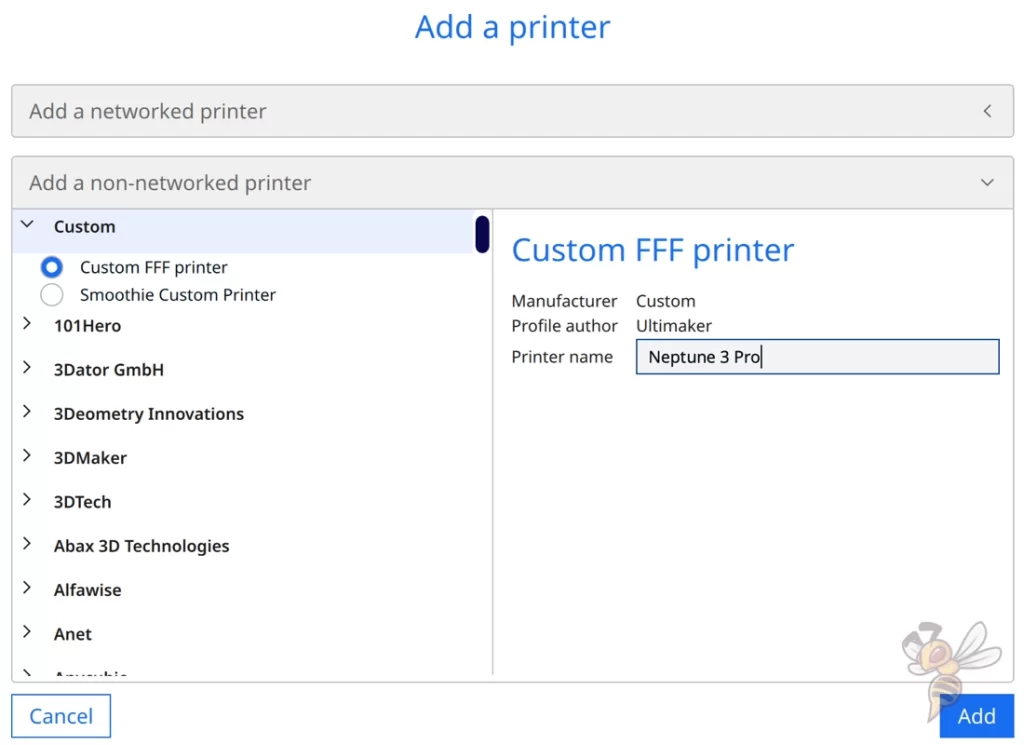
To create an empty profile for the Neptune 3 Pro in Cura, go to “Settings” > “Printer” > “Add Printer” in the menu. Then a menu opens with a dropdown selection of different manufacturers. But here you go to “Custom” > “Custom FFF printer”. Name the new printer Neptune 3 Pro and press “Add”.
Cura then generates a 3D printer profile with default settings that are not ideal for the Neptune 3 Pro. Therefore, we need to adjust both the machine settings and the print settings themselves.
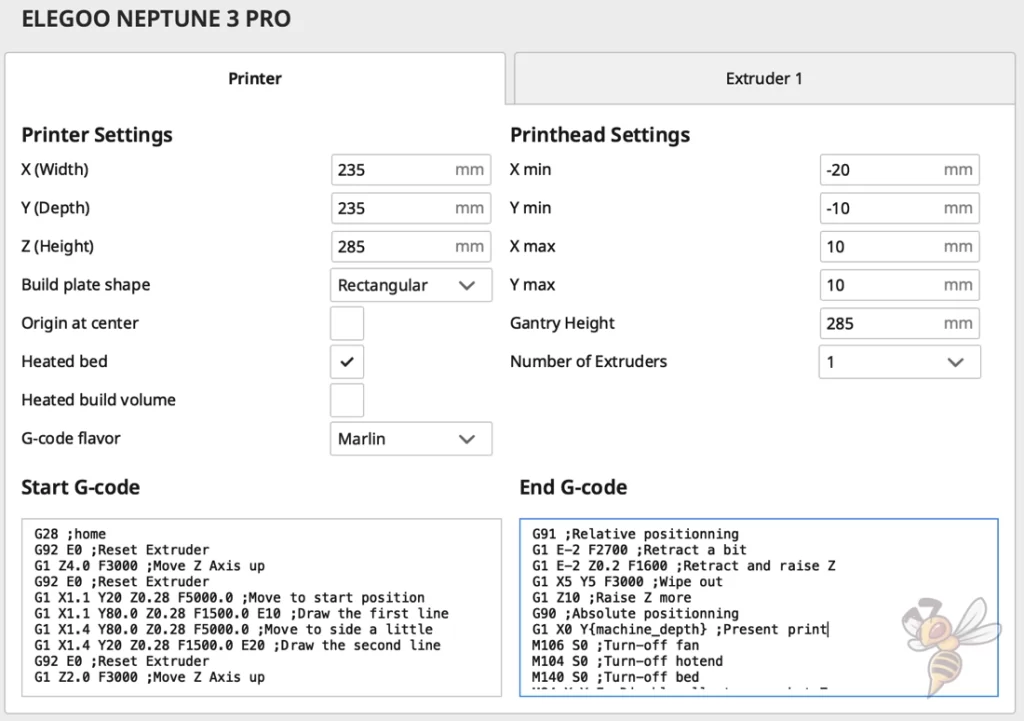
First, we take care of the machine settings for the Neptune 3 Pro. We can conveniently copy these from the Elegoo Slicer. Otherwise, we would have to measure the print head and define the G-code snippets ourselves.
In addition to the 3D printer hardware properties, the machine settings include G-code snippets to be executed at the beginning and end of each print.
This is the launch G-code for the Neptune 3 Pro:
- G28 ;home
- G92 E0 ;Reset extruder
- G1 Z4.0 F3000 ;Move Z Axis up
- G92 E0 ;Reset extruder
- G1 X1.1 Y20 Z0.28 F5000.0 ;Move to start position
- G1 X1.1 Y80.0 Z0.28 F1500.0 E10 ;Draw the first line
- G1 X1.4 Y80.0 Z0.28 F5000.0 ;Move to side a little
- G1 X1.4 Y20 Z0.28 F1500.0 E20 ;Draw the second line
- G92 E0 ;Reset extruder
- G1 Z2.0 F3000 ;Move Z Axis up
And here is the end G-code:
- G91 ;Relative positioning
- G1 E-2 F2700 ;Retract a bit
- G1 E-2 Z0.2 F1600 ;Retract and raise Z
- G1 X5 Y5 F3000 ;Wipe out
- G1 Z10 ;Raise Z more
- G90 ;Absolute positioning
- G1 X0 Y{machine_depth} ;Present print
- M106 S0 ;Turn-off fan
- M104 S0 ;Turn-off hotend
- M140 S0 ;Turn-off bed
- M84 X Y E ;Disable all steppers but Z
After entering the appropriate machine settings, we can now adjust the print settings to the Neptune 3 Pro.
It is best to set the view of the settings to “All” in the menu so that you can really see all the settings. This can be a bit confusing and overwhelming at first, as there really are a lot of settings in Cura.
However, we don’t need to adjust most of them because they are independent of the 3D printer and the filament. The most important settings that need to be adjusted for the Neptune 3 Pro are the print temperature, the print bed temperature, the print speed, the retraction and some settings for the first layer.
Before we look at each setting in detail, I’ll show you the best settings for the Neptune 3 Pro for the four standard filaments.
You can find more information on how to create a 3D printer profile in Cura and what you need to pay attention to in this article: How to Create a Custom 3D Printer Profile in Cura
PLA Settings
These are the correct Cura settings for the Neptune 3 Pro for PLA:
- Print temperature: 200 °C
- Print bed temperature: 60 °C
- Printing speed: 60 mm/s
- Retraction: 2.5 mm at 20 mm/s
- Cooling: 100%
- First layer: 5-10 mm/s, 0% cooling, 100% extrusion width, 100% layer height
Every FDM 3D printer can process PLA. It does not matter which extruder the device has or which print bed. However, due to the very accurate direct drive extruder and the excellent adhesion provided by the PEI print bed, it is easy to achieve perfect PLA results with the Neptune 3 Pro.
I tested the Neptune 3 Pro mainly with Eryone PLA, but also with two PLA filaments from other manufacturers. No matter which filament I worked with, the perfect printing temperature was 200 °C.
However, you may be a few degrees off from the perfect temperature, so the print temperature should always be calibrated. You’ll learn how to do that later in this article.
The Neptune 3 Pro gives you a wide range of print bed temperatures. The PEI print bed creates such great adhesion that you can use a wide range of temperatures with PLA without compromising print bed adhesion.
As a general rule, you should increase the print bed temperature until you notice the first signs of an elephant foot. Then the temperature is too high.
The retraction is also one of the most important settings that you have to adjust to the respective printer and the filament used. The direct drive extruder of the Neptune 3 Pro works very precisely and reproducible. Therefore, it is relatively easy to calibrate the retraction. The values given above should give you a good starting point.
ABS Settings
The Neptune 3 Pro is perfectly suited for the standard filaments PLA, TPU and PETG. It can also process ABS excellently. However, there is one significant detail with ABS: It contracts strongly if it cools down too quickly.
This effect becomes so strong, especially with larger or taller objects, that the object can warp or detach from the print bed during printing. So, without any further precautions, you can print ABS objects that are small enough even without printing errors with the Neptune 3 Pro.
Otherwise, you need a suitable enclosure for the 3D printer. There are suitable “3D printer tents”, like this one from Creality. I have already had good experiences with it and was able to print ABS flawlessly.
Otherwise, you have to be aware that the Neptune 3 Pro’s hot end is not completely made of metal. It still has a PTFE tube installed, which starts to slowly dissolve at 240 °C and emit toxic fumes. Since ABS does this during printing as well, you don’t really need to worry much about this since you will be operating the printer in a well-ventilated room anyway and won’t be there during printing.
However, this means you will have to replace the PTFE tube regularly if you want to print frequently at such high temperatures.
TPU Settings
These are the correct Cura settings for the Neptune 3 Pro for TPU:
- Print temperature: 215 °C
- Print bed temperature: 60 °C
- Printing speed: 30 mm/s
- Retraction: 3.5 mm at 25 mm/s
- Cooling: 100%
- First layer: 5-10 mm/s, 0% cooling, 100% extrusion width, 100% layer height
TPU can be printed perfectly with the direct drive extruder of the Neptune 3 Pro. However, there are a few important things to keep in mind when printing with TPU.
TPU is flexible and can partially compensate for the movements of the extruder. This leads to inaccuracies in the extrusion. Therefore, direct drive extruders are, among other things, better suited for flexible filaments than Bowden extruders, since the path between the extruder and the nozzle is shorter. On this short path, the flexible filament can only compensate for the movements to a small extent.
Nevertheless, you have to reduce the printing speed drastically to reduce this compensation even further. The faster you print, the faster the extruder movements and thus the compensation due to the flexibility of the filament.
No matter what 3D printer I use, I always start at 30 mm/s for TPU and try to increase after that when I have minimized all printing errors.
Another print setting that relates to the speed of the extruder movements is the retraction. It usually differs from the retraction settings for rigid filaments. The above values should give you a good starting point for further optimization for most TPU filaments.
PETG Settings
These are the correct Cura settings for the Neptune 3 Pro for PETG:
- Print temperature: 230 °C
- Print bed temperature: 60 °C
- Printing speed: 50 mm/s
- Retraction: 2.5 mm at 20 mm/s
- Cooling: 50-100%
- First layer: 5-10 mm/s, 0% cooling, 100% extrusion width, 100% layer height
PETG is a very popular filament when it comes to mechanical or outdoor applications. It is relatively easy to print and extremely robust at the same time. The Neptune 3 Pro can also process PETG excellently.
The problem with PETG is that it tends to string strongly (click here for the PETG Stringing Guide). Therefore, the calibration of the printing temperature and the retraction is urgently necessary for this filament.
The above values will most likely result in stringing at the beginning. I will show you how to calibrate these two print settings at the end of the article. Basically, you try to change the settings in small steps and observe the effects on the result. This way you can get closer to the perfect value with small steps.
Since PETG is also printed at relatively high temperatures, you will also have issues with the PTFE tube in the hotend over time. Remember to ventilate the room well and check the PTFE tube regularly and replace it if necessary.
As far as cooling is concerned, PETG filaments sometimes differ drastically among themselves. Some require a cooling rate of 100%, others only produce good results with less cooling. A little experimentation is therefore also required here.
Best Cura Settings for the Neptune 3 Pro
Print Temperature
The best print temperatures for the Neptune 3 Pro in Cura:
- PLA: 200 °C
- ABS: 250 °C
- TPU: 215 °C
- PETG: 230 °C
The hotend of the Neptune 3 Pro works very precisely, which is why the settings of the perfect temperature for the respective filaments are found relatively quickly. A print temperature that is not set correctly, causes various printing errors.
If the printing temperature is set too low, under-extrusion, poor layer adhesion or poor print bed adhesion may occur.
If the printing temperature is set too high, over-extrusion, stringing or, in extreme cases, blobs may occur.
Therefore, the printing temperature is one of the most important settings and must be recalibrated for each filament to achieve perfect results.
Print Bed Temperature
The best print bed temperatures for the Neptune 3 Pro in Cura:
- PLA: 60 °C
- ABS: 90 °C
- TPU: 60 °C
- PETG: 60 °C
To ensure that the first layer adheres well to the print bed, the print bed temperature must be set correctly.
Due to the good adhesion of the PEI print bed, you have a wide range for the print bed temperature with the Neptune 3 Pro. Even if the print bed temperature is far below the recommended values, you will probably still be able to achieve good adhesion.
It is therefore relatively easy to avoid an elephant foot with the Neptune 3 Pro. Elephant foot often occurs when the print bed temperature is set too high. The bottom layer is then too liquid, flows more quickly to the side and is squashed by the layers above it.
If you still have problems with print bed adhesion, the first thing you should try is to reduce the print speed for the first layer. This will give the filament more time to bond to the print bed before it cools down. Otherwise, there are always tools like special 3D printing adhesives.
Print Speed
The best printing speed for the Neptune 3 Pro in Cura:
- PLA: 60 mm/s
- ABS: 60 mm/s
- TPU: 30 mm/s
- PETG: 50 mm/s
Due to its stable construction and relatively light print head, the Neptune 3 Pro can achieve relatively high print speeds compared to similar 3D printers. Typically, it reaches 60 mm/s with rigid filaments without generating print errors.
The higher you set the print speed, the more often vibrations occur when the print head changes its direction of movement. These vibrations are reproduced on the printed object by printing errors such as ringing or ghosting.
So, the rule of thumb with this 3D printer is also that you can increase the speed significantly for coarse prints where surface quality is secondary, and you need to decrease it if quality is important.
Flexible filaments are a special case here as well. The Cura settings for flexible filaments such as TPU are sometimes very different from those for rigid filaments. In addition to retraction, the printing speed must also be changed drastically.
For flexible filaments, the ideal printing speed is about half that of rigid filaments.
Layer Height
The best layer heights for the Neptune 3 Pro in Cura:
- Decorative objects: 0.12 mm
- Standard: 0.20 mm
- Rough, fast prints: 0.28 mm
In 3D printing, the layer height defines how smooth the surface of the finished object will be. The smaller the layer height, the finer the surface.
For decorative objects, smaller layer heights are ideal, and for objects where the surface quality is only secondary, larger layer heights can save you a lot of time.
The thinner the layers are, the longer the printer needs to print the individual layers. The printing speed does not change when the layer height is changed. A layer still takes the same amount of time, even if the layer height is changed.
A change in the layer height thus has a very large influence on the printing time.
Flow Rate
The best flow rate for the Neptune 3 Pro in Cura:
- Default value: 100%
- For over-extrusion: 90% to 99
- For under-extrusion: 101% to 110%.
The flow rate is always 100% by default. It determines how much filament is extruded per second. Higher values will extrude more filament, lower values will extrude less filament.
In most cases, you do not need to change the flow rate. However, it can help to control certain printing errors. It is also one of the settings that must be calibrated.
Retraction
The best retraction settings for the Neptune 3 Pro in Cura:
- PLA: 2.5 mm at 20 mm/s
- ABS: 2.5-3.0 mm at 20-30 mm/s
- TPU: 3.5 mm at 25 mm/s
- PETG: 2.5 mm at 20 mm/s
Retraction is one of the most important settings in 3D printing. Because it has such a big impact on the print result, it is often a source of frustration for beginners. Finding the right settings for the particular printer and filament used is sometimes not easy.
If the retraction is set incorrectly, many printing errors can occur. If the retraction is too low, the classic print error that occurs is stringing, which is the dragging of fine filament hairs between two parts of the object.
But values that are too high can also produce printing errors. Holes can then occur at the transition between two layers, among other things.
The above values are a good basis for good results with the Neptune 3 Pro. In most cases, however, you will not achieve perfect results. A calibration of the retraction is absolutely necessary if you want to eliminate printing errors. More about this at the end of the article.
Infill
The best infill density for the Neptune 3 Pro in Cura:
- Decorative objects: 0-15%
- Standard objects: 15-50%
- Stable objects: 50-100%
The structure inside a 3D-printed object is called infill. The two most important settings for the infill are the infill density and the pattern.
The higher the density inside the object, the more stable it becomes. But the pattern also has an influence on the stability and the printing speed. Most patterns for high stability take a little longer to print.
High stability (for stable objects):
- Cubic
- Cubic subdivision
- Octet
- Gyroid
Medium stability (for standard objects):
- Grid
- Triangles
- Tri-Hexagon
Low stability (for decorative objects):
- Lines
- Zigzag
- Lightning
First Layer
These are the best Cura settings for the first layer on the Neptune 3 Pro:
- Layer height: 100-200% of normal layer height (higher values to increase print bed adhesion)
- Line width: 100-200% of normal line width (higher values to increase print bed adhesion)
- Print temperature: Same as the rest of the object or 5-10 °C higher for better print bed adhesion.
- Print speed: 50% of normal print speed (i.e. 30 mm/s for a normal print speed of 60 mm/s) or 5-10 mm/s for high print bed adhesion
- Flow rate: 100-110% (higher values in case of poor print bed adhesion)
- Raft/Brim/Skirt: Not necessary, as the Neptune 3 Pro has a PEI print bed and already extrudes a line at the edge of the print bed due to the Start G-Code.
Thanks to the PEI print bed of the Neptune 3 Pro, it is easy to get a good first layer. The print bed adhesion is so good that you don’t need to tweak the settings in Cura much.
If you still have problems, the above values can help you. Especially, lowering the printing speed for the first layer should be emphasized. The slower the first layer is printed, the better the print bed adhesion.
How to Calibrate the Cura Settings for the Neptune 3 Pro
Although the Cura settings for the Neptune 3 Pro given in this article will give you good results, you will only get perfect results without printing errors if you calibrate the most important settings.
These settings definitely include print temperature, flow rate and retraction.
Calibration is about adjusting the respective value in small steps and observing the print result. Depending on whether the result is better or worse, you change the value in one direction or the other. In this way, you can approach the perfect result step by step.

Read the full calibration guide:
3D Printer Calibration: Step-by-Step to Perfect Results

3D printing can be difficult – especially in the beginning. Many beginners struggle with print errors, poor print bed adhesion, or don’t know how to properly set up the slicer.
That’s why I created an online course to get everyone up to my expert level and as quickly as possible.
The course covers everything you need to know about FDM 3D printing to get perfect results every time. Click the link below to learn more about the content and what to expect (and don’t worry: there are no tests! Learn at your own pace, completely stress-free).
How to Calibrate the Print Temperature
To calibrate the print temperature, it is best to use a temperature tower. You can find such objects on most portals like Thingiverse.
But there is also a handy plugin in Cura, the “Calibration Shapes Plugin”. In this plugin, you will find a suitable calibration object for all essential settings.
The temperature tower consists of several layers that are printed at different temperatures. You can see directly after printing at which temperature the least printing errors appear.
How to Calibrate the Flow Rate
If the flow rate is set incorrectly, too much or too little filament will be extruded. The result is that the printed lines are either too thin or too thick. To check this, you can compare the actual printed line width with the theoretical one in the slicer.
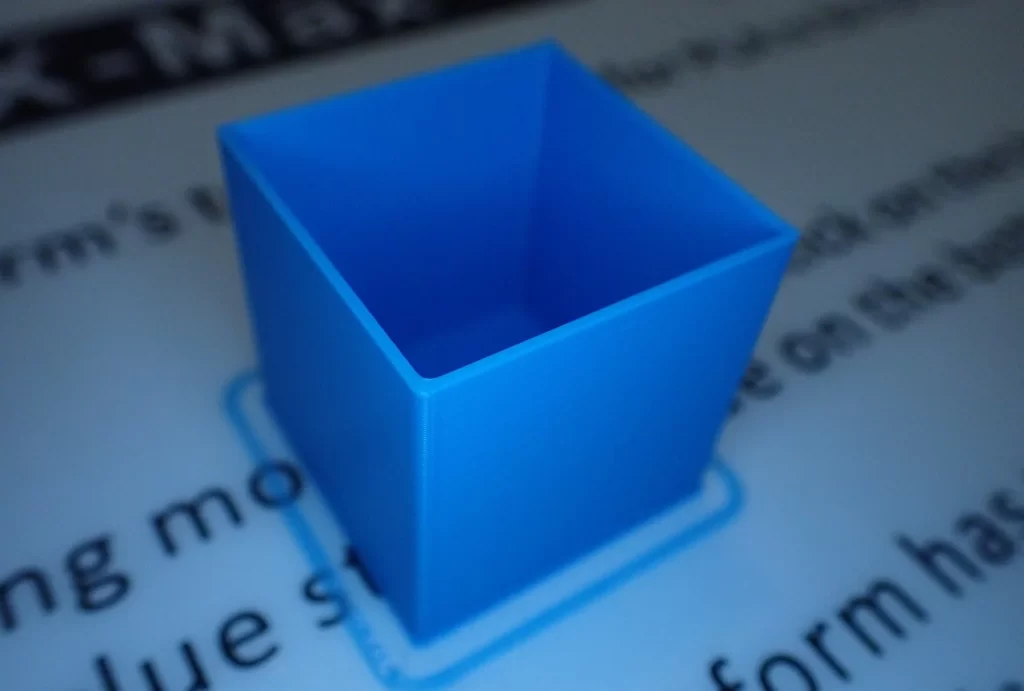
I prefer to do this with a hollow cube, where I measure the wall thickness with a caliper after printing. Change the flow rate in small steps until the actual value matches the theoretical value in Cura.
How to Calibrate the Retraction
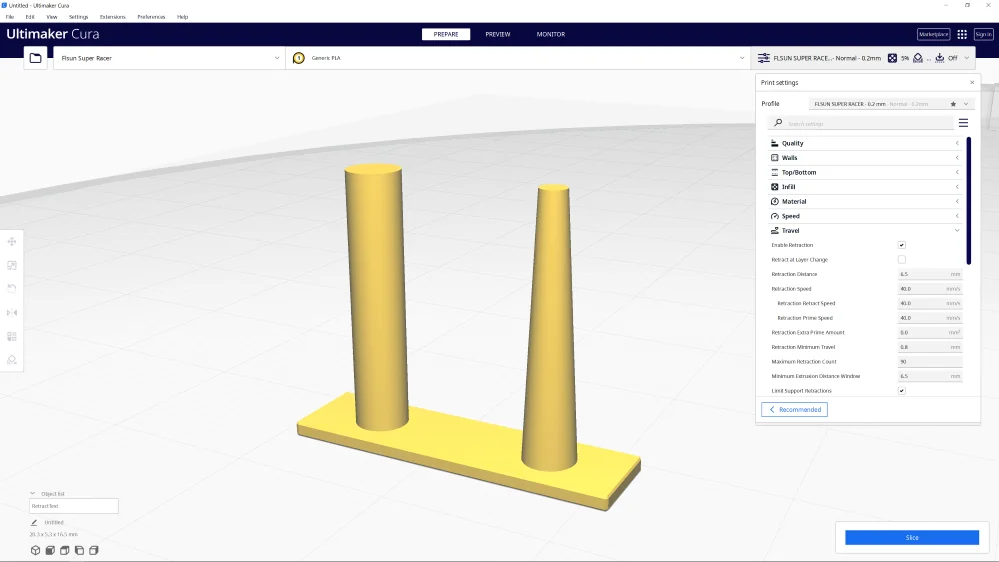
To get certain printing errors such as stringing under control, it is essential to calibrate the retraction. The goal here is to adjust the retraction distance and retraction speed in small steps and to see if this improves or worsens stringing.
Here, too, there are various suitable calibration objects. Similar to a temperature tower, there is also a retraction tower. However, I prefer to use the much smaller objects from the Calibration Shapes Plugin.
These two columns are printed within a few minutes, allowing you to quickly find the right retraction settings.
Conclusion
The Neptune 3 Pro is a really great 3D printer. You will have a lot of fun with it. However, this requires the necessary Cura settings that you learned in this article.
But always remember that you probably won’t get “perfect” results with these settings. Only after a calibration can you eliminate all printing errors.
Disclosure: This website is the property of Martin Lütkemeyer and is operated by Martin Lütkemeyer. Martin Lütkemeyer is a member of the Amazon Services LLC and other Affiliate Programs. These are affiliate advertising programs designed to enable websites to earn advertising revenue through advertising and linking to Amazon.com and others. Links marked with * are affiliate links.
