
- Wet Filament: Prevention, Symptoms & Drying - July 18, 2024
- Sovol SV08 – Best PrusaSlicer Settings & Profile - June 26, 2024
- Sovol SV08 – Best Orca Slicer Settings & Profile - June 26, 2024
Disclosure: Links marked with * are Affiliate Links. I earn from qualifying purchases if you decide to make a purchase through these links – at no additional cost for you!
The BQ-Hurakan oder BIQU-Hurakan uses Klipper as firmware and an accelerometer, which increases the print quality. However, you still need the right print settings to benefit from it.
To create a Cura profile for the BQ-Hurakan, the standard profile of the Biqu B1 can be used and adapted. Besides a few of the machine settings, various print settings must also be adjusted.
How to do all this and which Cura settings are best for the BQ-Hurakan, you will learn in this article. For a quick start, here is an overview table for the recommended values for the most important standard filaments.
| PLA | ABS | PETG | |
|---|---|---|---|
| Printing temperature | 200-205 °C | 240-245 °C | 240-250 °C |
| Print bed temperature | 60 °C | 90 °C | 70 °C |
| Print speed | 60 mm/s | 60 mm/s | 60 mm/s |
| Retraction | 4 mm at 100 mm/s | 4 mm at 90 mm/s | 3-4 mm at 80-100 mm/s |
| Cooling | 100 % | 0% + enclosure | 50-100 % |

Calibrated Cura Profile
For optimal print quality with minimal effort, you can download my calibrated Cura profile for this 3D printer and import it directly into Cura. All settings are perfectly adapted to this printer, e.g. the accelerations, jerk, supports and the first layer.
Table of Contents:
Creating a Profile for the BQ-Hurakan in Cura
The easiest way to create a Cura profile for the BQ-Hurakan is to use the default profile of the Biqu 1, rename it and adjust a few machine settings to the BQ-Hurakan.
These are the steps to do this in Cura:
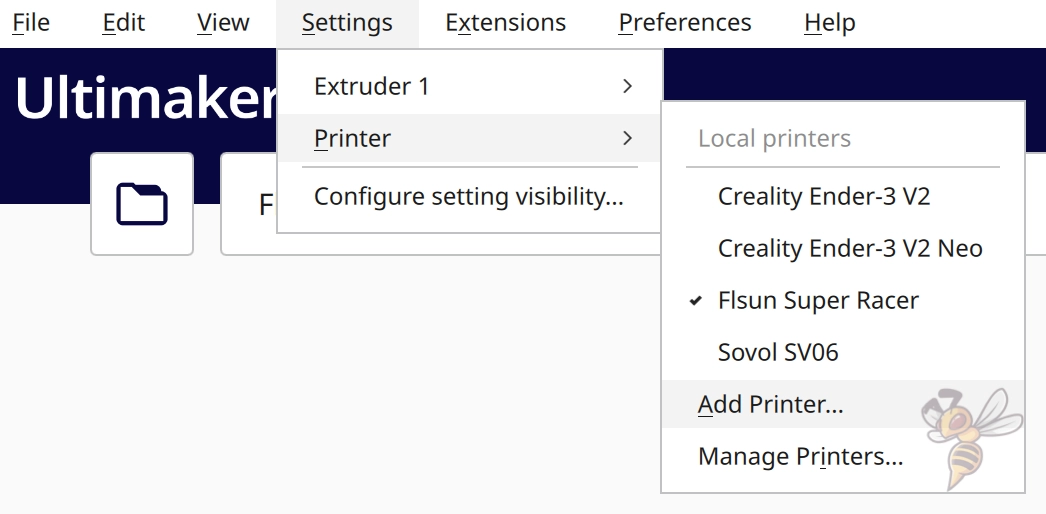
- Click on “Settings” > “Printers” > “Add printer” in the menu bar.
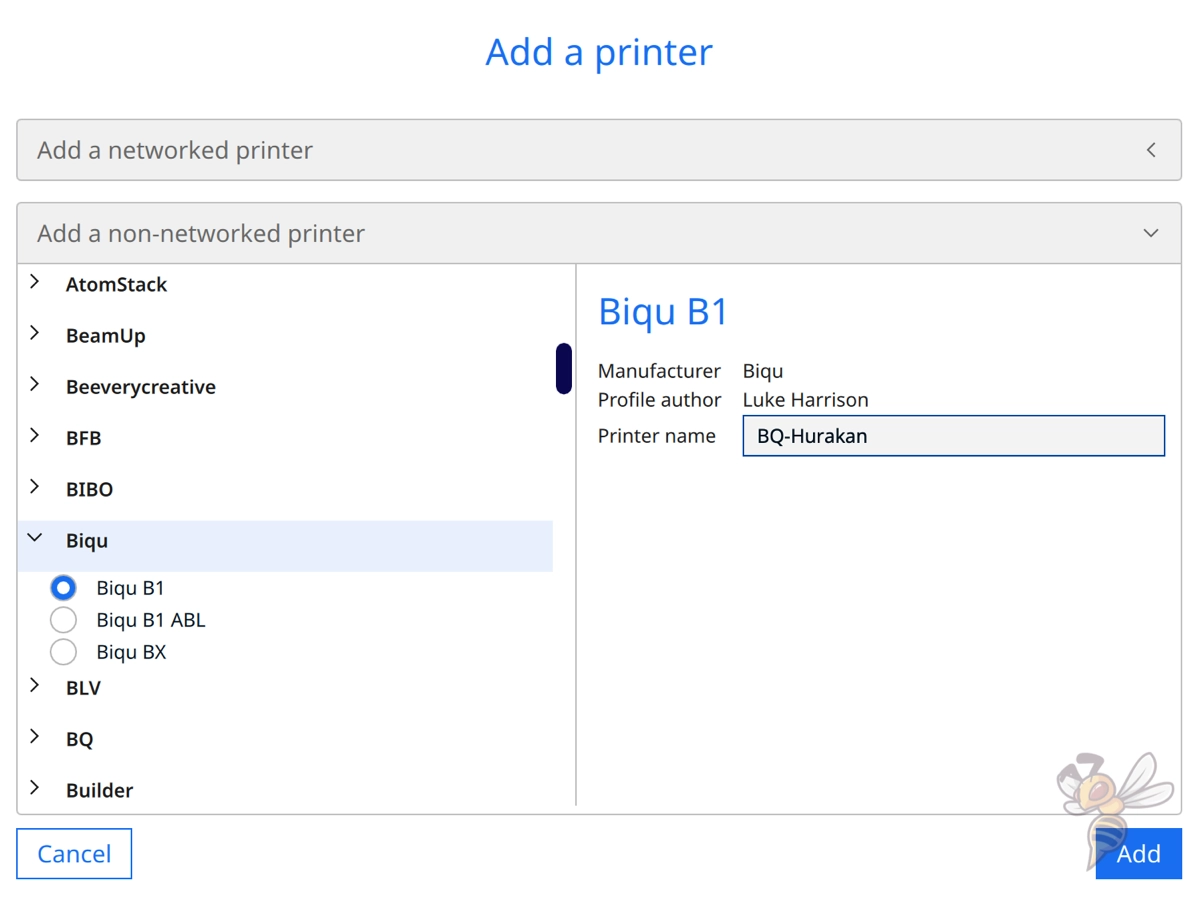
- Search for Biqu among the manufacturers and select the Biqu B1.
- Name the new 3D printer “BQ-Hurakan“.
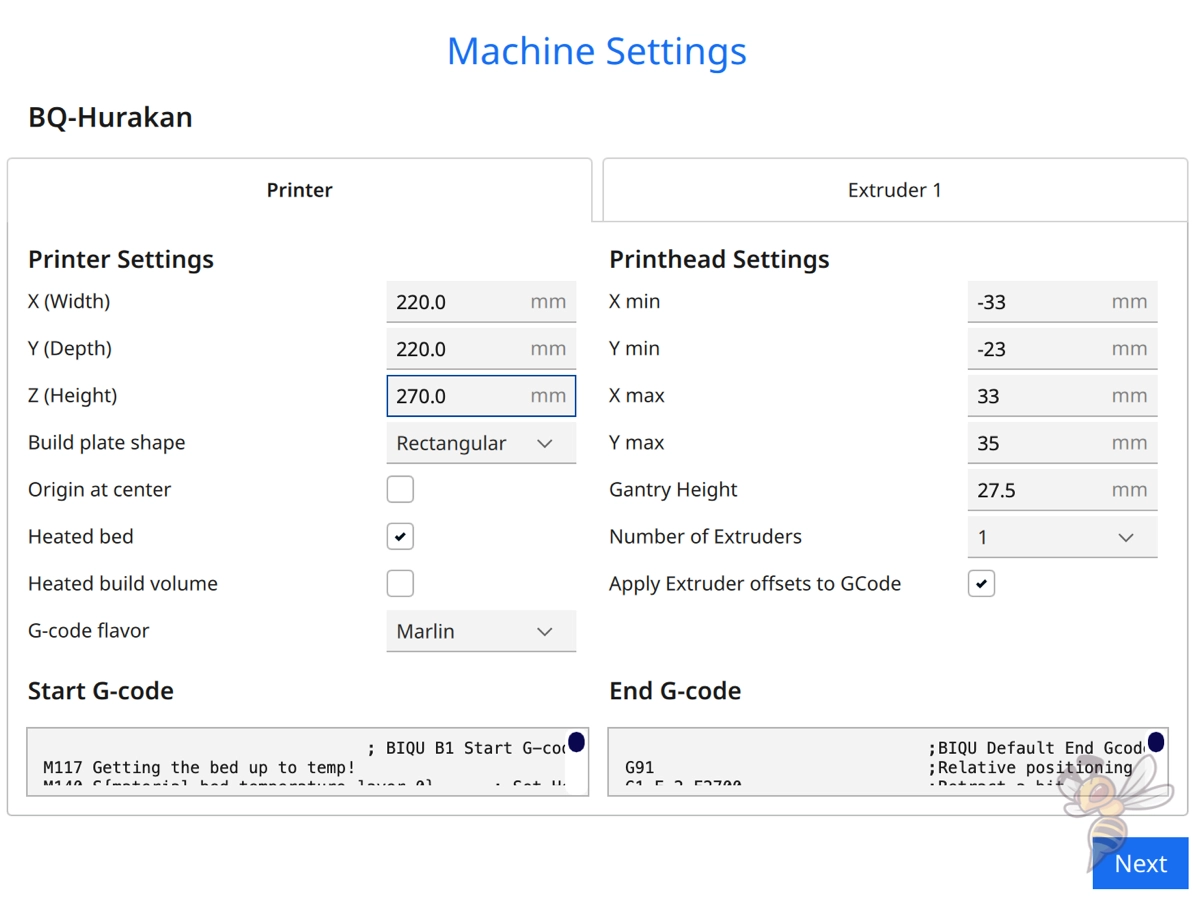
- Adjust the machine settings as shown in the screenshot.
- Add the start and end G-code (see below).
- Adjust the print settings to suit the BQ-Hurakan and the filament being used.
In addition to the dimensions of the 3D printer and its print head, the G-code snippets are also essential in the machine settings. These commands are executed before and after each print. For example, they ensure that the print head moves to the home position each time or prints a line on the left side of the print bed before printing to stimulate extrusion and strip off excess material.
Start G-code:
- M117 Getting the bed up to temp!
- M140 S{material_bed_temperature_layer_0} ; Set Heat Bed temperature
- M190 S{material_bed_temperature_layer_0} ; Wait for Heat Bed temperature
- M117 Getting the extruder up to temp!
- M104 S{material_print_temperature_layer_0} ; Set Extruder temperature
- G92 E0 ; Reset extruder
- M117 Homing axes
- G28 ; Home all axes
- M109 S{material_print_temperature_layer_0} ; Wait for Extruder temperature
- G1 Z2.0 F3000 ; Move Z Axis up little to prevent scratching of Heat Bed
- G1 X4.1 Y20 Z0.3 F5000.0 ; Move to start position
- M117; Purging
- G1 X4.1 Y200.0 Z0.3 F1500.0 E15 ; Draw the first line
- G1 X4.4 Y200.0 Z0.3 F5000.0 ; Move to side a little
- G1 X4.4 Y20 Z0.3 F1500.0 E30 ; Draw the second line
- G92 E0 ; Reset extruder
- M117 Lets make
- G1 Z2.0 F3000 ; Move Z Axis up little to prevent scratching of Heat Bed
- G1 X5 Y20 Z0.3 F5000.0 ; Move over to prevent blob squish
End G-code:
- G91; Relative positioning
- G1 E-2 F2700; Retract a bit
- G1 E-2 Z0.2 F2400 ;Retract a bit more and raise Z
- G1 X5 Y5 F3000 ;Wipe out
- G1 Z10 ;Raise Z by 10mm
- G90 ;Return to absolute positioning
- G1 X0 Y{machine_depth} ;TaDaaaa
- M106 S0 ;Turn-off fan
- M104 S0 ;Turn-off hotend
- M140 S0 ;Turn-off bed
- M84 X Y E ;Disable all steppers but Z
After you enter the machine settings and add the printer, Cura will create profiles for the print settings with default values that are not customized for the BQ-Hurakan. Many of these are independent of the 3D printer, but some are very. Especially, such settings as retraction are very individual for each 3D printer.
Of course, it also plays a big role with which filament you print. Therefore, we will now go into the best Cura settings for the BQ-Hurakan with the most important standard filaments.
You can find more information on how to create a 3D printer profile in Cura and what you need to pay attention to in this article: How to Create a Custom 3D Printer Profile in Cura
PLA Settings
These are the correct Cura settings for the BQ-Hurakan for PLA:
- Print temperature: 200-205 °C
- Print bed temperature: 60 °C
- Print speed: 60 mm/s
- Retraction: 4 mm at 100 mm/s
- Cooling: 100%
- First layer: 5-10 mm/s, 0% cooling, 100% extrusion width, 100% layer height
PLA is the easiest of all 3D printing filaments to print. Nevertheless, it is important to set the print settings correctly, otherwise various print errors may occur.
The setting you need to worry about the least is the print bed temperature. The BQ-Hurakan has a PEI-coated print bed that PLA filament adheres to almost perfectly. As long as the print bed is properly leveled, PLA will adhere perfectly to it, even on very delicate objects.
So, you don’t need to do much experimenting with the print bed temperature until you find the right setting. The above 60 °C is ideal for PLA.
Since the BQ-Hurakan has a Bowden extruder, you may need to slightly adjust the above retraction values for the PLA filament you are using. You can learn how to calibrate the retraction later in this article.
ABS Settings
Because the BQ-Hurakan can reach such high temperatures, it’s also great for printing with ABS. The only hurdle you will have is warping on large objects. ABS shrinks as it cools and can detach from the print bed or warp completely during printing.
However, smaller objects are printable without problems. If you want to print larger objects with the BQ-Hurakan in ABS, a suitable 3D printer enclosure would be advisable to keep the ambient temperature evenly warm. This tent from Creality is perfect for this.
If you still have difficulties with print bed adhesion, you should reduce the print speed for the first layer, preferably to 5 to 10 mm/s. This allows the printed filament to cool down more slowly and bond better with the print bed surface.
TPU Settings
The BQ-Hurakan is excellently suited for just about all filaments. Only for flexible filaments such as TPU is the Bowden extruder too susceptible to inaccuracies in the extrusion.
With a Bowden extruder, the distance between the extruder, i.e., the point at which the filament is controlled, and the nozzle is much longer than with a direct drive extruder. On this long distance, the flexible filament can partially compensate for the movements of the extruder.
This can lead to print errors such as stringing or even clogging of the nozzle.
This does not mean that TPU is completely impossible with the BQ-Hurakan. If you still want to try it, you should reduce the printing speed, preferably to 20 to 30 mm/s and experiment with the retraction until you find an acceptable value.
PETG Settings
These are the correct Cura settings for the BQ-Hurakan for PETG:
- Print temperature: 250-250 °C
- Print bed temperature: 70 °C
- Print speed: 60 mm/s
- Retraction: 3-4 mm at 80-100 mm/s
- Cooling: 50-100%
- First layer: 5-10 mm/s, 0% cooling, 100% extrusion width, 100% layer height
Finding the right settings for PETG is often not easy. PETG has a strong tendency to pull threads. To get the stringing of PETG under control, it is necessary to set the correct printing temperature as well as the correct retraction.
I tested the above settings with two different types of PETG. The results were flawless in each case, but different between the two types. So, it is important that you calibrate the retraction – more about that later.
Furthermore, different PETG filaments require different cooling rates during printing. Typically, you will get good results with a cooling rate of 100%, but with some PETG filaments you should reduce it. So, you have to experiment a bit here as well.
Best Cura Settings for the BQ-Hurakan
Now that we have looked at the Cura settings for the BQ-Hurakan for the various standard filaments, let’s look at the individual settings in detail.
Print Temperature
The best print temperatures for the BQ-Hurakan in Cura:
- PLA: 200-205 °C
- ABS: 240-245 °C
- PETG: 250-250 °C
The print temperature is one of the first settings you need to adjust for the filament. If the print temperature is set incorrectly, various print errors can occur. Moreover, the print bed adhesion or the layer adhesion can suffer from an incorrectly set temperature.
Since the hotend of the BQ-Hurakan can reach a maximum temperature of 260 °C, you can process all standard filaments and many of the more exotic filaments without any problems.
In my experience, the set temperature on the 3D printer is also very close to the actual temperature. So with the BQ-Hurakan, you can usually use the manufacturer’s recommended print temperatures as a good starting point for further optimization.
Print Bed Temperature
The best print bed temperatures for the BQ-Hurakan in Cura:
- PLA: 60 °C
- ABS: 90 °C
- PETG: 70 °C
The print bed temperature is only important to create a good print bed adhesion for the filament used.
The values given above for the various filaments should provide a good adhesion. In most cases, they are already optimal. The PEI-coated print bed of the BQ-Hurakan offers excellent adhesion, so it is not necessary to search for the right print bed temperature. Typically, you can even go down a bit with the temperature to avoid an elephant foot due to too high temperatures.
Print Speed
The best printing speed for the BQ-Hurakan in Cura:
- PLA: 60 mm/s
- ABS: 60 mm/s
- PETG: 60 mm/s
When it comes to print speed, the BQ-Hurakan is very flexible. The Klipper firmware and accelerometer compensate for vibrations caused by the print head moving too fast. This allows higher printing speeds without causing printing errors such as ringing or ghosting.
Still, a print speed of 60 mm/s is a good benchmark to start with. This speed is already good compared to other Cartesian FDM 3D printers and you can certainly go further up here if time is important to you.
Layer Height
The best layer heights for the BQ-Hurakan in Cura:
- Decorative objects: 0.1 mm
- Standard: 0.2 mm
- Coarse, fast prints: 0.3 mm
The layer height is independent of the 3D printer. It depends solely on the nozzle used. The BQ-Hurakan comes standard with a 0.4 mm nozzle, as do most other 3D printers.
The layer height used should be in the range between 25 and 75% of the nozzle diameter. So in the case of a 0.4 mm nozzle, you can use layer heights from 0.1 to 0.3 mm.
The smaller the layer height, the finer the surface. The coarser the layer height, the less time the print takes. So, it depends on the application area of the object which layer height you use.
Flow Rate
The best flow rate for the BQ-Hurakan in Cura:
- Default value: 100%
- For over-extrusion: 90% to 99
- For under-extrusion: 101% to 110%.
Adjusting the flow rate can eliminate printing errors caused by over-extrusion or under-extrusion. You will learn how to calibrate the flow rate later in this article.
You can also adjust the flow rate for the first layer only and improve the print bed adhesion by increasing it slightly. However, there is a risk that you artificially create an elephant foot. So be careful with this setting.
Retraction
The best settings for the retraction for the BQ-Hurakan in Cura:
- PLA: 4 mm at 100 mm/s
- ABS: 4 mm at 90 mm/s
- PETG: 3-4 mm at 80-100 mm/s
The retraction settings are essential for the BQ-Hurakan to avoid classic printing errors such as stringing. The above values should avoid such printing errors, but it will certainly be necessary to adjust them to the filament used.
With the BQ-Hurakan, the retraction speed is unusually high. Nevertheless, I got the best results with it. In addition, this value is recommended by BIQU.
Infill
The best infill density for the BQ-Hurakan in Cura:
- Decorative objects: 0-15%
- Standard objects: 15-50%
- Stable objects: 50-100%
With the infill, i.e., the structure of the filament inside the object, you can influence its stability. The more filament is printed inside, i.e., the higher the infill density, the more stable the finished object will be.
If the object has only decorative purposes, you do not need so much filament inside. Infill densities of 0 to 15% are advisable to save filament and printing time. However, if you want to print objects that should be very stable, you should work with densities of 50% or more.
In addition to the density, the pattern of the infill also determines how stable the object will be. There are patterns that can be printed quickly, but are not quite as stable, and there are patterns that are very complicated, but offer high stability.
High stability (for stable objects):
- Cubic
- Cubic subdivision
- Octet
- Gyroid
Medium stability (for standard objects):
- Grid
- Triangles
- Tri-Hexagon
Low stability (for decorative objects):
- Lines
- Zigzag
- Lightning
First Layer
These are the best Cura settings for the first layer on the BQ-Hurakan:
- Layer height: 100-200% of normal layer height (higher values to increase print bed adhesion)
- Line width: 100-200% of normal line width (higher values to increase print bed adhesion)
- Print temperature: Same as the rest of the object or 5-10 °C higher for better print bed adhesion.
- Print speed: 50% of normal print speed (i.e. 25 mm/s for a normal print speed of 50 mm/s) or 5-10 mm/s for high print bed adhesion
- Flow rate: 100-110% (higher values in case of poor print bed adhesion)
With the BQ-Hurakan, you don’t have to worry too much about the first layer. Due to the PEI-coated print bed, it is usually sufficient to set the print bed temperature and the z-offset correctly to create perfect adhesion.
If you still have problems, you can use the Cura settings described above to increase print bed adhesion. The purpose of these settings is to allow the filament to take longer to cool. The longer it sits hot on the print bed, the better it can flow into the fine crevices of the PEI coating and create good adhesion.
How to Calibrate the BQ-Hurakan Cura Settings
Although the values given in this article are good guidelines for the BQ-Hurakan, you will only achieve optimal results if you calibrate the most important settings.
Every 3D printer and every filament is slightly different, which also means that the print settings have to be calibrated to the particular combination.
To calibrate these settings, you need suitable objects. These objects are designed to provoke certain printing errors. So, you can adjust the settings in small steps and observe the result.
You can find such objects on most portals where print files are available (like Thingiverse) or in the Calibration Shapes plug-in of Cura.

Read the full calibration guide:
3D Printer Calibration: Step-by-Step to Perfect Results
How to Calibrate the Print Temperature
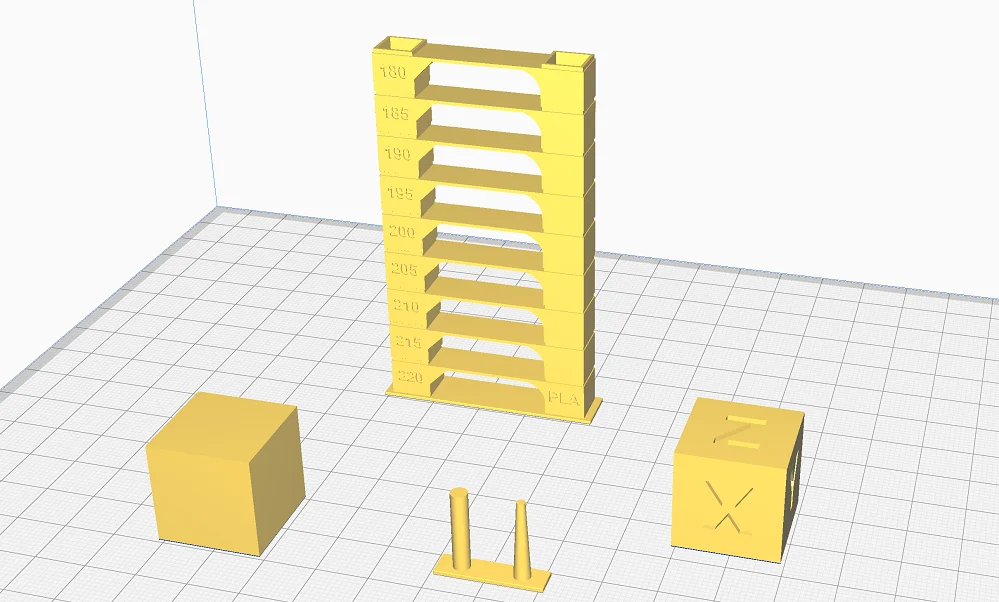
To calibrate the print temperature, there are many objects. My favorite among them is the classic temperature tower. Such a tower consists of several levels that are printed at different temperatures.
When the object has finished printing, you can then immediately see at which temperature the fewest printing errors occurred.
How to Calibrate the Flow Rate
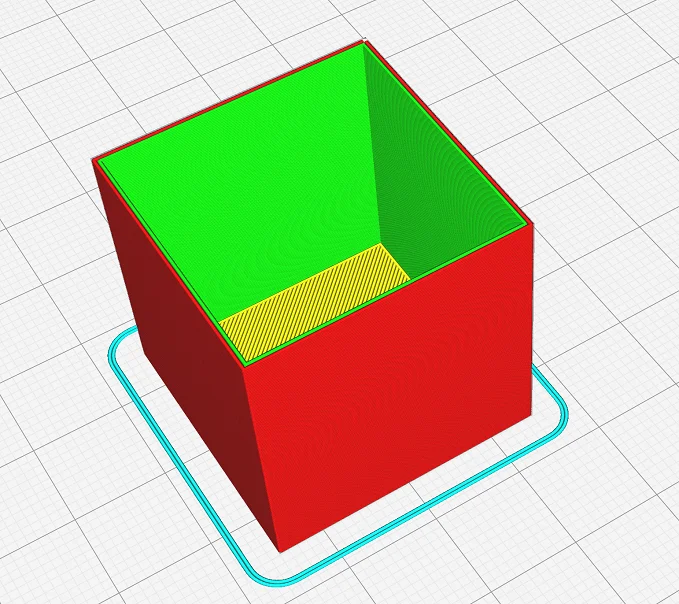

Calibrating the flow rate is about making sure that the actual printed line width is as wide as specified in Cura. There are several options for how you can do this.
I usually print a hollow cube without top layers so that I can measure the wall thickness with a caliper after printing. Pay attention to how many wall lines you have set. Otherwise, you wonder why the wall thickness is a multiple of your line width.
From the measured value, you can calculate the actual line width and compare it with the value in Cura. Adjust the setting until the two values are identical.
How to Calibrate the Retraction
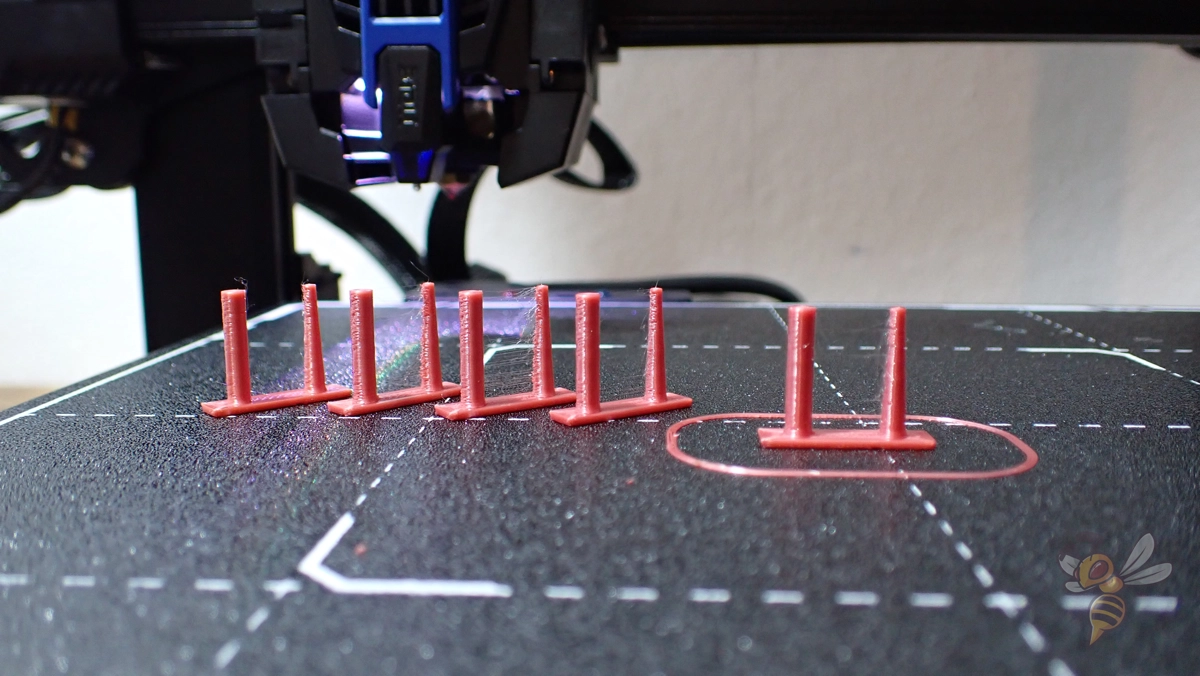
Retraction calibration is about avoiding printing errors such as stringing. Therefore, objects are useful where stringing would be immediately obvious. One of the simplest objects for this are the two small columns from the Calibration Shapes plug-in.
If the retraction setting is not optimal, fine hairs of filament will appear between these two columns. Start at the above values for the retraction for the respective filament and adjust the retraction distance and the retraction speed in small steps until you see no or only extremely few fine hairs.
Conclusion
I hope this article helps you find the optimal Cura settings for your BQ-Hurakan. It’s always a very satisfying feeling of achievement when you get perfect results after a calibration!
Disclosure: This website is the property of Martin Lütkemeyer and is operated by Martin Lütkemeyer. Martin Lütkemeyer is a member of the Amazon Services LLC and other Affiliate Programs. These are affiliate advertising programs designed to enable websites to earn advertising revenue through advertising and linking to Amazon.com and others. Links marked with * are affiliate links.
