
- Wet Filament: Prevention, Symptoms & Drying - July 18, 2024
- Sovol SV08 – Best PrusaSlicer Settings & Profile - June 26, 2024
- Sovol SV08 – Best Orca Slicer Settings & Profile - June 26, 2024
Disclosure: Links marked with * are Affiliate Links. I earn from qualifying purchases if you decide to make a purchase through these links – at no additional cost for you!
The Artillery Sidewinder X2* is an improved version of its predecessor. The improved features make it well suited for both beginners and advanced users.
The Artillery Sidewinder X2 delivered good results in this hands-on review, scoring high marks for accurate automatic print bed leveling, its professional design, and very good print quality.
It has been very popular since its release and, apart from a weakness inherited from its predecessor, it showed its good side in this review. You’ll find out all the good and bad in detail in this hands-on review of the Artillery Sidewinder X2.

Check Price at:
Table of Contents:
- 1 Key Takeaways
- 2 Who Should Buy the Sidewinder X2?
- 3 Pros & Cons > Artillery Sidewinder X2 Review
- 4 Technical Specifications > Artillery Sidewinder X2 Review
- 5 Scope of Delivery > Artillery Sidewinder X2 Review
- 6 Setup > Artillery Sidewinder X2 Review
- 7 Features > Artillery Sidewinder X2 Review
- 7.1 Direct Drive Extruder
- 7.2 PTFE-Lined Volcano Hotend
- 7.3 Glass Print Bed
- 7.4 Double Z-Axis
- 7.5 32-Bit Motherboard
- 7.6 2.7” Color Touch Screen
- 7.7 Neat Wiring
- 7.8 Automatic Print Bed Leveling
- 7.9 220/110V Voltage Switch
- 7.10 Resume Print
- 7.11 Filament Sensor
- 7.12 Easy Assembly
- 7.13 Quiet Stepper Motor Drivers
- 7.14 Cast Aluminum Z Slide
- 7.15 Power Supply Without Fan
- 8 Heating Times > Artillery Sidewinder X2 Review
- 9 Noise Level > Artillery Sidewinder X2 Review
- 10 Print Speed > Artillery Sidewinder X2 Review
- 11 Operation > Artillery Sidewinder X2 Review
- 12 Slicer > Artillery Sidewinder X2 Review
- 13 Print Quality > Artillery Sidewinder X2 Review
- 14 Upgrades > Artillery Sidewinder X2 Review
- 15 Sidewinder X2 vs. Ender 3 S1 > Artillery Sidewinder X2 Review
- 16 Sidewinder X2 vs. Genius Pro > Artillery Sidewinder X2 Review
- 17 Sidewinder X2 vs. Sidewinder X1 > Artillery Sidewinder X2 Review
- 18 Sidewinder X2 vs. Bluer Plus > Artillery Sidewinder X2 Review
- 19 Is the Sidewinder X2 Worth It?
- 20 Similar 3D Printers
Key Takeaways
- Large print volume of 300 x 300 x 400 mm
- High accuracy of 0.1 to 0.3 mm layer thicknesses
- Automatic print bed leveling
- Quiet stepper motors and quiet power supply without fan
- Very fast heat-up times for nozzle and print bed
- Textured glass print bed with good adhesion but inhomogeneous temperature distribution
Who Should Buy the Sidewinder X2?
The Artillery Sidewinder X2 is suitable for anyone who wants to print large objects in one piece with high accuracy and reliable quality. It is also great for beginners who want to spend less time tinkering and more time printing, as it offers many quality-of-life features such as automatic print bed leveling.
Pros & Cons
> Artillery Sidewinder X2 Review
PRO:
- Easy assembly
- Automatic print bed leveling
- 32-bit motherboard
- Stable print bed cable feed
- Fast heat up
- Large print volume
- Quiet
CON:
- Inhomogeneous temperature distribution of the print bed
Technical Specifications
> Artillery Sidewinder X2 Review
DEVICE
- Technology: FDM (Fused Deposition Modeling)
- Assembly: Mostly pre-assembled
- Size: 550 x 470 x 730 mm
- Weight: 12.9 kg
- Power requirement: 110/220 V, 350 W
- Print volume: 300 x 300 x 400 mm
- Layer thickness: 0.1 – 0.3 mm
- Max. Nozzle temperature: 240 °C
- Max. Print bed temperature: 130 °C
- Extruder: Direct drive
- Nozzle quantity: 1
- Nozzle diameter: 0.4 mm
- Filament diameter: 1.75 mm
- Filaments: PLA, ABS, PETG, TPU, Wood, PVA, HIPS
- Print bed material: Textured glass
- Print bed leveling: Automatic
- Resume Print: Yes
SOFTWARE
- Slicer: Cura, Simplify3D, Slic3r, Ideamaker
- File types: STL, OBJ, AMF
- Connectivity: USB, microSD
Check Price at:
Scope of Delivery
> Artillery Sidewinder X2 Review
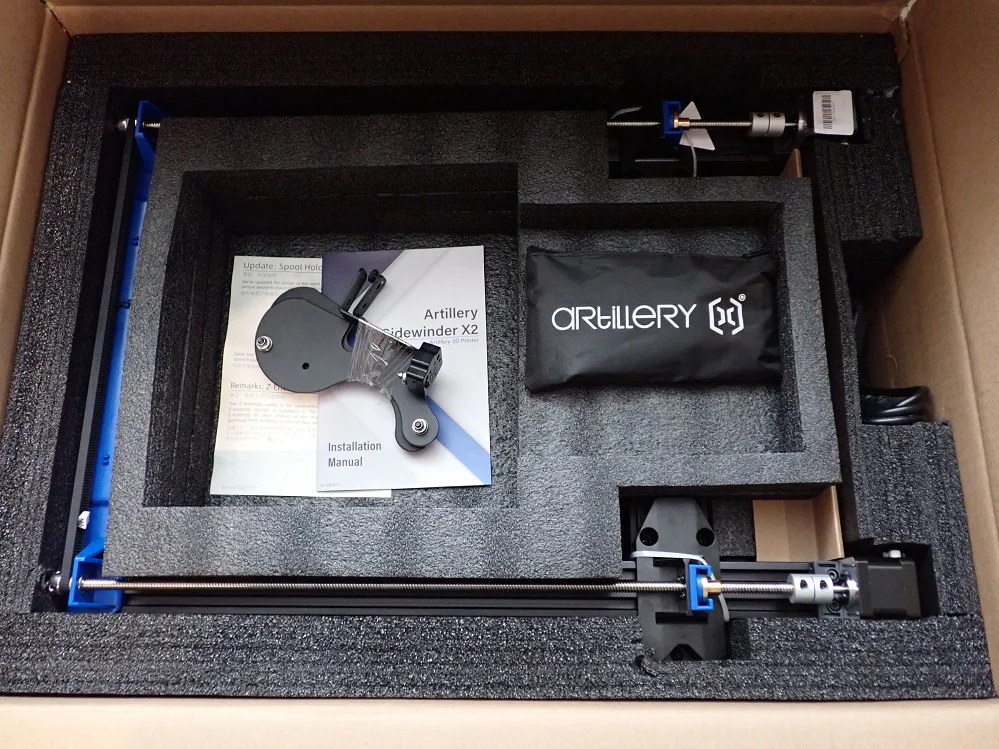

The Artillery Sidewinder X2 comes with a surprisingly small package for its features. Still, everything is included to start printing right away. The only thing you’ll need is good filament and print bed adhesion tools for delicate first layers like Magigoo.
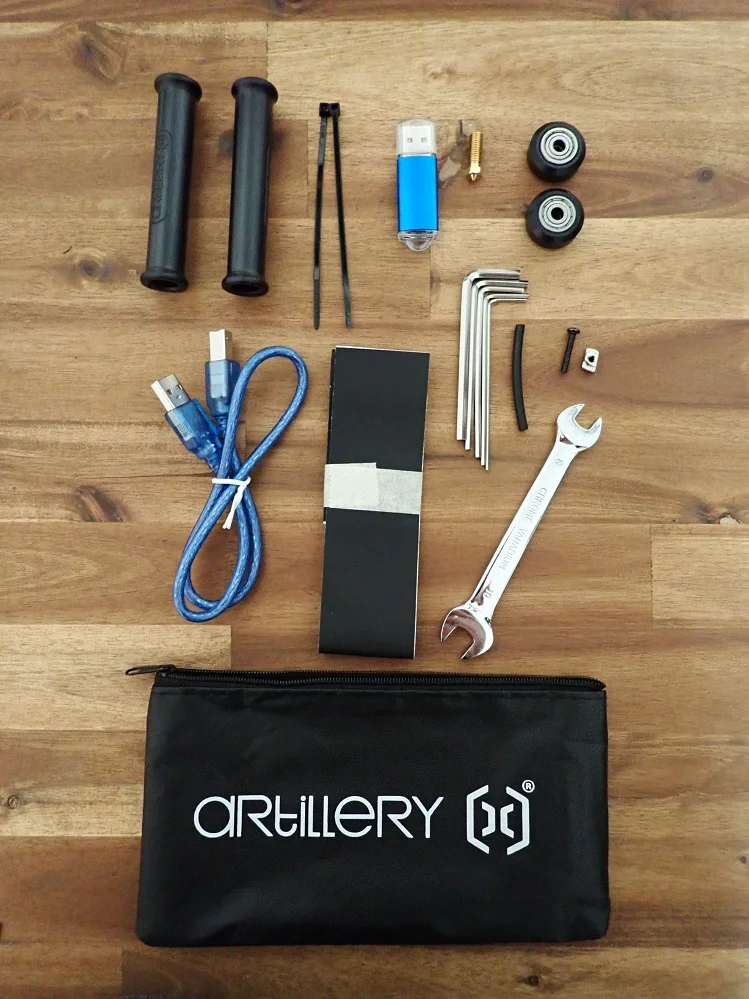
Besides the mostly pre-assembled 3D printer, all the tools you need for assembly are included. There are also a few spare parts included, such as a spare cable or wheels for the axis.
Despite the large dimensions of the Artillery Sidewinder X2, the packing dimensions of the package are relatively small. This is due to the clever packaging with foam inserts cut to fit. The package is still small and light enough to carry on your own. All parts inside are well protected from transport damage.
What I really like about this 3D printer is that it comes with a USB stick and not a micro SD card. The handling with a USB stick is much more convenient. Inserting, removing and transporting a relatively large USB stick is faster and easier than with a micro SD card.
Included with the Artillery Sidewinder X2 are the following items:
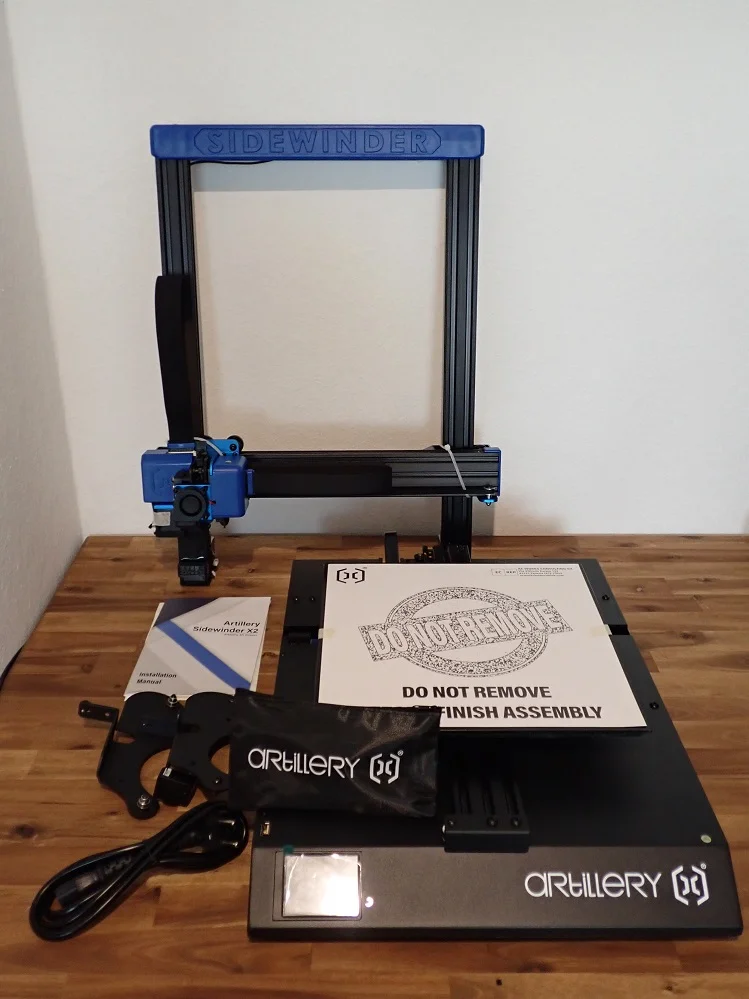
- Pre-assembled 3D printer:
- Frame with X-axis (printhead incl. toothed belt is already mounted)
- 3D printer base with print bed
- Filament holder with filament sensor
- Power cable
- Various spare parts
- Toolbag
- Necessary tools for assembly
- Data cable
- USB stick:
- Test model
- Cura
- Digital instruction manual
If you order filament to go with your 3D printer, make sure it is stored in a dry and dust-proof place.
There are special storage boxes for filaments* for this purpose.
You can also use a suitable plastic box with silica gel* to protect the filament from dust and moisture. If the filament is out in the air for too long, it will soak up moisture and produce bubbles and other print defects.
Setup
> Artillery Sidewinder X2 Review


The assembly of the Artillery Sidewinder X2 reminded me of the quick assembly of many resin 3D printers, as it also consists of only a few individual parts. The assembly is done in less than 10 minutes!
Very few things need to be screwed together and connected. Also, the wiring is very cleverly done, so a large part is done directly once you mount the frame on the 3D printer base.
Here are the steps necessary to assemble the Sidewinder X2:
- First, the frame with the X- and Z-axis is plugged onto the 3D printer base. On the left side there is a connector that connects the cables of the print head and the X-axis to the base.
- The 4 screws with which you fix the frame are already pre-assembled in the 3D printer base and only need to be screwed on. To do this, it is best to place the 3D printer on the edge of a table so that one side protrudes over the edge of the table and you can comfortably turn the screws from below.
- Next, mount the filament holder at the top of the frame.
- Connect all the cables: filament sensor, stepper motors, end stops.
- Optional: It is possible that the wheels on the X and Y axis have become a little loose due to transport. You can tighten them again with the included wrench so that no vibrations or positioning errors can occur.
The only thing you need to do now is print bed leveling.
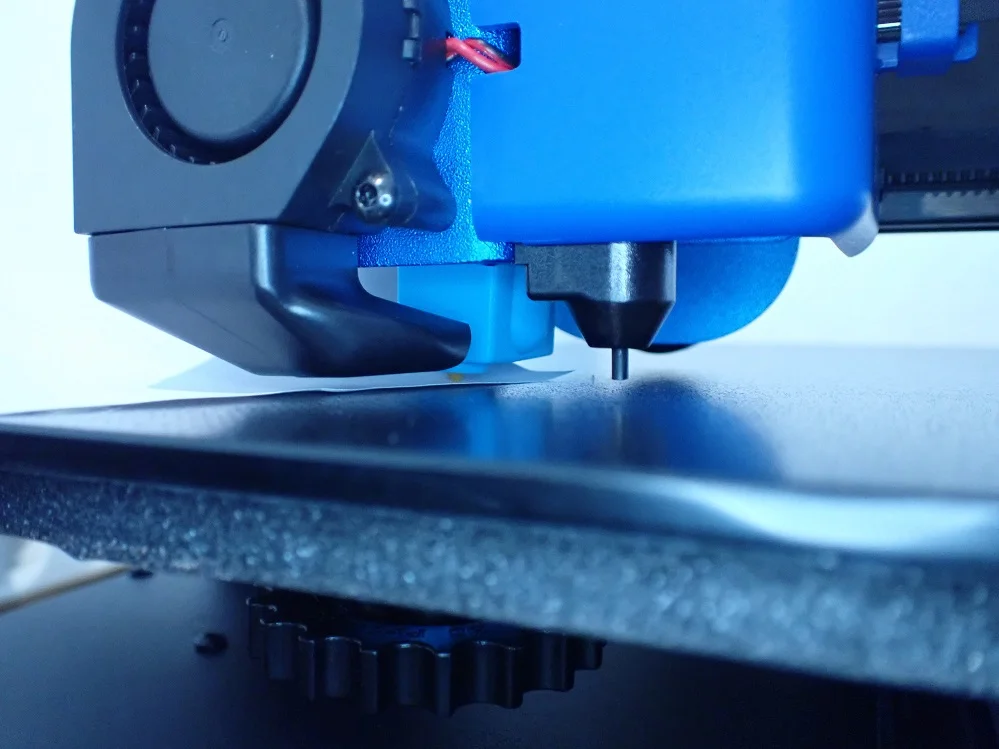
Print Bed Leveling


Print bed leveling happens automatically on the Artillery Sidewinder X2. A mechanical proximity sensor is installed in its print head for this purpose. It works similarly to the popular BL Touch and CR Touch.
Before you can use the automatic print bed leveling, however, you must roughly adjust the print bed manually. If the print bed is very uneven, the sensor can no longer compensate for the inclination.
This is how you level the print bed of the Sidewinder X2:
- Heat the print bed to 70 °C and the hot end to 240 °C.
- In the menu, go to Tools and then to Level.
- Slide a piece of paper between the nozzle and the printing plate.
- Turn the screws under the print bed until you have adjusted the distance so that there is enough space between the nozzle and the print bed that you can move the piece of paper back and forth with some friction.
- Repeat step 4 for all four corners.
- Then go to Tools, More in the menu and click on Auto-Level. The printer will then initialize the automatic print bed leveling process.
- As soon as the automatic leveling is completed, press EEPROM Save.
In all the time I’ve been using the Sidewinder X2, I’ve only manually leveled it once. After several 3D prints, I ran the automatic print bed leveling and saved it. Once I had to readjust the Z-Offset after I ripped a print object too violently off the print plate. Apparently, the print bed was slightly misaligned in the process.
Features
> Artillery Sidewinder X2 Review
3D printers in the mid-range price segment must not only offer very good print quality but also the necessary features to justify their price. And that is exactly what the Sidewinder X2 does with various functions that not only guarantee a reproducible good print quality but also simplify operation and handling.
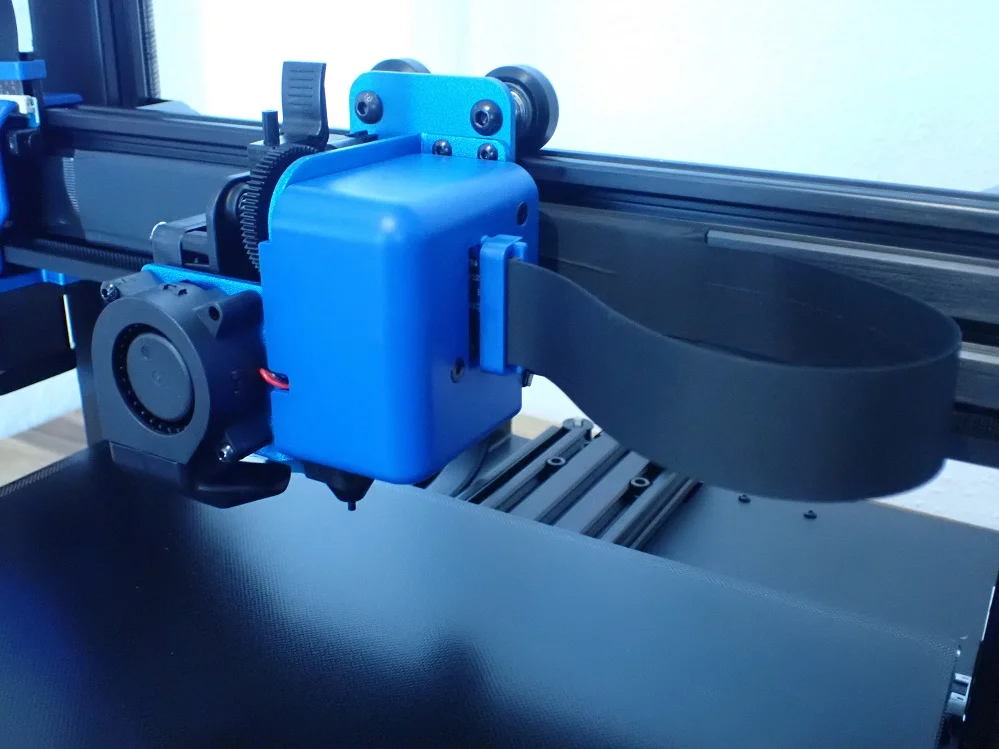
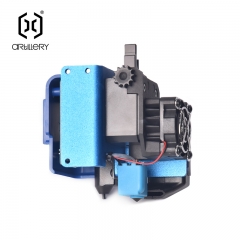
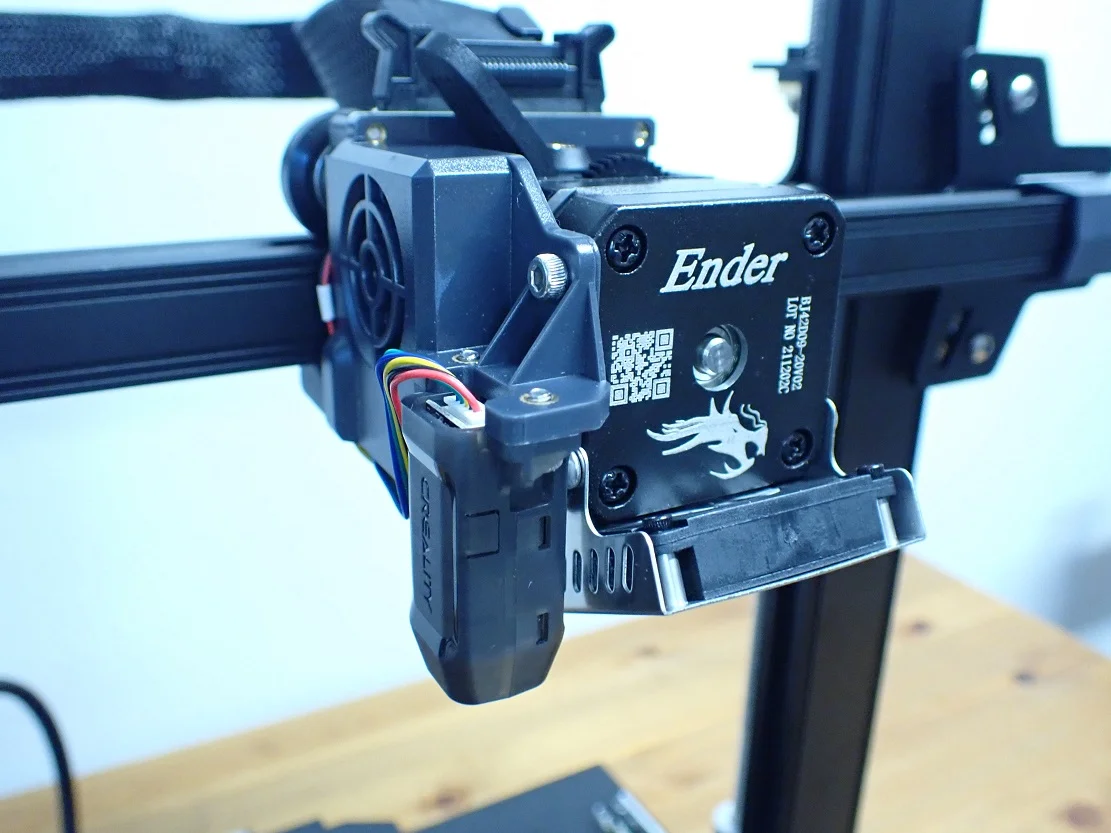
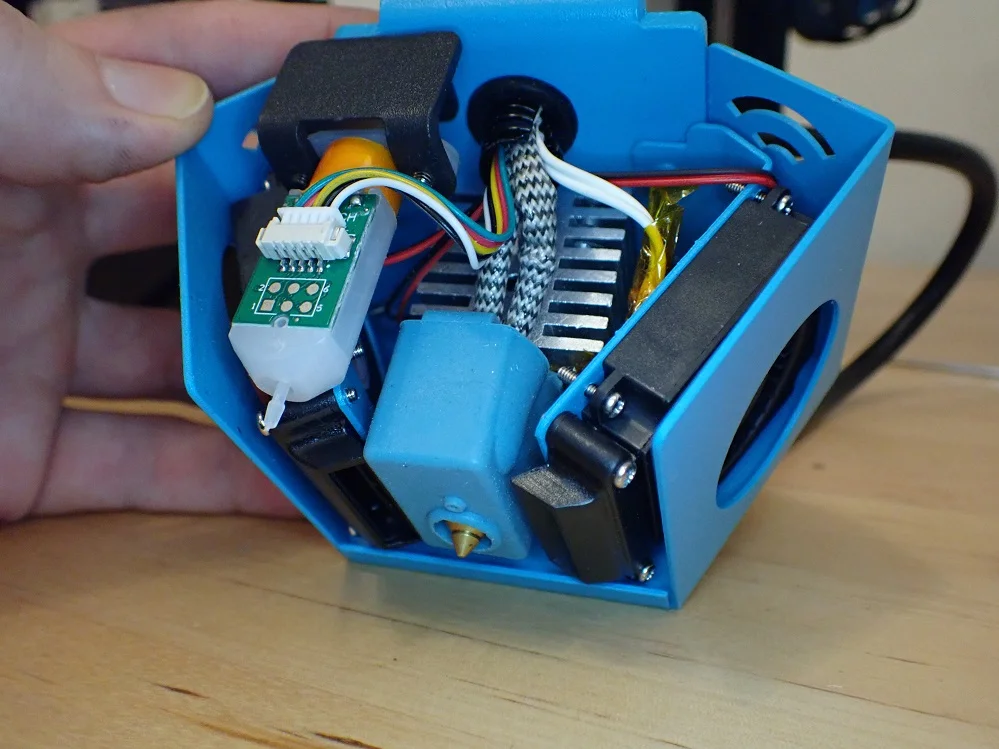
Direct Drive Extruder

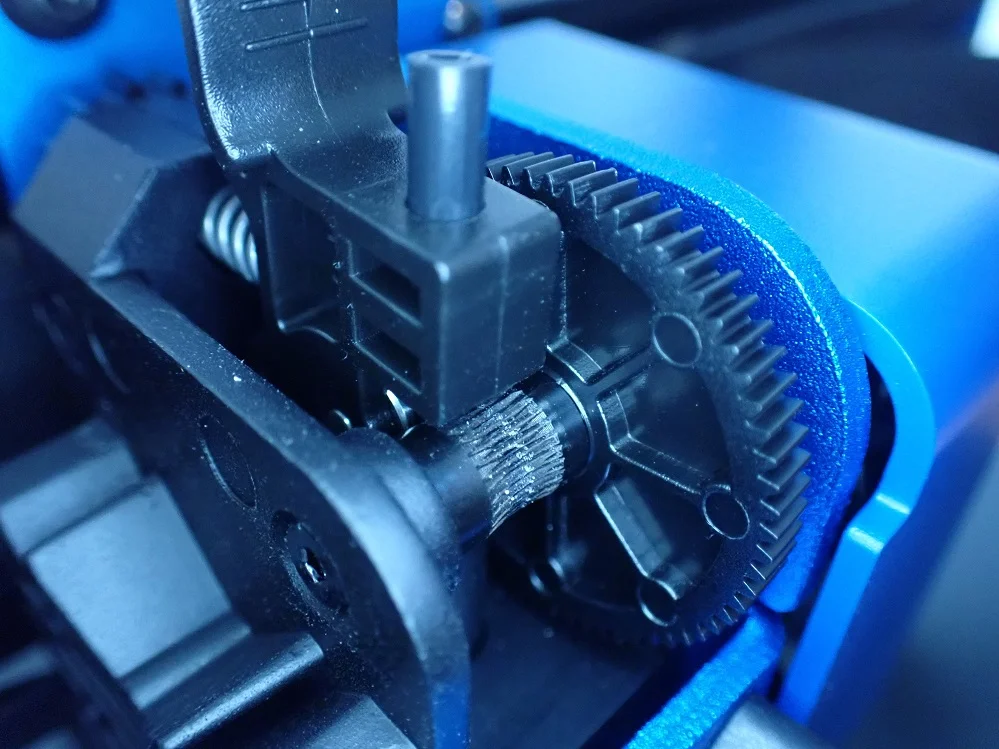
A direct drive extruder is installed in the print head. This leads the filament directly into the hotend and without the detour via a tube as with a Bowden extruder. This has several advantages, the two most important of which are the ability to print flexible filaments better and a higher extrusion accuracy.
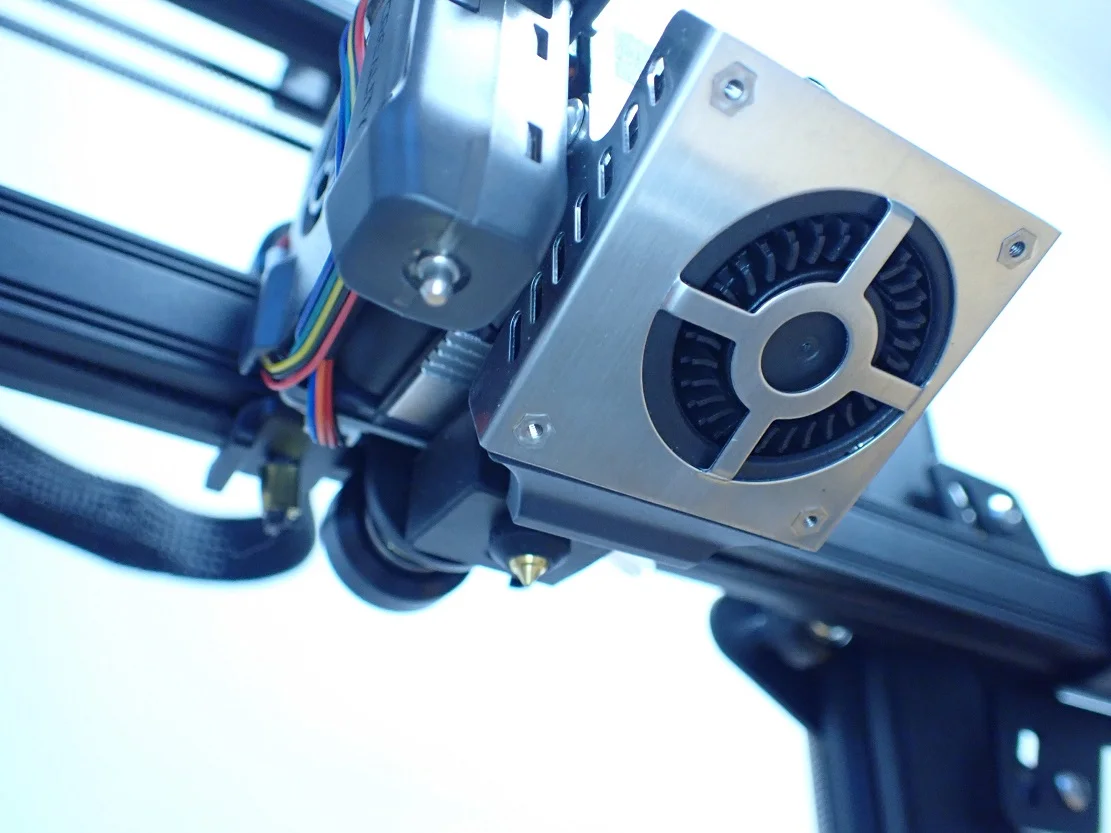
Next to the extruder is a radiator which is now part of the extruder. This greatly improves cooling compared to the previous model. The cooling of the filament directly above the nozzle prevents the filament from sticking to the extruder. If liquid filament gets into the extruder and is not cooled down quickly enough there, a stubborn clogging will occur. And the efficient passive cooler right next to the extruder prevents this.
The only drawback to the extruder is the plastic wheel that feeds the filament. On the Sidewinder X1, this plastic wheel was one of the most common sources of failure and had to be replaced fairly frequently. Therefore, it is somewhat illogical why this was not replaced by a more stable metal part. At least the wheel did not wear out much during my test and will probably last several hundred printing hours until it needs to be replaced.
PTFE-Lined Volcano Hotend
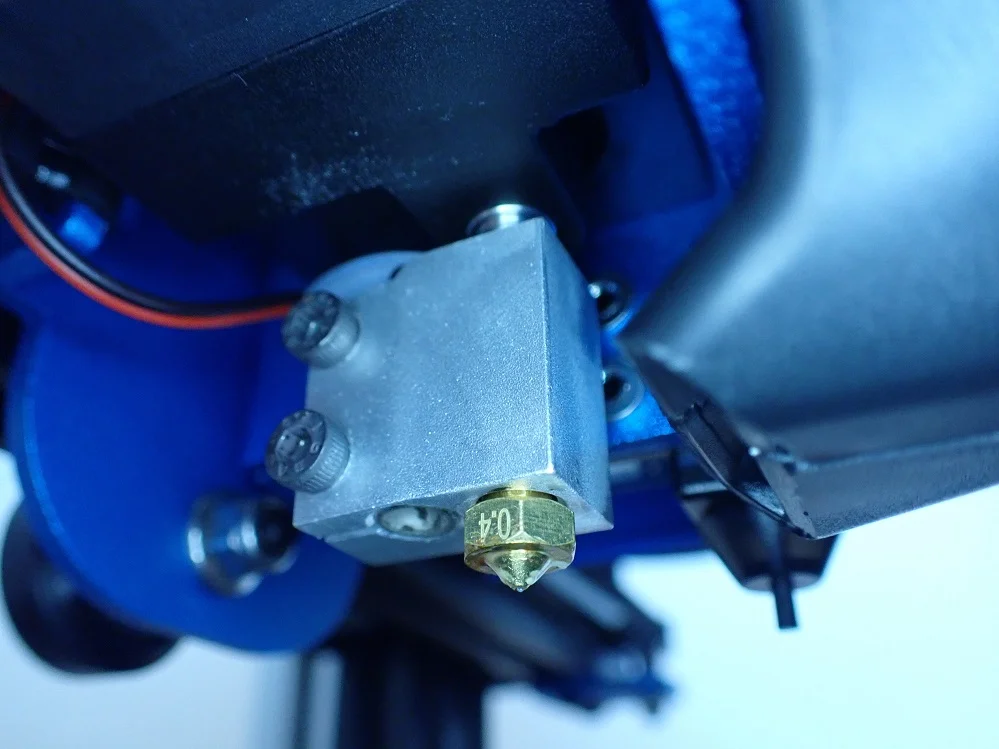
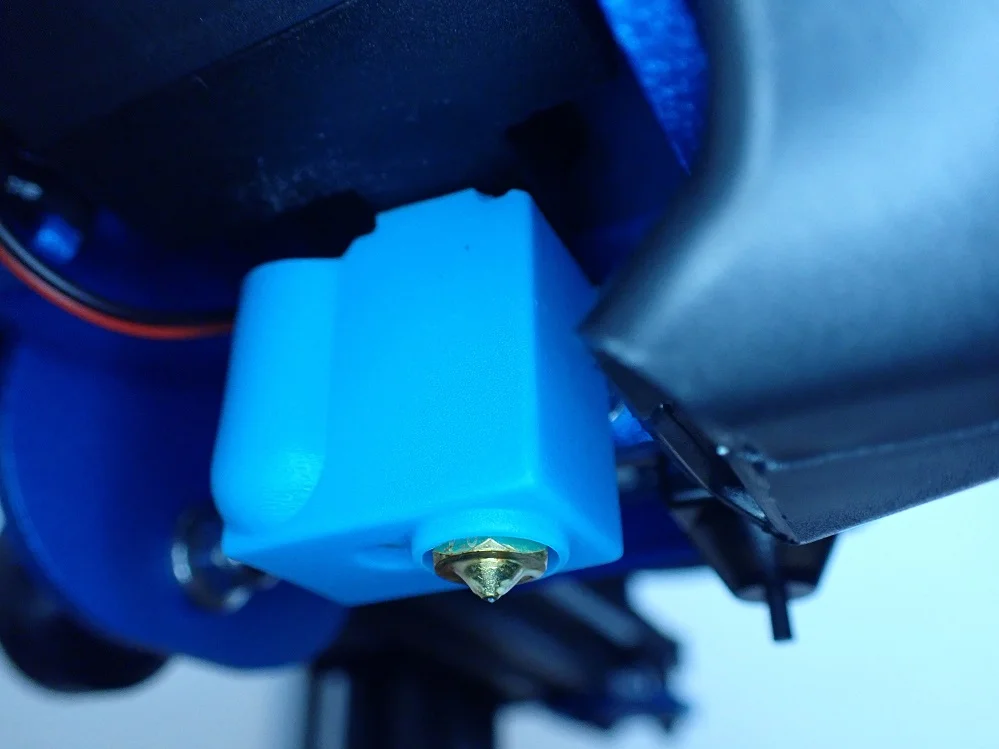
The Sidewinder X2 has a PTFE-lined Volcano hotend. This is not really bad and is very common among 3D printers. However, the maximum temperature is limited to about 240 °C, otherwise the PTFE would melt. For most standard filaments this is sufficient.
Another disadvantage for such hotends is that the small PTFE tube has to be replaced after a few months (depending on how often you print and with which temperatures). Due to the high temperature, it wears out slowly but surely and must be replaced sooner or later, otherwise it will lead to a clogged nozzle.
However, it is quite easy to disassemble the hotend and replace the part. Only two screws on the extruder have to be loosened to remove the hotend.
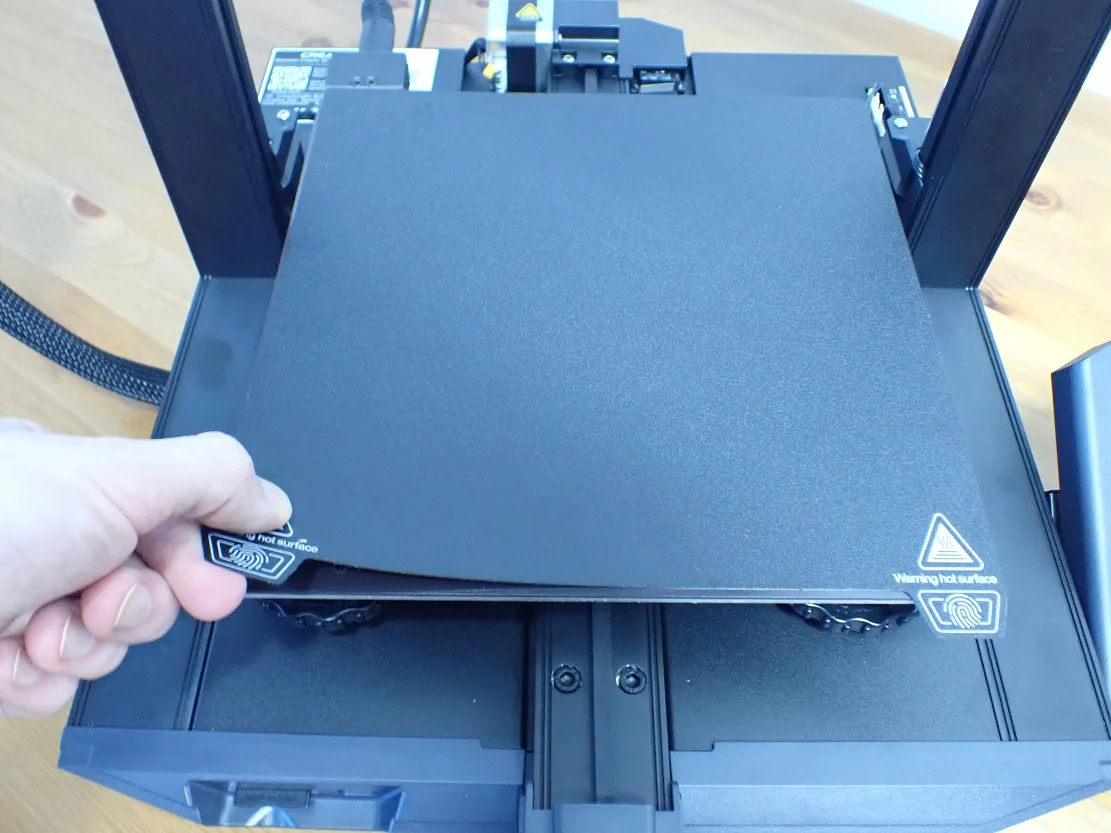
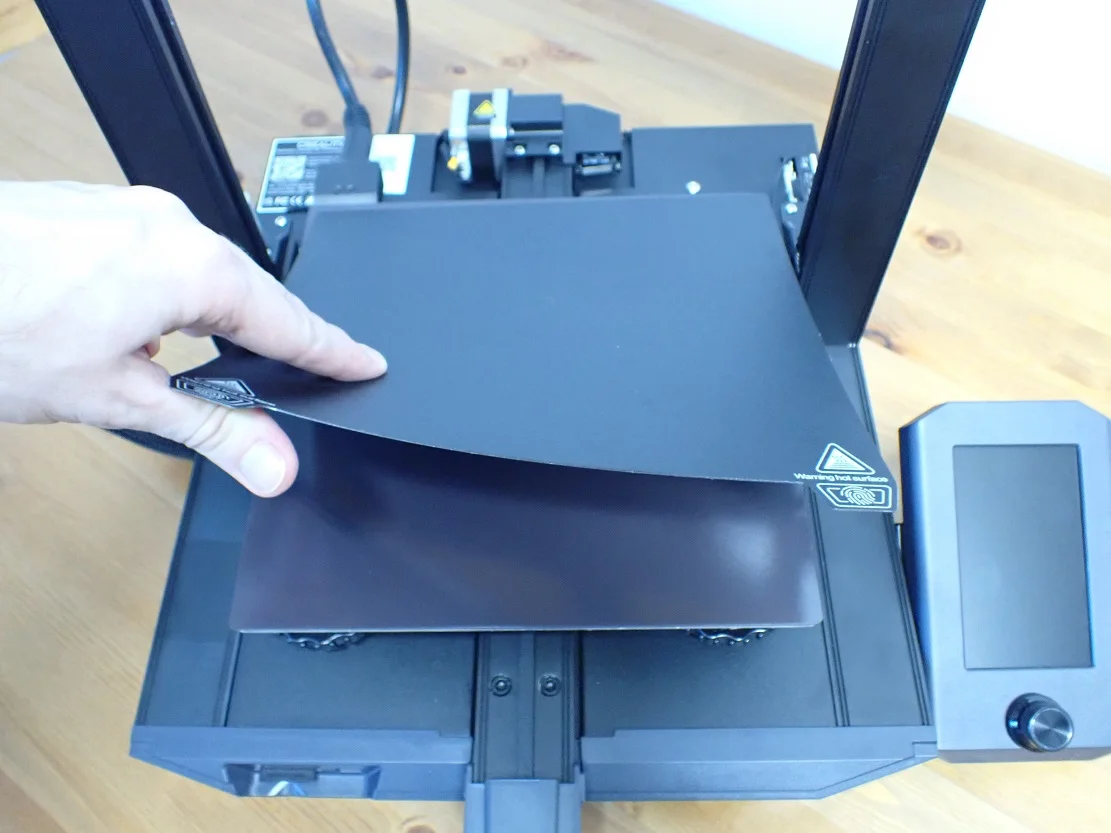
Glass Print Bed

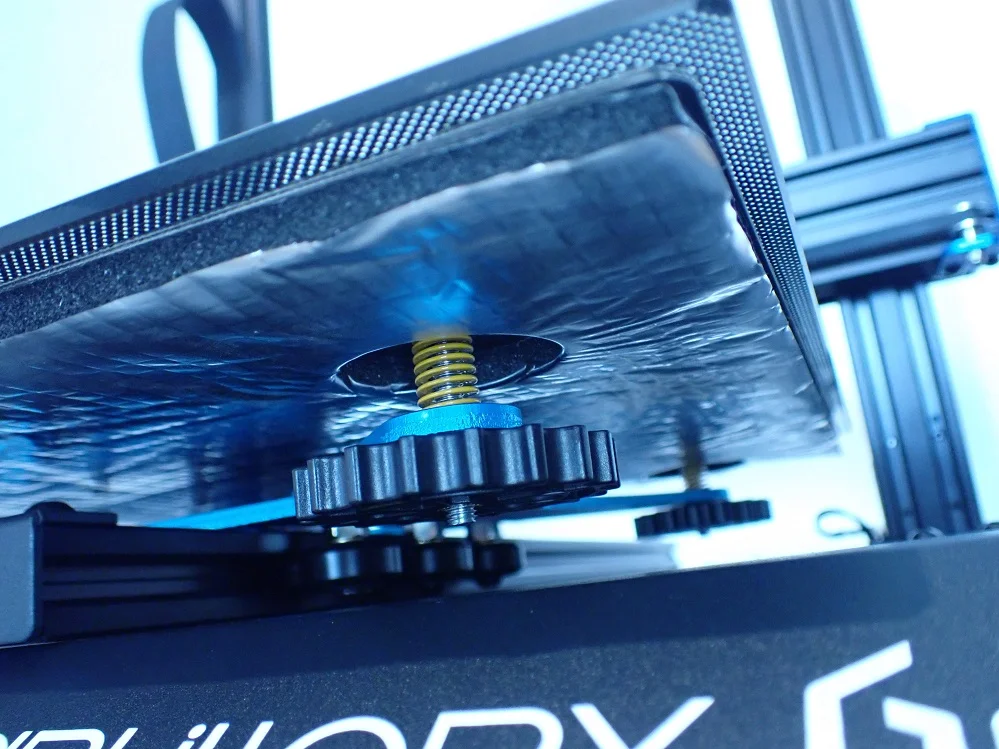
The print bed of the Artillery Sidewinder X2 has an impressive area of 310 x 310 mm. This means that even very large objects can be printed in one piece. The surface is made of textured glass that provides very good print bed adhesion for many filaments. However, with some filaments, some adhesive like Magigoo has to help.
Under the print bed, there are four turning screws to manually adjust the inclination of the print bed. They are large enough to be turned comfortably.
Unfortunately, the problem with the rotary screws is that in the four places where they touch the print bed, the AC heating is not applied to the print bed. This results in cold spots on the print bed above the four rotary screws where the print bed adhesion is worse than on the rest of the print bed.
So if you want to print large objects that touch these four places, you should keep this in mind. Especially then it is recommended to work with tools like a raft or adhesives like Magigoo. This problem also existed with its predecessor, the Sidewinder X1. Therefore, the most popular upgrade of the X1 3D printer was to replace the print bed with an aluminum print bed. This gave a homogeneous temperature distribution on the print bed.
Double Z-Axis
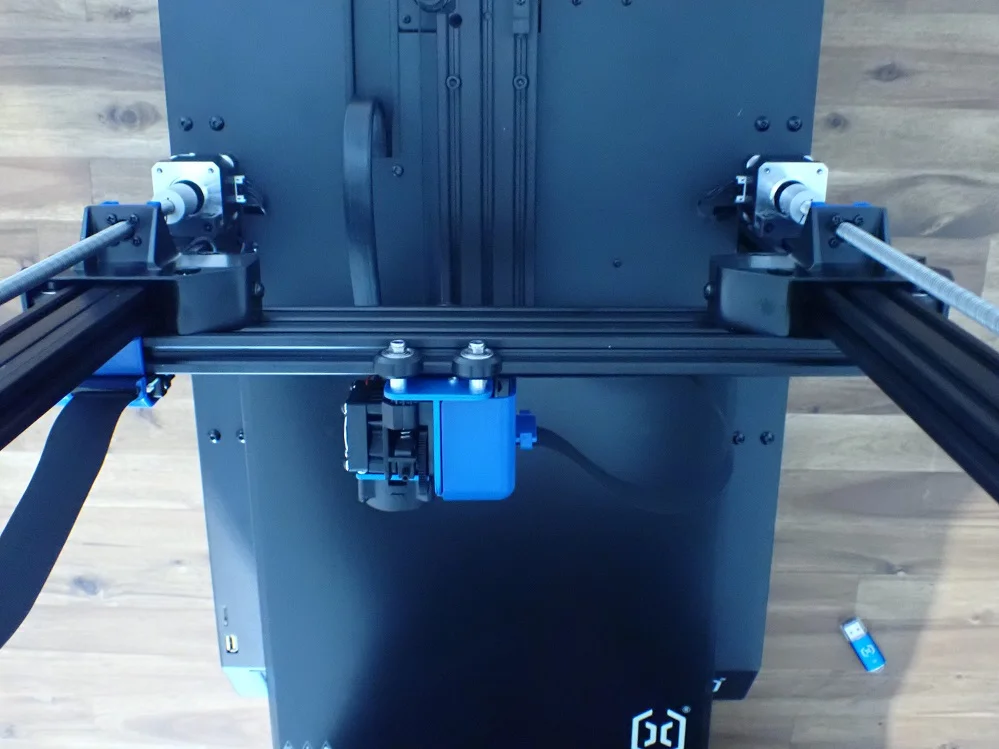
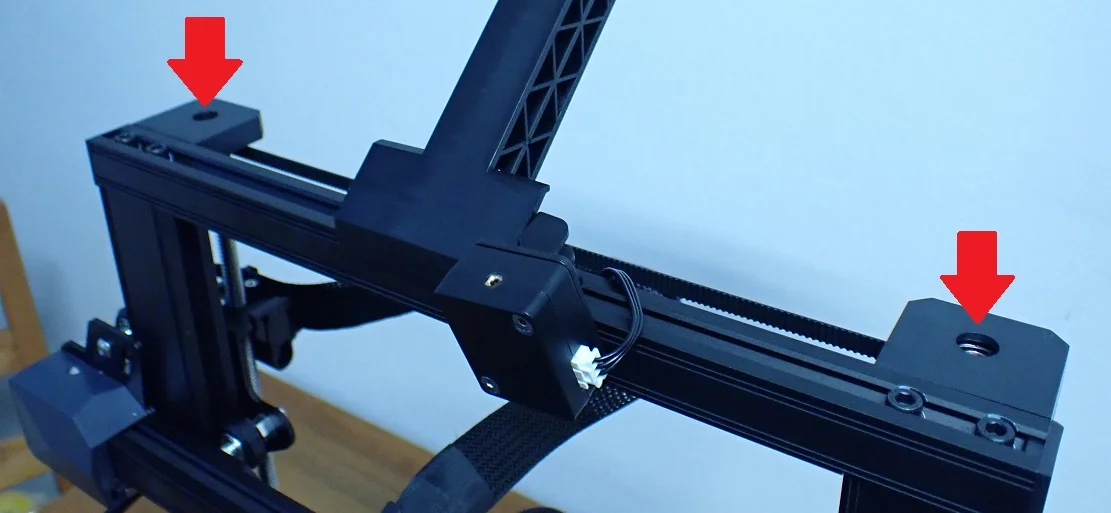
The Sidewinder X2 has a preassembled double Z-axis with two dedicated stepper motors. They are also connected to each other at the top of the frame with a synchronizing toothed belt. This guarantees synchronous movement.
For 3D printers with such a large print volume and a relatively heavy X-axis, a dual Z-axis is a must.
The two Z-axes are connected to each other at the upper end with a horizontal plastic strut. In many 3D printers, this part is also made of aluminum. However, since the plastic is very stable and fulfills its function of stabilizing the two Z-axes 100% in my eyes, this is not a disadvantage compared to a 100% aluminum frame.
The double Z-axis stabilizes the movements of the X-axis and thus of the printhead and helps with positioning accuracy in the Z-direction. This not only improves print quality, but also reduces printing errors caused by vibrations or an imperfectly horizontal X-axis.
The two stepper motors are addressed by a single driver and thus move synchronously. The toothed belt at the upper end connects the two Z-axes and also guarantees the synchronicity of the movement.
32-Bit Motherboard
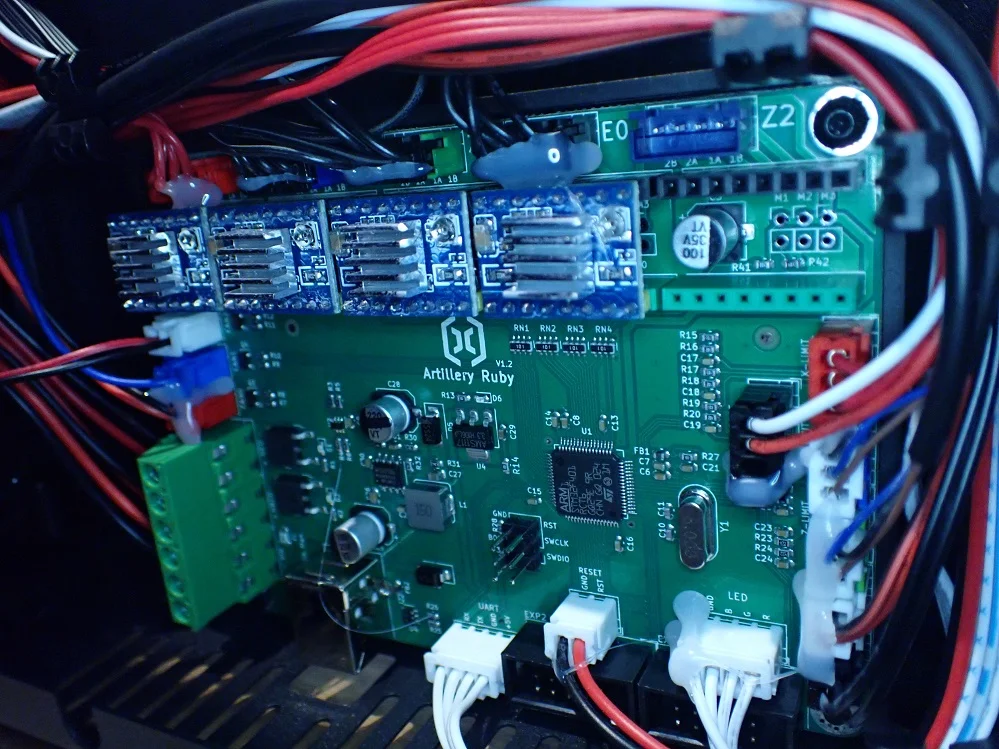
With its predecessor, the Sidewinder X1, it was a popular upgrade to replace the 8-bit motherboard with a 32-bit motherboard. The Sidewinder X2 comes with a 32-bit motherboard, the so-called Artillery Ruby 32-bit Motherboard V1.2.
The motherboard itself looks very small in the spacious 3D printer base. However, this helps with the cooling, which is handled by a single 80mm 24V fan.
The 32-bit motherboard includes slots for the stepper motor drivers, making them easy to replace in the future. There is also more room for upgrades and customization of the software. The new motherboard would theoretically allow you to go wild with customizations to the Marlin software.
Another plus point of the Sidewinder X2’s motherboard is the neat cabling and the high quality of the connections. If you ever need to replace the motherboard, you can get to it very easily and remove and reinstall it with just a few screws. However, I would recommend that you remove the frame so that you can turn the 3D printer base flat upside down. Make sure that you protect the print bed from scratches.
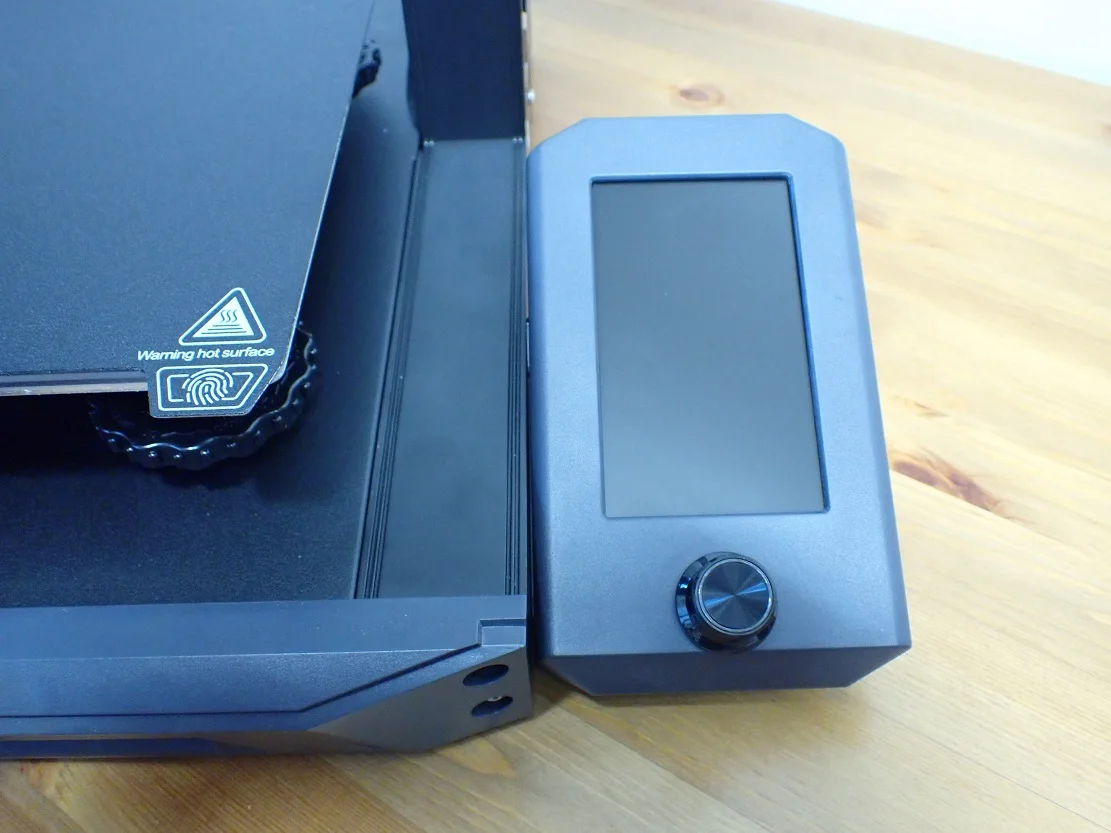
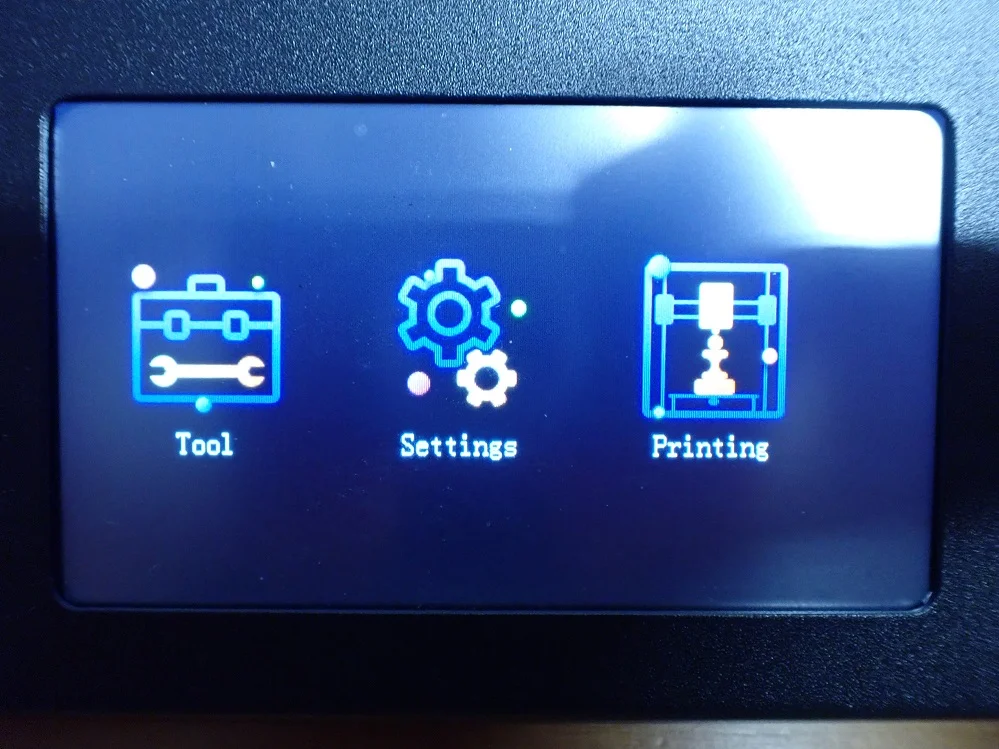
2.7” Color Touch Screen


The colored touchscreen has unfortunately not changed compared to its predecessor. Artillery could have made the handling more modern and convenient here. Although you can quickly find all the important settings in the menu and get used to the layout and size, it is not as intuitive and user-friendly as other 3D printers.
Replacing the touchscreen with a larger one will be difficult, but there are certainly firmware upgrades/updates that make the handling more comfortable by adjusting the menu.
The standard menu of the Sidewinder X2 is divided as follows:
- Main menu:
- Display of the current and set temperature of the nozzle and the print bed
- Display for the current cooling rate
- Buttons for submenus: Tools, Set, Print
- Tools:
- Buttons for submenus: Heat, Extrude, Move, Home, Level, Change, More
- In the More submenu: Z-Offset settings, Auto Level, Switch light on and off.
- Settings:
- Buttons for submenus: File, Continue, Fan, About, Motor-Off
- Print:
- Selection of print file on text basis without preview image/thumbnail
Even though the previous description of the touchscreen sounds rather negative, it also has a few good sides. It reacts very well and quickly to your touches, and you can quickly find your way around the menu after a while. In the long run, the operation via this touchscreen can even be faster than the widespread displays with a rotary knob, like the Ender 3 S1 for example.
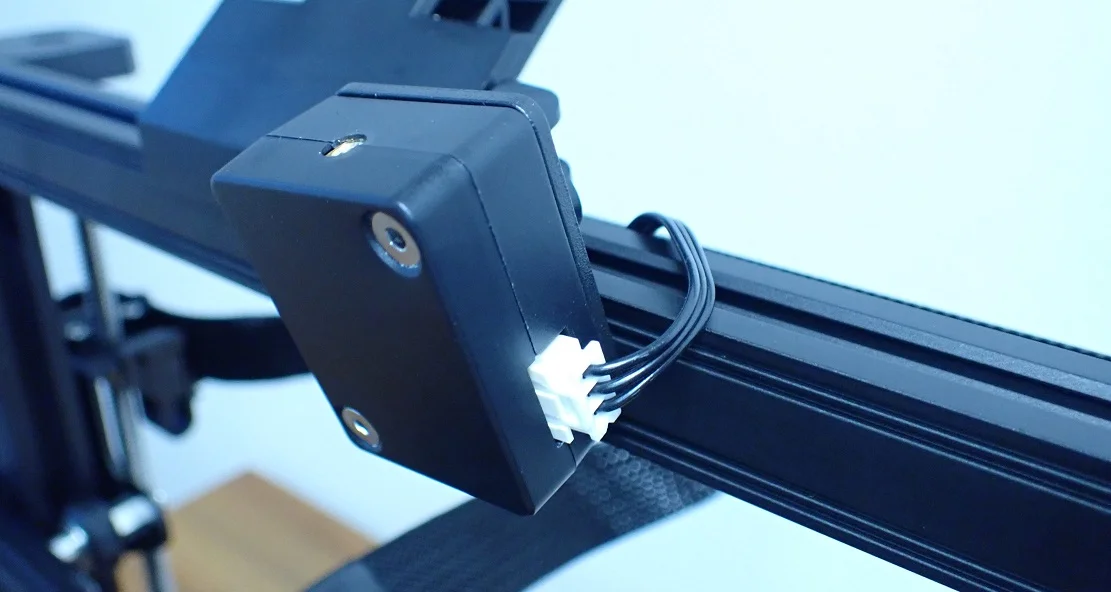
Neat Wiring


Artillery 3D printers are known for having a neat look. With many low-budget 3D printers, the cabling is often very messy and has to be brought under control with cable ties.
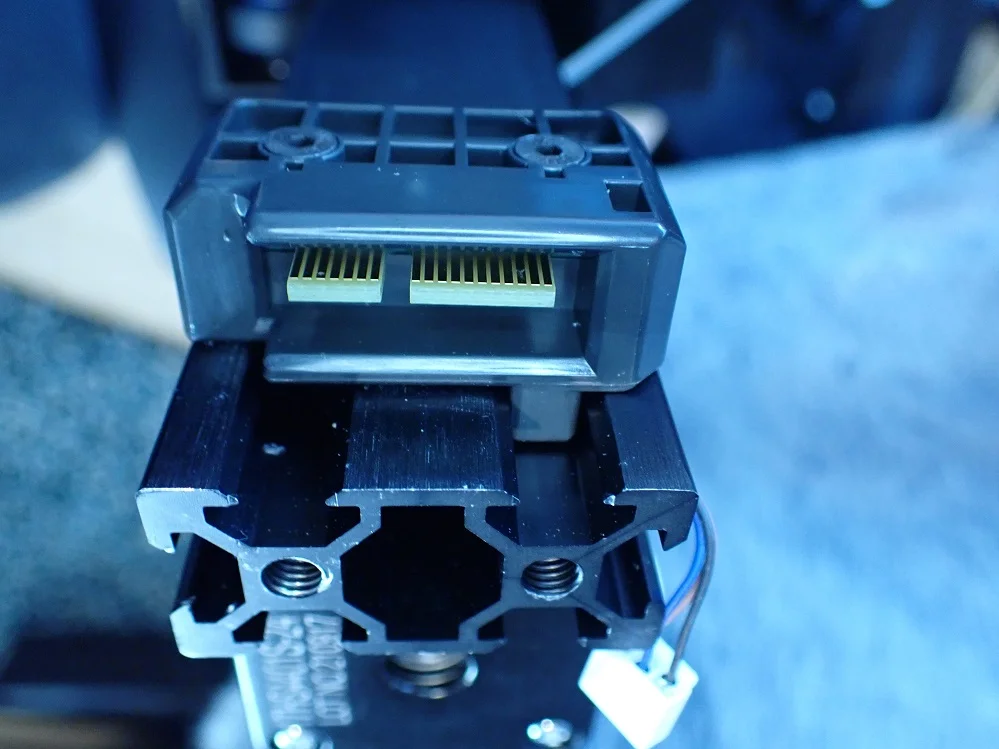
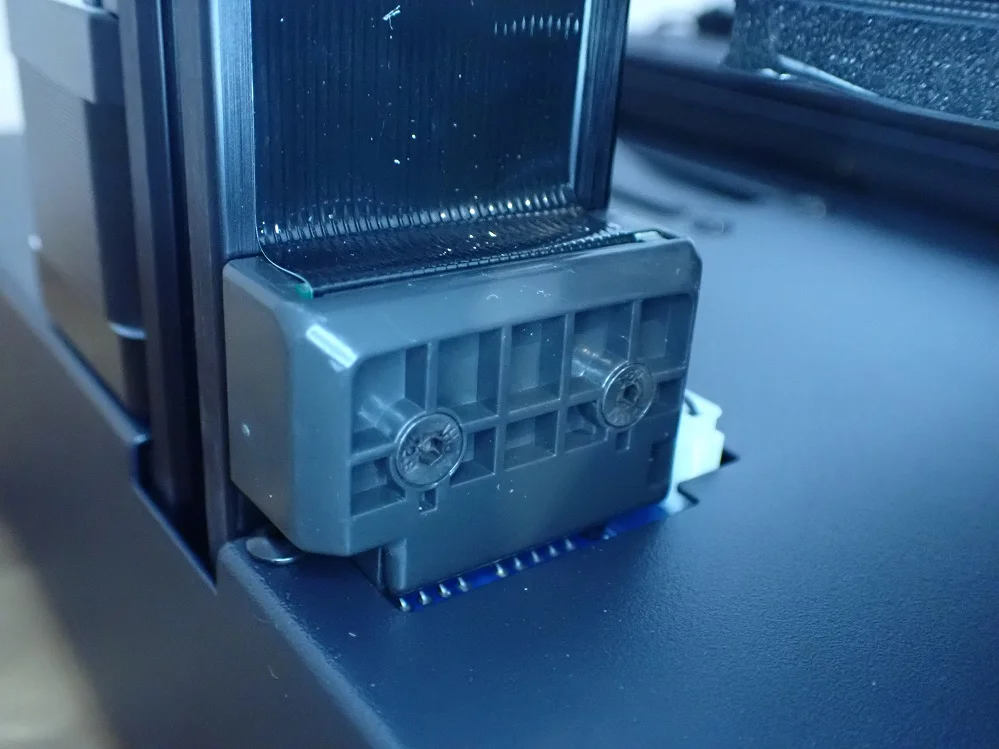
With the Sidewinder X2, all cables are already pre-assembled and only a few connections have to be plugged during assembly. The cabling between the motherboard and the X-axis with extruder was realized by a ribbon cable. This means that even fewer cables are used and the ribbon cable looks professional and tidy.
However, with ribbon cables, the connection point is a common problem when movement is involved. As the X-axis moves up and down and the print head moves right and left, there is constant mechanical stress on these connectors during printing. This often caused the Sidewinder X1 to break the connection and disrupt data transmission.
There have been many solutions that have prevented this, but none have been very satisfactory or permanent. Fortunately, this problem has been solved with the Sidewinder X2.
The connections have been designed to be as stable as possible. The ribbon cables are fixed with stable clips just before the connectors, so that the movements of the ribbon cables do not reach the connectors. This prevents unwanted damage to the connectors.
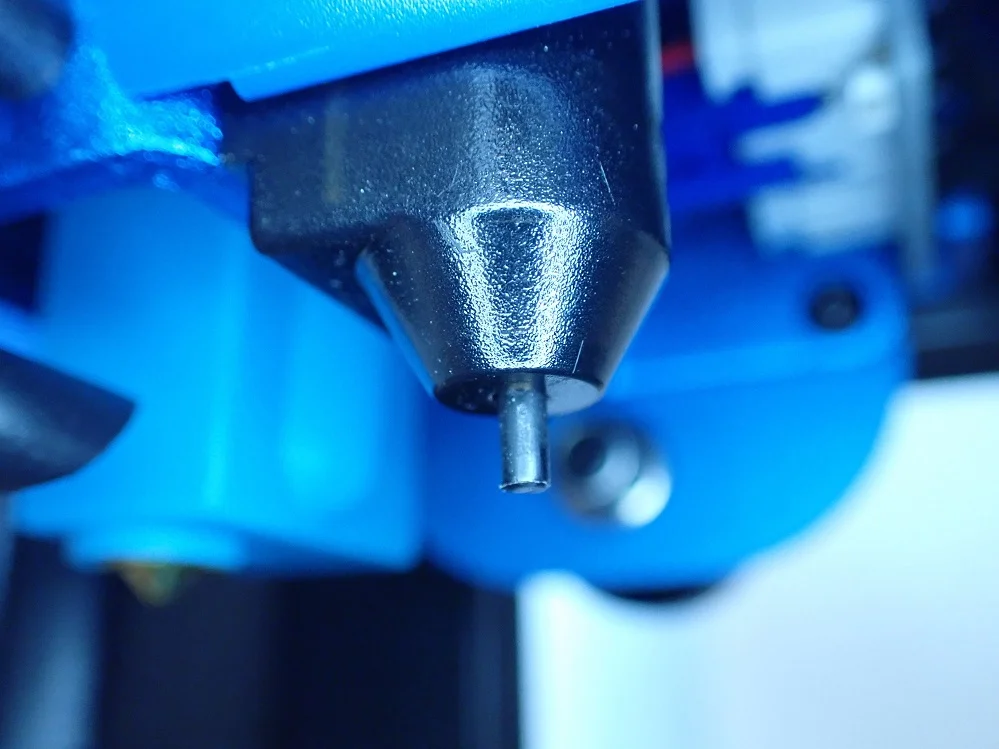
Automatic Print Bed Leveling
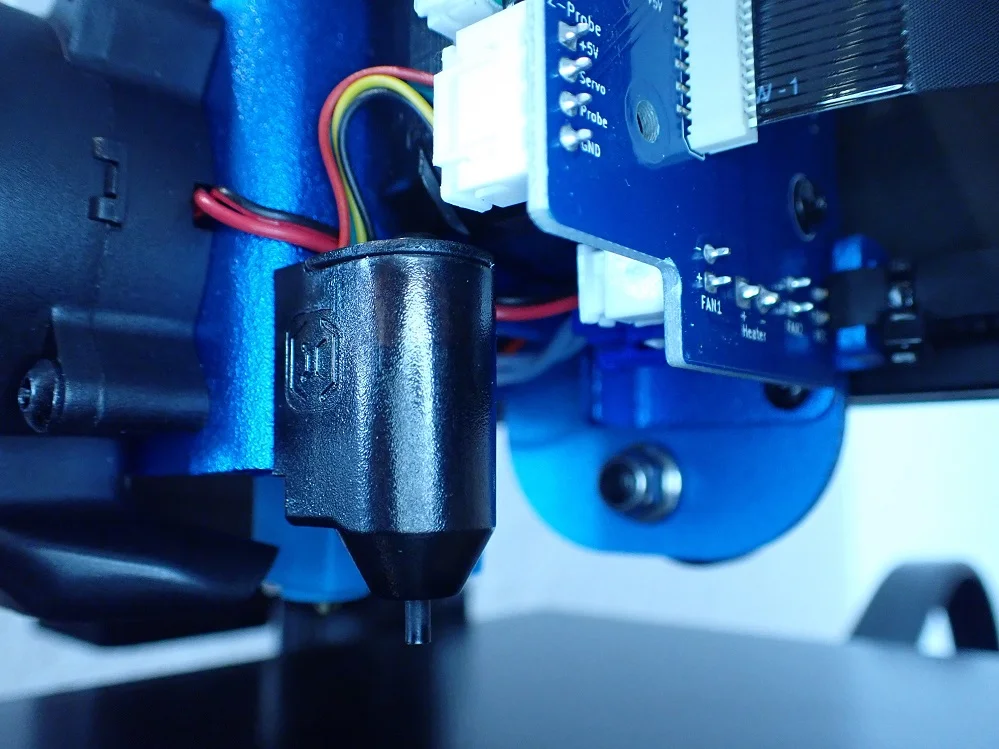
One of the best upgrades of the Sidewinder X2 is the sensor for automatic print bed leveling. It works similar to a BL Touch or CR Touch. It uses a thin pin to mechanically feel the print bed.
As soon as this pin touches the print bed, it moves back and triggers the sensor. The sensor does this at 20 points on the print bed and thus calculates its inclination. The inclination of the print bed determined in this way is then automatically compensated for during printing. This saves you a considerable amount of effort when leveling the print bed!
You only need to perform manual leveling at the very beginning of assembly to compensate for extreme inclinations. After that, it is sufficient to perform the automatic print bed leveling from time to time.
Via the menu, you can also easily set the Z-Offset (the Z-Offset globally sets the zero position of the print bed).
I am very satisfied with the automatic print bed leveling sensor on the Sidewinder X2. The leveling is very accurate and I could hardly notice any deviations in my tests. If you are not satisfied with the sensor or need to replace it, there is also a slot included on the printhead for the BL Touch or Cr Touch.
220/110V Voltage Switch

On the back of the 3D printer, there is a voltage switch next to the on/off switch and the power cord plug. You can switch between 110 volts and 220 volts.
This way Artillery does not have to produce two different versions of the printer and only needs one version that can be used in different parts of the world. The downside to this, however, is that you really need to pay attention to what voltage is set. If you select the wrong voltage, you will only turn on the 3D printer once and then never again, because the power supply will be defective.
Resume Print
For a mid-range 3D printer, the resume print feature is a must. With this feature, the 3D printer remembers the point of the 3D print where it was interrupted by an unforeseen power failure.
With the Resume Print feature, you don’t have to worry about the 3D print being ruined by such an interruption. The Sidewinder X2 will continue printing at exactly the same point where it was interrupted. Especially for large 3D prints this feature is very handy and can save a lot of time, material, power costs and nerves in case of doubt.
I tried out this feature, of course. To test the resume print feature, I spontaneously unplugged the power cord during printing. After I restored the power after a few minutes, the Sidewinder X2 started 3D printing in the same place.
However, you could tell where the print was interrupted by the fact that some spilled material stuck to the outer wall of the 3D print. After the print was finished, this excess material was easily removed with a fingernail, and the surface looked as if nothing had happened.
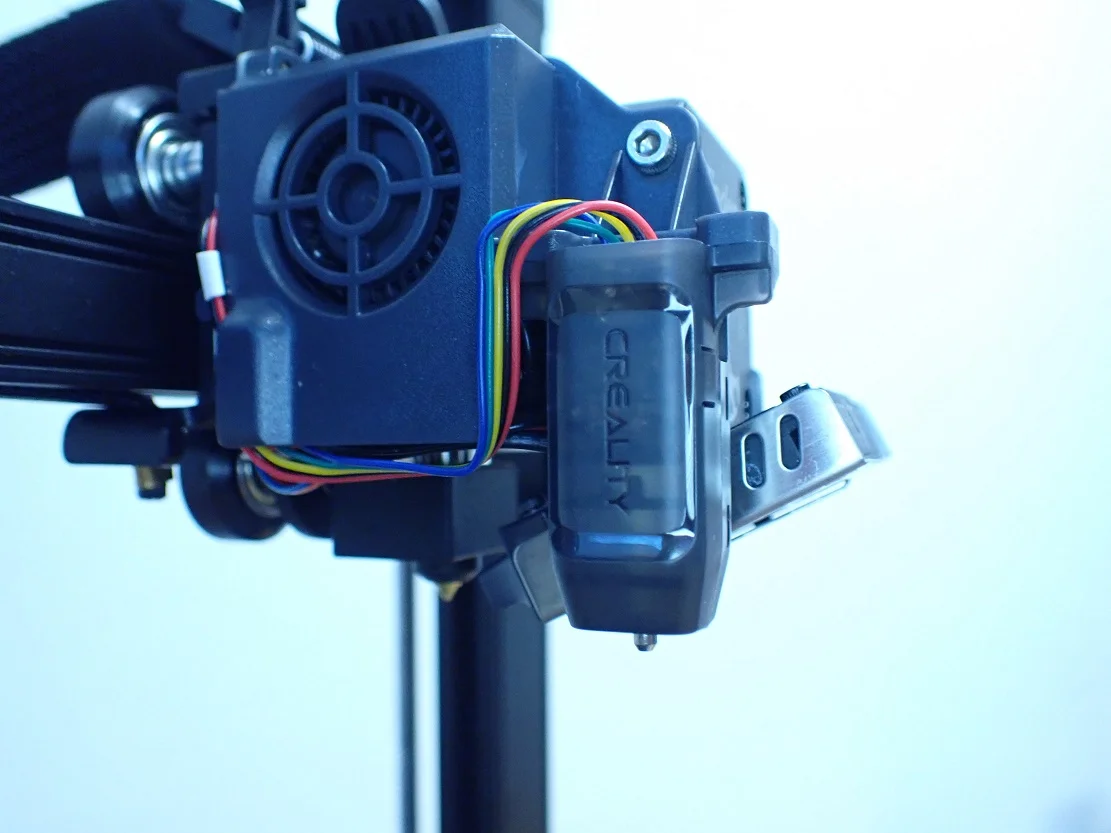
Filament Sensor
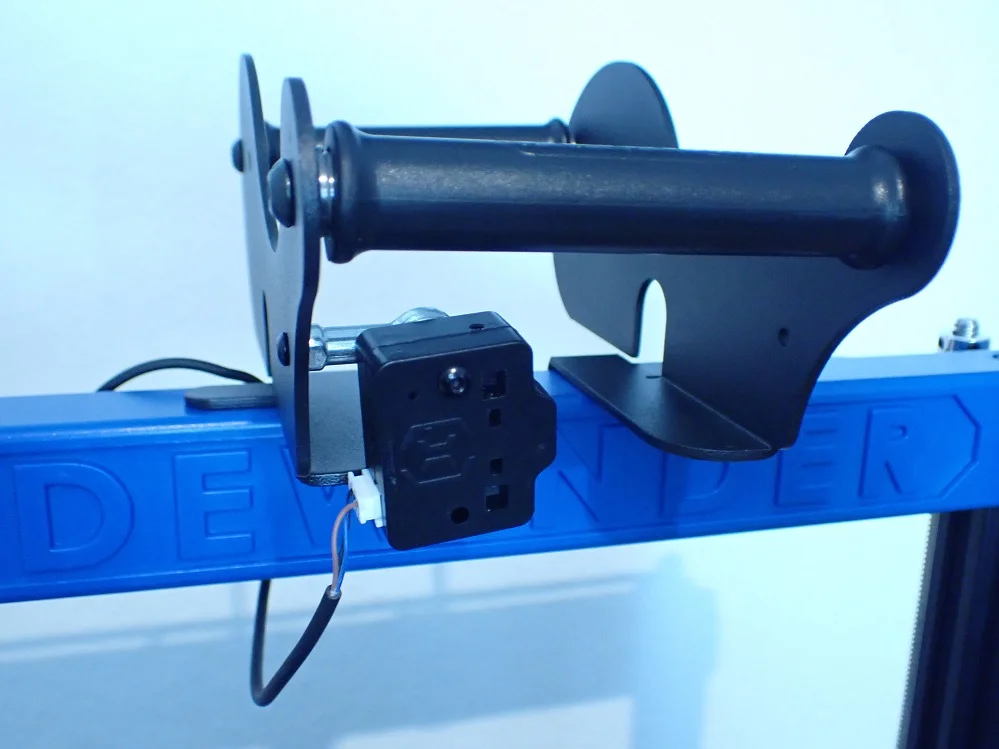
The filament sensor on the Artillery Sidewinder X2 is located directly under the filament spool on the filament holder. The sensor cable is already pre-assembled in the frame upon delivery and only needs to be plugged into the filament sensor.
The filament sensor can move relatively freely to dynamically follow the movements of the filament and the print head. This ensures undisturbed feeding of the filament.
Through a filament sensor, the 3D printer notices when the filament is running low. This prevents the 3D printer from printing without filament and you have to repeat the print. As soon as the filament sensor detects no more filament, the print is paused so that you can reload new filament.
With Bowden extruders, which are normally positioned on the X-axis, the filament sensor is usually located directly in front of the extruder. With a direct drive extruder, this would unnecessarily increase the weight of the printhead. The print head of a direct drive extruder must be as light as possible to avoid vibrations and to enable a higher print speed.
The only downside to the Filament Sensor is that its wiring disrupts the otherwise perfectly neat cabling of the Sidewinder X2. Its cable can’t be perfectly hidden or placed in a way that makes it less eye-catching. But maybe I’m just a little clumsy and you can find a nicer way to route the cable.
Easy Assembly
While I enjoy assembling 3D printer kits that consist of many small parts, I have assembled and disassembled many 3D printers, so a simple assembly that is done in minutes was a welcome change.
But there are also many users who prefer a fast assembly. If you are one of them, you are definitely right with the Sidewinder X2. The assembly of the Artillery Sidewinder X2 takes less than 10 minutes! This is one of the easiest and fastest assemblies I have seen on a 3D printer.
The assembly consists of only a handful of steps and mainly of tightening a few screws and connecting a few cables. Artillery seems to have designed it with user-friendly assembly in mind, in addition to proper cabling.
I really liked the fact that the screws that connect the base to the frame were already in the base and that the plug-in connection of the cables from the motherboard to the print head was done directly by inserting the frame.
The only point of assembly that could be perfected would be an immobile print bed that can only be leveled automatically without turning screws. Other 3D printers already have such leveling and eliminate manual leveling completely.
Quiet Stepper Motor Drivers
The 32-bit motherboard has slots for stepper motor drivers. This allows you to replace the stepper motor drivers if they are defective or replace them with better ones. However, the installed stepper motor drivers are extremely quiet, so an upgrade would not make much sense. Besides the fan system, the quiet stepper motor drivers contribute significantly to the low noise level of the Sidewinder X2.
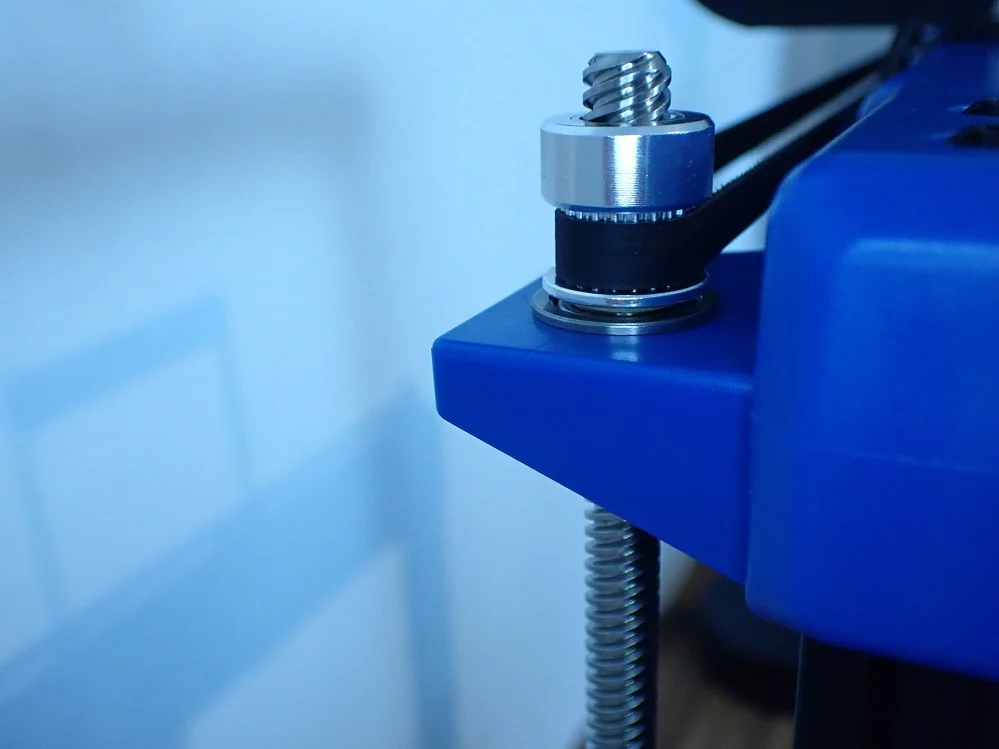
Cast Aluminum Z Slide
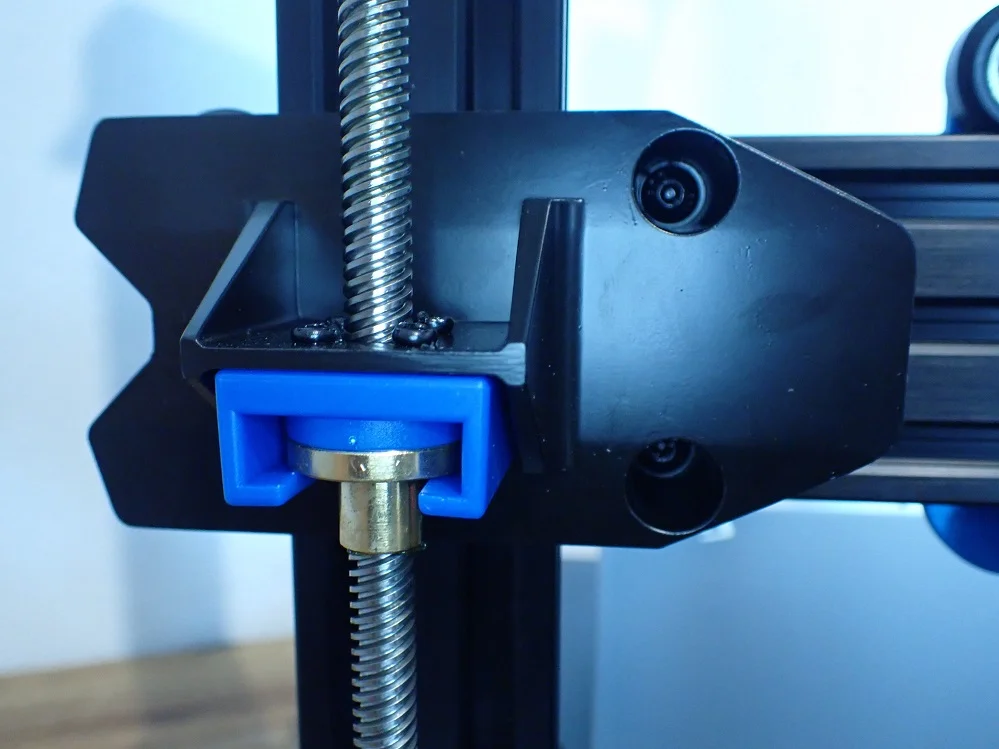
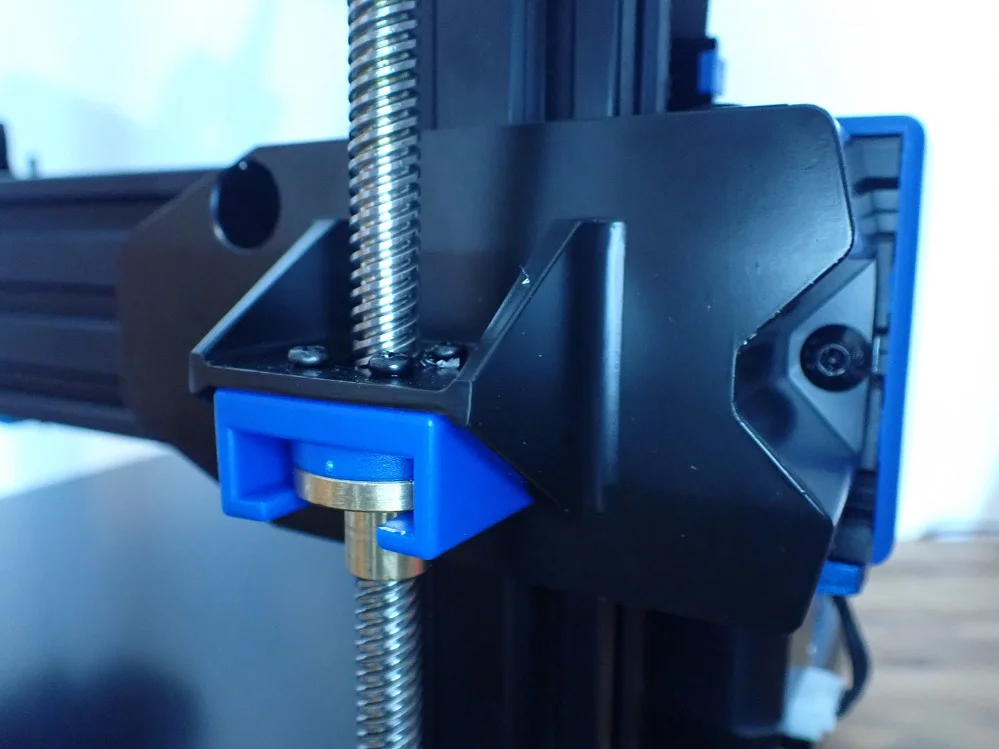
The guidance of the X-axis on the aluminum frame was realized by cast aluminum parts. In these parts are the wheels with which the X-axis moves up and down on the Z-axis.
Unlike many other 3D printers, the pressure with which the wheels press on the frame is produced by a spring. I already knew this principle from the Bluer Plus.
Power Supply Without Fan

Since the print bed requires very little power due to the AC heater, a 200 watt power supply is sufficient for the rest of the 3D printer. The power supply comes out without a fan due to the low power, which further reduces the noise level of the Sidewinder X2. The power supply is located in the 3D printer base and can be set between 110 volts and 220 volts depending on the region.
Check Price at:
Heating Times
> Artillery Sidewinder X2 Review
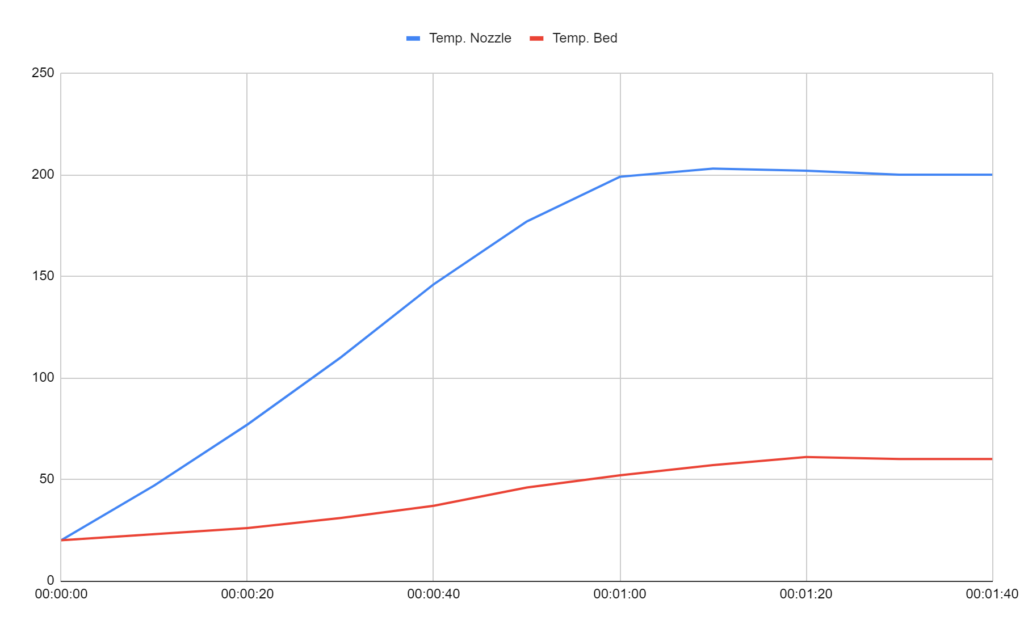
The Artillery Sidewinder X2 has a very fast heat-up time of 01:30 minutes for typical temperatures of PLA (200 °C for the hot end and 60 °C for the print bed). Most other 3D printers in its price range require 2 minutes or longer for such temperatures. This fast heat-up time is due to the PTFE lined Volcano Hotend and the fast AC heating of the print bed.
| Time | Temp. Nozzle | Temp. Bed |
|---|---|---|
| 00:00:00 | 20 | 20 |
| 00:00:10 | 47 | 23 |
| 00:00:20 | 77 | 26 |
| 00:00:30 | 110 | 31 |
| 00:00:40 | 146 | 37 |
| 00:00:50 | 177 | 46 |
| 00:01:00 | 199 | 52 |
| 00:01:10 | 203 | 57 |
| 00:01:20 | 202 | 61 |
| 00:01:30 | 200 | 60 |
| 00:01:40 | 200 | 60 |
The two components of the 3D printer not only reach the temperature very quickly, they also keep the temperature stable immediately. This means that you can start printing very quickly and do not have to wait long until the 3D printer is up to temperature.
But even though the Sidewinder X2 has an extremely fast heat-up time due to the AC heating, I would rather trade the fast heat-up time for a slower heat-up time with a homogeneous temperature distribution on the print bed.
Noise Level
> Artillery Sidewinder X2 Review
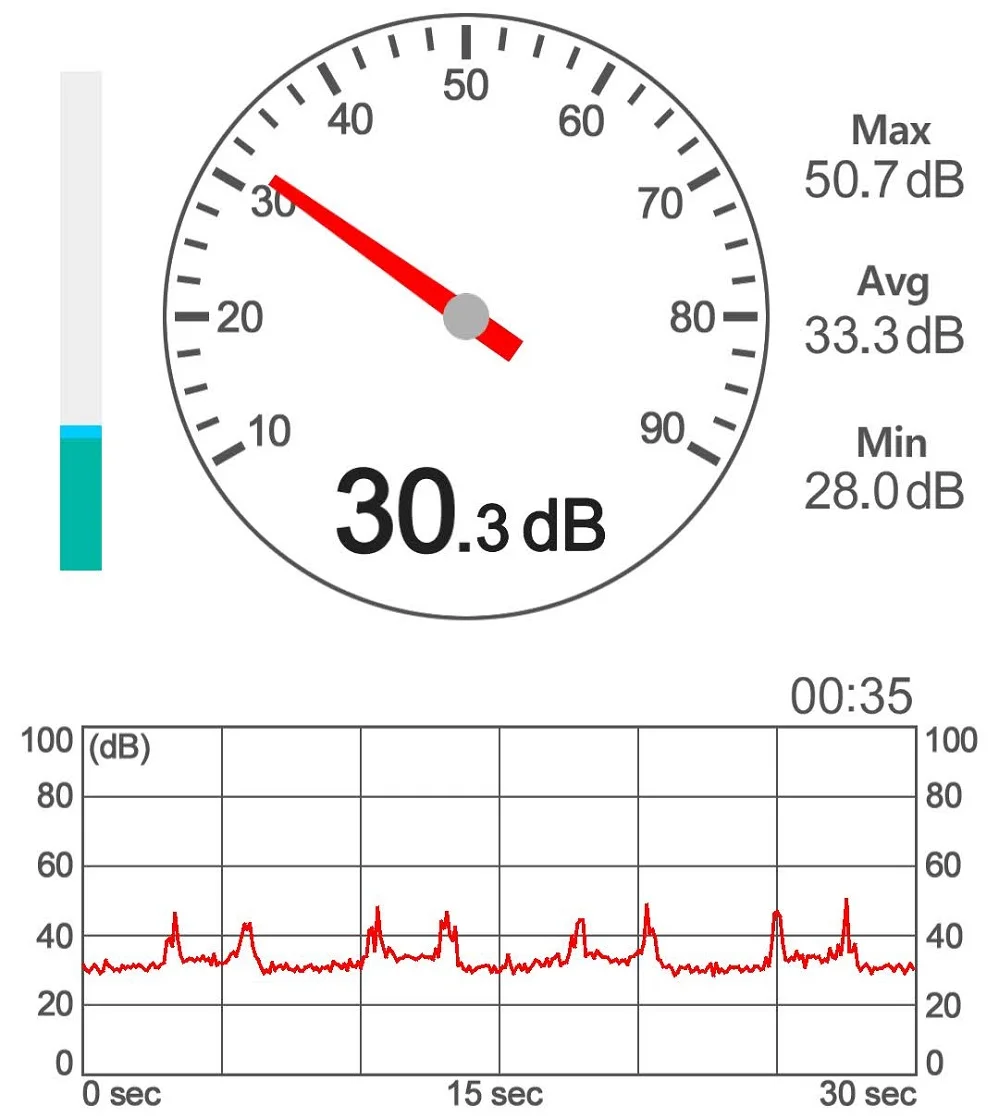
The volume of the Sidewinder X2 is about 33 dB loud on average during printing. This corresponds to a whisper. During printing, however, it occasionally reaches 50 dB when printing diagonally. Except for these peaks, it is very quiet, even compared to other 3D printers in its price range.
The low noise comes from the fact that it has ultra-quiet stepper motor drivers and the power supply has no fans. This eliminates two of the biggest noise producers in classic 3D printers.
Artillery has always put a lot of emphasis on the look and feel of their 3D printers. And this also includes the noise level. Other models from the manufacturer also have a low noise level during printing.
It is difficult to say where the spikes come from during printing in diagonal movements. The stepper motors themselves and their drivers do not produce these noises if they were activated individually. Therefore, I guess that this problem can possibly be eliminated with an update.
Print Speed
> Artillery Sidewinder X2 Review
The maximum print speed of the Artillery Sidewinder X2 is 150 mm/s. However, this is a theoretical figure and is only used for very rough objects. Standard print speeds are around 60 mm/s.
I did all my test prints at 60 mm/s and had consistently good results.
The slower the printing speed, the better the result. However, this will make printing take longer. The faster the print head moves, the less accurate it will be and printing errors may occur due to vibration. It is therefore important to find the right balance between too fast and too slow.
The correct value also depends on the material used. Flexible filaments require a slower speed of about 30 mm/s, otherwise they can get tangled or have a strong tendency to stringing or blobbing because they cannot be pulled back in time.
Operation
> Artillery Sidewinder X2 Review
UI: The operation of the Sidewinder X2 is facilitated by the color touchscreen. However, it is not very large with its 2.7-inch diagonal. Artillery has missed a great opportunity here to increase the usability even more. However, once you get used to the small screen, you’ll quickly find your way around the menu.
A big plus is that the printer comes with a USB stick that you can use to feed the printer with files. This makes operation much more convenient than with a MicroSD card.
Print bed: The textured glass print bed provides very good print bed adhesion for most standard filaments. I mainly printed with PLA and only had difficulties with the print bed adhesion for very filigree first layers. However, this could be corrected with some Magigoo.
The print bed is very large, which allows you to print large objects in one piece. The big disadvantage of the print bed, however, is that the temperature is not homogeneously distributed. The very effective AC heater unfortunately has many large holes in the places where the rotary screws are placed under the bed. At these places, the temperature on the surface is much lower than on the rest of the print bed. This greatly reduces the print bed adhesion at these points.
Printing:
Starting a print is relatively easy with the Artillery Sidewinder X2. Since the heat-up times for the hotend and the double are as fast, it takes less than two minutes for the print to start after you give the command.
Slicer: The Sidewinder X2 is compatible with many slicers. These include Cura, Ideamaker, Simplify3D and Slic3r. Like all of my other FDM 3D printers, I have used the slicer with Cura. There is a very good profile in Cura for its predecessor, the Sidewinder X1. This profile worked flawlessly for me without much calibration effort.
Slicer
> Artillery Sidewinder X2 Review
At the time of this review, there is no dedicated profile for the Artillery Sidewinder X2 in Cura. However, there is a very good profile for the Sidewinder X1. The profile is well calibrated and delivers very good results even with the successor. I have hardly changed the profile and had very good results directly.
However, finding the right settings is sometimes not that easy. Every 3D printer is slightly different, so it’s a good idea to calibrate the most important settings. These include the print temperature, the extrusion or flow rate, and the retraction.
Read the full guide:
Best Cura Settings & Profile for the Sidewinder X2 – Tested!
Printing Temperature Calibration on the Sidewinder X2
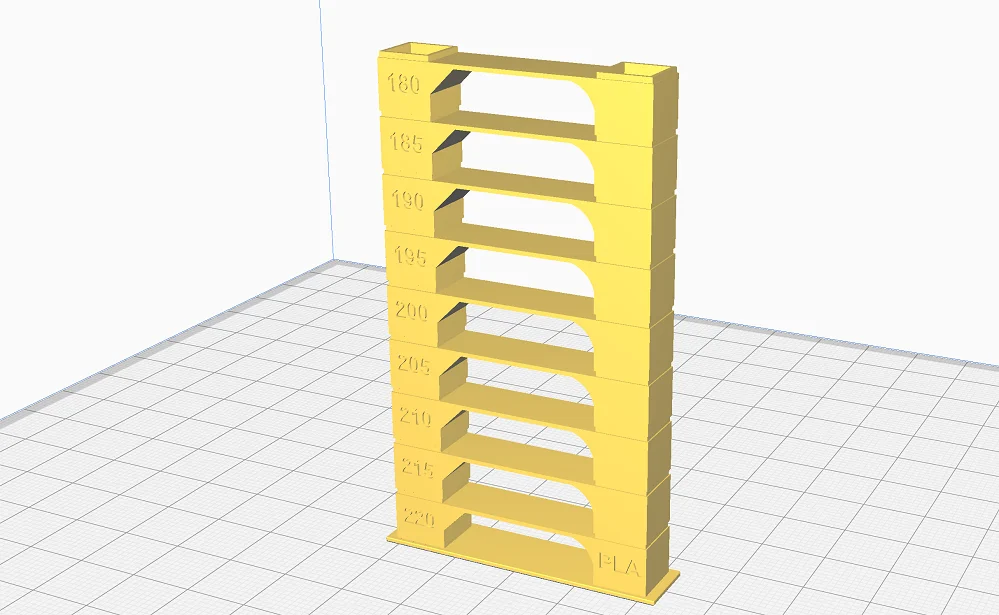
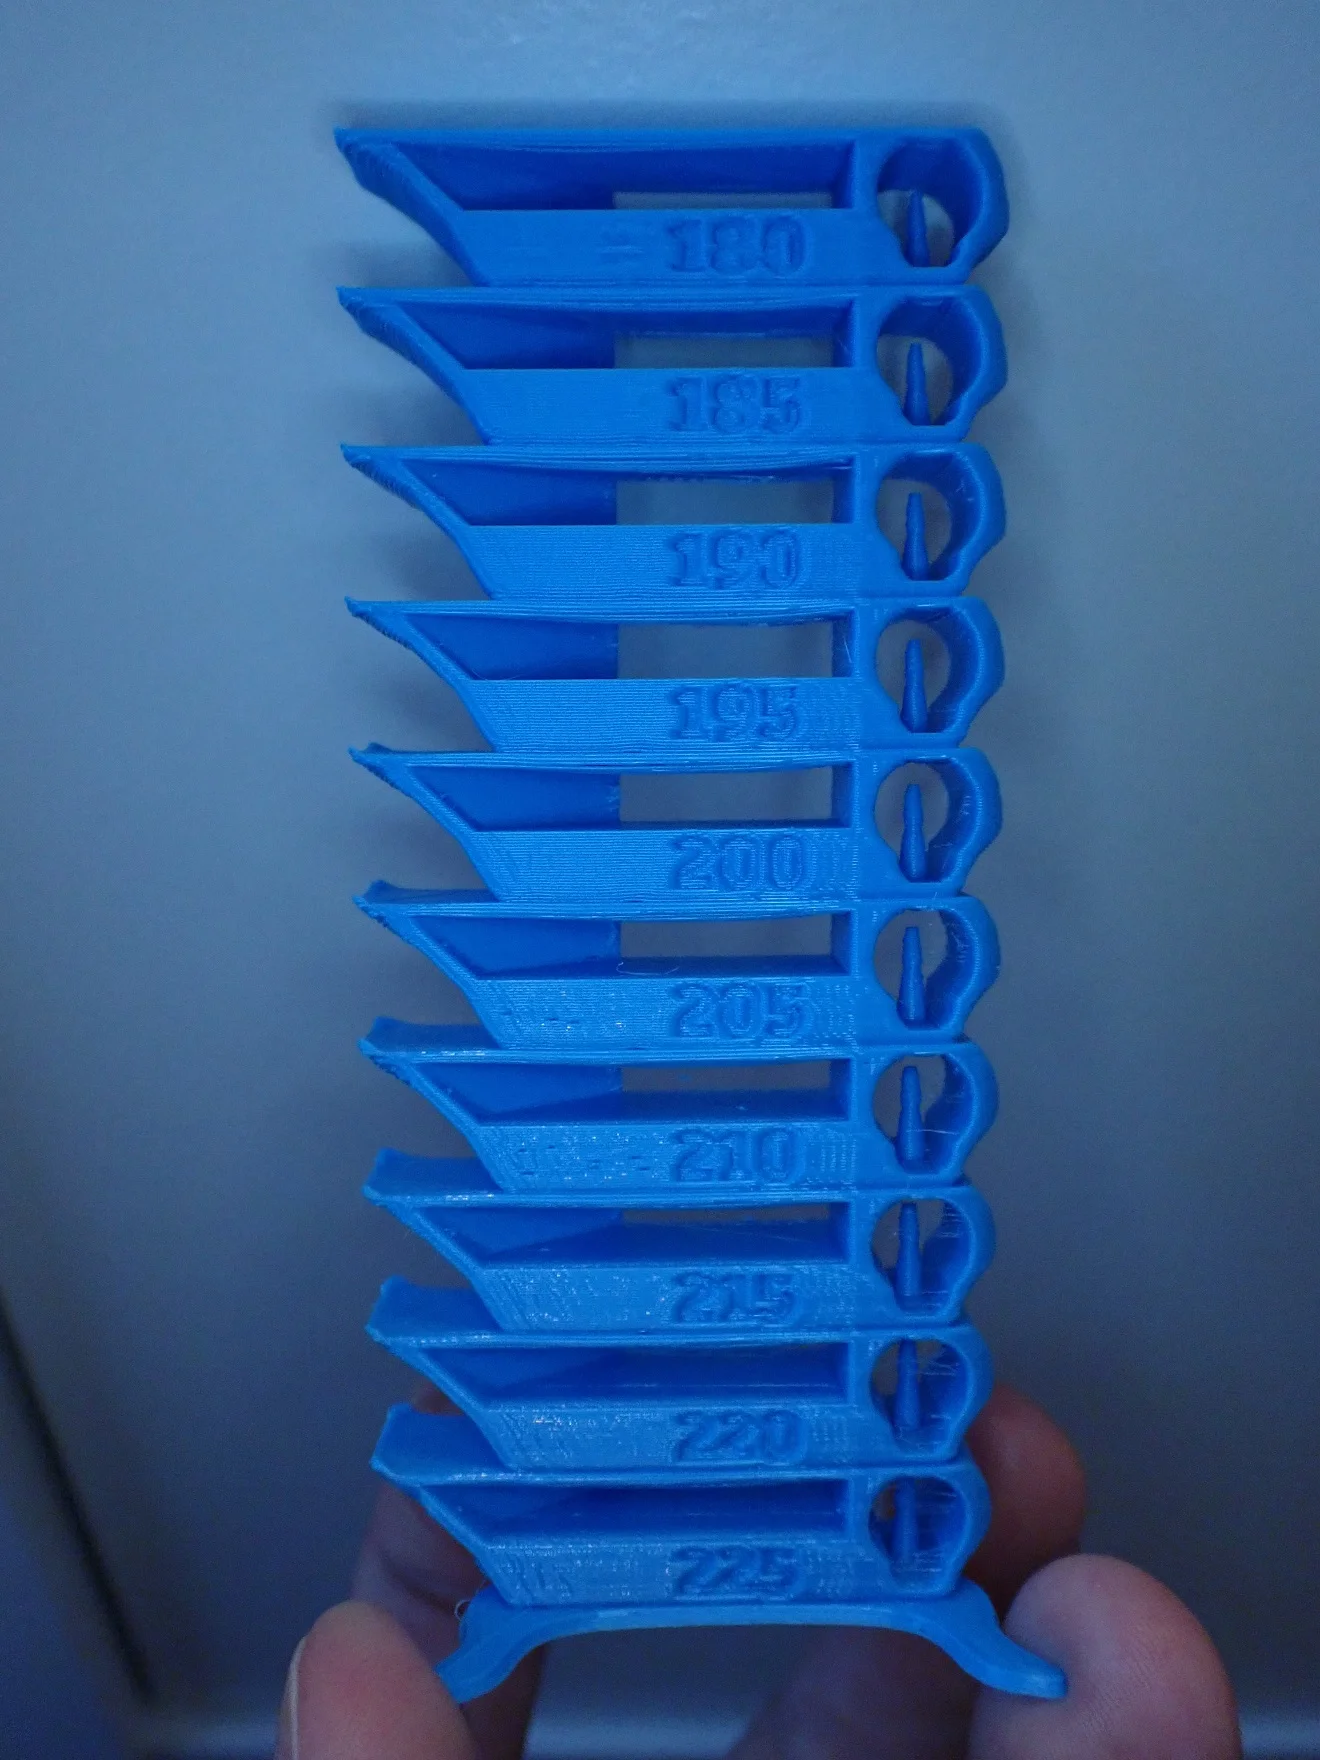
To find the right printing temperature for the material used, a so-called temperature tower is useful. With such an object you can print a recurring geometry with different temperatures to test the right temperature. To such a tower always belongs the appropriate script that changes the print temperature from a certain height.
I like to use the temperature tower from the Calibration Shapes plugin in Cura. But there are also very good objects on portals like Thingiverse.
The individual floors of the tower are designed to promote various printing errors. Especially under-, over-extrusion and stringing are tested.
Flow Rate Calibration on the Sidewinder X2
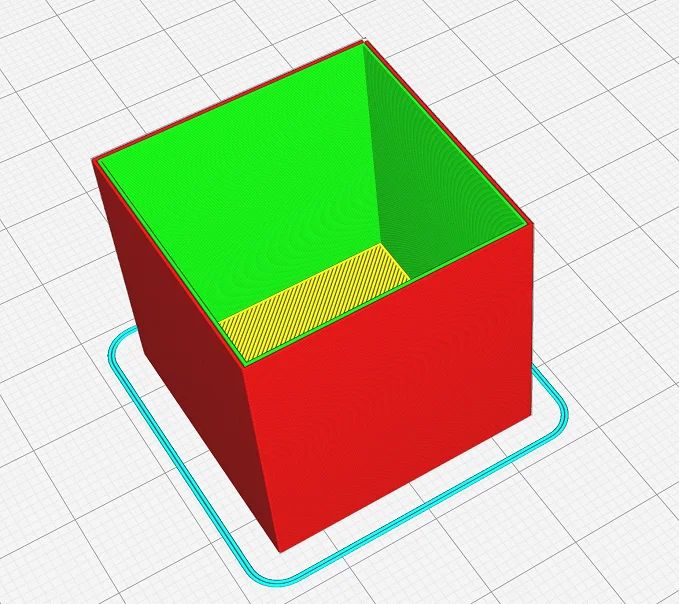
The flow rate determines how much filament is extruded per time unit. It is expressed as a percentage and is usually 100%. If you increase this value, more filament will be extruded, if you decrease it, less filament will be extruded.
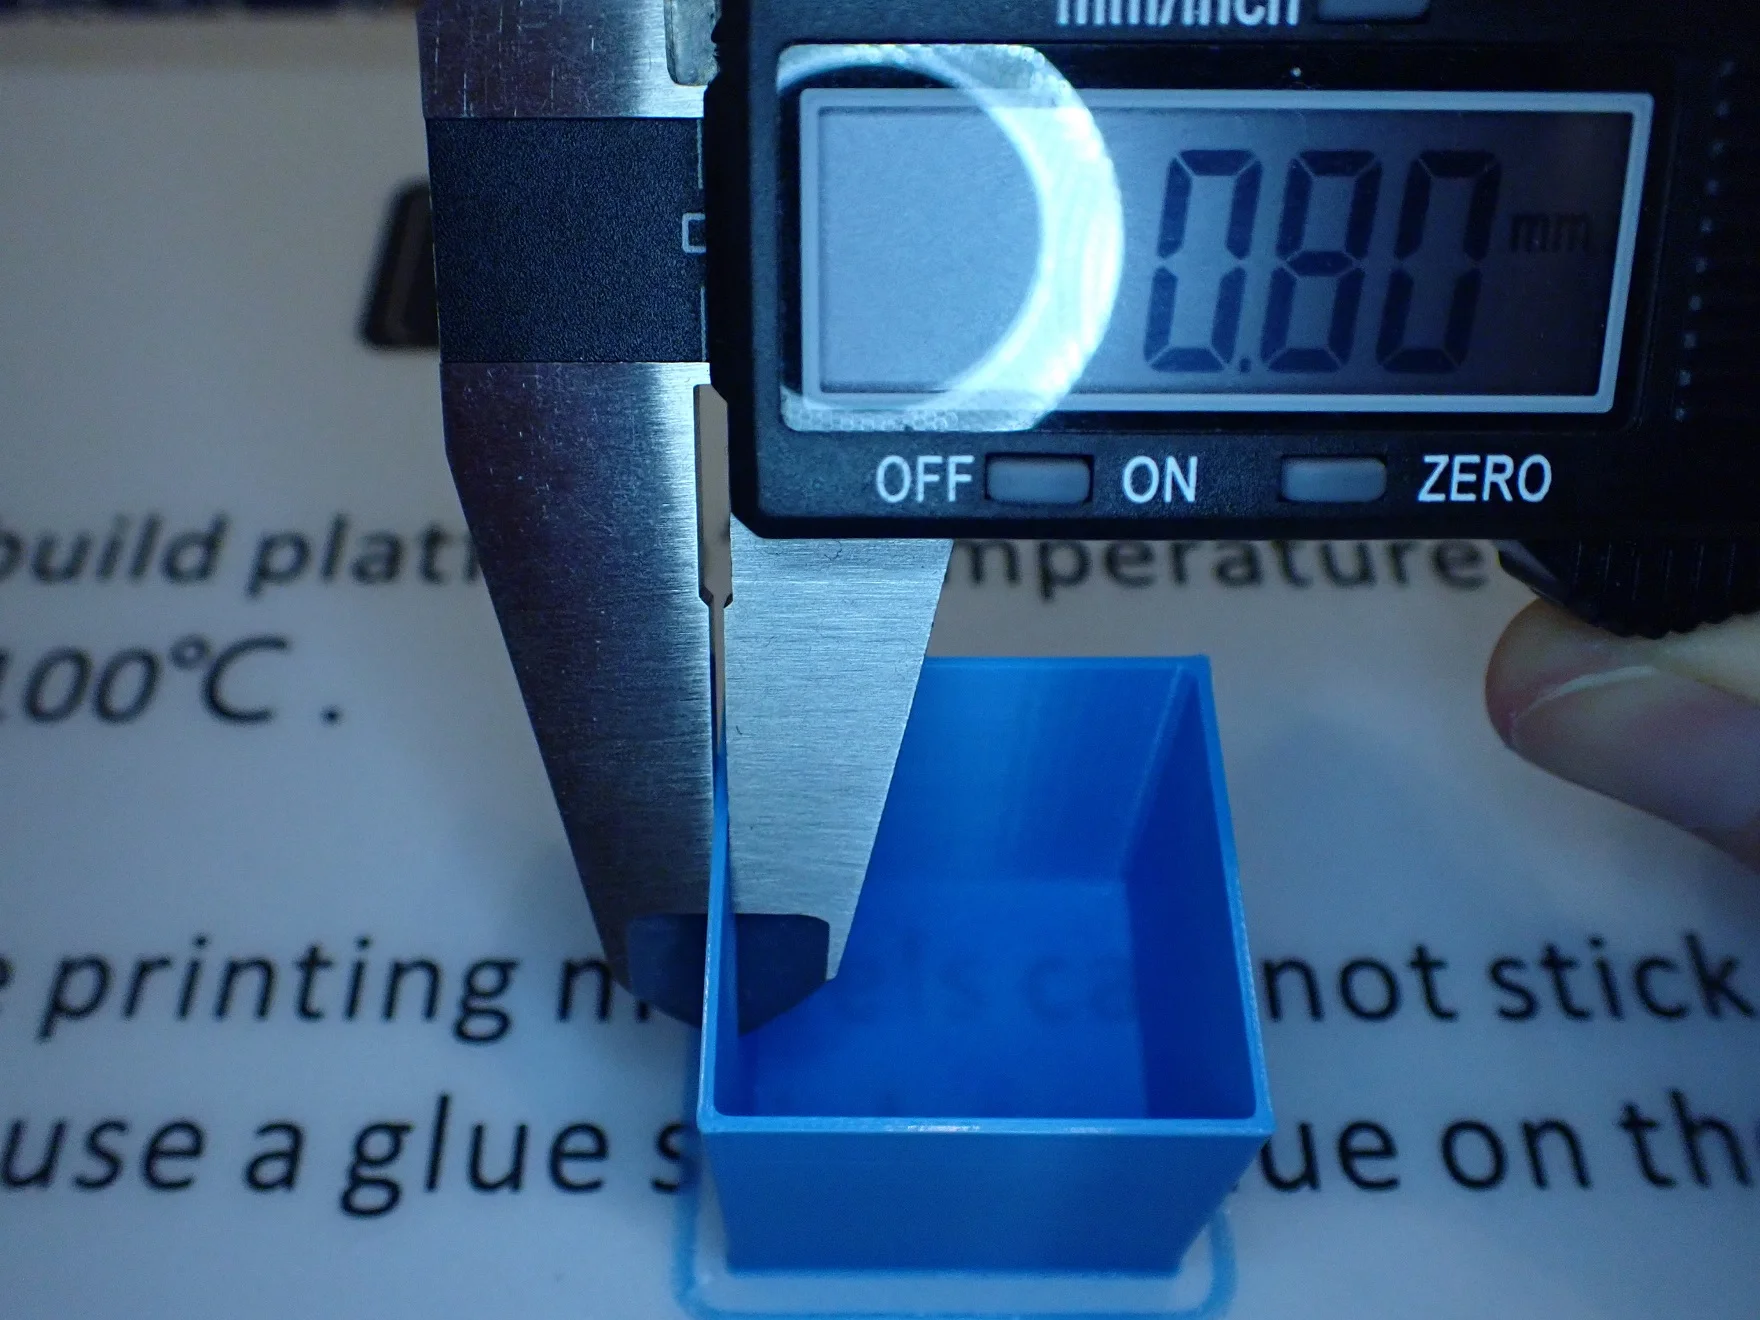
To determine if you need to adjust this value, you can print a cube without infill and without top layers. If you set the wall thickness to print two lines, you can measure with a caliper after printing whether too much or too little filament is extruded. If the wall thickness is greater than twice the line width, you must reduce the value for the flow and vice versa.
Example: You have a line width of 0.4 mm, print a cube with two walls and measure a wall thickness of 0.82 mm. Then the flow rate is too high by 2.5%.
Calculation:
- (measured value / number of walls – line width) / line width
- (0,82 / 2 – 0,4) / 0,4 = (0,41 – 0,4) / 0,4 = 0,01 / 0,4 = 0,025 = 2,5%
In this example, you would have to set the flow rate to 97.5%. It is recommended to repeat the test to check if the flow rate is now set correctly. With my Sidewinder X2, I also needed only one pass to find the correct setting.
Retraction Calibration on the Sidewinder X2

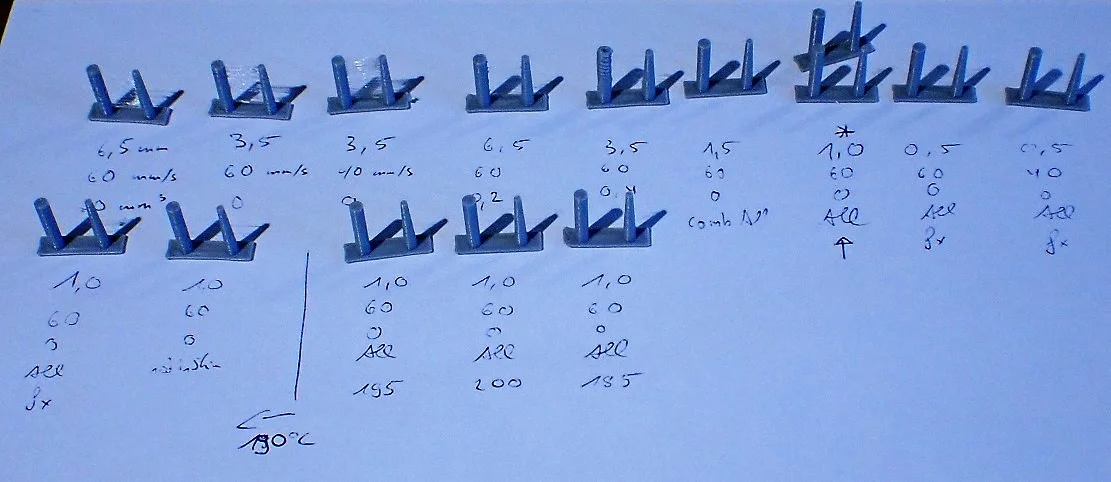
For retraction, there is also a very good object in the Calibration Shapes plugin. It consists of two columns and can be printed within a few minutes. This allows you to quickly test different settings and quickly find the optimal value.
The best way is to start from the default settings for the retraction and the retraction speed and then try to optimize the result in small steps up and down. Remember, though, that you should only change one value at a time so that you know what caused the changes in the 3D print.
Print Quality
> Artillery Sidewinder X2 Review
The print quality of the Artillery Sidewinder X2 is good, with layer thicknesses of 0.1 mm to 0.3 mm, but nothing unusual. With its direct drive extruder, accurate stepper motors and low vibration movements, the print quality is very repeatable and reliable.
To test the print quality, I printed various test objects after calibration.
Test Object on USB Stick
The test object on the USB stick was already sliced by Artillery and only needed to be printed. For some reason, Artillery decided to use a Brim, which ruined the final result a bit, as the settings for the Brim seemed to be such that it was very difficult to remove.
For such a smooth and relatively large bottom layer, a brim would not have been necessary at all for the print bed. Otherwise, the print quality is very good and no printing errors occurred.
- Material: Eryone PLA Blue*
- Layer thickness: 0.15 mm
- Nozzle temperature: 200 °C
- Print bed temperature: 60 °C
- Printing speed: 80 mm/s
3DBenchy


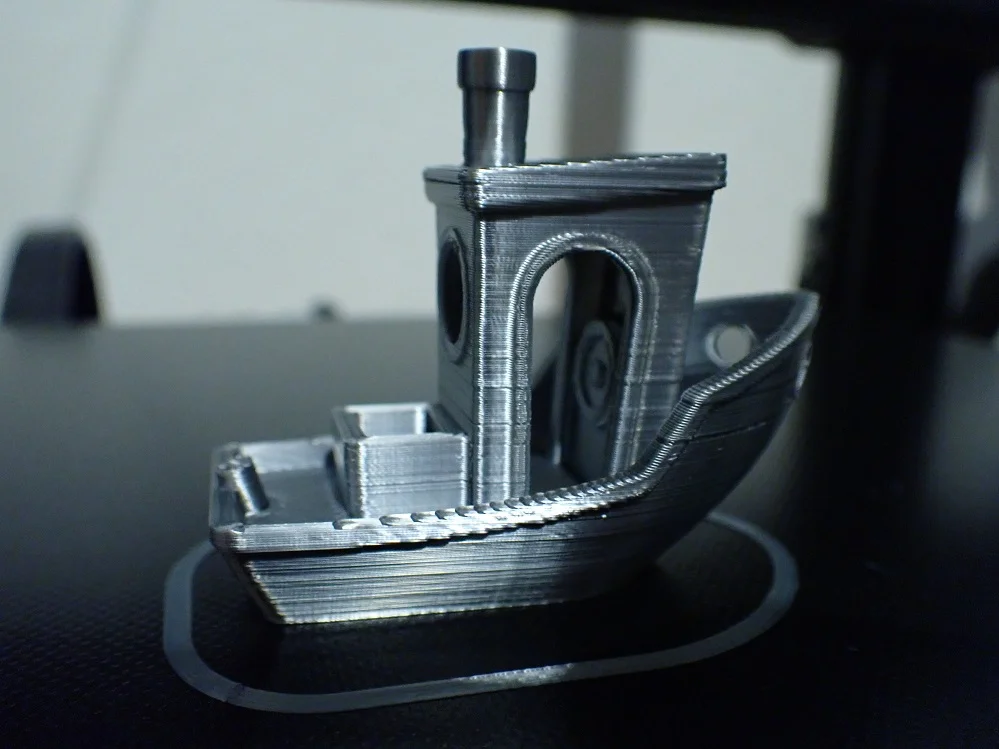
3DBenchy (link to model) is a very popular calibration object and one of the first objects I print with any 3D printer. The geometry of the model challenges any 3D printer and favors printing errors so you can quickly see the weak points of the settings.
I printed this stress test with PLA after calibrating the main settings as described above. The result is mostly good, but on the smooth front of the ship you can see horizontal lines, but I attribute them to inhomogeneities in the filament.
- Material: Sunlu Shiny Silk PLA Grey*
- Layer thickness: 0.2 mm
- Nozzle temperature: 195 °C
- Print bed temperature: 60 °C
- Printing speed: 60 mm/s
Iron Man Bust

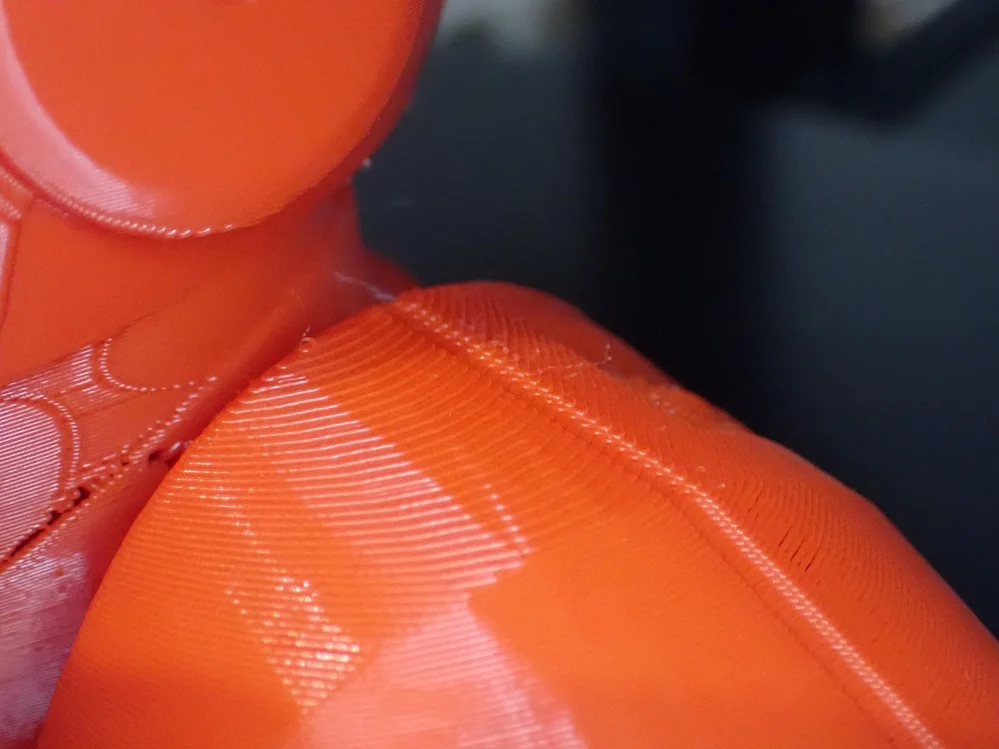

In addition to PLA, I also wanted to test a slightly more demanding filament. For the PETG filament, I have performed the calibration again. The result (link to the model) is impressive and there was only some over-extrusion in a few places.
I did not scale the model and printed it in its original size. However, if I had printed it larger and placed the base on the areas of the print bed where the four screws are located, there would probably have been problems with the print bed adhesion, as the temperature there is lower than on the rest of the print bed.
- Material: Geetech PETG Red*
- Layer thickness: 0.2 mm
- Nozzle temperature: 235 °C
- Print bed temperature: 70 °C
- Printing speed: 50 mm/s
Infinity Cube

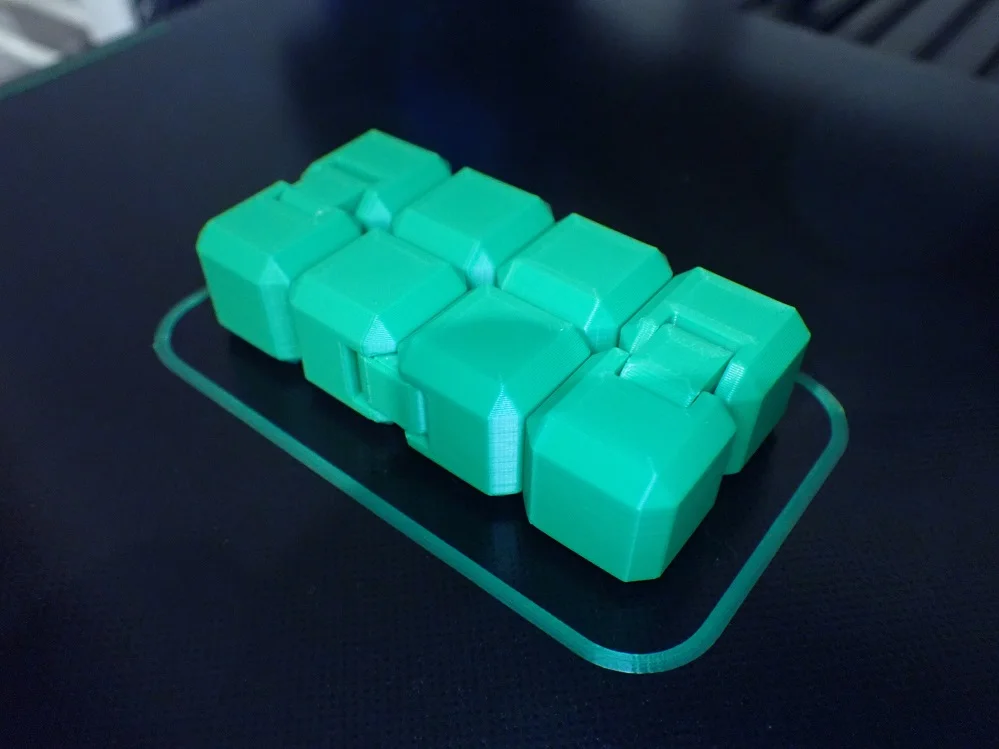
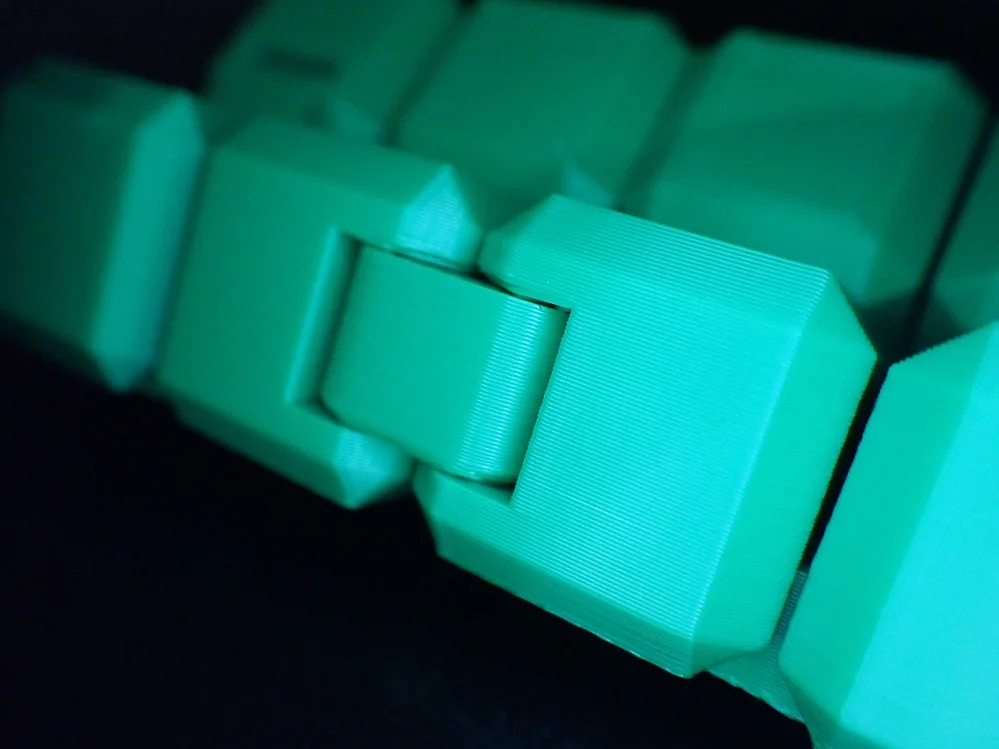
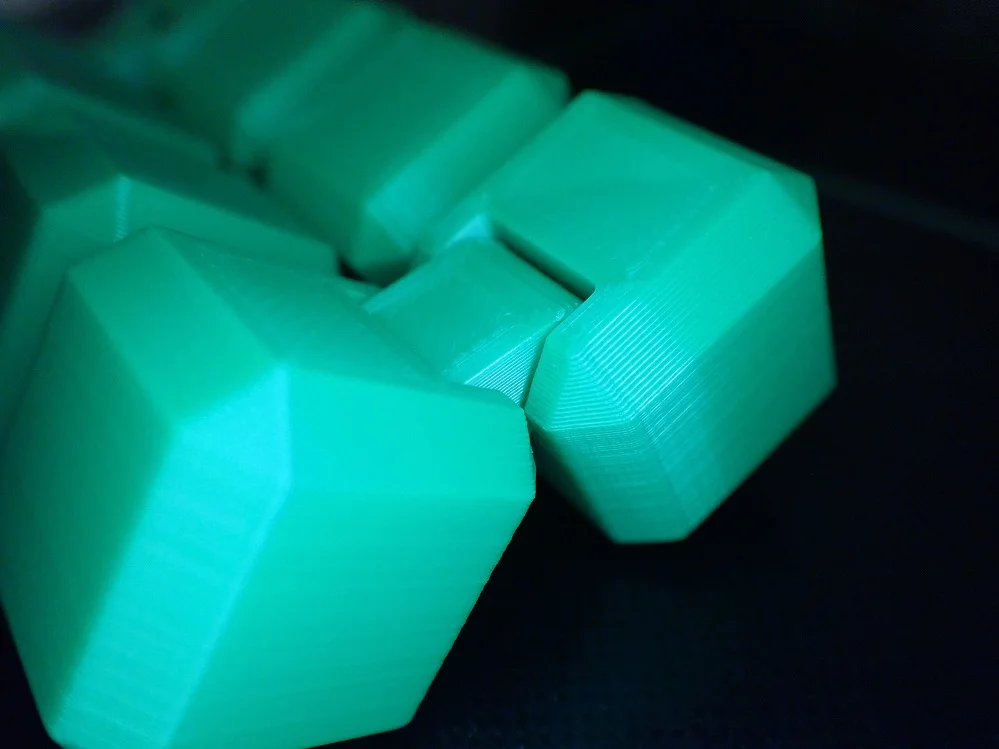
Mechanical objects are always a very good test of whether the extrusion is set correctly. If the line width or the layer thickness is too large or too small, the mechanical function will be disturbed and joints or other moving functions will be blocked.
This Infinity Cube (link to model) has multiple joints on all axes. Since I had calibrated the flow rate beforehand, it was no big surprise that the object worked right on the first try. Also, no other printing errors occurred.
- Material: Eryone PLA Green*
- Layer thickness: 0.2 mm
- Nozzle temperature: 195 °C
- Print bed temperature: 60 °C
- Printing speed: 60 mm/s
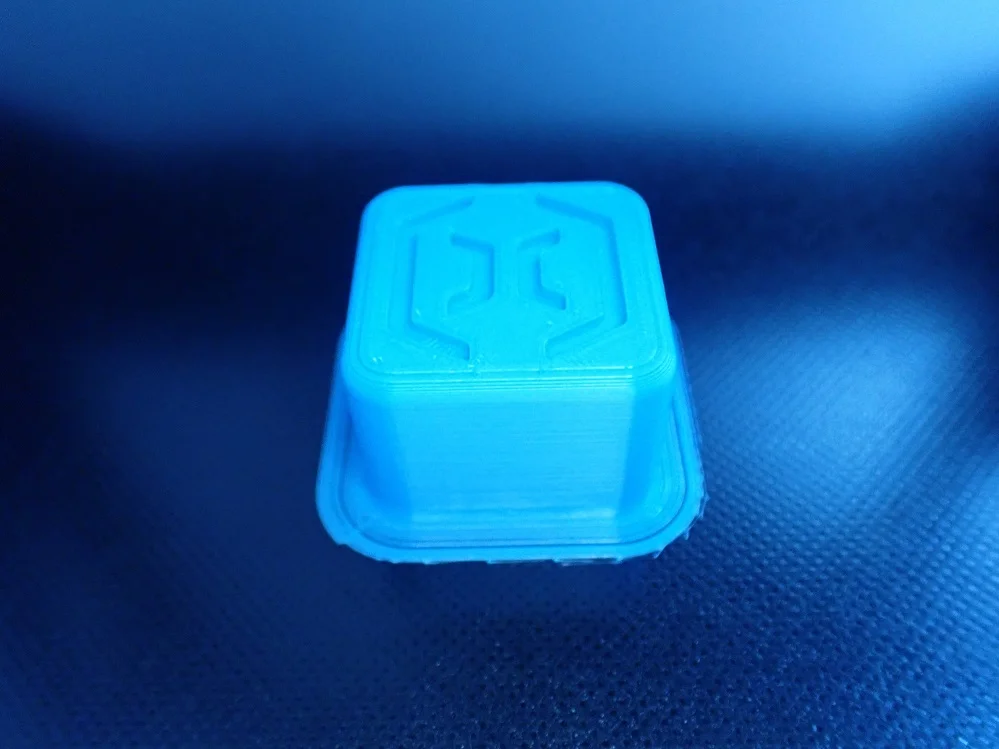
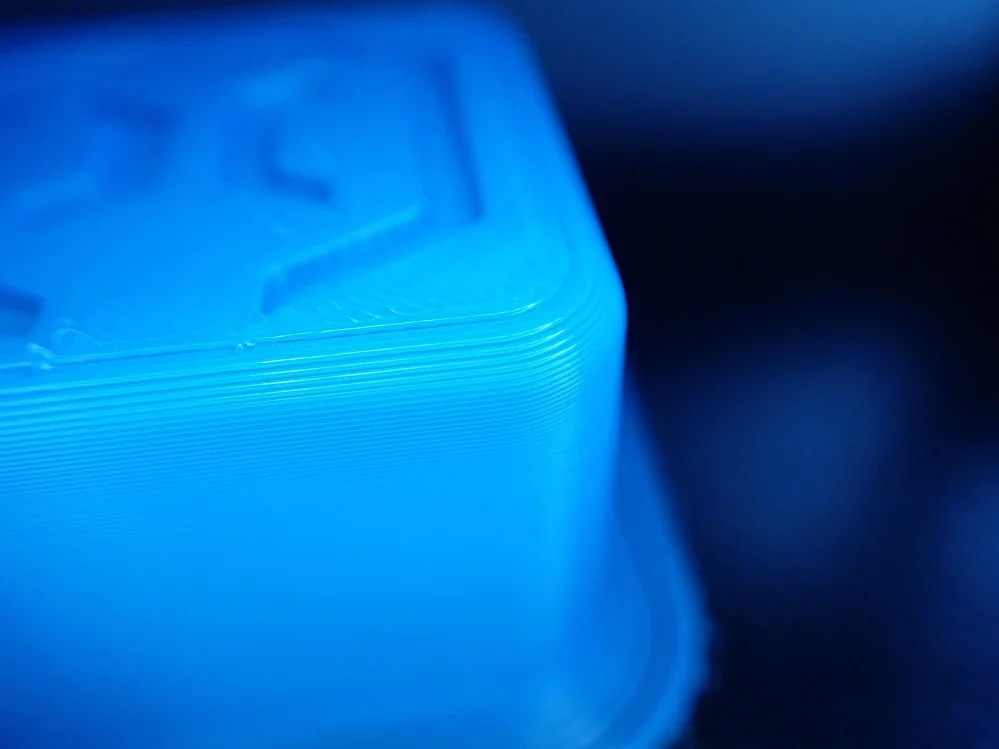
Curtain Box

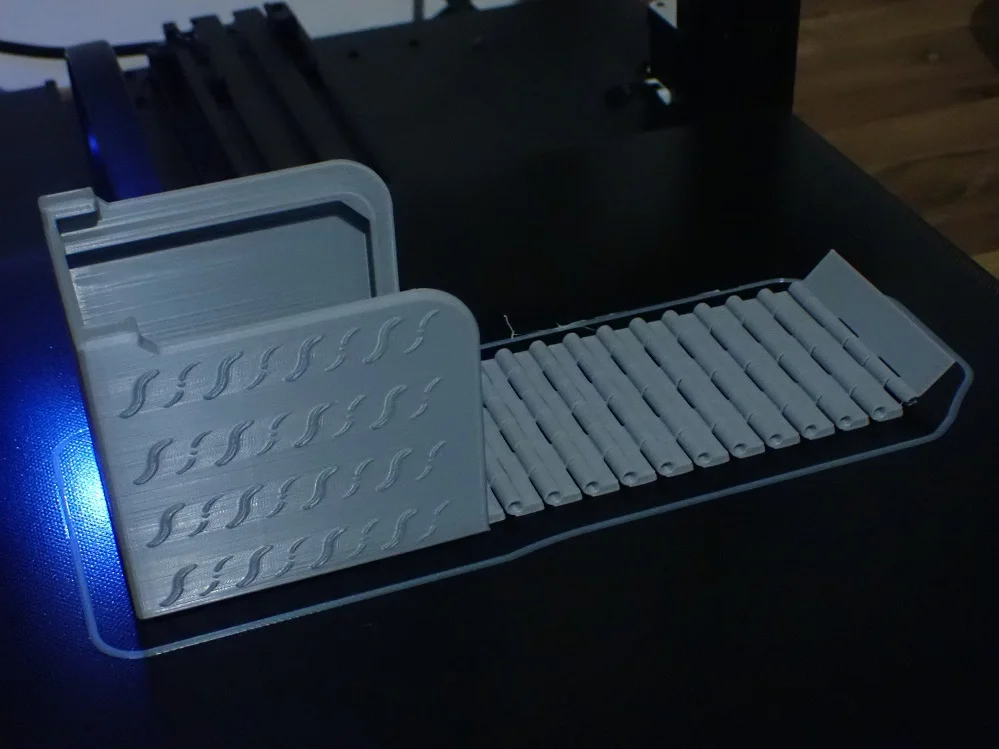


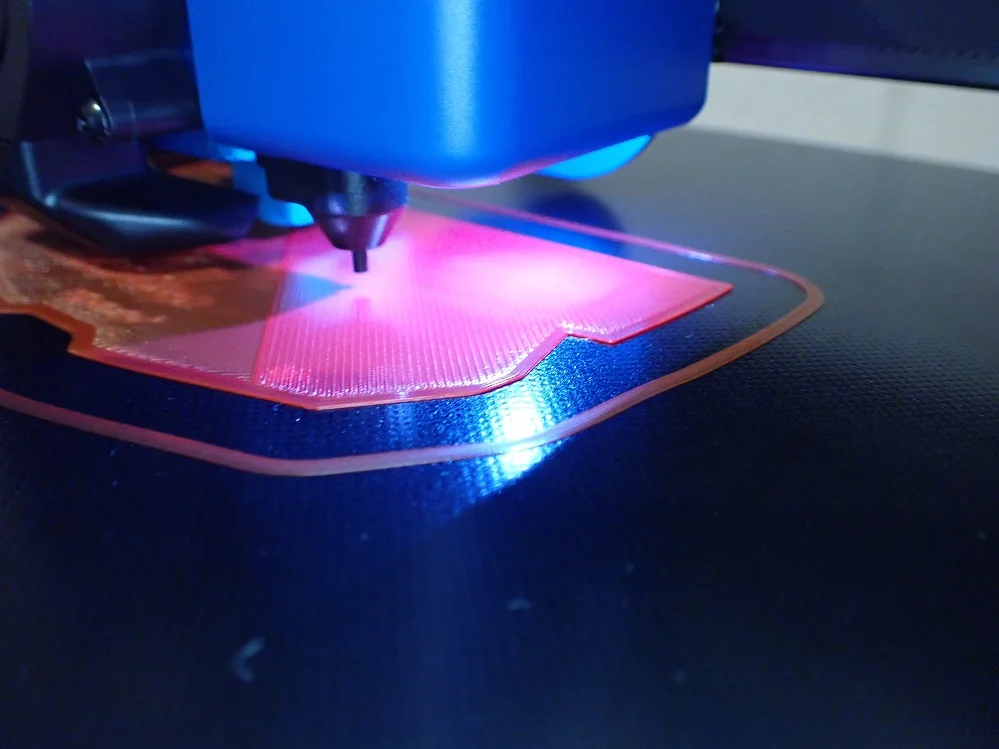
For this box (link to model), good print bed adhesion is important because the individual moving parts of the front have quite delicate first layers and no brims or rafts can be used.
It is also important that the extrusion is set correctly, otherwise the joints would jam. The print bed adhesion of the textured glass print bed was sufficient to print this object flawlessly. Also, I did not need Magigoo to further increase the print bed adhesion.
- Material: Anycubic PLA Grey*
- Layer thickness: 0.1 mm
- Nozzle temperature: 195 °C
- Print bed temperature: 60 °C
- Printing speed: 60 mm/s
Check Price at:
Upgrades
> Artillery Sidewinder X2 Review
Even though the Sidewinder X2 already has a lot of features built-in, there are still improvements you can make. There are many purchasable and printable upgrades for this 3D printer.
Full Metal Extruder up to 350 °C
Check Price at:
The PTFE-lined Volcano Hotend of the Sidewinder X2 can only be heated up to 240 °C, otherwise the PTFE would melt. If you want to go to higher temperatures, this extruder with a hardened steel nozzle can be heated up to 350 °C.
This opens up many new possibilities through exotic filaments that require higher temperatures than 240 °C. In addition, this extruder does not wear out as quickly, since no PTFE was used here.
Flexible Magnetic PEI Print Bed

Check Price at:
Magnetic PEI print plates* are extremely practical and provide very good print bed adhesion. With this upgrade, you can improve the print bed for various materials and simplify the removal of objects. Such magnetic printing plates can be easily removed from the 3D printer and bent. This makes it easy to remove the objects.
Bi-Metal Heat Break

Check Price at:
A PTFE heat break is installed in the hotend of the Sidewinder X2. This limits the printing temperature to 240 °C and the PTFE has to be replaced regularly after a few months because it wears out over time.
However, there are also bi-metal heat breaks* that can withstand higher temperatures and offer better print performance. This upgrade gives you not only a higher print temperature but also a shorter retraction and faster print speeds.
BL Touch

Check price at:
I myself have had no problems with the Sidewinder X2’s print bed sensor. In my opinion, it works great and provides very good accuracy.
However, if you are dissatisfied with the installed sensor for print bed leveling, you can also replace it with the popular BL Touch.
Silicone Print Bed Dampers

Check Price at:
The Artillery Sidewinder X2 hast to be leveled manually from time to time, as the springs under the print bed can give way over time and become misaligned. Even the print bed leveling sensor cannot compensate for excessive deviations in the tilt.
To avoid this and do as little manual leveling as possible, you can get these silicone shock absorbers*. They’re much stiffer and won’t give over time, so you’ll have to level manually even less often.
Sidewinder X2 vs. Ender 3 S1
> Artillery Sidewinder X2 Review

Check Price at:
In terms of features, the Ender 3 S1 is a great competitor to the Sidewinder X2. The biggest difference between these two 3D printers is their print volume. The Ender 3 S1 has a print volume of 220 x 220 x 270 mm and the Sidewinder X2 has a print volume of 300 x 300 x 400 mm.
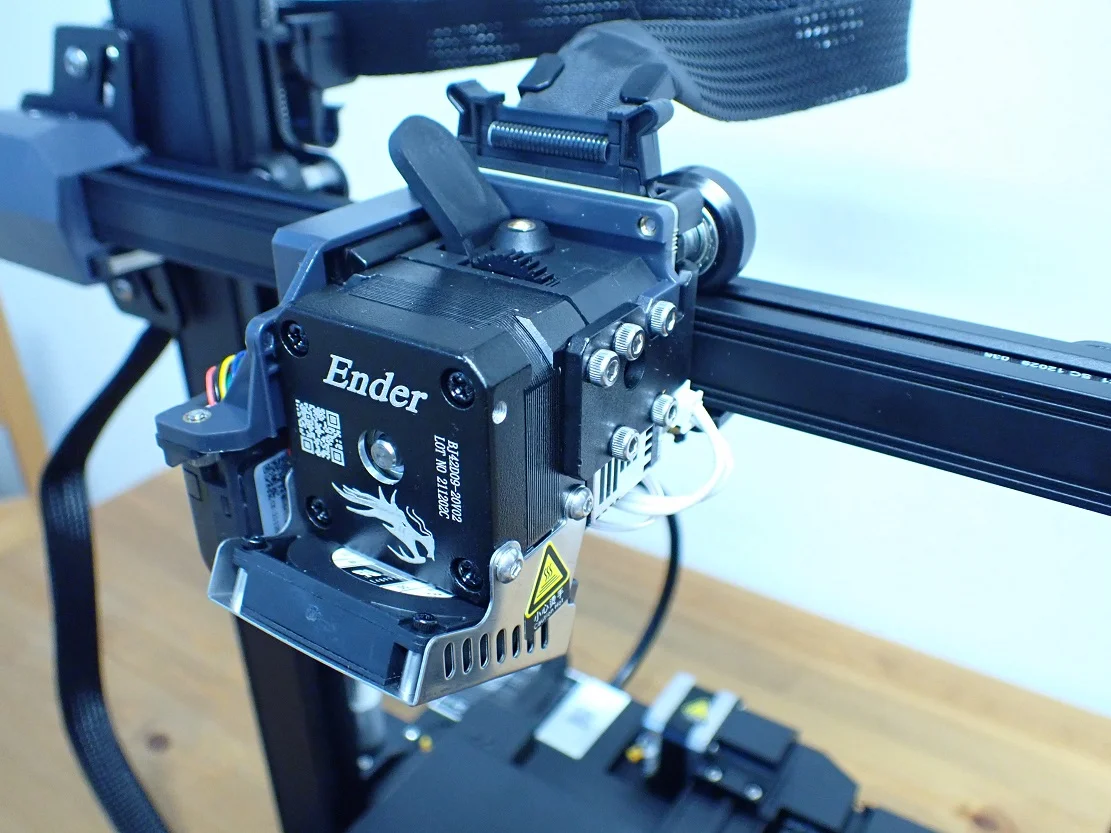
Direct drive extruder: Both 3D printers have a direct drive extruder. The newly developed “Sprite” extruder of the Ender 3 S1 is extremely lightweight and basically only consists of the individual components that are cleverly connected to each other. As a result, it has a minimal weight so that it generates virtually no vibrations even at high printing speeds. In contrast, the direct drive extruder of the Sidewinder X2 is much larger and somewhat heavier.
Another advantage of the Ender 3 S1’s Sprite extruder is the dual gear system inside the extruder, where the filament is driven by two gears. The plastic gear on the Sidewinder X2 wears out over time and needs to be replaced.

Automatic print bed leveling: The sensor for automatic print bed leveling on the Sidewinder X2 is good enough and quite accurate in my eyes. However, there are many users who would prefer to replace it with a BL Touch. The Ender 3 S1 has a CR Touch, which is even slightly better than the BL Touch. The CR Touch is more solidly built because it has a metal pin and has an optical sensor inside and not a Hall sensor like the BL Touch.
Dual Z-axis: Both the Ender 3 S1 and the Sidewinder X2 feature a synchronized dual Z-axis with independent stepper motors. This ensures accurate positioning of the X-axis in the Z-direction on both 3D printers and the lowest possible vibration. The synchronizing toothed belt at the top end of the frame ensures that both axes rotate evenly.
Filament Sensor: The filament sensors of both 3D printers not only look similar, they also have a similar position. They both sit directly under the filament holder and can dynamically adapt to the movements of the filament.

Print bed: The textured glass print bed of the Sidewinder X2 provides good print bed adhesion for many standard filaments, but has great difficulty with temperature homogeneity. As a result, print bed adhesion is very poor at the points where the four pivot screws are attached under the print bed.
The print bed of the Ender 3 S1 consists of a PC coated flexible magnetic PLatte. The print bed adhesion is excellent, the objects can be easily removed after printing by bending the plate and the temperature is homogeneous over the entire surface.
Screen & Operation: The Sidewinder X2 has a 2.7-inch touchscreen. The Ender 3 S1 has a 4.3-inch LCD screen with a rotary knob. Although I prefer touchscreens in general, the Ender 3 S1 is more comfortable to use than the Sidewinder X2’s small touchscreen. The menu is also more intuitive.
Sidewinder X2 vs. Genius Pro
> Artillery Sidewinder X2 Review

Check Price at:
The Artillery Genius Pro* was released at the same time as the Sidewinder X2 and is basically a smaller version of the X2. All features are identical, only the print volume is 220 x 220 x 250 mm instead of 300 x 300 x 400 mm.
If the Sidewinder X2 convinced you, but you don’t need the print volume, you might be right with the Genius Pro.
Sidewinder X2 vs. Sidewinder X1
> Artillery Sidewinder X2 Review

Check Price at:
The Sidewinder X2 is the further development of the Sidewinder X1* and has some features that not only eliminate common errors of the first version, but also increase the user-friendliness. Here is a brief introduction to the most important changes.
Automatic print bed leveling: The Sidewinder X1 must be leveled manually. While there is 5-point leveling supported via the menu, you will still have to do it manually on a regular basis with this printer.
The Sidewinder X2 has a BL-Touch clone and can automatically level its print bed. However, the leveling is not 100% automatic – you will still need to level it manually from time to time.
Mainboard: The Sidewinder X1 has an 8-bit mainboard, the X2 uses a self-developed 32-bit mainboard. The new mainboard allows for better operation and various upgrades.
Extruder: The heatsink is now part of the extruder. This improves cooling considerably compared to the predecessor.
Print bed: Unfortunately, the print bed has not changed. The temperature distribution problems still exist with the X2. The AC heater is very effective and fast, but it has holes in the four places where the rotary screws are located under the print bed.
Wiring: With the Sidewinder X1, there were frequent breaks in the ribbon cable connection. This was one of the most common criticisms from the community. Artillery has fortunately listened to the feedback and built more stable connections into the X2. In addition, they are already pre-assembled, which further reduces the susceptibility to errors.
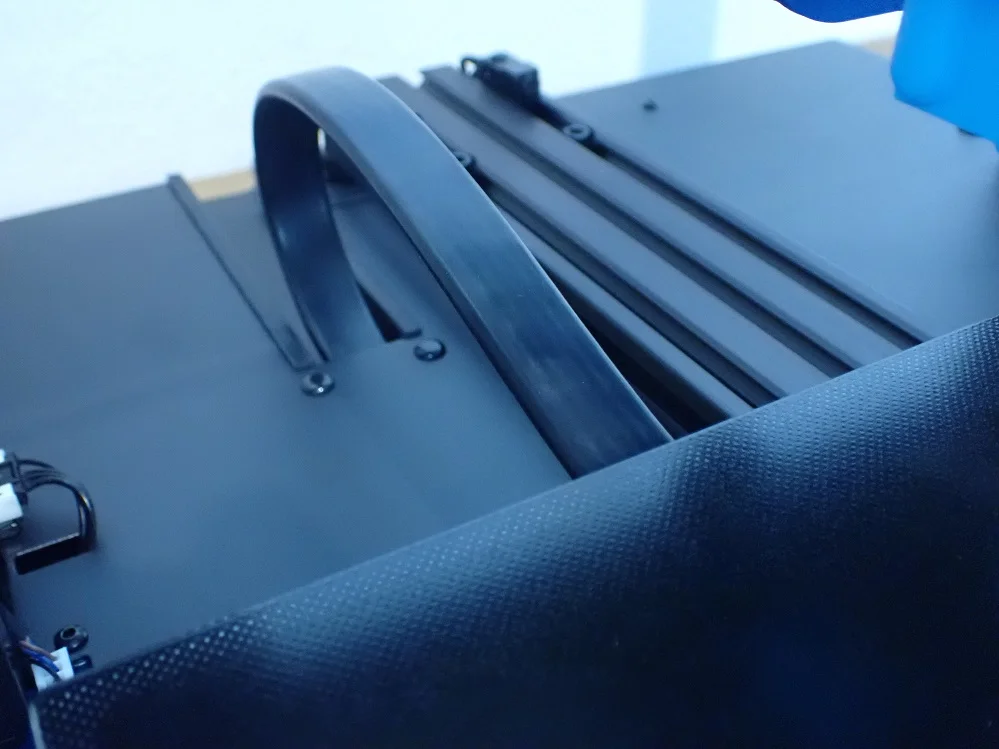
Another improvement is the bend protection of the print bed cable. On the X1, the cable could kink during printing and break in the long run.
Sidewinder X2 vs. Bluer Plus
> Artillery Sidewinder X2 Review

Check Price at:
The Bluer Plus not only looks similar, it also has an identical print volume to the Sidewinder X2. With a volume of 300 x 300 x 400 mm, you can print even large objects in one piece. But there are also a few differences and important similarities between these two 3D printers.


Double Z-axis: A double Z-axis is a must for large 3D printers. Otherwise, vibrations can occur that produce printing errors. Both the Bluer Plus and Sidewinder X2 have a dual Z-axis for stabilization.

Automatic print bed leveling: The Bluer Plus uses a 3D Touch to automatically level its print bed. This sensor is very similar to the BL Touch and works at least as reliably and accurately as the sensor in the Sidewinder X2.

Print bed: The Bluer Plus has a magnetic PEI print bed that can be removed from the printing plate. The print bed adhesion is excellent and the objects are easy to release. In addition, the homogeneity of the temperature distribution is better than the Sidewinder X2.

Touchscreen: The operation of the Bluer Plus is simpler and more intuitive than that of the Sidewinder X2. The touchscreen is larger and the menu is simpler. You can find the most important settings faster and the menu structure is not as confusing.

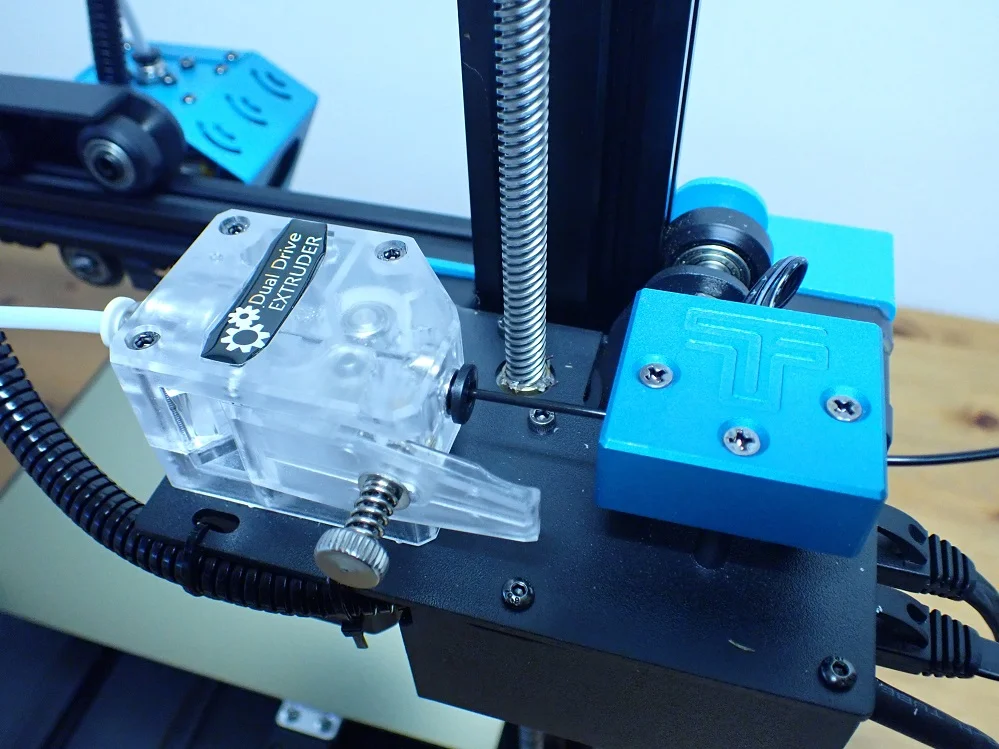
Extruder: The Bluer Plus only has a Bowden extruder, but it reliably pushes the filament to the hotend using a dual drive system. This makes the Sidewinder X2 more suitable for flexible filaments.

V-Slot wheels with suspension: The wheels of the individual axles are tensioned on one side with a spring. This means that their tension is always set correctly. This feature is available on both the Blue Plus and the Sidewinder X2.
Check Price at:
Is the Sidewinder X2 Worth It?
The Artillery Sidewinder X2* is a significant improvement over its predecessor. It has a very large print volume, high print accuracy and can process various standard filaments.
The only disadvantage of the Sidewinder X2 is the inhomogeneous temperature distribution on the print bed. This can lead to difficulties with print bed adhesion for large objects. However, this can be easily remedied with aids such as Magigoo.
Apart from this drawback, the Sidewinder X2 is definitely worth it. It has a very good price-performance ratio and except for a few small spare parts that you have to replace after a few months, it prints very reliably and accurately for a long time.
Similar 3D Printers
Artillery Genius Pro
Check Price at:
The Artillery Genius Pro* has a print volume of 220 x 220 x 250 mm, automatic print bed leveling and can process filaments up to 240 °C. It has a textured glass print bed with good adhesion and operates very quietly.
Bluer Plus
Check Price at:
The Bluer Plus has a print volume of 300 x 300 x 400 mm, a Bowden extruder, automatic print bed leveling and a magnetic flexible PEI print bed.
Ender 3 S1
Check Price at:
The Ender 3 S1 has a print volume of 220 x 220 x 270 mm, an extremely lightweight direct drive extruder, a magnetic flexible print bed with perfect print bed adhesion and a double Z-axis for improved stabilization.
Disclosure: This website is the property of Martin Lütkemeyer and is operated by Martin Lütkemeyer. Martin Lütkemeyer is a member of the Amazon Services LLC and other Affiliate Programs. These are affiliate advertising programs designed to enable websites to earn advertising revenue through advertising and linking to Amazon.com and others. Links marked with * are affiliate links.
