
- Wet Filament: Prevention, Symptoms & Drying - July 18, 2024
- Sovol SV08 – Best PrusaSlicer Settings & Profile - June 26, 2024
- Sovol SV08 – Best Orca Slicer Settings & Profile - June 26, 2024
Disclosure: Links marked with * are Affiliate Links. I earn from qualifying purchases if you decide to make a purchase through these links – at no additional cost for you!
The Sovol SV06 Plus has all the features to achieve good print quality with most filaments. Its extruder has high accuracy and the print bed offers optimal adhesion.
However, you can only achieve flawless results if you make the right settings in Cura and ideally calibrate them.
In this article, I will show you the best Cura settings for the four standard filaments. You will also learn how to optimize and calibrate these settings to get perfect results without printing errors.
| PLA | ABS | TPU | PETG | |
|---|---|---|---|---|
| Print temperature | 195-205 °C | 235-240 °C | 210-220 °C | 225-245 °C |
| Print bed temperature | 60 °C | 90 °C | 60 °C | 65-75 °C |
| Print speed | 60 mm/s | 50 mm/s | 30 mm/s | 50-60 mm/s |
| Retraction | 0.5 mm at 30 mm/s | 0.5 mm at 25 mm/s | 0.5-1 mm at 30 mm/s | 0.4-0.7 mm at 30-40 mm/s |
| Cooling | 100 % | 0% + enclosure | 100 % | 50-100 % |

Calibrated Cura Profile
For optimal print quality with minimal effort, you can download my calibrated Cura profile for this 3D printer and import it directly into Cura. All settings are perfectly adapted to this printer, e.g. the accelerations, jerk, supports and the first layer.
Table of Contents:
How to Create a Cura Profile for the Sovol SV06 Plus
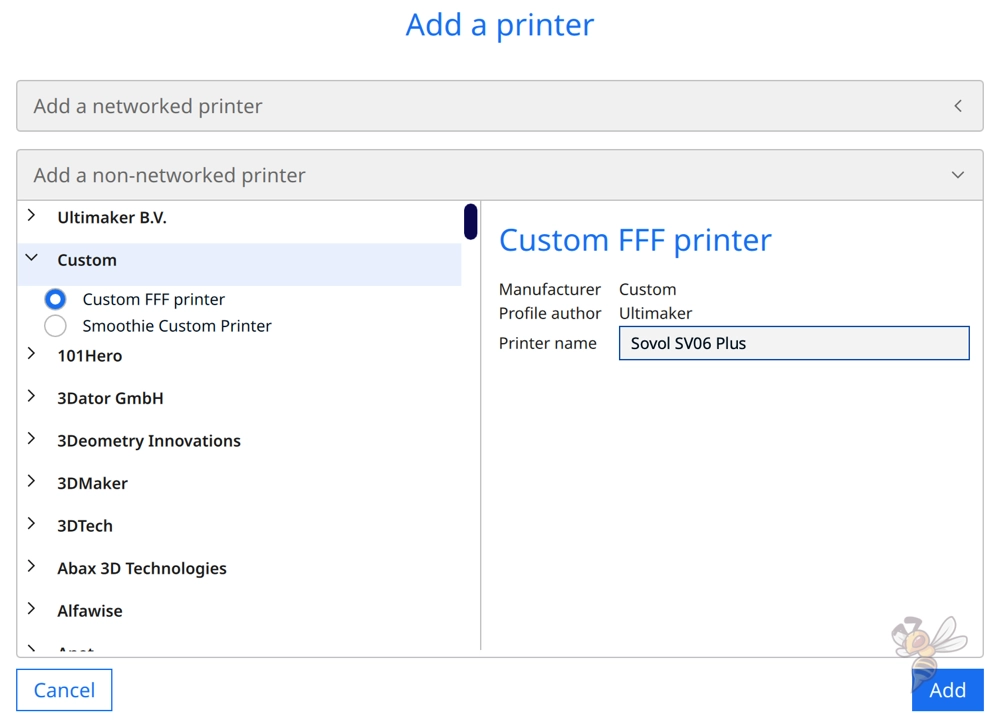
To create a new profile for the Sovol SV06 Plus in Cura, select“Custom FFF printer” in the selection of different manufacturers and 3D printers. Enter Sovol SV06 Plus as the name and press “Add“.
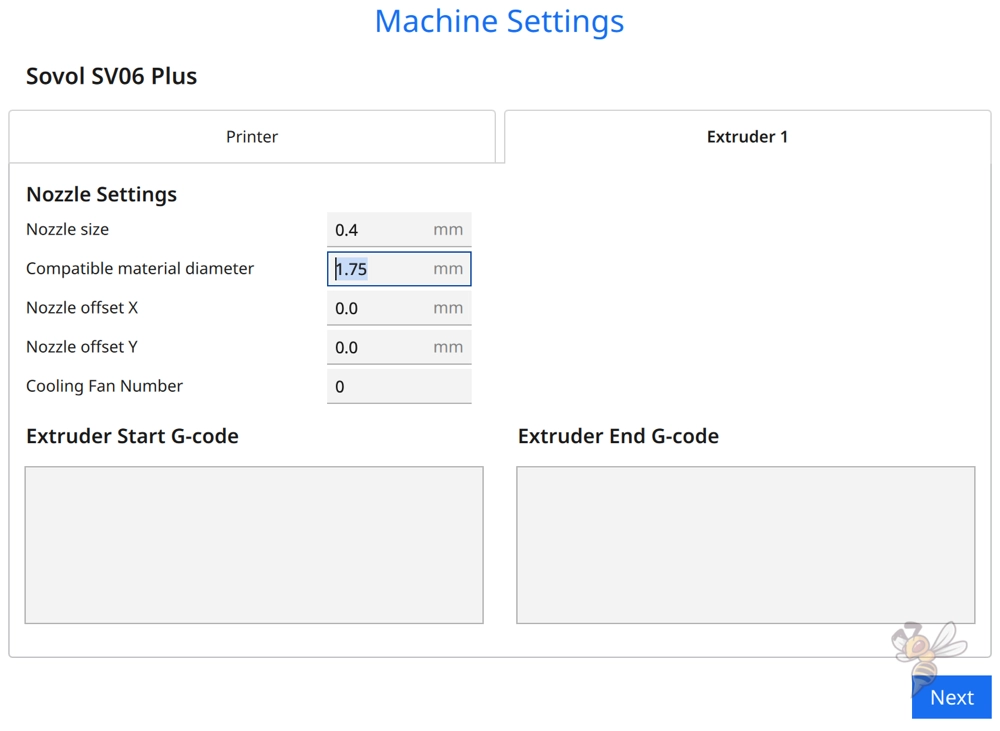
In the next step, you need to specify the machine settings of the 3D printer. In the machine settings, you have to define the dimensions of the print volume, the print head and other important parameters.
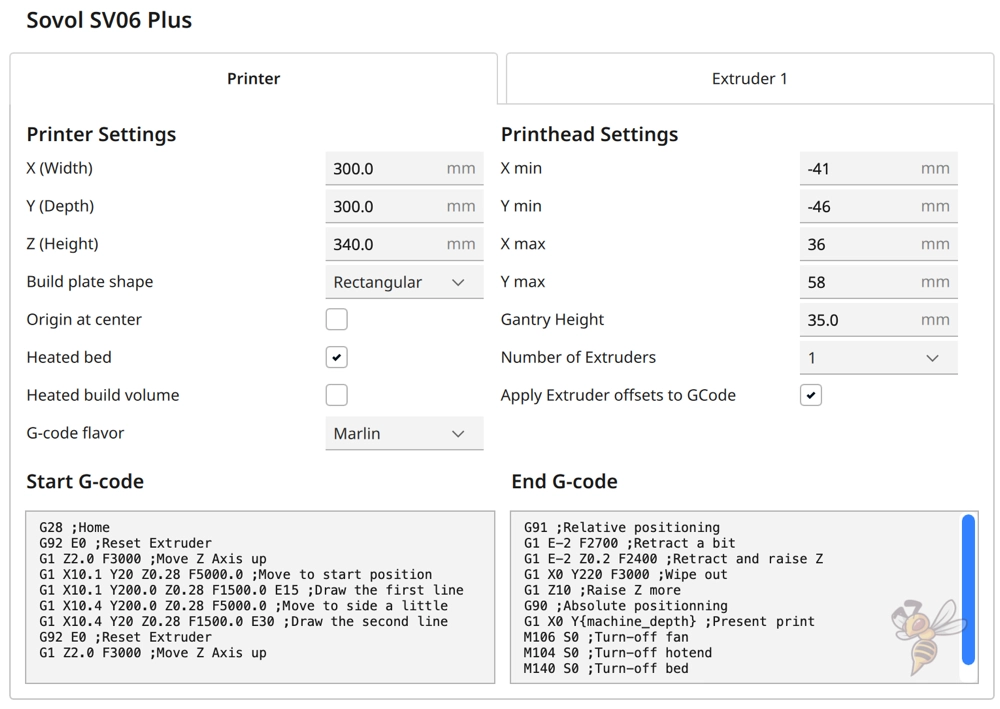
The print head settings are important if you want to print with the print order One at a Time. Otherwise, you can ignore these settings. If you are interested, you can either use the values given above or measure the print head yourself.
Otherwise, the G-code snippets at the start and end of each print are still important. They determine what the 3D printer does before and after each object. For example, the measured data from the automatic print bed leveling is loaded and the filament flow is stimulated with two small lines at the edge of the print bed (similar to a skirt, which you then don’t need).
Here is the starting G-code for the Sovol SV06 Plus:
- G28 ;Home
- G92 E0 ;Reset extruder
- G1 Z2.0 F3000 ;Move Z Axis up
- G1 X10.1 Y20 Z0.28 F5000.0 ;Move to start position
- G1 X10.1 Y200.0 Z0.28 F1500.0 E15 ;Draw the first line
- G1 X10.4 Y200.0 Z0.28 F5000.0 ;Move to side a little
- G1 X10.4 Y20 Z0.28 F1500.0 E30 ;Draw the second line
- G92 E0 ;Reset extruder
- G1 Z2.0 F3000 ;Move Z Axis up
And here is the end G-code:
- G91 ;Relative positioning
- G1 E-2 F2700 ;Retract a bit
- G1 E-2 Z0.2 F2400 ;Retract and raise Z
- G1 X0 Y220 F3000 ;Wipe out
- G1 Z10 ;Raise Z more
- G90 ;Absolute positionning
- G1 X0 Y{machine_depth} ;Present print
- M106 S0 ;Turn-off fan
- M104 S0 ;Turn-off hotend
- M140 S0 ;Turn-off bed
- M84 X Y E ;Disable all steppers but Z
Once you have made these settings, Cura will create several print profiles with different layer heights. The settings in them are relatively general and those settings that depend on the 3D printer you are using are not suitable for the Sovol SV06 Plus and will need to be adjusted. You’ll find out what those are later in this article.
Before we look at the individual settings and how you can tweak them, I’ll show you the best settings in Cura for the four standard filaments that have produced good results for me. However, they are highly dependent on which filament you are using, so be sure to read and apply the sections below on calibration if you want perfect results.
You can find more information on how to create a 3D printer profile in Cura and what you need to pay attention to in this article: How to Create a Custom 3D Printer Profile in Cura
PLA Settings
These are the correct Cura settings for the Sovol SV06 Plus for PLA:
- Print temperature: 195-205 °C
- Print bed temperature: 60 °C
- Print speed: 60 mm/s
- Retraction: 0.5 mm at 30 mm/s
- Cooling: 100%
- First layer: 5-10 mm/s, 0% cooling, 100% extrusion width, 100% layer height
The Sovol SV06 Plus is ideally suited to process PLA. Its extruder is very accurate and offers high print quality, and the PEI-coated print bed creates perfect adhesion. You will have no trouble getting good results with PLA on the Sovol SV06 Plus.
With the values given above, you should already be able to achieve pretty good results. However, depending on which filament from which manufacturer you use, you might still see stringing or other printing errors.
It is therefore important to calibrate the print temperature and retraction for PLA as well. How to do that, you will learn later in this article.
As for the print speed, I have noticed that you can print much faster than 60 mm/s in some cases. Due to the lightweight print head and the stable construction, the Sovol SV06 Plus only produces vibrations at very high print speeds.
Here, too, a calibration is worthwhile, which basically consists of increasing the print speed until you are no longer satisfied with the print quality.
ABS Settings
These are the correct Cura settings for the Sovol SV06 Plus for ABS:
- Print temperature: 235-240 °C
- Print bed temperature: 90 °C
- Print speed: 50 mm/s
- Retraction: 0,5 mm at 25 mm/s
- Cooling: 0% + housing
- First layer: 5-10 mm/s, 0% cooling, 100% extrusion width, 100% layer height
ABS is significantly more difficult to print than PLA. This is mainly because ABS contracts during cooling. If it does this uncontrollably during printing, it can separate from the print bed, crack, or otherwise warp.
With ABS filament, it is therefore important to keep the ambient temperature warm and homogeneous so that the finished object can cool slowly after printing.
The best way to do this is with an enclosure. The Sovol SV06 Plus does not have such an enclosed print volume, but you can retrofit it. There are many 3D printer tents that should fit it. I have had good experiences with the Creality 3D printer tent.
However, in my test of the Sovol SV06 Plus, I was able to print smaller objects in ABS without an enclosure using a Draft Shield. This keeps the ambient air warm enough to prevent printing errors. Only with larger objects does the use of a Draft Shield become impractical and no longer effective enough.
TPU Settings
These are the correct Cura settings for the Sovol SV06 Plus for TPU:
- Print temperature: 210-220 °C
- Print bed temperature: 60 °C
- Print speed: 30 mm/s
- Retraction: 0.5-1 mm at 30 mm/s
- Cooling: 100%
- First layer: 5-10 mm/s, 0% cooling, 100% extrusion width, 100% layer height
Due to the very accurate direct drive extruder, the Sovol SV06 Plus is also excellent for flexible filaments such as TPU. Flexible filament can partially compensate for the movements of the extruder. If the distance between the extruder and the nozzle were too long (as with a Bowden extruder), extrusion accuracy would suffer.
However, since the distance between the extruder and the nozzle is very short here, you benefit from high print quality even with flexible filaments. In my tests, I also found that the print bed adhesion on the PEI print bed is perfect for TPU. So, you don’t need any auxiliary constructions, adhesives or other measures to increase the print bed adhesion.
PETG Settings
These are the correct Cura settings for the Sovol SV06 Plus for PETG:
- Print temperature: 225-245 °C
- Print bed temperature: 65-75 °C
- Print speed: 50-60 mm/s
- Retraction: 0.4-0.7 mm at 30-40 mm/s
- Cooling: 50-100
- First layer: 5-10 mm/s, 0% cooling, 100% extrusion width, 100% layer height
The biggest difficulty with PETG is getting stringing under control. So, especially with this filament, it is important to calibrate the print temperature and retraction.
As you may have noticed, the settings given above are relatively rough for exactly these two printing parameters. This is because PETG filaments differ greatly in quality and, due to their sensitivity, react dramatically to slightly changed values of these parameters.
You will also have to experiment a bit with cooling to find the right setting. Some PETG filaments print well with full cooling, except for the first layer. For others, you need to reduce the cooling to get flawless results. Especially if you want to print objects with overhangs, the cooling settings are crucial for the result.
Best Cura Settings for the Sovol SV06 Plus
After showing you the Cura settings of the four standard filaments that gave me good results, we will now go into detail about the individual settings.
I’ll also show you how to calibrate the most important ones. Calibration is absolutely necessary if you want to get the most out of your 3D printer.
If you would like to learn more about calibrating your 3D printer, you should check out this article: 3D Printer Calibration: Step-by-Step to Perfect Results
Print Temperature
The best printing temperatures for the Sovol SV06 Plus in Cura:
- PLA: 195-205 °C
- ABS: 235-240 °C
- TPU: 210-220 °C
- PETG: 225-245 °C
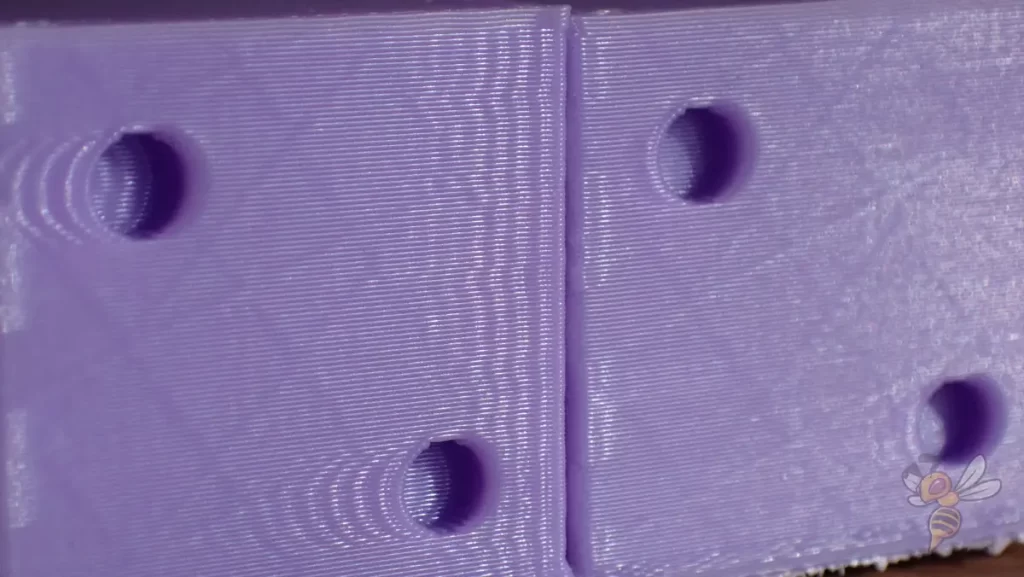
An incorrectly set printing temperature can lead to many printing errors. If it’s too high, you’ll get stringing and other phenomena of over-extrusion. If it’s too low, layer adhesion could suffer or even cracks could form between layers.
The Sovol SV06 Plus can reach a maximum printing temperature of 300 °C. This allows you to process a wide range of filaments. In my experience, the temperature accuracy of the extruder is relatively good, which means it shouldn’t be too hard to find the right temperature for the filament you’re using.
Calibrating the print temperature is definitely a good idea. I perform a calibration every time I change filament. Only when I use the same filament from the same manufacturer again do I don’t calibrate the 3D printer again. It is rare that the same grade of filament differs so much between two different batches from the same manufacturer that recalibration would be necessary.
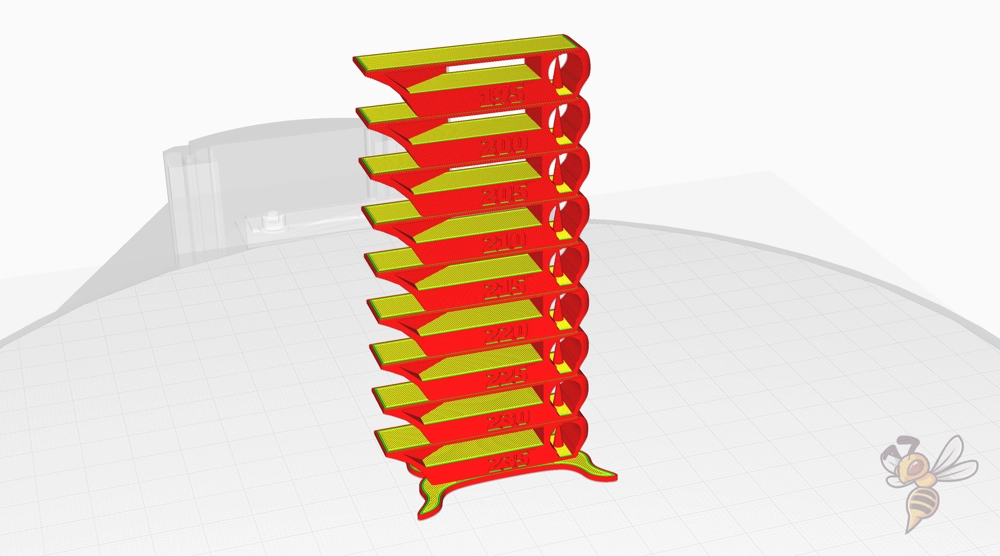
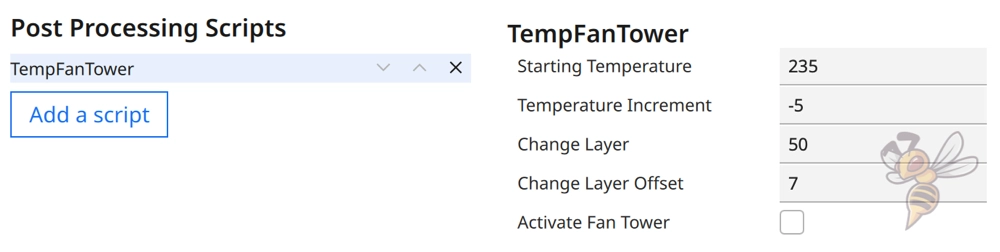
The easiest way to calibrate the print temperature is to print a temperature tower. This way, you can find the correct temperature within one print.
These calibration objects consist of several layers, which are printed at different print temperatures. Using a suitable script, you can set the print temperature for the layers differently in Cura.
After printing, you can quickly determine at which layer and thus at which printing temperature the fewest printing errors occurred.
Print Bed Temperature
The best print bed temperatures for the Sovol SV06 Plus in Cura:
- PLA: 60 °C
- ABS: 90 °C
- TPU: 60 °C
- PETG: 65-75 °C
The higher the print bed temperature is set, the better the print bed adhesion will be. However, if it is too high, you will get an elephant foot, where the first layer or layers flow too far out. Basically, therefore, you try to reduce the print bed temperature as much as possible until you still have sufficient adhesion.
Thanks to the PEI print bed of the Sovol SV06 Plus, the range in which you have good print bed adhesion and still don’t create an elephant foot is considerable. So, it shouldn’t be too difficult to find the right print bed temperature. The values given above should already be sufficient for most filaments.
Print Speed
The best print speed for the Sovol SV06 Plus in Cura:
- PLA: 60 mm/s
- ABS: 50 mm/s
- TPU: 30 mm/s
- PETG: 50-60 mm/s
How fast a 3D printer can print depends predominantly on the weight of the print head and the stability of its construction. The greater the vibrations caused by too high a printing speed, the greater the printing errors such as ringing or ghosting.
The Sovol SV06 Plus has a very light print head and also a stable construction. So, you can achieve relatively high print speeds with it without causing vibrations.
The above values are chosen relatively conservatively, with the highest possible print quality in mind. However, you can also try to increase the print speed even further until you are no longer satisfied with the print quality.
When calibrating the print speed, you therefore mainly pay attention to whether the above-mentioned print errors appear. They manifest themselves in echoes of certain surface details. Depending on how high your surface requirements are, you can therefore set the print speed much higher than indicated above.
Layer Height
The best layer heights for Sovol SV06 Plus in Cura:
- Decorative objects: 0.1 mm
- Standard: 0.2 mm
- Rough, fast prints: 0.3 mm
The Sovol SV06 Plus is supplied with a 0.4 mm nozzle. This allows you to reliably print layer heights from 0.1 to 0.3 mm. Of course, you can also try smaller or larger values, but in my experience, the probability of printing errors is then higher.
The smaller the layer height, the finer the surface. If you have higher demands on the surface, you should choose a smaller layer height. If the surface accuracy is not relevant and the main aim is to print quickly, you should increase the layer height. This will save you a lot of printing time.
Flow Rate
The best flow rate for Sovol SV06 Plus in Cura:
- Default value: 100%
- For over-extrusion: 90% to 99%
- For under-extrusion: 101% to 110%
Flow rate is one of the settings you should definitely calibrate. In most cases, no major adjustment is needed here. Occasionally, however, it is precisely the calibration of the flow rate that prevents various printing errors.
The flow rate determines how much filament is extruded per second. The higher the flow rate, the wider the lines.
When calibrating the flow rate, you match the theoretical line width value from Cura with the actual printed line width. If the printed line width is too large, you have to decrease the flow rate and vice versa.
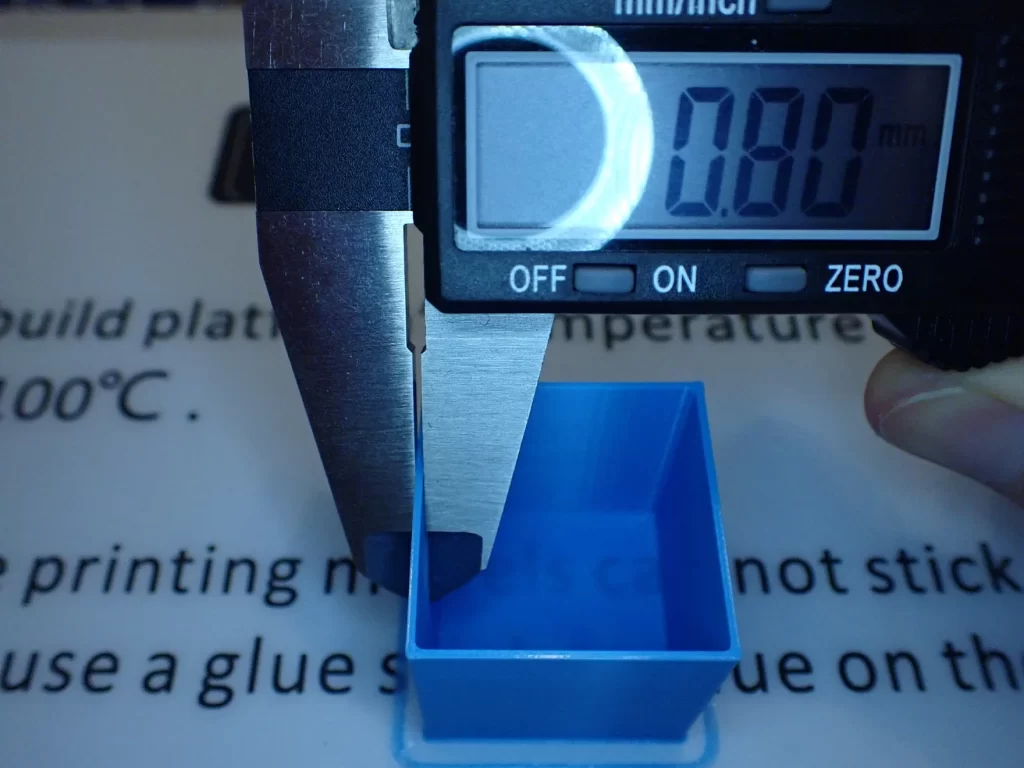
I always calibrate the flow rate with a hollow cube. After printing, you can measure the wall thickness and compare it to the value from Cura. In the example above, the wall thickness is 0.4 mm twice, where 0.4 mm is the line width.
Depending on the direction and how much the measured value differs from the theoretical value in Cura, you have to adjust the flow rate accordingly.
Retraction
The best retraction settings for the Sovol SV06 Plus in Cura:
- PLA: 0.5 mm at 30 mm/s
- ABS: 0.5 mm at 25 mm/s
- TPU: 0.5-1 mm at 30 mm/s
- PETG: 0.4-0.7 mm at 30-40 mm/s
Although you can probably already achieve relatively good results with the Sovol SV06 Plus with the values given above for retraction, I recommend calibrating the retraction in any case.
Many filaments react strongly to suboptimal retraction settings. The first print defect you will notice with incorrect retraction settings is stringing. Therefore, calibrating this setting also revolves around minimizing or completely avoiding this print error.
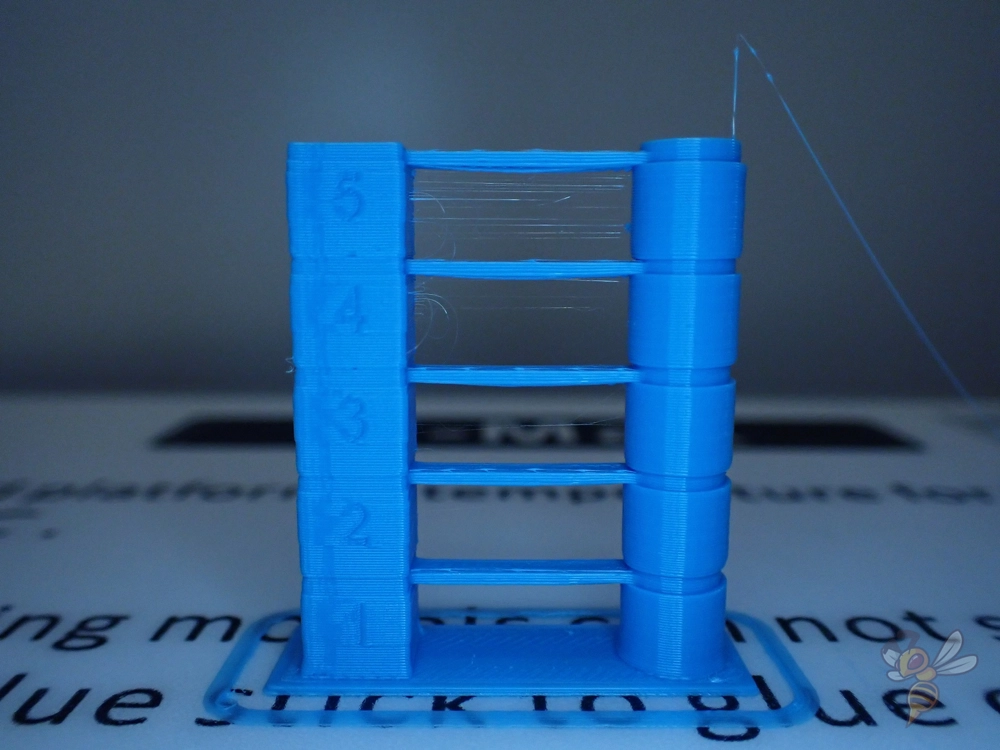
Similar to print temperature, there are specialized calibration objects for retraction. Here you can set and test the two most important settings for retraction, the retraction distance and the retraction speed, separately. Make sure that you only change one of these settings at a time. Otherwise, you will not know where the observed change comes from.
When calibrating retraction, don’t be discouraged if you need several passes to find the right values. Furthermore, retraction is highly dependent on print temperature. So, it is common if you have to calibrate the print temperature and retraction many times in a row to find the perfect values.
Infill
The best infill density for Sovol SV06 Plus in Cura:
- Decorative objects: 0-15%
- Standard objects: 15-50%
- Stable objects: 50-100%
How your printed object looks inside is completely independent of which 3D printer you use. The infill depends entirely on what purpose you want your object to have.
The higher the infill density, the more stable it will be. But the infill pattern also has a small contribution to the stability.
High stability (for stable objects):
- Cubic
- Cubic subdivision
- Octet
- Gyroid
Medium stability (for standard objects):
- Grid
- Triangles
- Tri-Hexagon
Low stability (for decorative objects):
- Lines
- Zigzag
- Lightning
First layer
These are the best Cura settings for the first layer on Sovol SV06 Plus:
- Layer height: 100-200% of normal layer height (higher values to increase print bed adhesion)
- Line width: 100-200% of normal line width (higher values to increase print bed adhesion)
- Print temperature: Same as the rest of the object, or 5-10 °C higher for better print bed adhesion.
- Print speed: 50% of normal print speed (i.e. 25 mm/s for a normal print speed of 50 mm/s) or 5-10 mm/s for high print bed adhesion
- Flow rate: 100-110% (higher values for poor print bed adhesion)
- Raft/Brim/Skirt: Not necessary as the Sovol SV06 Plus has a PEI print bed and already extrudes a line at the edge of the print bed due to the Start G-Code.
To ensure that the first layer of your 3D print adheres well to the print bed, you should adjust a few settings in Cura. While the Sovol SV06 Plus PEI print bed already provides excellent adhesion for most filaments, a few settings will help to improve it from the start. This way you will never have problems with poor print bed adhesion.
By default, I would recommend you to reduce the print speed to 5 to 10 mm/s. You only need to use the other measures above to improve print bed adhesion if you are having trouble with it.
Conclusion
In this article, I showed you which settings I used to achieve the best results with the Sovol SV06 Plus using the four standard filaments.
I also showed you how to optimize and calibrate these Cura settings for your Sovol SV06 Plus.
With this, you should quickly get perfect results for your 3D printing projects. Have fun printing!
Disclosure: This website is the property of Martin Lütkemeyer and is operated by Martin Lütkemeyer. Martin Lütkemeyer is a member of the Amazon Services LLC and other Affiliate Programs. These are affiliate advertising programs designed to enable websites to earn advertising revenue through advertising and linking to Amazon.com and others. Links marked with * are affiliate links.
