
- Wet Filament: Prevention, Symptoms & Drying - July 18, 2024
- Sovol SV08 – Best PrusaSlicer Settings & Profile - June 26, 2024
- Sovol SV08 – Best Orca Slicer Settings & Profile - June 26, 2024
Disclosure: Links marked with * are Affiliate Links. I earn from qualifying purchases if you decide to make a purchase through these links – at no additional cost for you!
The Ender-3 V3 is a worthy successor to the legendary Ender-3 series from Creality and is currently one of my favorite entry-level 3D printers.
By default, the Ender-3 V3 is operated with Creality Print as a slicer. However, if you pay attention to a few things, it is also compatible with Cura.
I have been using the Ender-3 V3 intensively over the last few weeks and have printed numerous projects with it. I have mainly used it with Cura and optimized all settings for it.
In this article, I will show you step by step how to add the Ender-3 V3 in Cura and which of the most important settings are best suited for the standard filaments PLA, ABS, PETG and TPU.

Calibrated Cura Profile
For optimal print quality with minimal effort, you can download my calibrated Cura profile for this 3D printer and import it directly into Cura. All settings are perfectly adapted to this printer, e.g. the accelerations, jerk, supports and the first layer.
Table of Contents:
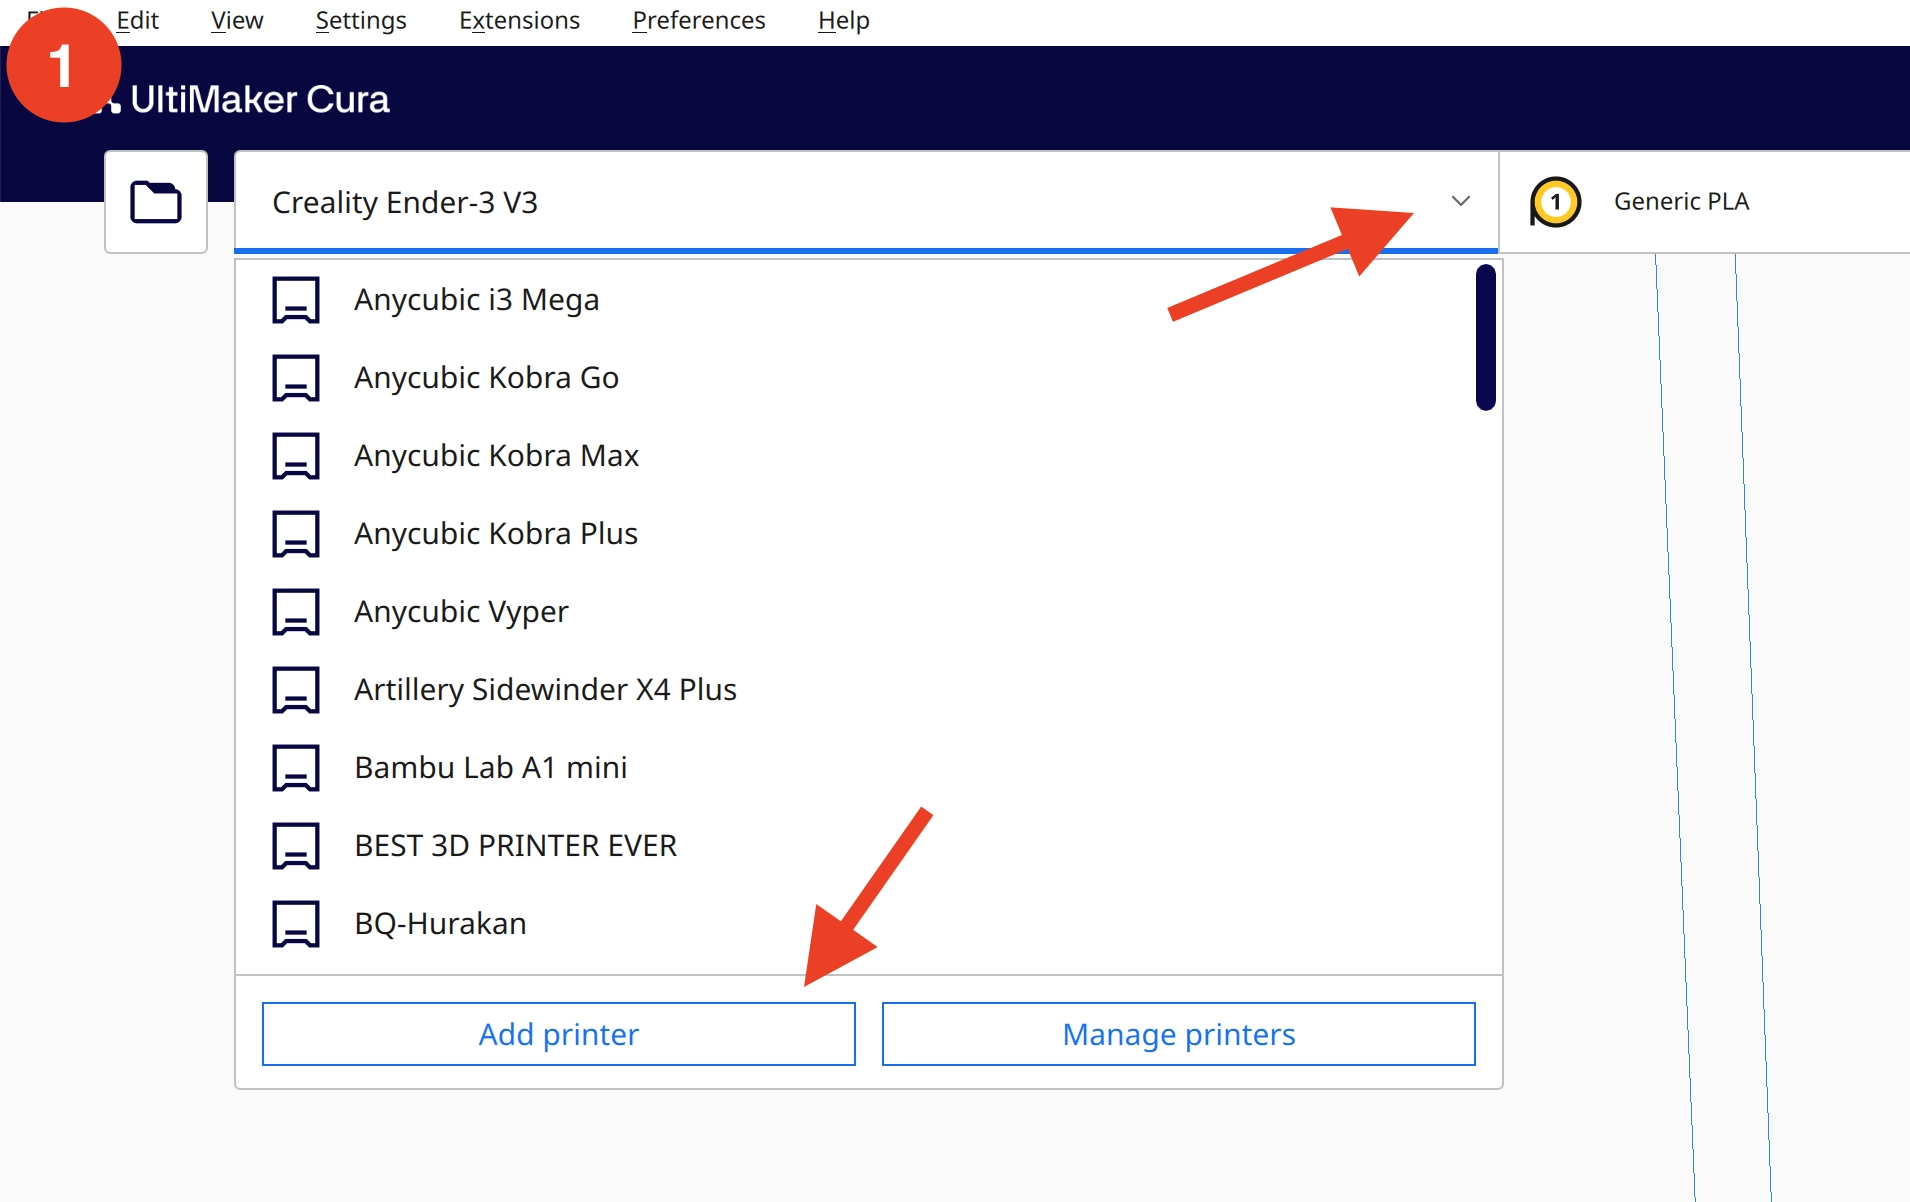
Step 1: Add Printer
In the first step, we will create an entirely new profile for the Ender-3 V3 in Cura. We will use an empty profile as a template.
This is how you create a new, empty profile:
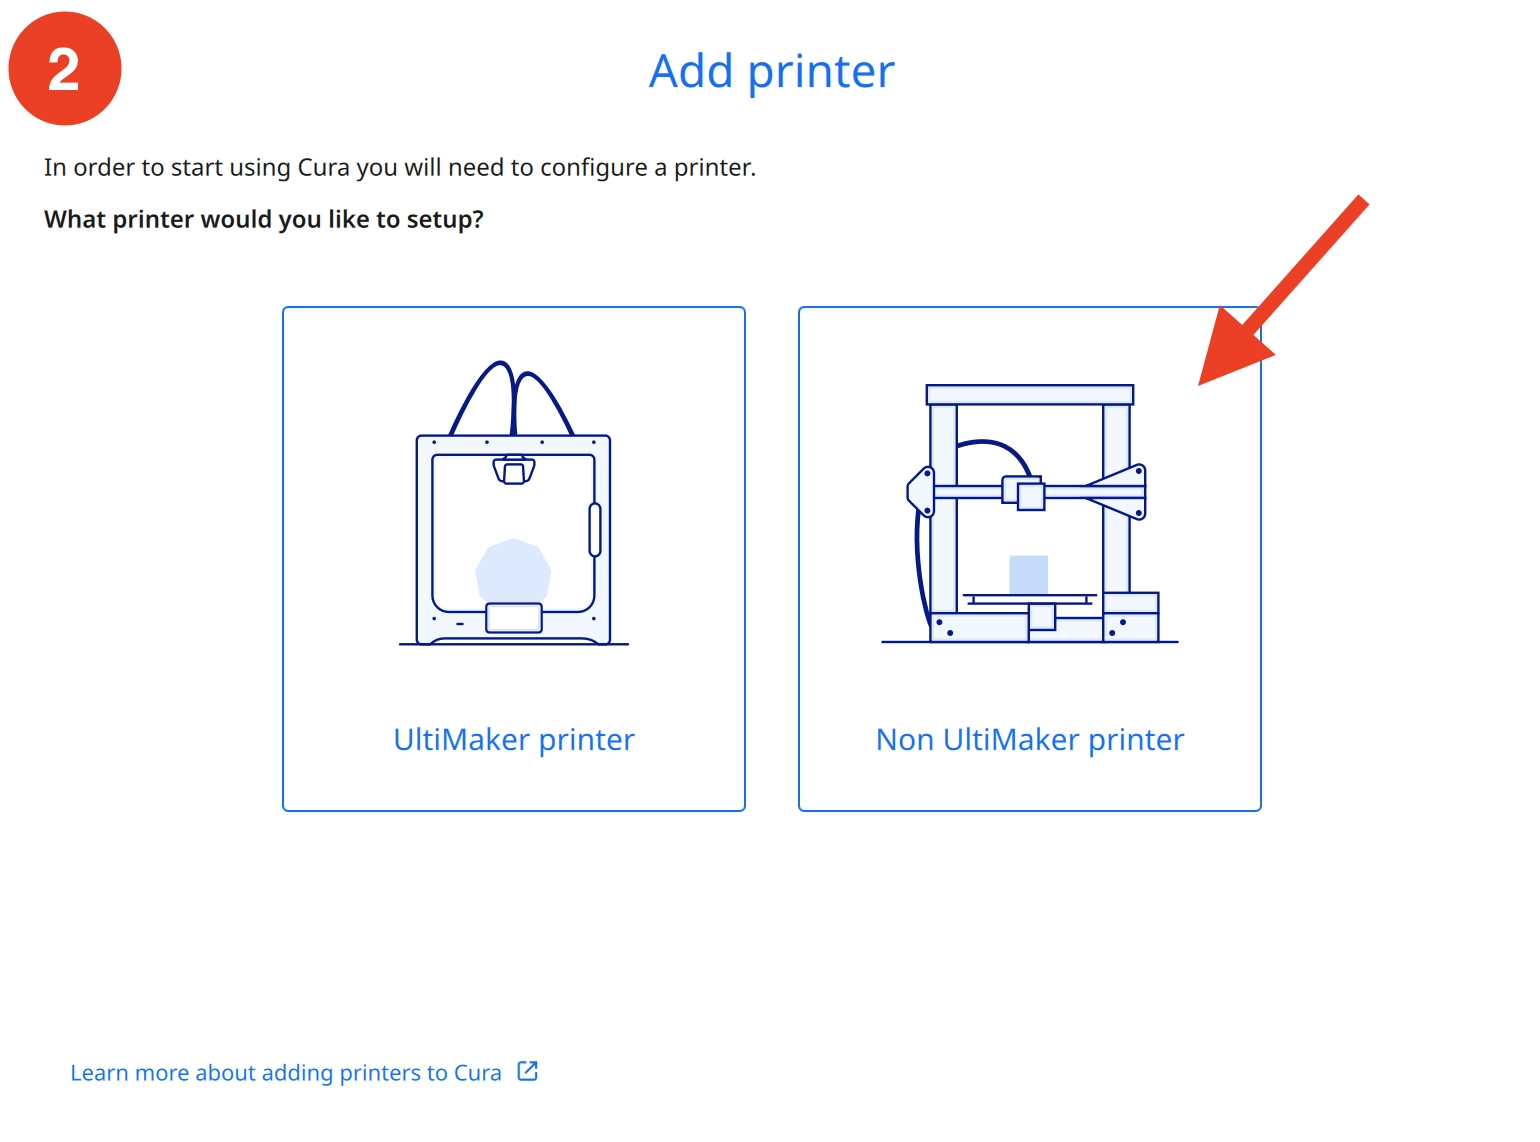
- Click on the active printer and then on “Add printer“.
- Click on “Non UltiMaker printer“.
- Search for “Custom” under the individual manufacturers, select “Custom FFF printer“, then enter the name of your 3D printer and click on “Add“.
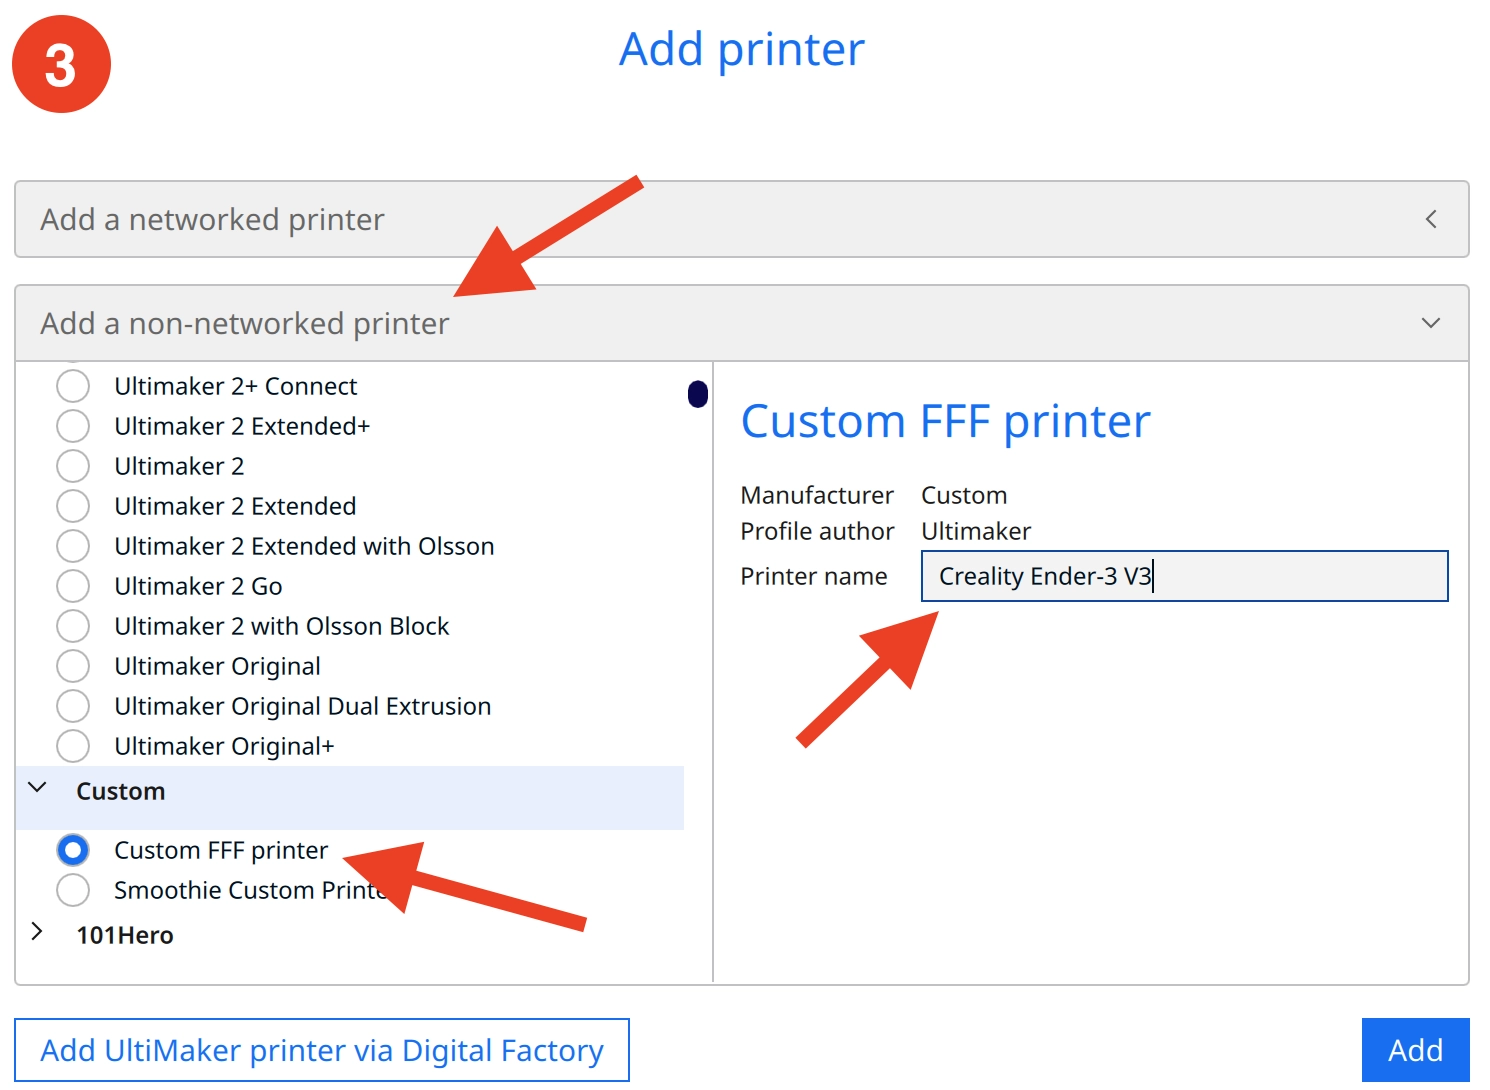
And now you have created a new profile for your Ender-3 V3! However, we still need to adjust the machine settings and the print settings.
In the next step, we first define the correct machine settings.
Step 2: Define Machine Settings
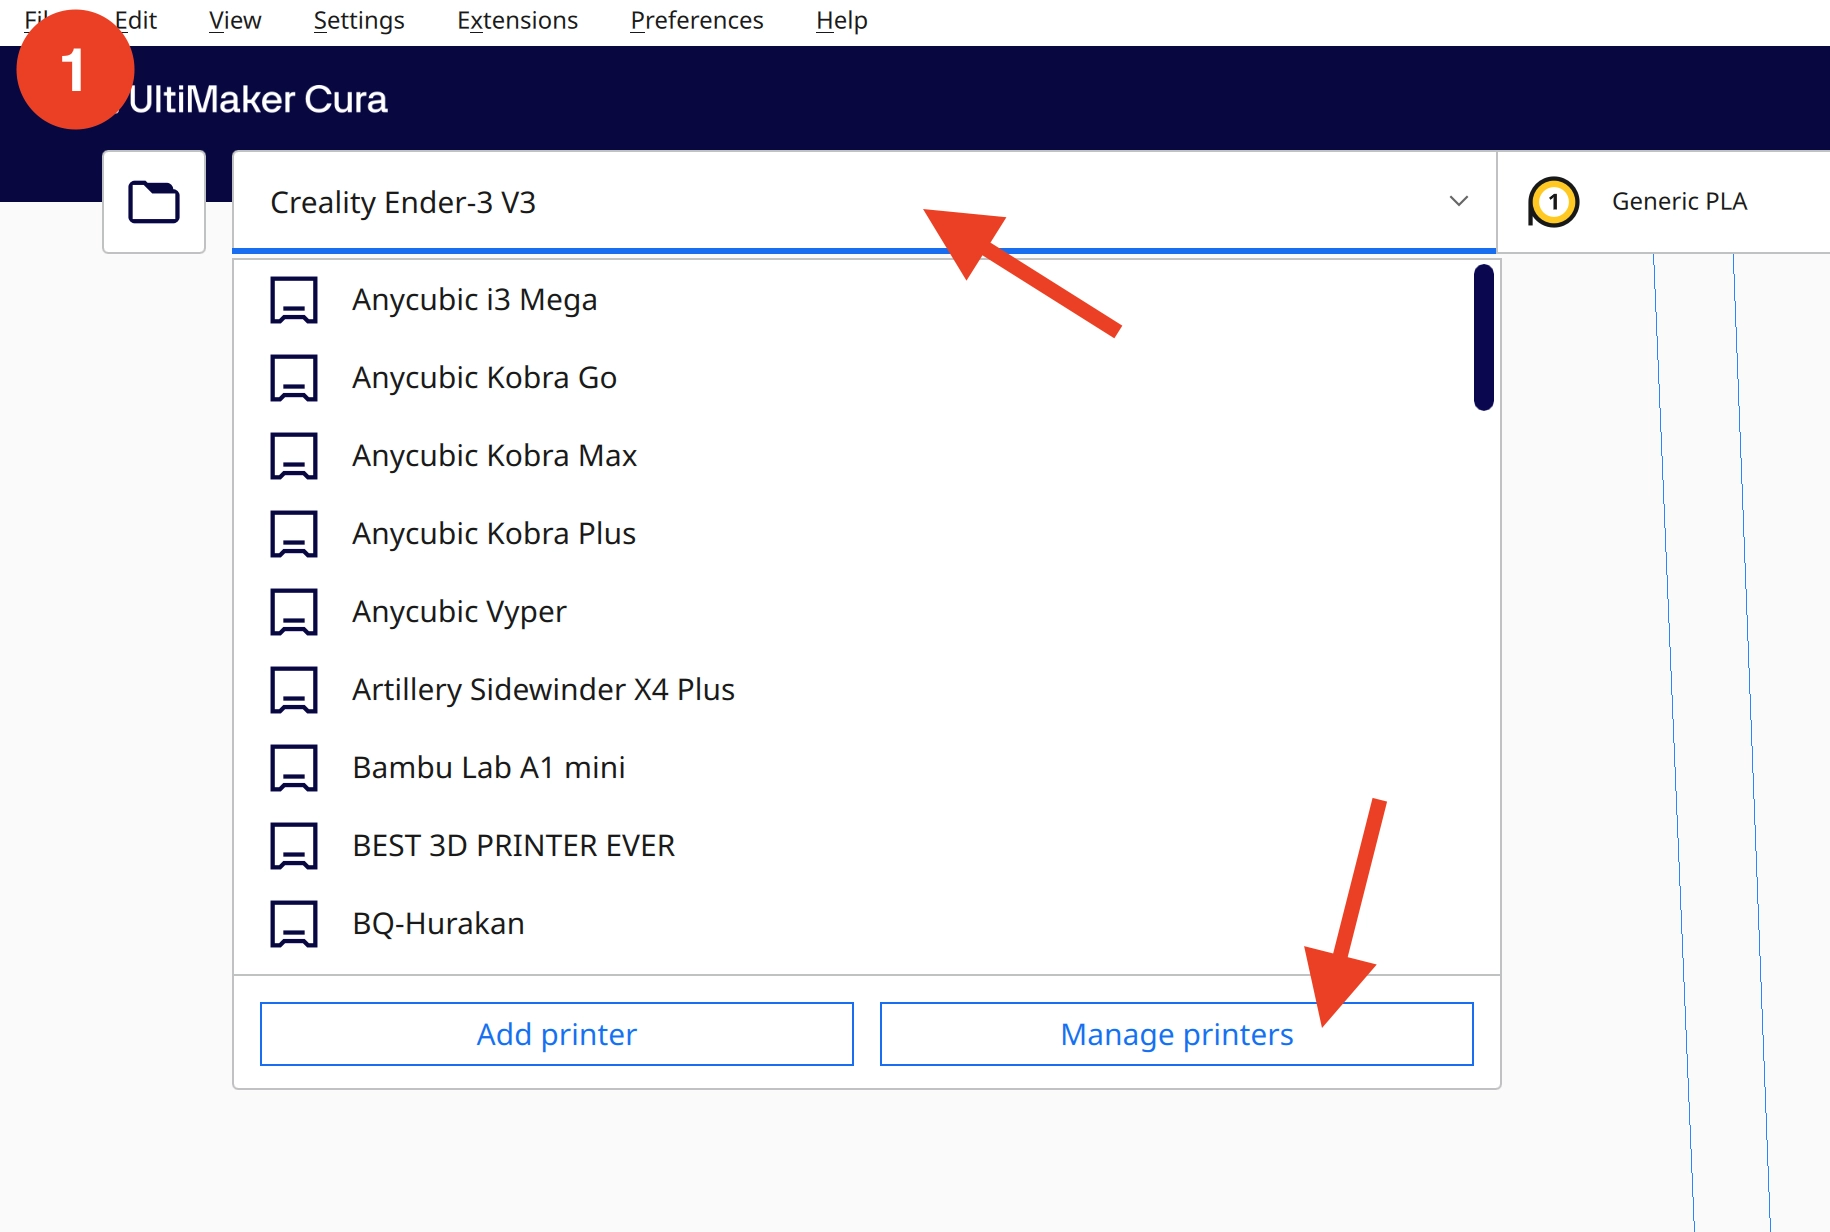
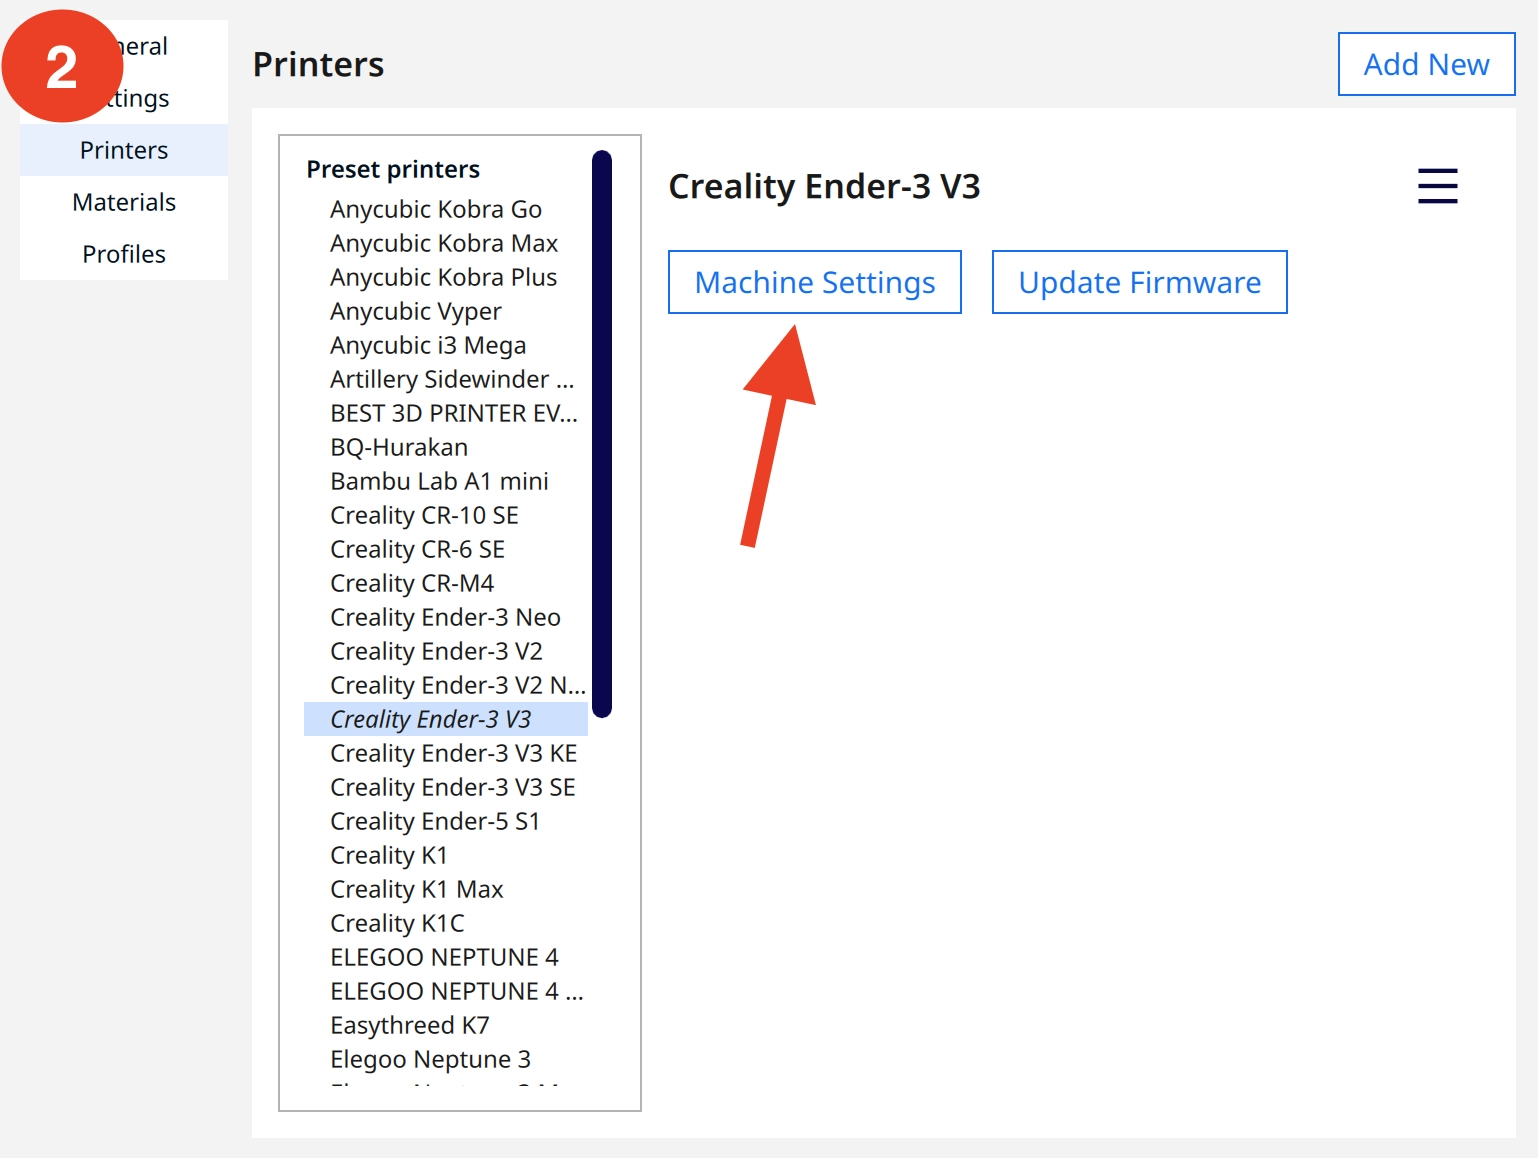
After you have added the Ender-3 V3, the machine settings will open directly. However, if you have clicked away this window or would like to adjust the machine settings again later, you can open them this way:
- Click on the active printer and then on “Manage printers“.
- Then click on “Machine Settings” in the new window.
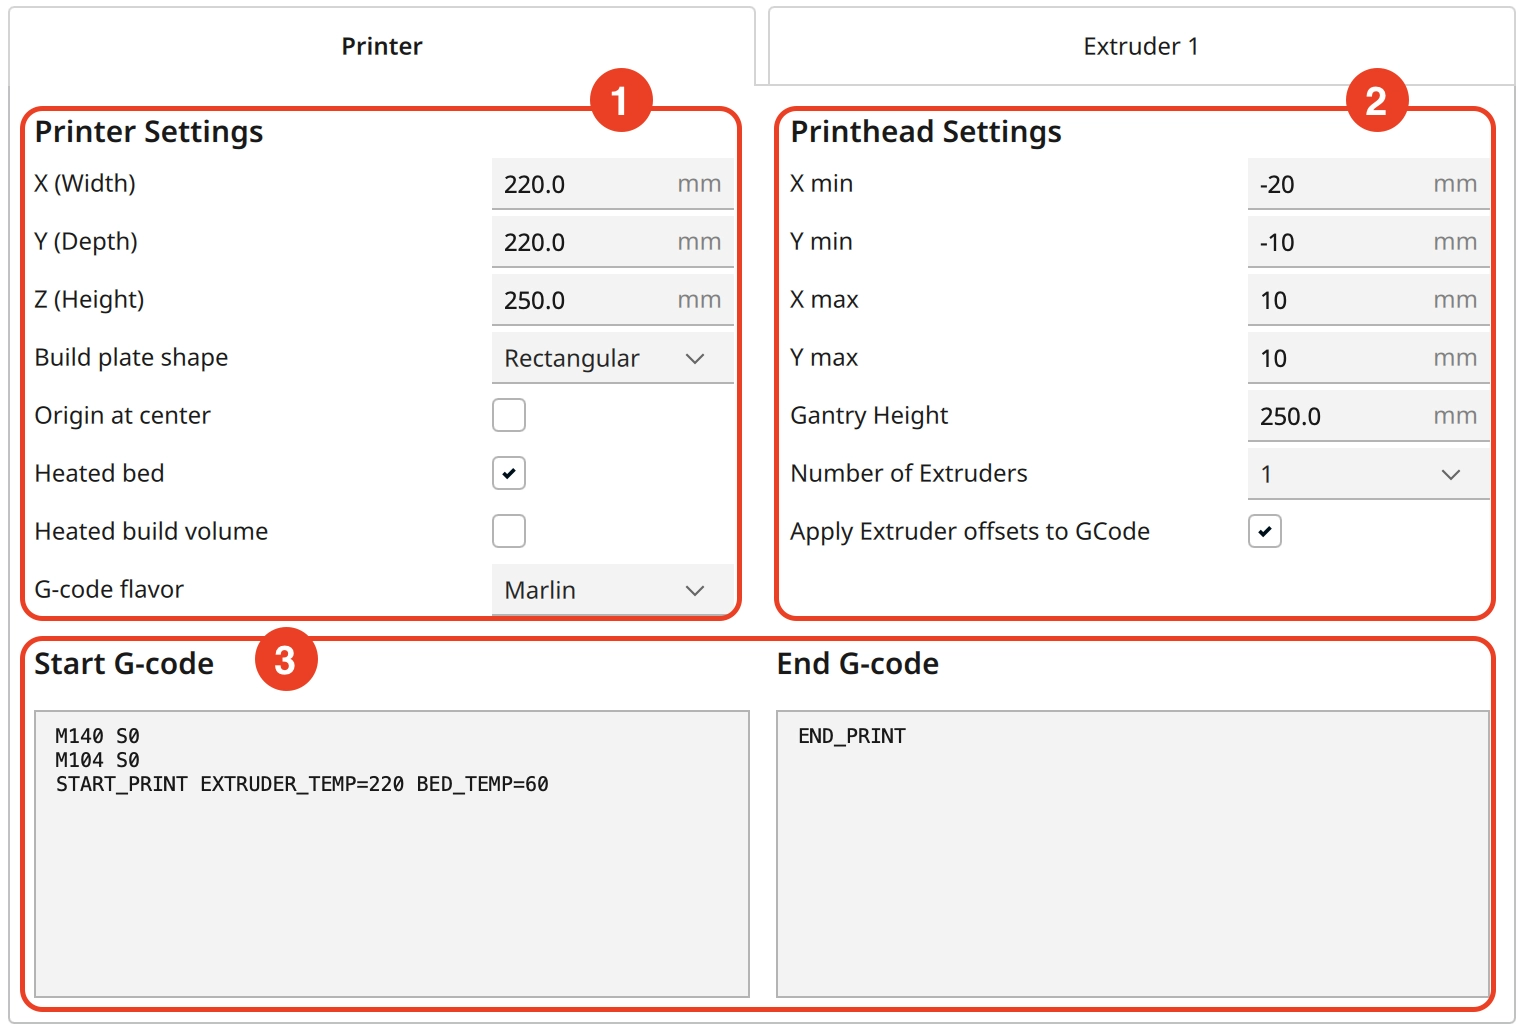
The machine settings in Cura define certain hardware parameters of the 3D printer:
- Printer Settings: The size of the print volume and the shape of the print bed are defined here. It is also specified here whether the 3D printer has a heated print bed or print volume and which G-code variant it communicates with.
- Printhead Settings: These settings are required if you want to print with the “Print Sequence: One at a Time” mode. To do this, Cura needs to know the dimensions of the print head. However, as this mode is a niche application, these settings are rarely required. If you want to print in this mode, you can find out how to define the settings correctly in this detailed guide.
- Start & End G-Code: G-code is the programming language in which 3D printers speak. In these two fields, G-code snippets can be defined that are to be executed before and after each print.
In the Start G-code, for example, the print head is moved to the home position and the nozzle and print bed are heated up. In the End G-code, these are then cooled down again and the print object can be presented by moving the print bed forwards.
These code snippets are different for each 3D printer. Sometimes they are only a few lines long, as in this example, but sometimes they can be 10 to 20 lines long.
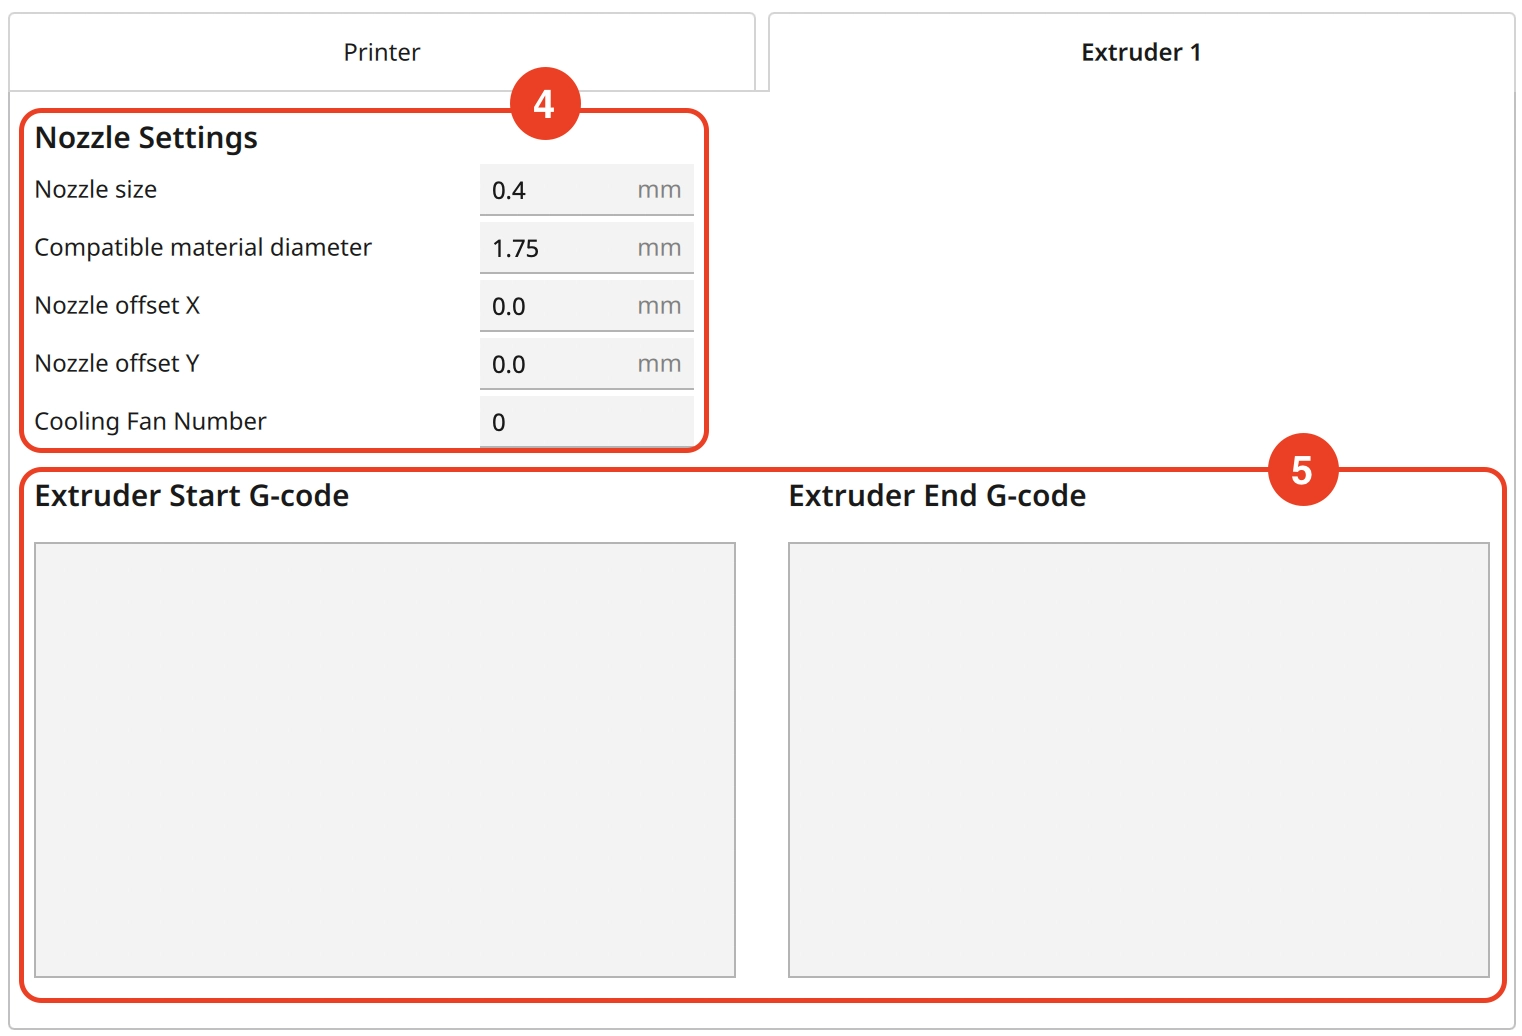
- Nozzle Settings: In the nozzle settings, you specify the inner diameter of the nozzle and which filament diameter it is compatible with. In almost all cases, these are 0.4 and 1.75 mm.
- Extruder Start & End G-Code: If you have a 3D printer that has more than one extruder, you can define G-code snippets here that are executed as soon as you switch to the respective extruder. For 3D printers with only one extruder, these fields remain empty.
For the Ender-3 V3, enter the following values in the machine settings:
- X (Width): 220 mm
- Y (Depth): 220 mm
- Z (Height): 250 mm
- Build plate shape: Rectangular
- Origin at center: No
- Heated bed: Yes
- Heated build volume: No
- G-code flavor: Marlin
- Leave at the default values, unless you want to use the “One at a Time” print order.
M140 S0M104 S0START_PRINT EXTRUDER_TEMP=220 BED_TEMP=60
END_PRINT
- Nozzle size: 0.4 mm
- Compatible material diameter: 1.75 mm
- Nozzle offset X: 0 mm
- Nozzle offset Y: 0 mm
- Cooling Fan Number: 0
- Leave empty.
Step 3: Adjust Print Settings
The print settings determine how the object is printed. In addition to the layer height, the speed and temperatures, how much material is printed inside the object (infill) and much more are defined here.
After you have created the profile for the Ender-3 V3, Cura creates several print profiles for different layer heights:
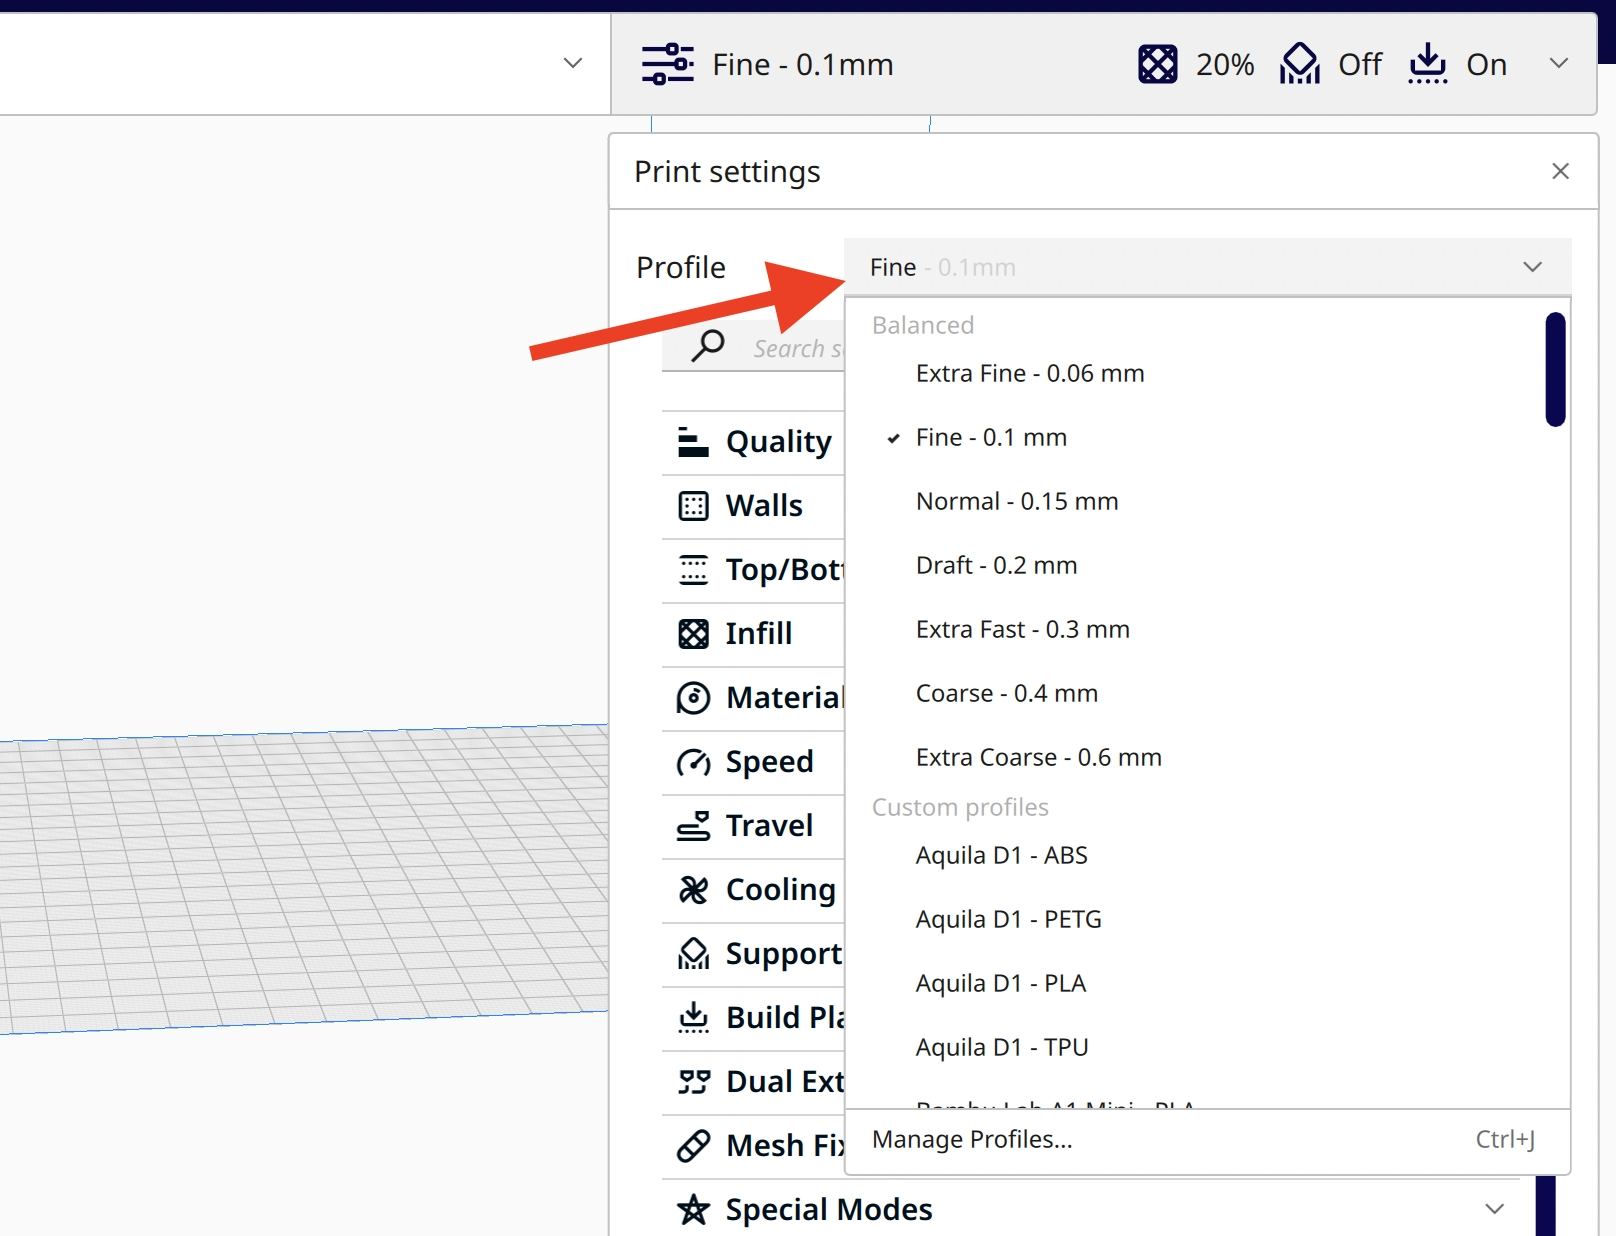
However, many of the settings in the standard profiles are unsuitable for the Ender-3 V3 and would lead to print errors or print failures.
To customize the print settings and create a custom profile for the Ender-3 V3, it is advisable to start with a standard profile that seems appropriate for most of your projects. I always start with a layer height of 0.1 mm and therefore select “Fine” as the template.
🧠
Note: The slicer settings shown here will produce good but not perfect results. You need to calibrate them to your specific filament. You can learn how to do this in my comprehensive calibration guide or in my 3D printing course.
These are the most important print settings for the Ender-3 V3:
- Layer Height: 0.1 mm
- Line Width: 0.4 mm
The layer height should be between 25% and 75% of the nozzle diameter. For a 0.4 mm nozzle, this means between 0.1 and 0.3 mm.
The line width should be between 100% and 120% of the nozzle diameter. For a 0.4 mm nozzle, this means between 0.4 and 0.48 mm.
- Wall Line Count: 2-4
- Wall Ordering: Inside To Outside
The wall thickness mainly depends on how stable the object has to be. More walls = more stability.
- Top Layers: 4-8
- Bottom Layers: 4-8
- Monotonic Top/Bottom Order: Yes
The same applies here: more top/bottom layers = more stability.
- Decorative objects: 0-15%
- Standard objects: 15-50%
- Stable objects: 50-100%
If you print thin walls, it can sometimes happen that the infill shows through from the inside. In this case, you should decrease the “Infill Overlap Percentage” settings.
- Printing Temperature:
- PLA: 215 °C
- ABS: 260 °C
- PETG: 250 °C
- TPU: 225 °C
- Build Plate Temperature:
- PLA: 60 °C
- ABS: 100 °C
- PETG: 70 °C
- TPU: 50 °C
The print temperature is one of the settings that should definitely be calibrated.
You can’t go too far wrong with the temperature of the build plate, as the print bed of the Ender-3 V3 offers excellent adhesion for most filaments.
- Print Speed: 250 mm/s
- Initial Layer Speed: 10 mm/s
The considerably reduced speed of the first layer helps to increase the print bed adhesion.
- Retraction Distance:
- PLA: 0.7 mm
- ABS: 0.7 mm
- PETG: 0.8 mm
- TPU: 0.8 mm
- Retraction Speed:
- PLA: 40 mm/s
- ABS: 40 mm/s
- PETG: 45 mm/s
- TPU: 45 mm/s
- Z-Hop When Retracted: Yes
- Z-Hop Only Over Printed Parts: Yes
- Z-Hop Height: 0.6 mm
Retraction is also one of the settings that must be calibrated. Otherwise, stringing will quickly occur.
- Fan Speed:
- PLA: 100%
- ABS: 50%
- PETG: 100%
- TPU: 100%
- Minimum Layer Time: 8 s
Cooling only needs to be reduced for ABS. ABS has a strong tendency to warp as it shrinks during cooling. As the Ender-3 V3 does not have a closed print volume, it can only process ABS to a limited extent. However, smaller objects are certainly possible.
If you cannot avoid drafts, a draft shield could be an option.
🧠
Note: There are additional print settings that need adjustment; however, discussing the more than 500 print settings in Cura is beyond the scope of this article. As a shortcut, you can import my calibrated Cura profile with just a few clicks.
Disclosure: This website is the property of Martin Lütkemeyer and is operated by Martin Lütkemeyer. Martin Lütkemeyer is a member of the Amazon Services LLC and other Affiliate Programs. These are affiliate advertising programs designed to enable websites to earn advertising revenue through advertising and linking to Amazon.com and others. Links marked with * are affiliate links.
