- Wet Filament: Prevention, Symptoms & Drying - July 18, 2024
- Sovol SV08 – Best PrusaSlicer Settings & Profile - June 26, 2024
- Sovol SV08 – Best Orca Slicer Settings & Profile - June 26, 2024
Disclosure: Links marked with * are Affiliate Links. I earn from qualifying purchases if you decide to make a purchase through these links – at no additional cost for you!
The Anycubic i3 Mega* is one of the most popular FDM 3D printers. Although there is a relatively good standard profile for it in Cura, these values must be individually adjusted to the respective 3D printer and the filament used. Only then can you achieve perfect results with the i3 Mega.
After adding the default profile for the Anycubic i3 Mega, the most important print settings like print temperature, retraction and flow rate have to be calibrated to avoid print errors and to optimize the print quality.
In this article, I will show you the best Cura settings for the Anycubic i3 Mega and how to calibrate them. If you follow the instructions from this article, you will get perfect printing results.
Why can you trust this article? I have been using the Anycubic i3 Mega for years and regularly print objects with it that require a high level of accuracy. During that time, I’ve perfected its Cura profile and respective print settings, and now I’m sharing them with you.
| PLA | ABS | TPU | PETG | |
|---|---|---|---|---|
| Print temperature | 200-210 °C | 250-255 °C | 210-215 °C | 230-235 °C |
| Print bed temperature | 60 °C | 90 °C | 60 °C | 60 °C |
| Print speed | 50 mm/s | 50 mm/s | 30 mm/s | 45 mm/s |
| Retraction | 5-6 mm at 40 mm/s | 5-5.5 mm at 40 mm/s | 4-7 mm at 30 mm/s | 5-6 mm at 50 mm/s |
| Cooling | 100% | 0% + enclosure | 100% | 50-100% |
Read the full calibration guide:
3D Printer Calibration: Step-by-Step to Perfect Results
Table of Contents:
Create a Profile for the Anycubic i3 Mega in Cura
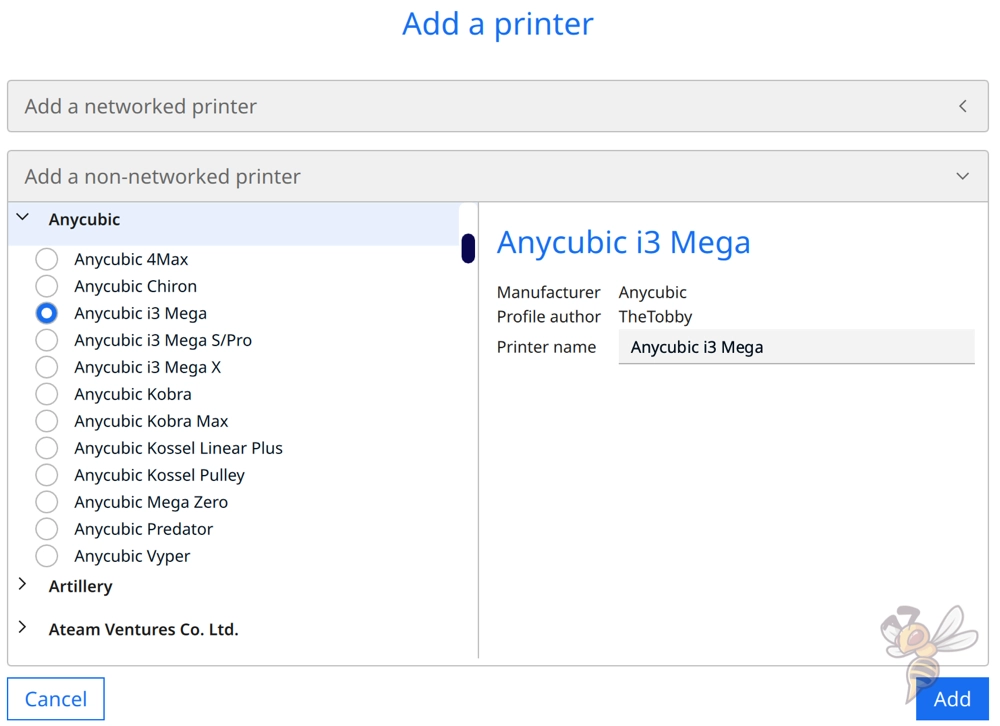
The profile for the Anycubic i3 Mega in Cura is a good starting point for further optimization of the print settings. To add the profile, go to “Settings” in the menu bar, then “Printers” and then “Add Printer”.
This will open the window shown above, where you can choose from different manufacturers and their 3D printers. Since the Anycubic i3 Mega has been around for a relatively long time, there is also a matching profile for it. This has the advantage that the machine settings with the dimensions of the 3D printer and the start and end G-codes are already available.
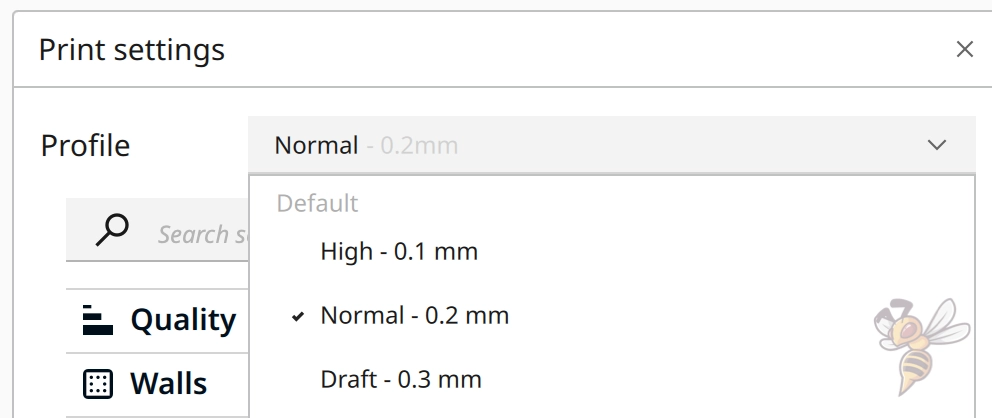
After you press Add, Cura automatically creates three profiles for different print qualities. There is a profile for a high quality with 0.1 mm, a normal one with 0.2 mm and a rough one with 0.3 mm layer height. In these profiles, the printing speed is also adapted to the quality. In the coarse accuracy, the print speed is slightly higher.
To optimize the print settings for your 3D printer, you can either adapt one of these existing profiles or create a new one.
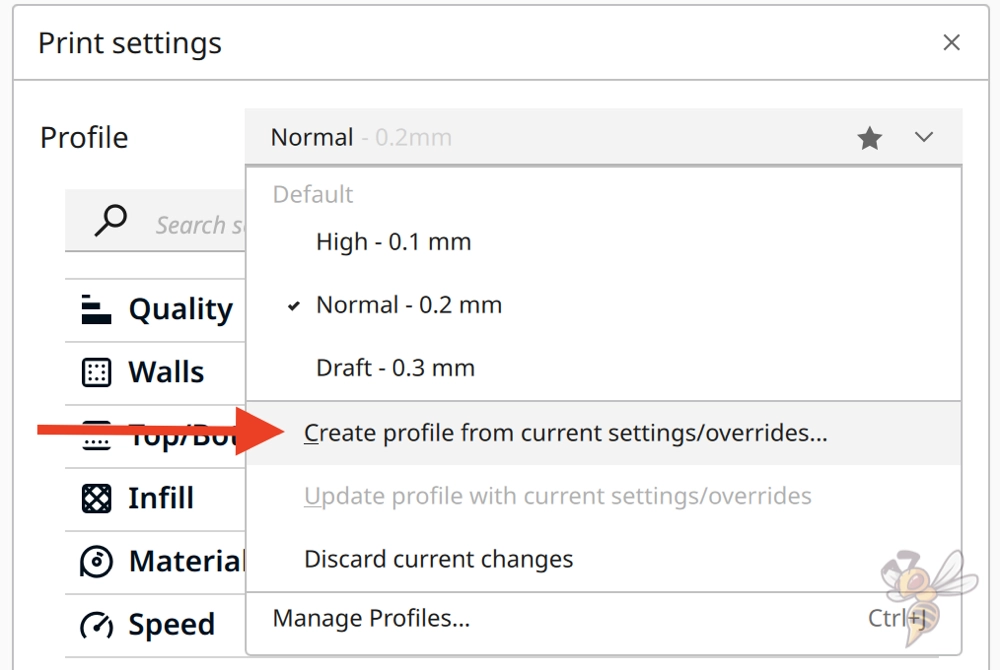
I would recommend that you select one of the three default profiles, customize it, and create your own profile from the new settings. This way, if you get bogged down in calibration, you can always go back to the original settings.
The settings in your Cura profile depend not only on your 3D printer, but also on the filament. I’ve used the Anycubic i3 Mega with many filaments and will first go over the respective settings for the four standard filaments. After that, we’ll look at the print settings in detail and how to calibrate them to get perfect results.
You can find more information on how to create a 3D printer profile in Cura and what you need to pay attention to in this article: How to Create a Custom 3D Printer Profile in Cura
PLA Settings
These are the correct Cura settings for the Anycubic i3 Mega for PLA:
- Print temperature: 200-210 °C
- Print bed temperature: 60 °C
- Print speed: 50 mm/s
- Retraction: 5-6 mm at 40 mm/s
- Cooling: 100%
- First layer: 5-10 mm/s, 0% cooling, 100% extrusion width, 100% layer height
The Anycubic i3 Mega is made for PLA. Due to its Bowden extruder, the print head is very light, which allows for a high print speed without vibrations. This makes the likelihood of print errors very low at normal print speeds of 40 to 60 mm/s.
Still, there are a few things you should pay attention to when printing PLA with the i3 Mega. Besides print temperature and retraction, the settings for the first layer are also important to create a good print bed adhesion.
Depending on what kind of PLA filament you are using, print temperatures of 200 to 210 °C are ideal. For retraction, I have always had good results with 5 to 6 mm retraction distance at a retraction speed of 40 mm/s.
However, you should calibrate both the printing temperature and the retraction in order to produce error-free prints. How to do this is explained in the respective settings later in this article.
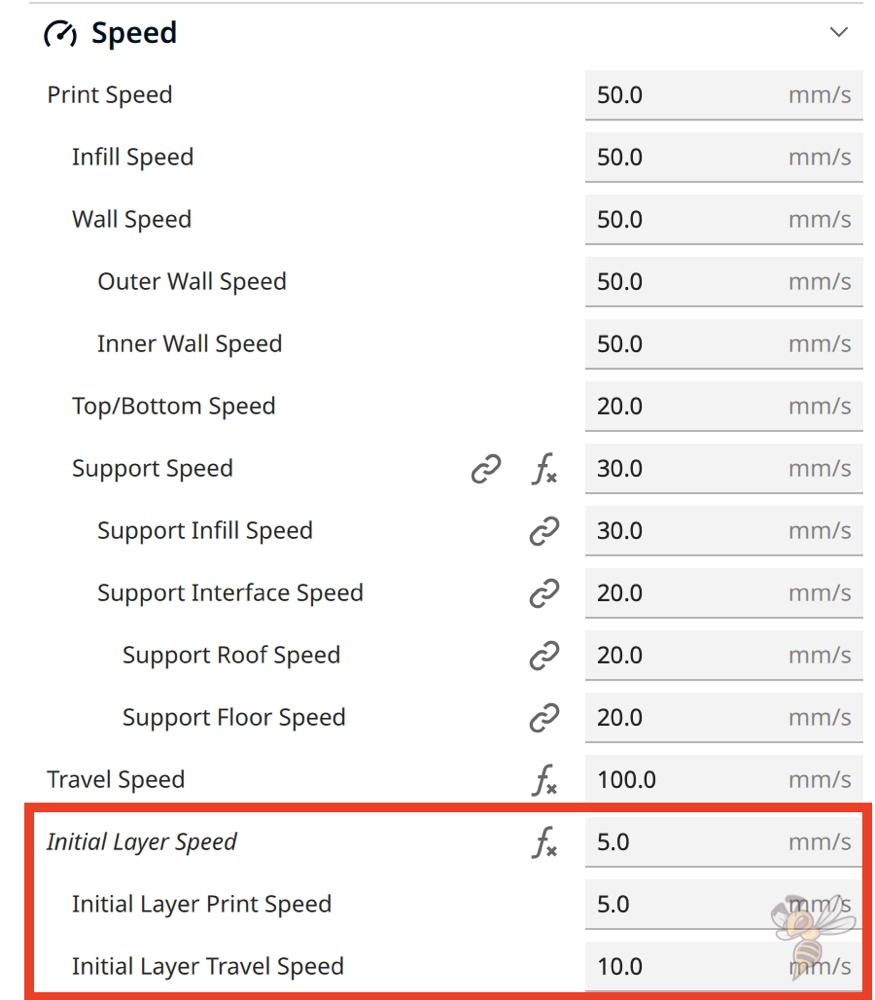
The i3 Mega has a glass print bed and therefore produces relatively good adhesion for most filaments. However, if you don’t make any special settings for the first layer, you will sometimes have trouble with PLA.
Therefore, you should definitely reduce the printing speed for the first layer. I have always been able to create a good print bed adhesion with 5 to 10 mm/s. For very delicate first layers, you could also use special adhesives like Magigoo.
ABS Settings
These are the correct Cura settings for the Anycubic i3 Mega for ABS:
- Print temperature: 250-255 °C
- Print bed temperature: 90 °C
- Print speed: 50 mm/s
- Retraction: 5-5,5 mm at 40 mm/s
- Cooling: 0% + housing
- First layer: 5-10 mm/s, 0% cooling, 100% extrusion width, 100% layer height
The Anycubic i3 Mega is also well suited for ABS. The only thing it lacks is a closed print volume. ABS warps if it cools too quickly. This can cause it to separate from the print bed or lose its dimensional accuracy.
To prevent this warping, for small objects you can print a draft shield to keep the air around the object warm. For larger objects, however, you need a suitable enclosure. I have had good experience with this tent from Creality.
Otherwise, with ABS, you also need to match the print temperature and retraction to the particular filament to get flawless results.
Likewise, I recommend you greatly reduce the print speed to improve print bed adhesion. The slower the speed, the longer the filament stays hot and flows into the small depressions of the print bed. This results in better adhesion.
At the print speed you should get good results with 50 mm/s for ABS. If you want to optimize this setting, you should decrease it in small steps and compare the print result.
TPU Settings
These are the correct Cura settings for the Anycubic i3 Mega for TPU:
- Print temperature: 210-215 °C
- Print bed temperature: 60 °C
- Print speed: 30 mm/s
- Retraction: 4-7 mm at 30 mm/s
- Cooling: 100%
- First layer: 5-10 mm/s, 0% cooling, 100% extrusion width, 100% layer height
TPU is a flexible filament. Therefore, different rules apply here than for normal rigid filaments. The Anycubic i3 Mega is not well suited for flexible filaments because it has a Bowden extruder.
With a Bowden extruder, the filament path between the extruder and the nozzle is very long. The flexible filament can partially compensate for the movements of the extruder on the long path. If the extruder pushes the filament forward, this movement arrives at the nozzle somewhat later. This reduces the extrusion accuracy and printing errors occur.
To still print TPU with the i3 Mega, you can try to reduce the print speed significantly. This will give the flexible filament longer to pass on the movements of the extruder to the other end of the filament at the nozzle. I was able to get relatively good results at 30 mm/s.
Another critical setting is retraction. As you noted above, the range of retraction distance is relatively large. This is because some of the filaments on the market vary greatly in flexibility. So it is imperative to calibrate the retraction settings in order to successfully print with TPU on the i3 Mega.
PETG Settings
These are the correct Cura settings for the Anycubic i3 Mega for PETG:
- Print temperature: 230-255 °C
- Print bed temperature: 60 °C
- Print speed: 45 mm/s
- Retraction: 5-6 mm at 50 mm/s
- Cooling: 50-100
- First layer: 5-10 mm/s, 0% cooling, 100% extrusion width, 100% layer height
The i3 Mega’s hotend reaches the necessary temperatures for PETG. This filament is especially popular for mechanical or outdoor applications. It is easier to print than ABS and more stable than PLA.
However, the big drawback to PETG is that it tends to string a lot. It is therefore necessary to calibrate the printing temperature and retraction carefully. In this article, you will learn more about how to avoid this printing error with PETG: PETG Stringing | Main Causes and Step by Step Solutions
PETG is also a bit special when it comes to cooling. In my experience, cooling needs to be reduced for some PETG fialments. If your object has many overhangs, you should activate the bridge settings in Cura. Among other things, this allows you to adjust the print speed and cooling of the filament separately for overhangs.
The Best Cura Settings for the Anycubic i3 Mega
After the quick overview of the best settings for the four standard filaments for the i3 Mega, let’s now look at the individual print settings in detail. You should calibrate the most important of them to get perfect results without print errors.
Printing Temperature
The best printing temperatures for the Anycubic i3 Mega in Cura:
- PLA: 200-210 °C
- ABS: 250-255 °C
- TPU: 210-215 °C
- PETG: 230-235 °C
The print temperature is one of the most important settings in 3D printing. If you set it too high, you will get printing errors like stringing and if it is too low, you will get errors due to under-extrusion.
The above values are good starting points for the filaments in question. You may already get perfect results with them. However, you will only achieve perfect prints without errors reliably if you calibrate the print temperature.
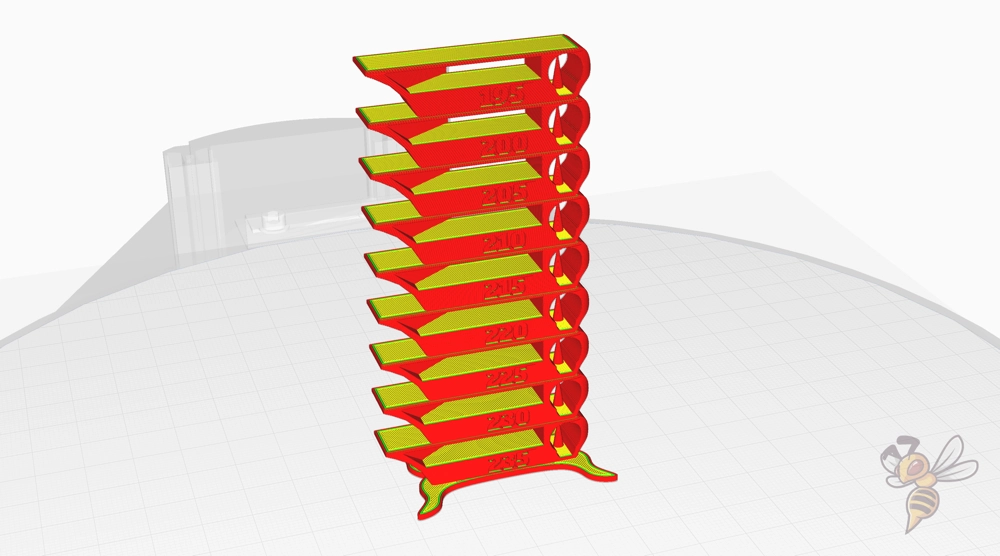
To calibrate the print temperature, I prefer to use a temperature tower. You can find such objects either on one of the many websites where you can get STL files (like Thingiverse) or in the Calibration Shapes plugin in Cura.
Such a temperature tower consists of several layers that are printed at different temperatures. This way, you can quickly see which printing temperature is best suited for the particular filament.
When switching to a filament from another manufacturer, you should always perform a temperature calibration.
In order to print this temperature tower, you still need the appropriate script in Cura. Either you use the standard script ChangeAtZ or the TempFanTower script from the Calibration Shapes plugin. In both scripts, you can set the temperature change per layer.
The step size of 5 °C is good for the beginning. If you really want to perfect the settings, you can reduce the step size even further in a second step to narrow down the previously determined temperature even more.
Print Bed Temperature
The best print bed temperatures for the Anycubic i3 Mega in Cura:
- PLA: 60 °C
- ABS: 90 °C
- TPU: 60 °C
- PETG: 60 °C
The print bed of the i3 Mega reaches a maximum temperature of 110 °C. This allows you to print most filaments and create sufficient adhesion for them. While print bed adhesion gets better the higher the temperature is set, it also increases the likelihood of an elephant foot.
With an elephant foot, the first layers of the object are too soft due to the high print bed temperature and flow outward. The wider foot of the object gives this print defect its name.
So the correct print bed temperature is in the area where the print bed adhesion is sufficient and elephant foot does not yet occur. Sometimes this range is small or non-existent if the print bed adhesion on the glass bed of the i3 Mega is too poor for the filament in question.
However, to both avoid elephant foot and increase print bed adhesion, there are a few options with the i3 Mega. The first approach is to greatly reduce the print speed of the first layer.
After that, you can make other adjustments in Cura that will make the filament cool down more slowly. This includes increasing the layer height and line width of the first layer.
If you have problems with the print bed adhesion, you can find all measures to improve the adhesion in this article: 3D Print Not Sticking to the Bed: How to Fix it Step-by-Step
Printing Speed
The best printing speed for the Anycubic i3 Mega in Cura:
- PLA: 50 mm/s
- ABS: 50 mm/s
- TPU: 30 mm/s
- PETG: 45 mm/s
With the Anycubic i3 Mega, you can achieve normal print speeds of 40 to 60 mm/s for FDM 3D printers. The built-in print head with the Bowden extruder is relatively light, which means it generates very little vibration at these print speeds.
Such vibrations can increase at high printing speeds and cause printing errors such as ringing or ghosting. The values given above are good guidelines for the particular filaments where these printing errors do not occur.
However, you can also try to optimize the print speed. Calibrating the print speed is about increasing it until you can no longer tolerate the resulting print errors for your project.
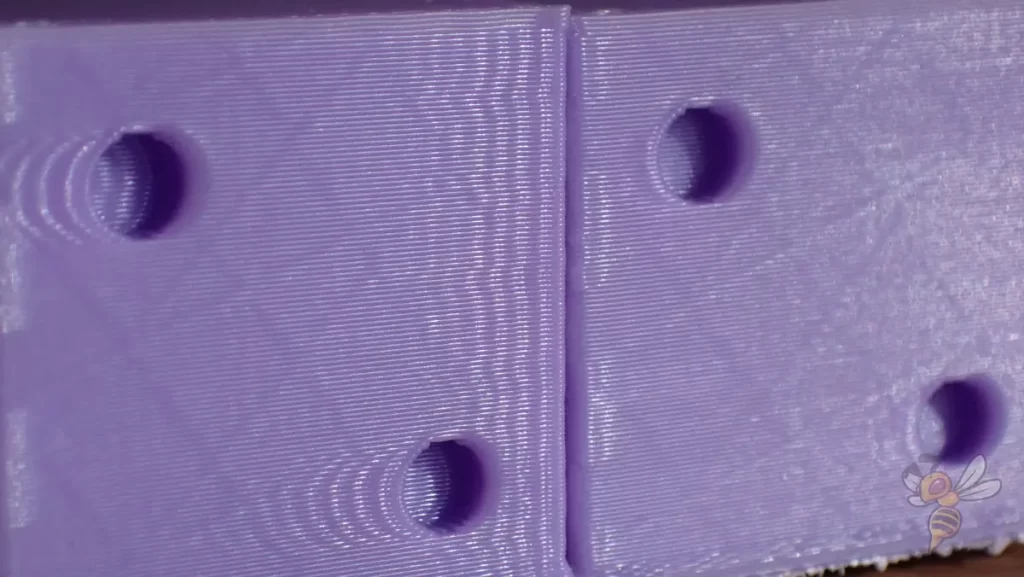
I use an appropriate ringing test for this. Here is a link to the object. In this cube, echoes of the surface details occur at too high print speeds. The vibrations of the print head when the direction of movement changes too fast will trace onto the object.
There is no hard limit above which these printing errors appear. You have to decide for yourself how strong this print error can be in your project. If you want to avoid it completely, you should reduce the printing speed to the values given above.
Layer Height
Best layer heights for the Anycubic i3 Mega in Cura:
- Decorative objects: 0.1 mm
- Standard: 0.2 mm
- Rough, fast prints: 0.3 mm
The layer height you can print with the i3 Mega is independent of the 3D printer. The possible layer heights depend on the diameter of the nozzle.
As a rule of thumb, you can print layer heights in the range of 25% to 75% of the diameter of the nozzle. If you want to print higher layers than specified above, you will need a wider nozzle.
The i3 Mega comes standard (like most other FDM 3D printers) with a 0.4 mm nozzle. However, you can also choose a 0.6 or 0.8 mm diameter nozzle to print higher layers.
The layer height you choose depends mainly on the purpose of your object. If you want to print the surface as accurately as possible, you should choose a smaller layer height. If you want to save printing time, you can increase the layer height.
Flow Rate
The best flow rate for the Anycubic i3 Mega in Cura:
- Default value: 100%
- For over-extrusion: 90% to 99%
- For under-extrusion: 101% to 110%
In Cura, the flow rate affects how much filament is extruded per second. The higher you set it, the wider the lines will be. The purpose of the flow rate is to match the theoretically set line width and the actual line width.
Normally the flow rate is always 100%. The flow rate is one of the settings you should calibrate to get perfect results. The easiest way to calibrate the flow rate is to use a hollow cube (infill = 0%, top layers = 0).
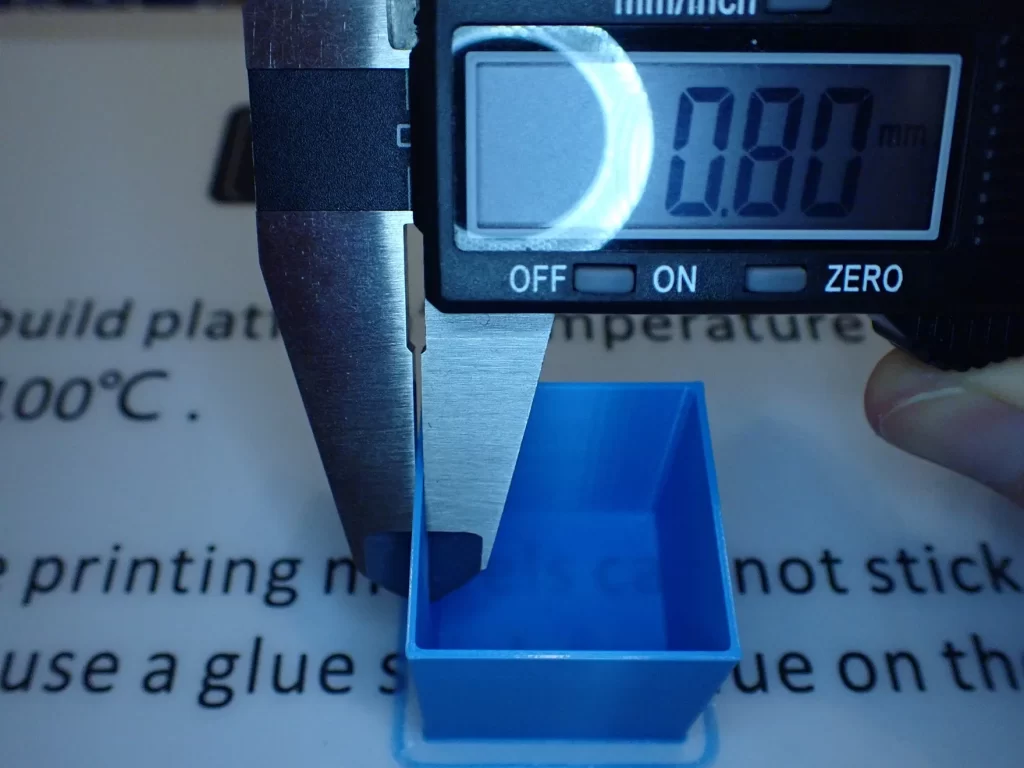
After printing, you can measure the wall thickness with a caliper. It is a product of the line width and the number of wall lines. If the measured value is equal to the theoretical one, you do not need to adjust the flow rate. If the actual wall thickness is too high, you must decrease the flow rate, and vice versa.
Retraction
The best retraction settings for the Anycubic i3 are as follows Mega in Cura:
- PLA: 5-6 at 40 mm/s
- ABS: 5-5.5 at 40 mm/s
- TPU: 4-7 at 30 mm/s
- PETG: 5-6 at 50 mm/s
Next to print temperature, retraction is the most important print setting. The two settings have the greatest effect on the printing result. Especially, the retraction is very dependent on the used 3D printer and the filament.
You probably won’t get perfect results with the values given above. Maybe you are lucky and hit exactly the right setting for PLA. However, at least with the other filaments, a calibration of the retraction is mandatory.
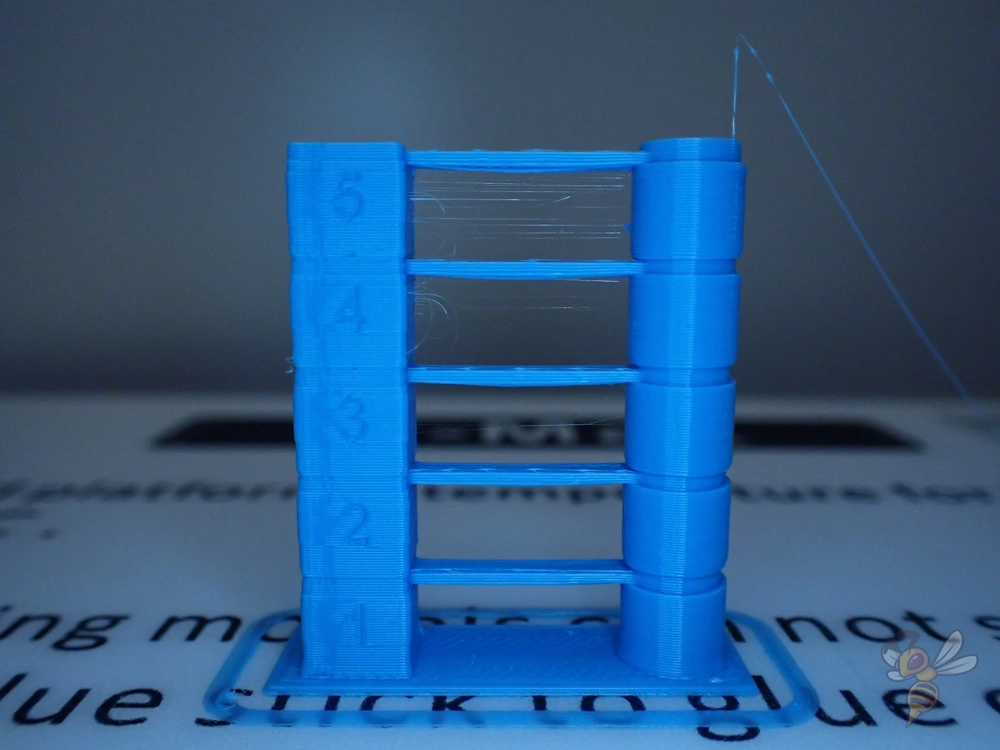
Similar to the print temperature, there are also calibration towers for the retraction. Here, too, you change the retraction settings per layer to test several settings with one print.
For retraction, the retraction distance and the retraction speed are mainly important. Although there are many other settings for retraction, these two have the greatest influence on print quality.
To quickly approach the perfect value, you can use the above values as a starting point and optimize in small steps from there. Remember to change only one of the two settings at a time and evaluate the results. Otherwise, you won’t know which change led to the result produced.
Infill
The best infill density for the Anycubic i3 Mega in Cura:
- Decorative objects: 0-15%
- Standard objects: 15-50%
- Stable objects: 50-100%
How high you set the density inside your object depends on how stable it needs to be. For decorative objects, you theoretically don’t need any infill at all. For such objects, the vase mode or the lightning infill pattern is suitable.
As soon as you want the objects to be more stable, you should increase the density to over 10%. For projects with a technical application, densities above 50% are advisable.
High stability (for stable objects):
- Cubic
- Cubic subdivision
- Octet
- Gyroid
Medium stability (for standard objects):
- Grid
- Triangles
- Tri-Hexagon
Low stability (for decorative objects):
- Lines
- Zigzag
- Lightning
First Layer
These are the best Cura settings for the first layer on the Anycubic i3 Mega:
- Layer height: 100-200% of normal layer height (higher values to increase print bed adhesion)
- Line width: 100-200% of normal line width (higher values to increase print bed adhesion)
- Print temperature: Same as the rest of the object or 5-10 °C higher for better print bed adhesion.
- Print speed: 50% of normal print speed (i.e. 25 mm/s for a normal print speed of 50 mm/s) or 5-10 mm/s for high print bed adhesion
- Flow rate: 100-110% (higher values for poor print bed adhesion)
If you are having problems with print bed adhesion, the above settings are a good way to increase it. Each of these settings aims to make the filament cool more slowly on the print bed.
The longer the filament stays hot on the print bed, the better it can bond to the print bed surface.
Conclusion
With the Cura settings for the Anycubic i3 Mega that I listed for you in this article, you should be able to get good results.
Also, you learned how to optimize these Cura settings by calibrating the most important print settings. Remember to always recalibrate these settings as soon as you switch to a different filament type or a filament from a different manufacturer.
Enjoy 3D printing with your i3 Mega!
Disclosure: This website is the property of Martin Lütkemeyer and is operated by Martin Lütkemeyer. Martin Lütkemeyer is a member of the Amazon Services LLC and other Affiliate Programs. These are affiliate advertising programs designed to enable websites to earn advertising revenue through advertising and linking to Amazon.com and others. Links marked with * are affiliate links.

