- Wet Filament: Prevention, Symptoms & Drying - July 18, 2024
- Sovol SV08 – Best PrusaSlicer Settings & Profile - June 26, 2024
- Sovol SV08 – Best Orca Slicer Settings & Profile - June 26, 2024
Disclosure: Links marked with * are Affiliate Links. I earn from qualifying purchases if you decide to make a purchase through these links – at no additional cost for you!
The Sidewinder X2 is a popular large format 3D printer with automatic print bed leveling. However, to achieve good results with it, a good slicer profile is necessary.
A good starting point for a Cura profile for the Sidewinder X2 is the standard profile of the Sidewinder X1. The settings then only need to be adjusted and partially calibrated for the X2.
In this article, you’ll learn how to do that and what settings have worked well for the Sidewinder X2. Before we go into detail, here is an overview table:
| PLA | ABS | TPU | PETG | |
|---|---|---|---|---|
| Printing temperature | 200-210 °C | 225-235 °C | 215-225 °C | 225-240 °C |
| Print bed temperature | 60-65 °C | 90-100 °C | 55-60 °C | 65-75 °C |
| Print speed | 60 mm/s | 60 mm/s | 22-30 mm/s | 60 mm/s |
| Retraction | 2 mm at 25 mm/s | 2 mm at 30 mm/s | 2-2.5 mm at 50 mm/s | 1.8-2.0 mm at 25 mm/s |
| Cooling | 100 % | 0% + enclosure | 100 % | 100 % |
Table of Contents:
Creating a Profile for the Sidewinder X2 in Cura
A 3D printer profile in Cura is a set of specific settings tailored to a particular 3D printer and filament type. They control things like print speed, layer height, and fan speed. A good profile will result in high-quality prints with minimal errors.
At the time of the last update of this article, there is no predefined default profile for the Sidewinder X2 in Cura. However, this is not a big deal, as you can use the profile for the X1 and adapt it for the X2.
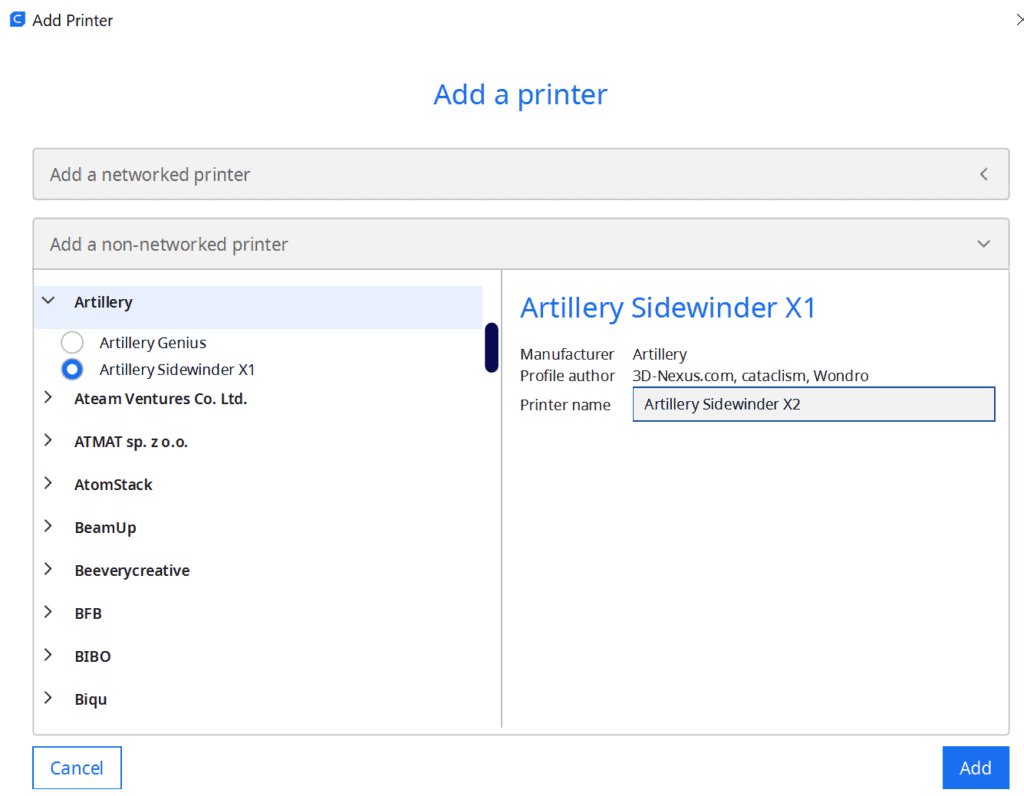
Adding a 3D printer in Cura is very simple. Just click on “Settings” in the menu bar at the top of the screen and select “Printers” and then “Add Printer”. This will open a window where you will see a number of manufacturers and their printers.
Select the Artillery Sidewinder X1, name it “Artillery Sidewinder X2” and press “Add”. Since the Sidewinder X2 is the optimized version of the Sidewinder X1 and mainly brings “Quality-of-Life-Features” like the automatic print bed leveling, there are only a few things you have to adjust on its profile.
You can find more information on how to create a 3D printer profile in Cura and what you need to pay attention to in this article: How to Create a Custom 3D Printer Profile in Cura
PLA Settings at a Glance
The Sidewinder X2 is a great printer for PLA. Although its direct drive extruder makes it well suited for a wide range of filament types including flexible filaments, it produces excellent results with PLA.
The only part of the Sidewinder X2 that is not perfect for PLA is its glass print bed. For PLA, other print bed surfaces like PEI would be better. But if you reduce the print speed of the first layer to 5 to 10 mm/s, the adhesion will be good enough. Otherwise, you can always use adhesives like Magigoo.
When it comes to printing temperature, I have found with a variety of PLA filaments that the Sidewinder X2 gives the best results when you are in the upper range of the recommended temperature range. The best results have been achieved between 200 and 205 °C.
Also with the print bed temperature, a slightly higher temperature than usual is good to increase the print bed adhesion. However, with some filaments, you have to be careful that it does not come to an elephant’s foot and the first layer is widened to the outside. Too high a temperature here could make the filament so fluid that it gives way under the weight of the layers above it.
Due to the direct drive extruder, the retraction of 2 mm is quite low and the retraction speed of 25 mm/s as well. Especially the settings for retraction can differ greatly between different 3D printers. Therefore it is important to calibrate this setting individually.
These are the correct Cura settings for the Sidewinder X2 for PLA:
- Printing temperature: 200-210 °C
- Print bed temperature: 60-65 °C
- Print speed: 60 mm/s
- Retraction: 2 mm at 25 mm/s
- Cooling: 100%
- First layer: 5 mm/s, 0% cooling, 100% extrusion width, 100% layer height
3D printing can be difficult – especially in the beginning. Many beginners struggle with print errors, poor print bed adhesion, or don’t know how to properly set up the slicer.
That’s why I created an online course to get everyone up to my expert level and as quickly as possible.
The course covers everything you need to know about FDM 3D printing to get perfect results every time. Click the link below to learn more about the content and what to expect (and don’t worry: there are no tests! Learn at your own pace, completely stress-free).
ABS Settings at a Glance
The Sidewinder X2 can also print with ABS. However, ABS is more demanding than PLA. In addition to the higher temperatures for the extruder and print bed, it also requires a warm and homogeneous ambient temperature. Since the X2 has an open print volume, it is best suited for small ABS parts only. If you want to print larger ABS parts, you should get a suitable enclosure. This one from Creality comes in two sizes, the larger of which should also fit the X2.
The glass print bed is also not perfect for ABS. If you don’t set the print bed temperature well and don’t have a heated print volume, warping or peeling prints will occur quickly. However, with the right print bed temperature and a sealed print volume, you can create a good bond. If not, you will need to resort to adhesives such as Magigoo or ABS Slurry/Juice.
These are the correct Cura settings for the Sidewinder X2 for ABS:
- Printing temperature: 225-235 °C
- Print bed temperature: 90-100 °C
- Print speed: 60 mm/s
- Retraction: 2 mm at 30 mm/s
- Cooling: 0% + enclosure
- First layer: 5 mm/s, 0% cooling, 100% extrusion width, 100% layer height
TPU Settings at a Glance
TPU is a flexible filament. Therefore, a few other rules apply here than with PLA and ABS. On the one hand, it is important to use the right extruder for it, on the other hand, some settings have to be chosen correctly to avoid filament jams.
The Sidewinder X2 has a direct drive extruder, where the extruder sits directly above the nozzle in the print head. This means that the distance that the filament has to get pushed between the extruder and the nozzle is very short. This is ideal for flexible filaments, as the extrusion and retraction movements cannot be compensated by the flexible filament.
With Bowden extruders, where this path is longer, inaccuracies or even filament jams in the Bowden tube often occur with flexible filaments.
For TPU, glass print bed surfaces are very good for creating sufficient print bed adhesion. For most TPU filaments it is sufficient to find the right temperature. However, for some filaments, you may need to use adhesives like Magigoo.
Make sure, however, that you only remove the printed TPU object from the printing plate when it has cooled down. Otherwise, the surfaces of the print bed or the model itself may be damaged, as the print bed adhesion is still too great.
These are the correct Cura settings for the Sidewinder X2 for TPU:
- Printing temperature: 215-225 °C
- Print bed temperature: 55-60 °C
- Print speed: 25-30 mm/s
- Retraction: 2-2.5 mm at 50 mm/s
- Cooling: 100%
- First layer: 5-10 mm/s, 0% cooling, 100% extrusion width, 100% layer height
PETG Settings at a Glance
PETG is a rigid filament just like PLA and ABS and does not necessarily require a direct drive extruder. However, the extruder is beneficial as it increases extrusion accuracy and simplifies retraction calibration. This is especially important with PETG, as this filament has a strong tendency to stringing (see this article for details on how to avoid stringing with PETG).
Another peculiarity of PETG is that it adheres extremely well to glass. And by “extremely” I mean that sometimes the adhesion is too high and you can’t get the object off the glass print bed without damaging it.
In this case, you should resort to tools that are normally used to increase adhesion. These include adhesives and blue tape. If you want to print with PETG more often, you might also want to use a flexible print bed from which you can remove the finished object more easily.
These are the correct Cura settings for the Sidewinder X2 for PETG :
- Printing temperature: 225-240 °C
- Print bed temperature: 65-75 °C
- Print speed: 60 mm/s
- Retraction: 1.8-2.0 mm at 25 mm/s
- Cooling: 100%
- First layer: 10 mm/s, 0% cooling, 100% extrusion width, 100% layer height
Best Cura Settings for the Sidewinder X2
Now that you’ve learned the best settings for PLA, ABS, TPU, and PETG, you’ll learn what to look for in each print setting in detail.
Printing Temperature

The printing temperature is of particular importance in 3D printing, as it usually has the greatest impact on the final result. An incorrectly set printing temperature leads to the most common printing errors. These include over-extrusion, under-extrusion, stringing and various other printing errors. Below are the best temperature ranges for the standard filaments on the Sidewinder X2 and later in this article you will learn how to calibrate this important setting.
The Sidewinder X2 reaches a maximum temperature of 240 °C. For most standard filaments this is sufficient, but for some PETG filaments, this could sometimes even be too weak. The heat break between the nozzle and extruder is made of PTFE and starts to dissolve at 240 degrees Celsius.
So if you want to print more often at these temperatures or even use other filaments that require even higher temperatures, an upgrade to a full metal extruder would be worthwhile. Artillery offers a matching extruder with a hardened steel nozzle that reaches up to 350 °C. Click here* to go directly to the product.
The best printing temperatures for the Sidewinder X2 in Cura:
- PLA: 200-210 °C
- ABS: 225-235 °C
- TPU: 215-225 °C
- PETG: 225-240 °C
Print Bed Temperature

The print bed temperature influences how well the filament adheres to the print bed surface. Some filaments like PLA theoretically do not need a heated print bed, but the adhesion can be increased with the right setting.
The Sidewinder X2 has a heated print bed that reaches a maximum temperature of 130 °C. This gives you a very large margin that is absolutely sufficient for most filaments.
However, the large glass print bed of the Sidewinder X2 has a rather inhomogeneous temperature distribution. For smaller objects, this is not a problem, but for very large objects this could lead to problems with the print bed adhesion. It is therefore usually advisable to set the print bed temperature as high as possible without causing print defects such as warping or an elephant foot.
The best print bed temperatures for the Sidewinder X2 in Cura:
- PLA: 60-65 °C
- ABS: 90-105 °C
- TPU: 55-65 °C
- PETG: 65-75 °C
Print Speed

The print speed of a 3D printer is mainly limited by its design. Here, the weight of the print head is particularly important, as this can lead to vibrations on the X-axis at too high print speeds and thus to print errors such as ringing.
Since the Sidewinder X2 has a direct drive extruder where the extruder is built into the print head, the print head is relatively large. Therefore, the X2 does not have exceptionally fast print speeds, they are more in the normal range and comparable to other 3D printers in its class.
If high print speed is important to you, check out my hands-on review of the Flsun Super Racer. This Delta 3D printer is 3-4 times faster than the Sidewinder X2!
The best print speed for the Sidewinder X2 in Cura:
- PLA: 60 mm/s
- ABS: 60 mm/s
- TPU: 25-30 mm/s
- PETG: 60 mm/s
Layer Height

The layer height determines the surface quality of the 3D print. The thinner the layers, the finer and smoother the surface. The Sidewinder X2 can print layer thicknesses from 0.1 to 0.3 millimeters.
Depending on the purpose of the printed object, other layer heights are suitable. If the object should look nice and have a decorative purpose, layer thicknesses of 0.1 to 0.2 are a good value. For objects that will not serve a decorative purpose in the end, thicker layers are a good choice, which can save you a lot of printing time.
You can also change the nozzle of the Sidewinder X2 if you want to use other layer heights.
The best layer thicknesses for the Sidewinder X2 in Cura:
- Decorative objects: 0.1 mm
- Standard: 0.2 mm
- Coarse, fast prints: 0.3 mm
Flow Rate

An incorrectly set flow rate leads to extrusion problems and dimensional deviations. Either too much or too little filament is extruded per time unit. Next to the printing temperature and the retraction, the flow rate is one of the settings you should calibrate. How the calibration of these settings works you will learn later in this article.
Normally, the flow rate is always 100%. However, sometimes you may need to adjust this value slightly. If the other settings are correct, but you have problems with over- or under-extrusion, you can make small changes here.
If you have problems with print bed adhesion, you can also increase the flow rate for the first layer only to give the hot filament more time to cool down and bond to the print bed surface.
The best flow rate for the Sidewinder X2 in Cura:
- Default value: 100%
- For over-extrusion: 90% to 99
- For under-extrusion: 101% to 110%.
Retraction

The correct retraction settings are essential to avoid many printing errors. The retraction is divided into the distance and the speed. Both values must be set individually and in the best case calibrated.
The retraction distance defines how far the filament is pulled back into the nozzle after an extrusion movement. The speed defines how fast this should happen. The filament is pulled back into the nozzle to prevent it from escaping unintentionally between extrusion movements and leaving blobs or threads on the object.
The retraction settings are extremely different between a Bowden extruder and a direct drive extruder. The retraction distances are much smaller with a direct drive extruder.
The best retraction settings for the Sidewinder X2 in Cura:
- PLA: 2 mm at 25 mm/s
- ABS: 2 mm at 30 mm/s
- TPU: 2-2.5 mm at 50 mm/s
- PETG: 1.8-2.0 mm at 25 mm/s
Infill

The interior of a 3D-printed object has a significant impact on how stable it becomes. If you set the infill incorrectly, it could either become too unstable for its intended purpose or use too much filament.
When infilling, it is important to select the right density and the right pattern. Different patterns are available for different stability requirements.
High stability (for stable objects):
- Cubic
- Cubic Subdivision
- Octet
- Gyroid
Medium stability (for standard objects):
- Grid
- Triangles
- Tri-Hexagon
Low stability (for decorative objects):
- Lines
- Zigzag
- Lightning
If your object is only decorative, you can either print it completely hollow or with a low infill density to save filament. On the other hand, if you want to print objects that will be used a lot (such as toys), densities in the range of 15 to 50% are recommended. If you are printing objects that need to be very stable, you should use even higher densities or print them completely solid (100% infill density).
The best infill density for the Sidewinder X2 in Cura:
- Decorative objects: 0-15%
- Standard objects: 15-50%
- Stable objects: 50-100%
First Layer
The first layer determines to a large extent whether the 3D printing will be successful or not. Mainly the print bed adhesion is important. You can adjust this with the right settings to the needs of the filament.
You can improve the print bed adhesion by adjusting the layer height, the line width, the printing temperature, the print speed and/or the flow rate. The first optimization should always be the print speed, as this has the least negative impact on print quality.
Especially with the glass print bed of the Sidewinder X2, reducing the print speed to 5-10 mm/s is a good idea. Especially PLA benefits from this.
These are the best Cura settings for the first layer on the Sidewinder X2:
- Layer thickness: 100-200% of normal layer thickness (higher values to increase print bed adhesion)
- Line width: 100-200% of normal line width (higher values to increase print bed adhesion)
- Printing temperature: Same as the rest of the object or 5-10 °C higher for better print bed adhesion.
- Print speed: 50% of normal print speed (i.e. 25 mm/s at a normal print speed of 50 mm/s); 5-10 mm/s for better print bed adhesion
- Flow rate: 100-110% (higher values in case of poor print bed adhesion)
How to Calibrate the Cura Settings for the Sidewinder X2
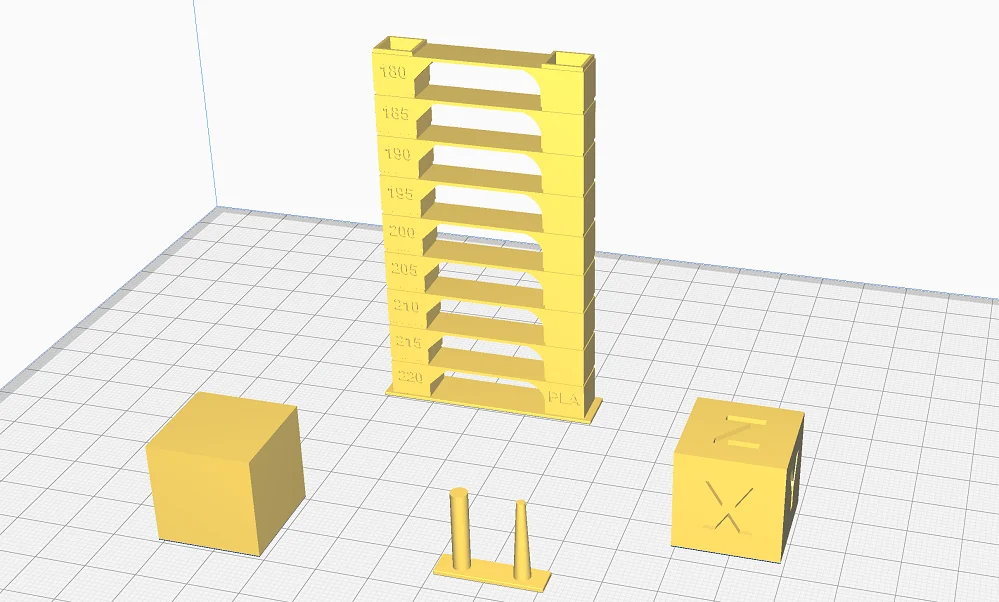
Every 3D printer behaves differently. The best settings therefore also vary from printer to printer. In order to get a good print result, it is important to calibrate a few specific settings. This calibration is not only recommended for each 3D printer, but also different filaments differ from each other.
Printing settings that should be calibrated include printing temperature, flow rate, and retraction.
To calibrate these three settings, you can either use objects from different portals like Thingiverse or Cult3D, or you can use the Calibration Shapes plugin in Cura.
Read the full calibration guide:
3D Printer Calibration: Step-by-Step to Perfect Results
How to Calibrate the Printing Temperature of the Sidewinder X2
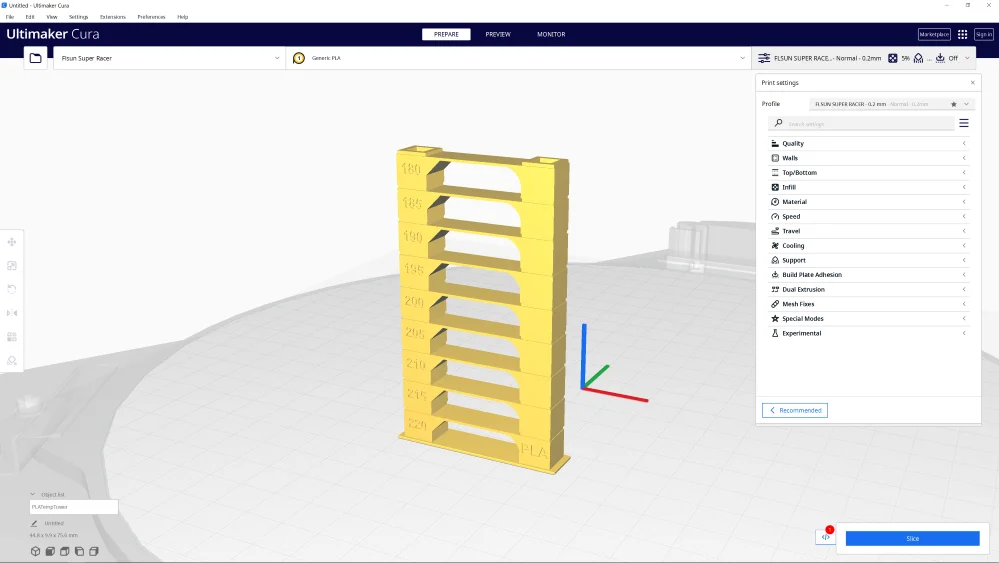

A temperature tower can be used to calibrate the printing temperature. This object consists of different levels that are printed at different temperatures.
Since the geometry of the individual layers provokes different printing errors, you can see immediately after printing at which temperature you can achieve the best results.
How to Calibrate the Flow Rate on the Sidewinder X2
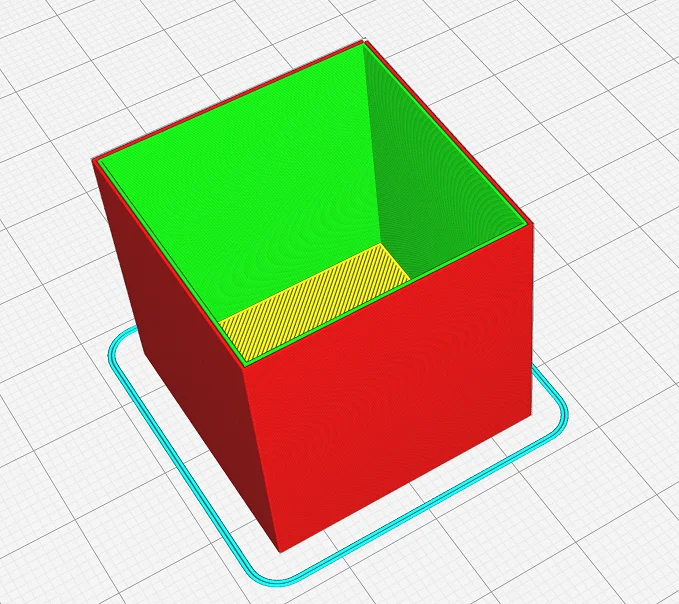
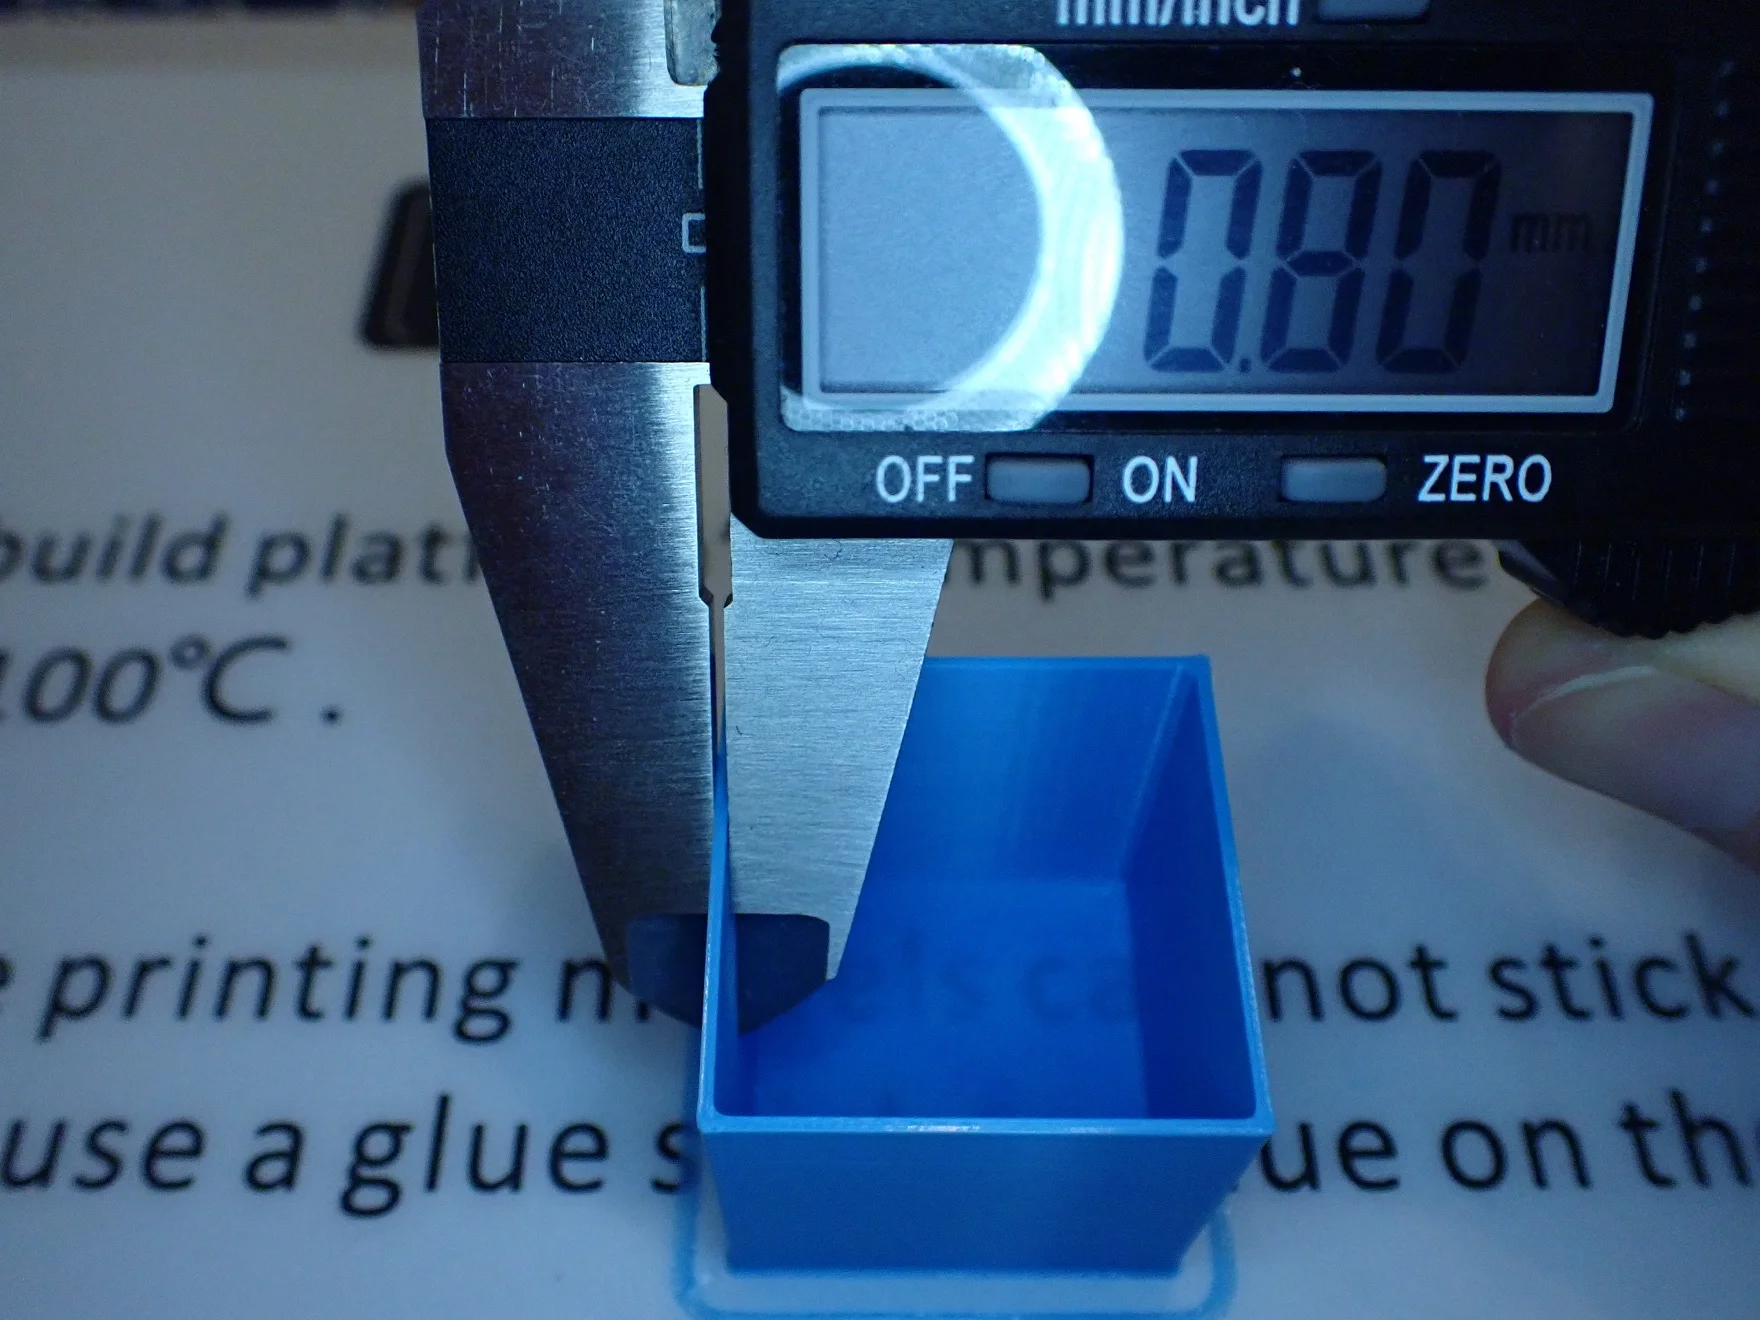
The goal of the flow rate calibration is that the printed lines are as wide as you have specified in the slicer. If the flow rate is set too high, the lines will be too wide; if the flow rate is set too low, they will be too thin. Both will result in unsightly and sometimes catastrophic printing errors.
The best way to calibrate the flow rate is to print a hollow cube without infill and without top layers. Then you can measure the wall thickness with a caliper and compare it with the theoretical value in the slicer.
How to Calibrate the Retraction of the Sidewinder X2
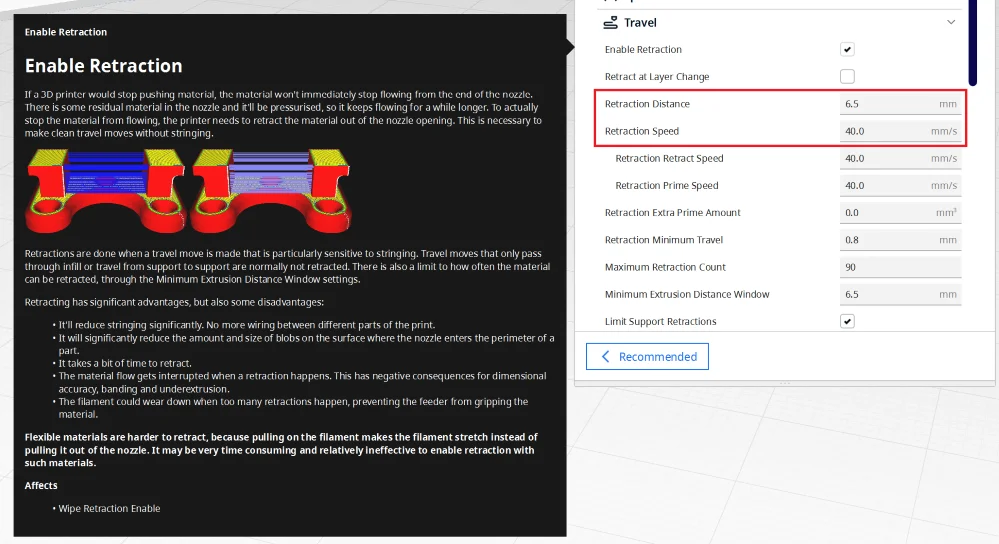
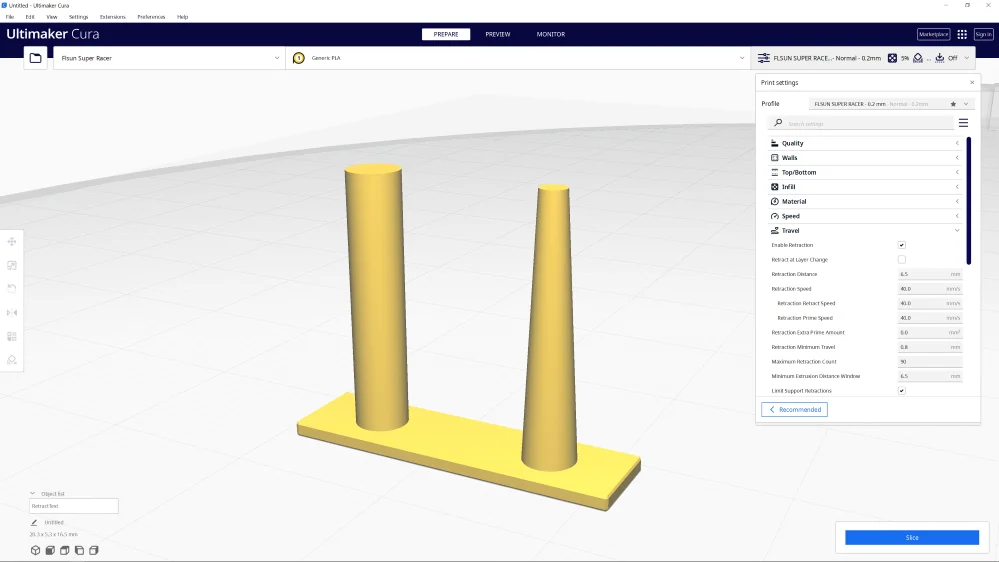
Calibrating retraction is essential to avoid printing errors such as stringing. Stringing occurs when the 3D printer moves from one place to another without extruding filament. Therefore, calibration objects for retraction usually consist of thin columns.
When calibrating, make sure that you only adjust one retraction value at a time and observe the result. If you change the retraction distance and the speed at the same time, you do not know which change is responsible for the result.
Conclusion
In this article, you have learned the best settings for the Sidewinder X2 in Cura. Since 3D printers of the same model can differ slightly from each other, the values given here offer you a good starting point for further optimizations.
Most importantly, you should calibrate the printing temperature, flow rate and retraction individually to get the best results.
Disclosure: This website is the property of Martin Lütkemeyer and is operated by Martin Lütkemeyer. Martin Lütkemeyer is a member of the Amazon Services LLC and other Affiliate Programs. These are affiliate advertising programs designed to enable websites to earn advertising revenue through advertising and linking to Amazon.com and others. Links marked with * are affiliate links.

