
- Wet Filament: Prevention, Symptoms & Drying - July 18, 2024
- Sovol SV08 – Best PrusaSlicer Settings & Profile - June 26, 2024
- Sovol SV08 – Best Orca Slicer Settings & Profile - June 26, 2024
Disclosure: Links marked with * are Affiliate Links. I earn from qualifying purchases if you decide to make a purchase through these links – at no additional cost for you!
The Ender 5 series from Creality is extremely popular with the original Ender 5*, the Ender 5 Plus* and the Ender 5 Pro*. Also the popular slicer Cura is mostly used for these 3D printers.
However, finding the right settings is not always easy. Individual Cura profiles for the Ender 5 models are therefore a useful feature for optimising the settings and saving them for later printing.
Cura has standard profiles for the Ender 5, and the settings included are good guidelines for initial test prints. Many of these settings, such as speed, temperature and retraction must be calibrated individually.
How to find these default profiles and the best settings in Cura you will learn in this article. You will also find proven values for the most important settings.
Table of Contents:
Standard Cura Profiles
Ender 5 (Plus/Pro)
Cura now includes standard profiles for many 3D printers from various manufacturers. These profiles are a very good starting point for most printers.
Here you will find the standard profiles in Cura:
Settings > Printer > Add Printer…
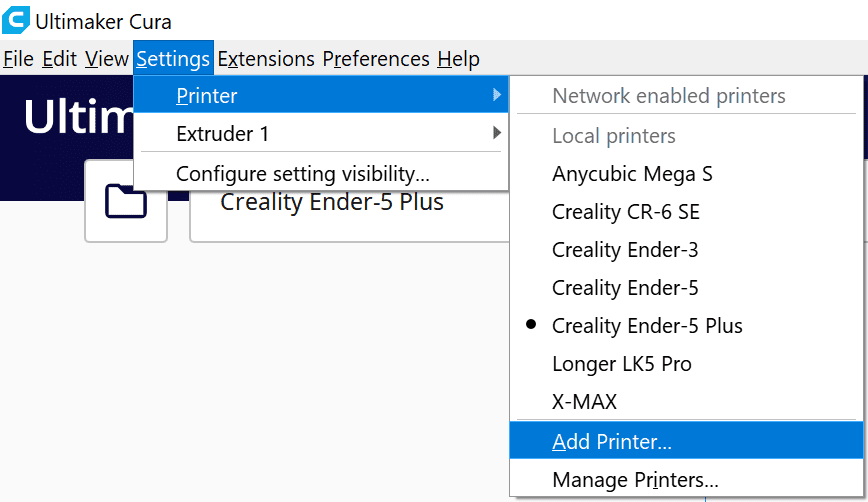
Then a window opens in which you can connect network or offline printers. Under the option “Add a non-networked printer” you will find the different profiles.

At the time of this article, you’ll find default profiles for the Ender 5 and the Ender 5 Plus. However, the Ender 5 Pro is not much different from the Ender 5 in its Cura settings. All its dimensions are the same, it just has a few upgrades. Because of the different extruder, the retraction settings might be different. More on that later.
You can find more information on how to create a 3D printer profile in Cura and what you need to pay attention to in this article: How to Create a Custom 3D Printer Profile in Cura
But since every 3D printer and filament is different, you should calibrate your printer-filament-combination anyway. To get the perfect settings for temperature, speed and retraction, there are many test objects on platforms like Thingiverse.
The perfect Ender 5 (Plus/Pro) Cura profile for PLA:
- Layer height: 0.12 mm
- Filling / Infill: 20 %
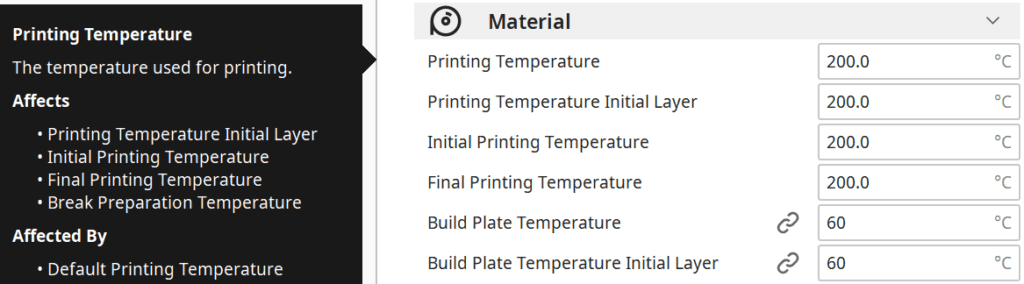
- Printing temperature: 200 °C
- Print bed temperature: 55 °C
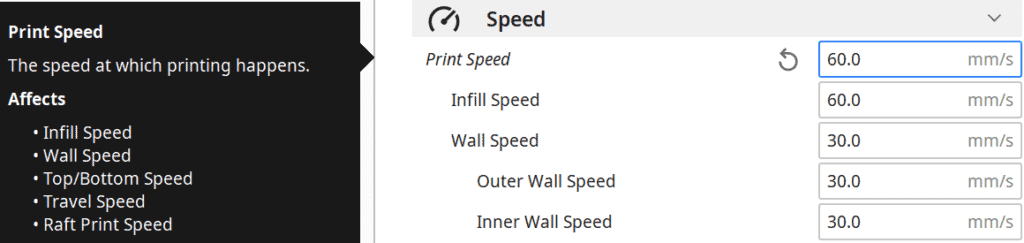
- Print speed: 60 mm/s
- Retraction: 6 mm at 40 mm/s
- Speed of the first layer: 30 mm/s
- Initial fan speed: 0%
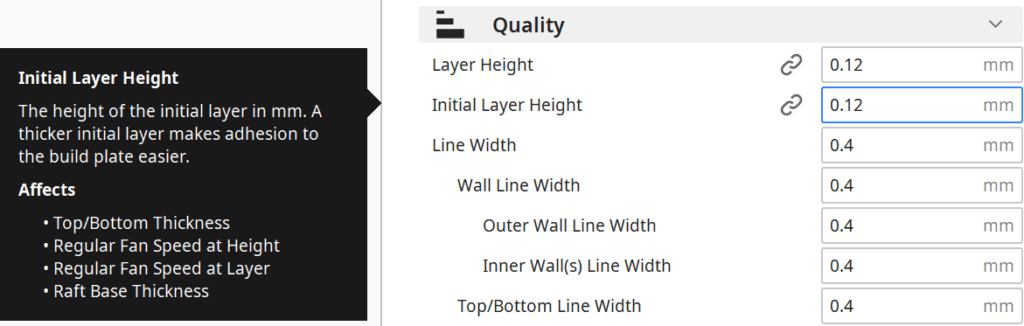
Layer Height
Ender 5 (Plus/Pro)
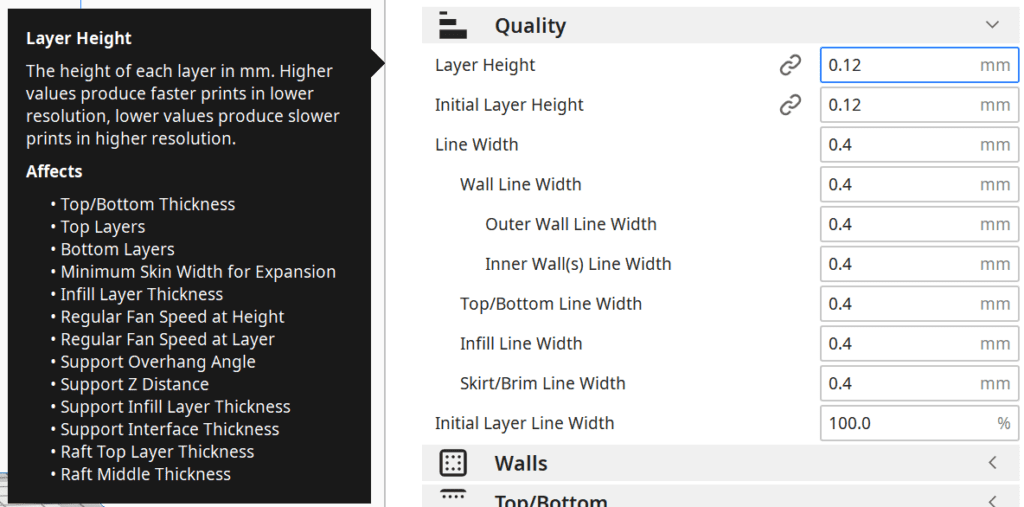
The layer height determines how detailed the surface of your 3D print will be. The smaller the layer height, the higher the print resolution.
Since the print takes longer, the smaller the layer height is set, you have to decide for yourself where you find the right balance. Fast and coarse, or slow and fine?
The best layer heights for the Ender 5 (Plus/Pro):
- 0.12 mm (fine details, slow)
- 0.16 mm
- 0.20 mm
- 0.28 mm (little details, fast)
As you may have noticed, these values are all multiples of 0.04. This is because the built-in stepper motor for the Z-axis changes the height by 0.04 mm with each step. So if you are creating your own profile, the layer height should be a multiple of this to get the best results.
The maximum layer height with a standard 0.4 mm nozzle is 0.3 mm according to the 25%-75% rule. The minimum layer height is therefore 0.1 mm.
So the above profiles are already very well distributed over this range. If you want to test the limits of your Ender 5, you can try the 0.08 mm as a layer height.
Infill
Ender 5 (Plus/Pro)
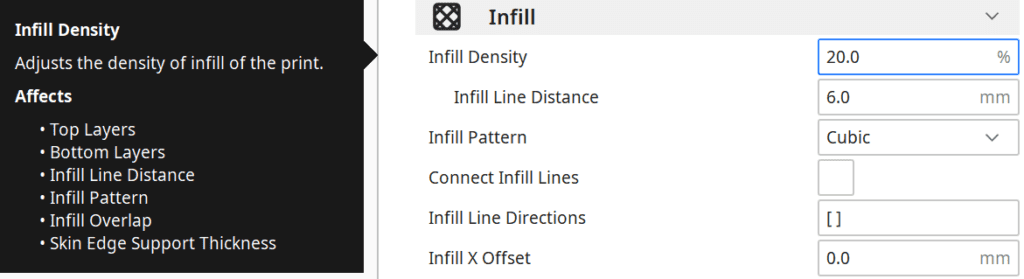
The infill density determines how much material is inside the 3D print. This allows you to adjust the stability to your purposes. These settings do not depend on the 3D printer you are using, but only on your objects.
If you are printing objects that are mainly decorative, you can print with an infill of 5-10%.
For standard objects, 20% has proven to be a good guideline. But if you need stronger mechanical properties, you should set something between 20 and 60%. In extreme cases, you can also print completely solid with 100% infill.
Best infill for the Ender 5 (Plus/Pro):
- Decoration: 10%
- Standard: 20%
- Robust: 40%
Keep in mind, however, that higher densities mean longer print times. So you need to find the balance of strength, print time, and material consumption that works best for you and the object’s application.
The infill pattern is also important. In Cura, you have the choice between different patterns, which differ in their stability.
Best infill patterns for the Ender 5 (Plus/Pro):
- Decoration: Lines, Zig Zag
- Standard: Grid, Triangles, Tri-Hexagonal
- Stable: Cubic, Cubic Subdivision, Octet, Gyroid
Complete Guide:
3D Printing Infill Guide 👉 Basics, Patterns and Stability
Temperature
Ender 5 (Plus/Pro)
The print temperature is one of the most important settings in Cura. If you choose the wrong temperature here, you may get various printing errors, such as stringing, over– or under-extrusion.
It is therefore important to set the right temperature for your filament. There are guidelines for the different filaments and the manufacturers also specify suitable temperatures for their filaments.
You should stick to these guideline values at the beginning and continue to optimize from there. The temperature of the nozzle is one of the settings you should calibrate. The correct setting depends not only on the type of filament (PLA/ABS/etc.), but also on the characteristics of your 3D printer and the specific filament you are using (even different batches of the same product can differ!).
Temperature towers are best suited for this calibration. You can find the required print files for this on platforms like Thingiverse.
The best printing temperatures for the Ender 5 (Plus/Pro):
- PLA: 200 °C
- ABS: 230 °C
- PETG: 240 °C
- TPU: 220 °C
Print Bed Temperature
Ender 5 (Plus/Pro)
The print bed temperature also depends on the material used.
PLA theoretically does not require a heated print bed and can be printed at room temperature. However, print bed adhesion is significantly better when you set temperatures between 50 and 60 °C. With the Ender 5 (Plus/Pro) it is also quite rare that you need to use aids such as Blue Tape to increase the print bed adhesion.
For other materials, you will need higher temperatures on your print bed to enable good adhesion. PETG needs about 70 °C and ABS even 110 °C.
If you want to print ABS, you need to know how to avoid warping. The easiest way to avoid this with ABS is to use an enclosure for your Ender 5* to keep the ambient air temperature high and homogeneous.
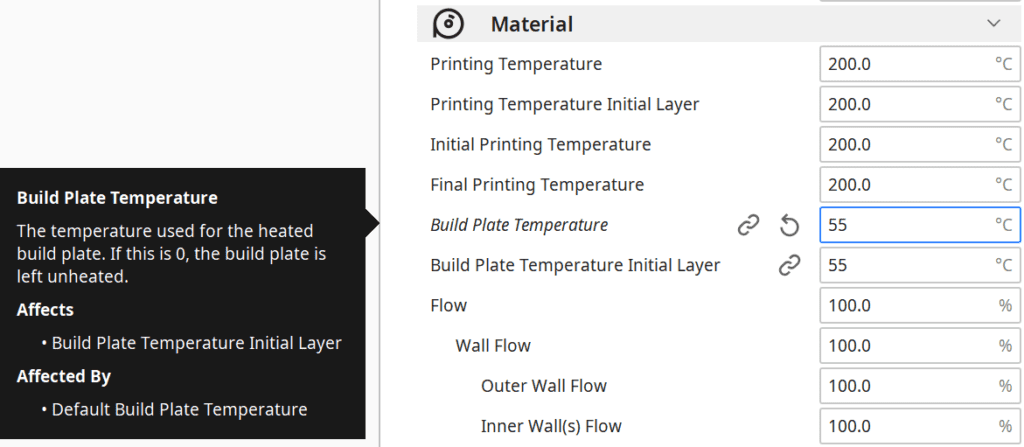
The best print bed temperatures for the Ender 5 (Plus/Pro):
- PLA: 55 °C
- ABS: 110 °C
- PETG: 70 °C
- TPU: 50 °C
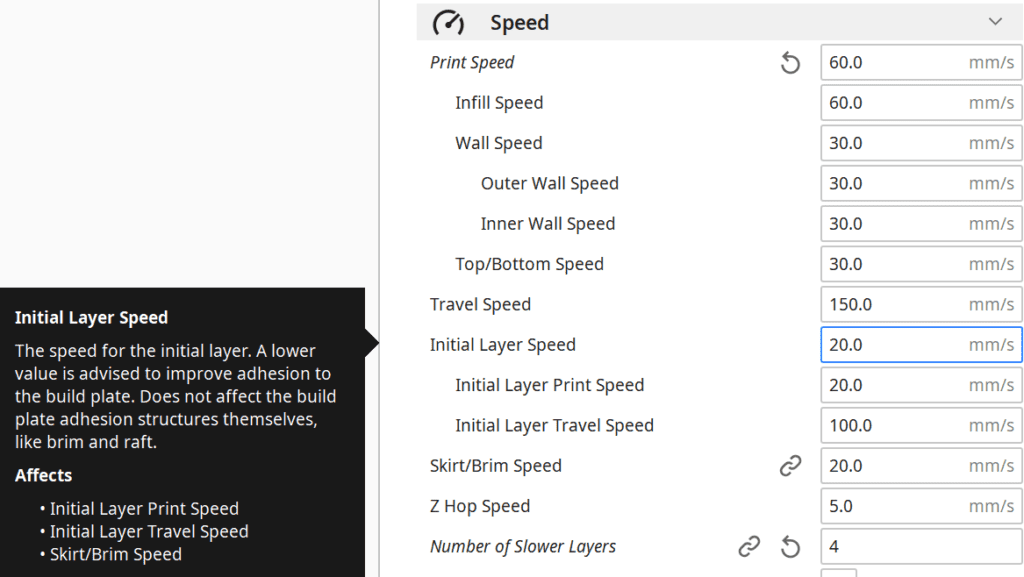
Print Speed
Ender 5 (Plus/Pro)
Similar to the layer height, the printing speed also has an extreme influence on the printing time. Again, you need to achieve a good balance between speed and quality. The faster you print, the worse the quality will be in general.
However, the correct print speed also depends on the material used. Cura sets the Ender 5 to 80 mm/s by default. For very fine prints and also for different materials this can be too fast. Normally PLA is printed between 40 and 80 mm/s. For functional parts, it is recommended to choose a fast speed and for decorative parts a slower speed.
With flexible filaments such as TPU, excessive speed can lead to various problems. If the filament is extruded or fed too quickly, it can become tangled and cause clogging. Therefore, it is advisable to print TPU and other flexible filaments at a low printing speed of 20 to 40 mm/s.
My tip for flexible materials: Set all speeds in Cura (print speed, retraction speed, travel speed, etc.) to a single value. Then the risk of tangles and other disturbances is the lowest.
The best print speeds for the Ender 5 (Plus/Pro):
- PLA: 60-80 mm/s
- ABS: 60-80 mm/s
- PETG: 50-60 mm/s
- TPU: 20-40 mm/s
Retraction
Ender 5 (Plus/Pro)
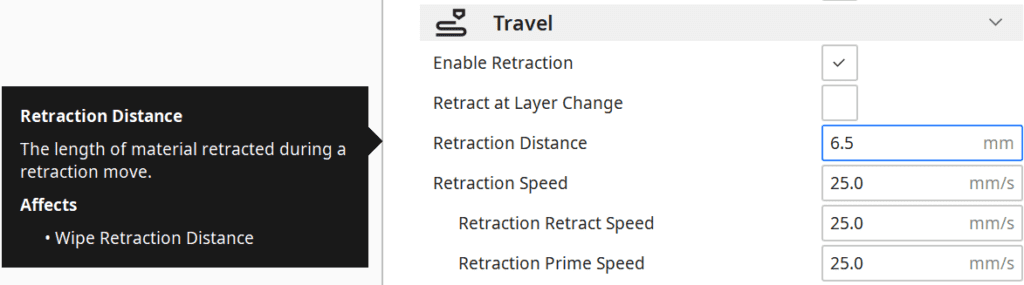
The retraction of the filament back into the nozzle prevents the accidental extrusion of filament during travel movements without extrusion (e.g. from one layer to the next).
If too little filament is pulled back into the nozzle, the liquid filament will escape during the movement and unsightly threads (stringing) or blobs will result. But a retraction that is too high can also be harmful. If the filament is pulled back too far into the nozzle, the hot liquid filament hardens and clogs the nozzle.
But not only the distance of the retraction is important, but also the retraction speed has a big effect on your print result. Like other settings, the retraction distance and retraction speed is highly dependent on the printer and filament used.
The values given below for different materials are good guidelines for all Ender 5 models. However, it is advisable to carry out test prints to find the right settings for the retraction. You can also find suitable test objects for retraction at Thingiverse. As soon as you have found a setting where no more threads are visible, you can start with your real prints.
The best retraction settings for the Ender 5 (Plus/Pro):
- PLA: 6 mm at 40 mm/s
- ABS: 6 mm at 40 mm/s
- PETG: 5 mm at 40 mm/s
- TPU: 6.5 mm at 30 mm/s
Print Bed Adhesion
Ender 5 (Plus/Pro)
The standard print bed of the Ender 5 models offers a very good print bed adhesion. However, it is important that you make the correct settings to ensure good print bed adhesion. Once you have found the right settings, tools such as Blue Tape or special glue sticks* are not necessary.
If the thickness of the first layer is slightly higher than the rest of your layers, you can slightly increase the print bed adhesion. With the Ender 5, this is usually not necessary. However, it is a useful tip if you want to improve your adhesion a bit.
Much more important are settings for the speeds during the first layers and the use of auxiliary constructions for the print bed adhesion.
If you print the first few layers slower, you give the liquid filament more time to bond to the underlying material. The slower you print the first few layers, the better the print bed adhesion will be. A good value is about half the normal print speed.
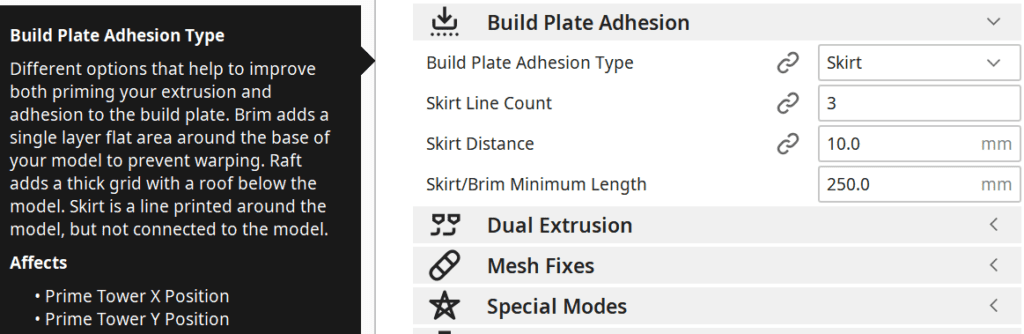
In Cura, you have the choice between three different auxiliary constructions for the print bed adhesion. You can print a Skirt, Brim or Raft before the actual print starts.
Brims and rafts print a surface of filament on the outside or underneath the print object. This increases the surface and the adhesion. These two options are only necessary in extreme cases and have the disadvantage that you have to remove these auxiliary constructions from the print object after printing.
With the Ender 5 beds, you usually only need a skirt to stimulate the filament flow with a few printed lines around the print object.

You should set the fan speed of the first layer to 0%. If the first few lines of filament are cooled too much, it can warp and come off the print bed.
The best settings for good print bed adhesion on the Ender 5 (Plus/Pro):
- Thickness of the first layer: 1-2 times the layer height of the remaining object
- Speed of the first layer: 30 mm/s
- Number of slower layers: 4
- Auxiliary construction: Skirt (Brim/Raft with very bad adhesion)
- Fan speed at first layer: 0%
Disclosure: This website is the property of Martin Lütkemeyer and is operated by Martin Lütkemeyer. Martin Lütkemeyer is a member of the Amazon Services LLC and other Affiliate Programs. These are affiliate advertising programs designed to enable websites to earn advertising revenue through advertising and linking to Amazon.com and others. Links marked with * are affiliate links.
