
- Wet Filament: Prevention, Symptoms & Drying - July 18, 2024
- Sovol SV08 – Best PrusaSlicer Settings & Profile - June 26, 2024
- Sovol SV08 – Best Orca Slicer Settings & Profile - June 26, 2024
Disclosure: Links marked with * are Affiliate Links. I earn from qualifying purchases if you decide to make a purchase through these links – at no additional cost for you!
The Ender-3 V3 KE is definitely one of the best entry-level 3D printers. However, to achieve the best results with Cura, the right settings are crucial. The printer has the potential to produce perfect results, but only if it is operated with carefully optimized settings.
At the time of writing, there is no default profile for the Ender-3 V3 KE in Cura.
In this article, I’ll show you how to create a suitable profile for it and share my own Cura settings that I’ve calibrated and optimized. These settings should give you a solid foundation to achieve perfect printing results with your Ender-3 V3 KE. They are a good starting point, especially if you are just beginning to familiarize yourself with the intricacies of 3D printing.
However, you will only achieve perfect printing results after a specific calibration for the respective filament. For more detailed information on calibration, I recommend you consult my detailed calibration guide or my 3D printing course.

Calibrated Cura Profile
For optimal print quality with minimal effort, you can download my calibrated Cura profile for this 3D printer and import it directly into Cura. All settings are perfectly adapted to this printer, e.g. the accelerations, jerk, supports and the first layer.
| Material | Print temperature | Print bed temperature | Print speed | Retraction | Cooling |
|---|---|---|---|---|---|
| PLA | 210 °C | 60 °C | 180-250 mm/s | 0.8 mm at 40 mm/s | 100 % |
| ABS | 250 °C | 100 °C | 150 mm/s | 0.5 mm at 40 mm/s | 50 % |
| TPU | 215 °C | 30 °C | 100 mm/s | 2 mm at 40 mm/s | 100 % |
| PETG | 230 °C | 80 °C | 150 mm/s | 1.2 mm at 40 mm/s | 50 % |
Table of Contents:
How to Create a Cura Profile for the Ender-3 V3 KE
A Cura profile consists of two important parts: the machine settings and the print settings. The machine settings define the physical properties and capabilities of your 3D printer, such as the build size and whether the print bed is heated.
The print settings, on the other hand, are specific parameters that affect how your object is printed, including temperature, speed and layer height.
First, the machine settings must be defined. An empty profile that you can create in Cura serves as a template for this.
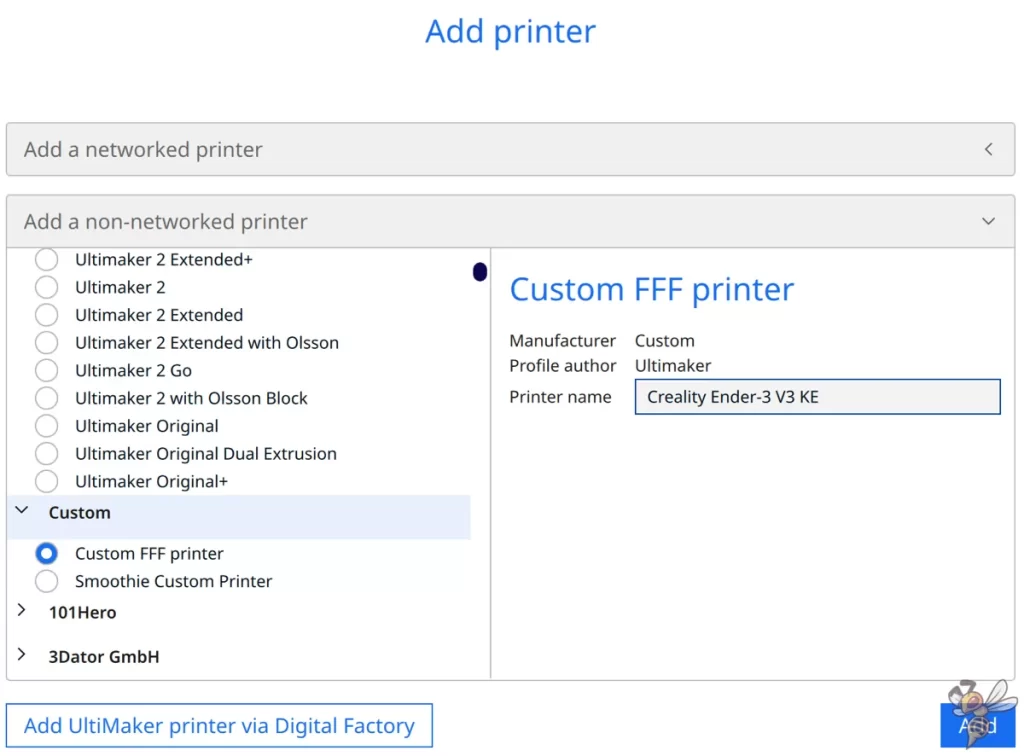
To add a 3D printer in Cura, click on ‘Settings’, then on ‘Printers’ and then on ‘Add printer’. Select ‘Non-networked printer’ and then ‘Custom’ and ‘Custom FFF printer’. Enter the name of your printer and click on ‘Add’.
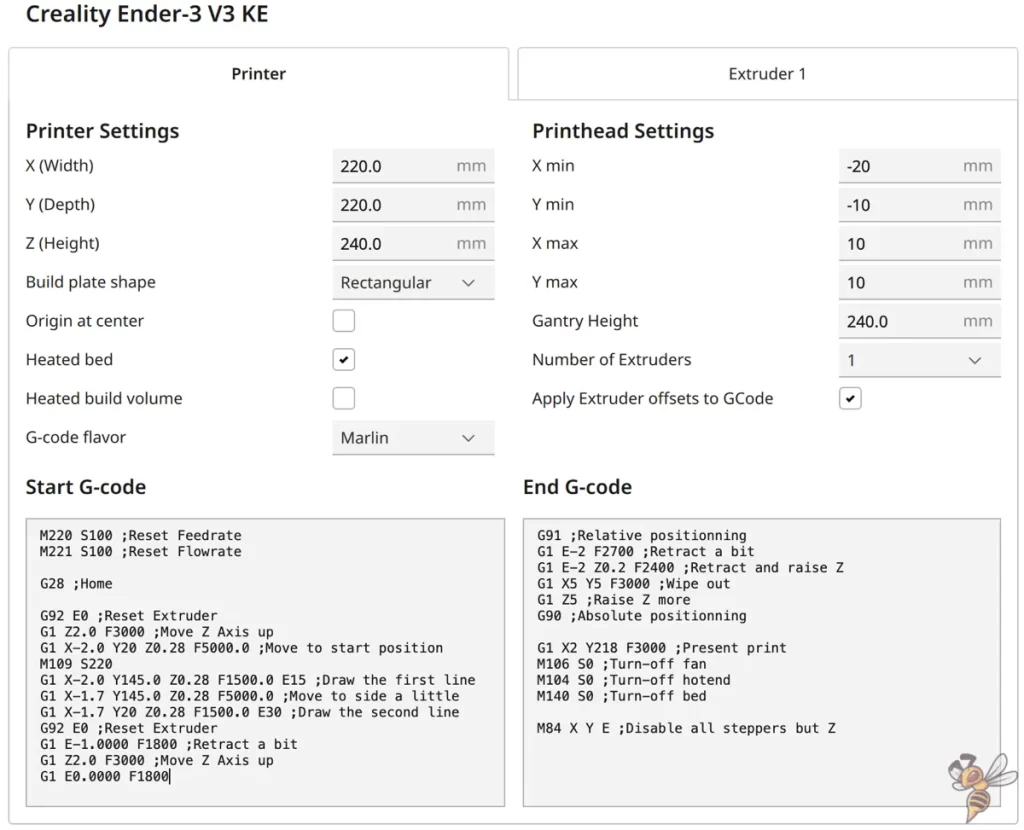
The machine settings you see in the screenshot above form the basis for your printer profile.
The G-code snippets follow directly after this, which you can simply copy:
Start G-Code:
- M220 S100 ;Reset feed rate
- M221 S100 ;Reset flow rate
- G28 ;Home
- G92 E0 ;Reset extruder
- G1 Z2.0 F3000 ;Move Z Axis up
- G1 X-2.0 Y20 Z0.28 F5000.0 ;Move to start position
- M109 S220
- G1 X-2.0 Y145.0 Z0.28 F1500.0 E15 ;Draw the first line
- G1 X-1.7 Y145.0 Z0.28 F5000.0 ;Move to side a little
- G1 X-1.7 Y20 Z0.28 F1500.0 E30 ;Draw the second line
- G92 E0 ;Reset extruder
- G1 E-1.0000 F1800 ;Retract a bit
- G1 Z2.0 F3000 ;Move Z Axis up
- G1 E0.0000 F1800
End G-Code:
- G91 ;Relative positioning
- G1 E-2 F2700 ;Retract a bit
- G1 E-2 Z0.2 F2400 ;Retract and raise Z
- G1 X5 Y5 F3000 ;Wipe out
- G1 Z5 ;Raise Z more
- G90 ;Absolute positioning
- G1 X2 Y218 F3000 ;Present print
- M106 S0 ;Turn-off fan
- M104 S0 ;Turn-off hotend
- M140 S0 ;Turn-off bed
- M84 X Y E ;Disable all steppers but Z
After you have created the printer profile, you have to define the print settings. These settings include aspects such as the print temperature, the bed temperature, the print speed and the retraction settings.
First we will go straight into the settings for the four standard filaments, and then we will look at the individual print settings in detail and how you can calibrate them.
You can find more information on how to create a 3D printer profile in Cura and what you need to pay attention to in this article: How to Create a Custom 3D Printer Profile in Cura
PLA Settings
These are the correct Cura settings for printing PLA filament with the Ender-3 V3 KE:
- Print temperature: 210 °C
- Print bed temperature: 60 °C
- Print speed: 180-250 mm/s
- Retraction: 0.8 mm at 40 mm/s
- Cooling: 100 %
The Ender-3 V3 KE handles printing with PLA filament very well, without the need for extensive calibration. This makes it an excellent choice for beginners and experienced users who want to get straight into 3D printing.
The adhesion of the PLA filament to the PEI print bed of the printer is impressive; I had no adhesion problems even with particularly delicate first layers.
However, it is important to fine-tune the printing temperature and retraction specifically for PLA in order to achieve optimum printing results. The settings mentioned above serve as a good basis, but it should be borne in mind that they may not be ideal for every type of PLA.
In the rest of this article, I will go into more detail about calibration to show you how to adjust the settings to your specific PLA material.
ABS Settings
These are the correct Cura settings for printing ABS filament with the Ender-3 V3 KE:
- Print temperature: 250 °C
- Print bed temperature: 100 °C
- Print speed: 150 mm/s
- Retraction: 0.5 mm at 40 mm/s
- Cooling: 50 %
ABS filament is a slightly more demanding filament compared to PLA, especially in terms of shrinkage during cooling. The Ender-3 V3 KE does not have an enclosure, which means that you should ensure a stable ambient temperature when printing with ABS to avoid warping and detachment from the print bed. Small objects can usually be printed without any problems.
A helpful tool when printing ABS is the use of a draft shield in Cura. This creates a kind of barrier around the object, which helps to keep the temperature around the print object constant and avoid drafts.
I had some issues with the print bed adhesion with very small first layers. However, mouse ears helped to solve this problem.
TPU Settings
These are the correct Cura settings for printing TPU filament with the Ender-3 V3 KE:
- Print temperature: 215 °C
- Print bed temperature: 30 °C
- Print speed: 100 mm/s
- Retraction: 2 mm at 40 mm/s
- Cooling: 100 %
The Ender-3 V3 KE is equipped with a direct drive extruder, which makes it suitable for printing with flexible filaments such as TPU. In contrast to Bowden extruders, which can often lead to problems with flexible filaments, the Ender-3 V3 KE’s Direct Drive extruder enables more precise and reliable material transport.
When printing with TPU, some settings are particularly important. Due to the flexibility of the material, it is crucial to print at a reduced speed in order to achieve the best possible results. It is also important to carefully adjust the retraction settings to minimize the risk of clogging and stringing.
PETG Settings
These are the correct Cura settings for printing PETG filament with the Ender-3 V3 KE:
- Print temperature: 230 °C
- Print bed temperature: 80 °C
- Print speed: 150 mm/s
- Retraction: 1.2 mm at 40 mm/s
- Cooling: 50 %
PETG combines some of the best properties of PLA and ABS in that it is both easy to print and offers high strength. However, one challenge when printing PETG is its tendency to string, forming fine hairs between print areas.
Retraction settings play an essential role when printing PETG and must be carefully calibrated to minimize stringing. It is important to find a balance between enough retraction to avoid stringing and too much retraction, which can lead to other printing problems.
Another important aspect of printing with PETG is the storage of the filament. PETG is hygroscopic, which means it attracts moisture. It is therefore important to store the filament in a dry place to ensure optimum print quality. Moist filament can lead to problems such as poor layer adhesion and altered print properties.
Best Cura Settings for the Ender-3 V3 KE
In this section, you will find the optimal Cura settings for your Ender-3 V3 KE. These settings are the result of thorough testing and calibration to achieve the best possible print quality with different filament types.
While these settings are likely to produce relatively good results, it is essential to perform your own calibrations for perfect results!
Print Temperature
The best printing temperatures for the Ender-3 V3 KE in Cura:
- PLA: 210 °C
- ABS: 250 °C
- TPU: 215 °C
- PETG: 230 °C
The printing temperature is one of the key factors for successful 3D prints. It varies depending on the filament type and should be calibrated individually for each material. An effective way to find the optimal printing temperature for a specific filament is to print a temperature tower.
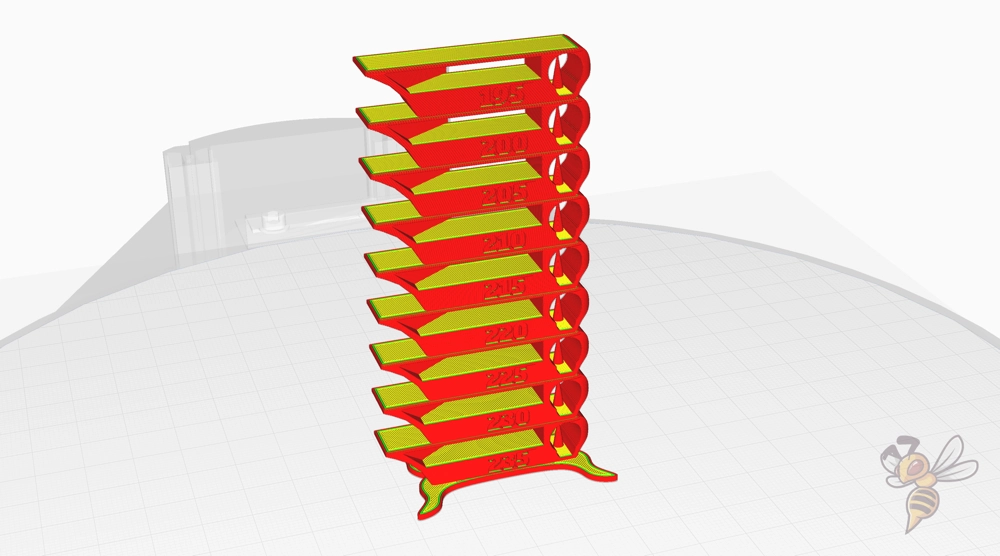
A temperature tower is a 3D printing test in which the temperature is changed at regular intervals during printing. Each section of the tower is printed at a different temperature, so you can easily see at which temperature your filament gives the best results.
This test will help you determine the ideal printing temperature for maximum print quality and minimal problems such as stringing or poor layer adhesion.
To use this temperature tower correctly, you need to use a script in Cura. How to do this is described in the article on calibrating 3D printers linked at the top.
Print Bed Temperature
The best print bed temperatures for the Ender-3 V3 KE in Cura:
- PLA: 60 °C
- ABS: 100 °C
- TPU: 30 °C
- PETG: 80 °C
The right print bed temperature is crucial for the success of your 3D printing project. A well-set bed temperature ensures a strong first layer adhesion and minimizes the risk of warping and detachment of the print from the bed. Especially for large prints or those with large, flat areas, a stable bed temperature is essential.
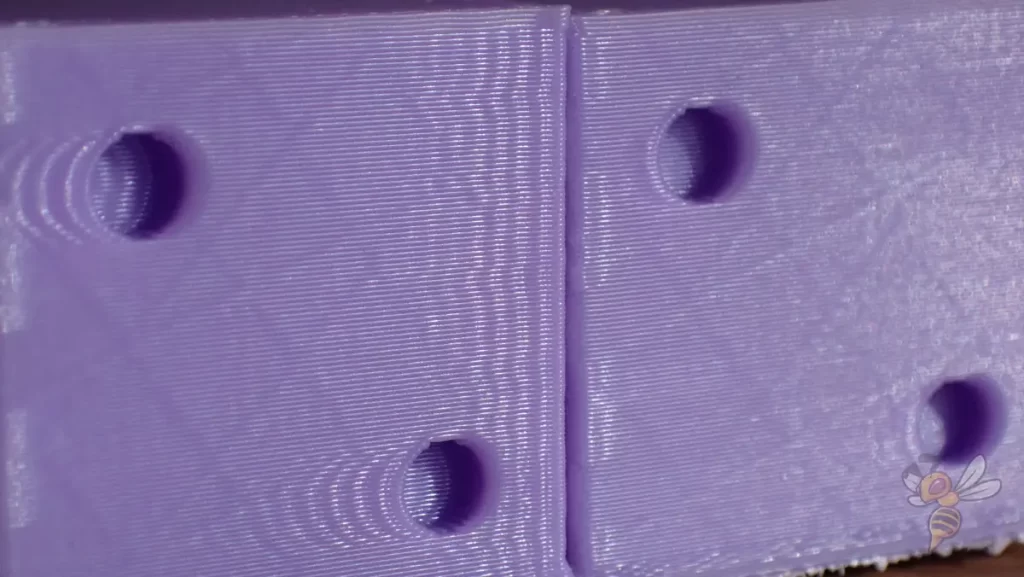
A common problem associated with the print bed temperature is the so-called “elephant foot“. This is a deformation at the base of the print that occurs when the first layer gets too hot and expands. By adjusting the print bed temperature and, if necessary, the first layer height, this problem can be effectively avoided.
It is a balancing act to find a temperature that is high enough for good adhesion, but not so high that it causes deformation.
Print Speed
The best print speeds for the Ender-3 V3 KE in Cura:
- PLA: 180-250 mm/s
- ABS: 150 mm/s
- TPU: 100 mm/s
- PETG: 150 mm/s
Printing at too high a speed can lead to problems such as poor layer adhesion, inaccurate dimensions and aesthetic defects. On the other hand, too slow a speed can unnecessarily increase printing times.
I usually use this ringing test to calibrate the print speed.
Ringing or ghosting occurs when the print head is accelerated or decelerated quickly, typically at corners and sharp transitions. A ringing test helps to find the optimum speed at which your printer delivers clean and accurate results without causing vibrations or blurring in the prints.
In most cases, this will not be a problem with the Ender-3 V3 KE as it has Input Shaping. This feature compensates for the rapid changes in direction and is largely responsible for the high printing speed that the KE can achieve.
Layer Height
These are the best layer heights for the Ender-3 V3 KE in Cura:
- Decorative objects: 0.1 mm
- Standard: 0.2 mm
- Rough, fast prints: 0.3 mm
The choice of layer height plays a key role when it comes to balancing quality and speed in 3D printing. For objects where fine details and smooth surfaces are important, such as decorative pieces, a low layer height of 0.1 mm is ideal. Although this fine adjustment requires more time, the result is highly detailed and precise prints.
A layer height of 0.2 is often used as a standard. This height offers a balanced mix of speed and detail, making it ideal for a wide range of printing projects.
If speed is the primary concern and fine detail is less important, a layer height of 0.3 mm is recommended. This setting speeds up the printing process and is particularly suitable for coarser objects where the accuracy of the details plays a subordinate role.
Flow Rate
These are the best flow rates for the Ender-3 V3 KE in Cura:
- Standard: 100%
- For over-extrusion: 90% to 99%
- For under-extrusion: 101% to 110%
Before making any adjustments to the flow rate, it is important that the print temperature and retraction have already been carefully calibrated. These steps ensure that your printer is set correctly and the flow rate is adjusted on a solid basis.
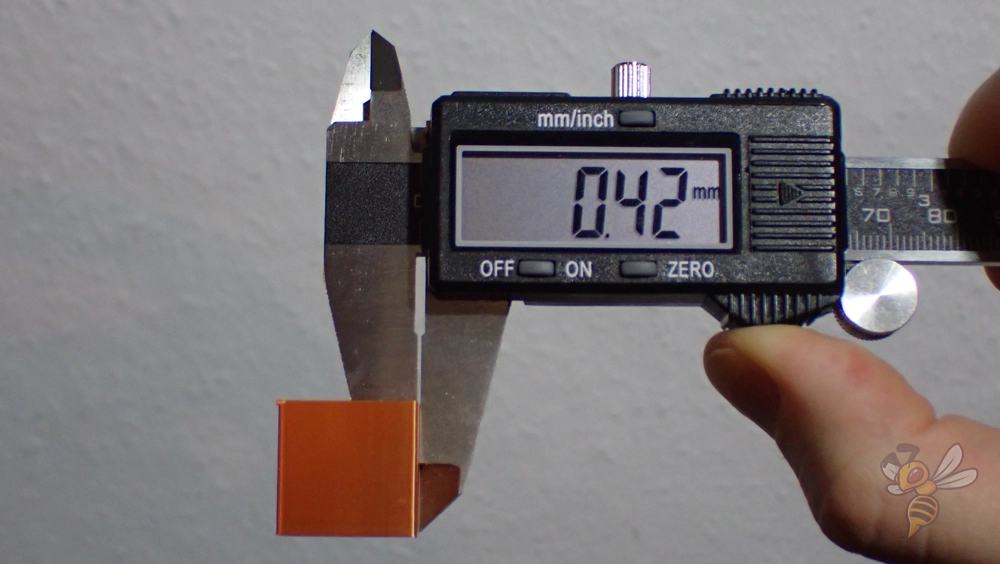
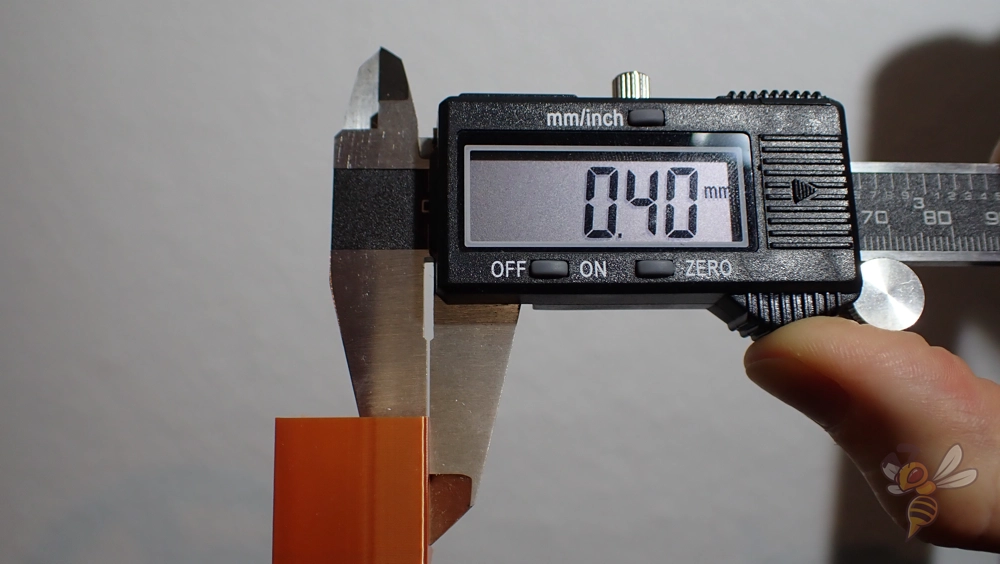
To calibrate the flow rate, it is recommended to print a test cube without infill or top layers. The wall thickness of the cube serves as an indicator of the accuracy of the flow rate.
If the walls are too thick or too thin, this indicates over- or under-extrusion, which can be corrected by adjusting the flow rate.
This simple but effective test will help you find the perfect flow rate for your Ender-3 V3 KE to achieve consistent and accurate printing results.
Retraction
The best retraction settings for the Ender-3 V3 KE in Cura:
- PLA: 0.8 mm at 40 mm/s
- ABS: 0.5 mm at 40 mm/s
- TPU: 2 mm at 40 mm/s
- PETG: 1.2 mm at 40 mm/s
The retraction settings are essential to avoid stringing and oozing during 3D printing. It is essential to calibrate the retraction individually for each filament type, both in terms of distance and speed.
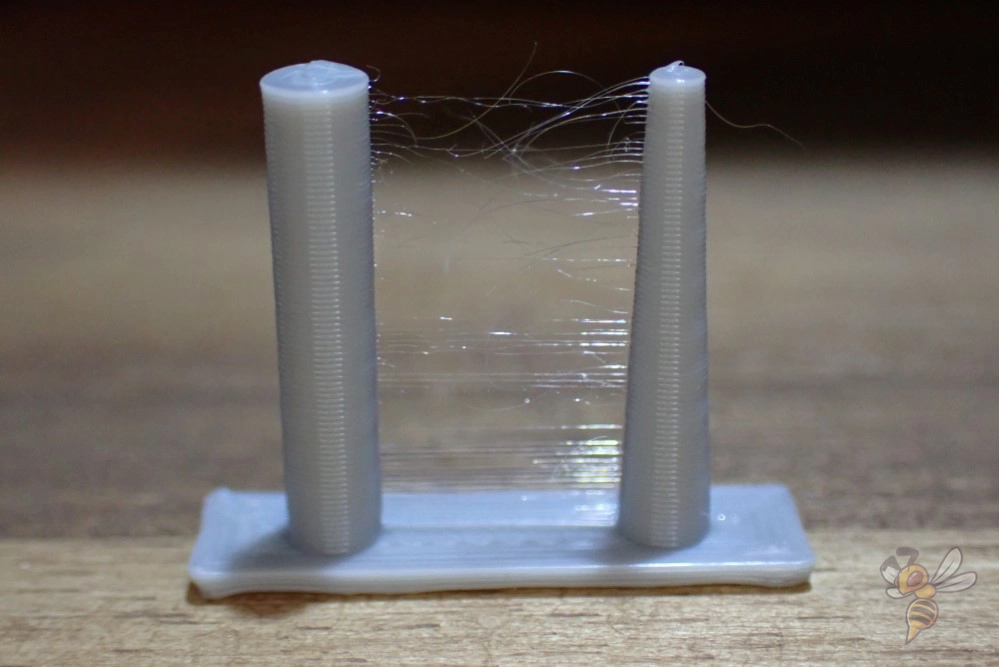
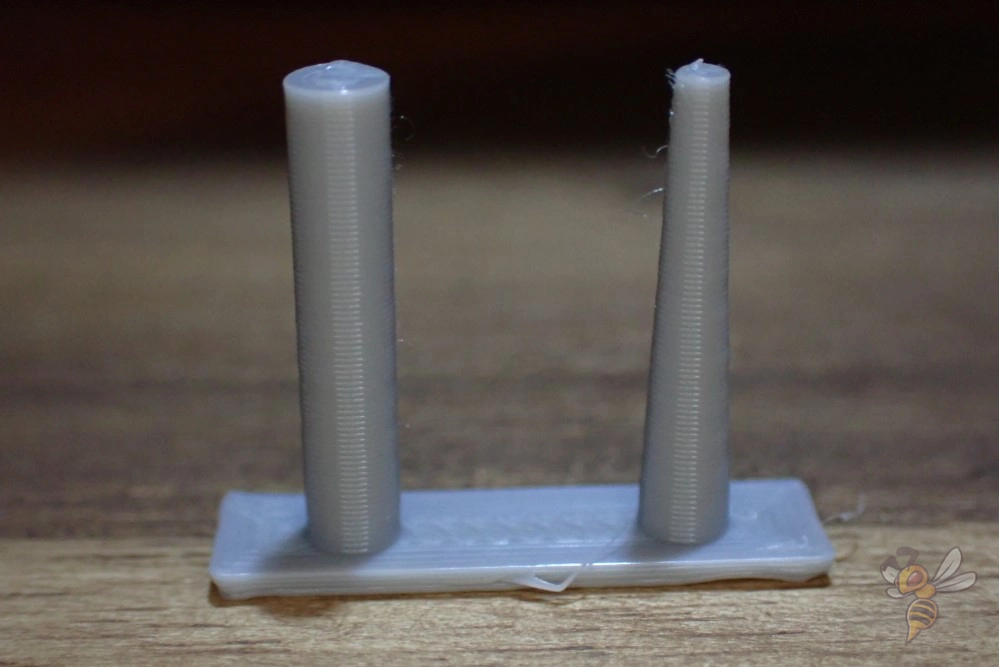
To calibrate the retraction, you can perform test prints with special retraction tower models or other suitable test objects.
These models are designed to highlight retraction management challenges, such as small gaps between sections.
By analyzing these prints, you can adjust the retraction settings to find an optimal balance between avoiding stringing and maintaining print quality.
Start with the above settings and adjust them until you achieve the best possible results.
Infill
The best infill density for the Ender-3 V3 KE in Cura:
- Decorative objects: 0-15%
- Standard objects: 15-50%
- Stable objects: 50-100%
Choosing the right infill density is an important aspect of 3D printing, as it significantly influences the strength and weight of the printed object. For decorative objects where the structure is less critical, a low infill density of 0 to 15% is often sufficient. This setting saves material and shortens the printing time while still providing sufficient support for the object.
For standard objects that require a balance between strength and material consumption, an infill density of 15 to 50% is recommended. This setting is suitable for most everyday printing tasks and provides good stability without excessive material consumption.
For objects that require high stability and robustness, such as functional parts or those that are subject to stress, a higher infill density of 50 to 100% is advisable. These settings are largely printer-independent and serve as general guidelines for different types of 3D printing projects.
First Layer
These are the best Cura settings for the first layer with the Ender-3 V3 KE:
- Layer height: 100%
- Line width: 100%
- Print temperature: Same as the rest
- Print speed: 10 mm/s
- Raft/Brim/Skirt: Skirt
The speed at which the first layer is printed is crucial for good adhesion to the print bed. A slower print speed for the first layer, such as the recommended 10 mm/s, contributes significantly to strong adhesion.
This allows the filament to remain on the print bed in a heated state for longer, resulting in an improved bond. A well-adhering first layer is the basis for the entire printing process and helps to avoid challenges such as peeling or warping of the print.
By keeping the filament warm for longer during the first layer, the chance of successful adhesion is increased. This is particularly important because a stable first layer is crucial to the success of the entire printing process. It ensures that all subsequent layers are applied evenly and accurately.
Disclosure: This website is the property of Martin Lütkemeyer and is operated by Martin Lütkemeyer. Martin Lütkemeyer is a member of the Amazon Services LLC and other Affiliate Programs. These are affiliate advertising programs designed to enable websites to earn advertising revenue through advertising and linking to Amazon.com and others. Links marked with * are affiliate links.
