
- Wet Filament: Prevention, Symptoms & Drying - July 18, 2024
- Sovol SV08 – Best PrusaSlicer Settings & Profile - June 26, 2024
- Sovol SV08 – Best Orca Slicer Settings & Profile - June 26, 2024
Disclosure: Links marked with * are Affiliate Links. I earn from qualifying purchases if you decide to make a purchase through these links – at no additional cost for you!
The Creality Ender-3 V3 KE* arrives with promises of a leap forward in effortless 3D printing. With a direct drive extruder and 100% automatic bed leveling, it’s designed to simplify printing while catering to both newcomers and 3D printing veterans.
This hands-on Creality Ender-3 V3 KE review will explore whether the Ender-3 V3 KE indeed makes good on these promises, offering a printer that is as reliable and user-friendly as it is versatile.
Key Takeaways:
- The Ender-3 V3 KE is designed for both beginners and enthusiasts, featuring a direct drive extruder, fully automatic bed leveling, and high print speeds.
- Setup is streamlined, taking only 15 minutes, and the automatic bed leveling feature along with the Sprite Direct Drive extruder optimizes user experience and print quality, even for novices.
- With a high maximum print speed of 500 mm/s and compatibility with a wide range of filaments, the Ender-3 V3 KE offers versatility and efficiency, establishing it as a cost-effective and long-term investment for varied 3D printing needs.
- The Ender-3 V3 KE is one of the best entry-level 3D printers!
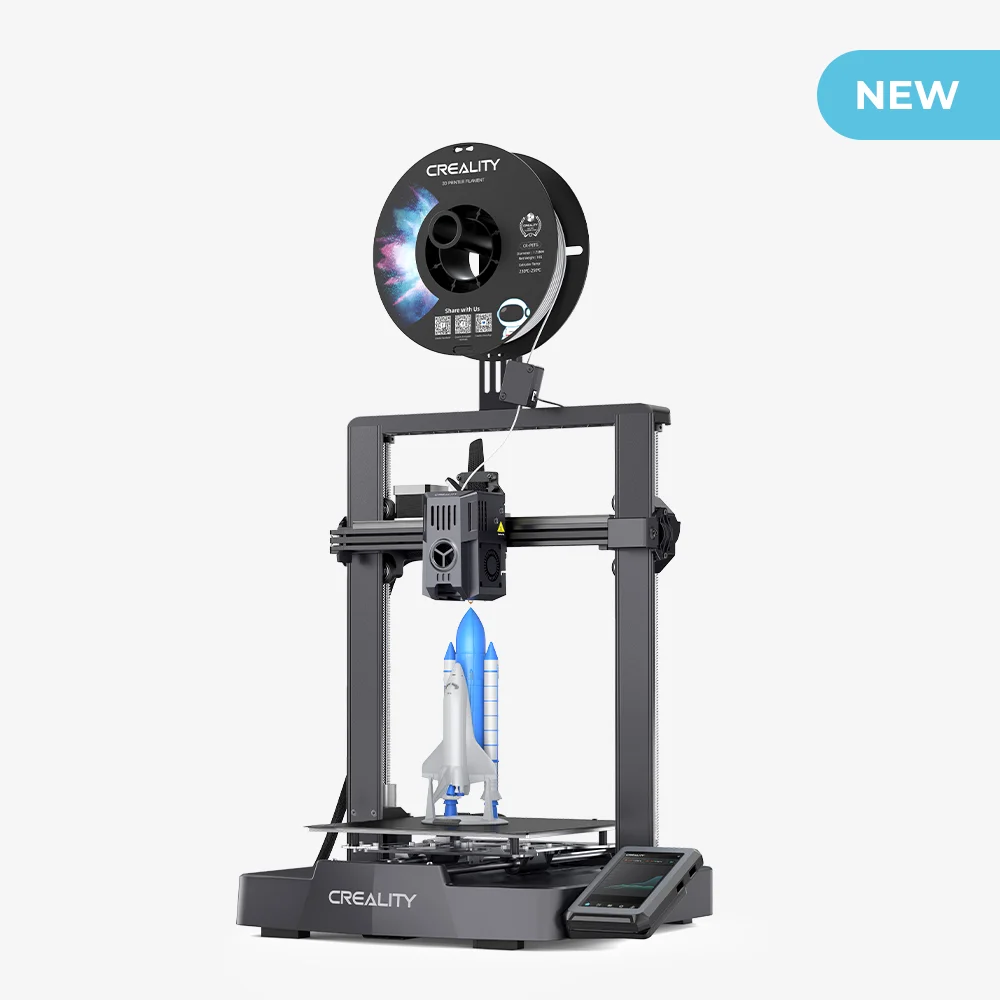
The Creality Ender-3 V3 KE is a medium-sized beginner 3D printer with high printing speeds and 100% automatic print bed leveling.
Build Volume: 220 × 220 × 240 mm
Speed: 300-500 mm/s
Extruder: “Sprite” Direct Drive
Print Bed: PEI coated & flexible
Leveling: 100% automatic
Nozzle Temp.: 300 °C
Bed Temp.: 100 °C
Pros:
✓ Very fast
✓ Automatic leveling incl. z-offset
✓ Filament sensor
✓ Touchscreen
✓ PEI print bed
✓ High filament compatibility
Cons:
× Calibration necessary (as with most other 3D printers)
Table of Contents:
- 1 Review Summary
- 2 Unboxing & First Impressions
- 3 Setting Up the Ender-3 V3 KE
- 4 Automatic Bed Leveling
- 5 Print Volume & Frame Stability
- 6 Extruder
- 7 Filament Sensor
- 8 Print Bed
- 9 Print Speed & Input Shaping
- 10 User Interface
- 11 Filament Compatibility
- 12 Slicer
- 13 Print Quality
- 14 Ender-3 V3 KE vs. SE
- 15 Is the Ender-3 V3 KE Worth the Investment?
Review Summary

As the newest model in the Ender-3 series, the Ender-3 V3 KE aims to be the top choice for 3D printing novices. With features like a direct drive extruder, touchscreen, and fully automatic bed leveling, it certainly looks impressive on paper. But can it deliver on these promises in real-world printing scenarios? We’re eager to find out.
The Ender-3 V3 KE offers the following key features:
- Direct drive extruder for easy filament feeding
- Automatic bed leveling for hassle-free printing (including z-offset)
- High print speeds for faster results
- Touchscreen interface for a user-friendly experience
This printer is designed for beginners and hobbyists, with intuitive features and cutting-edge technology. It also appeals to experienced tinkerers with its advanced capabilities.
The Ender-3 V3 KE, with its robust features and intuitive design, is poised as a highly recommended 3D printer that caters to diverse user requirements and proficiency levels.
But does it live up to its claims in real-world testing? Time to unbox and evaluate this powerhouse.
Unboxing & First Impressions
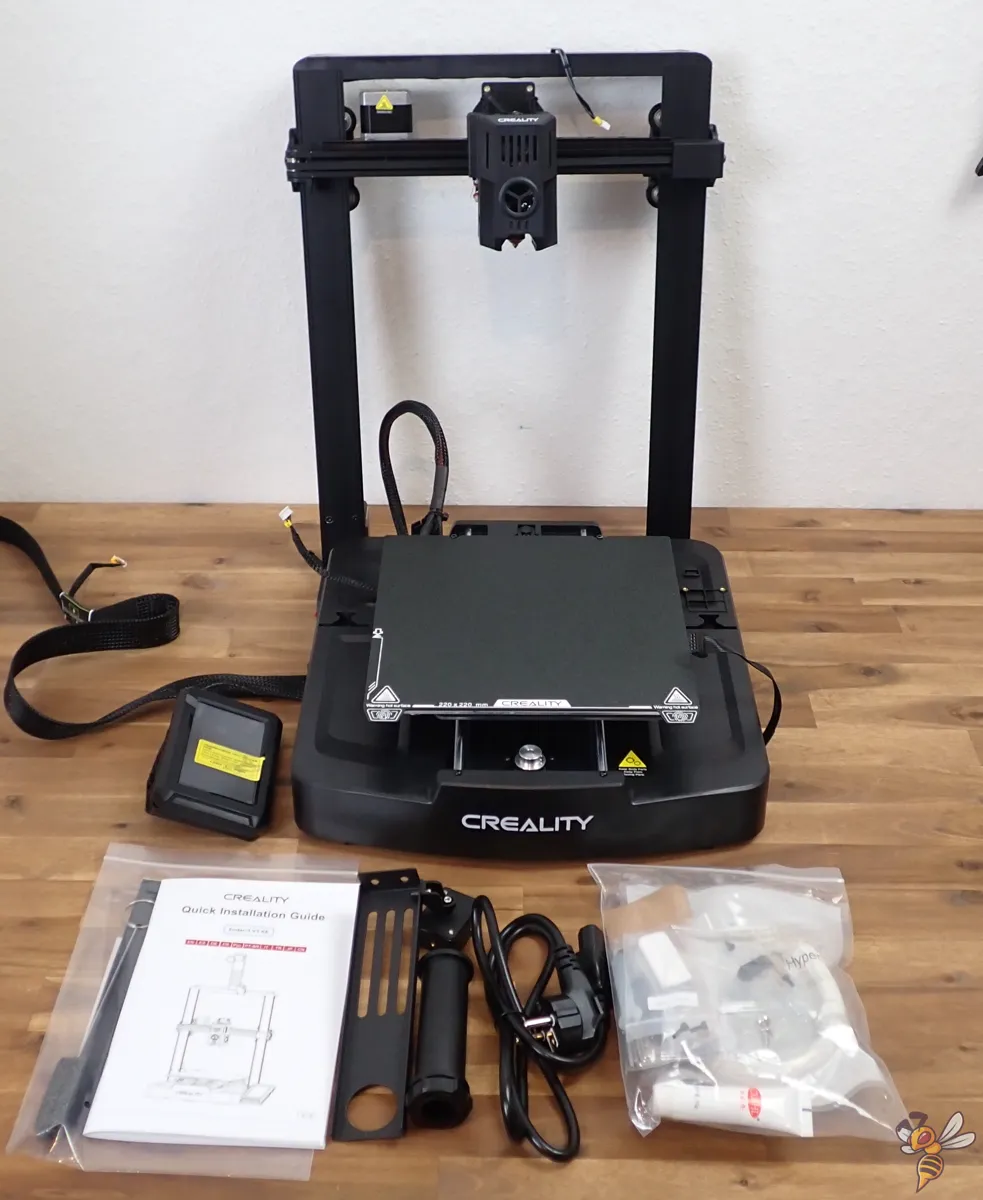
Unboxing the Ender-3 V3 KE is akin to unwrapping a present on Christmas morning (for 3D printing nuts like me at least). Upon opening the box, you find a nearly pre-assembled printer. The individual modules are securely packed, ensuring protection during shipping.
The printer showcases a classic Ender-3 design in Cartesian style, but it’s the presence of the following features that immediately catch your eye:
- Direct drive extruder
- Filament sensor
- Linear rail on the X-axis
- Absence of screws under the print bed
- Inclusion of two cooling fans
These features are a testament to the thoughtful design that has gone into this printer, ensuring minimal print defects and excellent usability and print quality.
The package also includes:
- A user-friendly touch screen
- A side cutter for filament
- All necessary screws and tools for assembly
- A USB stick with digital instructions, test models, and slicer software
- 20 m of PLA filament
- A nozzle cleaner
- A replacement nozzle
This attention to detail ensures that you have everything you need to get started.
Setting Up the Ender-3 V3 KE
The setup process for the Ender-3 V3 KE is incredibly straightforward. Creality has used its experience in developing user-friendly 3D printers to ensure that the assembly of the Ender-3 V3 KE takes just 15 minutes from unpacking to the first print. This is a commendable feat, especially when you consider that the setup process is easy to carry out, even for people with no technical skills.
The printer comes with:
- Only a few screws for assembly
- All cables are clearly marked, making it almost impossible to plug them in incorrectly
- All necessary tools and components required for assembly
This user-friendly design makes the setup process a breeze.
Automatic Bed Leveling
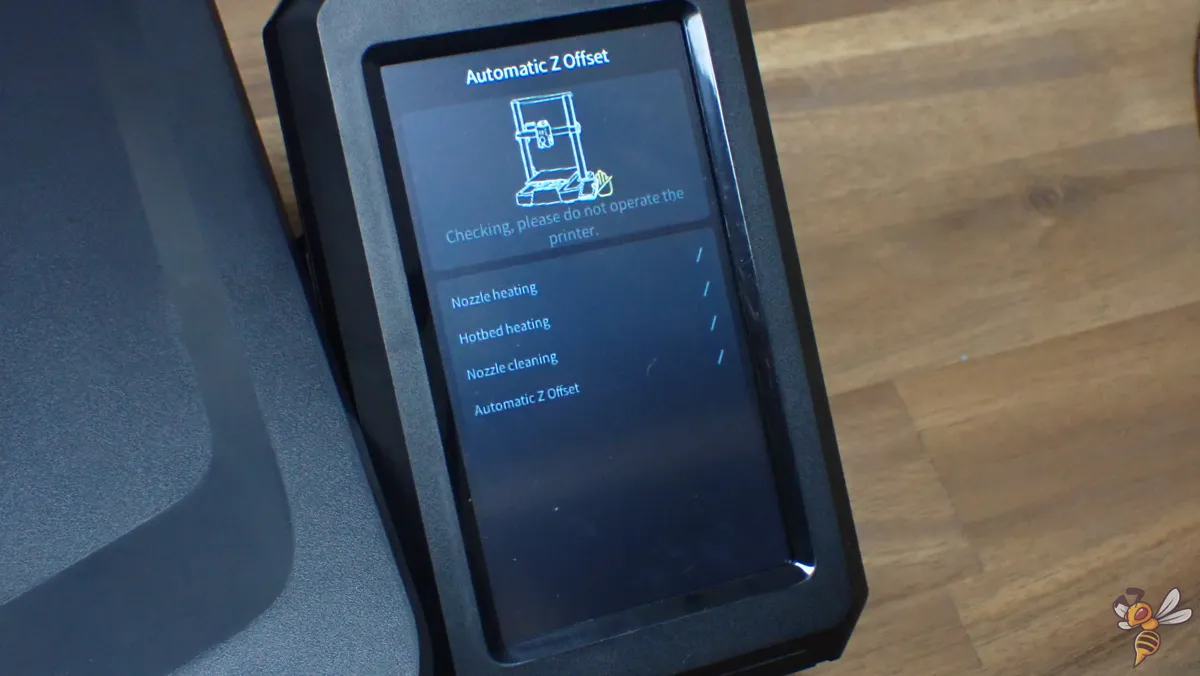
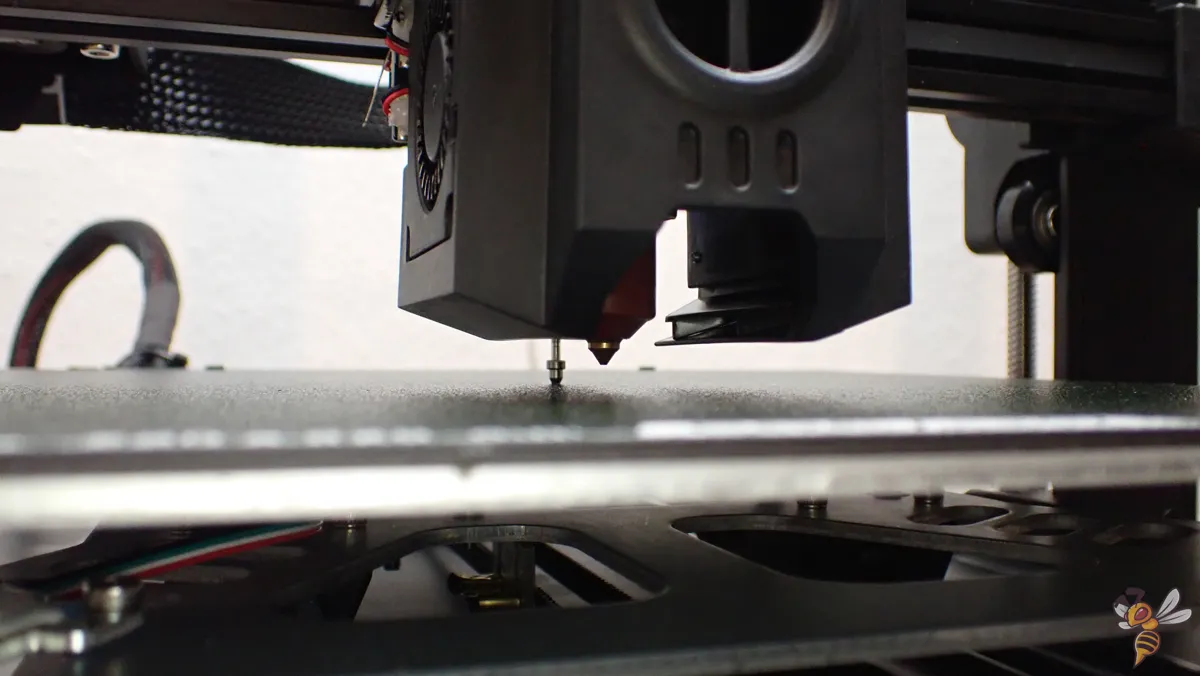
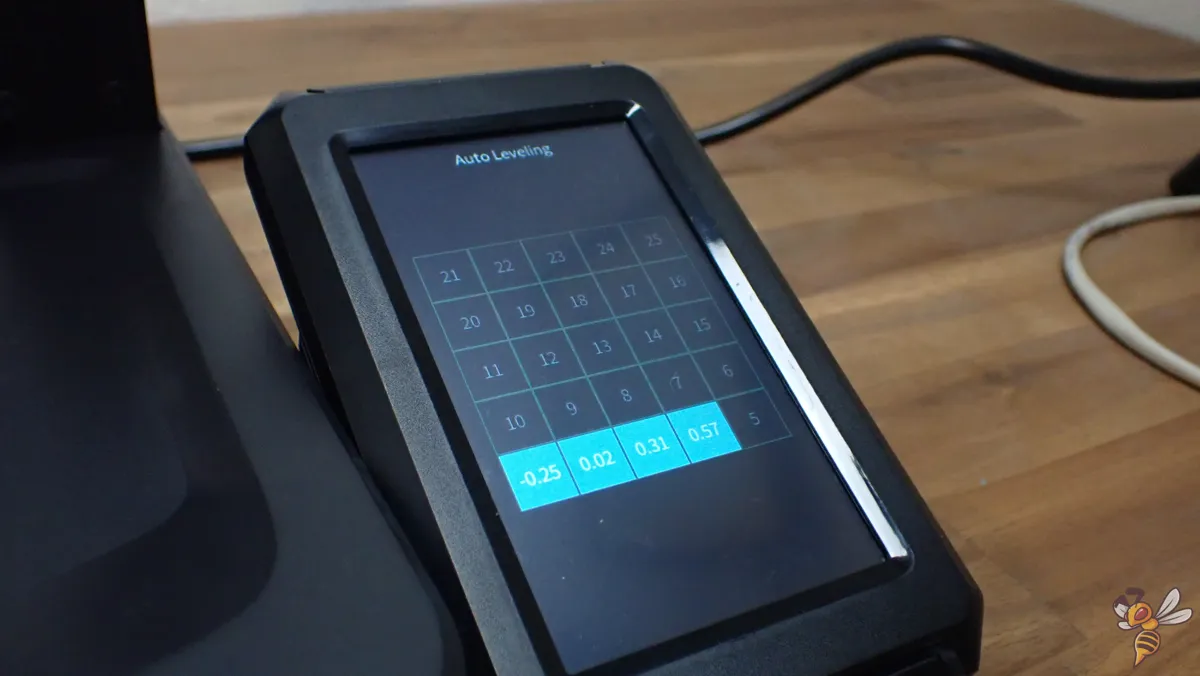
Auto bed leveling distinguishes the Ender-3 V3 KE from many other 3D printers. Apart from using my favorite bed leveling sensor, the CR-Touch, the KE can also adjust the Z-Offset by itself.
This is a significant upgrade over many other 3D printers that only offer semi-automatic print bed leveling. This printer takes the hassle out of bed leveling by making the process completely automatic, a feature that is particularly beneficial for beginners.
The leveling process involves compensating for the inclination of the print bed and adjusting the Z-offset. On most 3D printers, manual adjustment of the Z-offset with a piece of paper is required. But with the Ender-3 V3 KE, no manual adjustment of the Z-offset is required, rendering the leveling process fully automatic.
The automatic bed leveling isn’t just for ease of use; it also ensures a consistent first layer and enhances the reliability of the printing process.
Print Volume & Frame Stability


Boasting a print volume of 220 × 220 × 240 mm, the Ender-3 V3 KE can produce small to medium-sized single-piece objects. This generous print volume allows for better design and greater flexibility in the types of projects that can be undertaken.
The Ender-3 V3 KE is not just about size; it’s also about precision and stability. The printer features a double-driven Z-axis, synchronized at the upper end of the frame via a toothed belt. This double-driven Z-axis is crucial for accuracy in the Z direction and for stability even at high printing speeds.
In addition, the Ender-3 V3 KE has a linear rail on the X-axis, which moves the print head very precisely. The Y-axis is moved via two rods, providing enough stability to prevent printing errors even at high printing speeds. These features collectively ensure precision and stability, permitting the printer to deliver high-quality prints consistently.
Extruder
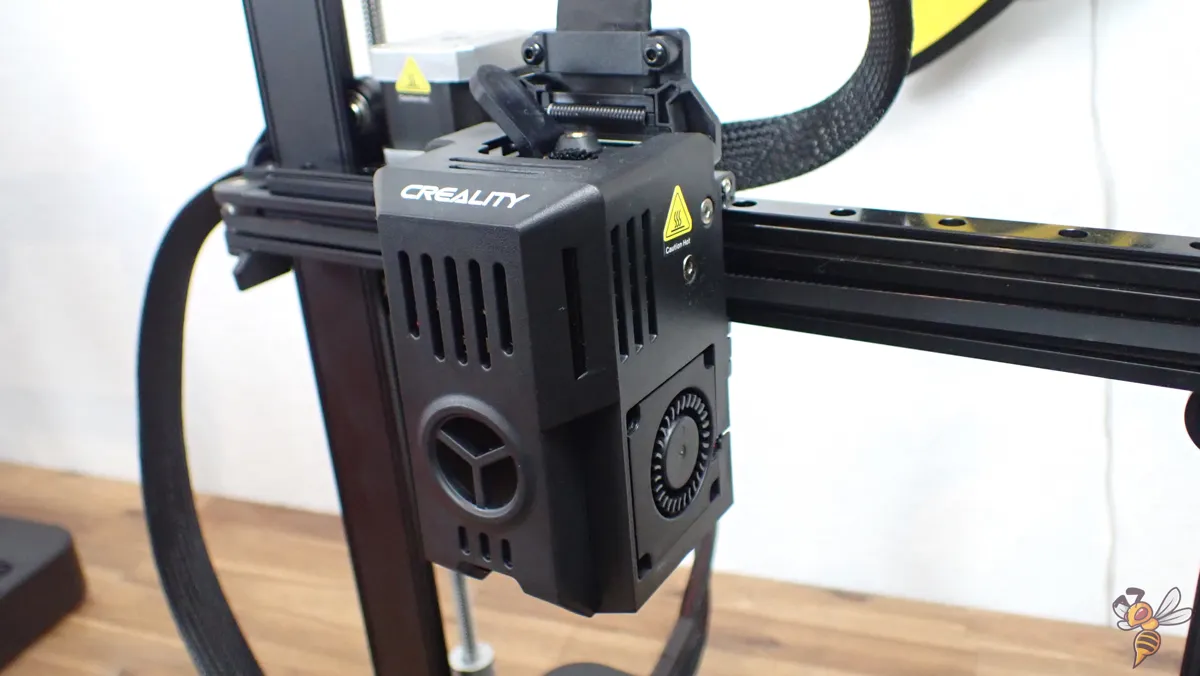
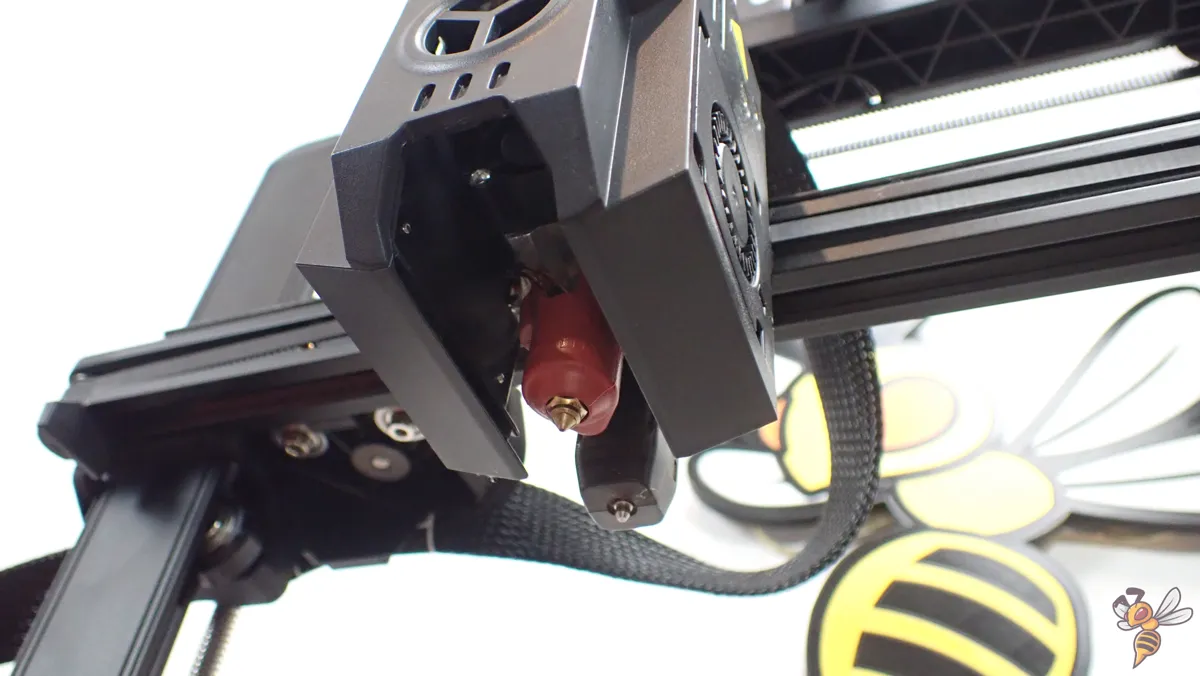
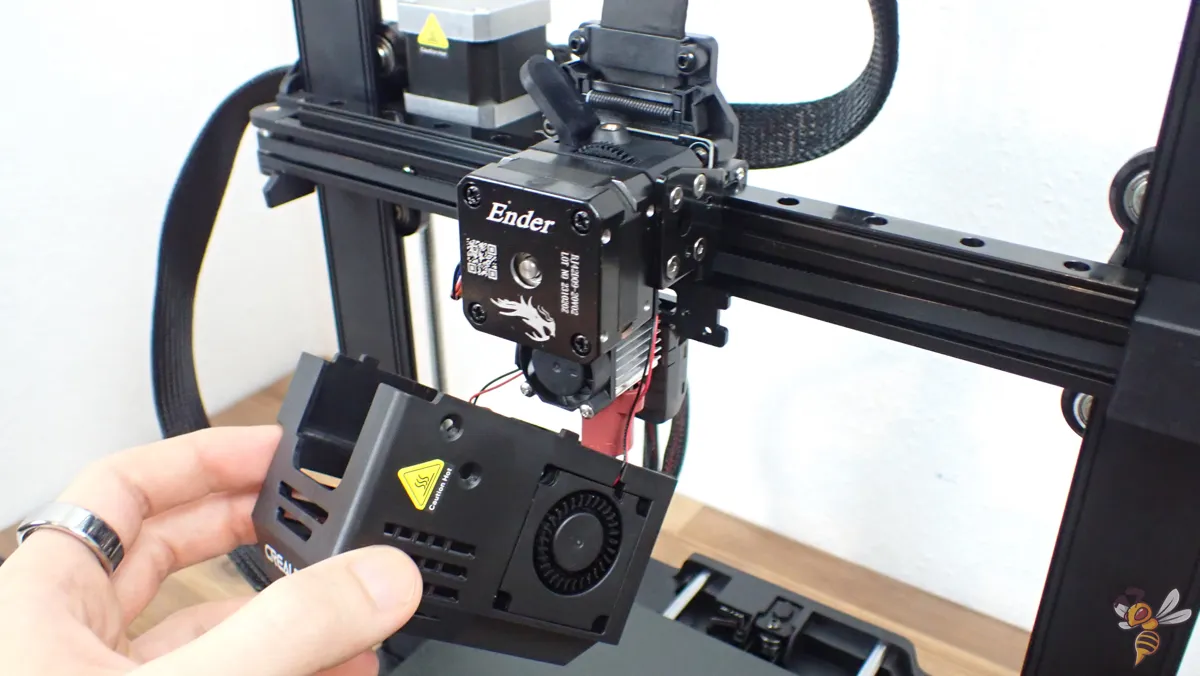

The Sprite Direct Drive extruder is the core component of the Ender-3 V3 KE. This extruder is very light, and it can also process flexible filaments perfectly, making it a standout feature of this printer. I’ve seen the Sprite Direct Drive extruder in action on other 3D printers, and I can personally vouch for its effectiveness based on the numerous positive experiences I’ve had with it.
The extruder isn’t just about handling different kinds of filaments; it’s also about optimizing the feeding flow for fewer blobs and oozes. This is achieved through a feature known as motion advance, which adjusts the extruder’s motor speed based on the speed of the print head. This helps to reduce blobs and oozes, resulting in cleaner prints.
The extruder performs optimally in conjunction with the Ender-3 V3 KE’s other features, contributing to the overall superior performance of this printer. Whether you’re printing with PLA, ABS, or TPU, the Sprite Direct Drive extruder ensures that your prints come out looking their best.
Filament Sensor

The filament sensor alerts the user when the filament is about to run out, ensuring uninterrupted and reliable printing, and preventing potential print failures. This significantly enhances the overall reliability of the printer, making it an excellent choice for both beginners and experienced users alike.
The filament sensor on the Ender-3 V3 KE works with all types of filament, providing flexibility for users utilizing various printing materials. This wide compatibility makes the printer versatile and adaptable, capable of working with a range of materials without compromising on performance or quality.
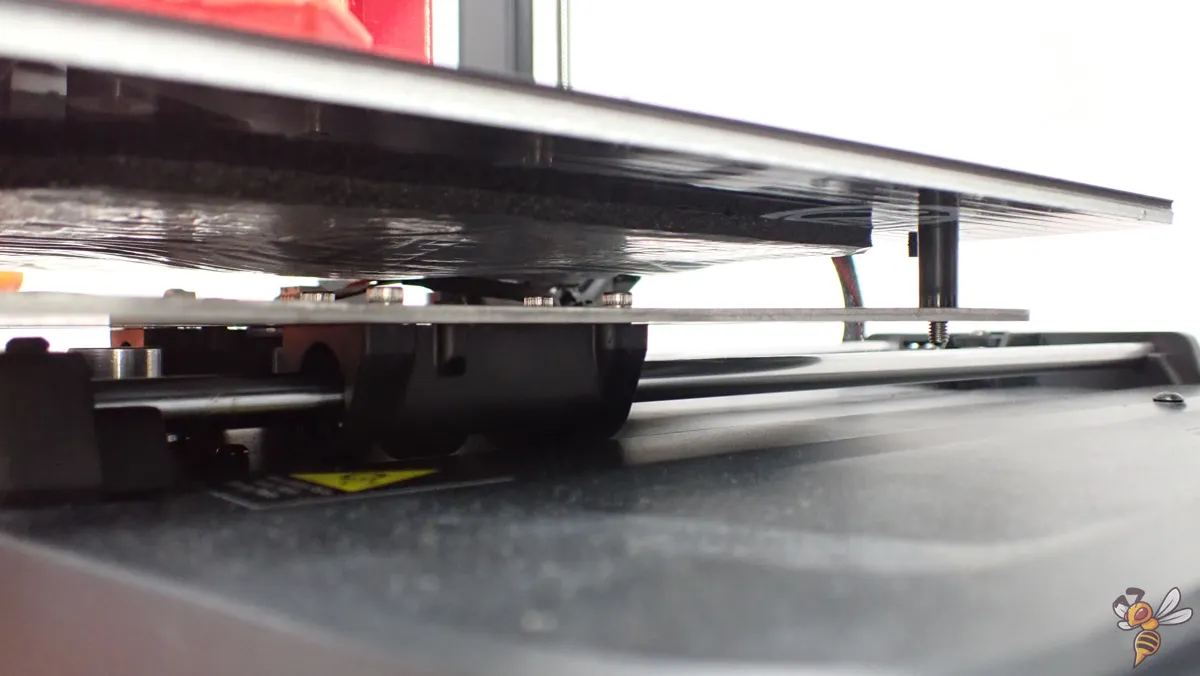
Print Bed
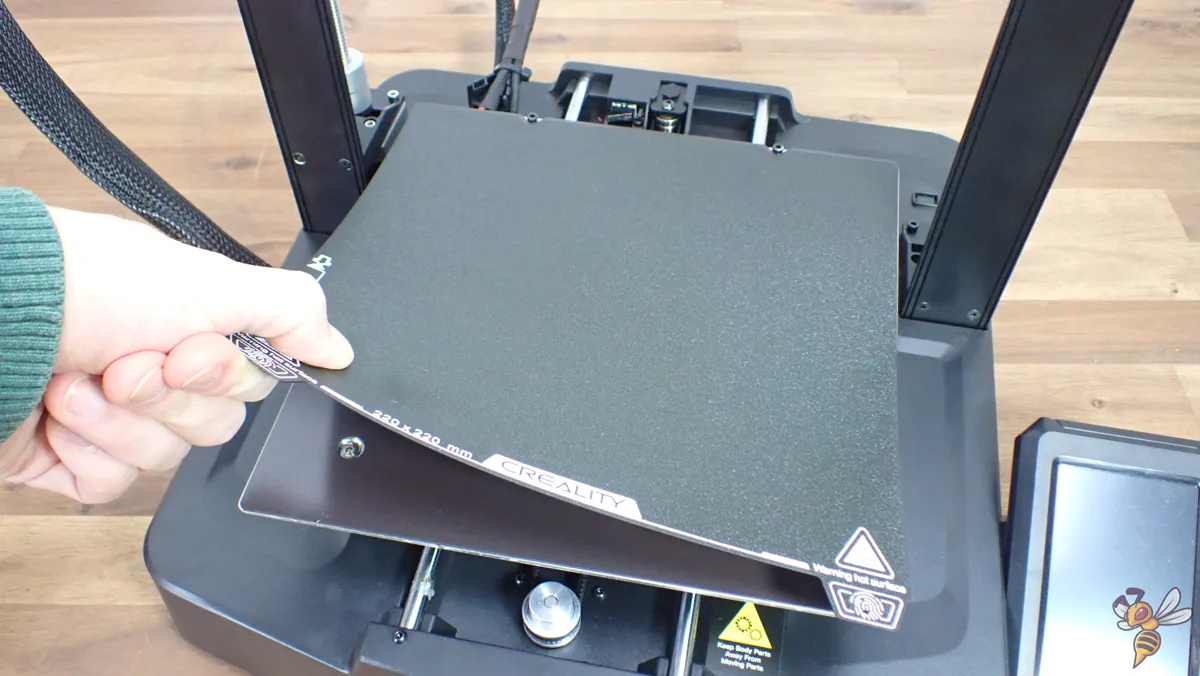

The print bed of the Ender-3 V3 KE is perfect. The print bed material is a spring steel sheet with a PEI coating, which ensures perfect adhesion for most filaments on the bed surface. This is a significant upgrade over conventional glass or aluminum print beds or even PC coated spring steel, making the Ender-3 V3 KE more reliable and user-friendly.
The print bed is not just reliable; it’s also flexible, which make it easy to remove prints once they’re done. This ease of removal is a welcome feature, particularly for larger prints that can sometimes prove difficult to remove from the print bed.
The bed has two small notches at the rear end, which serve a crucial role in accurately positioning the bed. These notches align with corresponding screws on the print plate, ensuring the bed is correctly placed and stable before each print job.
The PEI spring steel bed, engineered for durability, provides a long-lasting surface that can endure continuous printing while maintaining its adhesion properties. Regardless of the filament type used – PLA, ABS, or others – the bed ensures optimal adhesion for every print, leading to consistently high-quality output.
Print Speed & Input Shaping
The Ender-3 V3 KE’s print speed:
- Maximum print speed of 500 mm/s
- Standard speed with good results achievable at 250 mm/s
To achieve these high speeds without compromising on print quality, the Ender-3 V3 KE utilizes a technique known as input shaping. This sophisticated algorithm is implemented in the Creality OS to enhance flow, remove ripples, and eliminate corner bulges, resulting in superior model detailing. This means that even when you’re printing at high speeds, you can expect precise, detailed prints.
In 3D printing, ringing and ghosting are common issues that can affect the quality of prints. Ringing, also known as “echoes” or “ripples”, is a disturbance that occurs when the print head changes direction rapidly. This can result in a series of wave-like patterns appearing on the surface of the print, which can detract from the overall print quality.
Ghosting, on the other hand, refers to faint replicas of an image appearing in a print, often as a result of vibration during the printing process. Like ringing, ghosting can impact the aesthetic quality of a print and is particularly noticeable on prints with smooth surfaces or intricate details.
Without input shaping, these issues can be particularly pronounced. Input shaping is a technique used to counteract the effects of ringing and ghosting by adjusting the motion of the print head. By optimizing the speed and acceleration of the print head, input shaping can greatly reduce the occurrence of these issues, resulting in cleaner, higher-quality prints.
Therefore, the inclusion of input shaping in the Ender-3 V3 KE is a significant advantage, as it helps to ensure consistently high-quality prints, even at high speeds.
User Interface
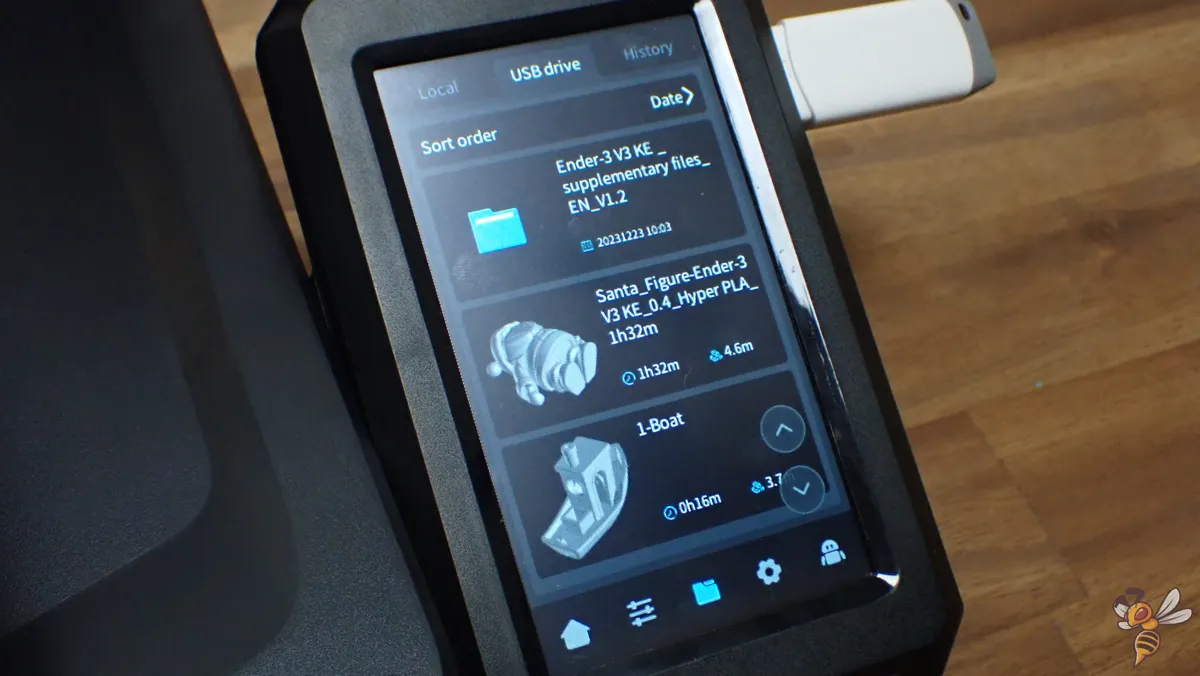
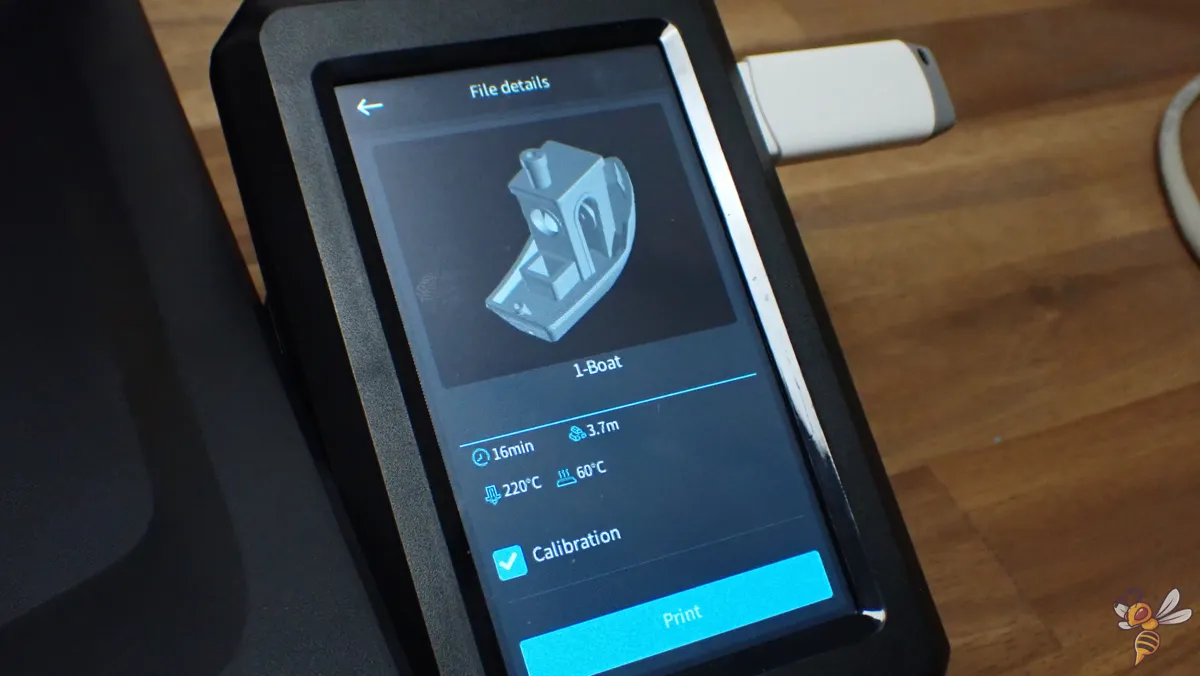
Another area where the Ender-3 V3 KE is very user-friendly is its user interface. This printer features a 4.3-inch touchscreen interface, providing an intuitive and user-friendly experience. This screen allows for easy navigation and control, making it easy for beginners to get started with 3D printing.
In addition to its user-friendly interface, the Ender-3 V3 KE also offers advanced remote control and remote monitoring capabilities. With WiFi connectivity, users can remotely access the printer’s status from a smartphone or computer. This level of control and convenience sets the Ender-3 V3 KE apart from its competitors, further enhancing its value proposition.
Filament Compatibility
The versatility of a 3D printer is also determined by the variety of filaments it can process, and in this regard, the Ender-3 V3 KE is quite good. This printer is compatible with a wide range of filaments, including:
- PLA
- PETG
- ABS
- TPU
- ASA
- and more
This broad compatibility allows for a wide variety of prints, from simple PLA models to technical designs using more exotic filament types. This makes it perfect for those looking not only for a 3D printer that can print decorative objects but also mechanical parts.
Transitioning between different types of filaments on the Ender-3 V3 KE requires some adjustments to print settings, such as the temperature and retraction settings. Be sure to calibrate the settings for optimal results.
TIP: Learn how to calibrate your 3D printer to get perfect results every time in my 3D printing course: FDM 3D Printing: The Comprehensive Course from A to Z
(The course teaches everything you need to know for FDM 3D printing in over 60 lessons. The course will get beginners up to my level in no time!)
Slicer
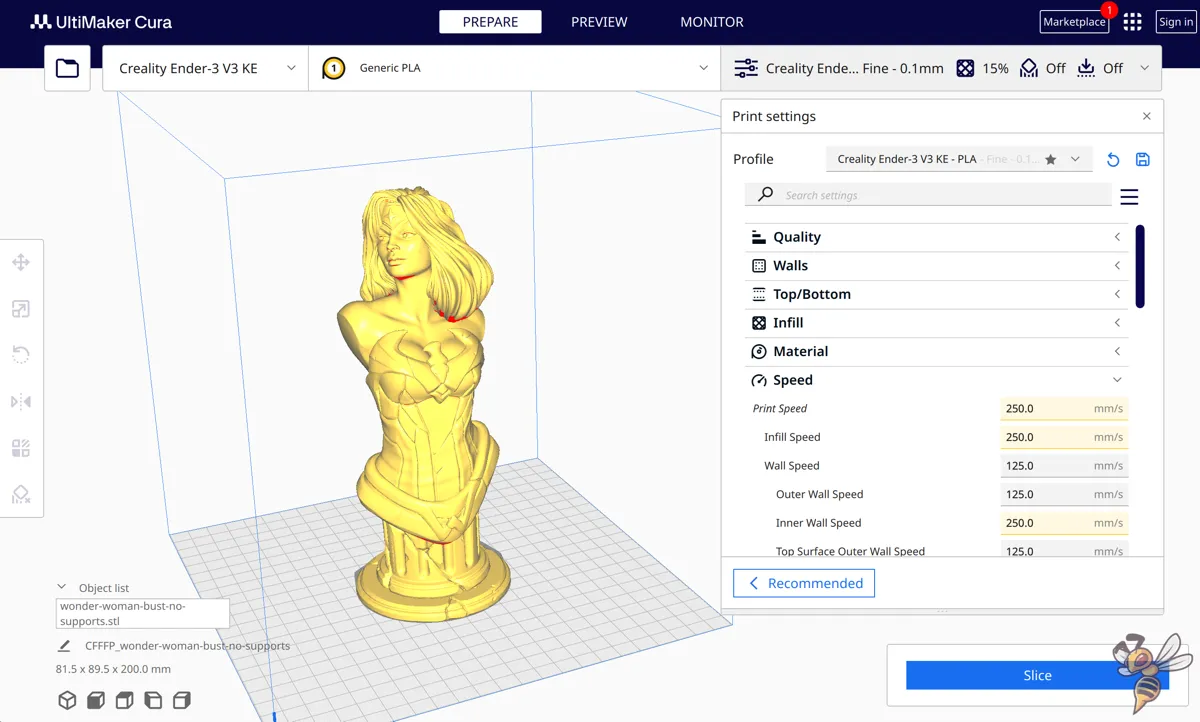
The Ender-3 V3 KE works well with widely-used slicers such as Cura, allowing users to:
- Formulate custom profiles for the printer within these slicers
- Precisely calibrate the most important print settings such as the print temperature and retraction
- Achieve high-quality prints with ease using Cura’s up-to-date features.
The standard slicer for the Ender-3 V3 KE is Creality Print.
A lot of users like me are more comfortable with Cura as a slicer. If you’re new to 3D printing, you’ll find Cura’s intuitive interface and comprehensive feature set to be a boon, while the Creality Cloud app offers an alternative option for users.
As an owner of the Ender-3 V3 KE, I’ve taken the time to create a custom profile for this printer in Cura. Since Cura doesn’t offer a standard profile for this particular model, I started from scratch, carefully calibrating the most important settings to ensure optimal printing results.
In this article I share my Cura settings: Ender-3 V3 KE – Best Cura Settings & Profile
Print Quality
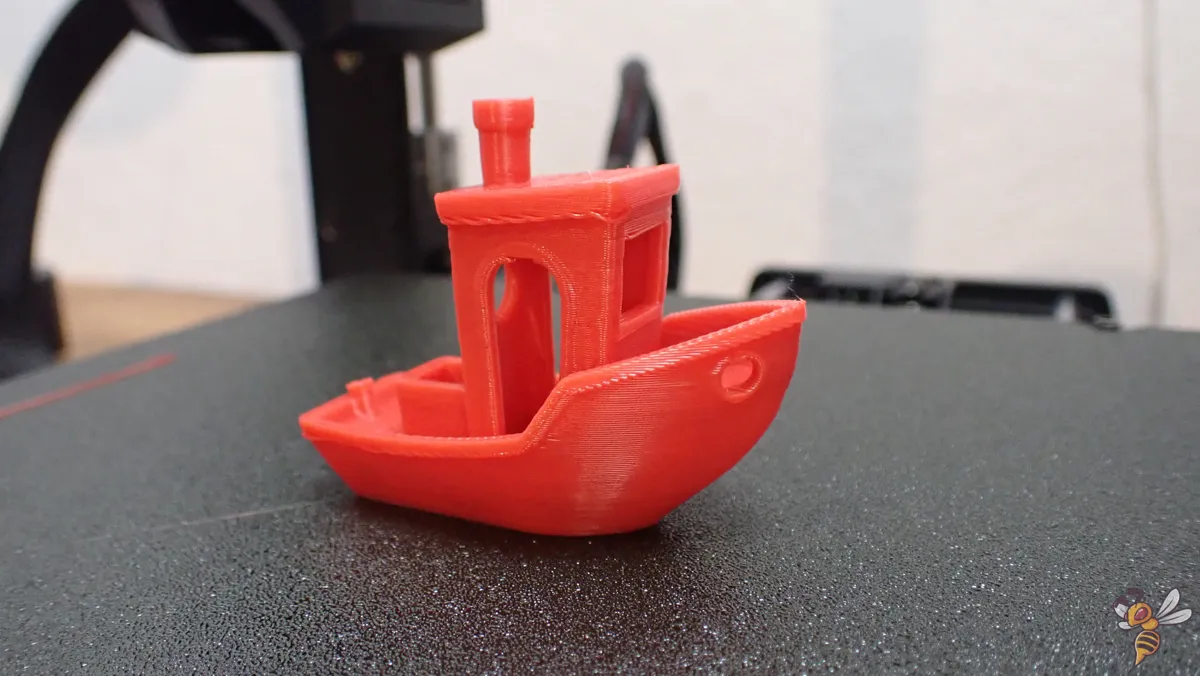

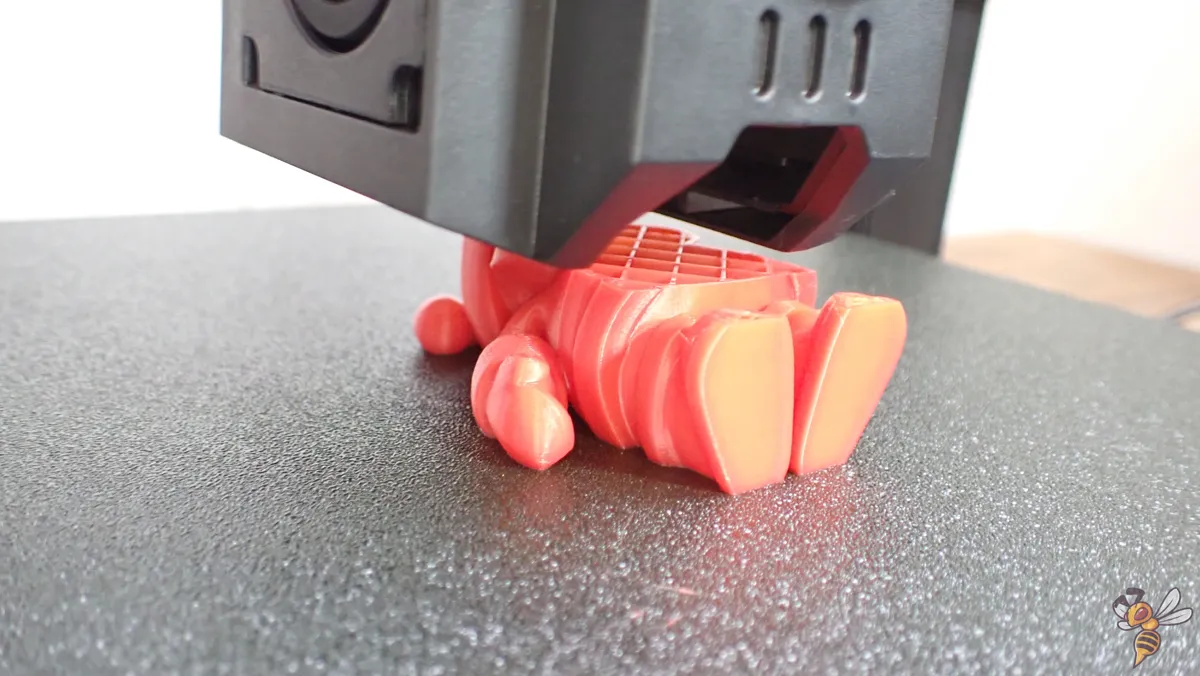
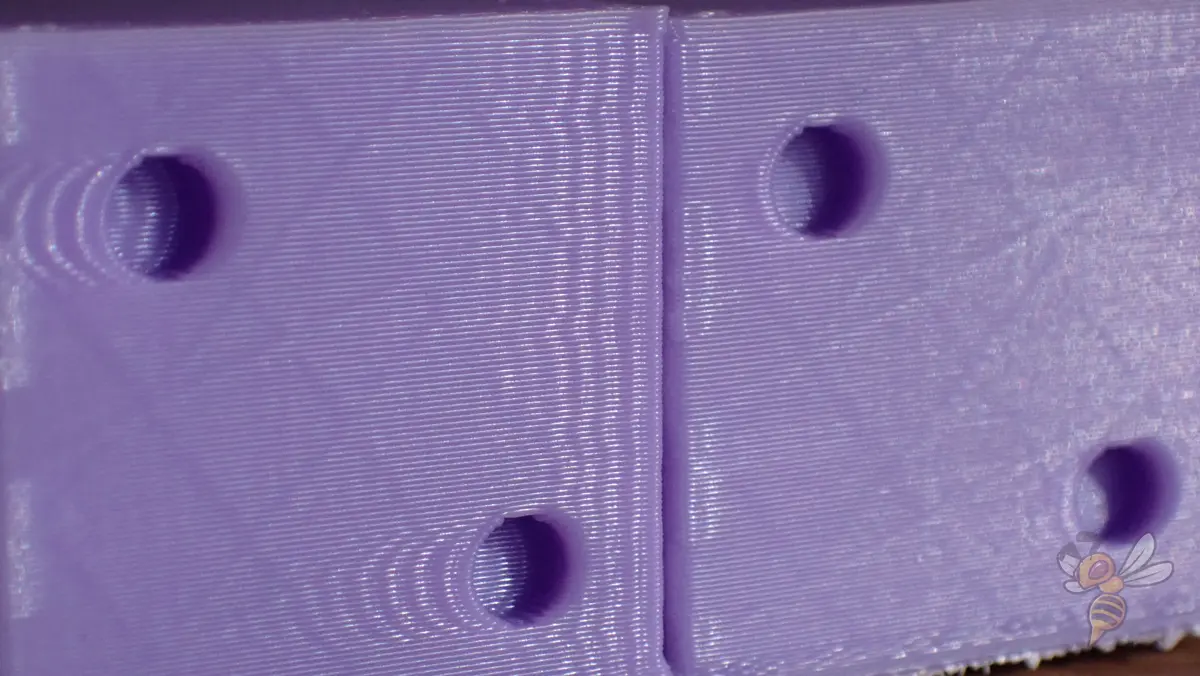
Following some calibration, the Ender-3 V3 KE achieves flawless print quality. I first tested the print quality using prepared test prints on the SD card, starting with a lying Santa Claus model. All objects were printed with a layer height of 0.1 mm, which resulted in high-resolution prints.
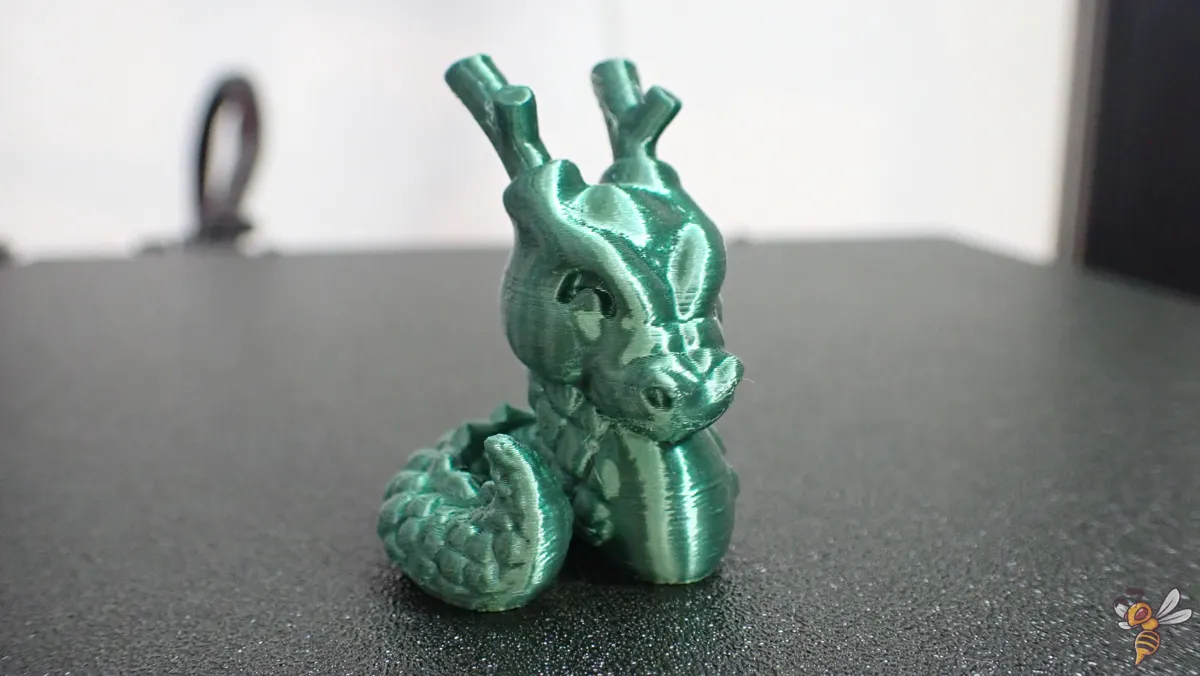
I then printed a Cali Dragon, a popular calibration object for FDM 3D printers. The results achieved were almost perfect.


This Mandalorian Statue was printed without supports but had some issues with sagging overhangs. This is why I activated the bridge settings in Cura.
After that the print quality was very satisfiying and I printed three busts.

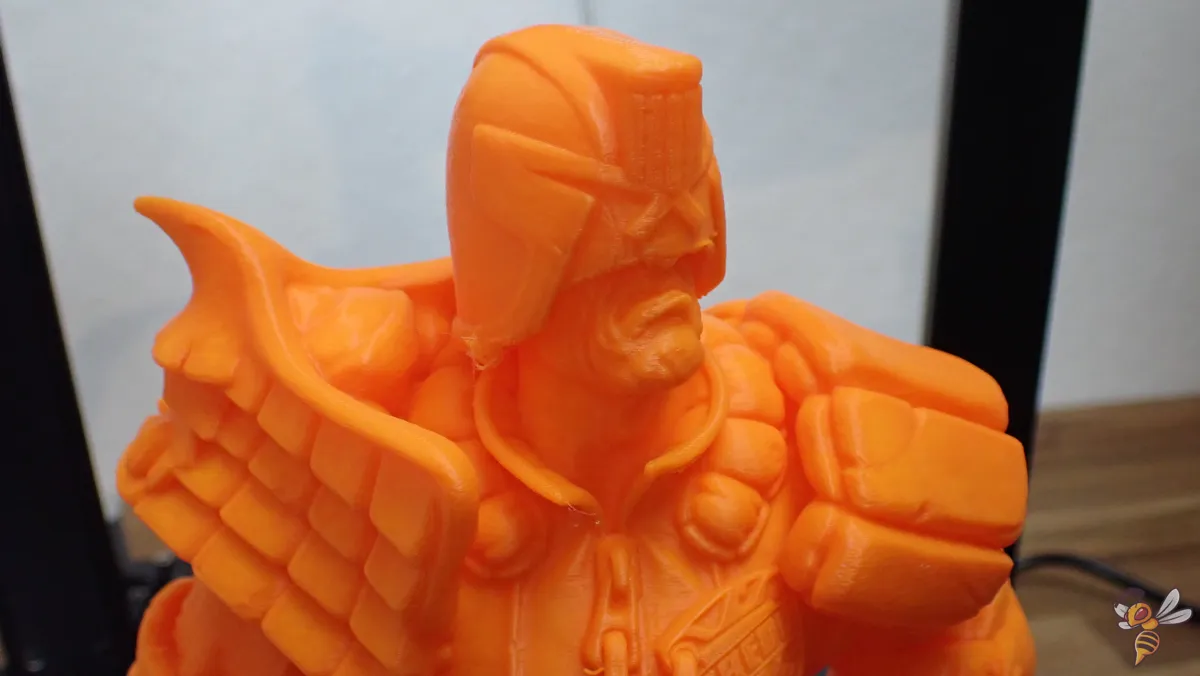
The bust of Judge Dredd was printed without changing any print settings, and the print quality was nearly perfect.
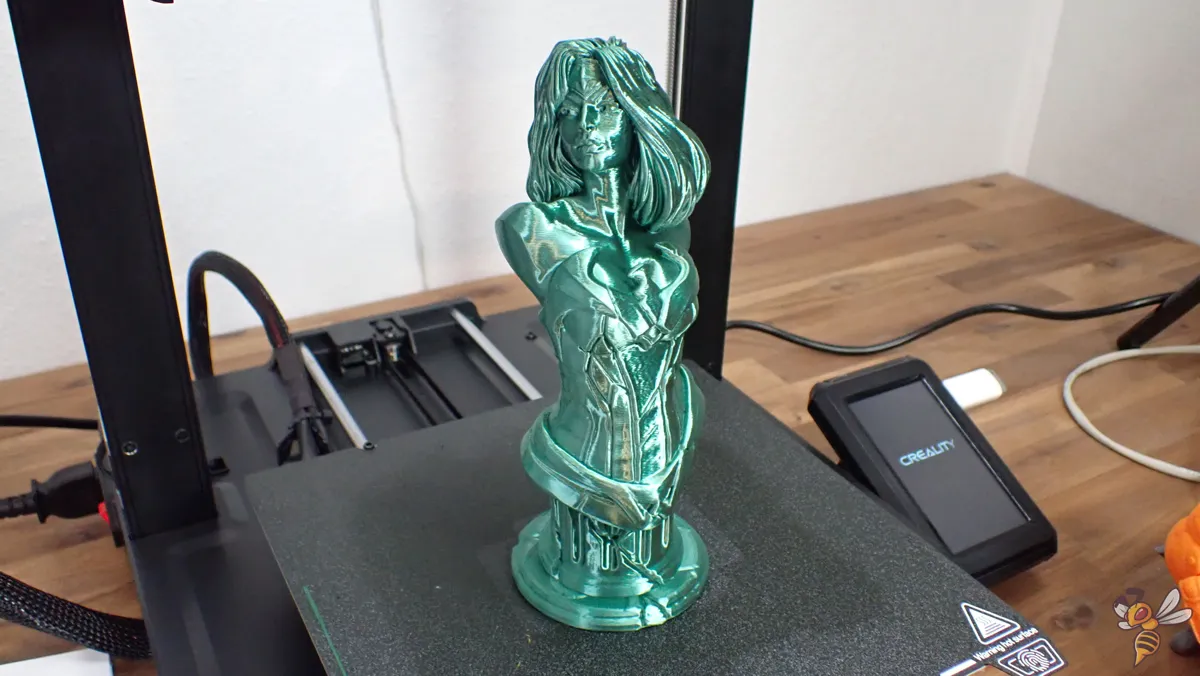


Wonder Woman was also printed without changing any print settings, and the print quality remained excellent.


To test the printer’s speed capabilities, I printed the bust of Captain America at a higher speed of 300 mm/s. Surprisingly, the print quality was still nearly perfect.
These test prints demonstrate the exceptional print quality of the Ender-3 V3 KE, showcasing its ability to deliver high-quality prints across a range of speeds and settings.
Ender-3 V3 KE vs. SE
Here’s a detailed comparison table for the Creality Ender-3 V3 KE and Ender-3 V3 SE 3D printers:
| Feature | Ender-3 V3 SE | Ender-3 V3 KE |
|---|---|---|
| Year Released | 2023 | 2023 |
| Build Volume | 220 × 220 × 250 mm | 220 × 220 × 240 mm |
| Technology | FDM | FDM |
| Physical Size | 349 × 364 × 490 mm | 433 × 366 × 490 mm |
| Bed Material | PC Spring Steel | PEI Spring Steel |
| Extruder Type | Direct Drive | Direct Drive with upgraded all-metal hotend |
| Hot-end Type | Standard | Upgraded, more powerful heater core |
| Auto Leveling | CR-touch | CR-touch |
| Assembly Time | 15 minutes | 15 minutes |
| Linear Rail System | On Y Axis | On X and Y Axis |
| Display Screen | 3.2” Color Knob Screen | 4.3″ Color Touch Screen |
| Filament Detector | No | Yes |
| Dual Z-axis | Yes (1 motorized) | Yes (2 motorized) |
| File Transfer | SD Card, USB-C Cable | USB drive, LAN, Creality Cloud APP |
| Supported Filaments | PLA, PETG, TPU | PLA, PETG, ABS, TPU, ASA |
| Heatbed Temperature | 100℃ | 100℃ |
| Nozzle Temperature | 260℃ | 300℃ |
| Max. Printing Speed | 250 mm/s | 500 mm/s |
| Typical Printing Speed | 180 mm/s | 300 mm/s |
| Max. Acceleration | 2500 mm/s² | 8000 mm/s² |
| Nozzle Diameter | 0.4 mm (default) | 0.4 mm (default) |
| Layer Height | 0.1 – 0.35 mm | 0.1 – 0.35 mm |
| Printing Accuracy | ± 0.1 mm | ± 0.1 mm |
| Filament Diameter | 1.75 mm | 1.75 mm |
| Slicing Software | Creality Print, Cura, Simplify3D | Creality Print, Cura, Simplify3D |
In a comparison between the Ender-3 V3 KE and the Ender-3 V3 SE model, the KE emerges as the more sophisticated and feature-packed choice. The Ender-3 V3 KE boasts features like an aditional fan on the direct drive extruder, a touchscreen, and a filament sensor, which are not found on the SE model. This positions the KE as a more attractive option for both beginners and experienced users.
In terms of print speed, the Ender-3 V3 KE surpasses the SE with a maximum print speed of 500 mm/s and a typical speed of 300 mm/s, in contrast to the SE which has a maximum print speed of 250 mm/s. This makes the KE a faster and more efficient printer, ideal for users who value speed and productivity. This is also due to the linear rail on the x-axis of the KE.
When it comes to print quality, the Ender-3 V3 KE does not really outperform the SE model. With its advanced features it can print faster and with more filaments but after some calibration, the print quality of the two printers is comparable.
If you don’t mind the slower speed, fewer available filament and the lacking quality of life features, the SE is also a great choice! Here you can find my in-depth review of the SE: Creality Ender-3 V3 SE: In-Depth & Hands-On Review
Is the Ender-3 V3 KE Worth the Investment?
So, should you invest in the Ender-3 V3 KE? According to my testing and experience, the answer is an emphatic yes.
Compared to similar products in the market, the Ender-3 V3 KE offers better value for money. Its robust features and reliable performance position it as a compelling option for individuals seeking top-notch prints within budget constraints. Furthermore, with an estimated lifespan of 5 to 10+ years, it’s an investment that will continue to deliver value in the long run.
The Creality Ender-3 V3 KE is a medium-sized beginner 3D printer with high printing speeds and 100% automatic print bed leveling.
Build Volume: 220 × 220 × 240 mm
Speed: 300-500 mm/s
Extruder: “Sprite” Direct Drive
Print Bed: PEI coated & flexible
Leveling: 100% automatic
Nozzle Temp.: 300 °C
Bed Temp.: 100 °C
Pros:
✓ Very fast
✓ Automatic leveling incl. z-offset
✓ Filament sensor
✓ Touchscreen
✓ PEI print bed
✓ High filament compatibility
Cons:
× Calibration necessary (as with most other 3D printers)
Whether you’re a beginner stepping into the world of 3D printing or an experienced hobbyist looking to upgrade your current printer, the Ender-3 V3 KE is a worthy contender. With its impressive features, reliable performance, and affordable price, it’s a printer that truly delivers on its promises.
Disclosure: This website is the property of Martin Lütkemeyer and is operated by Martin Lütkemeyer. Martin Lütkemeyer is a member of the Amazon Services LLC and other Affiliate Programs. These are affiliate advertising programs designed to enable websites to earn advertising revenue through advertising and linking to Amazon.com and others. Links marked with * are affiliate links.
