- Z Seam | How to Hide & Avoid | Cura & PrusaSlicer - April 20, 2024
- Qidi Tech Q1 Pro – Best Orca Slicer Settings & Profile - April 9, 2024
- Creality Ender-3 V3 Review – Will CoreXZ be the New Trend? - March 27, 2024
Disclosure: Links marked with * are Affiliate Links. I earn from qualifying purchases if you decide to make a purchase through these links – at no additional cost for you!
The Ender-3 V3 is a worthy successor to the legendary Ender-3 series from Creality and is currently one of my favorite entry-level 3D printers.
By default, the Ender-3 V3 is operated with Creality Print as a slicer. However, if you pay attention to a few things, it is also compatible with Orca Slicer.
I have been using the Ender-3 V3 intensively over the last few weeks and have printed numerous projects with it. I have used it with Orca Slicer and optimized all settings for it.
In this article, I will show you step by step how to add the Ender-3 V3 to Orca Slicer and which of the most important settings are best suited for the standard filaments PLA, ABS, PETG and TPU.
Calibrated Orca Slicer Profile
For optimal print quality with minimal effort, you can download my calibrated Orca Slicer profile for this 3D printer and import it directly into Orca Slicer. All settings are perfectly adapted to this printer, e.g. for accelerations, jerk, supports and the first layer.
Table of Contents:
Step 1: Adding the 3D Printer
In the first step, we will create an entirely new profile for the Ender-3 V3 in Orca Slicer. We will use an empty profile as a template.
This allows you to create a new, user-defined profile in Orca Slicer for the Ender-3 V3:
- Click on the active printer and then on “Create printer“.
- In the new window that appears, name your new 3D printer, enter the correct nozzle diameter, the print volume and the maximum print height. Then click on “OK“.
- In the next window, you have to specify a template for the printer preset. Select the 3D printer that is most similar to yours. Also activate all filaments that are of interest to you and then click on “Create“.
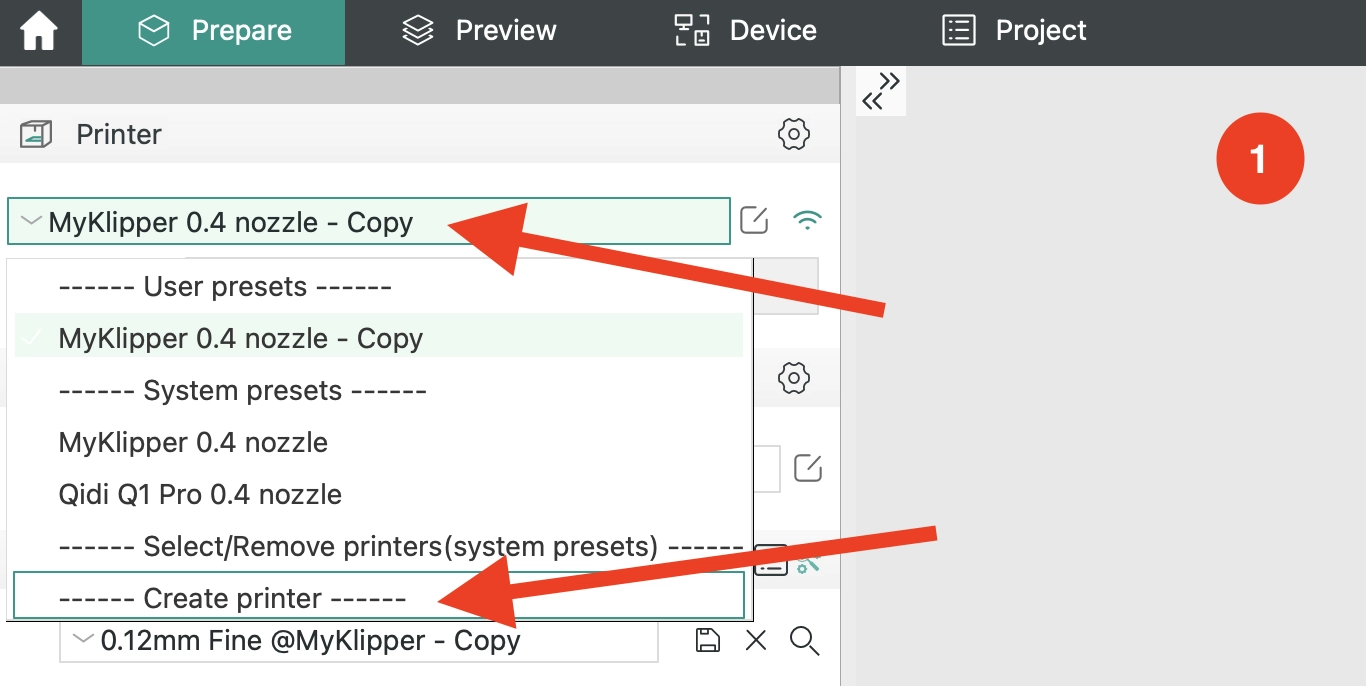
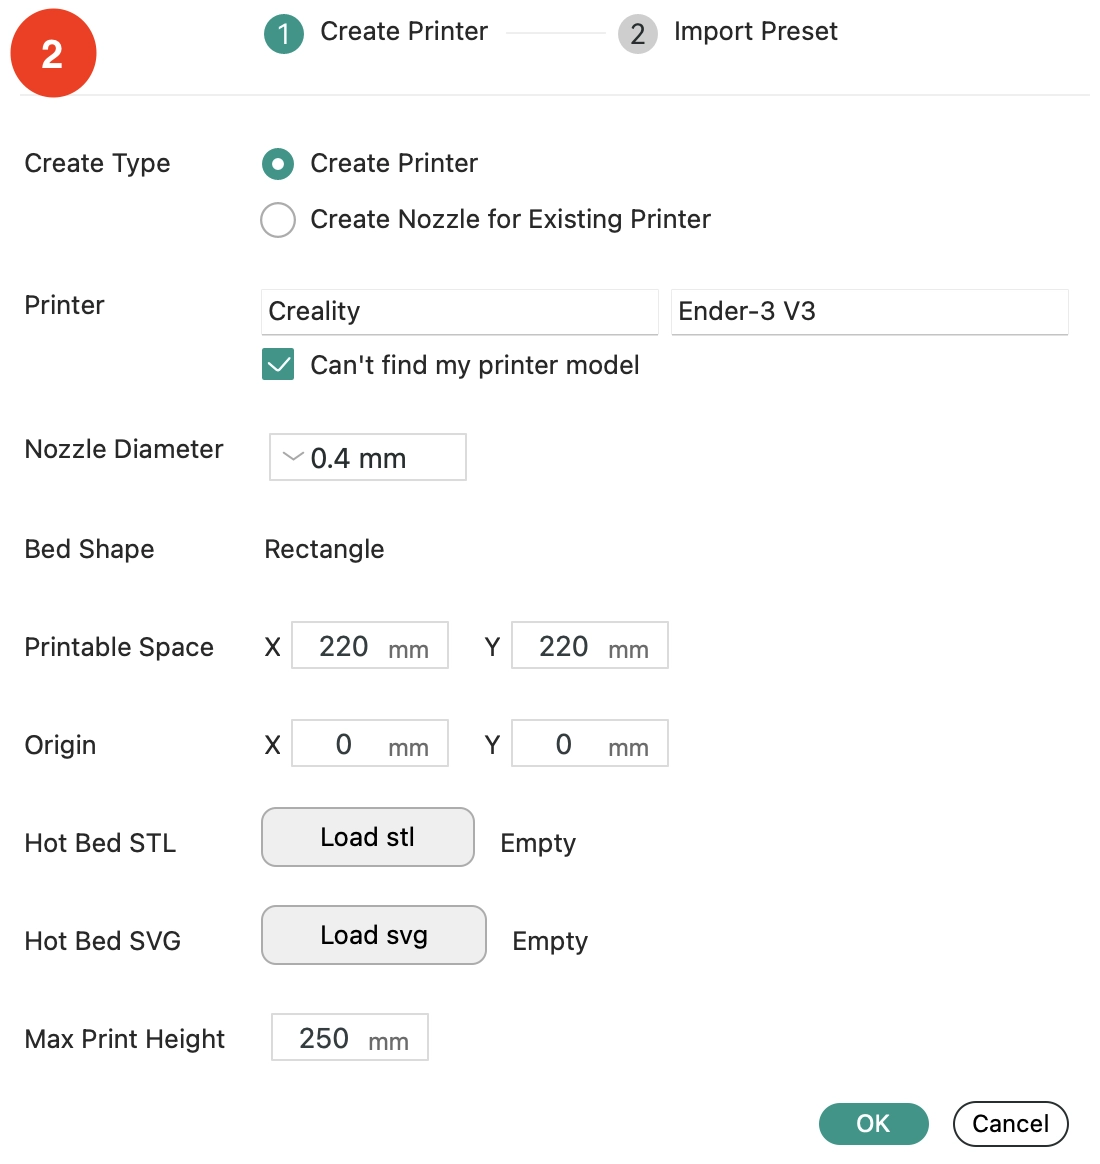
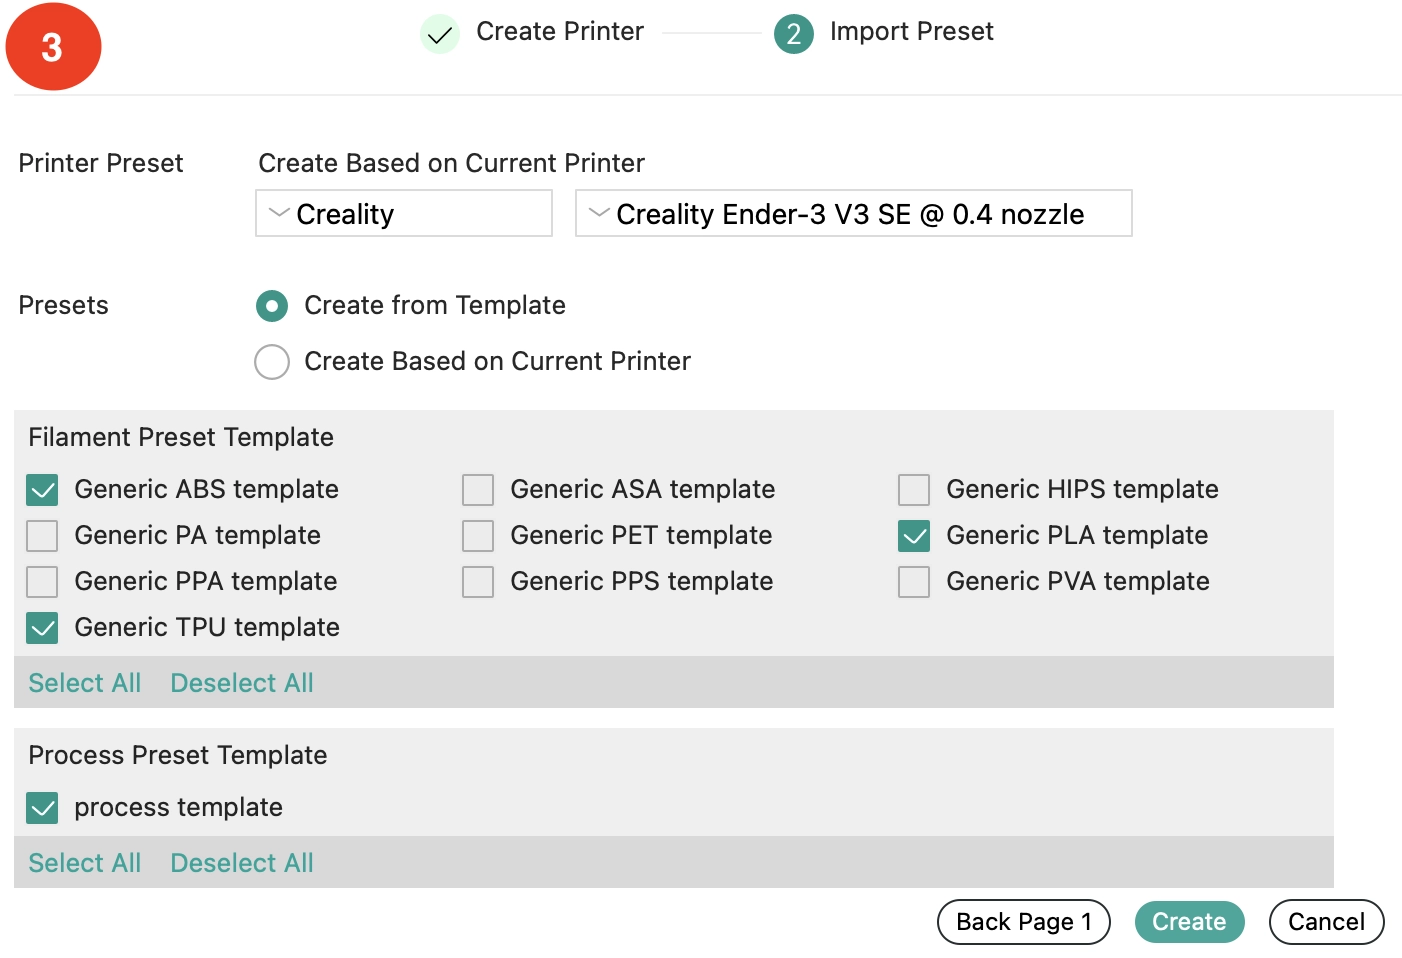
And now you have created a new profile for your Ender-3 V3! However, we still need to adjust the printer, filament and process settings.
In the next step, we first define the correct printer settings.
Step 2: Define the Printer Settings
Open the printer settings:
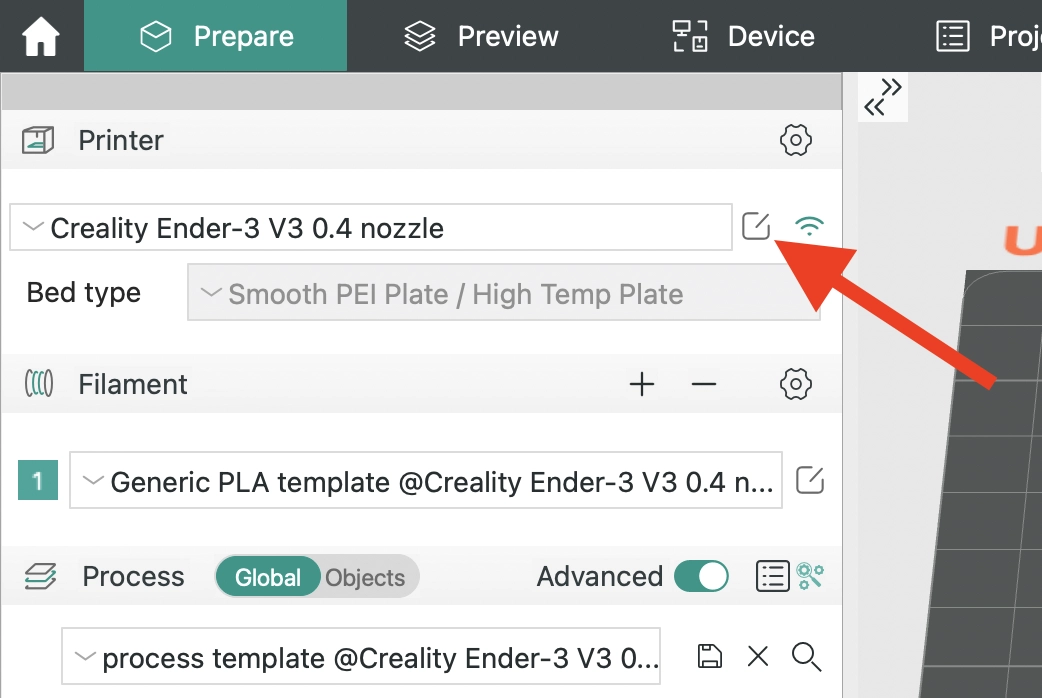
A new window opens with several tabs in which you can configure the printer settings.
Here are the most important printer settings in Orca Slicer for the Ender-3 V3:
- Print volume: 220 × 220 × 250 mm
- G-code flavor: Klipper
- Machine start G-code:
- M140 S0
- M104 S0
- START_PRINT EXTRUDER_TEMP=220 BED_TEMP=60
- Machine end G-code:
END_PRINT
G-code is the programming language in which 3D printers speak. In these two fields, G-code snippets can be defined that are to be executed before and after each print.
In the Start G-code, for example, the print head is moved to the home position and the nozzle and print bed are heated up. In the End G-code, these are then cooled down again and the print object can be presented by moving the print bed forwards.
These code snippets are different for each 3D printer. Sometimes it is only a few lines, but sometimes it can be 10 to 20 lines.
- Nozzle diameter: 0.4 mm
- Retraction length: 0.5 mm
- Retraction speed: 40 mm/s
Retraction is also one of the settings that must be calibrated. Otherwise, stringing will quickly occur.
- Maximum speed X: 800 mm/s
- Maximum speed Y: 800 mm/s
- Maximum speed Z: 30 mm/s
- Maximum speed E: 100 mm/s
- Maximum acceleration X: 20000 mm/s^2
- Maximum acceleration Y: 20000 mm/s^2
- Maximum acceleration Z: 500 mm/s^2
- Maximum acceleration E: 5000 mm/s^2
- Maximum jerk X: 10 mm/s
- Maximum jerk Y: 10 mm/s
- Maximum jerk Z: 2 mm/s
- Maximum jerk E: 2.5 mm/s
These are not the settings that we define in the process settings. They are merely the hardware limits of the 3D printer.
🧠
Note: The slicer settings shown here will produce good but not perfect results. You need to calibrate them to your specific filament. You can learn how to do this in my comprehensive calibration guide or in my 3D printing course.
Step 3: Adjust the Filament Settings
Open the filament settings:
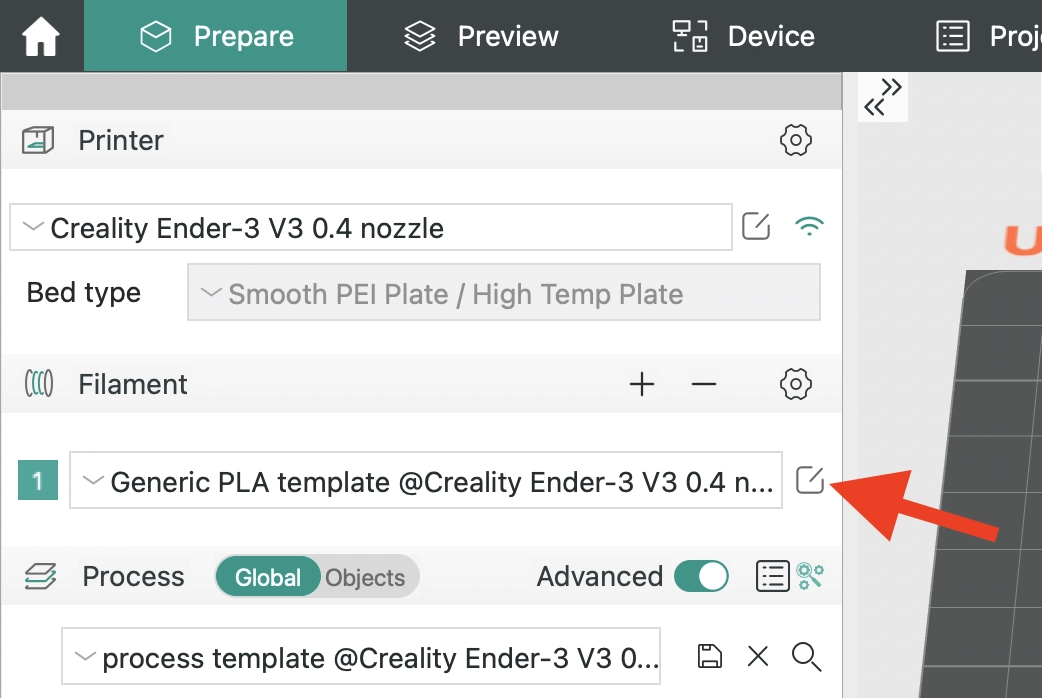
As with the printer settings, a new window opens up with several tabs in which you can make the filament settings.
Here are the most important filament settings in Orca Slicer for the Ender-3 V3:
- Diameter: 1.75 mm
- Print temperature:
- PLA: 215 °C
- ABS: 260 °C
- PETG: 250 °C
- TPU: 225 °C
- Bed temperature:
- PLA: 60 °C
- ABS: 100 °C
- PETG: 70 °C
- TPU: 50 °C
The print temperature is one of the settings that should definitely be calibrated.
You can’t go too far wrong with the print bed temperature, as the print bed of the Ender-3 V3 offers excellent adhesion for most filaments.
- No cooling for the first: 2 layers
- Fan speed:
- PLA: 100%
- ABS: 50%
- PETG: 100%
- TPU: 100%
Cooling only needs to be reduced for ABS. ABS has a strong tendency to warp as it shrinks during cooling. As the Ender-3 V3 does not have a closed print volume, it can only process ABS to a limited extent. However, smaller objects are definitely possible.
Step 4: Configure the Process Settings
After you have created the profile for the Ender-3 V3, Orca Slicer creates a process template with default values. However, many of these settings are unsuitable for the Ender-3 V3 and would lead to printing errors or print fails.
These are the most important process settings for the Ender-3 V3 in Orca Slicer:
- Layer height: 0.1 mm
- First layer height: 0.2 mm
The layer thickness should be between 25% and 75% of the nozzle diameter. This means between 0.1 and 0.3 mm for a 0.4 mm nozzle.
To improve adhesion to the print bed, the first layer should be slightly thicker.
- All values: 0.4 mm
The line width should be between 100% and 120% of the nozzle diameter. So for a 0.4 mm nozzle, between 0.4 and 0.48 mm.
- Wall loops: 4
The wall thickness mainly depends on how stable the object is to be.
More walls = more stability.
- Top shell layers: 4
- Bottom shell layers: 4
Here too, more layers provide more stability. The surface pattern is purely cosmetic. Here you can try out which pattern you like best.
- Infill density for decorative objects: 0-15%
- Infill density for standard objects: 15-50%
- Infill density for stable objects: 50-100%
The infill density and infill pattern are process parameters that are independent of the printer. It all depends on how stable you want your project to be. For more information on how to adjust the infill to your needs, please refer to this detailed guide.
- Infill/wall overlap: 10%
If you print thin walls, it can sometimes happen that the infill shows through from the inside. In this case, you should reduce this settings.
- First layer: 15 mm/s
- Number of slow layers: 2
The greatly reduced speed of the first layer helps to increase print bed adhesion.
- Outer wall: 150 mm/s
- Inner wall: 250 mm/s
I have achieved the best results with these values. However, you can go even higher if you are careful not to produce any printing errors such as ringing or ghosting.
- Travel: 400 mm/s
This value defines the speed at which the nozzle is moved when no filament is being extruded.
- Skirt loops: 1
- Skirt height: 2 layers
- Skirt speed: Same as the first layer
As already mentioned, the print bed adhesion of the Ender-3 V3 is excellent. It is therefore only necessary to print a Brim or Raft in very few cases.
A height of two layers makes it easier to remove the skirt after printing.
🧠
Note: There are other print settings that need to be adjusted; however, it is beyond the scope of this article to talk about hundreds of print settings. A shortcut for you is my calibrated Orca Slicer profile, which you can import with just a few clicks.
Disclosure: This website is the property of Martin Lütkemeyer and is operated by Martin Lütkemeyer. Martin Lütkemeyer is a member of the Amazon Services LLC and other Affiliate Programs. These are affiliate advertising programs designed to enable websites to earn advertising revenue through advertising and linking to Amazon.com and others. Links marked with * are affiliate links.

