
- Wet Filament: Prevention, Symptoms & Drying - July 18, 2024
- Sovol SV08 – Best PrusaSlicer Settings & Profile - June 26, 2024
- Sovol SV08 – Best Orca Slicer Settings & Profile - June 26, 2024
Disclosure: Links marked with * are Affiliate Links. I earn from qualifying purchases if you decide to make a purchase through these links – at no additional cost for you!
3D printing is still an adventure. The devices have become affordable, the software even intuitive to use, but 3D printing still poses many problems.
A lot can go wrong when printing. To avoid ruining the entire print piece because of an incorrectly set nozzle or poorly preheated filament, it is advisable to use a so-called Skirt.
The Skirt does not touch your actual printed part, but lies loosely around the outside and is printed before the part. If things go wrong with the Skirt, not much material is lost, you can adjust the settings and everything will be fine.
A 3D printing Skirt is a filament layer around the outside of your actual print object without touching it. With this auxiliary print, you can directly check certain print parameters (e.g. flow, filament quality, etc.) and intervene before you waste too much filament.
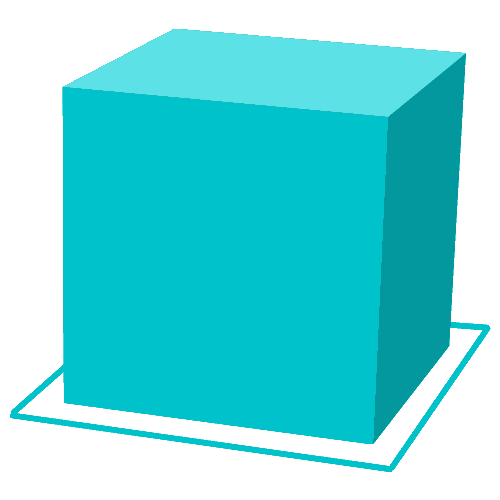
Table of Contents:
Skirt, Brim, Raft – Different Auxiliary Constructions
Skirt, Brim, Raft – these are the common auxiliary constructions in 3D printing. Unlike the brim and raft, however, the Skirt is not connected to the component and does not provide more adhesion to the printing plate.
Rather, the Skirt is intended to ensure that the filament actually flows on the build plate as you imagine it before the actual print. After all, the material doesn’t always come out of the extruder at the start of printing. The Skirt is therefore a kind of test print that uses little material.
What Does a Skirt Look Like?
The Skirt is a thin layer of material that is placed in a wide circle around the actual print piece. There are no points of contact. If you are not quite sure whether your print piece really fits on the build plate, you can try it out by printing a Skirt. If the Skirt fits on the build plate, the internal component will also fit on it.
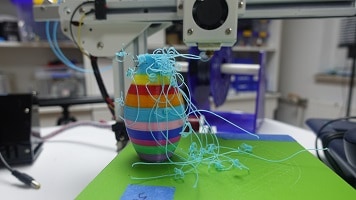
And the third point where the Skirt helps you is drafts. You are printing with a plastic that is only liquid at the right temperature. If the plastic cools down, it becomes hard. The individual print layers will no longer bond to each other if the plastic cools down too quickly. You may be able to preheat your print bed to prevent it from cooling down too quickly.
But not every 3D printer has an enclosed print bed that is protected from drafts. A gentle breeze blowing through the rooms may be enough to ruin a print piece. The Skirt lies around the outside of your print piece, it is printed first. This also keeps drafts away from the first layers and protects them somewhat from deformations such as warping.
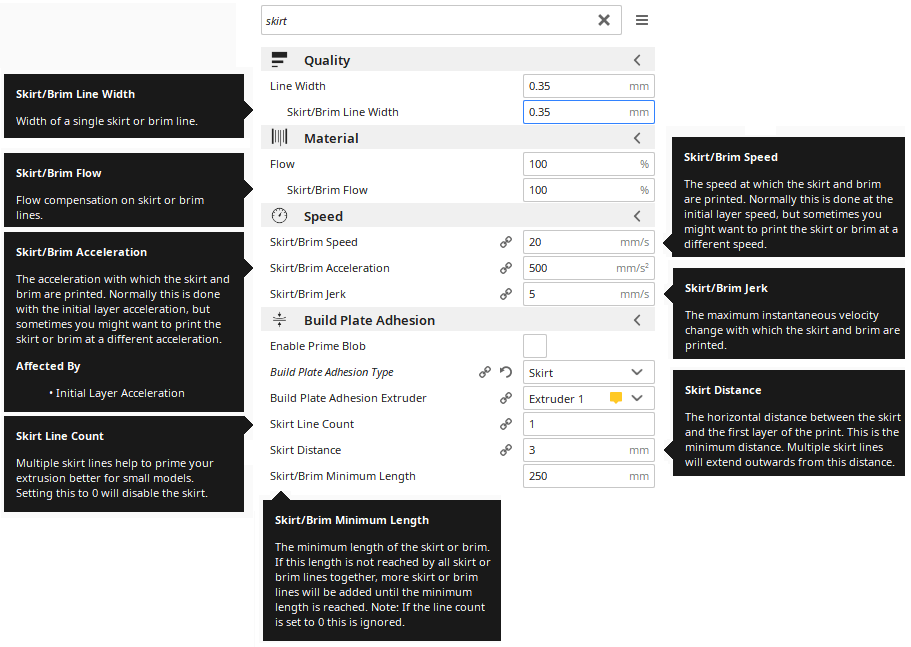
Skirt Slicer Settings
Skirts and other auxiliary prints are available by default in the settings of many slicers.
The most important settings are the number of lines and the distance to the print object. In principle, you should make these settings depending on the size of your object. If your print object is very small, it is best to print several lines and for large models only one.
The idea behind this is that you use about the same amount of filament for the Skirt to detect certain problems before the actual printing. If you are only printing one line on a small object, this may not be enough.

Related Post:
Cura Skirt | Best Settings to Test the Filament Flow
Skirts Detect Flow Problems
Of course, you always clean the nozzle thoroughly when you have finished your print. And you always adjust the nozzle properly. You heat up the extruder when it is idle and always follow the instructions. So why does it always happen that no filament lands on the build plate when you start printing?

Problem 1: Simply no plastic comes out of the extruder
The extruder normally heats up when idle, reaching high temperatures that cause the filament to melt. The filament, which is already in the nozzle, thus melts. It drips out, creating a cavity in the extruder. The technical term for this is oozing. The filament brought to high temperatures simply evaporates. You see this as a delayed extrusion. Only after a few seconds has the feeder transported new filament to the nozzle.
If you create a Skirt before the actual printing, delayed extrusion is not a problem. By the time your printer creates the actual part inside the Skirt, the air bubble has long since escaped from the extruder and the new filament has followed.
Problem 2: The nozzle hangs too close to the print bed
If you place the nozzle too close to the print bed, the filament cannot escape from the extruder. The filament is liquid, but it still needs some space. If the build plate blocks the hole from which the plastic is supposed to flow out, it simply won’t come out.
If the material does not really come out of the extruder until the third or fourth layer, this is exactly the problem. The first and second layers simply don’t have enough room to build up. Before you really know what’s going on, your printer has removed the bed down the z-axis and stopped printing.
Before printing, check the distance between the nozzle and the print bed. If you print a Skirt before the actual part, you will notice the problem when creating the auxiliary print. Some 3D printers have automatic leveling via sensor technology on board to help you set the distance. Others come with a gauge card. However, you can also use a simple metal gauge if you want to control the distance.
Problem 3: The extruder does not get filament
The filament must somehow be transported into the extruder in the 3D printer. In most devices, this happens via a small gear wheel whose teeth grip the filament and move it along. However, the teeth of the gear also rub in the filament and generate abrasion.
Small chips are produced that get into the feed and possibly block it. Sometimes the abrasion is also so strong that too much plastic is removed from the filament and a milled-out groove is created on the filament. Then the gear no longer grips, and the filament can’t be moved to the nozzle. How do you deal with this problem?
Always check the diameter of new filament. Even if the manufacturers specify the diameter of the filaments, there can be deviations of about 0.1 millimeters to 1.5 millimeters in diameter due to production. And this is quite enough for the gear wheel in the extruder to just not grip anymore, but only produce an abrasion. The problem is particularly well known among inexpensive suppliers who produce in Asia.
Problem 4: The extruder is blocked
If you have checked the previous three points and found no problem, the extruder may also be clogged. If foreign objects get into the nozzle, this can happen. Sometimes hot plastic stays too long inside the extruder and gets stuck.
Or the material cools down in the extruder after printing and forms a plug. The only way to remove this clog is to disassemble the extruder. How exactly this works is slightly different for each 3D printer. Check with the printer manufacturer, look at the manuals that come with the printer. If you don’t find what you’re looking for, you can find information in the relevant forums on the Internet or watch information videos.
A Skirt does not prevent these problems!
Back to the topic at hand: Why would you create a Skirt as an auxiliary construction in 3D printing? A Skirt cannot solve the problems described above. However, it is very annoying when you start your print and find that the first layers do not print or print poorly.
You stand next to the printer, watch the nozzle work (or not), and only after a while notice that the print is not running as it should. Then you stop the printer and start troubleshooting. By then, the first six layers of your part may have already run through the printer and you have a lot of material sitting on the build plate that you’re just throwing in the trash can.
However, a Skirt can detect the problems described above!
If you put on a Skirt before printing, you prevent this. The thin layer of the Skirt does not need much material. If no material really lands on the plate because the nozzle is clogged, because of oozing or because the nozzle is too close to the print bed, not much is lost with the Skirt. The actual print will succeed, the Skirt may not – that’s fine. Think of the Skirt as the last test before the actual print, making sure the settings are right and the path is clear for the filament.
Skirt vs. Draft
Let’s move on to the second reason why a Skirt is sometimes useful. Your 3D printer works with plastics that are liquefied by heat. When the plastics cool down again, they are solid. Your part is created by the printer pushing a thin layer of liquid plastic out of the nozzle and depositing it on the build plate. Before this first layer cools down and becomes hard, the second layer must be placed on top.
Two liquid, warm layers combine. A cool, already hard layer never bonds with a liquid, hot layer. This is how your 3D printer builds the part layer by layer. Since the individual layers are very, very thin (even thinner depending on your settings), they cool down very, very quickly.
To prevent the print bed from cooling down too quickly, many 3D printers have it in an enclosed room protected from drafts (there are also enclosures or tents that you can buy to upgrade your 3D printer*).
And some printers offer the option of heating the print bed. This is also intended to prevent the individual layers of plastic from cooling down too quickly during printing. Incidentally, this is particularly dangerous for the success of your printed piece when it comes to the first layer: the first layer of plastic must adhere firmly to the building plate so that your component has exactly the shape you designed. If the plastic cools down, it contracts.
This quite normal shrinkage can amount to up to 2 percent of the volume. However, since the building board does not contract, the plastic may detach from the substrate and warp as it cools.
At which temperature the filament becomes hard again depends on the material. ABS* adheres very well at a temperature of around 100 degrees Celsius to 120 degrees Celsius, while 60 degrees Celsius to 70 degrees Celsius is sufficient for PLA*. If the first layers do not adhere to the printing plate, it may be useful to deactivate the cooling of your 3D printer.
However, this may not be enough. Check if there is a window open somewhere nearby, a fan blowing or the cooling from the laptop creating a draft. This is sometimes enough to let the plastic cool down too quickly.
If you construct a Skirt that lies around your component, no drafts will get to these sensitive lower layers. This is because the Skirt creates a wind shadow precisely for these first layers!
Related Questions
What can I do if the Skirt does not stick?
If the build plate is too cold or if there is a draft, you will logically also have problems constructing a clean Skirt on the build plate. The plastic will have no adhesion and will detach from the substrate and warp before you have built your auxiliary construction. Two tricks can help you:
- Try using an upright large book, a baking sheet, or a binder to keep the draft away from the print bed. This may be enough to make the plastic for the Skirt adhere.
- Scotch Blue Tape*, Kapton tape*, hairspray, special glue sticks* or similar can increase the adhesion of the material to the print bed so that you can construct your Skirt even in adverse conditions.
How do I Counteract Underextrusion?
Underextrusion is quite normal at the start of printing. This is because the filament flow must first get going before the plastic really flows evenly and as intended. Construct a Skirt around your print piece. In the Skirt, you don’t mind underextrusion and the associated suboptimal print image. The Skirt does not touch your print piece and therefore has no negative influence on the appearance of your print piece. The few layers of filament are a negligible (because very small) loss of material. At the same time, you use the time during which your printer creates the Skirt to check or quickly correct a few points. For example:
- Leveling the print bed
- Nozzle distance to print bed
Conclusion: Skirts are useful and quickly created
As an auxiliary construction, a Skirt makes perfect sense. The fine frame, which does not touch your print piece, helps you to quickly detect and correct problems at the start of printing – and without material loss. Depending on the slicer you use, you may even be able to include Skirt creation in the default settings.
A Skirt consists of only a few layers of material, so the loss of material is really small. Because your printer creates the Skirt before the actual print piece, you can still correct faulty settings such as too little distance between the nozzle and the print bed.
Underextrusion is caught by the Skirt, your print piece is not affected. So consider the Skirt also as a cleaning measure – old filament is removed from the printhead and new filament can be added.
Disclosure: This website is the property of Martin Lütkemeyer and is operated by Martin Lütkemeyer. Martin Lütkemeyer is a member of the Amazon Services LLC and other Affiliate Programs. These are affiliate advertising programs designed to enable websites to earn advertising revenue through advertising and linking to Amazon.com and others. Links marked with * are affiliate links.
