
- Wet Filament: Prevention, Symptoms & Drying - July 18, 2024
- Sovol SV08 – Best PrusaSlicer Settings & Profile - June 26, 2024
- Sovol SV08 – Best Orca Slicer Settings & Profile - June 26, 2024
Disclosure: Links marked with * are Affiliate Links. I earn from qualifying purchases if you decide to make a purchase through these links – at no additional cost for you!
As with many other 3D printers, it can be difficult to find the right Cura settings for the Creality Sermoon V1 Pro. Often there are no suitable default profiles in Cura for a very long time after the release of new 3D printers.
The best way to create a good Cura profile for the Creality Sermoon V1 Pro is to take the machine parameters from the Creality Slicer, apply the default print settings for the filament in question and calibrate the most important settings.
In this article, I share with you the best Cura settings for the Sermoon V1 Pro that have led to perfect results for me. I also show you how to set up the profile correctly and how to calibrate the most important print settings.
First of all, here is a table to see all the settings at a glance:
| PLA | ABS | TPU | PETG | |
|---|---|---|---|---|
| Printing Temperature | 195-200 °C | 240 °C | 215 °C | 225 °C |
| Print bed temperature | 60 °C | 80 °C | 60 °C | 70 °C |
| Printing speed | 50 mm/s | 50 mm/s | 40 mm/s | 50 mm/s |
| Retraction | 0.8 mm at 25 mm/s | 0.8 mm at 25 mm/s | 1.0 mm at 25 mm/s | 0.8 mm at 25 mm/s |
| Cooling | 100% | 0% + closed enclosure | 100% | 100% |
Table of Contents:
How to Create a Profile for the Creality Sermoon V1 Pro in Cura
A 3D printer profile in Cura is a set of print settings tailored to a specific 3D printer and filament. The purpose of a 3D printer profile is to give the user a starting point for their prints so they don’t have to spend time calibrating all the settings every time they want to print something.
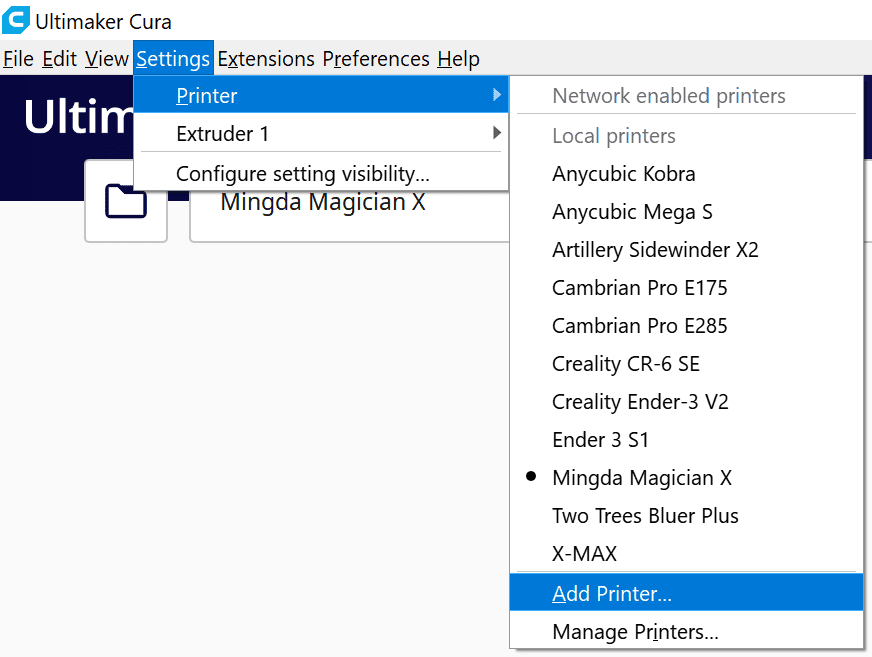
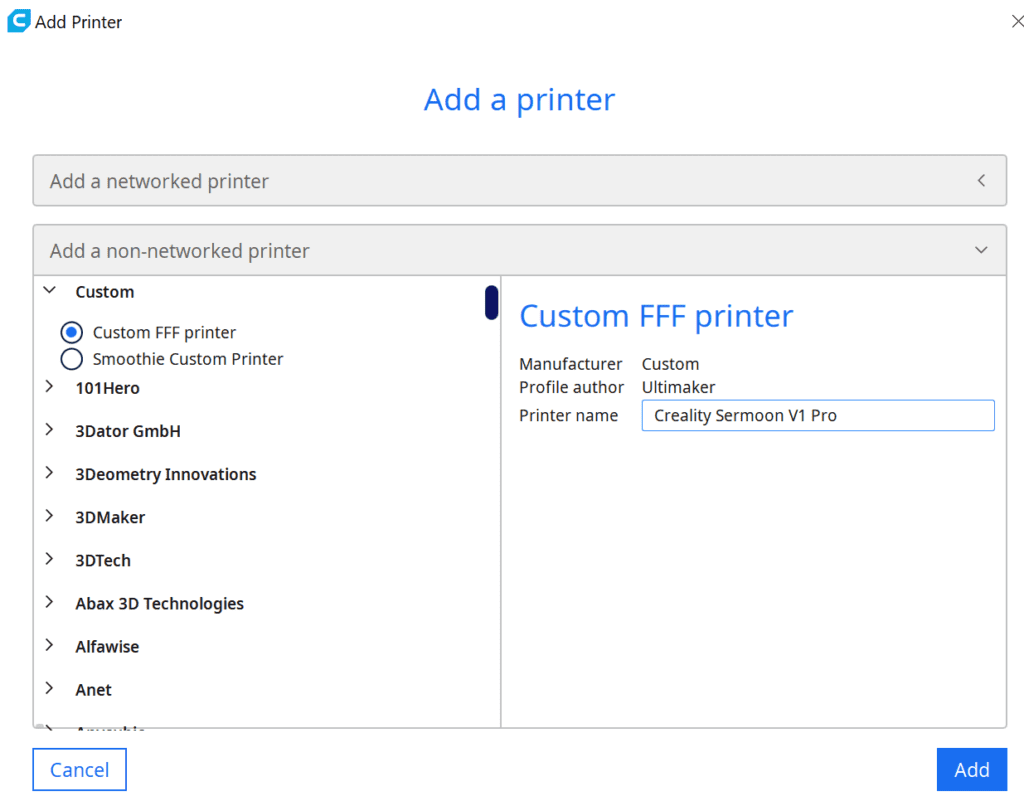
To add a 3D printer in Cura or to create a new profile for it, go to “Settings” -> “Printers” -> “Add Printer”. A new window will open where you select “Custom FFF printer” from the drop-down menu, enter the name “Creality Sermoon V1 Pro” and click on “Add”.
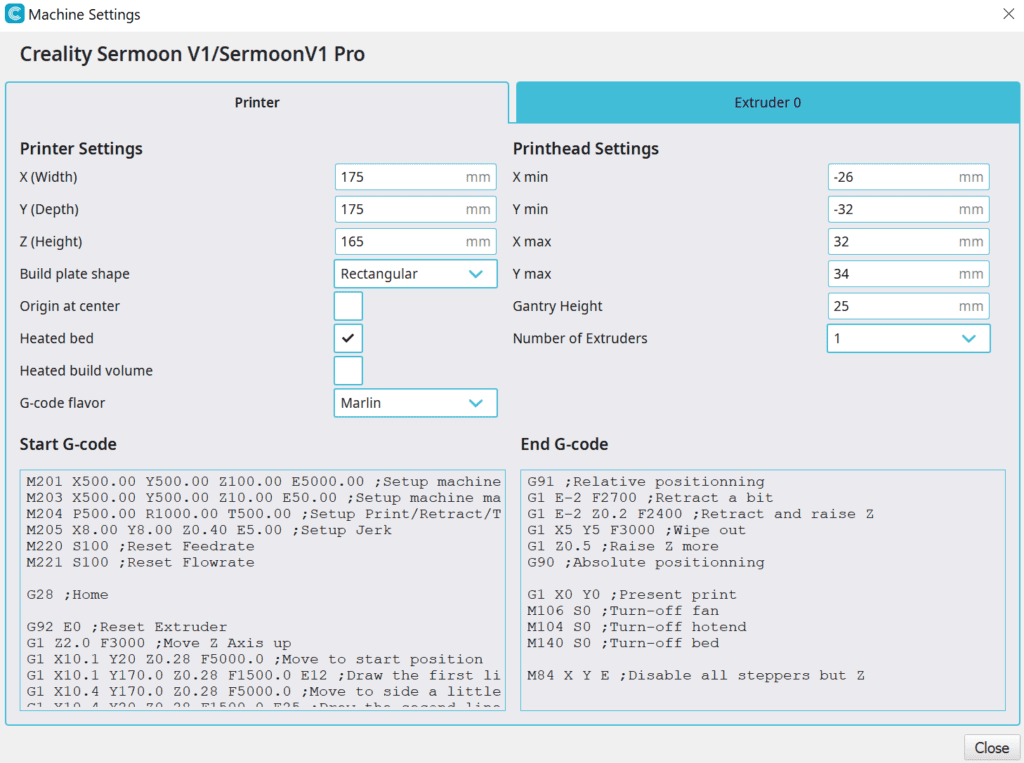
The machine parameters open with the printer settings. Here you enter the following values to define the dimensions and other hardware properties:
- Printer settings:
- X (Width) = 175 mm
- Y (Depth) = 175 mm
- Z (Height) = 165 mm
- Build plate shape = Rectangular
- Origin at center = No
- Heated bed = Yes
- Heated build volume = No
- G-code falvor = Marlin
- Printhead settings:
- X min = -26 mm
- Y min = -32 mm
- X max = 32 mm
- Y max = 34 mm
- Number of extruders = 1
- Gantry Height = 25 mm
- Apply extruder offsets to GCode = Yes
- Start G-Code = Leave at default values
- End G-Code = Leave at default values
- Nozzle Settings:
- Nozzle size = 0.4 mm
- Compatible material diameter = 1.75 mm
- Nozzle offset X = 0.0 mm
- Nozzle offset Y = 0.0 mm
- Cooling Fan Number = 0
- Extruder Start G-Code = Leave at default values
- Extruder End G-Code = Leave at default values
Cura will then create several print settings (profiles). These mainly have different layer heights. The next step is to match these settings to the particular filament and 3D printer, as they only contain default values. For a good start, however, only a few settings are important.
You can find more information on how to create a 3D printer profile in Cura and what you need to pay attention to in this article: How to Create a Custom 3D Printer Profile in Cura
PLA Settings at a Glance
There are a few things to keep in mind when printing with PLA. PLA prints best at a temperature between 190 and 220 °C. This wide temperature range is further limited by the printer and the filament used.
The Creality Sprite extruder in the Sermoon V1 Pro is great for printing with PLA. It’s also very effective, keeping the print temperatures for each filament mostly at the lower end of the recommended temperature range.
One more tip: Something many people don’t realize is that you should let the printed object cool down for at least half an hour (depending on the size) before you take it out of the printer. Then it is much easier to remove the finished object from the print bed and there is no danger of accidentally distorting the object.
These are the correct Cura settings for the Sermoon V1 Pro for PLA:
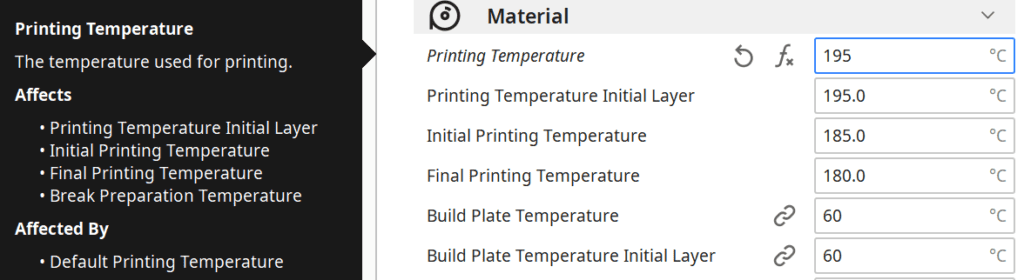
- Print temperature: 195-200 °C
- Print bed temperature: 60 °C
- Printing speed: 50 mm/s
- Retraction: 0.8 mm at 25 mm/s
- Cooling: 100%
- First layer: 0% cooling, 100% extrusion width, 100% layer height
Note: Retraction is always divided into the distance the filament is pulled back into the nozzle and the speed at which this is done.
ABS Settings at a Glance
When printing with ABS, there are a few things to keep in mind to get the best results. Temperature is critical – if the temperature is incorrect or inhomogeneous, the ABS will warp.
A 3D printer enclosure is useful when 3D printing with ABS because it helps maintain a consistent temperature. If the temperature fluctuates, the ABS can warp.
Therefore, the Sermoon V1 Pro is also equipped with an enclosure. When you close it during printing with ABS, the ambient temperature remains homogeneous. This ensures that the ABS cannot warp or crack during printing.
It is also very important that you deactivate the enclosure ventilation and the parts ventilation during printing. Otherwise cold drafts will occur – exactly what you want to avoid with ABS. It is also advisable to preheat the enclosure to a certain temperature before printing by heating the print bed to 80 °C for about 10 minutes.
These are the correct Cura settings for the Sermoon V1 Pro for ABS:
- Print temperature: 240 °C
- Print bed temperature: 80 °C
- Printing speed: 50 mm/s
- Retraction: 0.8 mm at 25 mm/s
- Cooling: 0% + closed enclosure
- First layer: 0% cooling, 100% extrusion width, 100% layer height
TPU Settings at a Glance
Bowden extruders use PTFE tubing to carry the filament from the extruder motor to the hot end. This allows for faster print speeds and a lighter printhead weight, as most of the extruder’s weight is at the base.
Direct drive extruders (such as the Sprite extruder on the Sermoon V1 Pro) have the filament drive wheel mounted directly in the print head. This allows for more precise control over the filament, but typically makes the printhead heavier since all of the extruder’s weight is in the printhead.
Thanks to the lightweight Sprite extruder, however, this disadvantage is not given with the Sermoon V1 Pro. The complete print head weighs less than some Bowden extruders. So you have both advantages at once.
The biggest advantage of having a lot of control over the filament with a Direct Drive Extruder is that you can print flexible filaments very well. With Bowden extruders, flexible filaments can get tangled in the tubing or give way, resulting in an inaccurate print. Therefore, the Sermoon V1 Pro is perfect for flexible filaments like TPU.
These are the correct Cura settings for the Sermoon V1 Pro for TPU:
- Print temperature: 215 °C
- Print bed temperature: 60 °C
- Printing speed: 40 mm/s
- Retraction: 1 mm at 25 mm/s
- Cooling: 100%
- First layer: 0% cooling, 150% extrusion width, 150% layer height
Another tip: The print bed adhesion of TPU to the print bed of the Sermoon V1 Pro is extremely good. If you let the print cool completely and then try to remove the object from the print bed, you will probably have trouble. Also, since TPU is flexible, the bendable print bed won’t do you any good when removing the object. Your best bet is to heat the print bed to 75°C and then remove the object.
PETG Settings at a Glance
PETG is best printed at around 220-250 degrees Celsius. However, as with the other filaments, the ideal temperature for PETG on the Sermoon V1 Pro is at the lower end of this range, at around 225°C.
PETG is a filament that tends to pull threads during 3D printing, i.e. thin strands can form between the printed layers (= Stringing). Therefore, it is especially important to pay attention to the correct settings for the retraction. Later in this article, you will learn how to calibrate the retraction correctly. To start with, the values given below for the Sermoon V1 Pro are a very good starting point.
Since PETG tends to string so much in general, this filament is especially suited for those objects where there is little detail to have to do as little retraction as possible. Therefore it is ideal for non-decorative objects where a little stringing here and there is not a big deal.
These are the correct Cura settings for the Sermoon V1 Pro for PETG :
- Print temperature: 225 °C
- Print bed temperature: 70 °C
- Printing speed: 50 mm/s
- Retraction: 0.8 mm at 25 mm/s
- Cooling: 100%
- First layer: 0% cooling, 100% extrusion width, 100% layer height
How to Import the Sermoon V1 Pro Profile from Creality Slicer into Cura
Like Cura, Creality Slicer is a software program that slices 3D models for printing. In principle, Creality Slicer is a Cura clone and shares a similar user interface as well as most of the settings.
Still, there are some differences between Creality Slicer and Cura. Cura offers more customization options and has more recent updates, while Creality Slicer is more user-friendly and has printer profiles earlier.
Also for the Sermoon V1 Pro, there is a predefined standard profile that you can easily transfer to Cura. You will find the profile just like in Cura and can simply copy the individual settings and paste them into a newly created “Custom FFF Printer” profile in Cura.
Best Cura Settings for the Creality Sermoon V1 Pro
Now that you’ve seen the best settings for each filament, let’s go into detail about the individual print settings. It is often the case that the settings can differ between two 3D printers of the same type. In order to adjust them correctly, it is important to understand the individual settings.
Print Temperature
The Sermoon V1 Pro’s extruder can reach temperatures of up to 250°C, making it perfect for a variety of filaments. Whether you’re using PLA, ABS or something else entirely, the Sermoon V1 Pro can handle it.
The Sprite extruder heats the filament quickly and is very effective. As a result, the recommended printing temperatures are mostly in the lower range of the temperature ranges recommended by the filament manufacturers.
For PLA, the coldest temperature I’ve had good results at is 190°C, and the hottest is 200°C. For ABS, 240°C is a good all-around temperature. If you have problems with warping, you can try raising the temperature too slightly. The other filaments gave good results right away at the temperatures listed below!
The best printing temperatures for the Sermoon V1 Pro in Cura:
- PLA: 195-200 °C
- ABS: 240 °C
- TPU: 215 °C
- PETG: 225 °C
Print Bed Temperature
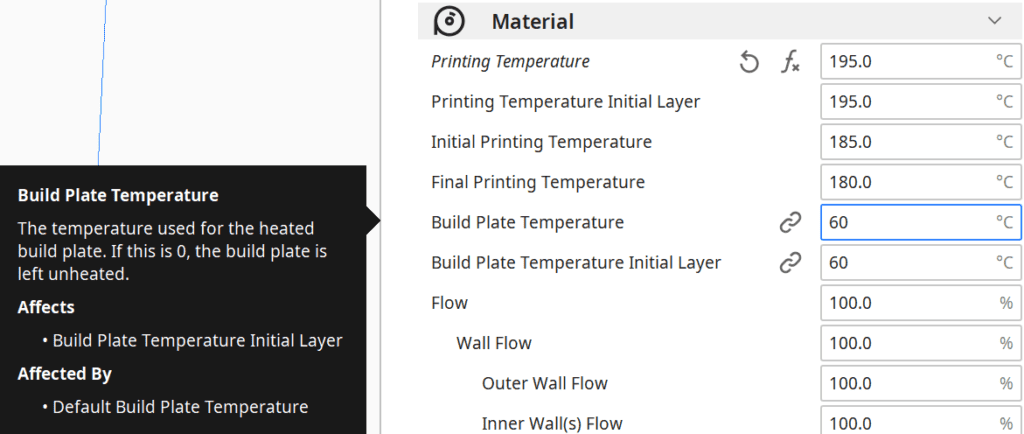
If the print bed temperature is not set correctly, the filament may not adhere to the print bed. If the filament does not adhere to the print bed, it may cause the print to partially or completely detach from the print bed.
The print bed of the Sermoon V1 Pro can reach temperatures of up to 80 °C. With this temperature range, you can print all common standard filaments. Since the adhesion on this print bed is extremely good, you have a lot of wiggle room when setting the temperature. Sometimes, like with TPU for example, the adhesion on this print bed can even be too good.
Normally I can’t do without Magigoo on most 3D printers – especially for delicate first layers. But with the Sermoon V1 Pro, I didn’t have to artificially increase the adhesion even once.
The best print bed temperatures for the Sermoon V1 Pro in Cura:
- PLA: 60 °C
- ABS: 80 °C
- TPU: 60 °C
- PETG: 70 °C
Print Speed
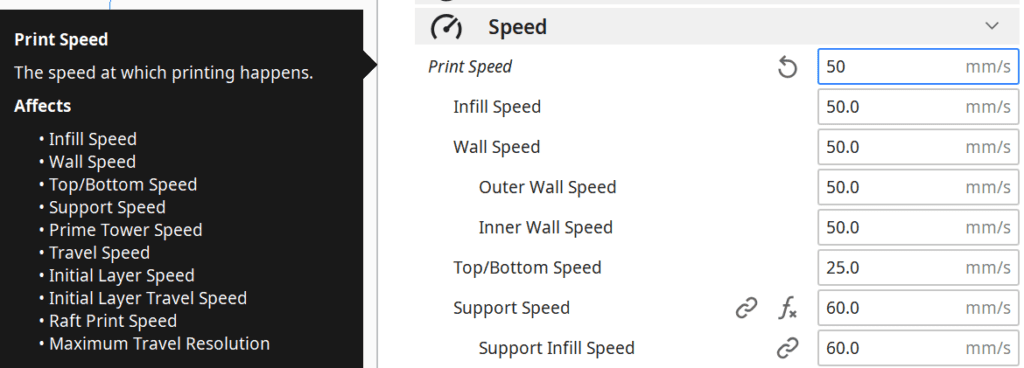
An incorrectly set print speed can cause great damage to the final result of the 3D print. If the speed is set too fast, the printer does not have enough time to fuse the plastic properly, resulting in a weak and unstable print. If the speed is set too slow, the printer wastes time.
The Print Speed setting in Cura controls the feed rate of the filament when printing. The default setting is 50 mm/s, but you can increase this to make your prints faster. However, this will reduce the quality.
With the Sermoon V1 Pro, 50 mm/s has proven to be a good compromise between speed and quality. Only with TPU should the speed be reduced slightly so that the flexible filament has enough time to react to the movements.
The best printing speed for the Sermoon V1 Pro in Cura:
- PLA: 50 mm/s
- ABS: 50 mm/s
- TPU: 40 mm/s
- PETG: 50 mm/s
Layer Height
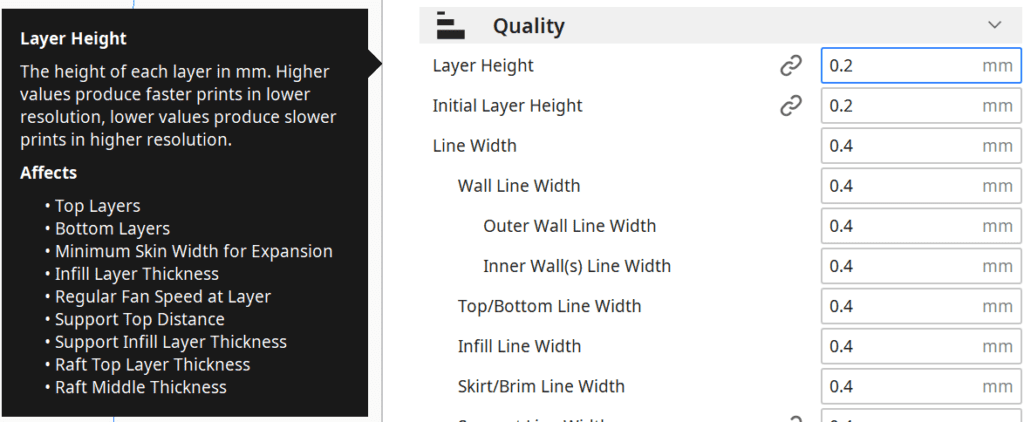
Layer height is one of the most important settings when it comes to 3D printing. It determines how thick each layer of your print will be. Thicker layers result in a rough and fast print. Thinner layers will give a smoother surface, but the print will take longer.
The Sermoon V1 Pro can print layers that are between 0.1 mm and 0.4 mm high. However, I have also successfully printed with a layer height of 0.06 mm.
In general, layer heights of 0.15 mm or thinner are well suited for 3D printing decorative objects. Layer thickness is an important factor in 3D printing because it affects the quality and strength of the finished product. For objects that will ultimately have to be stable, layer thicknesses of 0.2 or thicker are advisable.
The best layer thicknesses for the Sermoon V1 Pro in Cura:
- Decorative objects: 0.08-0.12 mm
- Standard: 0.16-0.20 mm
- Coarse, fast prints: 0.24-0.28 mm
Flow Rate
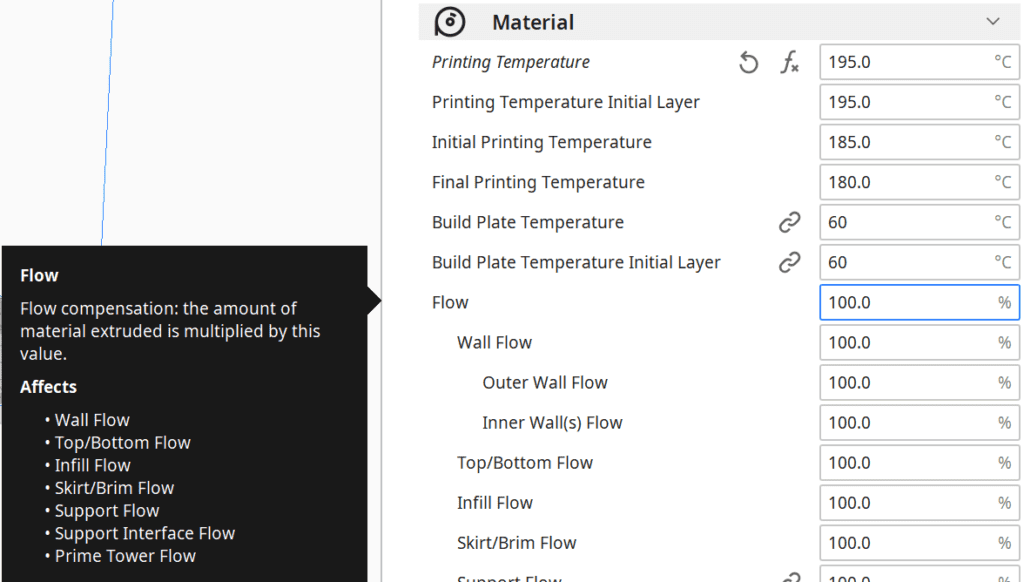
An incorrectly set flow rate in 3D printing can distort the shape of the printed object and cause other problems in printing. If the flow rate is set too high, the filament will extrude too quickly and can cause bubbles in the print. This can also cause the filament to sag or fall off.
Especially for objects where dimensional accuracy is important, an incorrect flow rate is disadvantageous. The wrong flow rate will cause a line to be thicker or thinner than you set it.
However, a higher flow rate can also lead to better print bed adhesion. The lines become wider and can enter a better connection with the print bed. So if you have poor print bed adhesion, which I doubt with the Sermoon V1 Pro, you can try increasing the flow rate for the first layer.
The best flow rate for the Sermoon V1 Pro in Cura:
- Default value: 100%
- For over-extrusion: 90% to 99%.
- For under-extrusion: 101% to 110
Retraction

An incorrectly set retraction can cause great damage to the 3D print result – the most common print error is stringing. If the retraction distance or the retraction speed is set incorrectly, various errors can occur.
Retraction is used to pull the filament back into the extruder nozzle when it is not being used, i.e. between two print movements. This prevents the filament from exiting the nozzle and creating filaments on the print.
With the Sprite Extruder of the Sermoon V1 Pro you only need to enter relatively small distances for the retraction. If the distance becomes too large, it could be that holes or cracks arise. Also, the speed is very small relative to other extruders.
Since especially the retraction is strongly dependent on the respective extruder and these can also differ slightly from model to model, it is very important to calibrate this value. How you do this, you will learn further down in the article.
The best retraction settings for the Sermoon V1 Pro in Cura:
- PLA: 0.8 mm at 25 mm/s
- ABS: 0.8 mm at 25 mm/s
- TPU: 1 mm at 25 mm/s
- PETG: 0.8 mm at 25 mm/s
Infill
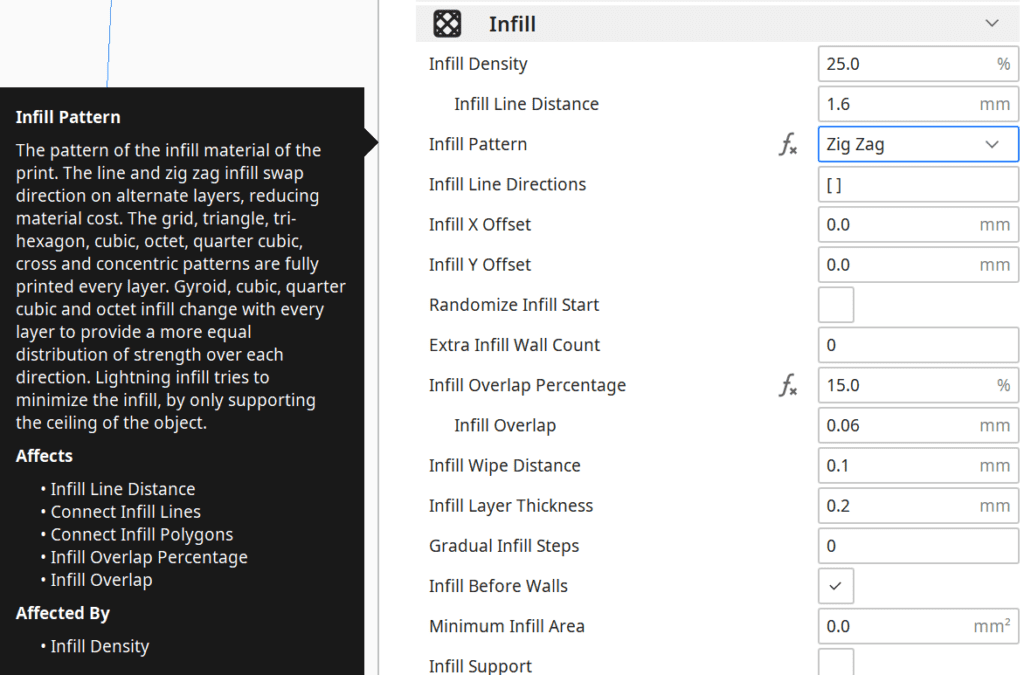
If the infill percentage is set too low, the object will be weak and more likely to break. If the density is set too high, the object will be heavy and take a long time to print. So the right balance is important to print an object that is stable enough for the application but does not consume too much time and filament when printing.
There are two ways to control the strength and weight of an object printed with a 3D printer: Infill Pattern and Infill Density. The infill pattern determines how the inside of the object is filled with filament. There are several patterns that can be used:
High stability (for stable objects):
- Cubic
- Cubic subdivision
- Octet
- Gyroid
Medium stability (for standard objects):
- Grid
- Triangles
- Tri-Hexagonal
Low stability (for decorative objects):
- Lines
- Zigzag
- Lightning
When it comes to choosing the right fill density for 3D printing, there are a few things to consider. The first is the intended use of the object. If the object needs to be strong and durable, a higher infill density is recommended. However, if the object is lightweight or decorative, a lower infill density may be appropriate.
The best infill density for the Sermoon V1 Pro in Cura:
- Decorative objects: 0-15%
- Standard objects: 15-50%
- Stable objects: 50-100%
First Layer
The first layer of a 3D print is critical to the overall result of the print. If the first layer is not built up properly, the entire print will likely not be successful. Especially the print bed adhesion is crucial. Therefore, there are a few settings that can be adjusted depending on the print bed adhesion.
I don’t expect you will have any problems with print bed adhesion with the Sermoon V1 Pro as the print bed has a near perfect print bed adhesion. However, if you do have problems, you can first try the settings below, which all aim to increase the time the filament has to cool down. The longer the filament stays hot and liquid on the print bed, the better it will bond to it.
If you still have problems with the print bed adhesion, I can highly recommend Magigoo. This is my go-to adhesive for 3D printing for all filament types.
These are the best Cura settings for the first layer on the Sermoon V1 Pro:
- Layer height: 100-200% of normal layer height (higher values to increase print bed adhesion)
- Line width: 100-200% of normal line width (higher values to increase print bed adhesion)
- Print temperature: Same as the rest of the object or 5-10 °C higher for better print bed adhesion.
- Print speed: 50% of the normal print speed (i.e. 25 mm/s with a normal print speed of 50 mm/s)
- Flow rate: 100-110% (higher values in case of poor print bed adhesion)
How to Calibrate the Sermoon V1 Pro Cura Settings
Calibrating a 3D printer is important because it ensures that the printer prints correctly and consistently. If the printer is not calibrated, it can produce prints that are inaccurate or have inconsistencies in dimensions. This can cause problems with the final product and be frustrating for users.
There are a few important settings that need to be calibrated in order to create accurate prints with a 3D printer: the print temperature, the flow rate and the retraction. Each of these settings affects the quality and accuracy of the print. If they are not calibrated properly, the prints may be inaccurate or have uneven dimensions.
Although you will find very good starting values for these settings in this article, you should calibrate them, as they may differ slightly even among different printers of the same type.

Read the full calibration guide:
3D Printer Calibration: Step-by-Step to Perfect Results
How to Calibrate the Print Temperature
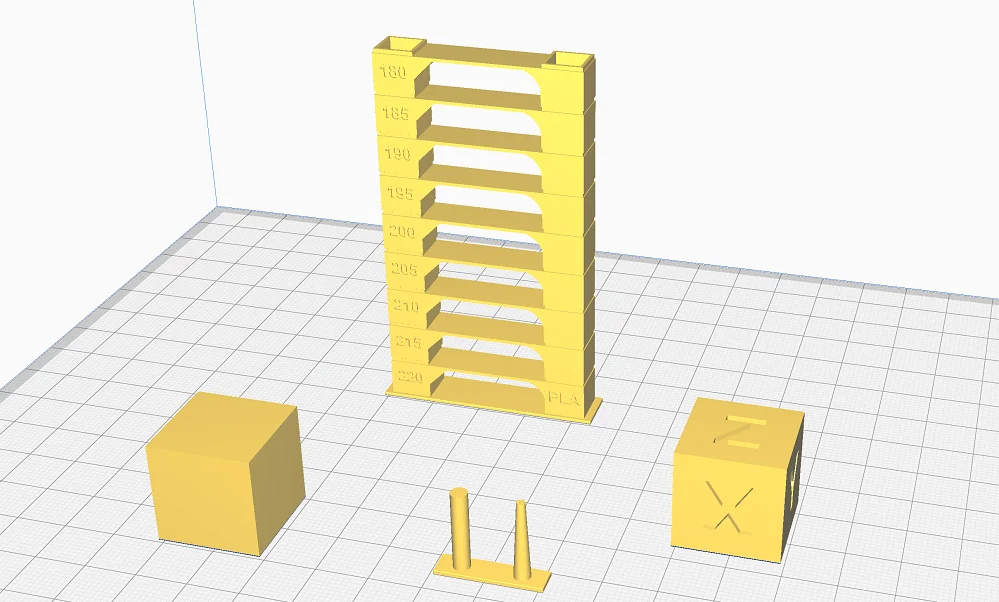
For calibration, I prefer to use the Calibration Shapes plugin in Cura. You can also download calibration objects from portals like Thingiverse.
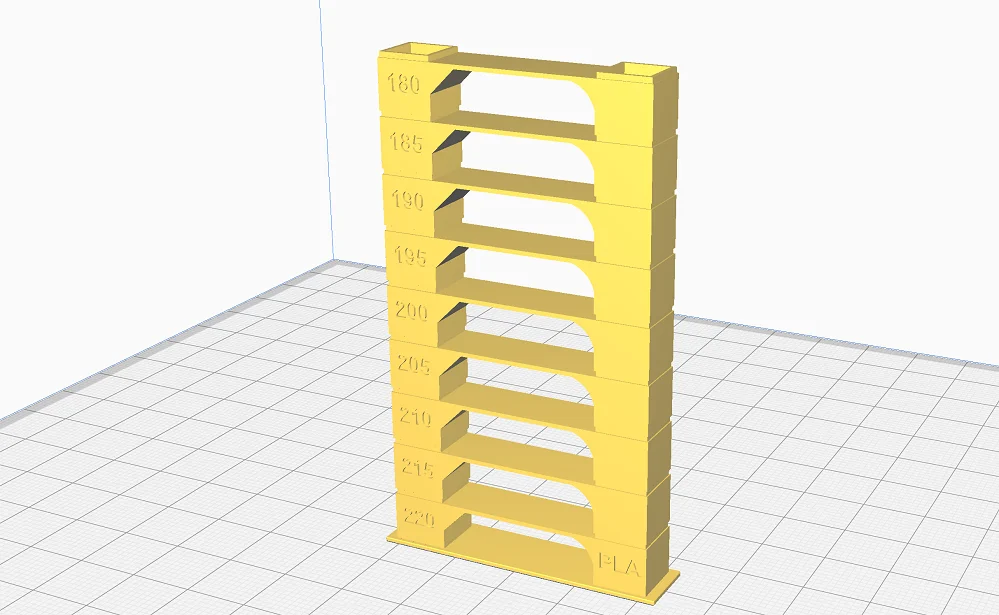
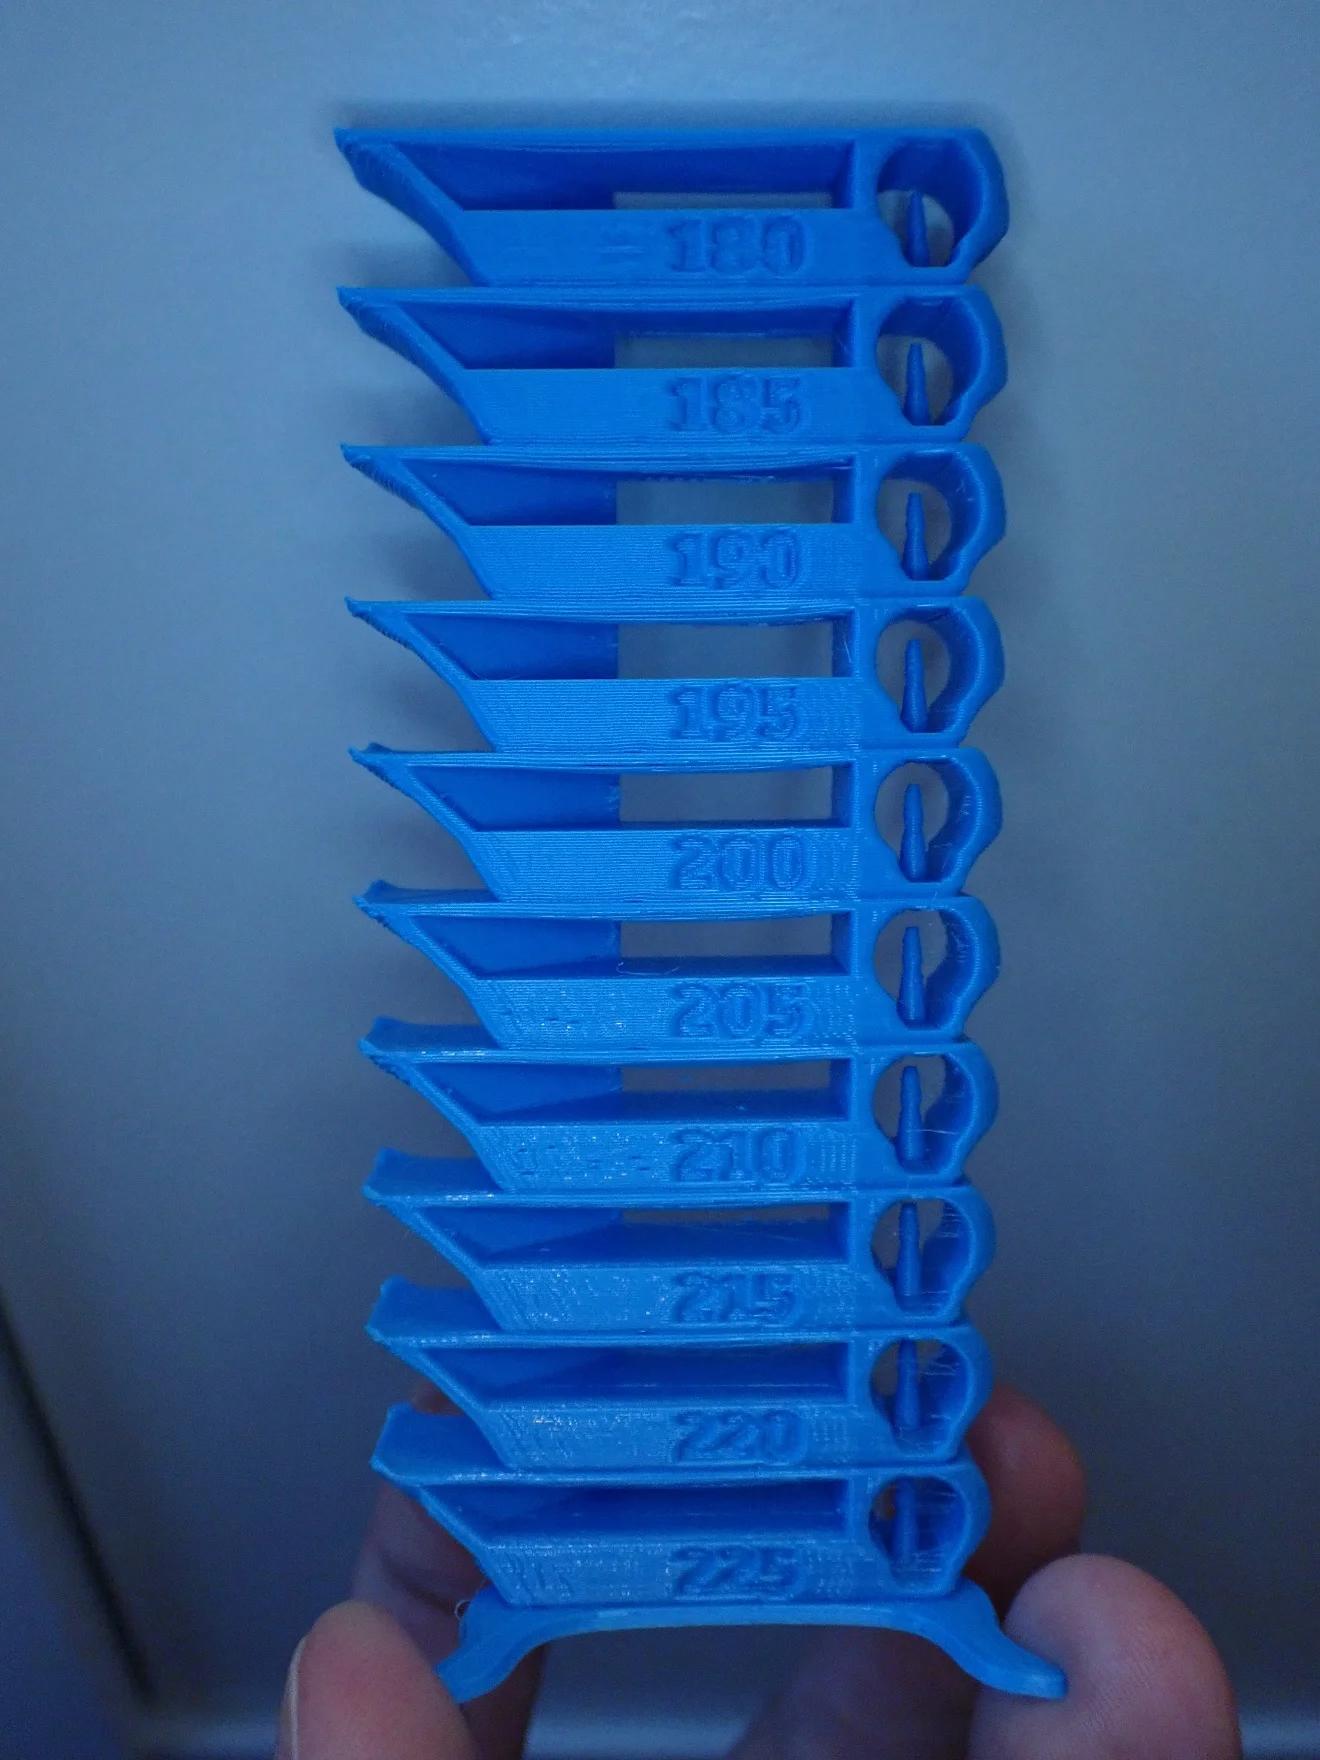
For the printing temperature a temperature tower is best suited. This tower is printed with different temperatures so that at the end you can read the correct temperature from the floors. So you can find the right temperature after only one print.
How to Calibrate the Flow Rate
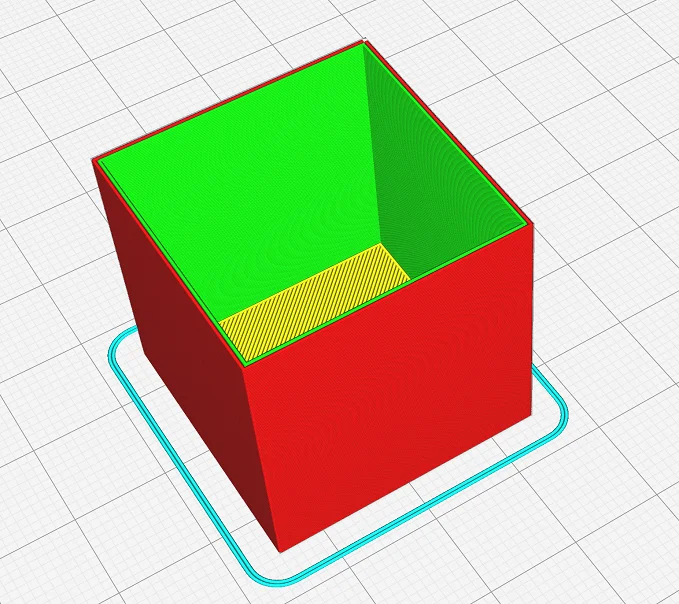
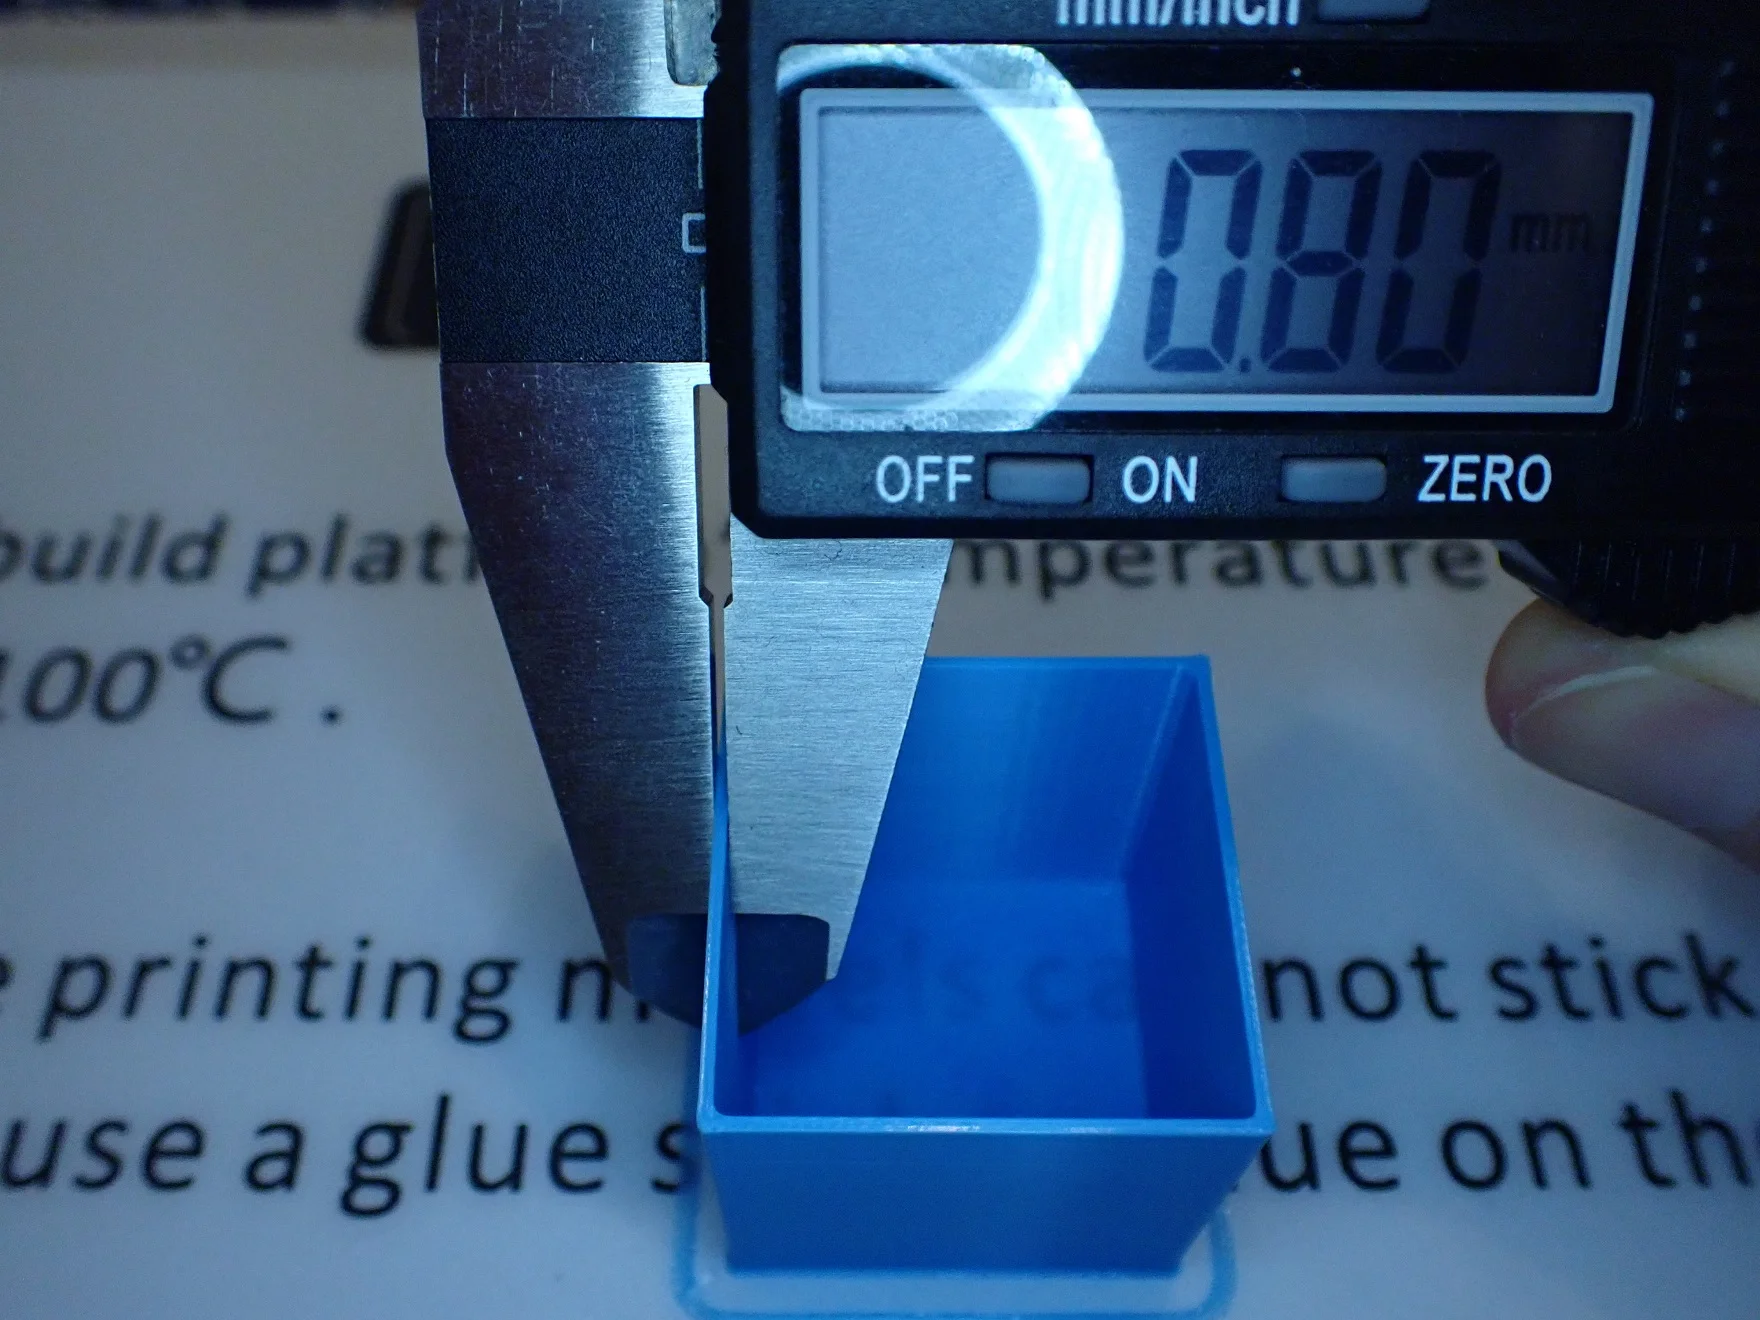
The object with which you can calibrate the flow rate is even easier to print than the temperature tower. It is basically just a calibration cube with no top layers and no infill. Set a certain number of walls in the print settings so that you can measure the wall thickness after printing.
If the wall thickness is higher than the theoretical value from the slicer, the flow rate is too high, the opposite is true if you measure a wall thickness that is too low. Adjust the flow rate slightly in each case, I advise you to use 1% steps, print the cube again and check the result a second time.
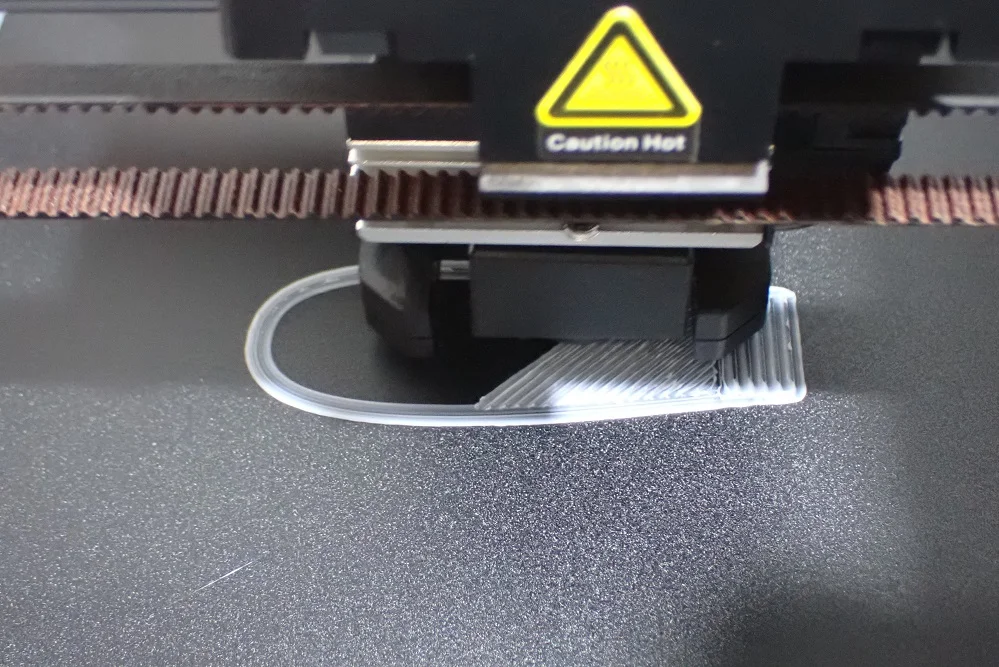
How to Calibrate the Retraction

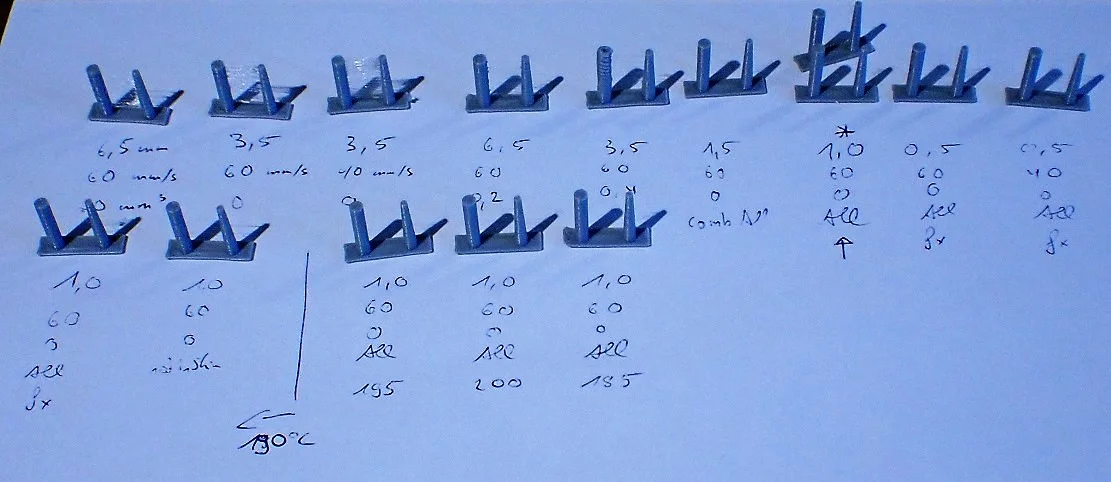
The object in the Calibration Shapes plugin in Cura that you can use to calibrate the retraction is basically just two small columns that are printed within a few minutes.
If the retraction is not set correctly, you will obviously see this, as the characteristic strings have formed between the two columns. Adjust the retraction distance and speed in small steps until you can no longer see any stringing.
Conclusion
With the Cura settings for the Creality Sermoon V1 Pro in this article you have a very good starting point for perfect 3D prints.
After calibrating the print temperature, flow rate, and retraction, you should be able to create accurate prints with your 3D printer. Each of these settings affects the quality and accuracy of the print, so it is important to calibrate these 3 values.
Disclosure: This website is the property of Martin Lütkemeyer and is operated by Martin Lütkemeyer. Martin Lütkemeyer is a member of the Amazon Services LLC and other Affiliate Programs. These are affiliate advertising programs designed to enable websites to earn advertising revenue through advertising and linking to Amazon.com and others. Links marked with * are affiliate links.
